Uncategorized

Varan Bhaat: Maharashtra’s Soulful Lentil & Rice Dish

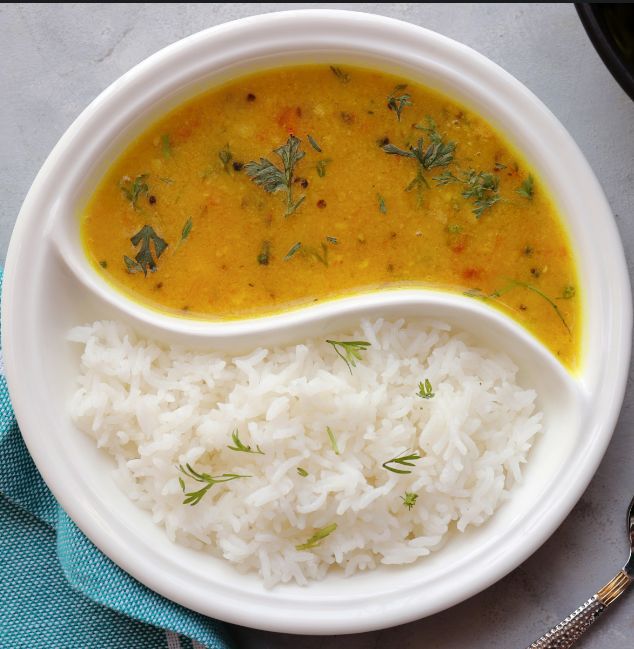
There’s something sacredly simple about a steaming plate of Varan Bhaat. For Maharashtrian families, this humble dal‑rice combo is more than just food – it’s comfort, home, and even devotion. As one food writer notes, the rice+dal pairing “holds a special place” in Indian hearts: “It is much more than food. It is an emotion. Literally sacred and revered”. In my childhood too, the aroma of turmeric‑tinged dal cooking in ghee always signaled warmth and togetherness. Varan Bhaat is a daily staple and a festive favorite – famously offered as naivedhya (prasād) to Lord Ganesha during Ganesh Chaturthi. Even on ordinary days it anchors the meal, and on auspicious days it sits beside modaks and puran poli as a symbol of simple, pure nourishment.

What Is Varan Bhaat?

“Varan” (वरण) is Marathi for lentil curry, and “bhaat” (भात) means rice.  In practice, varan bhaat is simply a bowl of steaming toor dal (split pigeon pea lentils) tempered and poured over hot steamed rice. What makes it special is the minimal, heartfelt seasoning – a little turmeric and salt in the dal itself, plus a comforting tadka (tempering) of cumin and ghee on top. Maharashtrian home cooks typically prepare toor dal with water, turmeric and salt, pressure‑cooking it until very soft. The cooked dal is then mashed smooth and simmered to just the right consistency (neither too thick nor too thin). A simple tempering – or tadka – of ghee, cumin seeds and a pinch of asafoetida (hing) is poured into the hot dal for flavor. This daal is ladled over rice and often finished with a drizzle of warm toop (clarified butter); in Marathi, toop means ghee, and it truly makes the dish melt-in-your-mouth.

Ingredients

The beauty of varan bhaat is its simplicity. You’ll need:

1 cup toor dal (split yellow pigeon pea lentils), rinsed

3 cups water

½ tsp turmeric powder

Salt, to taste

1 tbsp ghee (clarified butter)

½ tsp cumin seeds

Pinch of asafoetida (hing)

(Optional for non-satvik version) 1 minced garlic clove and/or 1 slit green chili

Steamed rice (to serve the dal over)

Accompaniments: Lemon pickle (limbu loncha), papad, or a simple potato sabzi (batata bhaji)


These humble ingredients – dal, turmeric, ghee, cumin – are all you need for an authentic varan bhaat. Shweta Arora notes that this “nutritious and comforting meal is a staple in Marathi homes” and is often served with tup (ghee), lemon pickle, papad, and potato curry. (In fact, as one blogger remarks, a meal of varan bhaat with ghee, lonache and batata bhaji was her “favorite growing up”.)

How to Make Varan Bhaat

The cooking method is straightforward.

1. Cook the Dal: Rinse the toor dal and put it in a pressure cooker with 3 cups water, ½ tsp turmeric and salt. Pressure-cook for about 4–5 whistles (until the dal is very soft). If you don’t have a cooker, simmer the dal in a pot for 20–25 minutes until mushy.


2. Mash and Adjust: When done, open the cooker and mash the dal thoroughly with a whisk or spoon until smooth. If the dal is too thick, add a little hot water and simmer gently until it reaches a medium consistency – creamy and pourable, “neither thick nor thin”.


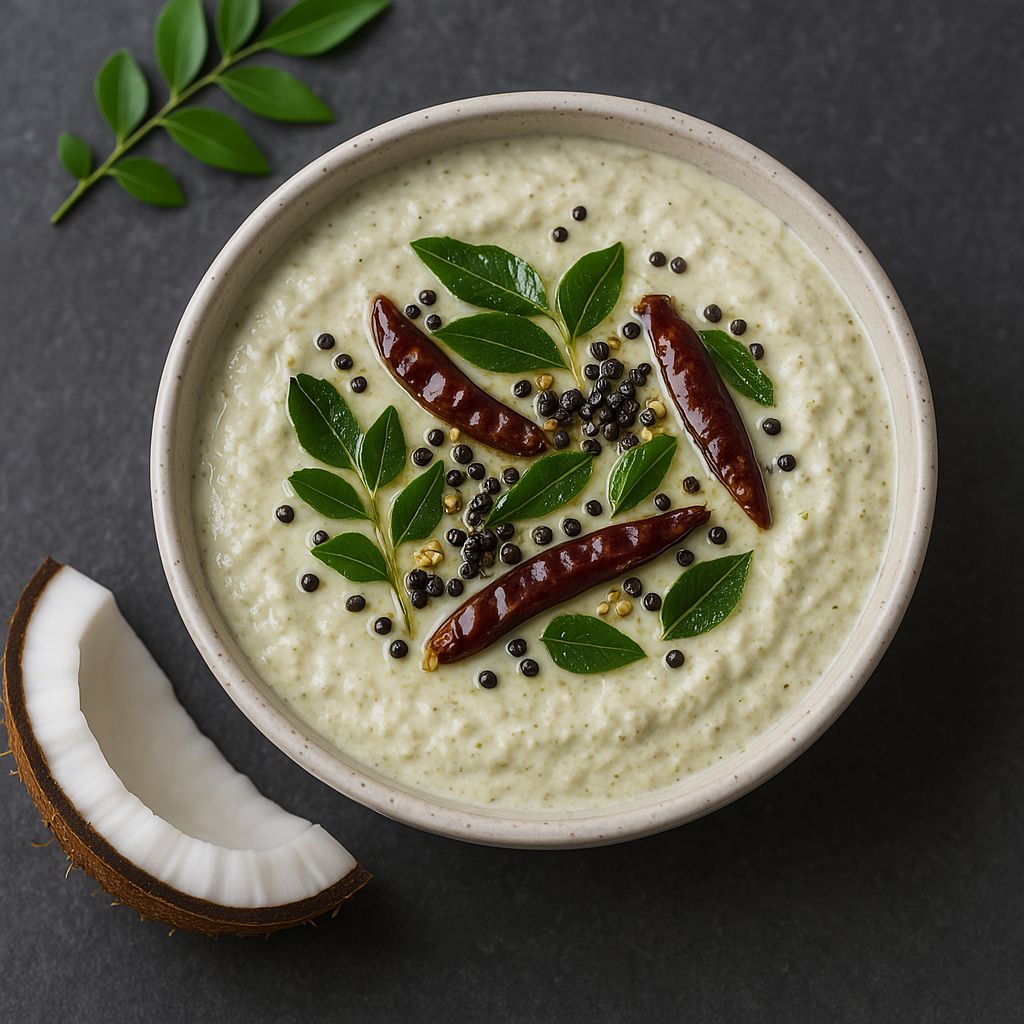
3. Temper (Tadka): Heat 1 tbsp ghee in a small pan. Add ½ tsp cumin seeds; when they crackle, sprinkle in a pinch of asafoetida. (Non-satvik version: this is the time to add minced garlic and green chili if you like.) Fry briefly until fragrant (just seconds), then immediately pour this hot seasoning into the dal and stir. Cover and simmer the dal for a minute or two so the flavors blend.


4. Cook the Rice: Meanwhile, rinse 1 cup rice and drain. In a pot, boil about 2 cups water with a little salt, add the rice, reduce heat, and cook covered until all water is absorbed and the grains are fluffy.


5. Plate and Serve: Scoop a mound of hot rice onto each plate. Ladle the steaming dal over the rice. If you like, drizzle a little extra ghee on top (toop). Garnish with chopped fresh coriander or a squeeze of lemon juice for brightness. Traditionally, varan bhaat is enjoyed with tangy sides: a pickle (especially limbu loncha), crispy papad or wadis, and sometimes a simple potato curry.


Satvik (Temple-Style) Variation

For a satvik (pure) version suitable as temple prasād, simply skip any onion or garlic. The Maharashtrian varan bhaat recipe is already very mild, so omitting garlic yields a perfectly plain dish. In fact, many sources emphasize making varan bhaat without onion/garlic during Ganesh Chaturthi. Dassana Amit notes: “When making it for the Ganesha festival, skip onion and garlic. If preparing on regular days, you can add garlic and onion”. Shweta Arora also points out that this lentil stew is offered on auspicious occasions “since it contains no onion nor garlic”. The cooking method is the same otherwise – pressure-cook and mash the dal, then temper with hing, cumin and ghee. The resulting satvik dal is then offered to the deity and later eaten by the family, symbolizing simplicity and purity.

Tips for the Perfect Varan Bhaat

Consistency: The dal should be smooth and slightly soupy. Mash it well, then simmer with added water until it coats the back of a spoon. Aim for “neither thick nor thin” – too thick and it clumps, too thin and it won’t cling to rice.

Use Ghee (Toop): A generous splash of ghee is the secret to authentic flavor. Whether in the tempering or drizzled on the finished plate, warm toop adds richness. As one recipe notes, a drizzle of hot toop over rice and dal is “truly satisfying”.

Accompaniments: The mellow dal goes beautifully with a tangy bite. Serve varan bhaat with lime or lemon pickle (limbu loncha), crisp papad or kothimbir vadi, and perhaps a simple potato bhaji. These salty/spicy sides cut through the creaminess and complete the meal.

Bright Flavors: A final squeeze of fresh lemon juice or chopped coriander can brighten the dish just before eating. Even a grind of black pepper adds warmth.

Serve Hot: Varan bhaat is best enjoyed piping hot. If it cools or if you’re reheating leftovers, stir in a splash of water before gently heating so the dal loosens up again.


Varan Bhaat in Festivals and Fasting

The simple purity of varan bhaat gives it a special place in Maharashtrian rituals. During Ganesh Chaturthi, it is traditional to offer varan bhaat to Lord Ganesha as part of the bhog. GKToday explains that “Varan Bhaat is a traditional Marathi … dish offered as naivedhya to Lord Ganapati during Ganesh Chaturthi, symbolizing simplicity and purity”. In practice, a temple spread might include varan bhaat alongside modaks, puran poli, shrikhand and other favorites. (Remarkably, varan bhaat itself is listed among Ganesha’s prasād dishes in some recipes.)

Varan bhaat also plays a role in breaking fasts. After evening aarti on a fasting day, Maharashtrians traditionally eat simple sattvic foods – steamed rice and dal among them. In other words, when the fast is over, the first meal often resembles varan bhaat. As one guide notes, “the fast is broken by eating regular but sattvik food like rice, dal, chapatis and subzis”. A warm bowl of dal-rice is therefore an ideal post-vrat comfort.

Whether it’s a humble family dinner or a festive offering, varan bhaat embodies home and devotion. Every spoonful of this ghee-topped lentil curry speaks of Maharashtra’s culinary soul – simple, nurturing, and deeply satisfying. In the end, varan bhaat is more than a recipe; it’s a culinary hug from tradition, reminding us of the warmth and purity at the heart of Marathi food.

satvik food

Kosambari – Traditional Moong Dal Salad from Karnataka

A Memory from Festival Mornings

Every Ugadi morning in our home began with the scent of jasmine flowers, fresh mango leaves adorning the doorway, and the rhythmic clang of steel tumblers as everyone hurried through the morning pooja rituals. Amidst all this, one quiet dish always sat on the kitchen counter, waiting to be mixed Kosambari.

I remember my grandmother preparing it with her graceful calm while the rest of us were caught up in festive chaos. The yellow moong dal would be soaked early in the morning, perfectly timed to soften by lunch. She’d peel crisp cucumbers, grate snowy coconut, and chop tiny green chilies that looked so innocent but packed quite the punch.

When she finally mixed everything together the tender lentils, crunchy cucumber, and coconut it wasn’t just a salad; it was a tradition in a bowl. And when the tempering hit the mixture, the mustard seeds crackled like firecrackers and the aroma filled the kitchen, signaling the start of the festive meal.

Even today, one bite of that cool, lightly seasoned salad takes me back to those temple lunches on banana leaves where Kosambari sat beside Payasam, Puliyogare, and Sagu balancing every spicy, rich flavor with its quiet simplicity.

Recipe Card

Servings: 3–4
Prep Time: 10 minutes
Cook Time: 0 minutes
Resting Time: 1 hour (for soaking moong dal)

Ingredients

For the Salad

½ cup split yellow moong dal (hesaru bele)

1 small cucumber, finely chopped

2 tablespoons fresh grated coconut

1–2 green chilies, finely chopped (adjust spice to taste)

1 tablespoon lemon juice (or more, depending on sourness)

2 tablespoons fresh coriander leaves, finely chopped

Salt, to taste


For Tempering (Optional but Traditional)

1 teaspoon ghee or oil

½ teaspoon mustard seeds

1 pinch asafoetida (hing)

5–6 curry leaves

Step-by-Step Instructions

1. Soak the Moong Dal

Rinse the moong dal 2–3 times until the water runs clear.
Soak it in a cup of water for about 1–2 hours, until the lentils turn slightly soft but retain their shape.
Drain completely using a sieve and keep aside.
(Tip: Don’t over-soak the lentils should have a bite, not become mushy.)


2. Prepare the Salad Base

In a large mixing bowl, combine the soaked dal, chopped cucumber, grated coconut, green chilies, lemon juice, and salt.
Mix everything gently with a spoon until well combined.
Add freshly chopped coriander for that bright, herbal touch.


3. Make the Tempering (Optional but Traditional)

In a small pan, heat ghee (or oil).
Add mustard seeds and let them splutter.
Then add hing and curry leaves, and fry for a few seconds until aromatic.
Pour this sizzling tempering over the salad mixture.

The moment it touches the bowl, you’ll hear a soft hiss that’s when you know the magic is happening. Stir lightly to coat everything evenly.


4. Chill and Serve

Kosambari tastes best slightly chilled or at room temperature.
Let it rest for 10–15 minutes before serving, so the flavors from the tempering, lemon, and coconut meld beautifully.

Serve it in a small bowl or banana leaf cup (donne) alongside your festive meals or enjoy it solo as a light, protein-rich snack.

Expert Tips for Authentic Flavor

Soaking Time: The ideal texture of the moong dal is soft yet firm. Soak for about 1–2 hours not more. Over-soaking makes it mushy and ruins the crunch.

Fresh Ingredients Matter: Always use fresh coconut and tender cucumbers. The combination gives the salad its signature lightness and fragrance.

Temple-Style Version: Skip the onions or garlic entirely. Use ghee instead of oil for the tempering to capture the satvik temple flavor.

For a Twist: You can add grated carrot, finely chopped raw mango (for tanginess), or pomegranate seeds (for sweetness and color).

Serving Tip: Kosambari is best served immediately after mixing. If making ahead, keep the soaked dal and chopped veggies separate and mix just before serving.

Pairing Suggestion: Serve it alongside South Indian festive dishes like Puliyogare, Chitranna, or Bisi Bele Bath for a complete Karnataka-style thali.

Closing Note

Every family has that one recipe that feels like sunshine in a bowl for me, Kosambari is exactly that.
It’s humble, refreshing, and quietly nourishing. In a world where food often feels complicated, this simple salad reminds us that true comfort lies in simplicity in the rhythm of soaking lentils, the crunch of cucumber, and the scent of tempering drifting through a festive home.

When I make Kosambari today, I still serve it the way my grandmother did in a small steel bowl, with a drizzle of ghee and a smile that says, “Eat slow, this is how traditions taste.” 💛

Fastival Food

Kanika – Temple-Style Sweet Ghee Rice from Odisha

In every Odia household, Kanika is more than a dish — it’s a celebration, a sacred offering, and a sweet memory rolled into fragrant grains of rice. I remember every Rath Yatra and festive Sunday, my mother would prepare Kanika in a brass handi with generous spoonfuls of ghee, and as the aroma filled the house, we’d know the bhog plate was almost ready.

Kanika is a traditional sweet rice dish from Odisha, flavored with ghee, jaggery, and spices. It’s part of the famous Chappan Bhog offered to Lord Jagannath in Puri and is often paired with dalma, saga, or khatta. Unlike kheer, Kanika is dry, rich, and lightly spiced — often served in temple rituals or made at home during pujas and celebrations.

Ingredients (Serves 3–4)

1 cup arua chaula (raw rice or basmati rice)

¾ cup grated jaggery (adjust to sweetness)

2 tbsp desi ghee

2 tbsp grated coconut (optional)

2 tbsp cashews and raisins

1–2 small bay leaves

2–3 cloves

2–3 green cardamoms

A small piece of cinnamon

A pinch of salt

2 cups water


Step-by-Step Preparation

1. Wash & soak rice

Wash the rice and soak it in water for 20–30 minutes. Drain and set aside.

2. Prepare jaggery syrup

In a small pan, dissolve jaggery in 2 cups warm water. Strain to remove impurities and keep aside.

3. Temper the ghee

In a thick-bottomed kadhai, heat ghee. Add bay leaves, cloves, cardamoms, and cinnamon. Let them splutter and release aroma.

4. Add dry fruits

Toss in cashews and raisins. Fry till golden. Add grated coconut if using.

5. Cook the rice

Add drained rice and stir gently to coat with ghee and spices. Sauté for 2–3 minutes.

6. Add jaggery water

Pour in the strained jaggery water and add a pinch of salt (to enhance sweetness). Bring to a gentle boil.

7. Simmer and cook

Cover and cook on low heat until the rice absorbs all the liquid and turns soft and aromatic. Do not stir too much — let it steam gently.

8. Rest and fluff

Turn off heat. Let it sit covered for 5 minutes. Fluff with a fork. Serve warm.


Tips for Perfect Kanika

Use arua chaula (raw rice) or aged basmati for fragrance.

Do not overcook the rice — each grain should be soft but separate.

A little salt actually balances the sweetness and brings out flavor.

For temple-style feel, use brass utensils and no onions or garlic.


Serving Suggestions

Serve with dalma, khatta, or simple mixed veg curry

Add it to a festive bhog thali with saga, chutney, and pakhala

Enjoy as a warm sweet snack with just a spoon of ghee on top


Why I Love It

I love Kanika because it smells like tradition. It brings back memories of temple bells, copper thalis, and the rustle of tulsi leaves on a summer afternoon. It’s sweet, but not overly so — soft, spiced, and rich with ghee. On puja days or whenever my heart needs a little comforting, I make a small pot of Kanika, and suddenly, everything feels sacred again.

Breakfast

Coconut Chutney – Cool, Creamy & South India’s Comfort Sidekick


🥥 The Chutney That Knows How to Stay Humble & Shine

There’s something deeply comforting about coconut chutney.
No drama, no overload. Just the cool of grated coconut, the kick of green chili, and a sizzling tadka poured on top.

Whether it’s served at temple feasts, roadside dosa stalls, or in grandma’s steel katori — this chutney is always welcome.


🛒 What You’ll Need (Serves 3–4):

For the chutney:

1 cup fresh grated coconut (or frozen, thawed)

2 tbsp roasted chana dal (daliya)

1 small green chili

½ inch ginger (optional)

Salt to taste

¼ to ½ cup water (adjust for consistency)


For tempering:

1 tsp oil

½ tsp mustard seeds

½ tsp urad dal

1 dry red chili

A few curry leaves

Pinch of hing


🫙 How to Make It – Silky, Spiced & Soulful

1. Grind the Chutney

Blend coconut, chana dal, green chili, ginger, salt, and water until smooth. Adjust thickness to your liking.

2. Temper to Finish

Heat oil. Add mustard seeds, let them crackle.
Add urad dal, red chili, curry leaves, and hing. Let them sizzle till golden.

3. Pour & Pair

Pour tempering over chutney. Serve fresh with idli, dosa, pongal, or vada.


❤️ Why Coconut Chutney Is a Forever Favorite

Naturally cooling and refreshing

Comes together in 5 minutes

No preservatives, pure flavor

Because great meals start with great sides