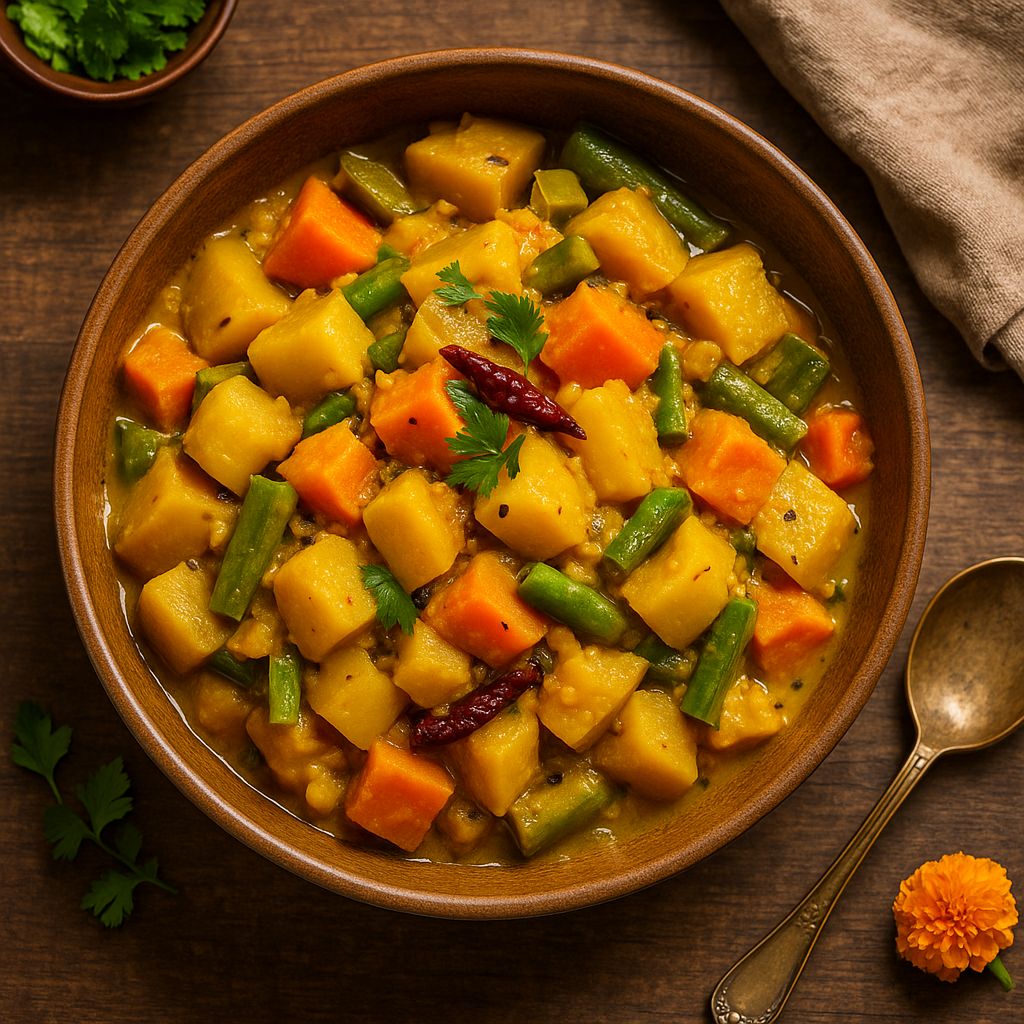
In our house, the definitive sound of winter wasn’t the whistling wind; it was the steady pop-pop-tinkle of fresh green peas hitting a steel bowl. I remember my mother sitting on a low stool in the afternoon sun, a mountain of pea pods in her lap. She never rushed the task. To her, shelling peas was a visual meditation a way to ensure that only the sweetest, most “intentional” grains made it into the pot. “A potato is just earth,” she would say, “but the pea is the spirit.” She taught me that the secret to a royal Aloo Matar wasn’t in the spices, but in the hierarchy of the cook. You had to respect the potato’s need for a headstart and the pea’s delicate desire to remain vibrant. This dish is a “Parasocial Companion” on our lunch table a warm, reliable hug that has survived generations of winter Sundays . Today, at The Pinch of Masala, we are moving away from the “frozen-bag” culture and returning to the “Quiet Luxury” of hand-shelled winter bounty and my mother’s “Golden Sear” technique.
The most common mistake in Aloo Matar is ending up with a mushy, greyish mash. To keep your sabji looking “emerald and gold,” you must follow my mother’s two technical rules: The “Golden Sear” Rule: Never boil the potatoes in the gravy from the start. You must sauté the potato cubes in oil or ghee until they develop a thin, golden crust. This “sealing” prevents the starch from leaking into the gravy, keeping it clean and allowing the potatoes to retain their shape. The “Steam Trap” Finish: In 2026, we prioritize “Simplicity with Purpose”. My mother would never add excess water. She would cover the pan with a tight-fitting lid and cook the vegetables in their own juices. This “Steam Trap” method concentrates the natural sugars of the winter peas, making them taste like candy rather than water.
Prep time: 20 mins | Cook time: 20 mins | Servings: 4 Diet: Vegan, Gluten-Free | Cuisine: North Indian Heritage
Ingredients: 2 cups Fresh Green Peas: Hand-shelled winter peas are best. 3 Medium Potatoes: Peeled and diced into ¾-inch cubes. The Aromatics: 1 Large Onion (finely chopped), 1 inch Ginger (grated), 3 Garlic cloves (crushed). The Base: 2 Ripe Tomatoes (pureed). Fat: 2 tbsp Mustard Oil or Ghee. Spices: 1 tsp Cumin seeds (Jeera), ½ tsp Turmeric (Haldi), 1 tsp Coriander powder, ½ tsp Red Chili powder, and ½ tsp Garam Masala. The Finish: A handful of fresh Coriander leaves and a squeeze of Lemon juice. Instructions: The Sear: Heat oil in a heavy pan. Add the potatoes and a pinch of salt. Sauté on medium-high for 5–7 minutes until the edges are golden brown. Remove and set aside. The Bloom: In the same oil, add cumin seeds. Once they sizzle, add the onions. Sauté until they are a deep translucent pink. The Masala Base: Add the ginger and garlic. Sauté for 30 seconds, then pour in the tomato puree and dry spices. Cook until the oil begins to separate from the sides. The Union: Add the seared potatoes and the fresh peas. Toss well to coat every piece in the masala. The Steam Trap: Add only ¼ cup of water (or our Pod Stock, see below). Cover tightly and cook on low heat for 10–12 minutes. The Reveal: Check if the potatoes are fork-tender. If the gravy is too thin, cook open for 2 minutes to thicken. Final Touch: Stir in the garam masala and coriander. Squeeze lemon juice just before serving to “brighten” the earthy potatoes.
The Pod Stock: In the 2026 “Use-Up” economy, we value “Ingredient Integrity” . Do not throw away those fresh, green pea pods! Wash them thoroughly and boil them in water with a pinch of salt for 15 minutes. Strain this liquid and use it as the “Pod Stock” for your gravy. It adds a concentrated green sweetness and extra fiber, aligning with the current “Fibremaxxing” movement.
For Bengalis, Durga Puja is as much about feasting as it is about devotion. I can still picture myself as a child, sitting eagerly on the floor with a banana leaf spread out in front of me. Volunteers at the local pandal would come around with buckets of bhog (community feast), generously serving ladlefuls of khichuri (rice-lentil porridge), Labra, tomato chutney, and payesh (sweet rice pudding) onto our leaves. The air would be thick with the mouthwatering aroma of ghee, spices, and incense. One bite of that warm, mildly spiced Labra mixed with the ghee-soaked khichuri, and I felt the true spirit of Puja come alive in my mouth.
Labra – or bhoger labra as we often call it when it’s prepared for puja – is more than just a mixed vegetable curry; it’s an emotion. The term bhog denotes food offered to the gods, and accordingly this dish is prepared without any onion or garlic. Yet despite being a satvik (pure veg) preparation, Labra bursts with flavor. Ma always said the secret was in using the freshest seasonal vegetables and the magical tempering of panch phoron (Bengali five-spice mix) in mustard oil. She would toss in whatever veggies were on hand – pumpkin for sweetness, eggplant for creaminess, a few potatoes or sweet potatoes for heartiness, plus sometimes radish or green beans – making sure to include that trio of pumpkin, eggplant, and potato that defines a good Labra. As the vegetables slowly simmered together, they released their own juices and melded into a harmonious medley of textures and tastes.
I recall how the whole house would come alive with the sound and smell of Labra cooking. The panch phoron seeds would sputter in hot mustard oil, releasing an inviting aroma that drew everyone to the kitchen. Towards the end, Ma would drizzle a spoonful of ghee into the pot for a divine finishing touch. Sometimes she also added a pinch of homemade bhaja masala – a dry-roasted spice blend – right at the end to elevate the fragrance. The result was a hearty, homestyle curry where the vegetables were soft, slightly mushy, and soaked in spices, each bite tasting like comfort and tradition.
1 tablespoon ghee, for finishing (optional but recommended)
—
Instructions:
1. Prep the veggies: Wash, peel, and cut all the vegetables into similar bite-sized pieces. Try to keep the pumpkin, potato (or sweet potato), eggplant, radish, etc., in slightly larger than bite-size chunks so they don’t disintegrate completely while cooking.
2. Temper the spices: In a heavy-bottomed pot or kadhai, heat the mustard oil over medium heat until it’s hot (you’ll see a slight smoke). Add the panch phoron and the dried red chilies. Let them sizzle for a few seconds until the seeds start to crackle and release their aroma. Sprinkle in the pinch of asafoetida (hing) as the spices crackle. This tempering will be very fragrant – be careful not to burn the spices, just toast them until aromatic.
3. Cook hardy vegetables first: Immediately add the diced pumpkin, potato, and radish (if using) to the pot. Stir the vegetables so they get coated in the spiced oil. Add the grated ginger, turmeric powder, red chili powder (if using), salt, and sugar. Mix well. Cover the pan and cook on low heat for about 8–10 minutes, stirring occasionally. You don’t need to add water at this stage – the veggies will begin to release their own moisture and steam in their juices. (Cooking covered on low heat helps the tougher veggies start to soften without burning. If things start sticking, you can sprinkle a tablespoon of water, but usually it’s not necessary.)
4. Add remaining vegetables: Once the pumpkin and potato are partially tender, add the eggplant and green beans to the pot. Give everything a good stir to combine. If the mixture looks very dry, add a splash of water (a few tablespoons at most). Cover again and continue to cook on low heat for another 5–7 minutes. The softer vegetables like eggplant will cook down fast. Stir occasionally. Cook until all the vegetables are soft and cooked through. The goal is for the veggies to be very tender and slightly melded together in a moist curry — they should release juices and almost mash together, creating that classic semi-stewy consistency of Labra.
5. Finish with spices and ghee: Remove the lid and check that the hardest veggies (pumpkin, potato, radish) are fork-tender. By now, you’ll notice the vegetables have released water and there’s a nice soft medley; it shouldn’t be watery, just a thick mixture. Lower the heat. Sprinkle the bhaja masala over the cooked vegetables and add the ghee. Gently fold (stir) the curry to mix in the bhaja masala and ghee, being careful not to mash the veggies too much. Let it cook for another 1 minute on low heat as the finishing spices infuse the dish. Turn off the heat. Taste and adjust salt or sugar if needed.
6. Serve: Labra is best served hot. Traditionally, it’s served as part of Durga Puja bhog with khichuri (Bengali rice-lentil khichdi). Serve a generous scoop of Labra alongside steaming khichuri for an authentic experience. It also goes well with plain steamed rice or even roti. Enjoy the medley of soft vegetables and warm spices, and get ready for a bite of nostalgia!
Tips:
Vegetable Choices: Use an assortment of seasonal vegetables for Labra. Traditionally, pumpkin, eggplant, and potato/sweet potato are must-haves for the perfect balance of sweetness, creaminess, and substance. Apart from these, you can add others like radish, green beans, carrots, or even a handful of spinach – whatever is fresh and available. The key is a mix of textures and flavors, but make sure to include that classic pumpkin-eggplant-potato trio for authenticity.
No Onion & Garlic: Remember that Labra is a satvik dish meant for holy offerings, so it contains no onion or garlic. Don’t be tempted to add them – the dish is designed to be flavorful without them. The combination of ginger, asafoetida, and whole spices provides plenty of depth, proving that you can have a delicious curry without any onion-garlic at all.
Panch Phoron Magic: Panch phoron is the heart of Bengali veggie dishes. If you don’t have this five-spice mix on hand, you can make it by combining equal parts of cumin seeds, black mustard seeds, fenugreek seeds, fennel seeds, and nigella seeds (kalonji). Keep a jar of this mix – when you temper these five spices in hot oil, their blended aroma is what gives Labra its signature Bengali character.
Bhaja Masala (Roasted Spice Mix): For an authentic touch, finish the Labra with a pinch of bhaja masala. To prepare bhaja masala at home, dry roast about 1 teaspoon cumin seeds, 1 teaspoon coriander seeds, 1/2 teaspoon fennel seeds, a bay leaf, and 1 dry red chili on low heat until aromatic. Let them cool, then grind into a fine powder. This fragrant roasted spice powder is a secret weapon in many Bengali recipes. Sprinkling a bit on your Labra at the end (or on individual servings) will add a warm, smoky depth of flavor that truly elevates the dish. You can make a small batch and store it in an airtight container for your next Bengali cooking adventure.
Slow Cooking = Best Flavor: Cook the Labra low and slow. Keep the heat low and the pot covered so the vegetables cook in their own steam. There’s usually no need to add water, as the veggies release enough moisture while cooking. This slow cooking concentrates the flavors and yields that soft, almost stew-like consistency that Labra is known for. If you do need to add a little water to prevent sticking, add just a splash. Also, stir gently from time to time – you want the veggies to soften and mingle, but not turn completely to mush. Labra has a rustic look, with soft pieces of pumpkin and potato that have partially broken down, coating the other veggies in a thick gravy.
Oil & Flavor: Mustard oil is traditionally used for its pungent, robust flavor that really defines Labra. If you have mustard oil, do use it (just remember to heat it to smoking point to remove the raw smell before cooking). If you don’t, you can substitute with any neutral vegetable oil for cooking the spices. However, finishing with a bit of ghee is highly recommended – that last drizzle of ghee adds a rich aroma and brings all the flavors together beautifully. Your kitchen will smell heavenly!
❤️ Closing Note:
This humble Labra isn’t just a curry — it’s a ladle of nostalgia from my childhood. Every time I cook it, I’m transported back to those Puja days, sitting with family and friends and savoring the bhog on banana leaves. It’s amazing how a simple mix of vegetables can carry the warmth of tradition and togetherness in each bite. I hope this recipe brings a bit of that festive magic and comfort into your home. Give it a try during your next celebration (or whenever you crave a hearty veggie dish), and maybe you’ll create some cherished memories of your own. Happy cooking and Subho Durga Puja! 🙏
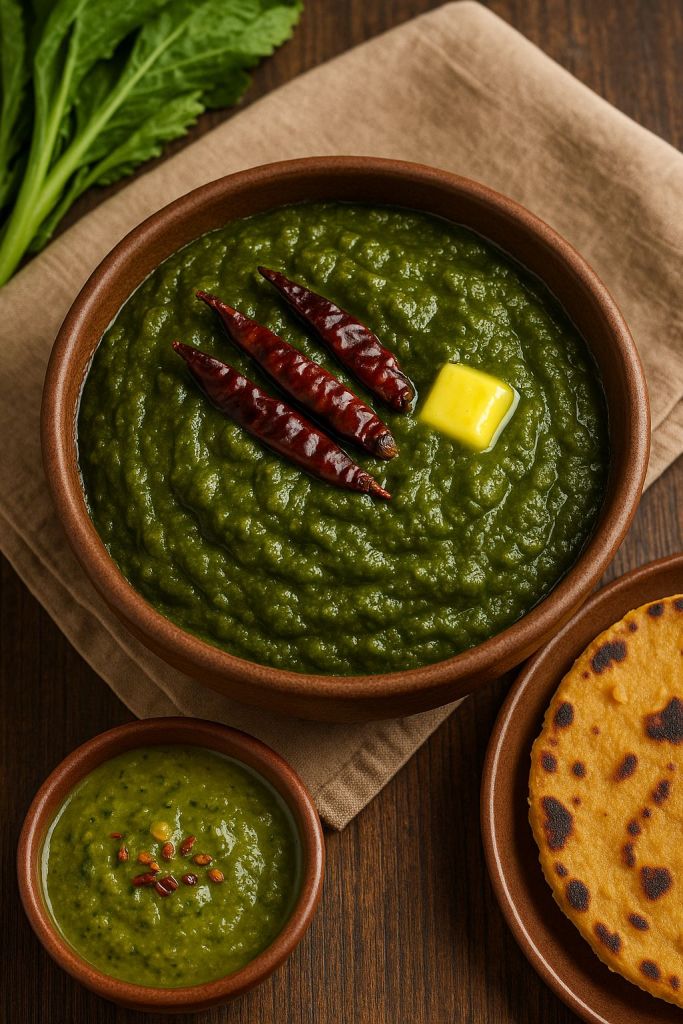
There’s a chill in the air and the fields are a sea of yellow mustard blossoms. In Punjabi households, this can only mean one thing: sarson ka saag season is here. Growing up, I remember sitting in my grandmother’s kitchen on a sunny winter afternoon, watching her patiently cook sarson ka saag in a heavy brass pot over the chulha (wood-fired stove). The aroma of mustard greens, spinach, and bathua simmering slowly with ginger and garlic would fill the house, building our anticipation. She would use a wooden madhani (hand churner) to gently mash the greens – an old-fashioned technique that gave the saag its rustic, slightly coarse texture. No blenders back then, just slow cooking and a lot of love. It’s often said that authentic sarson ka saag is a labor of love, requiring time and patience to get the flavors just right. And truly, after hours of bubbling away, what emerged was a pot of gold (or rather, emerald green) – creamy, hearty saag ready to comfort everyone on a cold evening.
A Taste of Tradition: Sarson ka saag isn’t just food; it’s a tradition and an emotion. This dish of spiced, pureed mustard greens is the pride of Punjabi winters, commonly enjoyed from late November through February when mustard leaves are freshest. Winter is the season when mustard (sarson) and bathua grow abundantly in North India, which is why this saag became a quintessential cold-weather dish in Punjab. Families often mix mustard greens with other seasonal greens like spinach and bathua (wild goosefoot) to balance the mustard’s spicy bitterness. The result is an earthy, mildly bitter greens curry that’s bursting with flavor and nutrients (so much so that an extra dollop of butter on top is completely justified!). Traditionally, the saag was slow-cooked for hours in a brass patila (pot) or clay handi on a low fire, which old-timers swear deepens the flavor. I’ve heard of folks using a century-old brass pot passed down through generations to make this dish, stirring it periodically with that wooden churner until the greens reach silky perfection. It’s no wonder that come winter, Punjabis look forward to cozy meals of sarson ka saag and makki di roti (maize flour flatbread) to warm the soul.
Nostalgia in Every Bite: The very serving of sarson ka saag can evoke nostalgia. Picture a brass thali (plate) or katori brimming with luscious green saag, a pat of homemade white butter (makkhan) melting slowly on top. Beside it rests a stack of Makki di Roti swathed in ghee, and on the side, a few sticks of gur (jaggery) and slices of crisp white radish. In my family, we’d even finish the meal with a bite of jaggery – the sweetness perfectly balances the slight bitterness of the greens and signifies the end of a hearty Punjabi feast. As a food writer once described, a tiny bowl of glistening homemade butter slathered on warm makki rotis and dipped into the saag can entice even the pickiest eater. Indeed, sarson ka saag with makki di roti isn’t just a meal – it’s winter comfort on a plate, a symbol of Punjabi hospitality, and a reminder of simpler times when food was slow-cooked with love.
Ingredients
To make traditional Sarson ka Saag, you will need the following:
Mustard greens (Sarson) – ~1 bunch (500 g), stems trimmed. These peppery mustard leaves give the saag its signature pungent flavor and are the star of the dish.
Spinach (Palak) – ~1/2 bunch (250 g). Adds mild sweetness and balances the mustard’s bitterness.
Bathua leaves – ~1/2 bunch (150–250 g), if available. Bathua (wild goosefoot) is a traditional addition that gives authentic flavor and helps mellow the mustard greens. If you can’t find bathua, you can use a little extra spinach or even fenugreek leaves.
Ginger & Garlic – 2 inches ginger and 6–8 cloves of garlic, finely chopped or grated. These aromatics infuse warmth and depth into the saag.
Green Chilies – 2–3 (or to taste), slit or chopped. For that gentle heat. You can adjust or skip for a milder saag.
Maize flour (Makki ka Atta) – 2–3 tablespoons. This fine cornmeal is crucial – it thickens the saag and also tones down the bitterness of the mustard.
Onion – 1 medium, finely chopped. Used in the tempering (tadka) for a subtle sweetness.
Ghee or Butter – 3–4 tablespoons. Used for cooking and for the finishing tadka. Ghee adds a lovely richness and authentic flavor.
Spices & Seasonings: Cumin seeds (1 tsp), salt (to taste), red chili powder (1/2 tsp, adjust to taste), turmeric powder (1/4 tsp, optional for color), garam masala (1/2 tsp, optional). Punjabi recipes are actually quite restrained with spices for this dish – the emphasis is on the greens. Just a hint of spices enhances the saag without overpowering the natural flavors.
Note: The ratio of greens can be adjusted. A common traditional proportion is 2 parts mustard : 1 part spinach : 1 part bathua. So if you have 500 g mustard, use ~250 g each of spinach and bathua. Don’t worry if you can’t be exact – the beauty of this recipe is that you can tweak the mix of greens based on availability. Fenugreek leaves (methi) or radish greens can also be thrown in for a twist, but mustard should remain the dominant portion.
Instructions (Step-by-Step Recipe)
Follow these steps to prepare Sarson ka Saag the traditional way. This recipe is meant to be leisurely, so put on some music or maybe call your mom for a chat while the greens cook – we’re channeling slow cooking, Punjabi-style!
1. Prep the Greens: Thoroughly wash all the leafy greens (mustard, spinach, bathua) to remove any grit – this may take 3-4 rinses since mustard leaves can be quite muddy. Chop the leaves roughly and discard any thick stems. (Tip: Cleaning the greens well is the most labor-intensive part, but it’s essential for a grit-free saag.) You should have a big mound of mixed greens; don’t worry, it will cook down significantly.
2. Cook until Tender: Place the cleaned, chopped greens in a large deep pot. Add about 2–3 cups of water (just enough to cover the greens). Toss in 2-3 chopped garlic cloves, half the ginger, and 1-2 green chilies. Also add 1/2 tsp salt to help the greens cook. Bring to a boil, then reduce to a low simmer and cover, allowing the greens to cook until completely soft. This can take around 30-40 minutes on the stovetop, stirring occasionally. (Traditionally, the greens were simmered for even longer, sometimes over an hour on low heat, to achieve that melt-in-mouth texture and to let the flavors deepen – truly slow cooking!). You’ll know it’s ready when the mustard leaves are tender and the kitchen smells like verdant, earthy goodness. (Quick alternative: You can pressure cook the greens with a little water for 1-2 whistles to save time, but purists prefer the slow simmer method for maximum flavor.)*
3. Mash/Blend the Greens: Once the greens are cooked, let them cool slightly. Then mash them into a coarse purée. Traditional method: Use a wooden madhani (hand churner) or a masher to churn the greens in the pot for several minutes. This manual mashing gives a wonderful rustic texture – you want the saag to be somewhat coarse, not a baby-food puree. Modern method: Alternatively, transfer the softened greens (with a bit of the cooking liquid) to a blender and pulse a few times until you get a medium-coarse paste. Do this in batches if needed. (Be careful with hot liquids in a blender; allow cooling or use an immersion blender.) Do not over-blend – authentic sarson ka saag has some leafy texture to it, so it shouldn’t be completely smooth.
4. Simmer with Makki ka Atta: Return the mashed greens to the pot (if you removed them) and place it back on low heat. Stir in the maize flour (makki ka atta), sprinkling it evenly and mixing continuously to avoid lumps. The cornmeal will thicken the saag as it cooks. Add a splash of hot water or the reserved cooking liquid if the mixture looks too thick initially. Now let the saag simmer on low heat for another 15-20 minutes, stirring every few minutes so it doesn’t stick to the bottom. This slow cooking with the corn flour is important – it eliminates the raw taste of the cornmeal and really allows all the flavors to meld beautifully into a creamy, homogenous saag. You’ll see the color of the saag deepen and the texture become velvety. (At this stage, your patience will be rewarded – as the pot bubbles gently, the aroma is irresistible!)
5. Prepare the Tadka (Tempering): In a separate pan, heat 2-3 tbsp of ghee (or butter). Add 1 tsp of cumin seeds and let them sizzle for a few seconds until aromatic. Then add the chopped onions and sauté on medium heat until they turn golden-brown. Next, add the remaining chopped garlic and ginger. Sauté for another minute until the raw smell disappears. (Some families also add 1-2 chopped tomatoes at this point, cooking them down to add a slight tang, but the traditional recipe often skips tomatoes. Feel free to include one tomato, chopped, and cook until it’s soft and the oil separates, especially if you like a hint of tang in your saag.) Now sprinkle in the spices: a pinch of turmeric, red chili powder to taste (if you want extra heat or color), and 1/2 tsp garam masala (if using). Stir for a few seconds to bloom the spices in the ghee – be careful not to burn them.
6. Combine Tadka with Saag: Pour this hot, fragrant onion-garlic masala (tadka) into the simmering pot of saag. You’ll hear a satisfying sizzle as it all meets. Stir everything together so the tempered ghee and aromatics mix well with the greens. Let the combined saag cook for another 5-10 minutes on low heat, so the flavors marry. At this point, check for seasoning and add salt if needed. If the saag looks too thick, you can add a bit more water and simmer a few minutes; if it’s too thin, cook a little longer to evaporate excess liquid. The final consistency should be like a medium-thick porridge – not runny, but flowing and creamy.
7. Finishing Touch (Optional Tadka): For extra indulgence and aroma, you can do a quick final tempering. In a small tadka pan, heat 1 tbsp ghee. Add 1-2 sliced garlic cloves and 1 dried red chili (broken). Fry for just half a minute until the garlic turns lightly golden and the red chili infuses the ghee (don’t let them burn). Turn off the heat and sprinkle a pinch of red chili powder in the hot ghee – this will instantly release a wonderful color and aroma. Drizzle this infused ghee on top of the prepared sarson ka saag just before serving. This step is optional but highly recommended for that restaurant-quality presentation and an extra layer of flavor. You’ll see the red-spiced ghee shimmering on the green saag – mouthwatering!
8. Serve: Sarson ka saag is best served hot, straight from the pot, with a generous dollop of makkhan (white butter or ghee) melting on top. The traditional accompaniment is Makki di Roti, the famous golden-yellow cornmeal flatbread, which you can make by kneading maize flour with warm water into a dough, patting it into flatbreads and cooking on a hot tawa (griddle). Serve the saag with makki rotis smeared with butter – this combination is soul-satisfying and authentic. Don’t forget to keep some sides like chopped onions, green chilies, and mooli (white radish) to munch on for freshness and crunch. And as many Punjabi households do, serve a little piece of jaggery (gur) on the side – a bite of jaggery after a spicy saag and roti mouthful is a divine sweet contrast that also helps cut any lingering bitterness. Now dig in and enjoy your hearty winter meal!
A traditional Punjabi spread of Sarson ka Saag with Makki di Roti on a brass thali, accompanied by white butter, radish, and even a bowl of boondi raita. The vibrant green saag is garnished with a drizzle of aromatic ghee tempered with garlic and red chili, and a dollop of homemade butter on top. A few slices of white radish (mooli), some green chili, and jaggery on the side complete this homestyle winter feast.
Conclusion
In the end, Sarson ka Saag is more than just a recipe – it’s a celebration of seasonal eating and a testament to the richness of Punjabi culture. Every bite carries the memory of grandmother’s kitchens, the warmth of the angeethi (hearth), and the joy of family gathered around a hearty meal. This winter, give yourself the pleasure of cooking this traditional dish slowly, and relish it with extra butter and love. As you scoop up the saag with pieces of makki di roti, you’ll understand why this simple greens curry has a legendary status. It’s homestyle Indian comfort food at its best – warm, earthy, and made with love. Happy cooking and Sat Sri Akal (salute to the truth)!
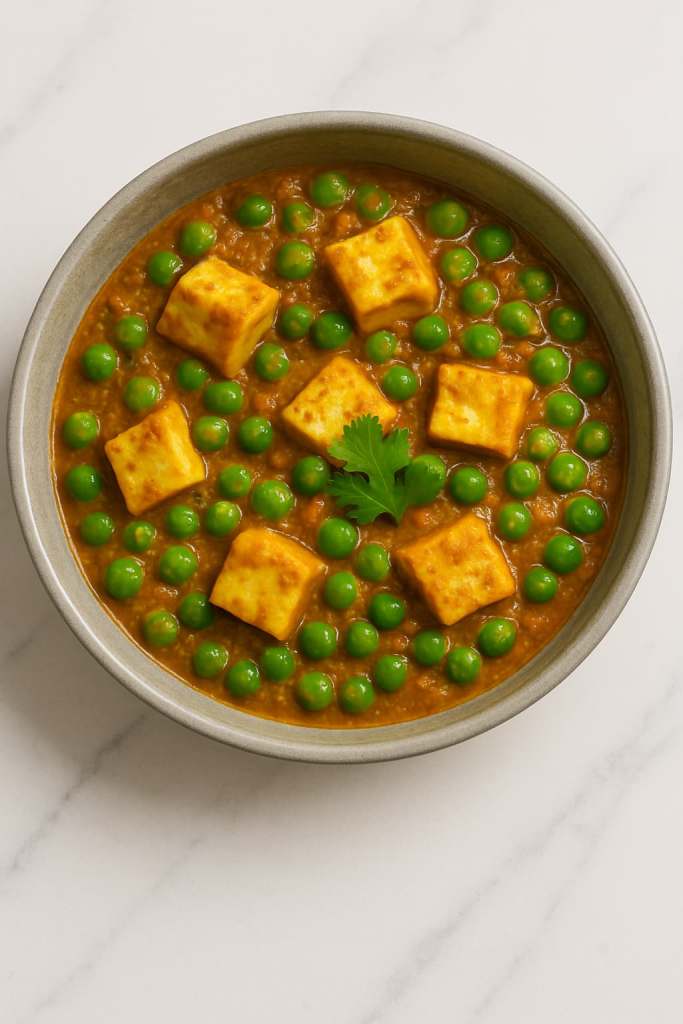
If there’s one dish that feels both festive and familiar, it’s Matar Paneer. For me, it was always the “special sabzi” at home — reserved for weekends, guests, or good news.
There’s something nostalgic about the softness of paneer, the pop of peas, and the rich masala that clings to every bite. Served with soft roti or jeera rice, it’s the kind of meal that makes you slow down and savor.
This is my tried-and-true version — not too heavy, not too fancy, just right.
🍛 Matar Paneer Recipe
Serves: 3–4 Prep Time: 15 mins Cook Time: 20 mins
🛒 Ingredients:
200g paneer, cubed
¾ cup green peas (fresh or frozen)
2 tbsp oil or ghee
1 onion, finely chopped
2 tomatoes, pureed
1 tsp ginger-garlic paste
½ tsp turmeric powder
1 tsp coriander powder
½ tsp red chili powder
½ tsp garam masala
Salt to taste
½ tsp kasuri methi (optional)
Water as needed
Fresh coriander leaves for garnish
👩🍳 Instructions:
1. Sauté Base: Heat oil/ghee in a pan. Add chopped onions and sauté till golden. Add ginger-garlic paste and sauté till raw smell goes.
2. Cook Masala: Add pureed tomatoes and all dry spices. Cook till the masala thickens and oil separates.
3. Add Peas & Water: Add peas and a little water. Cover and cook till peas are tender (5–6 mins).
4. Add Paneer: Gently stir in paneer cubes. Simmer for 3–4 mins. Add kasuri methi if using.
5. Garnish & Serve: Top with fresh coriander and serve hot with roti, paratha, or rice.
💡 Tips:
Lightly sauté paneer cubes in ghee for more flavor (optional).
If using frozen peas, soak in warm water for 5 mins.
Adjust gravy thickness to your liking — keep it thick for roti or slightly thin for rice.
❤️ Closing Note:
Matar Paneer is that beautiful middle ground — rich enough for guests, easy enough for weekday dinners. Once you master it, it becomes your go-to when you want comfort on a plate.