Uncategorized

Mangalore Buns (Banana Puri) Recipe


I still remember the first time I tasted Mangalore buns at a seaside café in Udupi during a sunny summer morning.  We had been exploring the old temples and my stomach growled as soon as the sweet smell of banana mixed with frying oil wafted through the air.  Sitting on a wooden bench by the coast, I bit into a warm, puffed bun – crispy on the outside and fluffy inside, with a gentle sweetness and a faint hint of spice.  It felt like biting into a soft banana cake hidden inside a puri.  Those golden-brown buns quickly became a favorite memory of my coastal travels, and I’ve been craving to recreate that homely snack ever since.

Servings

Makes about 12 buns (serves 4–6)

Prep Time

15 minutes (plus 4–6 hours resting time)

Cook Time

15 minutes

Ingredients

2 ripe bananas (preferably with brown spots), mashed

2½ cups all-purpose flour (maida) – or use whole wheat atta for a healthier twist (texture will change)

¼ cup plain yogurt (curd), at room temperature

3 tablespoons sugar (adjust to taste, depending on banana sweetness)

1 teaspoon cumin seeds (jeera)

½ teaspoon baking soda (soda bicarbonate)

½ teaspoon salt (or to taste)

Oil, for deep frying


Instructions

1. Mash the bananas: In a large mixing bowl, mash the ripe bananas thoroughly with a fork. (Avoid using a blender; hand-mashing preserves texture.)


2. Mix wet ingredients: Stir in the yogurt, sugar, and a pinch of salt into the mashed banana until smooth. The mixture will be runny – that’s okay.


3. Combine dry ingredients: In a separate bowl, whisk together the flour, cumin seeds, and baking soda.


4. Form the dough: Add the dry flour mixture to the banana mixture. Gently combine and knead into a smooth, non-sticky dough. If it’s too dry, add a little more yogurt or water. If too sticky, sprinkle a bit more flour. (The dough should be softer than chapati dough.)


5. Rest the dough: Lightly grease the dough with a teaspoon of oil or ghee and cover with a damp cloth. Let it rest in a warm place for at least 4–6 hours (or overnight). This resting time (fermentation) is crucial – it makes the buns puff up and gives them a chewy, bread-like texture.


6. Shape the buns: After resting, knead the dough a couple of times. Divide it into 10–12 equal parts and roll each into a smooth ball. Dust each ball lightly with flour and roll it out on a floured surface into a circle about 4–5 inches in diameter (slightly thicker than a regular puri, about 1/4 inch thick). Thicker rolls ensure the buns puff up nicely without tearing.


7. Heat the oil: Pour enough oil into a deep pan to submerge a bun. Heat it over medium heat. To test, drop a small piece of dough: if it sizzles and rises steadily, the oil is ready.


8. Fry the buns: Carefully slide one rolled dough circle into the hot oil. Gently press it down with a slotted spoon; it should puff up. Fry each side for about 30–60 seconds or until golden brown. Keep the flame at medium-low so the insides cook through without burning the exterior. Remove and drain on paper towels. Repeat with remaining dough.


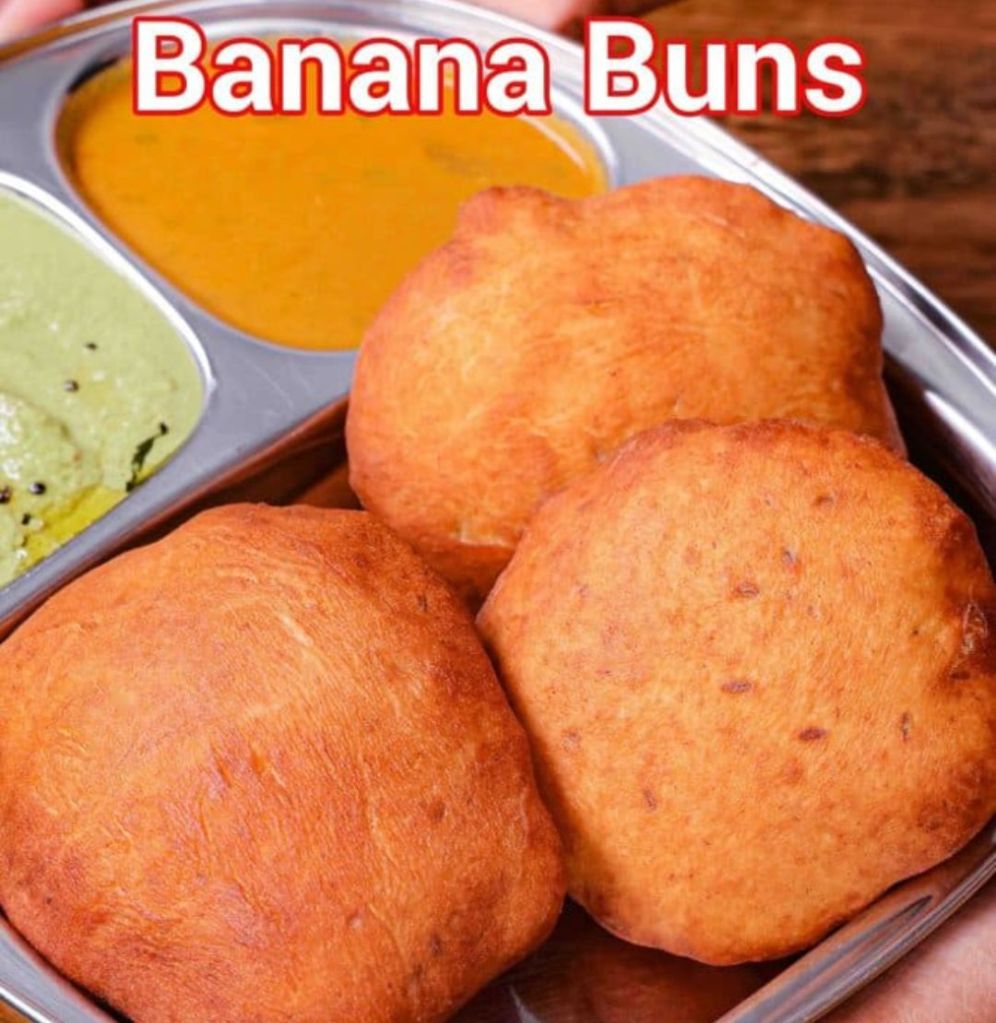
9. Serve hot: Serve the Mangalore buns immediately while warm. They go wonderfully with coconut chutney, a lentil curry (sagu), or simply with a cup of hot masala chai. These banana buns are equally comforting plain, as their natural sweetness shines through.


Tips

Use very ripe bananas: Overripe bananas (with black spots) give the best flavor and sweetness. The natural sugars help in fermentation too.

Allow proper resting: Don’t skip the long rest. Fermenting the dough for ~6–8 hours (or overnight) makes the buns soft and fluffy. In cold weather, place the covered dough in a slightly warm oven or microwave (turned off) to help rising.

Roll thickly: Roll the discs thicker than a regular puri. Very thin circles may stay dense; a thicker shape puffs up into a nice ball.

Check oil temperature: Keep the frying oil at medium heat. If too hot, the exterior browns quickly but the inside remains doughy. If too cool, the buns absorb oil. The right heat means a gradual, even golden color.

Enjoy warm or cooled: These buns are at their fluffiest when hot, but they remain soft and tasty even after cooling. If you have leftovers, reheat briefly on a skillet or serve at room temperature.


Closing Note

As you can see above, the homemade Mangalore buns turn out perfectly puffed and golden.  Enjoy them fresh from the pan with spicy coconut chutney or a steaming cup of chai. Even when cooled, these banana puris stay soft and delicious.  I hope this recipe brings a bit of coastal Karnataka to your kitchen – these sweet little buns are comfort food at its finest. Happy cooking and happy eating!

chutney

Oou Khata (Elephant Apple Chutney)


I still remember the monsoon afternoons at Grandma’s house in Odisha, with the sky dark and rain drumming on the tin roof. My cousins and I would dash into her courtyard, where the wild Oou (elephant apple) tree towered overhead. Fresh green fruits would tumble down after a big storm, and Grandma would scoop us up in a gleeful rush. The sour, tangy aroma of those fruit instantly brightened the air. She’d peel the prickly skin, grind mustard and cumin seeds on her heavy stone mortar, and stir up a bubbling pan of chutney that smelled of turmeric, mustard oil and jaggery. One bite of her homemade Oou Khata – hot steamed rice, dalma and a spoonful of that sweet-and-sour pickle – could chase all winter blues away. Those tastes and smells are pure comfort to me, a rain-soaked hug in a bowl.

I’ve learned that this Elephant Apple chutney is more than just a delicious snack; it’s a seasonal ritual. In Odisha, Oou is legendary for its sharp sourness, so cooks always add a good amount of jaggery (or sugar) to balance it. In fact, one Odisha food blog explains: *“Elephant apple (Ouu) is a sour fruit, so sugar or jaggery is added to it while cooking to get a sweet-n-sour taste.”*.  We always made this khata (sour chutney) around the end of the rains – just as another blogger notes, *“Elephant Apple Chutney (Ouu Khatta) is a typical recipe of Odisha prepared in every household mostly in post monsoon season.”*.  And just like at Grandma’s home, it was often cooked simply without any onion or garlic, especially during festival days. Those traditions made each spoonful of Oou Khata taste like home – a little sour, a little sweet, and completely heartwarming.

Ingredients

Oou (Elephant apple): 1 large (about 250g) – peel off the skin and cut into 1–2″ pieces

Mustard seeds: 1 teaspoon (mustard “rai”)

Cumin seeds: 1 teaspoon (jeera)

Dry red chilies: 2–3 (adjust for heat)

Turmeric powder: ½ teaspoon

Panch phoron: ½–1 teaspoon (optional Bengali five-spice mix: mustard, cumin, fennel, nigella, fenugreek)

Curry leaves: 5–6 leaves (optional, for aroma)

Jaggery (gur) or brown sugar: ⅓ cup, grated (add more or less to taste)

Oil: 1 tablespoon (mustard oil for authentic flavor, or any neutral cooking oil)

Salt: to taste (about ½–1 teaspoon)

Water: as needed (for boiling and simmering)

Optional: A small piece of ginger (mashed) or a teaspoon of ginger-garlic paste – skip if avoiding onion/garlic.


Instructions

1. Grind the spices. In a small bowl or mortar, combine the mustard seeds, cumin seeds, and 1 dry red chili. Grind or blend into a smooth paste, adding a little water if needed. (This fragrant paste is called “besa” in Odia.) Set aside.


2. Prep the elephant apple. Pull away any green outer petals and peel off the thick skin of the oou. Chop the peeled fruit into long strips or bite-size pieces (about 1–2″). Gently crush each piece with the back of a spoon or pestle – this releases more flavor as it cooks.


3. Boil the fruit. Place the chopped elephant apple in a saucepan with about 2 cups water, ¼ teaspoon turmeric and a pinch of salt. Bring to a boil, then lower heat and simmer for 5–10 minutes, until the oou pieces are just tender. Drain and reserve the cooked fruit (you can also use a pressure cooker for 1–2 whistles).


4. Tempering (tadka). Heat oil in a pan over medium heat. Add the panch phoron and remaining whole dry chilies; let them sizzle and pop. Add the curry leaves (if using) and fry briefly – you’ll smell their nutty aroma.


5. Sauté the fruit. Add the boiled elephant apple pieces to the hot pan. Stir and fry for 2–3 minutes so the pieces get lightly coated in the oil and spices.


6. Add the paste. Stir in the mustard–cumin paste you made, along with turmeric and salt. Mix well and cook for another minute to remove any raw flavor. The mixture will smell sharp and mustardy.


7. Simmer with jaggery. Pour in about ½ cup of water (or more if you like a thinner chutney) and bring to a gentle simmer. Cover and cook on medium-low for 8–10 minutes. The gravy will thicken slightly.


8. Sweeten the chutney. Add the grated jaggery (or sugar) and a pinch of chili powder if you want extra heat. Stir until the jaggery melts and blends into the sauce. Taste and adjust seasoning – add a little more salt or jaggery as needed. Remove from heat when you have a glossy, sweet-and-sour chutney coating the fruit.


9. Serve warm. Spoon the Oou Khata into a bowl and let it cool slightly. It’s traditionally served at room temperature. I like to garnish with a few fresh coriander leaves just before serving.


Tips & Variations

Sweetener swap: Jaggery gives the most authentic taste, but you can use brown sugar or even regular sugar in a pinch. (Add it gradually; you want the chutney tangy, not cloyingly sweet.)

More tang: If your elephant apples aren’t very sour, you can squeeze in a teaspoon of lemon or tamarind juice for extra zing.

Oil choice: Mustard oil lends a rustic pungency to Oou Khata. If you don’t have it, any neutral oil is fine. (A tiny drizzle of sesame oil at the end also adds a nice touch.)

Onion/garlic option: For a non-fasting version, you could sauté a chopped onion or a little minced garlic along with the tempering spices. This gives extra depth but is completely optional – the recipe is delicious even without them.

Spice variation: Swap panch phoron for a simple tempering of mustard and cumin seeds alone. You can also add a pinch of asafoetida (hing) in the oil if you skip the curry leaves – it mimics that savory aroma.

Make ahead: Like many chutneys, this tastes even better the next day. Store leftovers in the fridge (in a sealed jar) for up to 2–3 days – the flavors will mellow and blend as it sits.


Each time you stir a spoonful of this chutney into your rice and dal, I promise you’ll be transported back to my grandmother’s kitchen, rain pattering on the roof and kids laughing on the porch. Oou Khata is humble and homely – just like the memories it’s tied to. I hope this recipe brings a little of that old Odisha warmth into your home. Whenever you make it, do enjoy it with some hot chhena dalma or plain dal and steaming rice. Happy cooking and जय ଓଡ଼ିଶା (Jai Odisha)!