The very name “Tawa” hints at its roots: a tawa is a flat iron griddle, and cooking paneer on it imparts a special charred aroma. As Chef Ajay Chopra notes, *“Paneer Tawa Masala is a quintessential North Indian dish… cooked on a flat griddle (tawa) to impart a smoky flavor.”* It’s the kind of curry you’d find simmering in a roadside dhaba, the air thick with spice and smoke. In my kitchen, making this dish always transports me to those merry family meals on the road – a reminder that good food is as much about memory as it is about taste.
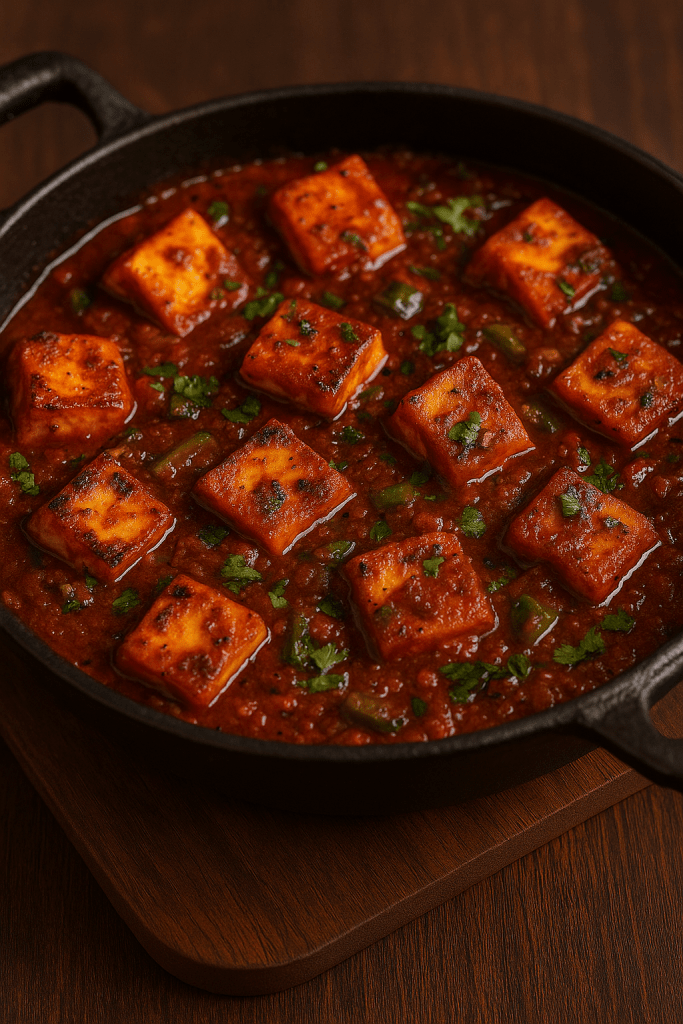
A homestyle Dhaba-style tawa paneer masala: charred paneer cubes in a glossy, spiced tomato-onion gravy, garnished with fresh cilantro. The vibrant curry looks comforting and rich, just like a plateful of warm memories.
1. Marinate the paneer: In a bowl, combine yogurt, tandoori masala, chaat masala, crushed kasuri methi, red chili powder, and salt. Add the paneer cubes and toss gently until well coated. Cover and refrigerate for 20–30 minutes to let the flavors meld.
2. Pan-fry the paneer: Heat 2 tbsp oil or ghee in a flat skillet or tawa over medium heat. When hot, add the marinated paneer cubes and shallow-fry until each side turns lightly golden (about 2–3 minutes per side). Remove the paneer and set aside.
3. Prepare the tawa masala base: In the same pan (or a wide, heavy-bottomed wok/pan), heat the remaining 2 tbsp oil on medium-high. Add cumin seeds, ajwain, and a pinch of hing, and let them sizzle. Toss in the chopped onions and sauté until they turn translucent (about 3 minutes).
4. Build the aromatics: Add the chopped ginger, garlic, and green chilies. Stir-fry until the raw aroma disappears. Then add the diced capsicum and cook for 2–3 minutes – it should still remain slightly crunchy for texture.
5. Tomato and spices: Stir in the puréed tomatoes and salt. Cook the mixture, stirring often, until it thickens and the oil begins to separate (about 5–6 minutes). Then sprinkle the coriander powder, turmeric, and extra red chili powder. Mix well and cook for another 2 minutes.
6. Add liquid: Pour in ¾ cup water, scraping the pan to incorporate any stuck bits. Let the gravy simmer on medium heat for 2–3 minutes so it comes together into a rich, saucy consistency.
7. Finish the curry: Stir in the garam masala. Add the fried paneer cubes back into the pan along with half of the chopped cilantro. Gently mix so the paneer is coated with the hot gravy. Simmer for 1–2 minutes to warm the paneer through and let it absorb the flavors.
8. Smoke infusion (optional): For an authentic dhaba-style smokiness, use the dhungar method. After turning off the heat, place a small piece of hot charcoal in a steel bowl and set it in the center of the curry. Drizzle ½ tsp ghee over the charcoal and immediately cover the pan. Let it rest for 5–7 minutes – the curry will take on a delicious smoky aroma.
9. Garnish and serve: Sprinkle the remaining cilantro on top. Serve the Tawa Paneer Masala piping hot.
Tips for Restaurant-Style Tawa Paneer
High heat & heavy pan: Use a cast-iron griddle (tawa) or a thick-bottomed pan on a high flame. This gives a slight char to the veggies and sauce, mimicking the roadside-dhaba sizzle.
Kasuri methi magic: Don’t skip the dried fenugreek – kasuri methi is key for that authentic dhaba aroma. Crush it between your palms before adding to release more fragrance.
Richness: A splash of cream or a small knob of butter/ghee at the end will make the curry luxuriously smooth and buttery, just like a restaurant version.
Marination: Marinating paneer in yogurt and spices (as above) helps it soak up flavor. If your store-bought paneer is very firm, briefly soak it in hot (not boiling) water before use to soften.
Char veggies: You can char the bell peppers and even tomatoes over an open flame or under a broiler before adding – this adds smoky depth (Chef Chopra suggests flaming the ingredients for extra char).
Sweet-tart balance: Use ripe red tomatoes (or even add a pinch of sugar) to balance the tartness. The goal is a slightly sweet-spicy gravy, not an overly sour one.
Serving Suggestions
Tawa Paneer Masala is a versatile dish that pairs beautifully with many sides:
Indian Breads: Warm butter naan, tandoori roti, or flaky parathas are perfect for scooping up the curry. They soak up the sauce and carry the flavor. Serve straight from the tawa or hot off the griddle.
Rice: Steamed basmati rice or jeera rice (cumin rice) provide a neutral, fragrant bed for the curry. The spiced paneer over rice is a comforting combo.
Accompaniments: A simple salad of sliced red onions and lemon wedges (common in dhabas) adds crunch and freshness. Cooled cucumber raita or a fresh cucumber-tomato salad also balance the heat. Pickled onions or lime pickle are classic sides that brighten each bite.
There’s a chill in the air and the fields are a sea of yellow mustard blossoms. In Punjabi households, this can only mean one thing: sarson ka saag season is here. Growing up, I remember sitting in my grandmother’s kitchen on a sunny winter afternoon, watching her patiently cook sarson ka saag in a heavy brass pot over the chulha (wood-fired stove). The aroma of mustard greens, spinach, and bathua simmering slowly with ginger and garlic would fill the house, building our anticipation. She would use a wooden madhani (hand churner) to gently mash the greens – an old-fashioned technique that gave the saag its rustic, slightly coarse texture. No blenders back then, just slow cooking and a lot of love. It’s often said that authentic sarson ka saag is a labor of love, requiring time and patience to get the flavors just right. And truly, after hours of bubbling away, what emerged was a pot of gold (or rather, emerald green) – creamy, hearty saag ready to comfort everyone on a cold evening.
A Taste of Tradition: Sarson ka saag isn’t just food; it’s a tradition and an emotion. This dish of spiced, pureed mustard greens is the pride of Punjabi winters, commonly enjoyed from late November through February when mustard leaves are freshest. Winter is the season when mustard (sarson) and bathua grow abundantly in North India, which is why this saag became a quintessential cold-weather dish in Punjab. Families often mix mustard greens with other seasonal greens like spinach and bathua (wild goosefoot) to balance the mustard’s spicy bitterness. The result is an earthy, mildly bitter greens curry that’s bursting with flavor and nutrients (so much so that an extra dollop of butter on top is completely justified!). Traditionally, the saag was slow-cooked for hours in a brass patila (pot) or clay handi on a low fire, which old-timers swear deepens the flavor. I’ve heard of folks using a century-old brass pot passed down through generations to make this dish, stirring it periodically with that wooden churner until the greens reach silky perfection. It’s no wonder that come winter, Punjabis look forward to cozy meals of sarson ka saag and makki di roti (maize flour flatbread) to warm the soul.
Nostalgia in Every Bite: The very serving of sarson ka saag can evoke nostalgia. Picture a brass thali (plate) or katori brimming with luscious green saag, a pat of homemade white butter (makkhan) melting slowly on top. Beside it rests a stack of Makki di Roti swathed in ghee, and on the side, a few sticks of gur (jaggery) and slices of crisp white radish. In my family, we’d even finish the meal with a bite of jaggery – the sweetness perfectly balances the slight bitterness of the greens and signifies the end of a hearty Punjabi feast. As a food writer once described, a tiny bowl of glistening homemade butter slathered on warm makki rotis and dipped into the saag can entice even the pickiest eater. Indeed, sarson ka saag with makki di roti isn’t just a meal – it’s winter comfort on a plate, a symbol of Punjabi hospitality, and a reminder of simpler times when food was slow-cooked with love.
Ingredients
To make traditional Sarson ka Saag, you will need the following:
Mustard greens (Sarson) – ~1 bunch (500 g), stems trimmed. These peppery mustard leaves give the saag its signature pungent flavor and are the star of the dish.
Spinach (Palak) – ~1/2 bunch (250 g). Adds mild sweetness and balances the mustard’s bitterness.
Bathua leaves – ~1/2 bunch (150–250 g), if available. Bathua (wild goosefoot) is a traditional addition that gives authentic flavor and helps mellow the mustard greens. If you can’t find bathua, you can use a little extra spinach or even fenugreek leaves.
Ginger & Garlic – 2 inches ginger and 6–8 cloves of garlic, finely chopped or grated. These aromatics infuse warmth and depth into the saag.
Green Chilies – 2–3 (or to taste), slit or chopped. For that gentle heat. You can adjust or skip for a milder saag.
Maize flour (Makki ka Atta) – 2–3 tablespoons. This fine cornmeal is crucial – it thickens the saag and also tones down the bitterness of the mustard.
Onion – 1 medium, finely chopped. Used in the tempering (tadka) for a subtle sweetness.
Ghee or Butter – 3–4 tablespoons. Used for cooking and for the finishing tadka. Ghee adds a lovely richness and authentic flavor.
Spices & Seasonings: Cumin seeds (1 tsp), salt (to taste), red chili powder (1/2 tsp, adjust to taste), turmeric powder (1/4 tsp, optional for color), garam masala (1/2 tsp, optional). Punjabi recipes are actually quite restrained with spices for this dish – the emphasis is on the greens. Just a hint of spices enhances the saag without overpowering the natural flavors.
Note: The ratio of greens can be adjusted. A common traditional proportion is 2 parts mustard : 1 part spinach : 1 part bathua. So if you have 500 g mustard, use ~250 g each of spinach and bathua. Don’t worry if you can’t be exact – the beauty of this recipe is that you can tweak the mix of greens based on availability. Fenugreek leaves (methi) or radish greens can also be thrown in for a twist, but mustard should remain the dominant portion.
Instructions (Step-by-Step Recipe)
Follow these steps to prepare Sarson ka Saag the traditional way. This recipe is meant to be leisurely, so put on some music or maybe call your mom for a chat while the greens cook – we’re channeling slow cooking, Punjabi-style!
1. Prep the Greens: Thoroughly wash all the leafy greens (mustard, spinach, bathua) to remove any grit – this may take 3-4 rinses since mustard leaves can be quite muddy. Chop the leaves roughly and discard any thick stems. (Tip: Cleaning the greens well is the most labor-intensive part, but it’s essential for a grit-free saag.) You should have a big mound of mixed greens; don’t worry, it will cook down significantly.
2. Cook until Tender: Place the cleaned, chopped greens in a large deep pot. Add about 2–3 cups of water (just enough to cover the greens). Toss in 2-3 chopped garlic cloves, half the ginger, and 1-2 green chilies. Also add 1/2 tsp salt to help the greens cook. Bring to a boil, then reduce to a low simmer and cover, allowing the greens to cook until completely soft. This can take around 30-40 minutes on the stovetop, stirring occasionally. (Traditionally, the greens were simmered for even longer, sometimes over an hour on low heat, to achieve that melt-in-mouth texture and to let the flavors deepen – truly slow cooking!). You’ll know it’s ready when the mustard leaves are tender and the kitchen smells like verdant, earthy goodness. (Quick alternative: You can pressure cook the greens with a little water for 1-2 whistles to save time, but purists prefer the slow simmer method for maximum flavor.)*
3. Mash/Blend the Greens: Once the greens are cooked, let them cool slightly. Then mash them into a coarse purée. Traditional method: Use a wooden madhani (hand churner) or a masher to churn the greens in the pot for several minutes. This manual mashing gives a wonderful rustic texture – you want the saag to be somewhat coarse, not a baby-food puree. Modern method: Alternatively, transfer the softened greens (with a bit of the cooking liquid) to a blender and pulse a few times until you get a medium-coarse paste. Do this in batches if needed. (Be careful with hot liquids in a blender; allow cooling or use an immersion blender.) Do not over-blend – authentic sarson ka saag has some leafy texture to it, so it shouldn’t be completely smooth.
4. Simmer with Makki ka Atta: Return the mashed greens to the pot (if you removed them) and place it back on low heat. Stir in the maize flour (makki ka atta), sprinkling it evenly and mixing continuously to avoid lumps. The cornmeal will thicken the saag as it cooks. Add a splash of hot water or the reserved cooking liquid if the mixture looks too thick initially. Now let the saag simmer on low heat for another 15-20 minutes, stirring every few minutes so it doesn’t stick to the bottom. This slow cooking with the corn flour is important – it eliminates the raw taste of the cornmeal and really allows all the flavors to meld beautifully into a creamy, homogenous saag. You’ll see the color of the saag deepen and the texture become velvety. (At this stage, your patience will be rewarded – as the pot bubbles gently, the aroma is irresistible!)
5. Prepare the Tadka (Tempering): In a separate pan, heat 2-3 tbsp of ghee (or butter). Add 1 tsp of cumin seeds and let them sizzle for a few seconds until aromatic. Then add the chopped onions and sauté on medium heat until they turn golden-brown. Next, add the remaining chopped garlic and ginger. Sauté for another minute until the raw smell disappears. (Some families also add 1-2 chopped tomatoes at this point, cooking them down to add a slight tang, but the traditional recipe often skips tomatoes. Feel free to include one tomato, chopped, and cook until it’s soft and the oil separates, especially if you like a hint of tang in your saag.) Now sprinkle in the spices: a pinch of turmeric, red chili powder to taste (if you want extra heat or color), and 1/2 tsp garam masala (if using). Stir for a few seconds to bloom the spices in the ghee – be careful not to burn them.
6. Combine Tadka with Saag: Pour this hot, fragrant onion-garlic masala (tadka) into the simmering pot of saag. You’ll hear a satisfying sizzle as it all meets. Stir everything together so the tempered ghee and aromatics mix well with the greens. Let the combined saag cook for another 5-10 minutes on low heat, so the flavors marry. At this point, check for seasoning and add salt if needed. If the saag looks too thick, you can add a bit more water and simmer a few minutes; if it’s too thin, cook a little longer to evaporate excess liquid. The final consistency should be like a medium-thick porridge – not runny, but flowing and creamy.
7. Finishing Touch (Optional Tadka): For extra indulgence and aroma, you can do a quick final tempering. In a small tadka pan, heat 1 tbsp ghee. Add 1-2 sliced garlic cloves and 1 dried red chili (broken). Fry for just half a minute until the garlic turns lightly golden and the red chili infuses the ghee (don’t let them burn). Turn off the heat and sprinkle a pinch of red chili powder in the hot ghee – this will instantly release a wonderful color and aroma. Drizzle this infused ghee on top of the prepared sarson ka saag just before serving. This step is optional but highly recommended for that restaurant-quality presentation and an extra layer of flavor. You’ll see the red-spiced ghee shimmering on the green saag – mouthwatering!
8. Serve: Sarson ka saag is best served hot, straight from the pot, with a generous dollop of makkhan (white butter or ghee) melting on top. The traditional accompaniment is Makki di Roti, the famous golden-yellow cornmeal flatbread, which you can make by kneading maize flour with warm water into a dough, patting it into flatbreads and cooking on a hot tawa (griddle). Serve the saag with makki rotis smeared with butter – this combination is soul-satisfying and authentic. Don’t forget to keep some sides like chopped onions, green chilies, and mooli (white radish) to munch on for freshness and crunch. And as many Punjabi households do, serve a little piece of jaggery (gur) on the side – a bite of jaggery after a spicy saag and roti mouthful is a divine sweet contrast that also helps cut any lingering bitterness. Now dig in and enjoy your hearty winter meal!
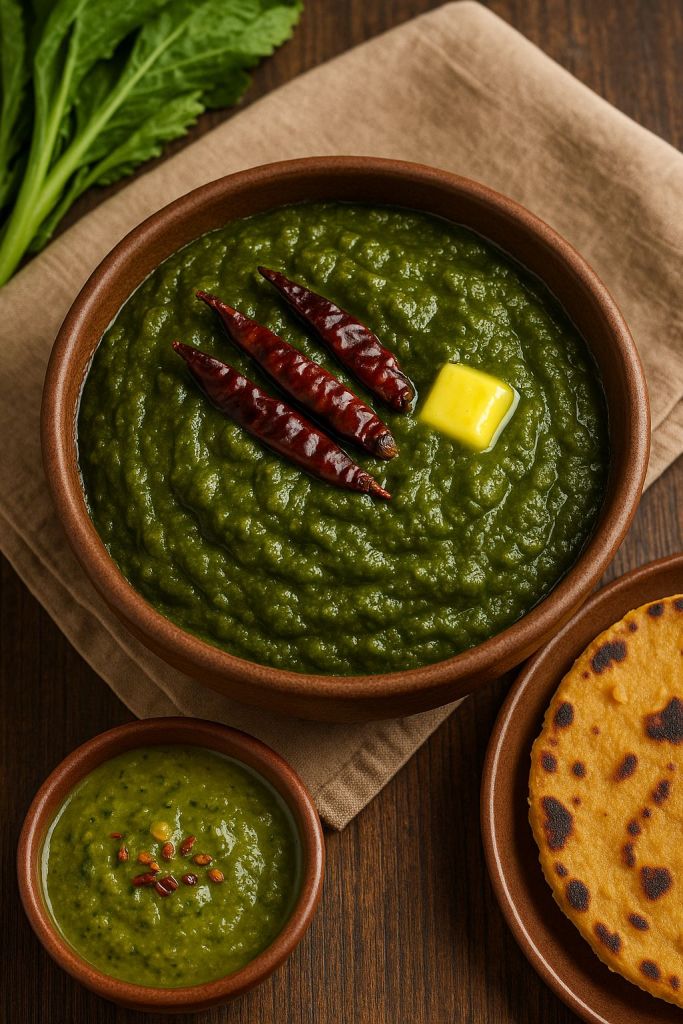
A traditional Punjabi spread of Sarson ka Saag with Makki di Roti on a brass thali, accompanied by white butter, radish, and even a bowl of boondi raita. The vibrant green saag is garnished with a drizzle of aromatic ghee tempered with garlic and red chili, and a dollop of homemade butter on top. A few slices of white radish (mooli), some green chili, and jaggery on the side complete this homestyle winter feast.
Conclusion
In the end, Sarson ka Saag is more than just a recipe – it’s a celebration of seasonal eating and a testament to the richness of Punjabi culture. Every bite carries the memory of grandmother’s kitchens, the warmth of the angeethi (hearth), and the joy of family gathered around a hearty meal. This winter, give yourself the pleasure of cooking this traditional dish slowly, and relish it with extra butter and love. As you scoop up the saag with pieces of makki di roti, you’ll understand why this simple greens curry has a legendary status. It’s homestyle Indian comfort food at its best – warm, earthy, and made with love. Happy cooking and Sat Sri Akal (salute to the truth)!
Every home has that one recipe — the one that comes out on rainy days, when you’re tired, or when nothing but comfort will do. For me, it’s this bowl of White Cheese Pasta.
It started as a quick fix during my college hostel days when I had only butter, milk, and a little cheese. What emerged was a silky, rich white sauce coating tender pasta — creamy enough to soothe a bad day, cheesy enough to feel like a reward. Over the years, I refined it. Added garlic, upgraded the cheese, tossed in some veggies on good days — but that first version? It still lives rent-free in my food memories.
This is the pasta I cook when I need joy in a bowl.
🧾 Ingredients (Serves 2)
1½ cups pasta (penne, fusilli, or macaroni)
1 tablespoon butter
2 garlic cloves, finely chopped
1 tablespoon all-purpose flour (maida)
1½ cups milk (warm)
½ cup grated cheese (mozzarella, cheddar, or mix)
Salt and pepper to taste
Oregano, chili flakes (optional, for seasoning)
Boiled sweet corn, bell peppers, or broccoli (optional add-ins)
👩🍳 Method
1. Cook the Pasta Boil pasta in salted water until al dente. Drain and set aside. Reserve ¼ cup pasta water (optional for loosening the sauce).
2. Make the White Sauce In a pan, melt butter. Add chopped garlic and sauté until fragrant. Stir in flour and cook for 1–2 minutes on low heat, until slightly golden.
3. Add the Milk Gradually pour in warm milk, whisking continuously to avoid lumps. Simmer until it thickens into a creamy sauce.
4. Add Cheese Stir in the grated cheese. Mix until fully melted and the sauce is smooth. Season with salt, pepper, oregano, and chili flakes.
5. Toss Pasta Add boiled pasta to the sauce. Mix well so every piece is coated. Adjust consistency with pasta water if needed.
6. Serve Hot Garnish with extra cheese or herbs and serve immediately.
I still remember those mornings when the house filled with the gentle sizzle of a dosa on the griddle and the rich scent of ghee in the air. In my family’s kitchen, breakfast was a warm ritual. My grandmother would ladle fermented dosa batter onto a hot cast-iron tawa, spreading it thin and circular. As it cooked, she’d sprinkle spicy milagai podi (literally “chili powder”) over the pancake. The moment was magic – a golden triangle of crispy dosa, flecked with nutty-red podi and glistening with melted ghee, was placed before me. I’d bite into its crisp edge, letting the fiery gunpowder blend with the savory dough, chased by sips of strong filter coffee. These simple flavors – the coconut-chutney dip, the tangy sambar – evoke the comfort of home and childhood.
In Tamil homes idli podi or milagai podi is a beloved staple. It’s a coarse, earthy mix of roasted lentils (like chana dal and urad dal), dried red chilies, sesame seeds and spices. South Indians call this mixture “gun powder” for the fiery kick it gives, and they sprinkle it not only on idlis but on dosas too. As one recipe notes, *“Idli Podi is also known as Milagai Podi… ‘Milagai’ means chilies and ‘Podi’ is powder.”* In fact, podi is often described as a coarse breakfast condiment used alongside idli and dosa, made from roasted dals and spices. A pinch of this powder on a hot dosa, drizzled with fragrant ghee, turns each bite into a burst of homestyle flavor.
Crucial to the perfect podi dosa is the batter. Dosas start with a naturally fermented batter of rice and urad dal. After soaking and grinding, the mixture is left to ferment overnight until it doubles and becomes bubbly. Swasthi’s Recipes explains: “After a good fermentation, the batter increases in volume, becomes light with plenty of small air pockets and develops a slight tangy flavor”. When you ladle this fermented batter onto a hot griddle and cook it with a little ghee or oil, it crisps up into a thin, golden crepe. (For extra crispiness, Serious Eats even suggests substituting some of the rice with parboiled rice.) The result is a lacy-edged dosa that’s perfect for holding a layer of spicy podi and glossy ghee.
Ingredients
For the Dosa batter: 2 cups raw rice (short-grain rice or sona masuri), ½ cup whole urad dal (skinned black gram), water for soaking/grinding, and salt to taste. (You may also add a tablespoon of poha or fenugreek seeds to the soak for a fluffier texture.)
For the Podi (gunpowder) mix: 2 tbsp white sesame (til) seeds, 1 tsp cooking oil, ¼ cup urad dal, ¼ cup chana dal, 6–8 dried red chilies (adjust for heat), a few fresh curry leaves, 2 tbsp dry coconut (copra), a small piece tamarind, ¼ tsp turmeric powder, a pinch of asafoetida (hing), and 1 tsp salt.
For cooking: Additional ghee (clarified butter) or oil for the griddle.
To serve: Coconut chutney, sambar, and strong South Indian filter coffee (optional) as accompaniments.
Method
1. Prepare and ferment the batter: Rinse the rice and urad dal separately and soak both in plenty of water for at least 4–6 hours (or overnight). Drain and grind them separately with just enough water to make a smooth paste. Combine the rice and dal batter, add salt, and stir well. Cover and ferment in a warm spot for 8–12 hours (or until doubled and bubbly). As noted by Swasthi, after fermenting *“the batter increases in volume, becomes light with plenty of small air pockets”*. This fermented batter will yield thin, crisp dosas when cooked.
2. Make the podi (spice mix): Dry-roast the ingredients slowly to bring out their aroma. In a large skillet on low heat, toast 2 tbsp sesame seeds until fragrant; transfer them to a plate. Add 1 tsp oil to the pan, then throw in ¼ cup urad dal, ¼ cup chana dal, 6 dried red chilies and a few curry leaves. Roast this mixture on low heat, stirring constantly, until the dals turn golden and the chilies darken (watch carefully so nothing burns). Now add the 2 tbsp dry coconut and continue to roast until the coconut is lightly browned. Let everything cool. Then transfer the roasted mix to a blender or spice grinder. Add the toasted sesame seeds, a small tamarind ball, ¼ tsp turmeric, a pinch of asafoetida, and 1 tsp salt. Grind to a coarse powder without adding water. You now have the spicy podi. (Tip: This coarse chili-lentil powder can be stored in an airtight jar for weeks.)
3. Cook the dosa: Heat a well-seasoned griddle or nonstick pan over medium-high heat. When the pan is hot, reduce heat to medium and pour a ladleful of the fermented batter onto the center. Quickly tilt and rotate the pan in a spiral motion to spread the batter thinly (you can also spread with the back of the ladle). Cover and cook for about 1 minute. The underside should be light golden and you will see small holes form on top as it cooks.
4. Add podi and ghee: Remove the lid. Evenly sprinkle 1–2 teaspoons of the prepared podi all over the semi-cooked dosa (as shown by Hebbar’s Kitchen). Immediately drizzle or spread about 1 tsp ghee (or oil) on top. Spread it lightly with the back of the ladle so it coats the surface. Continue cooking uncovered for another 30 seconds or so until the dosa edges curl up and the entire crepe turns golden brown and crisp. Swasthi’s guide reminds us that dosas are cooked *“with a little oil, ghee or butter until crisp”*. Indeed, adding ghee not only crisps the dosa but adds a rich aroma – as one recipe notes, *“podi dosa tastes great when dosa is prepared with ghee.”*
5. Serve hot: Fold or roll the dosa onto a plate. Serve it immediately while sizzling. Traditionally, podi dosa is enjoyed with steaming coconut chutney and hot sambar. Pour a tumbler of South Indian filter coffee to sip alongside. Each bite of the crisp, golden dosa with its fiery podi and buttery ghee, paired with cool chutney and hot sambar, delivers a warm, comforting taste of home.
In my family, Sunday breakfasts were always a special occasion. I remember waking up to the gentle scent of fresh coconut and spices wafting from the kitchen as my mother simmered vegetable kurma on the stove. The kitchen filled with the warm aroma of cinnamon, cardamom and toasted coconut – a fragrance that felt like home. By the time we sat down to eat, the table was set with soft, steaming appams (rice pancakes) and stringy idiyappams (rice noodle hoppers), all ready to be spooned into a pot of creamy vegetable kurma. It was a simple, comforting ritual: the subtle sweetness of coconut curry paired with fluffy rice breads, shared with family and brimming with nostalgia.
Kurma (or korma) is a traditional South Indian curry made by simmering a medley of vegetables in a rich coconut-based gravy. This curry is light yet flavorful – not as heavy as North Indian kormas that use yogurt – because its base is a paste of fresh coconut and mild spices. Many cooks add cashews, poppy seeds or roasted gram to the coconut paste for extra creaminess. Whole spices like cinnamon, cloves and cardamom are heated in oil first, releasing a wonderful aroma that infuses the curry. In fact, cooks note that these fragrant spices **“along with coconut paste bring in a wonderful aroma to the dish”**. In our home, that aroma of simmering coconut and spices meant that a cozy family meal was on the way.
Vegetable kurma is famously versatile: it can accompany rotis or puris at dinner, but in South India it is often served with breakfast breads. In Kerala and Tamil Nadu, it’s common to enjoy kurma with fluffy appams or string hoppers (idiyappams) for a comforting morning meal. As one cookbook explains, vegetable kurma is an “excellent side dish” for everything from chapathis to appams and idiyappams. Here we focus on the classic coconut‐gravy version with mixed veggies, perfect for scooping up with hot appams or idiyappams on lazy family mornings.
Ingredients
Mixed vegetables (about 3 cups total): A combination such as carrots, potatoes, green beans, peas (e.g. 1 cup chopped carrots, 1 cup diced potatoes, ½ cup beans, ½ cup peas)
Onion: 1 large, finely chopped
Ginger: 1-inch piece, grated or finely chopped
Garlic: 2 cloves, minced (optional)
Green chilies: 1–2, slit (adjust to taste for mild heat)
Ground spices: ½ teaspoon turmeric powder, 1 teaspoon coriander powder (optional: ¼ teaspoon mild red chili or Kashmiri chili powder for color)
Coconut paste ingredients: 1 cup freshly grated coconut (or frozen/thawed), 8–10 cashew nuts, 1 tablespoon poppy seeds (khus khus), ½ teaspoon fennel seeds – grind these to a smooth paste with a little water.
Whole spices (for tempering): 1 bay leaf, 1 small cinnamon stick (about 1 inch), 2–3 whole cloves, 2–3 green cardamom pods, ½ teaspoon fennel seeds.
Oil or ghee: 2 tablespoons (use coconut oil for extra flavor).
Salt: to taste.
Fresh cilantro (coriander leaves): a handful, chopped (for garnish)
Method
1. Cook the vegetables: Heat 1 tablespoon oil in a pot or pressure cooker. Add the chopped vegetables, a pinch of salt, and just enough water to cover them. Cover and cook until the veggies are tender but not mushy (about 5–7 minutes on the stove, or 1–2 whistles in a pressure cooker). Drain any excess water and set the vegetables aside. (Avoid overcooking, so they hold their shape in the curry.)
2. Grind the coconut paste: In a blender, combine the grated coconut, cashews, poppy seeds and fennel seeds with a little water. Grind to a smooth paste. This creamy paste will thicken the kurma and give it a rich coconut flavor. (If you don’t have poppy seeds, more cashews or a small roasted chana dal can substitute.)
3. Temper the spices: Heat the remaining 1 tablespoon of oil or ghee in a deep pan or kadai over medium heat. Add the bay leaf, cinnamon stick, cloves, cardamom pods, and ½ teaspoon fennel seeds. Sauté for about 30 seconds until they release a fragrant aroma.
4. Sauté aromatics: Add the chopped onion to the pan. Sauté on medium heat until the onion turns translucent and soft, about 3–4 minutes. Then add the ginger, garlic and green chilies. Cook for another 1–2 minutes until the raw smell of ginger and garlic disappears.
5. Spice it up: Sprinkle in the turmeric and coriander powders (and a little chili powder if using). Stir and cook for 30 seconds to bloom the spices. (This step ensures the spices toast slightly and become fragrant.)
6. Add the coconut paste: Pour in the ground coconut-cashew paste and mix well with the onions and spices. Cook for a minute while stirring, so the paste is heated through and coats the onions.
7. Combine and simmer: Add the boiled vegetables back into the pan along with ½ to 1 cup of water or thin coconut milk (enough to reach your desired curry consistency). Season with salt and stir to combine. Bring the curry to a gentle simmer, then reduce the heat to low. Let it cook uncovered for 3–5 minutes so the flavors meld. Tip: Once the curry comes to a boil, keep it on low heat – overboiling after adding coconut can make the gravy grainy.
8. Finish and serve: Just before turning off the heat, stir in half of the chopped cilantro. Taste and adjust salt or spices as needed. Garnish with the remaining cilantro. Serve the vegetable kurma hot, ideally with soft appams or idiyappams on the side (the curry is a perfect match for these rice breads).
This creamy, coconut-scented kurma is best enjoyed fresh, spooned generously over pillowy appams or threadlike idiyappams. Each bite – sweet coconut, gentle spices and tender mixed vegetables – brings back the warmth of home and family gatherings. Enjoy this homestyle South Indian vegetable kurma as comfort food any time you crave that nostalgic, curry-kissed aroma and taste.
Notes: You can customize the vegetables to your liking (cauliflower, peas, or even paneer). For a Kerala-style “white kurma”, use fewer red chilies and add a bit more coconut or coconut milk for a pale, fragrant curry. Leftovers keep well in the fridge for a couple of days; simply reheat gently and add a splash of water or coconut milk if it thickens.
Sources: This recipe is inspired by traditional South Indian vegetable kurma dishes and home cooks’ tips. It reflects the classic coconut-cashew gravy method and family meal traditions of the region.
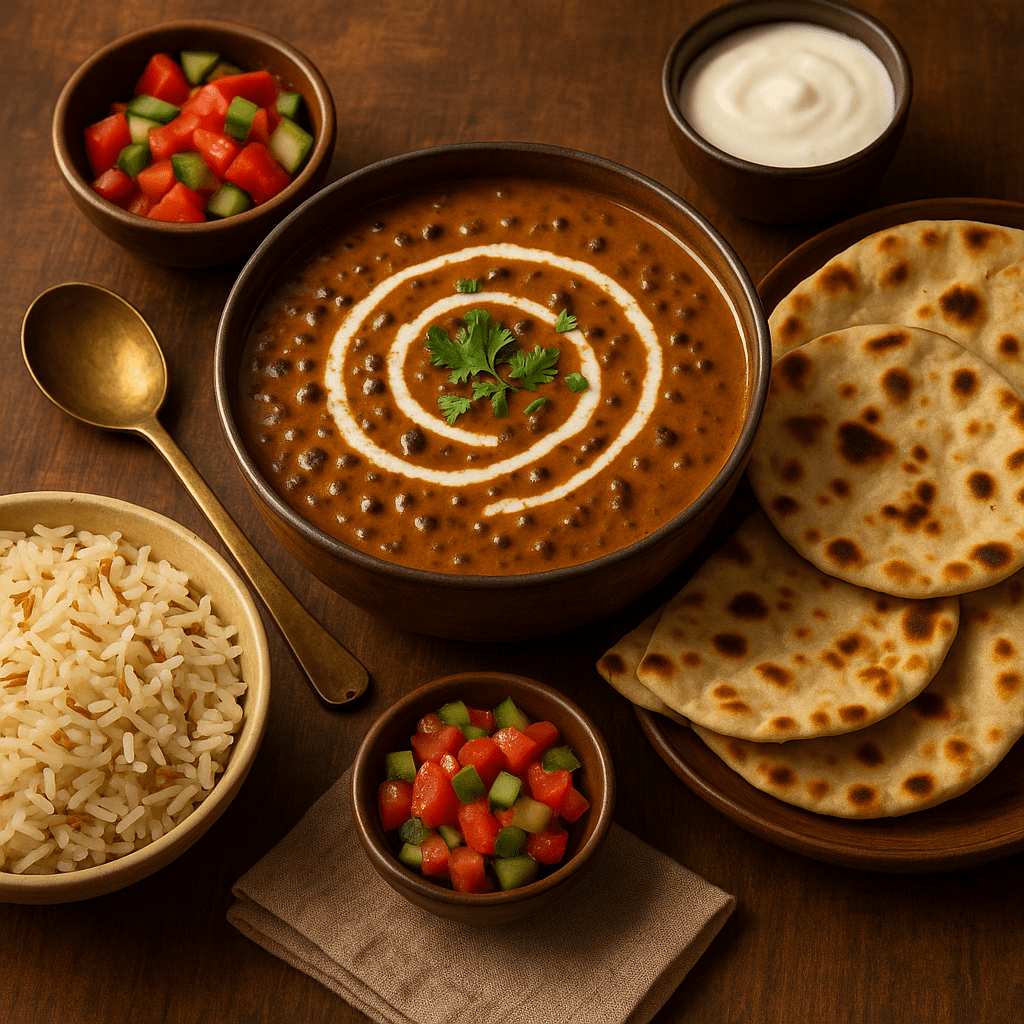
Every Sunday evening, I can still smell my grandmother’s kitchen filled with the rich aroma of butter, garlic, and spices. A big pot of Dal Makhani would be simmering on the stove, its creamy steam promising a hearty, comforting meal. We kids knew it was ready when the bubbling pot slurped gently and she ladled the velvety lentils into bowls. Sitting around the table, passing naan and rice, every bite felt like a warm hug – this slow-cooked black lentil curry was truly food for the soul.
Dal Makhani is renowned in Punjabi cuisine as “a rich, creamy and popular Punjabi dish made with slow-cooked black lentils (urad dal) and kidney beans (rajma), simmered with butter, cream and aromatic spices”. Its very name hints at indulgence – makhani means butter – and indeed “both cream and butter contribute to the richness” of this curry. The result is a luscious, buttery stew that is, as one recipe puts it, almost “bound to be decadent” with its generous dairy and spices. In many North Indian homes, Dal Makhani is considered a “labour of love,” because it’s traditionally left to cook for hours on a gentle flame or over coals until the lentils almost melt into gravy. Legend even credits Delhi’s famous Moti Mahal restaurant for inventing this dish (attributed to Kundan Lal Gujral), but any Punjabi grandmother will tell you the home-cooked version—simply seasoned and slowly simmered—is the true classic. After the long simmer, butter and fresh cream are stirred in to give it that signature thick, creamy finish.
In our family, Dal Makhani always meant we gathered together. We’d serve it piping hot, with plenty of warm, buttered naan or fragrant cumin-spiced rice. The first taste of that creamy dal, draped over a fluffy piece of naan, brings back all those memories of home, warmth, and togetherness.
Ingredients
Whole black urad dal (kali dal): 1 cup (soaked overnight)
Red kidney beans (rajma): ¼ cup (soaked overnight)
Water: about 3 cups (for cooking the lentils)
Ghee or butter: 2–3 tablespoons (plus more for finishing)
Cumin seeds: 1 teaspoon
Whole spices: 2–3 cloves, 2 green cardamoms, 1 black cardamom, 1-inch cinnamon stick, 1 bay leaf (tej patta)
Tomatoes: 2–3 medium, pureed (or 1 cup tomato puree)
Red chili powder: 1 teaspoon (Kashmiri chili for color, or paprika)
Nutmeg: a pinch, freshly grated (optional, for warmth)
Salt: to taste
Water or stock: 1 cup (to adjust consistency if needed)
Heavy cream: ½ cup (or fresh cream/yogurt, for richness)
Kasuri methi (dried fenugreek leaves): ½ teaspoon, crushed (optional)
Fresh cilantro (coriander): chopped, for garnish
Optional (smoky “dhungar”): 1 small piece charcoal (heated red-hot) and 1 tsp ghee
Method
1. Soak the lentils and beans. In a large bowl, cover the urad dal and rajma with plenty of water. Let them soak for 8–10 hours or overnight. Drain and rinse well before cooking.
2. Cook the dal and rajma. Transfer the drained lentils and beans to a pressure cooker. Add about 3 cups of fresh water and a pinch of salt. Cover and cook on high heat until the cooker whistles about 18–20 times (roughly 30–40 minutes). Then turn off the heat and allow the pressure to release naturally. The lentils should be very soft, almost falling apart – “melt in the mouth” tender.
3. Prepare the spice base (tadka). While the lentils cook, heat 2 tablespoons ghee or butter in a heavy-bottomed pot or deep pan over medium heat. Add the cumin seeds, cloves, green cardamoms, black cardamom, cinnamon stick, and bay leaf. Sauté for 30 seconds until fragrant.
4. Sauté onions and aromatics. Add the chopped onion and green chilies to the pot. Cook until the onion is translucent and just beginning to brown. Stir in the ginger-garlic paste and continue cooking for another minute, until the raw smell goes away.
5. Add tomatoes and spices. Pour in the tomato puree and a splash of water. Season with the red chili powder, a pinch of nutmeg, and salt. Cook the mixture, stirring often, until it thickens and the oil begins to separate from the masala.
6. Combine lentils and simmer. Stir the cooked dal and rajma (with its cooking liquid) into the pot. Add extra water or stock if needed to reach your desired consistency. Bring everything to a gentle boil, then reduce the heat to low. Slow simmer uncovered for 20–30 minutes, stirring occasionally. (As one chef notes, *“the more you slow cook it, the better it tastes.”*) This slow cooking helps the dal become creamy and develop a rich flavor.
7. Finish with dairy. Mash a few lentils against the side of the pot to naturally thicken the sauce. Stir in the heavy cream and mix well. Add a knob of butter or a splash of more ghee. Sprinkle in the crushed kasuri methi for a fragrant boost and adjust salt or spices to taste.
8. Optional smoke (dhungar). For the classic smoky aroma, light a piece of charcoal over an open flame until it glows. Carefully place it in a small metal cup or foil in the center of the pot, pour 1 teaspoon ghee over the hot coal, and immediately cover the pot for 2–3 minutes. The resulting smoke will infuse the dal with that restaurant-style smokiness. (Only do this if you’re comfortable with it and watch safety closely.)
9. Garnish and serve. Remove the whole spices if desired. Garnish the Dal Makhani with chopped cilantro and a drizzle of cream. Serve it hot as the star of a family dinner.
Suggested Accompaniments
Soft, buttery naan or garlic naan: Perfect for scooping up every last bit of dal.
Jeera (cumin) rice: Fragrant basmati rice tempered with cumin seeds complements the rich dal.
Roti or paratha: Warm flatbreads are also wonderful if you prefer.
Fresh salad or raita: A simple kachumber salad (chopped cucumber, tomato, onion with lemon) or cool yogurt raita balances the richness.
Pickles and lemon: Mango pickle, mixed achar or lemon wedges add a tangy punch.
Papadums (papads): Crispy lentil crackers make a nice crunchy side.
There’s nothing like the pitter-patter of rain on a monsoon morning to transport me back to my grandma’s kitchen. The air would be thick with the earthy aroma of bajra and the fresh, herbal scent of methi (fenugreek leaves). I remember waking up to find my grandmother already at the stove, roasting Methi Bajra Theplas on a hot griddle. The kitchen windows fogged up from the steam, the sizzle of each thepla hitting the tawa, and the warm, spiced fragrance wafting through the house – it was pure comfort. These wholesome flatbreads made with pearl millet (bajra) and fresh fenugreek greens are a traditional Gujarati delight, but for me, they’re so much more. They embody cozy family mornings, nostalgic flavors, and the simple joy of watching rain while nibbling on soft, hot theplas with a cup of chai.
Fast forward to today, and Methi Bajra Thepla is still my go-to comfort breakfast, especially when the weather turns gloomy. It’s amazing how a recipe can be nutritious yet deeply satisfying: bajra flour is rich in fiber and has a warming quality, fresh methi adds vitamins and a slight bittersweet bite, and a touch of yogurt in the dough keeps it tender. In this post, I’ll walk you through making these soft, flavorful theplas, just the way Grandma did – complete with tips to keep them pliable, ways to store and reheat for later, and serving suggestions that make them an irresistible treat on a rainy day.
Ingredients
Here’s what you’ll need to make approximately 8–10 Methi Bajra Theplas:
Bajra (Pearl Millet) Flour – 1 cup Provides a hearty, earthy base and makes the theplas wholesome.
Whole Wheat Flour – 1 cup For binding and a softer texture (a mix of wheat and bajra makes rolling easier).
Fresh Methi Leaves (Fenugreek) – ~1 cup, finely chopped Pick the leaves off the stems, wash thoroughly, and chop. These give a signature aromatic, slightly bitter flavor.
Plain Curd (Yogurt) – 1/2 cup Adds moisture and tang to the dough, making the theplas soft. (Use thick yogurt; if very watery, reduce amount or strain a bit).
Spices & Seasonings:
Turmeric powder – 1/2 tsp (for a warm color and subtle flavor)
Red chili powder – 1/2 tsp (adjust to taste for heat; or use 1–2 finely chopped green chilies for a fresh spice kick)
Ajwain (carom seeds) – 1/2 tsp (optional, aids digestion and adds a wonderful aroma)
Ginger paste – 1 tsp (or freshly grated ginger, optional but enhances flavor; you can add a clove of garlic paste too for extra zing)
Sesame seeds – 1–2 tsp (optional, I love the nutty crunch they add in each bite)
Salt – ~1 tsp or to taste (balance to enhance all the flavors)
Oil or Ghee – 2 tbsp (for the dough) + extra for cooking A bit of oil/ghee kneaded into the dough ensures tenderness, and you’ll shallow-fry or roast the theplas on the griddle with a little oil/ghee for golden spots and richness.
Water – as needed To adjust the dough consistency. Bajra is gluten-free, so warm water helps bind the dough with the wheat and yogurt. Have about 1/4 to 1/2 cup on hand (you may not use it all).
Note: All ingredients should ideally be at room temperature, especially the yogurt, so it mixes evenly. Fresh methi leaves are best for flavor, but you can use drained frozen methi or even kasuri methi (dried fenugreek) in off-season – just adjust quantity since dried herbs are stronger.
Making methi bajra thepla is straightforward. The key is to form a pliable dough and cook on medium heat for soft results. Let’s get started:
1. Prepare the Methi Leaves: Pluck the fresh methi (fenugreek) leaves from their stems. Rinse them thoroughly in water at least 2-3 times to remove any dirt (methi can be sandy). Drain well and pat dry slightly. Chop the leaves finely with a knife. Set aside. (Chopping helps the leaves distribute evenly in the dough and makes rolling easier.)
2. Mix Dry Ingredients: In a large mixing bowl or paraath (wide flat bowl), combine the flours and dry spices. Add the bajra flour and whole wheat flour first. Then stir in the spices and seasonings: turmeric, red chili powder, cumin seeds, ajwain (if using), sesame seeds, and salt. Mix them together with your hand or a spoon so the spices are evenly distributed in the flour mixture.
3. Add Wet Ingredients: To the flour mixture, add the chopped methi leaves. Also add the ginger paste (and garlic, if using) at this stage. Now make a well in the center of the mixture and spoon in the plain curd (yogurt). Drizzle about 1–2 tablespoons of oil or ghee over the flour as well.
4. Knead the Dough: Using your hand, start mixing the yogurt, oil, and flour mixture. The goal is to incorporate the wet ingredients into the dry mix. You will find the dough is coming together but still crumbly – at this point, add water a little at a time (a few tablespoons) and continue kneading. If possible, use lukewarm water for kneading; warm water helps the flours (especially bajra) bind better and yields softer theplas. Knead patiently for about 5–7 minutes, adding water as required, until you get a soft, semi-stiff dough. The dough should not be sticky (add a sprinkle of flour if it becomes too sticky) but should hold together well and feel pliable. (Tip: The methi and yogurt will release some moisture as you knead, so add water gradually to avoid a too-soft dough.)
5. Rest the Dough: Once the dough is smooth and soft (you should be able to press a finger and it leaves an indent easily), gather it into a ball. Rub a very light coat of oil/ghee on the surface to prevent drying. Cover the dough with a damp kitchen towel or a lid and let it rest for about 10–15 minutes at room temperature. This resting period allows the flours to hydrate fully and the gluten in the wheat flour to relax, which makes rolling easier and the theplas softer. (Note: Don’t let it rest much longer than 15–20 minutes, especially if you used fresh methi and yogurt, because the leaves will keep releasing water and the dough might turn too soft or sticky.)
6. Divide and Shape: After resting, give the dough a quick knead again. Then divide it into equal portions. For roughly 8–10 theplas, divide into 8–10 balls (about the size of a lemon or golf ball). Roll each portion between your palms to make a smooth ball, then flatten slightly into a patty. Keep the dough balls covered with a cloth while you work on one, so they don’t dry out.
7. Roll Out Theplas: Take one dough ball and dust it lightly with dry whole wheat flour (dusting flour prevents sticking while rolling). On a clean countertop or rolling board, gently roll out the dough into a circle of about 5–6 inches in diameter. Aim for an even thickness of about 2–3 mm (slightly thicker than a regular roti, but not as thick as a paratha). Don’t worry if the edges are not perfectly smooth – that’s the rustic charm of homemade thepla! If the dough is cracking or too tight, you might need to knead in a little more water or oil into the remaining dough balls. If it’s sticking to the board or rolling pin, dust a bit more flour. (If you find rolling difficult due to the bajra flour (since it’s gluten-free), you can roll between two sheets of parchment or plastic, or even pat it out with your fingers on a greased surface.)
8. Heat the Tawa (Griddle): While you’re rolling, place a tava/tawa (flat griddle or skillet) on the stove over medium heat. Let it heat up well. A moderately hot griddle is key – too low and the thepla will turn out hard (as it dries out slowly), too high and it might burn spots without cooking through. You can test by sprinkling a tiny bit of dry flour or water – it should sizzle gently and evaporate, indicating the pan is hot.
9. Cook the Thepla – First Side: Carefully lift the rolled thepla and place it on the hot tawa. Let it cook for about 30–40 seconds or until the bottom side starts to look opaque and you see a few tiny blisters or it changes color slightly. You might also see faint steam escaping.
10. Flip and Cook Other Side: Using a spatula, flip the thepla to the other side. Now cook this side for another 30 seconds. At this stage, you typically won’t have brown spots yet – that’s okay. We do a quick partial cook on both sides before adding oil/ghee, which ensures it cooks evenly through.
11. Apply Oil/Ghee and Roast: Drizzle or brush a small amount of oil or ghee (about 1/2 tsp) around the edges of the thepla and on the surface. Gently press and rotate the thepla with the spatula so it fries in the oil/ghee. You’ll see golden-brown spots appearing. Flip the thepla again, and apply a little oil/ghee on the other side as well, cooking that side. Press down slightly on the edges or any parts that seem uncooked. Each side should cook for another minute or so with the oil until nicely cooked through with brown speckles. The thepla should be well-cooked but still soft and pliable. Adjust the heat between medium to medium-high as needed; if you see it browning too fast, lower the flame a bit.
12. Repeat for All Theplas: Remove the cooked thepla and place it on a plate (or a roti basket lined with a cloth or paper towel to keep it soft). Proceed to roll and cook each of the remaining dough balls in the same way. It helps to roll the next one while one is cooking, to save time. If you’re not fast at rolling, you can also roll all the theplas first and keep them separated (so they don’t stick) under a cloth, then cook in batches. Keep the stack of cooked theplas covered so they stay warm and moist.
13. Serve Hot: Once all are done, your methi bajra theplas are ready to be devoured! They should be soft to tear, speckled with beautiful green methi bits and browned spots of flavor. Serve them fresh off the tava for the best experience. (Serving suggestions below!)
Tips for Softness, Storage, and Reheating
Keeping Theplas Soft: For the softest theplas, be generous with the moisture and fat in the dough. The combination of yogurt and a bit of oil/ghee in the dough works wonders for softness. Also, using warm water to knead (instead of cold) helps the dough become more pliable. Don’t skip the resting step; resting the dough allows the millet and wheat to fully absorb moisture. Finally, cook on medium heat – this ensures the thepla cooks through without becoming too crispy or hard. The moment you see golden spots and it’s cooked, take it off the pan; over-cooking on a low flame can dry them out.
Softness Trick from Grandma: My grandma’s tip for ultra-soft theplas – after cooking each thepla, stack them and wrap them in a clean kitchen towel for a few minutes. The steam softens them further, and they stay pliable. You can also apply a dab of ghee on each hot thepla as you take it off the tawa – this keeps them moist and adds rich flavor.
Storage (Short Term): Methi Bajra Theplas are an excellent make-ahead dish. Once they cool to room temperature, store them in an airtight container or a zip-lock bag. At room temperature, they stay good for 2 days easily. If it’s summer or very humid, or if you need to store longer, keep them in the refrigerator (good for about 5-6 days). Separate each thepla with a piece of parchment or paper towel if you’re stacking many, to avoid them sticking together due to any condensation.
Can I Freeze Theplas? Absolutely! These theplas freeze well, making them great for meal prep. To freeze, cool them completely, then stack with parchment paper between each thepla (this prevents them from freezing into a block). Place the stack in a freezer-safe bag, squeeze out excess air, and freeze. They can last about 1-2 months frozen. When you crave thepla, just take out as many as needed.
Reheating: To reheat refrigerated or frozen theplas, the best method is on a hot tawa/skillet. Warm the tawa on medium, then heat each thepla for ~30 seconds on each side until it’s soft and heated through. You can brush a tiny bit of ghee or oil if you want to refresh the gloss and softness. If you’re in a hurry, you can microwave the thepla: place it on a microwave-safe plate, cover with a damp paper towel (this prevents drying out), and microwave for 10-15 seconds (longer if frozen, about 30 seconds, checking in between). The damp towel steams it lightly, making it soft again. After microwaving, if it feels a bit moist, you can quickly toss it on a hot pan for a few seconds to get that slight toasty finish back.
Avoiding Spoilage: Because these theplas contain fresh methi and yogurt, avoid keeping them in very hot conditions for too long (to prevent spoilage). For travel or longer shelf life, some people omit yogurt and use only water and more oil, but the combination of bajra and methi really tastes best with yogurt. Using hung curd (thicker yogurt with less water content) can also help them stay good longer if carrying for travel.
Serving Suggestions
Methi Bajra Thepla is a versatile bread – it can be enjoyed in many ways. Here are my favorite serving ideas to make a simple thepla meal exciting:
Classic Pickle and Chai: The quintessential way to enjoy thepla is with a side of spicy pickle. Mango pickle (methia keri or chundo for a sweet twist) or lemon pickle pair beautifully with the gentle bitterness of methi in the thepla. Wash it down with a hot cup of masala chai (tea) – the combination of warm, spicy tea and savory thepla is the ultimate comfort on a rainy morning.
With Yogurt or Raita: Serve theplas with a bowl of plain yogurt (curd) or a simple raita. The cool, creamy yogurt balances the spices. You can mix a pinch of roasted cumin and salt into the yogurt to make an instant raita. Tear off a piece of thepla, dunk it in the curd – it’s heavenly! This combo is especially great for breakfast or a light lunch.
Chutney Spread: Smear the theplas with green chutney (coriander-mint chutney) or garlic chutney for an extra burst of flavor. You can even roll them up with a layer of chutney inside for a quick snack on-the-go. The fresh herbaceous chutney highlights the fenugreek’s flavor.
Subzi or Curry: Though typically eaten on their own or with light sides, you can also pair thepla with a sabzi (vegetable dish) or potato curry. Dry potato sabzi (like jeera aloo) or even a yogurt-based curry goes well – it turns it into a more filling meal.
On-the-Go Wrap: Get creative and use methi bajra theplas as a base for a wrap! They are pliable enough. For example, wrap one around some sautéed veggies or a scrambled paneer bhurji, and you have a nutritious roll for lunch. This is how I pack them for road trips – rolled with a simple potato filling, they stay mess-free and yummy.
No matter how you serve them, always try to reheat or toast the theplas lightly if they’ve cooled, because they’re at their best when warm and soft. And if you’re serving to guests, add a dollop of butter on top of a stack of hot theplas – watch their eyes light up at the sight of melting butter on those golden flatbreads!
Why I Love It
Methi Bajra Thepla isn’t just food, it’s emotion for me. Here’s why this recipe has a special place in my heart:
Nostalgic Comfort: I love it for the memories it carries – each bite takes me back to cozy monsoon mornings at my grandmother’s home. The sense of warmth and love I felt then is rekindled every time I make these. There’s something deeply comforting about cooking a traditional family recipe while rain drizzles outside.
Wholesome & Healthy: I adore how wholesome this thepla is. With nutrient-rich bajra (full of fiber, iron, and antioxidants) and vitamin-packed methi leaves, it’s a powerhouse of nutrition disguised as a treat. It proves that healthy food can be deliciously satisfying. The use of millet flour makes it filling and energizing, perfect for starting the day or keeping one satiated during a busy day.
Flavorful and Versatile: Thepla might look simple, but it’s bursting with flavor – from the slight bitterness of fenugreek balanced by the spices and the slight tang from yogurt. I love that you can enjoy it in so many ways (with pickles, chutneys, or just on its own). It’s equally good for breakfast, a quick snack, or a travel meal. I’ve taken theplas on long train journeys, road trips, and even flights – they travel well and always taste like home.
Seasonal Joy: While methi is best in winter, I particularly cherish making this during the rainy season. Something about the earthy bajra and fenugreek aroma mixes with the petrichor (the smell of rain-soaked earth) – it’s like the weather and food are in perfect harmony. It’s my personal ritual to cook these on the first rain of the monsoon. That first soft bite, with rain tapping on the window and a hot chai in hand… it’s pure bliss and makes me fall in love with cooking all over again.
In short, Methi Bajra Thepla is more than a recipe – it’s a hug on a plate. It brings together the goodness of traditional ingredients and the love of generations. I hope when you try it, you’ll fall in love with it just as I have!
In my childhood summers, raw mangoes were a prized ingredient in our kitchen. When the sun was blazing, my mother knew exactly how to turn that heat into comfort: with a pot of tangy Raw Mango Dal simmering on the stove. She’d toss tart green mango pieces into creamy yellow lentils, and the whole house would fill with a mouthwatering aroma. One sip of that sour-and-spiced dal and I’d be instantly refreshed – it was like summer vacation served in a bowl, bringing a smile to my sun-tired face every time.
Raw Mango Dal is a seasonal Indian lentil dish that combines the protein-packed goodness of dal with the bright tang of unripe mango. It’s especially popular during mango season in many regions of India. (In Andhra, for example, a similar mango dal is known as mamidikaya pappu, and in Bengal, aamer dal.) Essentially, we cook lentils like toor dal or moong dal with chunks of raw green mango so that the dal absorbs that lovely sourness. A simple tempering of spices (tadka) poured on top makes it truly sing with flavor. The result is a light, homestyle dal that’s comforting yet zesty – just the thing for hot days when you crave something soothing but also appetizing.
Ingredients (Serves 4)
1 cup toor dal (split pigeon peas) or moong dal (yellow lentils)
1 medium raw green mango, peeled and cut into chunks (about 1 cup of pieces)
2 green chilies, slit (adjust to taste)
2½ cups water (for cooking the dal, approximately)
½ teaspoon turmeric powder
Salt to taste (add after cooking the dal)
2 tablespoons ghee or oil (for tempering)
½ teaspoon mustard seeds
½ teaspoon cumin seeds
1–2 dried red chilies
¼ teaspoon asafoetida (hing)
8–10 fresh curry leaves
2 cloves garlic, sliced (optional)
½ teaspoon red chili powder (optional, for extra heat & color)
1. Pressure Cook the Dal & Mango: Rinse the dal a couple of times under water. In a pressure cooker, combine the rinsed dal, raw mango pieces, green chilies, turmeric, and about 2½ cups of water. Cook for 3–4 whistles (or until the dal is soft and mushy). If you don’t have a pressure cooker, boil the dal in a pot until the lentils are very tender (this may take 30–40 minutes, adding more water as needed). Allow the pressure to release naturally.
2. Mash & Adjust Consistency: Once the dal is cooked and soft, open the cooker and gently mash the dal with a spoon or whisk to your desired consistency. The cooked mango will be very tender and will mostly blend into the dal, adding a tangy flavor. If the dal looks too thick, stir in a bit of hot water to thin it out. Now add salt to taste. Keep the dal on low heat, simmering gently, while you prepare the tempering.
3. Prepare the Tadka (Tempering): In a small pan, heat the ghee or oil over medium heat. Add the mustard seeds and cumin seeds and let them splutter for a few seconds. Then add the dried red chilies, garlic slices (if using), and curry leaves. Sauté for about 30 seconds until the garlic turns lightly golden and the spices release their aroma (be careful, the curry leaves will crackle!). Turn off the heat and stir in the asafoetida. If you want an extra kick of heat and color, add the red chili powder now, stirring it into the hot oil (this prevents it from burning).
4. Combine & Serve: Carefully pour this hot tempering over the simmering dal. You should hear a satisfying sizzle! Give the dal a good stir so all that spiced ghee/oil blends in. Let the dal simmer together with the tempering for another 1–2 minutes to let the flavors meld, then turn off the heat. Sprinkle the chopped fresh coriander on top. Your Raw Mango Dal is ready – serve it piping hot with your favorite accompaniments and enjoy the tangy goodness!
Tips for Perfect Raw Mango Dal
Lentils: You can use either toor dal or moong dal for this recipe, or even a mix of both. Toor dal gives a slightly thicker, earthier base, while moong dal makes the texture a bit lighter and silkier. Both absorb the mango flavor well – so choose based on your preference or what’s on hand. (If using moong dal, you might not need to pressure cook as long since it softens faster.)
Tanginess: The tanginess of the dal will depend on your mango’s sourness. Feel free to adjust the amount of raw mango to your taste – if you want it extra tangy, add a few more mango pieces, and if your mango is very sour or you prefer a milder tang, you can use a little less. Pro tip: If the cooked dal turns out too sour for your liking, stir in a pinch of sugar or jaggery. It won’t make the dal sweet, but it will balance the sourness nicely without dulling that mango flavor.
Thickness: For a thicker, more porridge-like dal, mash the lentils well and simmer a bit longer to evaporate some water. For a thinner, soupier dal, add a little more water when cooking or after and don’t mash the lentils completely. You have complete control over the consistency – so make it as hearty or as light as you prefer. Remember, the dal will also thicken a bit as it cools, so aim slightly thinner if you plan to serve it later.
Flavor: Using ghee for the tempering gives a lovely rich aroma and taste (that nutty fried garlic and cumin in ghee is heavenly). If you’re vegan or want to keep it lighter, use any neutral cooking oil – it will still be delicious. Don’t skip the curry leaves and asafoetida if you can help it; even a small pinch of hing and those few curry leaves add an authentic depth of flavor that makes the dal taste like grandma’s recipe. Adjust the chilies to your heat preference – green chilies give a fresh heat while dried red chilies add warmth and a smoky touch. And if you love garlic, that optional sliced garlic in the tadka really brings an extra homestyle warmth to the dish.
Serving Suggestions
Classic Rice Meal: Raw Mango Dal is best enjoyed with plain steamed rice. Ladle the hot, tangy dal over a mound of rice, add a little drizzle of ghee on top, and serve it with a crispy papad and a side of spicy pickle (mango or lime pickle pairs exceptionally well). This combination of soft rice, sour dal, crunchy papad, and fiery pickle is simple yet absolutely satisfying – a classic summer comfort meal in many Indian homes.
Roti or Paratha: You can also relish this dal with chapatis, rotis, or parathas. Because it’s on the thinner side compared to gravies, make sure to cook the dal a bit thicker if you plan to scoop it up with bread. The tangy lentils make a great accompaniment to whole wheat flatbreads, especially when paired with a dry vegetable sabzi or a potato fry on the side. It’s a wonderful change from the usual dal sabzi routine and perks up your everyday dinner or lunch plate.
In a Thali: Include Raw Mango Dal as part of a larger summer thali (platter). It goes wonderfully next to other dishes like a light veggie stir-fry, maybe a cucumber salad or raita, and some jeera rice or pulao. The dal’s bright flavor can really balance richer dishes. And if you’re like me, you might even enjoy slurping a little bowl of this dal like a soup – it’s light and refreshing enough for it! However you serve it, make sure to have some extra papads or fryums on hand, because everyone will want something crunchy to munch with this tasty dal.
Why I Love It
I love Raw Mango Dal because it tastes like summer in a bowl. It’s amazing how a simple everyday dal transforms into something special just by adding a few pieces of raw mango. The moment that tangy mango hits the pot, it fills the kitchen with an irresistible aroma – a signal that my favorite time of year has arrived. Each spoonful is a beautiful balance: the comforting, creamy texture of lentils on one hand, and a zingy, mood-lifting sharpness on the other. It’s the dish that cheered me up on many a sweltering afternoon as a kid, and to this day, it never fails to make me happy. When I miss home or when the heat saps my appetite, I know I can cook up this dal and instantly bring back both my appetite and a flood of sweet summer memories. 🌼
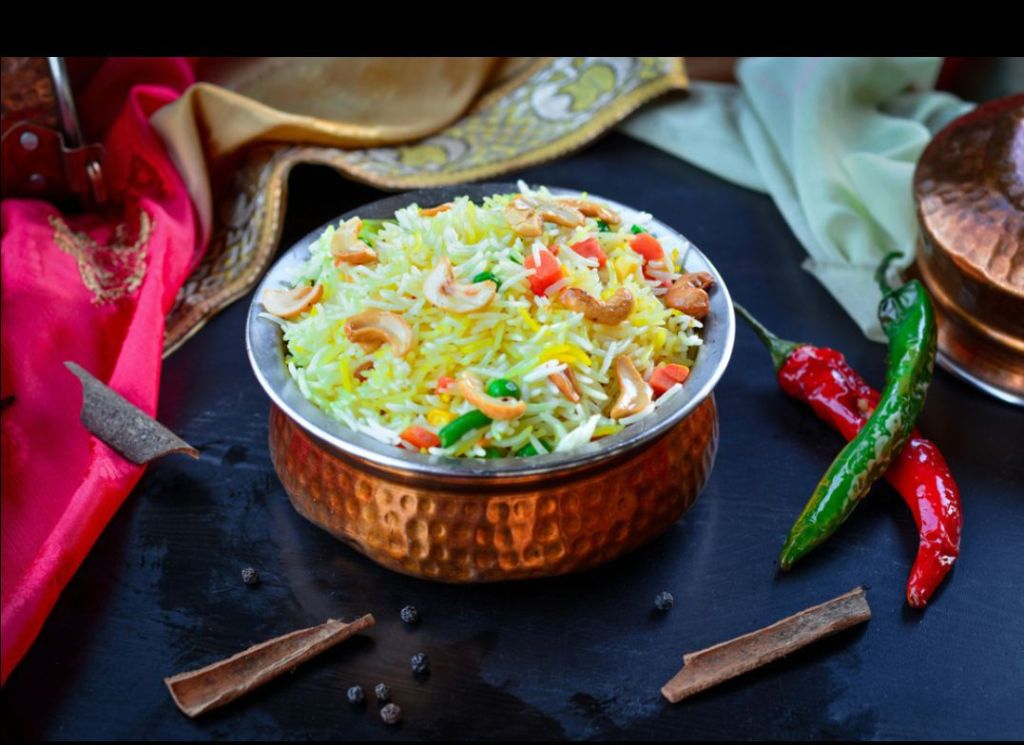
Dum-style Hyderabadi Vegetable Biryani is more than just a dish—it’s a warm hug from the kitchen. I still remember festive Sundays at my grandma’s house when a sealed handi of biryani would slowly cook on the stove, infusing the whole home with saffron, spices, and the scent of caramelized onions. Biryani was traditionally reserved for celebrations, and as it cooked under a dough-sealed lid, the anticipation built. Every time I lift that lid now, I’m taken back to those childhood moments and smiling faces around the table. The blend of fragrant rice, spiced vegetables, and herbs makes every bite nostalgic and comforting.
Juice of ½ lemon (to help keep rice grains separate)
Salt, to taste
For the Vegetable Marinade
1 cup plain yogurt (dahi)
2 tbsp ginger-garlic paste
2–3 green chilies, finely chopped
1 tsp chili powder
½ tsp turmeric powder
2 tsp garam masala (or biryani masala)
1 tsp coriander powder
Juice of 1–2 lemons
Salt, to taste
¼ cup fried onions (birista)
¼ cup chopped mint leaves
¼ cup chopped cilantro (coriander leaves)
Vegetables (about 1.2–1.5 kg total)
2 potatoes, cut into 1½-inch cubes
1 cup cauliflower florets (gobi)
1 cup carrot, chopped
1 cup green beans or French beans, chopped
1 cup green peas (fresh or frozen)
1 capsicum (bell pepper), cut into strips
(Optional: mushrooms, capsicum – for variation)*
For the Saffron-Milk Layer
10–15 saffron strands (soaked)
¼ cup warm whole milk (to steep saffron)
Few drops of rosewater (optional, for aroma)
2–3 tbsp ghee or melted butter
Method
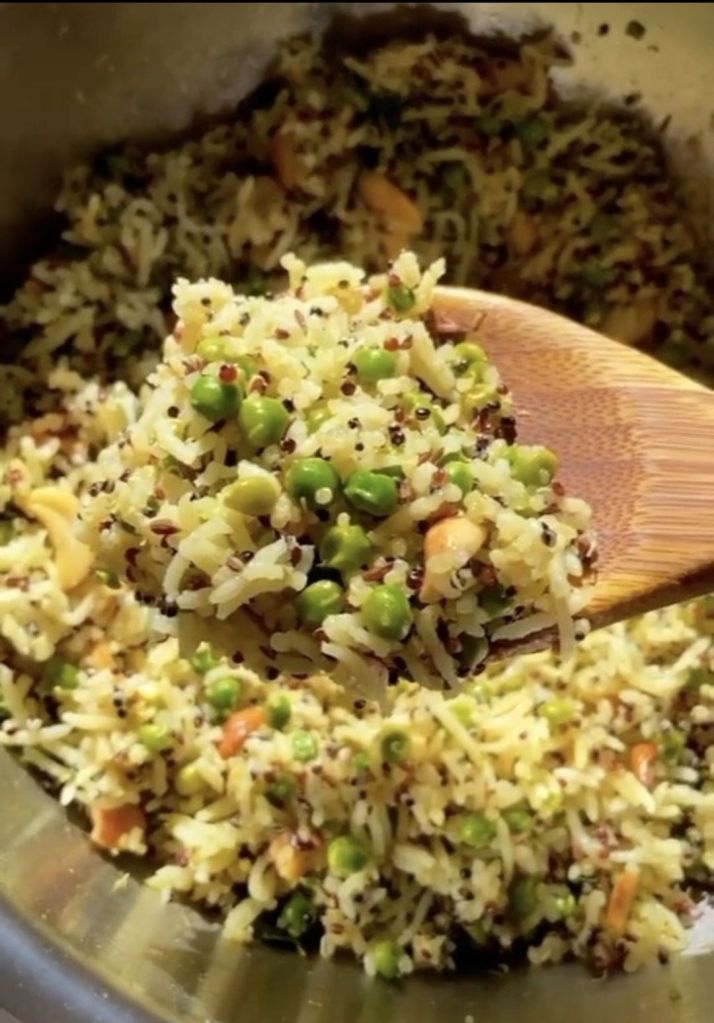
1. Marinate the Vegetables. In a large bowl, whisk together yogurt, ginger-garlic paste, chopped green chilies, lemon juice, chili powder, turmeric, coriander powder, garam masala, salt, chopped mint, and cilantro. Add the chopped vegetables (potatoes, carrots, beans, peas, cauliflower, bell pepper) and toss to coat them completely. Cover and let the veggies marinate for at least 15–30 minutes (even a quick 15-minute soak lets the spices meld).
2. Cook the Vegetable Masala. Heat 2 tablespoons ghee or oil in a heavy-bottomed pan over medium heat. Sauté sliced onions until golden brown – this caramelization (Maillard reaction) adds sweet, savory depth. Add a bit of salt to help them sweat. Stir in capsicum strips and fry briefly. Now pour in the marinated vegetables along with all the marinade. Stir well and cover the pan. Cook on medium heat for about 10 minutes, until the veggies are almost tender but still hold their shape. This forms your flavorful biryani base.
3. Parboil the Rice. Rinse the basmati rice under cold water until the water runs clear, then soak it for 30–45 minutes. In a large pot, bring water to a boil. Add whole spices (bay leaves, cinnamon, cardamom), a teaspoon of caraway or cumin, and a teaspoon of ghee for fragrance. Squeeze in lemon juice and salt. When the water boils vigorously, drain the soaked rice and add it to the pot. Cook the rice until it’s about 70–80% done – the grains should still have a slight bite. Drain the rice immediately to halt cooking (rice will finish in the dum).
4. Layer the Biryani. Grease the bottom of a heavy pot or handi with a little oil. Arrange a layer of tomato slices on the bottom – this traditional trick prevents sticking and adds moisture. Spread the cooked vegetable masala evenly over the tomatoes. Sprinkle half of the fried onions, mint, and coriander leaves on top of the veggies. Now add the rice in an even layer over the vegetables. Finally, top with the remaining fried onions, mint, and coriander.
5. Infuse with Saffron and Seal. Warm the milk in a small pan and steep the saffron strands in it (grinding the saffron first releases more color). Add a drop of rosewater if using. Gently pour the saffron-infused milk over the top of the rice, letting it seep through in golden rivulets. Drizzle the last bit of melted ghee or butter over everything. Seal the pot tightly with a heavy lid. Traditionally, a dough seal (chapati dough around the rim) locks in steam.
6. Dum Cook. Place the sealed biryani pot on a hot tawa (griddle) or directly on low heat. Cook on a gentle flame for about 20 minutes – this is the “dum” process. You’ll see a little steam trying to escape at the sides when it’s done. Turn off the heat and let the pot rest, unopened, for another 10–15 minutes (the flavors continue to meld, and the rice firms up). Avoid peeking too soon!
7. Serve with Accompaniments. Carefully mix (fluff) the rice and vegetables together just before serving. Serve this fragrant Dum Hyderabadi Vegetable Biryani hot, accompanied by cooling cucumber-mint raita and spicy Mirchi ka Salan (Hyderabadi chili-peanut curry). A simple kachumber salad of chopped cucumber, tomato, and onion (dressed with lemon) or crisp papadums make nice sides too.
Tips for Perfect Biryani
Choose and Prepare the Rice Right: Always use good-quality aged basmati rice – the longer it’s aged, the stronger and more fragrant its aroma. Soak the rice before boiling to keep grains fluffy. Add a splash of lemon juice and a little fat (ghee or oil) to the boiling water; this keeps the grains separate and non-sticky.
Caramelize Onions Thoroughly: Don’t rush the onions. Cook them until they are a deep golden-brown. The natural sugars caramelize, giving the biryani its rich sweetness and depth.
Layer Thoughtfully: Grease the pot and use tomato or potato slices at the base to prevent burning. Alternate layers: veg mix, then herbs/onions, then rice, then garnish. This ensures even flavor distribution and beautiful color marbling.
Seal and Cook on Dum: Seal the pot well with dough or tight foil – trapping the steam is key. Cook on the lowest flame possible to avoid scorching the bottom. A heavy-bottomed pot helps distribute heat gently.
Infuse with Saffron and Herbs: Don’t skip saffron! Soak strands in warm milk (or water) and sprinkle it over the rice for gorgeous color and aroma. A few drops of rosewater or kewra water can also add that authentic floral note.
Let it Rest: Once cooked, let the biryani sit off the heat for a while (still sealed). This resting period (even 10–15 minutes) lets the flavors settle and makes the rice absorb the steam fully. In fact, Hyderabadi biryani often tastes even better a bit later – it’s a true comfort food that evolves as it rests.
Spice Blend: Using freshly ground biryani masala or garam masala makes a difference. Fresh spices have more potency than store-bought powders.
Serving Suggestions
Cooling Raita: A dollop of cucumber-mint raita or boondi raita complements the heat of the biryani. The yogurt and cucumber cool your palate and add a creamy texture.
Mirchi ka Salan: A traditional Hyderabadi side, this spicy chili-and-peanut curry is almost synonymous with biryani. Its tangy, nutty flavor cuts through the rich rice.
Fresh Salad: A simple kachumber of chopped tomato, cucumber, and onion tossed with lemon and a pinch of salt adds freshness.
Pickles & Papad: Indian mango or lime pickle and crisp papadums are easy extras to round out the meal.
Why I Love It
This Dum-Style Veg Biryani holds a piece of my heart. It’s the family favorite on any special occasion or lazy weekend – from festive Eid lunches to relaxing Sunday dinners. I love that it’s a one-pot wonder that brings everyone together; while it’s cooking, the whole house fills with warm, inviting aromas. When I was little, I’d sneak into the kitchen just to catch a whiff of saffron and spices escaping the pot. Sharing the first bite with loved ones – rice steaming on your fork, crisp fried onions melting with every mouthful – feels like a celebration. It’s a humble dish that makes any day feel special, reminding me of home and warmth. Every time I make it, I taste those memories, and it never fails to make me smile.
I grew up eating lemon rice on sunny days and packed lunches. The tangy lemon and warm spices always feel like comfort food – it’s the dish that takes me right back to childhood. I remember summer picnics and train trips where this zesty rice was a staple, somehow staying fresh all afternoon thanks to the turmeric. Now I’ve given the classic a fun twist with golden roasted garlic and sweet green peas, making it even more irresistible. Just serving it up seems to lift everyone’s mood with its bright aroma and color.
Ingredients
2 cups basmati rice (or any long-grain rice)
2 tbsp oil (coconut oil or vegetable oil)
1 tsp mustard seeds
1 tbsp chana dal (split chickpeas; optional for crunch)
1 tbsp urad dal (split black lentils; optional)
A pinch of turmeric powder (for color and preservative benefits)
4–5 cloves garlic, thinly sliced
1 cup green peas (fresh or frozen)
10–12 curry leaves
1–2 green chilies, slit (optional for heat)
½ tsp asafoetida (hing; optional)
3–4 tbsp lemon juice (freshly squeezed; adjust to taste)
Salt, to taste
2 tbsp roasted peanuts or cashews (optional garnish)
Fresh cilantro leaves, chopped (optional garnish)
Preparation
1. Cook the rice: Rinse the rice under cold water until it runs clear. In a pot, combine the rice with 4 cups water (a 2:1 water-to-rice ratio), ½ tsp salt, and ½ tsp turmeric (for the sunny color and gentle preservative effect). Bring to a boil, then cover and reduce heat. Simmer for about 15–20 minutes, or until the rice is tender. Turn off the heat and let it sit, covered, for a couple of minutes. Fluff the rice gently with a fork and spread it on a platter or tray to cool slightly – this extra step prevents the grains from clumping.
2. Make the tempering: In a pan, heat the oil over medium heat. When the oil shimmers, add the mustard seeds and let them pop. Add the soaked chana dal and urad dal and fry until they turn golden brown. Toss in the curry leaves and green chili, which should sizzle immediately. Add the sliced garlic and sauté for just a few seconds until it’s fragrant and lightly golden (be careful not to burn it). Stir in a pinch of asafoetida and another ¼ tsp turmeric for color, then immediately turn off the heat.
3. Add peas: Stir in the green peas and a bit of salt. Cook only until the peas are just tender (about 1–2 minutes). If you’re using roasted peanuts or cashews, add them now and mix them through.
4. Combine rice and lemon: Turn off the heat completely, then add the cooked (and cooled) rice to the pan (or pour the tempering into the rice bowl). Drizzle the lemon juice over the rice (about 2–3 tablespoons to start) and gently fold everything together so the lemony tempering coats the rice. The grains should turn a pale yellow. Taste and add more salt or lemon if needed, then sprinkle chopped cilantro on top.
5. Fluff and serve: Using a fork or spatula, gently fluff the rice so the grains stay separate. Serve the rice warm alongside your favorite sides (see below).
Tips for Flavor and Texture
Rinse thoroughly: Rinsing rice removes excess starch, which helps the grains stay separate.
Add acid early: Try adding a little lemon juice to the cooking water (about ¼ teaspoon). This trick brightens the rice’s color and helps prevent clumping.
Coat with fat: Stir a tablespoon of oil or butter into the rice before or during cooking. The fat coats the grains so they slide past each other instead of sticking together.
Cool before lemon: Let the rice cool for a few minutes after cooking. Avoid squeezing lemon juice into very hot rice or tempering, as heat can mute the lemon’s bright flavor and diminish some nutrients.
Fluff gently: Once mixed, fluff the lemon rice carefully with a fork. This keeps the texture light and airy.
Season to taste: Start with 2–3 tablespoons of lemon juice for 2 cups of rice and adjust from there. Always taste and tweak salt and lemon at the end to match your preference.
Serving Suggestions
Yogurt or Raita: A spoonful of plain yogurt or cooling cucumber raita complements the tanginess.
Pickles & Chutneys: Tangy pickles (mango, lime) or chutneys (tomato, mint) add extra zing.
Crispy Sides: Serve with crunchy papadams, roasted peanuts, or simple fried snacks (like masala vadas).
Warm Accompaniments: This rice pairs beautifully with a lentil dal or vegetable curry. It also stands alone as a satisfying one-pot meal.
Why I Love It
I love this dish because it’s pure comfort and nostalgia. The bright yellow rice with pops of green peas always feels like a hug in a bowl. As a kid, Mom would pack it on trips—those citrusy notes and turmeric meant it stayed fresh for hours. Now, when I cook this fusion version with extra garlic and peanuts, the whole house smells like sunshine. Every bite brings a smile: it’s flavorful, wholesome, and brimming with happy memories.