Fastival Food

Enduri Pitha: A Traditional Odia Turmeric-Leaf Steamed Cake

Wrapped in fresh green turmeric leaves, Enduri Pitha is a beloved Odia delicacy steeped in culture and nostalgia.  Every Odia family recalls chilly winter mornings when elders rose before dawn to prepare this pitha for festivals like Prathamastami (the celebration of the firstborn child) and other winter pujas.  On Prathamastami, the eldest child is blessed with new clothes and prayers, and *“the main delicacy of the day is Enduri Pitha”*.  The soft fermented rice-and-urad-dal cakes are filled with a sweet coconut–jaggery mixture, then steam-cooked inside turmeric leaves.  When the spicy leaves are unwrapped, the heavenly aroma (often described as *“transporting you to an ethereal world”*) fills the kitchen.  For many, each Enduri Pitha carries memories of grandparents chanting morning prayers, the kitchen lush with earthy turmeric fragrance, and a sense of devotion and togetherness that marks the festival.

Turmeric (haldi) is considered holy in Odisha’s customs: its leaves are believed to purify and bless food.  The use of fresh turmeric leaves not only imparts aroma and a healthful touch (even giving Enduri Pitha a mild laxative effect), but also symbolizes purity and a spiritual link to nature.  Traditionally, these rice cakes were offered as Mahaprasad (sacred food) to Lord Jagannath in Puri, making them a blessed feast.  This post walks you through a step-by-step recipe for Enduri Pitha – from the fermented batter and coconut–jaggery stuffing to the sacred steaming process – along with tips, variations, and the cultural magic behind this dish.

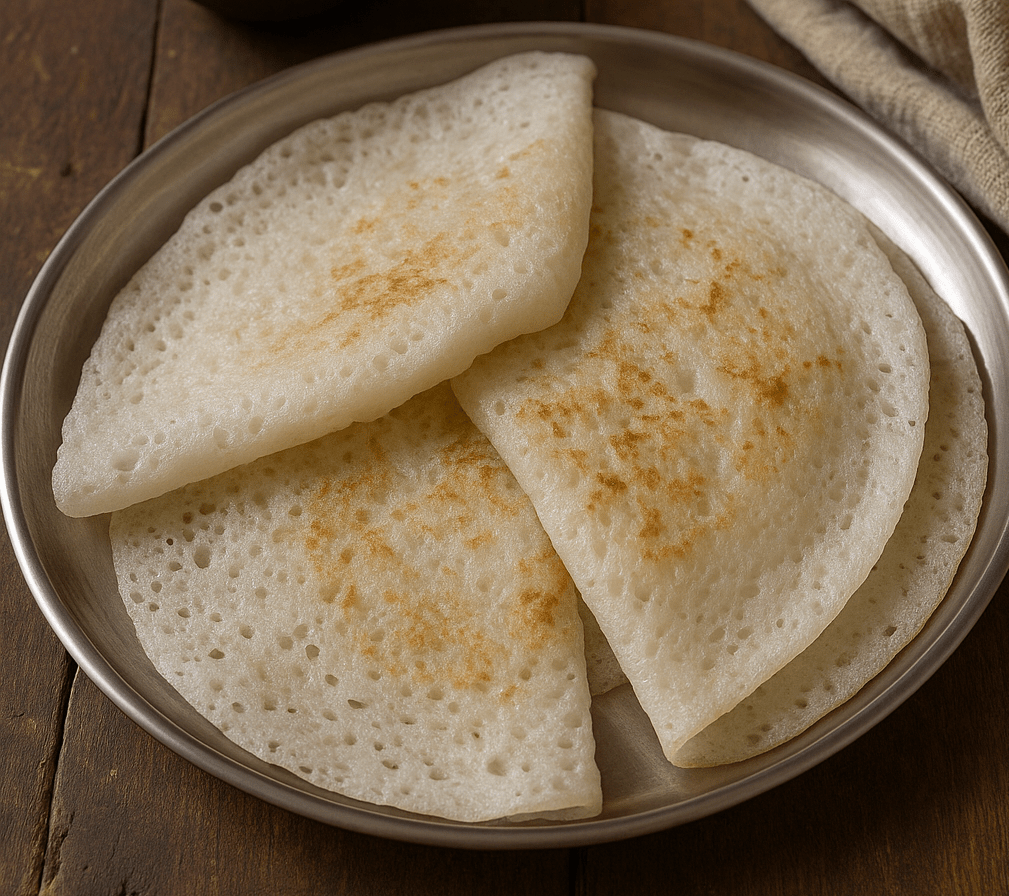
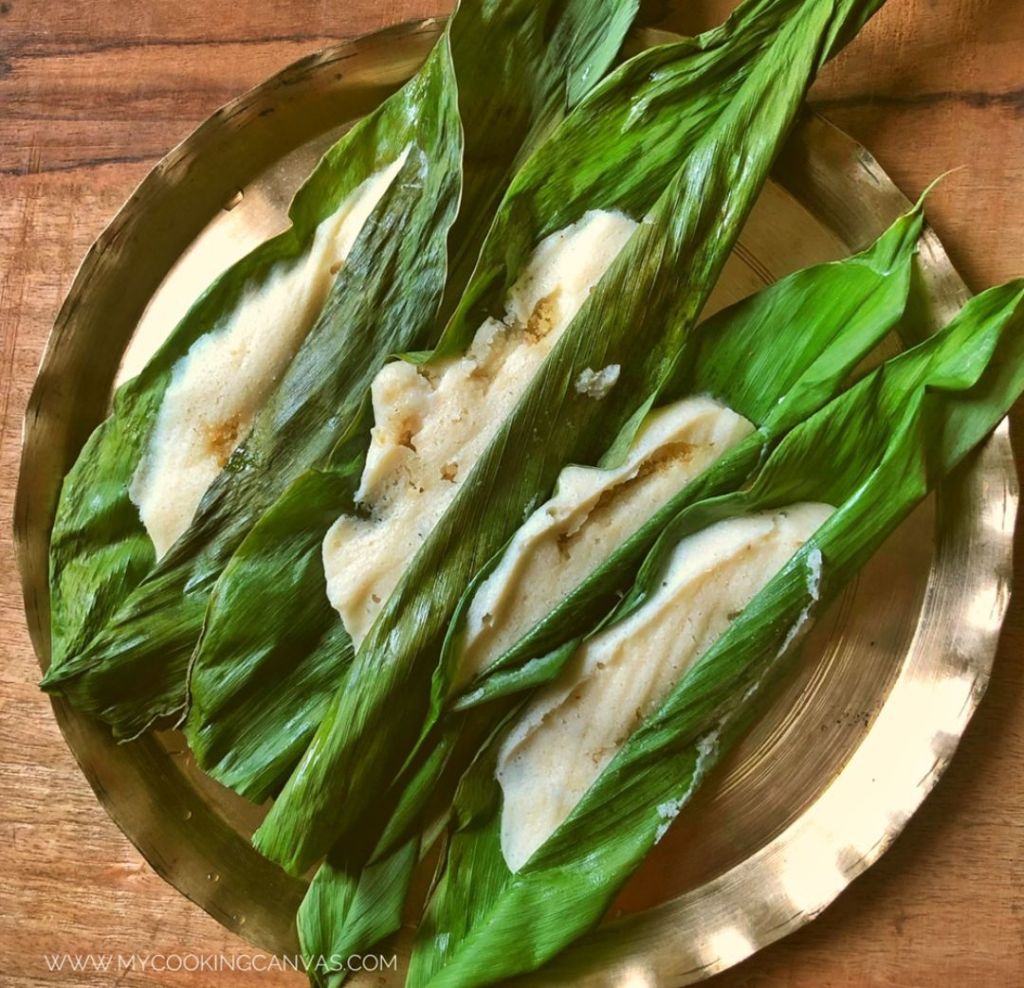
Enduri Pitha: Soft steamed cakes of rice-urad batter with sweet coconut–jaggery filling, wrapped in glossy green turmeric leaves.

Ingredients

To make about 10–12 Enduri Pithas, you’ll need:

Rice and Urad Dal: ~1 cup raw rice and ½ cup split urad dal (black gram). (You can soak them together or separately.)

Turmeric Leaves: 10–12 fresh green turmeric leaves (haldi patra). These are the envelopes that infuse fragrance. (If unavailable, large banana leaves may be substituted, though the unique aroma is then missing.)

Coconut-Jaggery Filling: 1 cup grated fresh coconut, 100–150 g jaggery (or dark jaggery/sugar to taste), and 4–6 green cardamom pods, crushed. (Some cooks also add 100 g crumbled chhena [fresh cottage cheese] and a few peppercorns to the filling for extra richness and spice.)

Seasoning: A pinch of salt for the batter; a small knob of ghee or oil to grease the leaves (optional).

Optional: A few whole black peppercorns for the stuffing (traditional).

To Steam: Water and a steamer (or large pot with a steaming setup).


These simple ingredients come together to showcase Odisha’s agrarian heritage – rice, lentils, coconut, and jaggery, wrapped in a symbol of the earth (the turmeric leaf).

Method: Step-by-Step Recipe

1. Soak and Grind Batter: Wash the rice and urad dal well. Soak them together (or separately) in enough water for at least 4–6 hours, or overnight. Drain the water and grind the dal into a fine smooth paste (adding a little water as needed). Next, add the soaked rice and grind again, leaving the rice batter slightly coarse (this is traditional). The final consistency should be similar to dosa batter – neither too thin nor too stiff.


2. Ferment the Batter: Transfer the batter to a bowl, stir in a pinch of salt, and cover. Let it ferment in a warm place for 5–8 hours (or overnight). In warm weather, fermentation happens faster (5–6 hours); in cooler climates, you might ferment longer or use a warm oven to help. Fermentation gives the pitha a light tang and fluffiness reminiscent of idli. When done, the batter will have risen slightly and feel a bit airy.


3. Make the Filling: While the batter ferments, prepare the sweet stuffing. In a pan over medium heat, melt the jaggery with a splash of water and bring it to a boil. Add the grated coconut and (if using) crumbled chhena, stirring constantly. Cook until the mixture starts to thicken and the coconut pieces look lightly toasted. Stir in cardamom powder and coarsely crushed peppercorns for warmth. Once the filling is moist but no longer runny, remove from heat and let it cool. The cooled stuffing should hold together slightly but still be soft.


4. Prepare the Turmeric Leaves: Wash each turmeric leaf and pat it dry. If the leaves are large, you can cut them into roughly equal strips. Lightly grease each leaf with a bit of ghee or oil – this prevents sticking and adds shine. Place a greased leaf on a flat surface (shiny side down, veins up). Using a ladle or spoon, pour a small oval of the fermented batter onto the lower half of the leaf, spreading it gently to about 1/4″ thickness (leaving room to fold).

Preparing Enduri Pitha: A spoonful of fermented rice–dal batter is spread on a greased turmeric leaf (on a brass plate) and topped with the sweet coconut–jaggery filling.


5. Stuff and Fold: Quickly place about 1–2 tablespoons of the coconut–jaggery mixture along the center of the batter oval. Fold the leaf lengthwise to encase the stuffing (like closing a book). You can simply fold the leaf over itself, or for extra security tie each bundle with a short kitchen thread. Tradition varies: in many Odia homes the folded pithas are tied or tucked so they stay closed while steaming. Repeat this with remaining batter, filling, and leaves.


6. Steam the Pithas: Arrange the folded pithas in a steamer basket or in an idli steamer tray. (If you don’t have an idli stand, you can improvise: line a wide pot with a clean cotton cloth stretched over the rim, place the pithas on the cloth, and fold the cloth to cover them.) Steam over boiling water for 10–15 minutes on high heat, or until the pithas look set and a toothpick inserted into the rice layer comes out clean. The turmeric leaf will darken and stick slightly to the rice, but it can be easily peeled off after cooking.


7. Cool and Serve: Remove the pithas from the steamer and let them sit a few minutes. To serve, gently peel back the turmeric leaf from each pitha – the hot pitha should slide out in one piece. Serve these warm or at room temperature. The steamed cake will be soft and fluffy; the filling melts in your mouth. They are traditionally eaten directly (no accompaniments needed), often on banana leaves or brass plates for an authentic touch.


Tips & Variations

Leaf Alternatives: If fresh turmeric leaves are scarce (they can be seasonal), use large banana (plantain) leaves as a substitute. The pitha will still steam beautifully, but it will lack the special turmeric aroma. You might also reuse each turmeric leaf 2–3 times before it withers, taking care to wash and pat it dry between uses.

Grease the Leaves: Rubbing a little ghee on the leaves before adding batter prevents sticking and adds a rich flavor. This tip keeps your pithas intact when unwrapping.

Stuffing Variations: The classic filling is coconut and jaggery, flavored with cardamom (and sometimes a hint of black pepper). For a twist, some cooks add chhena (cottage cheese) to make the filling even richer. You could also mix in toasted nuts or raisins for texture. Conversely, you can omit chhena for a purely coconut version as shown here. Just keep the proportions roughly 1:1 coconut to jaggery so the mixture isn’t too sweet or greasy.

Batter Consistency: Aim for a pourable but thick batter, similar to a traditional idli/dosa batter. It should be spreadable on the leaf. If it ferments too much and becomes very airy, gently fold it to deflate some bubbles. If it’s too thick, add a tablespoon of water.

Steaming Setup: If you have an Idli steamer, you can place the wrapped pithas in the idli molds (they may need to be folded slightly to fit). Otherwise, a pot method works: stretch a clean muslin cloth over a deep pot, secure it, and lay the pithas on top, covering with a lid. Either way, ensure there’s sufficient water below to boil for 10–15 minutes. The goal is gentle steam, not boiling the bottom of the leaves.

Make Ahead: You can prepare the batter and stuffing a day ahead (refrigerating the cooked stuffing). On the festival morning, assemble and steam. Steamed pithas keep well at room temperature for a day (in cold weather) or 1–2 days refrigerated. Warm slightly before serving if needed.


Cultural & Spiritual Significance

Enduri Pitha is more than food – it’s a ritual of devotion and family bonding. In Odisha, special dishes on festivals are offerings to God, and steamed dishes like this are considered pure (sattvic). The bright turmeric leaves symbolize the earth and purity, while the slow steaming method (with no oil or harsh ingredients) reflects sattvik cooking that nourishes both body and soul. As one writer observes, a mother’s careful preparation of these pithas is almost “like artwork in progress” – a gesture of love and reverence passed down through generations.

During Prathamastami, every step carries meaning: the maternal aunt sends turmeric leaves and jaggery as blessings, elders perform prayers and aarti for the firstborn, and Enduri Pitha is offered not only to God but also to the child. In many homes, a dollop of pitha is first placed on an idol or plate of Goddess Durga before being shared by the family. Eating Enduri Pitha, then, is both a treat and a prayer – wishing health and longevity for the child. The humble, natural ingredients (rice, dal, coconut, jaggery) used in this Maharabadi feast connect the family to the land and the rhythms of Odia tradition.

As the elders say in Odisha, these 13 festivals a year (one more than the months) are threads that weave families together. When the kitchen fills with the sweet-spicy steam of Enduri Pitha, it reminds us of those ties. Each unwrapped pitha carries the warmth of home, the blessings of ancestors, and the taste of devotion.

Whether you’re celebrating Prathamastami or simply craving a fragrant winter snack, this Enduri Pitha recipe brings a piece of Odia heritage to your table. Enjoy each bite with gratitude and share it with loved ones – after all, in Odia culture, food is love, faith, and family all wrapped up in one leaf.

Breakfast, Fastival Food

Traditional Chakuli Pitha – An Odisha Festival Pancake

Pancake and a Prayer: Devotion in Odia Kitchens

Chakuli Pitha (Odia: ଚକୁଳି ପିଠା) is a flat fermented rice-and-urad-dal pancake that epitomizes the taste of Odisha. This humble pancake is beloved across generations, and on festival mornings its aroma is as comforting and revered as a prayer. In my family home, the first hiss of chakuli on the tawa at dawn meant a celebration was underway – a joyful signal to the village that the women had rested and the day of feasting had begun.

On special occasions like Raja Parba or Pana Sankranti, chakuli pitha is as sacred as any offering. It is customary to offer these tender cakes to Goddess Lakshmi on Manabasa Gurubar, weaving devotion into each bite. The gentle sourness from overnight fermentation feels both grounding and auspicious, linking us to our ancestors and the rice fields that sustain us. Every warm plate of chakuli served in our home carries these loving memories – golden discs that taste of tradition and togetherness.

Chakuli Pitha Recipe

Ingredients:

2 cups parboiled rice (aruarua chaula)

1 cup whole white urad dal (biri dal)

½ tsp salt (or to taste)

Water, for soaking and grinding

Ghee or mustard oil (for cooking)


Steps:

1. Soak & Grind: Rinse the rice and urad dal. Soak them separately in water for 4–6 hours. Drain and grind each to a smooth batter (you can add a little water). Mix the two batters together, add salt, and whisk well until smooth.


2. Ferment: Cover the batter and let it ferment in a warm place for 8–12 hours (overnight is ideal). The batter will rise and develop a light sour aroma – a sign it’s ready.


3. Cook Chakuli: Heat a cast-iron tawa or heavy skillet on medium heat. Grease it lightly with ghee or mustard oil (traditional choices). Pour a ladleful of batter onto the hot tawa and gently spread it into a circle about 5–6 inches wide. Cover and cook for 2–3 minutes. Bubbles will form and edges will lift. Carefully flip (or fold) and cook another minute. The chakuli should be golden and spongy. Repeat with remaining batter.


4. Keep Warm: Stack the hot chakuli on a plate. If you like, smear a little ghee on top so they stay moist and flavorful.


Tips for Perfect Chakuli

Batter Consistency: The batter should pour smoothly but be slightly thicker than dosa batter. Too runny and it won’t hold shape; too stiff and it won’t ferment evenly. A good test is that it coats the ladle and falls slowly. Aim for a pourable, yet thick, consistency.

Fermentation: Warmth is key. Let the batter rest in a mildly warm corner of the kitchen. The ideal is around 25–30°C. In cooler climates, place the covered batter inside a turned-off oven with only the light on – the gentle heat will encourage fermentation. You’ll know it’s properly fermented when it smells slightly tangy.

Cooking: Preheat the skillet well so the chakuli cooks through. After pouring the batter, always cover with a lid; the steam cooks the top while the bottom crisps. Use just a teaspoon of ghee or mustard oil for each pitha to get the characteristic aroma. Avoid flipping back and forth – one flip (or none, if you prefer folding) is usually enough.

Serving Warm: Serve chakuli immediately while they’re soft. Cold chakulis tend to firm up, so keep them wrapped in a clean cloth or covered plate until serving.


Variations: Sweet and Savory Twists

Families across Odisha enjoy creative twists on chakuli. A popular sweet version is Budha (or Burha) Chakuli – literally the “grown-up” pancake – which is richer and thicker. For Budha Chakuli, a spoonful of jaggery (molasses) and grated coconut (and even mashed banana) is mixed into the fermented batter. The result is a dessert-like pancake often reserved for special days. I still remember my grandmother mashing ripe banana and stirring in coconut, turning our morning chakuli into a sweet festival treat.

In contrast, Saru Chakuli is made paper-thin, almost like a dosa. It’s spread very thin on the tawa and fried until crisp; perfect for those who love a lighter texture. Beyond these, you can simply enjoy plain chakuli pitha with spiced fillings or toppings: try folding a hot chakuli around freshly grated sweet coconut or pouring warm jaggery syrup (pani guda) over it for an instant dessert. Even a dollop of curd or coconut chutney provides a delightful contrast to the chakuli’s tang. These variations showcase the versatility of chakuli – from a simple breakfast pancake to a stuffed festival delicacy.

Serving Suggestions

Chakuli Pitha is always served hot. In Odisha, it’s common to present a stack of steaming chakulis alongside simple accompaniments. For a traditional experience, drizzle a little warm ghee on top and accompany the pitha with jaggery or sugar – the sweetness complementing its tang. Spicy sides are equally loved: we often serve chakuli with aloo dum (a potato curry) or guguni (a spiced chickpea curry). A bowl of coconut chutney, dal, or even plain yogurt also pairs nicely. In every case, the soft fermented pancake acts as a perfect vehicle for these flavors, turning humble ingredients into a hearty festival breakfast.

Every bite of chakuli pitha is a journey back to those simple, joyous mornings – a reminder that food can be an offering, a celebration, and a memory all at once. By following this traditional recipe and honoring the small rituals around it, you bring a bit of Odia devotion and nostalgia into your own kitchen. Enjoy cooking and savoring this timeless festival pancake!

Fastival Food

Singhada Chaat: A Nostalgic Navratri Fasting Snack

Every Navratri, my kitchen fills with memories of festive devotion and flavorful vrat (fasting) foods.  I remember the late-afternoon light filtering through the temple curtains as I helped my mother prepare special snacks.  After a long day of fasting and prayer, the first bite of something savory and crunchy felt like a sacred reward.  One dish that always stood out was Singhada Chaat – a crispy water-chestnut flour fritter tossed in tangy spices.  In our family, singhara (or singhada) recipes were a beloved tradition, connecting us to our elders and the spirit of the festival.

Singhada (water chestnut) flour is a gluten-free, nutrient-rich staple in many Navratri dishes.  Called singhara atta in Hindi (or pani phal in some regions), this pale flour is made by drying and grinding the crunchy water chestnut.  It’s especially valued during fasts because it provides complex carbohydrates and fiber without violating vrat rules.  In fact, during the nine days of Navratri, devotees avoid ordinary grains and instead use non-cereal flours like singhara, buckwheat and millet.  Rich in potassium and micronutrients, singhada atta helps keep energy levels up when other foods are off-limits.

In our family kitchen, Singhada Chaat was the perfect way to enjoy water chestnuts.  We would boil and mash potatoes, mix them with singhara flour, spices and a little ghee or oil, then shape the dough into small flat patties.  These were cooked on a hot griddle until golden and crispy (you can shallow-fry in oil or deep-fry as well).  Once they were done, we tossed the hot patties with fresh lemon juice, sendha namak (edible rock salt), cumin and green chili, turning them into a tangy chaat.  Each bite was crunchy and savory, with the rustic earthiness of potatoes and a subtle nutty aroma from the singhada.  Cooking this dish always felt like a prayer – comforting my hunger while honoring tradition.

Ingredients

1 cup singhara flour (water chestnut flour) – a fasting-friendly, gluten-free flour made from dried water chestnuts

2 medium potatoes, boiled, peeled and roughly mashed (boiling with sendha namak is optional)

2 tablespoons ghee or oil (for the dough and cooking)

1 teaspoon cumin seeds (jeera) – gives a warm, earthy spice (allowed in vrat)

1-2 green chilies, finely chopped (for heat)

1 teaspoon fresh ginger, grated (adds zing)

½ teaspoon coriander powder

A pinch of black pepper (or mild red chili powder) – also allowed

Sendha namak (rock salt) to taste (edible rock salt is used instead of regular salt during fasts)

Juice of ½ a lemon (for tang)

Handful of fresh coriander leaves, chopped (for garnish)

Optional garnishes: plain yogurt or curd, pomegranate seeds, roasted peanuts or broken sev – for topping (see Variations below)


These simple ingredients follow the vrat rules (no wheat, rice, onions, garlic, etc.), yet together they create a flavorful snack.  The key is using rock salt and satsvik spices (cumin, black pepper, ginger, chili) that are traditionally allowed on fast days.

How to Make Singhada Chaat

1. Prepare the dough: In a bowl, mash the boiled potatoes while they’re still warm.  Add the singhara flour, cumin seeds, chopped green chili, grated ginger, coriander powder, and a pinch of rock salt and black pepper.  Mix well.  Sprinkle a little water (or a teaspoon of ghee) and knead gently into a soft dough.  It should hold together but not be sticky – add more flour or water as needed.


2. Shape the patties: Divide the dough into small lemon-sized balls.  Flatten each ball slightly between your palms or on a piece of parchment to make mini flatbreads or tikkis about ¼–½ inch thick.  If the dough is very soft, dust your hands with a bit of singhada flour.


3. Cook until crisp: Heat a griddle (tava) or non-stick pan over medium-low heat.  Add a few drops of oil or ghee and spread it.  Place the patties on the hot pan and cook on each side for 2–3 minutes, pressing gently with a spatula so they make good contact with the heat.  They should turn golden brown and crispy.  (For a more indulgent version, you can deep-fry these patties in oil until they puff up – either way works, but roasting uses less oil.)


4. Spice and garnish: Arrange the cooked patties on a plate or shallow bowl.  Immediately squeeze fresh lemon juice over them and sprinkle a little more sendha namak and black pepper to taste.  Gently toss so the pieces absorb the seasonings.  Finally, sprinkle the chopped coriander leaves on top.  The result is a plate of golden, hearty chaat – each piece coated with zesty, peppery flavors and a hint of fresh herbs.


5. Serve hot: Serve this Singhada Chaat warm or at room temperature.  It makes a crunchy, satisfying snack or side dish. In a pinch, you can also break the larger patties into bite-size pieces and pile them like traditional chaat.


Tips & Variations

Use sendha namak: Always use sendha (rock) salt during fasts for the authentic taste. Normal table salt is avoided during vrat.

Flavor boosters: Feel free to add ½ tsp cumin powder for extra depth, or a pinch of chaat masala if your family allows it.  Dried pomegranate seeds (anardana) are also fast-friendly; crushing a few and mixing them in gives a tangy crunch.

Yogurt topping: Slurrp.com recommends topping singhara dishes with yogurt for richness.  Try drizzling some whisked plain yogurt or chhach (soured buttermilk) over the chaat just before serving. It adds cool creaminess, similar to how singhara parathas are eaten with curd.

Pomegranate & nuts: A sprinkle of fresh pomegranate arils adds color and a sweet-tart pop.  You can also mix in a spoonful of crushed roasted peanuts or khus khus (poppy seed powder) into the dough for extra crunch and nutrition.

Greens: Chop a few curry leaves (if available) or more cilantro into the dough for aroma. Even a dash of cumin powder roasted on low heat (till aromatic) can deepen the flavor.

Alternative shapes: Instead of patties, you can roll the dough into tiny balls and shallow-fry them like pakoras.  Or flatten and cut the dough into diamond shapes to fry like vrat puris. The seasoning steps remain the same.

Cooking method: For a lighter version, you can oven-bake or air-fry the patties at 180°C until crisp (about 15–20 minutes), flipping once, brushing them lightly with oil.


Each of these variations keeps the chaat fasting-friendly while adding new textures or tastes.  The core idea is to end up with crisp bites that soak up the tangy spices.

Serving Suggestions & Cultural Notes

Singhada Chaat is traditionally enjoyed as part of a Navratri vrat meal.  We often serve it alongside other vrat dishes – for example, warm kuttu ki puri (buckwheat flatbread) or samvat rice (barnyard millet), and a simple aloo sabzi (potato curry) or vrat ki kadhi.  As Slurrp.com notes, singhara puris and parathas are “tasty dishes enjoyed during Navratri” and are commonly served with curd or a potato curry.  Similarly, our chaat can be eaten as a crunchy side or even as a complete snack on its own.

In many households, a portion of vrat foods like this chaat is first offered to the deity as prasad (blessed food) and then shared among family.  Preparing satvik vrat recipes is considered an act of devotion.  As the NDTV Navratri guide explains, devotees worship Goddess Durga with “abundant offerings and prayers,” avoiding grains and stimulants during the nine-day fast.  Special recipes made with singhara atta hold a cherished place in these rituals.  Each ingredient – from edible rock salt to fragrant cumin – is chosen with reverence.  The crisp, tangy chaat embodies our cultural ethos: it’s not just food, but a devotional tradition handed down through generations.

Whether you enjoy it after arti (prayer) or as an evening snack with family, Singhada Chaat brings warmth and festivity to the table.  It might sound unusual to those unfamiliar with vrat cuisine, but each bite carries the homely comfort of a Navratri evening – the taste of pure love and tradition.

I hope this Singhada Chaat recipe becomes as special in your home as it is in mine.  May it fill your fast-breaking meal with joy and devotion.  Enjoy every crunchy, tangy bite and happy Navratri! 🙏✨

Fastival Food

Labra | Bengali Bhog Special Mixed Veg

For Bengalis, Durga Puja is as much about feasting as it is about devotion. I can still picture myself as a child, sitting eagerly on the floor with a banana leaf spread out in front of me. Volunteers at the local pandal would come around with buckets of bhog (community feast), generously serving ladlefuls of khichuri (rice-lentil porridge), Labra, tomato chutney, and payesh (sweet rice pudding) onto our leaves. The air would be thick with the mouthwatering aroma of ghee, spices, and incense. One bite of that warm, mildly spiced Labra mixed with the ghee-soaked khichuri, and I felt the true spirit of Puja come alive in my mouth.

Labra – or bhoger labra as we often call it when it’s prepared for puja – is more than just a mixed vegetable curry; it’s an emotion. The term bhog denotes food offered to the gods, and accordingly this dish is prepared without any onion or garlic. Yet despite being a satvik (pure veg) preparation, Labra bursts with flavor. Ma always said the secret was in using the freshest seasonal vegetables and the magical tempering of panch phoron (Bengali five-spice mix) in mustard oil. She would toss in whatever veggies were on hand – pumpkin for sweetness, eggplant for creaminess, a few potatoes or sweet potatoes for heartiness, plus sometimes radish or green beans – making sure to include that trio of pumpkin, eggplant, and potato that defines a good Labra. As the vegetables slowly simmered together, they released their own juices and melded into a harmonious medley of textures and tastes.

I recall how the whole house would come alive with the sound and smell of Labra cooking. The panch phoron seeds would sputter in hot mustard oil, releasing an inviting aroma that drew everyone to the kitchen. Towards the end, Ma would drizzle a spoonful of ghee into the pot for a divine finishing touch. Sometimes she also added a pinch of homemade bhaja masala – a dry-roasted spice blend – right at the end to elevate the fragrance. The result was a hearty, homestyle curry where the vegetables were soft, slightly mushy, and soaked in spices, each bite tasting like comfort and tradition.

Recipe: Labra (Bengali Bhog Special Mixed Veg)

Servings: 4
Prep Time: 15 minutes
Cook Time: 30 minutes

Ingredients:

2 cups pumpkin (red pumpkin/kabocha), peeled and cubed

1 medium potato (or sweet potato), peeled and cubed

1 small eggplant, cut into chunks

1 cup green beans, cut into 2-inch pieces

1 small radish, peeled and cubed (optional)

2 tablespoons mustard oil (or vegetable oil)

1 teaspoon panch phoron (Bengali five-spice mix)

A pinch of asafoetida (hing)

2 dried red chilies

1 teaspoon grated ginger

1/2 teaspoon turmeric powder

1/2 teaspoon red chili powder (optional, to taste)

1/2 teaspoon sugar (optional, for balance)

Salt to taste

1 teaspoon bhaja masala (Bengali roasted spice mix), optional (for finishing)

1 tablespoon ghee, for finishing (optional but recommended)


Instructions:

1. Prep the veggies: Wash, peel, and cut all the vegetables into similar bite-sized pieces. Try to keep the pumpkin, potato (or sweet potato), eggplant, radish, etc., in slightly larger than bite-size chunks so they don’t disintegrate completely while cooking.


2. Temper the spices: In a heavy-bottomed pot or kadhai, heat the mustard oil over medium heat until it’s hot (you’ll see a slight smoke). Add the panch phoron and the dried red chilies. Let them sizzle for a few seconds until the seeds start to crackle and release their aroma. Sprinkle in the pinch of asafoetida (hing) as the spices crackle. This tempering will be very fragrant – be careful not to burn the spices, just toast them until aromatic.


3. Cook hardy vegetables first: Immediately add the diced pumpkin, potato, and radish (if using) to the pot. Stir the vegetables so they get coated in the spiced oil. Add the grated ginger, turmeric powder, red chili powder (if using), salt, and sugar. Mix well. Cover the pan and cook on low heat for about 8–10 minutes, stirring occasionally. You don’t need to add water at this stage – the veggies will begin to release their own moisture and steam in their juices. (Cooking covered on low heat helps the tougher veggies start to soften without burning. If things start sticking, you can sprinkle a tablespoon of water, but usually it’s not necessary.)


4. Add remaining vegetables: Once the pumpkin and potato are partially tender, add the eggplant and green beans to the pot. Give everything a good stir to combine. If the mixture looks very dry, add a splash of water (a few tablespoons at most). Cover again and continue to cook on low heat for another 5–7 minutes. The softer vegetables like eggplant will cook down fast. Stir occasionally. Cook until all the vegetables are soft and cooked through. The goal is for the veggies to be very tender and slightly melded together in a moist curry — they should release juices and almost mash together, creating that classic semi-stewy consistency of Labra.


5. Finish with spices and ghee: Remove the lid and check that the hardest veggies (pumpkin, potato, radish) are fork-tender. By now, you’ll notice the vegetables have released water and there’s a nice soft medley; it shouldn’t be watery, just a thick mixture. Lower the heat. Sprinkle the bhaja masala over the cooked vegetables and add the ghee. Gently fold (stir) the curry to mix in the bhaja masala and ghee, being careful not to mash the veggies too much. Let it cook for another 1 minute on low heat as the finishing spices infuse the dish. Turn off the heat. Taste and adjust salt or sugar if needed.


6. Serve: Labra is best served hot. Traditionally, it’s served as part of Durga Puja bhog with khichuri (Bengali rice-lentil khichdi). Serve a generous scoop of Labra alongside steaming khichuri for an authentic experience. It also goes well with plain steamed rice or even roti. Enjoy the medley of soft vegetables and warm spices, and get ready for a bite of nostalgia!


Tips:

Vegetable Choices: Use an assortment of seasonal vegetables for Labra. Traditionally, pumpkin, eggplant, and potato/sweet potato are must-haves for the perfect balance of sweetness, creaminess, and substance. Apart from these, you can add others like radish, green beans, carrots, or even a handful of spinach – whatever is fresh and available. The key is a mix of textures and flavors, but make sure to include that classic pumpkin-eggplant-potato trio for authenticity.

No Onion & Garlic: Remember that Labra is a satvik dish meant for holy offerings, so it contains no onion or garlic. Don’t be tempted to add them – the dish is designed to be flavorful without them. The combination of ginger, asafoetida, and whole spices provides plenty of depth, proving that you can have a delicious curry without any onion-garlic at all.

Panch Phoron Magic: Panch phoron is the heart of Bengali veggie dishes. If you don’t have this five-spice mix on hand, you can make it by combining equal parts of cumin seeds, black mustard seeds, fenugreek seeds, fennel seeds, and nigella seeds (kalonji). Keep a jar of this mix – when you temper these five spices in hot oil, their blended aroma is what gives Labra its signature Bengali character.

Bhaja Masala (Roasted Spice Mix): For an authentic touch, finish the Labra with a pinch of bhaja masala. To prepare bhaja masala at home, dry roast about 1 teaspoon cumin seeds, 1 teaspoon coriander seeds, 1/2 teaspoon fennel seeds, a bay leaf, and 1 dry red chili on low heat until aromatic. Let them cool, then grind into a fine powder. This fragrant roasted spice powder is a secret weapon in many Bengali recipes. Sprinkling a bit on your Labra at the end (or on individual servings) will add a warm, smoky depth of flavor that truly elevates the dish. You can make a small batch and store it in an airtight container for your next Bengali cooking adventure.

Slow Cooking = Best Flavor: Cook the Labra low and slow. Keep the heat low and the pot covered so the vegetables cook in their own steam. There’s usually no need to add water, as the veggies release enough moisture while cooking. This slow cooking concentrates the flavors and yields that soft, almost stew-like consistency that Labra is known for. If you do need to add a little water to prevent sticking, add just a splash. Also, stir gently from time to time – you want the veggies to soften and mingle, but not turn completely to mush. Labra has a rustic look, with soft pieces of pumpkin and potato that have partially broken down, coating the other veggies in a thick gravy.

Oil & Flavor: Mustard oil is traditionally used for its pungent, robust flavor that really defines Labra. If you have mustard oil, do use it (just remember to heat it to smoking point to remove the raw smell before cooking). If you don’t, you can substitute with any neutral vegetable oil for cooking the spices. However, finishing with a bit of ghee is highly recommended – that last drizzle of ghee adds a rich aroma and brings all the flavors together beautifully. Your kitchen will smell heavenly!


❤️ Closing Note:

This humble Labra isn’t just a curry — it’s a ladle of nostalgia from my childhood. Every time I cook it, I’m transported back to those Puja days, sitting with family and friends and savoring the bhog on banana leaves. It’s amazing how a simple mix of vegetables can carry the warmth of tradition and togetherness in each bite. I hope this recipe brings a bit of that festive magic and comfort into your home. Give it a try during your next celebration (or whenever you crave a hearty veggie dish), and maybe you’ll create some cherished memories of your own. Happy cooking and Subho Durga Puja! 🙏

Fastival Food, Lunch & Dinner

Kashmiri Sweet Pulao: Festive Saffron Rice with Dry Fruits & Nuts

A Sweet Celebration from Kashmir

I still remember the first time I savored Kashmiri Sweet Pulao at a close friend’s Kashmiri wedding. The platter of golden rice, jeweled with nuts and raisins, perfumed the air with saffron and cardamom. Each bite of the warm, sweet rice mixed with crunchy nuts felt like a warm welcome into a Kashmiri home. In Kashmiri culture, this pulao is much more than just rice with dry fruits – it’s often described as “poetry in a pot,” a royal dish that carries the soul of Kashmir’s hospitality.

A bowl of Kashmiri sweet pulao garnished with fried nuts and raisins, served alongside a tomato onion raita and lauki yakhni (yogurt-based bottle gourd curry) – classic companions for this festive rice.

Unlike the spicy vegetable pulaos or biryanis common elsewhere in India, Kashmiri pulao stands apart with its mild, faintly sweet profile. Fragrant basmati rice is cooked with a medley of aromatic whole spices (think cinnamon, cardamom, cloves, bay leaf) that remain gentle, not overpowering. A pinch of Kashmiri saffron, sourced from the fields of Pampore, gives the dish its regal golden hue and heavenly aroma. A generous mix of dry fruits and nuts – cashews, almonds, raisins, and sometimes even walnuts or pistachios – provides luxurious texture and natural sweetness. In fact, this pulao is so mellow and rich that traditionally no meat or heavy spice is needed to make it special. Many authentic recipes also include a hint of crushed fennel seeds and a pinch of dry ginger (saunth) for that signature Kashmiri flavor note. The result is an aromatic rice pilaf that’s subtly sweet, delicately spiced, and utterly celebratory.

Kashmiri sweet pulao is often prepared on joyous occasions – it’s usually served at weddings, festivals like Eid, or family get-togethers to symbolize warmth and love. In Kashmiri homes, presenting this pulao to guests is a way of sharing a piece of their culture and hospitality. Now, let’s dive into my tried-and-tested recipe for this festive dish, along with all the tips to get it just right in your kitchen.

Ingredients

Basmati rice – 1 cup, preferably aged long-grain (soaked for 20–30 minutes)

Saffron strands (kesar) – a generous pinch (8–10 strands)

Milk – 3–4 tablespoons, warm (to soak saffron; use water for a vegan option)

Ghee – 2 tablespoons (clarified butter, for authentic flavor)

Mixed nuts – ~2 tablespoons cashew nuts (8–10 pieces) and 2 tablespoons almonds, halved or slivered (you can also add a few pistachios or walnuts)

Raisins – 2 tablespoons (golden or regular)

Whole spices – 1 bay leaf, 3 green cardamom pods, 4 cloves, 1 inch cinnamon stick, 1 teaspoon shahi jeera (caraway seeds) or cumin, 1 small piece of mace and 1 black cardamom (both optional)

Fennel seeds (saunf) – ½ teaspoon (or use ½ teaspoon fennel powder)

Dry ginger powder (saunth) – ¼ teaspoon (optional, for authentic flavor)

Onion – 1 small, thinly sliced (for fried onion garnish)

Sugar – 2 teaspoons (up to 1 tablespoon for a sweeter pulao, optional)

Salt – ½ teaspoon, or to taste

Water – 2 cups (for stovetop cooking; if using a pressure cooker, about 1½ cups is sufficient)


Yield: This ingredient list makes about 3–4 servings of pulao as a side dish.

Instructions

1. Prep the Rice: Rinse the basmati rice in cold water until the water runs clear. Soak the rinsed rice for 20–30 minutes in enough water. This helps the grains cook up fluffy and separate (soaked rice absorbs water and cooks more evenly). Meanwhile, warm the 3–4 tablespoons of milk, add the saffron strands to it, and set aside to let the saffron infuse its color and flavor.


2. Fry Nuts & Onions: Heat 1 tablespoon of ghee in a heavy-bottomed pot on medium heat. Add the cashews and almonds, stirring until they turn light golden. Then toss in the raisins and fry until they puff up. Remove all the nuts and raisins with a slotted spoon and set aside. In the same pot, add the remaining 1 tablespoon ghee. Add the sliced onions and fry, stirring frequently, until they turn golden-brown and caramelized. (Be careful not to burn them; lower the heat if needed toward the end.) Remove the fried onions and set aside on a paper towel. Tip: Frying the garnishes separately ensures they stay crisp and keeps the ghee flavored for the rice.


3. Sauté Spices: In the same pot, there should be a little ghee left. Add a touch more ghee if the pot looks dry. Keep the heat on low-medium. Now add the whole spices – bay leaf, green cardamoms, cloves, cinnamon, shahi jeera (or cumin), mace, and black cardamom. Sauté for a minute until they release their aroma (the spices will sizzle and become fragrant). Next, add the fennel seeds. If using dry ginger powder and/or fennel powder instead of seeds, you can briefly turn off the heat and stir them in now to prevent burning. Stir for just a few seconds to combine the spices with the ghee.


4. Add Rice and Seasonings: Drain the soaked rice completely and gently add it to the pot. Sauté the rice grains with the spices for 1–2 minutes on low heat, stirring carefully to coat each grain of rice with the spiced ghee. This step of frying the rice helps to keep the grains separate and aromatic. Now add the salt and the sugar to the rice and stir. (The sugar is optional, but a small amount gives that subtle sweetness characteristic of Kashmiri pulao.)


5. Cook the Pulao: Pour in the saffron-infused milk along with 2 cups of water (use 1½ cups water if you plan to pressure-cook). Give it a gentle stir. Increase the heat to high and bring the liquid to a boil. As soon as it starts boiling, reduce the heat to low, and cover the pot with a tight-fitting lid. Let the rice cook on low heat until all the water is absorbed and the rice is tender. This should take about 10 minutes. Do not uncover or stir while it’s cooking, to allow proper steam cooking (dum). If using a stovetop pressure cooker, cook for 1 whistle on medium heat, then turn off and let the pressure release naturally.


6. Rest and Fluff: After the rice is cooked (water absorbed), turn off the heat. Keep the pot covered and let the pulao rest for 5–10 minutes. This resting period allows the moisture to redistribute, so each grain turns fluffy without breaking. Remove the lid and gently fluff the rice with a fork, being careful not to mush the grains.


7. Garnish and Serve: Transfer the Kashmiri pulao to a serving dish (or you can serve straight from the pot). Gently fold in the fried cashews, almonds, and raisins. Top with the crispy fried onions. For an authentic touch, you can also garnish with a sprinkle of fresh pomegranate arils or a few small apple or pineapple cubes for a pop of color and extra sweetness (this is optional, but sometimes fresh fruit is added in festive versions of this pulao). Serve the pulao warm and enjoy its aroma!


Serving Suggestions

With Raita: The sweet and aromatic notes of Kashmiri pulao pair wonderfully with a cooling yogurt raita. Serve it with a simple cucumber raita or boondi raita, or even an onion-tomato raita spiced with cumin. The tanginess and creaminess of raita balance the richness of the pulao. In fact, because this pulao is on the sweeter side, it is typically served with a spiced yogurt dish to complement it.

With a Light Curry: For a more elaborate meal, pair the pulao with a mild curry so that the flavors don’t overpower the rice. A classic choice from Kashmiri cuisine is Lauki Yakhni, a delicate curry of bottle gourd in yogurt gravy. Its lightly spiced, tangy sauce is an excellent accompaniment to the sweet pulao. Alternatively, a gentle shahi paneer (paneer in a light creamy gravy) or a navratan korma can work well, providing a savory contrast without being too heavy.

Festive Feast Pairing: At grand Kashmiri gatherings like weddings (or in a traditional Wazwan feast), this pulao often appears alongside richer dishes. It may be served with a flavorful Rogan Josh (a Kashmiri lamb curry) or other spicy meats, acting as a sweet, fragrant counterpoint between spicy courses. If you have meat lovers at the table, a spoonful of a savory curry gravy alongside the pulao gives a delightful sweet-and-spicy contrast in each bite.


Tips for Perfect Fluffy Pulao and Make-Ahead

Choose the Right Rice: Opt for high-quality aged basmati rice for this recipe. Aged basmati has a lower moisture content and stays non-sticky, yielding long, fluffy grains once cooked. Avoid short-grain or new rice, as they can turn mushy.

Rinse & Soak: Always rinse the rice thoroughly 3-4 times to wash off excess starch (which is a culprit for sticky rice). Soaking the rice for at least 20 minutes is key – the grains absorb water and expand, which helps them cook perfectly fluffy and separate later. Just remember to drain the soaking water before cooking.

Low and Slow Cooking: Use a heavy-bottomed pot with a tight lid and cook the rice on a low flame. This slow, gentle cooking (similar to the traditional dum method) ensures the rice cooks evenly without burning. Resist the urge to peek too often or stir, as trapped steam is what cooks the rice fully. Once done, let the rice rest covered for a few minutes off the heat – this steam resting finishes the cooking and makes it easier to fluff the pulao without breaking the grains.

Don’t Skimp on Ghee: Frying the nuts, onions, and rice in ghee not only imparts a rich aroma but also coats the rice grains with a thin layer of fat. This helps in achieving a grain-separated pulao and enhances flavor. If you prefer, you can use half oil and half ghee, but a little ghee truly makes a difference in authenticity and taste.

Adjusting Sweetness: Traditional Kashmiri pulao is mildly sweet. The recipe uses a small amount of sugar for a hint of sweetness, but you can adjust this to your taste. Add an extra teaspoon of sugar if you want it sweeter, or skip the sugar entirely if you prefer the sweetness to come only from the raisins and nuts. The beauty of this dish is in its balance – it should not taste like a dessert, just a whisper of sweetness.

Make-Ahead and Reheating: You can prep parts of this dish in advance. Make-Ahead Garnishes: Fry the nuts and caramelize the onions a day ahead and store them in airtight containers (keep the fried onions in a paper towel to absorb excess oil so they stay crisp). Par-cook Rice: If you need to cook the rice ahead of time, slightly undercook it (leave it a tad firm), spread it on a tray to cool (this stops the cooking and prevents clumping), then refrigerate. When ready to serve, sprinkle 2–3 tablespoons of water or broth over the rice and reheat it gently – either on the stovetop covered (on low heat) or in the microwave covered with a damp paper towel. The added moisture will create steam and revive the rice’s fluffy texture. Once heated through, fluff the rice again and mix in the fried nuts and onions. (For food safety and best texture, reheat only the amount you plan to eat, and avoid reheating multiple times.)


With these tips in hand, you’re ready to create a truly memorable Kashmiri Sweet Pulao. The combination of saffron, nuts, and gentle spices will transport you straight to the Kashmir valley – right from your kitchen. Enjoy this royal, soul-soothing dish with your family, and feel the warmth and tradition of Kashmiri hospitality in every bite!

Fastival Food

Meethe Chawal – A Sweet Saffron Rice for Festive Celebrations

The aroma of saffron and cardamom wafting through the house instantly brings back memories of family gatherings and festival celebrations. Meethe Chawal (literally “sweet rice”) is more than just a dessert – it’s a traditional Punjabi sweet saffron rice dish that symbolizes joy and togetherness. Often prepared during harvest festivals like Baisakhi and the winter bonfire festival of Lohri, this golden rice pulao is considered auspicious and is a staple on celebratory occasions. In many North Indian homes, a bowl of meethe chawal graces the table at weddings or family get-togethers, representing the wish for sweetness and prosperity in life. Each spoonful evokes nostalgia – from childhood Lohri nights where we huddled around a fire with warm sweet rice, to Baisakhi afternoons when neighbors exchanged bowls of this fragrant dessert as a gesture of goodwill and cheer.

*Meethe Chawal served in an ornate metal bowl, garnished with glossy raisins, toasted almonds, and a few strands of saffron. In festive Punjabi traditions, the sweet saffron rice is often adorned with vark (edible silver foil) and presented alongside nuts and spices, symbolizing the richness of the celebration. The golden hue of the rice comes from premium saffron threads and a pinch of turmeric, making it a vibrant centerpiece on any festival thali.*


Ingredients

1 cup basmati rice, long-grain preferred (soaked 20–30 minutes)

2–3 tablespoons ghee (clarified butter)

½ cup sugar (adjust to taste)

4–5 green cardamom pods (crushed lightly for aroma)

1 pinch saffron strands (about ¼ teaspoon, soaked in 2 tablespoons warm milk or water)

2 tablespoons chopped almonds (about 8–10 almonds)

2 tablespoons raisins (golden raisins or sultanas)

2 tablespoons cashews or pistachios (optional, for extra nutty richness)

½ teaspoon turmeric powder (optional, for deeper yellow color if needed)

2 cloves & 1 small cinnamon stick (optional whole spices for added warmth)

2 cups water (for cooking the rice)


These ingredients yield a small pot of Meethe Chawal, about 4 servings. You can scale up as needed, maintaining roughly a 1:2 ratio of rice to water for cooking.

Instructions

1. Rinse and Soak the Rice: Wash the basmati rice in cold water until the water runs clear. Soak the rice in plenty of water for about 20–30 minutes, then drain. (Soaking helps each grain cook longer without breaking and results in fluffier, longer rice grains.) Meanwhile, warm the saffron strands in a tablespoon or two of milk (or water) and set aside to steep. The saffron will release a deep golden color and aroma into the liquid.


2. Prepare Flavorful Ghee Base: In a heavy-bottomed pot or kadhai, heat 2 tablespoons of ghee on medium heat. Once hot, add the crushed cardamom pods (and cloves and cinnamon stick, if using). Sauté the spices for a minute until aromatic – you’ll smell the sweet cardamom fragrance. Be careful not to burn them.


3. Fry Nuts and Raisins: Add the chopped almonds, cashews (if using) and raisins to the ghee. Fry for 30–60 seconds, stirring constantly, until the nuts turn light golden and the raisins plump up. Remove the fried nuts and raisins with a slotted spoon and set aside for later garnish. (Frying in ghee gives the nuts a toasted crunch and infuses the ghee with nutty flavor.)


4. Toast the Rice: In the remaining ghee (add another 1 tablespoon if the pot is dry), gently stir in the drained basmati rice. Sauté the rice for 1–2 minutes on medium-low heat, coating each grain with ghee and spices. Toasting the rice lightly in ghee helps keep the grains separate and imparts a nutty aroma.


5. Simmer with Saffron and Sugar: Pour in 2 cups of water and the saffron along with its soaking milk/water. Add the sugar and a tiny pinch of salt (to enhance sweetness). Stir everything gently just once to distribute the saffron and sugar – the liquid will already start taking on a lovely yellow hue from the saffron. Increase heat to bring the mixture to a boil.


6. Cook the Rice: When the water comes to a boil, reduce the heat to low, cover the pot with a tight-fitting lid, and let the rice cook undisturbed for about 10–12 minutes. (If using a very heavy pot or scaling up the recipe, you may need a few extra minutes.) Do not open or stir frequently, as the steam trapped inside is cooking the rice. After about 10 minutes, check if most of the water is absorbed – you’ll see holes or dimples on the surface of the rice and might hear a subtle sizzling sound, which indicates the water has mostly steamed off.


7. Steam and Fluff: Turn off the heat (or keep it on the absolute lowest setting) and let the covered pot sit for another 5–7 minutes. This resting time allows the rice to finish cooking in its own steam. Afterwards, lift the lid and gently fluff the sweet rice with a fork. The grains should be cooked through yet separate, not mushy or clumped. Each strand of rice will be long, aromatic, and tinged yellow from the saffron (and turmeric, if added).


8. Add Ghee & Garnish: Drizzle the remaining 1 tablespoon of ghee over the fluffed rice and gently mix. (A bit of extra ghee at the end adds shine and keeps the rice moist). Now fold in most of the fried nuts and raisins, reserving a few for garnish. Do not stir vigorously – use a light hand to avoid breaking the rice. Finally, sprinkle the reserved almonds and raisins on top. You can also decorate with a few saffron strands and even edible silver foil if you have it for a festive touch.


9. Serve: Serve the Meethe Chawal warm. It can be enjoyed on its own as a dessert, or as part of a larger meal. For the authentic Punjabi presentation, dish out the sweet rice in a brass or silver bowl and garnish with the remaining nuts and a pinch of saffron strands on top. Enjoy the heavenly aroma of saffron and cardamom in every bite!


Tips for Perfect Texture & Flavor

Use Good-Quality Basmati: Always choose long-grain basmati rice for meethe chawal. The long grains and lower starch content ensure the cooked rice remains fluffy and separate, not sticky. Inferior or short-grain rice can turn mushy, so splurge on the best basmati for this special dish.

Soak and Rinse Rice: Don’t skip the soaking step. Soaking rice for about 30 minutes not only shortens the cooking time but also prevents the grains from breaking. Rinsing beforehand washes away excess starch. This all helps in achieving that perfect non-sticky texture.

Heavy Pan & Gentle Heat: Cook the rice in a wide, heavy-bottomed pan with a tight lid. A heavy pan distributes heat evenly and prevents the sugar in the recipe from burning or the rice from catching at the bottom. Keep the flame low once it’s simmering – patience is key to allow gentle steaming. Avoid stirring while simmering, as it can make the rice release starch and become sticky.

Correct Water & Sugar Ratio: For fluffy rice, use roughly 2 cups of water per 1 cup of basmati when cooking everything in one pot. This accounts for the added sugar, which will melt and release moisture as the rice cooks. If you notice the rice is still too firm when time’s up and there’s no water left, you can sprinkle a few extra tablespoons of hot water and cover for a few more minutes. Also, add the sugar after the rice is partially cooked (as in our method) to avoid hindering the rice from cooking through – sugar creates a syrup that can slow softening of the grain.

Saffron Soaking: Saffron is the star of this dish, providing both color and fragrance. Crumble the saffron strands slightly and soak them in warm milk or water for at least 15–20 minutes (you can even do this before you start prepping anything else). This allows the saffron to bloom and release its full hue and aroma, which then gets evenly distributed in the rice. You’ll get a beautiful golden color without needing any artificial food dye.

Fluff, Don’t Stir: Once the meethe chawal is cooked, use a fork to gently fluff up the rice. Never mash or stir vigorously, as the delicate grains can break or turn pasty. Fluffing helps to separate the grains. If the rice looks a bit wet when just finished, the 5-minute rest with the lid on (heat off) will fix that by absorbing excess moisture. Just before serving, gently toss again to mix the nuts and raisins so every serving has some.

Taste and Balance: Meethe Chawal should be richly sweet but not cloying. ½ cup sugar for 1 cup of rice yields a dessert-level sweetness; you can adjust to your preference. A tiny pinch of salt in the dish accentuates the sweetness (it won’t taste salty, just more balanced). The cardamom and cloves infuse warmth, so don’t skip them entirely – if you prefer a milder spice note, you can remove the whole spices before serving.

Extra Richness (Optional): For special occasions, some families make this dish extra indulgent. You can stir in a couple of tablespoons of crumbled khoya (mawa) or milk powder at the end for a richer texture, or even a spoon of condensed milk for a stickier sweet rice. Edible rose petals or a few drops of rose water/kewra essence can be added on top for a royal touch (this is common in Mughlai versions). However, these extras are optional – the classic recipe is delicious in its simplicity with saffron, nuts, and ghee.


Serving Suggestions and Accompaniments

Meethe Chawal is traditionally served as part of a festive thali (platter) or as a sweet finish to an elaborate meal. Here are a few serving ideas and pairings:

Festive Thali: Include meethe chawal in your festival spread alongside other Punjabi favorites. It sits beautifully in a small katori (bowl) on a thali that might feature dishes like chole (spiced chickpeas), puri (fried bread), and raita. The sweet rice provides a welcome contrast to spicy and tangy items on the plate. In Punjabi cuisine, it’s common to end a special meal with a spoonful of this sweet saffron rice as a sign of celebration.

Dessert Bowl: Of course, you can serve meethe chawal purely as a dessert on its own. After a robust Indian meal (say, palak paneer, dal makhani, and roti), a small bowl of warm sweet saffron rice makes for a perfect dessert that isn’t too heavy. The fragrant rice with nuts can also be paired with a scoop of vanilla ice cream for a East-meets-West fusion dessert – the cold creamy ice cream with the warm spiced rice is a surprisingly delicious combo.

Festive Drink Pairing: If you’re enjoying meethe chawal during festivals like Lohri or Diwali, consider serving it with a glass of masala chai or warm badam milk (almond-spiced milk). The milky drink complements the sweet rice and enhances the cozy festive vibe. On Basant Panchami (spring festival), serve the yellow rice with other yellow-hued foods or drinks (like mango panna or saffron sherbet) to go all-out with the theme of prosperity and sunshine.


Meethe Chawal truly shines during festivals – it’s commonly made for Basant Panchami, Diwali, Eid, and Gurpurabs, among others. But you don’t need to wait for a special day to enjoy this comfort food. Whenever you crave a sweet, aromatic treat, this recipe is at your service. Each bite of the soft, saffron-infused rice with crunchy nuts and plump raisins is a reminder of Punjab’s rich culinary heritage and the simple joys of life. Serve it with love, and you’ll understand why this dish has been a beloved part of North Indian celebrations for generations.

Fastival Food

Kanika – Temple-Style Sweet Ghee Rice from Odisha

In every Odia household, Kanika is more than a dish — it’s a celebration, a sacred offering, and a sweet memory rolled into fragrant grains of rice. I remember every Rath Yatra and festive Sunday, my mother would prepare Kanika in a brass handi with generous spoonfuls of ghee, and as the aroma filled the house, we’d know the bhog plate was almost ready.

Kanika is a traditional sweet rice dish from Odisha, flavored with ghee, jaggery, and spices. It’s part of the famous Chappan Bhog offered to Lord Jagannath in Puri and is often paired with dalma, saga, or khatta. Unlike kheer, Kanika is dry, rich, and lightly spiced — often served in temple rituals or made at home during pujas and celebrations.

Ingredients (Serves 3–4)

1 cup arua chaula (raw rice or basmati rice)

¾ cup grated jaggery (adjust to sweetness)

2 tbsp desi ghee

2 tbsp grated coconut (optional)

2 tbsp cashews and raisins

1–2 small bay leaves

2–3 cloves

2–3 green cardamoms

A small piece of cinnamon

A pinch of salt

2 cups water


Step-by-Step Preparation

1. Wash & soak rice

Wash the rice and soak it in water for 20–30 minutes. Drain and set aside.

2. Prepare jaggery syrup

In a small pan, dissolve jaggery in 2 cups warm water. Strain to remove impurities and keep aside.

3. Temper the ghee

In a thick-bottomed kadhai, heat ghee. Add bay leaves, cloves, cardamoms, and cinnamon. Let them splutter and release aroma.

4. Add dry fruits

Toss in cashews and raisins. Fry till golden. Add grated coconut if using.

5. Cook the rice

Add drained rice and stir gently to coat with ghee and spices. Sauté for 2–3 minutes.

6. Add jaggery water

Pour in the strained jaggery water and add a pinch of salt (to enhance sweetness). Bring to a gentle boil.

7. Simmer and cook

Cover and cook on low heat until the rice absorbs all the liquid and turns soft and aromatic. Do not stir too much — let it steam gently.

8. Rest and fluff

Turn off heat. Let it sit covered for 5 minutes. Fluff with a fork. Serve warm.


Tips for Perfect Kanika

Use arua chaula (raw rice) or aged basmati for fragrance.

Do not overcook the rice — each grain should be soft but separate.

A little salt actually balances the sweetness and brings out flavor.

For temple-style feel, use brass utensils and no onions or garlic.


Serving Suggestions

Serve with dalma, khatta, or simple mixed veg curry

Add it to a festive bhog thali with saga, chutney, and pakhala

Enjoy as a warm sweet snack with just a spoon of ghee on top


Why I Love It

I love Kanika because it smells like tradition. It brings back memories of temple bells, copper thalis, and the rustle of tulsi leaves on a summer afternoon. It’s sweet, but not overly so — soft, spiced, and rich with ghee. On puja days or whenever my heart needs a little comforting, I make a small pot of Kanika, and suddenly, everything feels sacred again.

Fastival Food

Bel Pana – Traditional Summer Cooler from Odisha

Intro: The Taste of Pana Sankranti and Grandma’s Thali

If summer had a sacred drink in Odisha, it would be Bel Pana. Made with the pulp of wood apple (bel), mixed with jaggery and milk, and served chilled—it’s not just hydrating, it’s healing.

In my village, Pana Sankranti wasn’t complete without bel pana served in leaf cups. I still remember the smell of freshly cracked bel, the sound of my mother mixing it with jaggery and spices in a big terracotta pot, and the cool comfort it brought on April afternoons.


Ingredients:

1 ripe bel (wood apple)

2 tbsp jaggery (adjust to taste)

1 cup cold milk or curd

¼ tsp cardamom powder

1 tsp black pepper (optional)

A pinch of black salt

Water as needed


Steps to Make Bel Pana:

1. Extract the Pulp

Break the bel fruit. Scoop out the pulp and soak in water for 15 mins.

Mash and strain to remove seeds and fibers.


2. Sweeten & Spice It

Add jaggery, cardamom, black salt, and black pepper. Mix well.


3. Finish with Milk or Curd

Add cold milk (or curd for a tangy version). Adjust thickness with water.


4. Serve Chilled

Garnish with mint or a few ice cubes.


Serving Suggestions:

Serve during Pana Sankranti with tala poda pitha

Also great as a fasting drink during summer rituals or just to beat the heat naturally


Why I Love It

It’s nostalgic, it’s nutritious, and it tastes like Odisha in a cup. Bel Pana is how we survived summer before refrigerators and soft drinks.

Fastival Food

Kakara Pitha – Stuffed Sweet Semolina Dumplings (Odia Style)

Intro: A Sweet Worth Celebrating

Kakara Pitha brings back memories of Lakshmi Puja evenings and Raja celebrations, when the kitchen would be filled with the smell of jaggery, coconut, and ghee. It’s not just a sweet—it’s a celebration you can hold in your hands.

The outer cover is made with suji or atta, while the inside is filled with rich, gooey coconut-jaggery stuffing, flavoured with cardamom. Sometimes fried crisp, sometimes soft—every household has its style.


Ingredients:

For the Outer Dough:

1 cup suji (semolina)

1 cup water

1 tbsp sugar

A pinch of salt

1 tsp ghee


For the Stuffing:

1 cup grated coconut

½ cup jaggery (or more to taste)

½ tsp cardamom powder

1 tsp ghee


Other:

Oil or ghee for deep frying


Steps:

1. Prepare the Filling

Heat ghee, add coconut and jaggery.

Cook until it forms a sticky mass.

Add cardamom powder and let cool.


2. Prepare the Dough

Boil water with sugar, ghee, and a pinch of salt.

Slowly add suji while stirring. Cook till it forms a lump.

Let cool, then knead into a soft dough using ghee on hands.


3. Shape the Pithas

Take a small ball of dough, flatten into a disc.

Place coconut filling in the center and seal the edges.

Shape like a small patty or oval dumpling.


4. Fry Until Golden

Deep fry in medium-hot oil until golden brown and crisp outside.


Serving Suggestion:

Serve warm or at room temperature, as a tea-time snack or prasad. Stays good for 2–3 days when stored in an airtight container.


Why I Love It

Soft inside, crunchy outside, and packed with nostalgia—Kakara Pitha tastes like festivals, temple kitchens, and the love of generations.

Fastival Food

Arisa Pitha – Crispy & Sweet Odia Rice Flour Delight

Intro: A Bite of Tradition and Crunch

Arisa Pitha is not just a pitha—it’s patience, precision, and celebration in one golden bite. Made during auspicious days like Kartik Purnima and Manabasa Gurubar, this sweet is crunchy on the outside, soft inside, and carries the fragrance of cardamom and ghee.

It was a staple in my grandmother’s festive platter, and every time I recreate it, I remember her measured hands rolling perfect discs by touch.


Ingredients:

1 cup rice flour (preferably freshly ground)

½ cup grated jaggery (or more to taste)

½ tsp cardamom powder

1 tbsp white sesame seeds

1–2 tbsp ghee (for dough)

Water as needed

Oil or ghee for deep frying


Steps to Make Arisa Pitha:

1. Make the Jaggery Syrup

Heat jaggery with ¼ cup water until it melts.

Strain to remove impurities and boil again until slightly sticky (1-string consistency).

Turn off the heat.


2. Prepare the Dough

Add rice flour gradually into the jaggery syrup, stirring constantly.

Add ghee, sesame seeds, and cardamom.

Mix into a soft but firm dough. Let rest for 15–30 mins.


3. Shape the Pithas

Grease your palms. Take lemon-sized balls and flatten into thick discs (about 2.5–3 inch wide).

Press sesame seeds on top for a rustic finish.


4. Fry It Golden

Deep fry in medium-hot oil or ghee.

Flip gently and fry until both sides are golden and crisp.

Drain on paper towels.


Serving Tip:

Let cool completely before storing. Tastes even better the next day as flavors deepen!


Why I Love It

Crispy, sweet, and full of festive soul — Arisa Pitha is a link to heritage, a test of technique, and the kind of sweet that makes every occasion feel sacred.