Breakfast

Methi Bajra Thepla – Rainy Day Comfort from Grandma’s Kitchen

Introduction

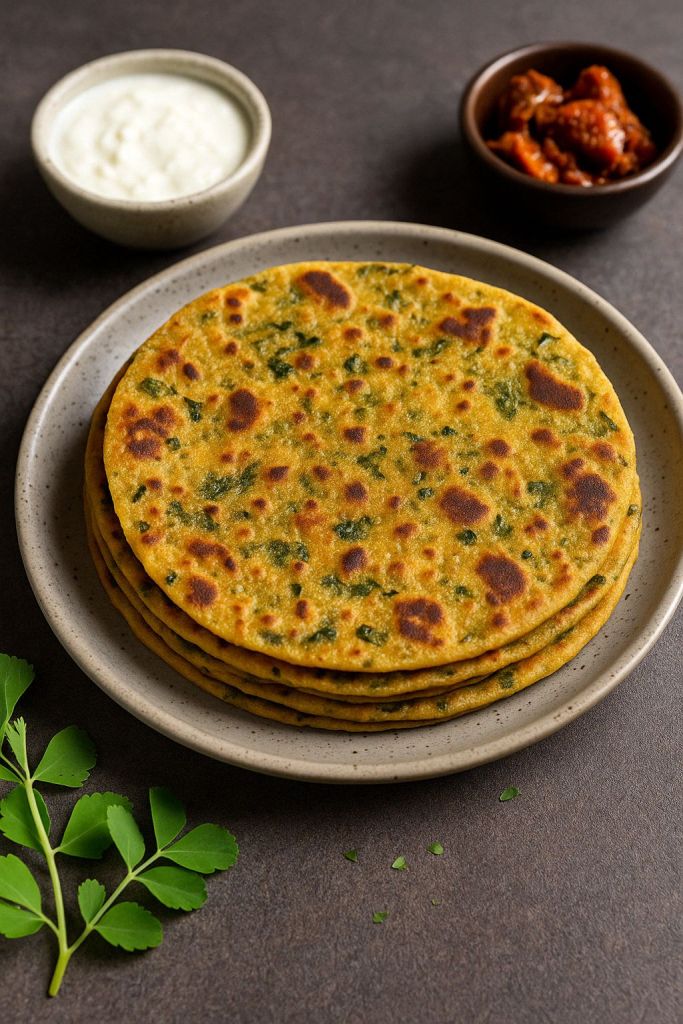
There’s nothing like the pitter-patter of rain on a monsoon morning to transport me back to my grandma’s kitchen. The air would be thick with the earthy aroma of bajra and the fresh, herbal scent of methi (fenugreek leaves). I remember waking up to find my grandmother already at the stove, roasting Methi Bajra Theplas on a hot griddle. The kitchen windows fogged up from the steam, the sizzle of each thepla hitting the tawa, and the warm, spiced fragrance wafting through the house – it was pure comfort. These wholesome flatbreads made with pearl millet (bajra) and fresh fenugreek greens are a traditional Gujarati delight, but for me, they’re so much more. They embody cozy family mornings, nostalgic flavors, and the simple joy of watching rain while nibbling on soft, hot theplas with a cup of chai.

Fast forward to today, and Methi Bajra Thepla is still my go-to comfort breakfast, especially when the weather turns gloomy. It’s amazing how a recipe can be nutritious yet deeply satisfying: bajra flour is rich in fiber and has a warming quality, fresh methi adds vitamins and a slight bittersweet bite, and a touch of yogurt in the dough keeps it tender. In this post, I’ll walk you through making these soft, flavorful theplas, just the way Grandma did – complete with tips to keep them pliable, ways to store and reheat for later, and serving suggestions that make them an irresistible treat on a rainy day.

Ingredients

Here’s what you’ll need to make approximately 8–10 Methi Bajra Theplas:

Bajra (Pearl Millet) Flour – 1 cup
Provides a hearty, earthy base and makes the theplas wholesome.

Whole Wheat Flour – 1 cup
For binding and a softer texture (a mix of wheat and bajra makes rolling easier).

Fresh Methi Leaves (Fenugreek) – ~1 cup, finely chopped
Pick the leaves off the stems, wash thoroughly, and chop. These give a signature aromatic, slightly bitter flavor.

Plain Curd (Yogurt) – 1/2 cup
Adds moisture and tang to the dough, making the theplas soft. (Use thick yogurt; if very watery, reduce amount or strain a bit).

Spices & Seasonings:

Turmeric powder – 1/2 tsp (for a warm color and subtle flavor)

Red chili powder – 1/2 tsp (adjust to taste for heat; or use 1–2 finely chopped green chilies for a fresh spice kick)

Cumin seeds – 1 tsp (or cumin powder, for earthy flavor)

Ajwain (carom seeds) – 1/2 tsp (optional, aids digestion and adds a wonderful aroma)

Ginger paste – 1 tsp (or freshly grated ginger, optional but enhances flavor; you can add a clove of garlic paste too for extra zing)

Sesame seeds – 1–2 tsp (optional, I love the nutty crunch they add in each bite)

Salt – ~1 tsp or to taste (balance to enhance all the flavors)


Oil or Ghee – 2 tbsp (for the dough) + extra for cooking
A bit of oil/ghee kneaded into the dough ensures tenderness, and you’ll shallow-fry or roast the theplas on the griddle with a little oil/ghee for golden spots and richness.

Water – as needed
To adjust the dough consistency. Bajra is gluten-free, so warm water helps bind the dough with the wheat and yogurt. Have about 1/4 to 1/2 cup on hand (you may not use it all).


Note: All ingredients should ideally be at room temperature, especially the yogurt, so it mixes evenly. Fresh methi leaves are best for flavor, but you can use drained frozen methi or even kasuri methi (dried fenugreek) in off-season – just adjust quantity since dried herbs are stronger.

Step-by-Step Instructions (Dough Preparation & Cooking)

Making methi bajra thepla is straightforward. The key is to form a pliable dough and cook on medium heat for soft results. Let’s get started:

1. Prepare the Methi Leaves: Pluck the fresh methi (fenugreek) leaves from their stems. Rinse them thoroughly in water at least 2-3 times to remove any dirt (methi can be sandy). Drain well and pat dry slightly. Chop the leaves finely with a knife. Set aside. (Chopping helps the leaves distribute evenly in the dough and makes rolling easier.)


2. Mix Dry Ingredients: In a large mixing bowl or paraath (wide flat bowl), combine the flours and dry spices. Add the bajra flour and whole wheat flour first. Then stir in the spices and seasonings: turmeric, red chili powder, cumin seeds, ajwain (if using), sesame seeds, and salt. Mix them together with your hand or a spoon so the spices are evenly distributed in the flour mixture.


3. Add Wet Ingredients: To the flour mixture, add the chopped methi leaves. Also add the ginger paste (and garlic, if using) at this stage. Now make a well in the center of the mixture and spoon in the plain curd (yogurt). Drizzle about 1–2 tablespoons of oil or ghee over the flour as well.


4. Knead the Dough: Using your hand, start mixing the yogurt, oil, and flour mixture. The goal is to incorporate the wet ingredients into the dry mix. You will find the dough is coming together but still crumbly – at this point, add water a little at a time (a few tablespoons) and continue kneading. If possible, use lukewarm water for kneading; warm water helps the flours (especially bajra) bind better and yields softer theplas. Knead patiently for about 5–7 minutes, adding water as required, until you get a soft, semi-stiff dough. The dough should not be sticky (add a sprinkle of flour if it becomes too sticky) but should hold together well and feel pliable. (Tip: The methi and yogurt will release some moisture as you knead, so add water gradually to avoid a too-soft dough.)


5. Rest the Dough: Once the dough is smooth and soft (you should be able to press a finger and it leaves an indent easily), gather it into a ball. Rub a very light coat of oil/ghee on the surface to prevent drying. Cover the dough with a damp kitchen towel or a lid and let it rest for about 10–15 minutes at room temperature. This resting period allows the flours to hydrate fully and the gluten in the wheat flour to relax, which makes rolling easier and the theplas softer. (Note: Don’t let it rest much longer than 15–20 minutes, especially if you used fresh methi and yogurt, because the leaves will keep releasing water and the dough might turn too soft or sticky.)


6. Divide and Shape: After resting, give the dough a quick knead again. Then divide it into equal portions. For roughly 8–10 theplas, divide into 8–10 balls (about the size of a lemon or golf ball). Roll each portion between your palms to make a smooth ball, then flatten slightly into a patty. Keep the dough balls covered with a cloth while you work on one, so they don’t dry out.


7. Roll Out Theplas: Take one dough ball and dust it lightly with dry whole wheat flour (dusting flour prevents sticking while rolling). On a clean countertop or rolling board, gently roll out the dough into a circle of about 5–6 inches in diameter. Aim for an even thickness of about 2–3 mm (slightly thicker than a regular roti, but not as thick as a paratha). Don’t worry if the edges are not perfectly smooth – that’s the rustic charm of homemade thepla! If the dough is cracking or too tight, you might need to knead in a little more water or oil into the remaining dough balls. If it’s sticking to the board or rolling pin, dust a bit more flour. (If you find rolling difficult due to the bajra flour (since it’s gluten-free), you can roll between two sheets of parchment or plastic, or even pat it out with your fingers on a greased surface.)


8. Heat the Tawa (Griddle): While you’re rolling, place a tava/tawa (flat griddle or skillet) on the stove over medium heat. Let it heat up well. A moderately hot griddle is key – too low and the thepla will turn out hard (as it dries out slowly), too high and it might burn spots without cooking through. You can test by sprinkling a tiny bit of dry flour or water – it should sizzle gently and evaporate, indicating the pan is hot.


9. Cook the Thepla – First Side: Carefully lift the rolled thepla and place it on the hot tawa. Let it cook for about 30–40 seconds or until the bottom side starts to look opaque and you see a few tiny blisters or it changes color slightly. You might also see faint steam escaping.


10. Flip and Cook Other Side: Using a spatula, flip the thepla to the other side. Now cook this side for another 30 seconds. At this stage, you typically won’t have brown spots yet – that’s okay. We do a quick partial cook on both sides before adding oil/ghee, which ensures it cooks evenly through.


11. Apply Oil/Ghee and Roast: Drizzle or brush a small amount of oil or ghee (about 1/2 tsp) around the edges of the thepla and on the surface. Gently press and rotate the thepla with the spatula so it fries in the oil/ghee. You’ll see golden-brown spots appearing. Flip the thepla again, and apply a little oil/ghee on the other side as well, cooking that side. Press down slightly on the edges or any parts that seem uncooked. Each side should cook for another minute or so with the oil until nicely cooked through with brown speckles. The thepla should be well-cooked but still soft and pliable. Adjust the heat between medium to medium-high as needed; if you see it browning too fast, lower the flame a bit.


12. Repeat for All Theplas: Remove the cooked thepla and place it on a plate (or a roti basket lined with a cloth or paper towel to keep it soft). Proceed to roll and cook each of the remaining dough balls in the same way. It helps to roll the next one while one is cooking, to save time. If you’re not fast at rolling, you can also roll all the theplas first and keep them separated (so they don’t stick) under a cloth, then cook in batches. Keep the stack of cooked theplas covered so they stay warm and moist.


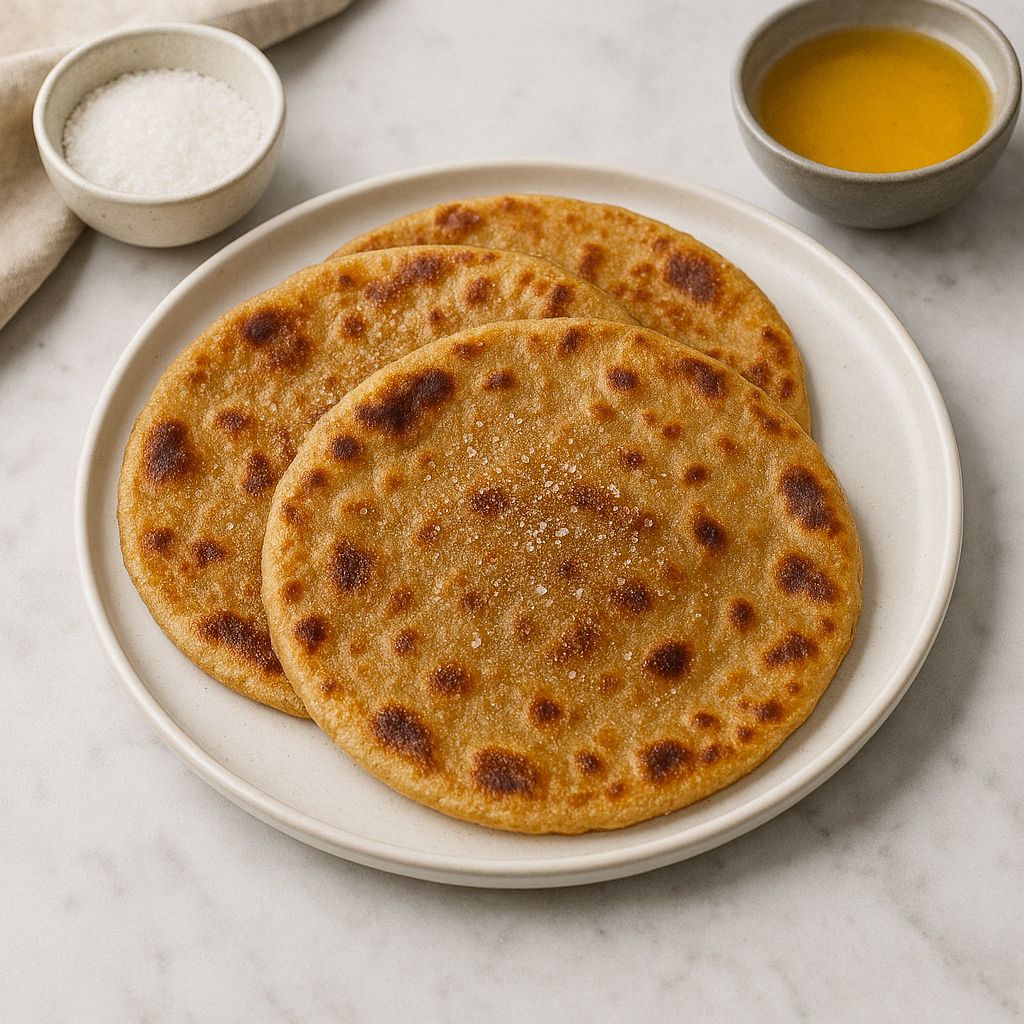
13. Serve Hot: Once all are done, your methi bajra theplas are ready to be devoured! They should be soft to tear, speckled with beautiful green methi bits and browned spots of flavor. Serve them fresh off the tava for the best experience. (Serving suggestions below!)


Tips for Softness, Storage, and Reheating

Keeping Theplas Soft: For the softest theplas, be generous with the moisture and fat in the dough. The combination of yogurt and a bit of oil/ghee in the dough works wonders for softness. Also, using warm water to knead (instead of cold) helps the dough become more pliable. Don’t skip the resting step; resting the dough allows the millet and wheat to fully absorb moisture. Finally, cook on medium heat – this ensures the thepla cooks through without becoming too crispy or hard. The moment you see golden spots and it’s cooked, take it off the pan; over-cooking on a low flame can dry them out.

Softness Trick from Grandma: My grandma’s tip for ultra-soft theplas – after cooking each thepla, stack them and wrap them in a clean kitchen towel for a few minutes. The steam softens them further, and they stay pliable. You can also apply a dab of ghee on each hot thepla as you take it off the tawa – this keeps them moist and adds rich flavor.

Storage (Short Term): Methi Bajra Theplas are an excellent make-ahead dish. Once they cool to room temperature, store them in an airtight container or a zip-lock bag. At room temperature, they stay good for 2 days easily. If it’s summer or very humid, or if you need to store longer, keep them in the refrigerator (good for about 5-6 days). Separate each thepla with a piece of parchment or paper towel if you’re stacking many, to avoid them sticking together due to any condensation.

Can I Freeze Theplas? Absolutely! These theplas freeze well, making them great for meal prep. To freeze, cool them completely, then stack with parchment paper between each thepla (this prevents them from freezing into a block). Place the stack in a freezer-safe bag, squeeze out excess air, and freeze. They can last about 1-2 months frozen. When you crave thepla, just take out as many as needed.

Reheating: To reheat refrigerated or frozen theplas, the best method is on a hot tawa/skillet. Warm the tawa on medium, then heat each thepla for ~30 seconds on each side until it’s soft and heated through. You can brush a tiny bit of ghee or oil if you want to refresh the gloss and softness. If you’re in a hurry, you can microwave the thepla: place it on a microwave-safe plate, cover with a damp paper towel (this prevents drying out), and microwave for 10-15 seconds (longer if frozen, about 30 seconds, checking in between). The damp towel steams it lightly, making it soft again. After microwaving, if it feels a bit moist, you can quickly toss it on a hot pan for a few seconds to get that slight toasty finish back.

Avoiding Spoilage: Because these theplas contain fresh methi and yogurt, avoid keeping them in very hot conditions for too long (to prevent spoilage). For travel or longer shelf life, some people omit yogurt and use only water and more oil, but the combination of bajra and methi really tastes best with yogurt. Using hung curd (thicker yogurt with less water content) can also help them stay good longer if carrying for travel.


Serving Suggestions

Methi Bajra Thepla is a versatile bread – it can be enjoyed in many ways. Here are my favorite serving ideas to make a simple thepla meal exciting:

Classic Pickle and Chai: The quintessential way to enjoy thepla is with a side of spicy pickle. Mango pickle (methia keri or chundo for a sweet twist) or lemon pickle pair beautifully with the gentle bitterness of methi in the thepla. Wash it down with a hot cup of masala chai (tea) – the combination of warm, spicy tea and savory thepla is the ultimate comfort on a rainy morning.

With Yogurt or Raita: Serve theplas with a bowl of plain yogurt (curd) or a simple raita. The cool, creamy yogurt balances the spices. You can mix a pinch of roasted cumin and salt into the yogurt to make an instant raita. Tear off a piece of thepla, dunk it in the curd – it’s heavenly! This combo is especially great for breakfast or a light lunch.

Chutney Spread: Smear the theplas with green chutney (coriander-mint chutney) or garlic chutney for an extra burst of flavor. You can even roll them up with a layer of chutney inside for a quick snack on-the-go. The fresh herbaceous chutney highlights the fenugreek’s flavor.

Subzi or Curry: Though typically eaten on their own or with light sides, you can also pair thepla with a sabzi (vegetable dish) or potato curry. Dry potato sabzi (like jeera aloo) or even a yogurt-based curry goes well – it turns it into a more filling meal.

On-the-Go Wrap: Get creative and use methi bajra theplas as a base for a wrap! They are pliable enough. For example, wrap one around some sautéed veggies or a scrambled paneer bhurji, and you have a nutritious roll for lunch. This is how I pack them for road trips – rolled with a simple potato filling, they stay mess-free and yummy.


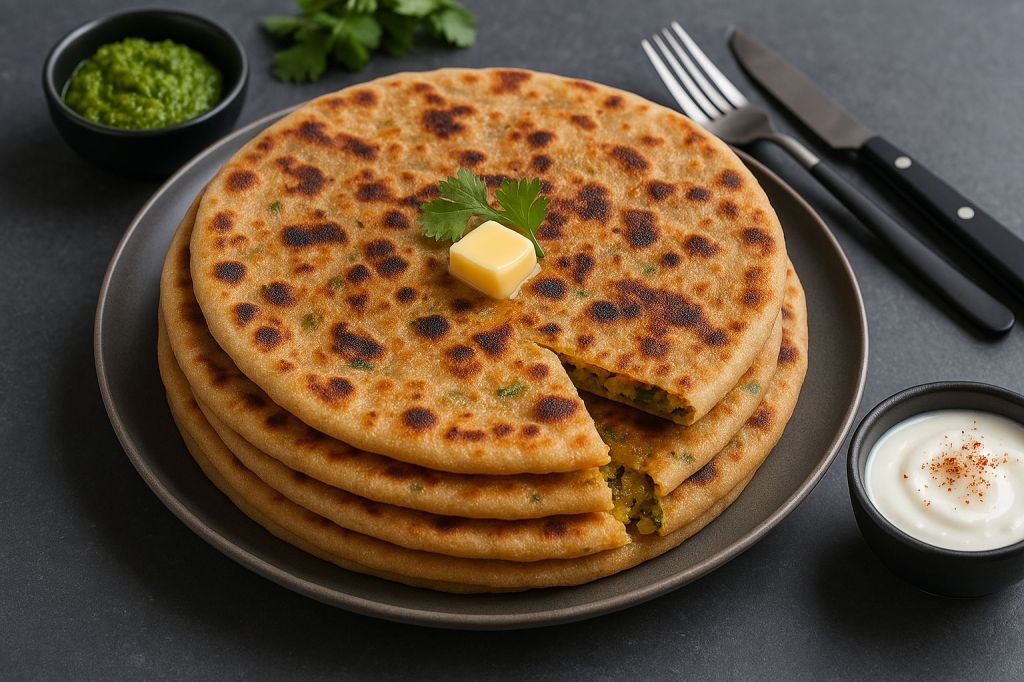
No matter how you serve them, always try to reheat or toast the theplas lightly if they’ve cooled, because they’re at their best when warm and soft. And if you’re serving to guests, add a dollop of butter on top of a stack of hot theplas – watch their eyes light up at the sight of melting butter on those golden flatbreads!

Why I Love It

Methi Bajra Thepla isn’t just food, it’s emotion for me. Here’s why this recipe has a special place in my heart:

Nostalgic Comfort: I love it for the memories it carries – each bite takes me back to cozy monsoon mornings at my grandmother’s home. The sense of warmth and love I felt then is rekindled every time I make these. There’s something deeply comforting about cooking a traditional family recipe while rain drizzles outside.

Wholesome & Healthy: I adore how wholesome this thepla is. With nutrient-rich bajra (full of fiber, iron, and antioxidants) and vitamin-packed methi leaves, it’s a powerhouse of nutrition disguised as a treat. It proves that healthy food can be deliciously satisfying. The use of millet flour makes it filling and energizing, perfect for starting the day or keeping one satiated during a busy day.

Flavorful and Versatile: Thepla might look simple, but it’s bursting with flavor – from the slight bitterness of fenugreek balanced by the spices and the slight tang from yogurt. I love that you can enjoy it in so many ways (with pickles, chutneys, or just on its own). It’s equally good for breakfast, a quick snack, or a travel meal. I’ve taken theplas on long train journeys, road trips, and even flights – they travel well and always taste like home.

Seasonal Joy: While methi is best in winter, I particularly cherish making this during the rainy season. Something about the earthy bajra and fenugreek aroma mixes with the petrichor (the smell of rain-soaked earth) – it’s like the weather and food are in perfect harmony. It’s my personal ritual to cook these on the first rain of the monsoon. That first soft bite, with rain tapping on the window and a hot chai in hand… it’s pure bliss and makes me fall in love with cooking all over again.


In short, Methi Bajra Thepla is more than a recipe – it’s a hug on a plate. It brings together the goodness of traditional ingredients and the love of generations. I hope when you try it, you’ll fall in love with it just as I have!

Breakfast

Poha: A Bowl of Comfort and Childhood Memories


A bowl of kande poha (onion poha) garnished with roasted peanuts, fresh coriander, and a lemon wedge.
My love affair with poha began on lazy weekend mornings. I’d wake up to the gentle sizzle of mustard seeds and curry leaves in hot oil – a sound that told me breakfast was almost ready. The kitchen would fill with the warm aroma of spices and tangy lemon, and soon I’d be spooning up a fluffy plate of poha for lunch. Poha – made from flattened rice – is a beloved Indian breakfast staple. It’s light and nutritious, yet comforting; *“often garnished with fresh herbs, peanuts, and spices, this dish is a comfort food for many”*. For me, each bite brings back those cozy family mornings and the feeling that even a busy day can start with something warm and nourishing.

Poha’s beauty lies in its simplicity and speed. With just a few basic ingredients and minutes of hands-on cooking, you can serve a wholesome meal. Whether I’m in a hurry or have time to linger over breakfast with my family, poha never disappoints. It can be as simple as turmeric and salt, or dressed up with veggies and tangy citrus – but the result is always a plate of pure comfort.

Ingredients

2 cups thick poha (flattened rice) – rinsed briefly under running water and drained in a colander

1 small onion, finely chopped (for Kanda Poha/Onion Poha)

1 small boiled potato, diced (for Aloo Poha/Batata Poha)

1–2 green chilies, finely sliced (adjust to taste)

½ tsp mustard seeds

½ tsp turmeric powder (for color and warmth)

6–8 curry leaves

2 tbsp roasted peanuts (optional, but recommended for crunch)

1 tbsp oil (vegetable, peanut, or coconut oil)

Salt, to taste

Juice of ½ lemon (or more to taste)

Fresh coriander leaves, chopped (for garnish)

Sev (crispy gram-flour noodles) for topping

Pomegranate seeds (optional, for a sweet-tart pop)


Variations

Kanda (Onion) Poha: Use chopped onion in the tempering. This Maharashtrian classic, known as kande pohe, is cooked with mustard seeds and curry leaves and often finished with coriander and a squeeze of lemon.

Aloo (Potato) Poha: Add boiled potato cubes along with the spices to make batata poha. The soft potatoes make the dish heartier and extra filling.

Lemony Poha: For a bright twist, stir in extra lemon juice and toss in some green peas or a handful of chopped coriander at the end. This gives the poha a fresh, tangy kick.


Step-by-Step Preparation

1. Prep the poha: Place the washed poha in a bowl. Cover it with room-temperature water for just 2–3 minutes, then drain thoroughly in a colander. It should soften and separate into flakes, but not become mushy.


2. Temper the spices: Heat oil in a large pan or wok. When the oil is hot, add mustard seeds. Let them pop for a few seconds until fragrant. Then add the curry leaves and peanuts, and sauté until the peanuts turn golden brown.


3. Add aromatics: Toss in the chopped onions and sliced chilies. Cook over medium heat until the onions turn translucent and tender.


4. Spice it up: Sprinkle the turmeric powder and salt. If using potatoes, add the diced boiled potatoes now. Gently mix so the spices coat the vegetables.


5. Fold in the poha: Add the drained poha to the pan. Carefully fold it into the mixture so the turmeric and spices coat the rice flakes. Cook on low heat for 2–3 minutes, stirring gently, until everything is heated through and aromatic.


6. Final touch: Turn off the heat. Squeeze the lemon juice over the poha and toss well. This final step brightens the whole dish.


7. Garnish and serve: Transfer the poha to serving bowls. Sprinkle generously with chopped coriander, sev, extra peanuts, or pomegranate seeds as desired. Enjoy it hot, preferably with an extra wedge of lemon on the side.


Tips for Perfect Poha

Avoid over-soaking: Rinse the poha quickly and drain it well. Over-soaking or adding too much water will make the poha mushy. Just a brief soak is enough to soften the flakes.

Choose the right poha: Medium or thick variety works best for savory poha. Very thin poha tends to break apart and become wet.

Cook on low heat: Once you add the poha to the spices, cook gently on low flame. Stirring gently and heating slowly helps each flake stay intact and absorb the flavors.

Let it rest: After turning off the heat, cover the pan for a minute. This helps any residual moisture distribute evenly. Then fluff the poha lightly with a fork to separate the grains.

Balance flavors: Make sure to add the lemon juice at the end – its acidity lifts the whole dish. Also taste for salt or a pinch of sugar (some people like a tiny bit of sweetness) to balance the savory notes.


A festive plate of Indori-style poha, piled high with sev, peanuts, pomegranate seeds, and a sweet jalebi on the side.

Suggested Toppings

Enhance your poha with extra texture and color. A sprinkle of the right toppings can make each bite exciting. For example, Indori poha is famous for its crunchy sev and jewel-like pomegranate seeds. Popular toppings include:

Roasted peanuts: Tossed in during cooking or sprinkled on top, peanuts add a satisfying crunch.

Crispy sev: These fried gram-flour noodles are a classic garnish, especially on Indori poha. Their savory crispiness is addictive.

Fresh coriander: Chopped cilantro leaves add a burst of green freshness and aroma.

Lemon wedges: A squeeze of lemon juice just before eating brings a zesty lift to the dish.

Pomegranate seeds: These little ruby-red jewels give a sweet-tart pop and make the poha look festive.


Mix and match toppings to your taste – the contrast of soft poha with crunchy, tangy, and sweet bits is part of the fun!

Why I Love It

Poha is more than just a quick meal to me – it’s comfort on a plate. It takes me right back to childhood breakfasts with my family. Even on the busiest mornings, I know I can whisk up poha in under 10 minutes and have everyone smiling at the table. As one food writer notes, poha is *“celebrated for providing a wholesome meal in minutes”*. I love that it’s so versatile: I can make it spicy or mild, simple or decked out with extras, according to our mood. Mostly, I cherish how it brings people together – passing around bowls of warm poha reminds me of laughter and chatter around the table. In a way, every spoonful is a little reminder of home and family love.

Breakfast

Chuda Kadali – Odia Flattened Rice with Banana & Grated Coconut

Intro: Simple Food, Sacred Memory

When the morning is lazy, or the mood is devotional, Odia kitchens turn to Chuda Kadali. It’s not flashy. There’s no fire. Just the gentle mashing of banana into soaked chuda, the sweetness of jaggery, and the light freshness of coconut.

In my childhood, this was offered during Kartik month, on Ekadashi, or even before school when time was short. And yet, it never felt like a shortcut — it felt like a blessing in a bowl.

Ingredients:

1 cup flattened rice (chuda/poha)

1–2 ripe bananas (preferably desi variety)

2–3 tbsp grated coconut (fresh or frozen)

1–2 tbsp jaggery or sugar (to taste)

½ cup milk or water (for soaking)

A pinch of cardamom (optional)


Steps to Make Chuda Kadali:

1. Soak the Chuda

Rinse and soak the poha in milk or water for 5–10 mins until soft. Drain excess.


2. Mash & Mix

In a bowl, mash bananas.

Add softened chuda, jaggery/sugar, coconut, and cardamom.

Mix gently. Serve immediately.


Serving Tips:

Serve as breakfast, prasad, or even a cooling evening snack

Optional: top with chopped nuts or ghee for extra richness


Why I Love It

Chuda Kadali is the kind of food that feels like it’s feeding more than your hunger. It’s ritual, it’s comfort, and it’s home in every bite.

Breakfast

Moonglet – The Viral Veg Omelette Without Eggs


Prep Time: 10 mins
Cook Time: 15 mins
Total Time: 25 mins
Serving: 2


About the Recipe

Moonglet is a fluffy, protein-rich, street-style dish made from soaked moong dal and veggies — often called the “vegetarian omelette.” It’s crispy on the outside, soft inside, and perfect for breakfast or light dinner. With no eggs or maida, it’s light, filling, and trending across food lovers online.

I stumbled upon this gem during lockdown while binge-watching food reels. What started as a curiosity soon became a staple — my family now asks for it almost every week!

Fluffy vegetarian moonglet omelette made with moong dal and mixed vegetables, served in a skillet.

Ingredients

1 cup moong dal (soaked 4–5 hrs or overnight)

1 green chili

½ inch ginger

¼ tsp turmeric

Salt to taste

A pinch of asafoetida (hing)

½ tsp baking soda (optional, for extra fluffiness)


Veggies (mix-in):

¼ cup chopped onions

¼ cup chopped tomatoes (deseeded)

¼ cup capsicum (any color)

2 tbsp chopped coriander leaves

Optional: grated carrot, beetroot, spinach


Other:

Oil or ghee for shallow frying

Chaat masala for sprinkling


Instructions

1. Prepare the Batter:

Drain soaked moong dal and blend with green chili, ginger, turmeric, salt, and a splash of water until smooth but thick (like dosa batter).

Just before cooking, add baking soda and mix lightly (optional).


2. Mix the Veggies:

Fold in onions, tomatoes, capsicum, and coriander into the batter.


3. Cook the Moonglet:

Heat 1 tsp oil in a small nonstick pan or iron tawa.

Pour a ladleful of batter and spread slightly thick (like a mini pizza).

Cover and cook on medium flame for 3–4 mins till golden at the bottom.

Flip gently and cook uncovered until both sides are golden.


4. Garnish & Serve:

Sprinkle chaat masala. Serve hot with mint chutney or tomato ketchup.

Craving more healthy breakfast ideas? Check out my Oats Khichdi and Ragi Paratha.


Tips & Variations

For extra crisp edges, use a well-seasoned iron pan.

Add cheese or paneer inside for a fusion twist.

Make mini versions as party starters or lunchbox ideas.


FAQs

Q: Can I store leftover batter?
A: Yes! Store in the fridge for 1 day. Stir before use and add soda fresh.

Q: Can I make this without soaking?
A: Quick tip — soak in hot water for 1 hour as a shortcut.

Breakfast

Easy Methi Paratha Recipe for Beginners


About the Recipe

Methi Paratha is a soft, spiced flatbread made with fresh methi (fenugreek) leaves kneaded directly into whole wheat flour. A regular in North Indian kitchens, this paratha is loved for its slightly bitter, earthy flavor and nutritional value — rich in iron, fiber, and vitamins.

It’s easy to make, ideal for meal prep, and stays soft for hours — making it perfect for tiffin boxes or road trips.

Flaky methi paratha made with fresh fenugreek leaves and whole wheat flour, served with pickle and curd.


Ingredients (Makes 6–8 parathas)

1½ cups whole wheat flour (atta)

1 cup fresh methi leaves, finely chopped

1 green chili, finely chopped (optional)

½ inch ginger, grated

½ tsp ajwain or jeera

½ tsp turmeric powder

½ tsp red chili powder

Salt to taste

1 tbsp oil or ghee

Water to knead

Ghee or oil for roasting


How to Make Methi Paratha (Step-by-Step)

1. Clean & Chop Methi Leaves

Pluck methi leaves from stems, rinse 2–3 times in water, and finely chop.

Optional: Sprinkle a little salt and rest for 5 mins to reduce bitterness, then squeeze gently.


2. Prepare the Dough

1. In a mixing bowl, add flour, chopped methi, ginger, green chili, spices, and salt.


2. Add oil and mix well.


3. Gradually add water and knead into a soft dough.


4. Rest the dough for 15–20 minutes.


3. Roll the Parathas

Divide dough into medium-sized balls.

Roll each ball into a disc, 6–7 inches wide, dusting lightly with flour.


4. Cook the Parathas

Heat a tawa. Place the paratha and cook until golden spots appear on both sides.

Apply ghee or oil and roast until fully done and crisp at the edges.


Serving Suggestions

Serve hot with curd, pickle, or chutney

Great with masala tea for a light meal

Can be packed in foil for lunch or travel


Tips for Best Methi Parathas

Always chop methi finely for even mixing

Use fresh leaves, not overgrown or yellow ones

Resting the dough enhances flavor and softness

Can be frozen half-cooked and reheated when needed


Variations

Add grated paneer or boiled potato for extra protein

Use kasuri methi when fresh methi isn’t available (reduce quantity)

Mix in yogurt while kneading for extra softness

Breakfast

Oats Khichdi Recipe | Healthy One-Pot Comfort Meal

About the Recipe

Oats Khichdi is a nutritious twist on the classic Indian khichdi, using oats instead of rice. Packed with veggies, yellow moong dal, and basic Indian spices, it’s a wholesome, one-pot meal that’s easy, comforting, and ready in under 30 minutes.

Ideal for busy days, diet meals, or those looking to eat clean without compromising on flavor.

Healthy oats and moong dal khichdi cooked with vegetables, garnished with ghee and coriander.


Ingredients (Serves 2)

½ cup rolled or quick oats

¼ cup yellow moong dal, washed

½ cup chopped vegetables (carrot, beans, peas, capsicum, etc.)

1 small onion, finely chopped (optional)

½ tsp ginger, grated

1 green chili, chopped

½ tsp jeera (cumin seeds)

½ tsp mustard seeds (optional)

1 pinch hing

½ tsp turmeric

1 tbsp ghee or oil

Salt to taste

2½ to 3 cups water

Fresh coriander for garnish


How to Make Oats Khichdi (Step-by-Step)

1. Dry Roast the Oats (Optional)

Lightly roast oats in a pan for 2–3 mins till aromatic. This step adds texture and prevents mushiness. Set aside.


2. Prepare the Dal

Cook moong dal in 1 cup water until soft (pressure cook for 1–2 whistles or simmer for 10–12 mins).


3. Tempering & Veggies

1. In a pan or cooker, heat ghee. Add jeera, mustard seeds, and hing.


2. Add onion (if using), ginger, and green chili. Sauté till soft.


3. Add all chopped veggies, turmeric, and a pinch of salt. Sauté for 3–4 minutes.


4. Combine Oats + Dal

1. Add roasted oats and cooked moong dal to the pan.


2. Pour in 1½ to 2 cups more water (adjust for desired consistency).


3. Add salt, mix well, and let simmer for 5–7 minutes until oats and veggies are cooked.


5. Serve

Turn off heat and let it rest for 2 minutes. Garnish with coriander and serve warm.


Serving Suggestions

Pair with pickle, papad, or a dollop of curd

Add a drizzle of ghee or lemon juice before serving

Ideal for light dinners, breakfast, or post-illness recovery


Tips & Variations

Use steel-cut oats for more texture (adjust cooking time)

Add spinach, methi, or bottle gourd for added nutrition

Skip onion & garlic for a Satvik/Vrat version

Add pepper & ajwain for digestive-friendly khichdi

Breakfast

Ragi Paratha Recipe | Soft & Nutritious Finger Millet Flatbread


About the Recipe

Ragi Paratha is a soft, gluten-free flatbread made using ragi flour (finger millet), either on its own or mixed with wheat flour. Mildly spiced, this paratha is light, earthy, and satisfying — ideal for those seeking wholesome, diabetic-friendly or fiber-rich meals.

Pair it with curd, pickle, chutney, or a simple dal for a balanced and delicious meal.


Ingredients (Makes 4–5 parathas)

1 cup ragi flour (nachni)

½ cup whole wheat flour (optional, for better binding)

1 green chili, finely chopped

1 inch ginger, grated

2 tbsp onion, finely chopped (optional)

2 tbsp coriander leaves, chopped

½ tsp ajwain (carom seeds)

Salt to taste

Water to knead

Ghee or oil for roasting


How to Make Ragi Paratha (Step-by-Step)

1. Prepare the Dough

1. In a mixing bowl, add ragi flour, wheat flour (if using), ajwain, salt, ginger, green chili, and coriander.


2. Slowly add warm water and knead into a soft, slightly sticky dough.


3. Apply a little oil on top and rest for 10–15 minutes.


> Note: Ragi flour has no gluten, so use light hands while rolling.


2. Roll the Paratha

1. Divide dough into equal balls. Dust with dry flour.


2. Roll each ball gently into a 5–6 inch disc. If sticky, roll between two sheets of butter paper or plastic.


3. Cook the Paratha

1. Heat a tawa. Place the rolled paratha and cook on one side until bubbles appear.


2. Flip and apply ghee or oil. Roast both sides till cooked and light brown spots appear.


3. Repeat for all parathas.


Serving Suggestions

Serve hot with curd and pickle

Pairs well with dal, chutney, or even jaggery-ghee for kids

Can be rolled and packed for lunchboxes


Tips for Soft Ragi Parathas

Mix wheat flour for easier handling and softness

Use warm water while kneading

Avoid overcooking — it can dry out quickly


Variations

Add mashed potato or grated paneer to the dough

Mix in spinach puree or beetroot for added nutrition

Skip onions to make it Satvik or vrat-friendly

Breakfast

Meethi Paratha – Sweet, Ghee-Roasted Flatbread Just Like Maa Made


🍯 A Taste of Childhood, Folded in Ghee & Sweetness

Meethi Paratha is the kind of dish that doesn’t need an occasion.
It could be a quick breakfast before school, a snack wrapped in foil for train journeys, or a warm surprise on a cold evening — all with that unmistakable smell of ghee + jaggery caramelizing on the tawa.

Soft, slightly crispy, and sweet with hints of saunf or cardamom — this paratha is simple joy on a plate.


🛒 What You’ll Need (Makes 3–4 parathas):

1½ cups atta (wheat flour)

2–3 tbsp jaggery (grated) or sugar

1 tbsp ghee (for inside + roasting)

½ tsp cardamom powder or crushed saunf (fennel seeds)

Water to knead

Optional: a pinch of salt


🍳 How to Make It – Sweet, Soft & Nostalgic

1. Knead the Dough

Mix flour, cardamom/saunf, and a pinch of salt (optional). Knead into a soft dough using water. Let it rest for 15 mins.

2. Roll & Fill

Roll a small dough ball into a circle. Spread a little ghee and sprinkle 1 tbsp jaggery/sugar evenly inside. Fold and roll again.

Tip: Fold into triangle or square for layers.

3. Roast on Tawa

Cook on hot tawa with ghee until golden brown spots appear and jaggery starts to melt inside.

4. Serve Hot

Enjoy as is, or with curd or a glass of milk — it’s satisfying either way!


❤️ Why Meethi Paratha Feels Like a Warm Hug

Ready in minutes

Perfect for kids or fasting days

Naturally sweet, no fancy ingredients

Because some recipes are made of memories

Breakfast

Paneer Paratha – Soft & Spiced Cottage Cheese Stuffed Flatbread

🫓 When Paneer Meets Paratha, It’s a Match Made on the Tawa

Crispy on the outside, soft and creamy inside — Paneer Paratha is a perfect stuffed flatbread made with crumbled paneer, fresh herbs, and gentle spices.

Best served hot with curd, pickle, or a dab of butter, this paratha is a must-have in every Indian kitchen — whether for breakfast, brunch, or a lazy lunch.


🛒 What You’ll Need (Makes 4 parathas):

For the dough:

1½ cups atta (wheat flour)

Pinch of salt

Water to knead

Oil/ghee to roast


For the stuffing:

1 cup grated or crumbled paneer

1 green chili, finely chopped

1 tbsp coriander leaves, chopped

½ tsp roasted cumin powder

¼ tsp red chili powder

Salt to taste

Optional: pinch of garam masala or amchur


🍳 How to Make It – Soft, Spiced & Paneer-Packed

1. Knead the Dough

Mix atta, salt, and water to make a soft, pliable dough. Rest for 15 mins.

2. Make the Stuffing

Combine paneer with chili, coriander, and spices. Mix well.

3. Roll & Stuff

Roll a dough ball into a disc. Place 2–3 tbsp paneer filling in the center, fold the edges, and roll gently into a medium-thick paratha.

4. Cook on Tawa

Heat tawa and cook the paratha on both sides with oil/ghee until golden brown.

5. Serve Hot

With curd, butter, or your favorite pickle. Tastes amazing even when packed in a lunchbox.


❤️ Why Paneer Paratha Is Always a Hit

High in protein and flavor

Great for kids and adults alike

Quick to make if you have paneer ready

Because paratha + paneer is comfort food at its best

Breakfast

Stuffed Paratha Recipes – From Classic Aloo to Street-Style Anda

🍽️ Intro Paragraph:

There’s something deeply comforting about a hot, golden paratha straight off the tawa — crisp at the edges, soft inside, and packed with spiced filling.
From everyday classics to street-side favorites, here’s a hand-picked collection of stuffed parathas that are perfect for breakfast, brunch, or tiffin.

Whether you like it with white butter, pickle, or curd, these parathas have one thing in common — flavor in every bite.

🫓 1. Aloo Paratha – The Evergreen Breakfast King

Stuffed with mashed potatoes, green chilies, and warming spices, this North Indian classic is best enjoyed with a dollop of ghee and curd on the side.
Read Full Recipe »

🥚 2. Anda Paratha – Street-Style Egg Flatbread

A protein-packed paratha where eggs meet masalas inside or right on top — quick, filling, and ideal for brunch or a tiffin twist.
Read Full Recipe »

🥦 3. Gobi Paratha – Cauliflower with a Kick

Grated cauliflower spiced with ajwain, chili, and amchur, stuffed into soft dough and roasted till crisp. A winter favorite that never goes out of style.
Read Full Recipe »

🥔 4. Poha Cutlet – A Crunchy Paratha Cousin

Not exactly a paratha, but close! This flattened snack made with soaked poha and mashed potatoes is crispy, spiced, and roti-like — perfect for tea-time.
Read Full Recipe »

❤️ More Paratha Ideas Coming Soon:

Paneer Paratha

Methi Paratha

Cheese-Chili Paratha for kids