In our family, the first basket of spring strawberries wasn’t just a treat; it was a deadline. I remember my mother standing at the counter, her fingers stained a soft rose as she hulled the berries with surgical precision. While my grandmother belonged to the era of strawberry gelatin and box mixes, it was my mother who pioneered the “Real Fruit” revolution in our kitchen.
“A cake should taste like the field it came from,” she would say. She didn’t believe in artificial colors or synthetic syrups. She taught me that the secret to a royal Homemade Strawberry Cake lay in the “Quiet Luxury” of patience specifically the hour spent watching strawberry puree simmer into a thick, ruby-red concentrate. This cake became a “Parasocial Companion” in our home, the centerpiece of every birthday and a fragrant promise that winter had finally ended.
Today, at The Pinch of Masala, we are documenting her “Concentration Technique” for a 2026 audience that values “Ingredient Integrity” and the honest, unadulterated flavor of fresh fruit.
The greatest challenge in fresh fruit baking is the water content. Strawberries are mostly water, which can turn a delicate crumb into a soggy disaster. To master the “Intense Berry” profile, follow my mother’s three non-negotiable rules:
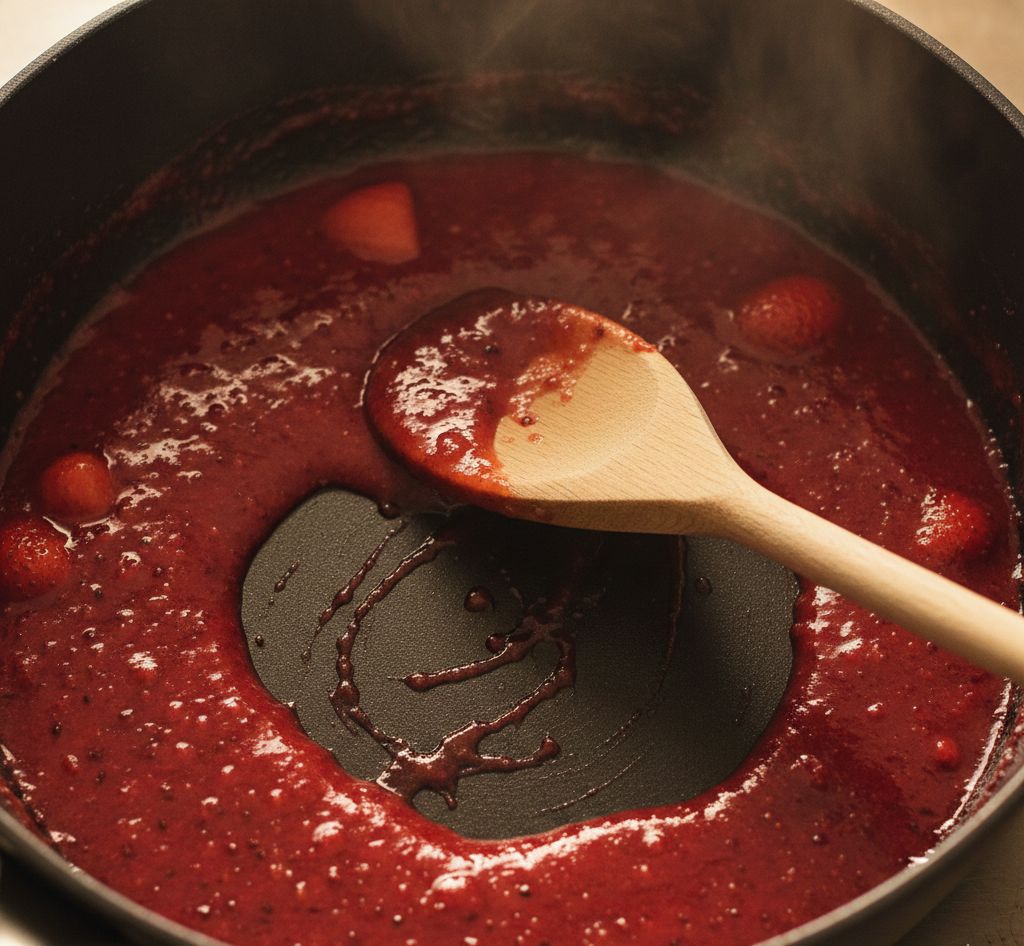
The “Reduction” Ritual: This is the ultimate “Digital Anthropologist” secret. You must never add raw strawberry puree directly to the batter. My mother would blend 1 cup of fresh berries and simmer them on low heat until they reduced to exactly 1/2 cup. This “reduction” evaporates the excess water, leaving behind a thick, jam-like concentrate that packs 10x the flavor without ruining the cake’s chemistry.
The Room Temperature Mandate: In 2026, we prioritize “Technical Excellence”. My mother insisted that every ingredient the butter, the eggs, and even the sour cream must be at room temperature before mixing. Cold ingredients prevent the fat from emulsifying, leading to a curdled batter and a flat, dense cake.
The “White” Egg Trick: For a light, airy, and fluffy crumb, my mother used only egg whites. This keeps the cake’s color a beautiful natural pink and ensures the texture remains “melt-in-the-mouth” soft, allowing the fruit’s aroma to be the hero.
Prep time: 30 mins | Reduction time: 30 mins | Cook time: 30 mins | Servings: 10-12
Diet: Vegetarian, Natural Fruit | Cuisine: Heritage Baking
2.5 cups All-Purpose Flour: Sifted to ensure a tender crumb.
The Concentrate: 1/2 cup Reduced Strawberry Puree (from 1 cup fresh berries).
The Moisture Base: 1 cup Unsalted Butter (softened), 1/2 cup Sour Cream (or Greek yogurt), and 1/2 cup Whole Milk.
The Sweetener: 1.5 cups Granulated Sugar.
Leavening: 2.5 tsp Baking Powder and 1/2 tsp Baking Soda.
Aromatics: 2 tsp Pure Vanilla Extract and 4 Large Egg Whites (room temperature).
Frosting: 8 oz Cream Cheese, 1/2 cup Butter, and 1/2 cup Ground Freeze-Dried Strawberries (the 2026 “flavor-bomb” secret).
Instructions:
The Reduction: Blend fresh strawberries and simmer in a saucepan over medium-low heat until reduced by half. Let it cool completely.
The Sift: Whisk together the flour, baking powder, baking soda, and salt.
The Creaming: Beat the butter and sugar for 3-5 minutes until light and fluffy. Add egg whites one at a time, followed by vanilla.
The Union: Alternate adding the dry ingredients and the sour cream/milk mixture to the butter base. Fold in the cooled strawberry reduction last.
The Bake: Pour into two greased 9-inch pans. Bake at 350^{\circ}F (177^{\circ}C) for 25-30 minutes until a toothpick comes out clean.
The Frosting: Whip cream cheese and butter until smooth. Add powdered sugar and the ground freeze-dried strawberries for an intense, naturally pink finish.
Serve: Frost the cooled layers and top with fresh, sliced strawberries.
The Berry Glaze: In the 2026 “Use-Up” economy, we value every scrap. Do not throw away the strawberry hulls or the “ugly” overripe berries. Simmer them with a little sugar and lemon juice to create a simple “Heritage Glaze.” Brush this over your warm cake layers before frosting to lock in moisture and add an extra layer of “Ingredient Integrity”.