I can still remember the gentle clink of the pot as my mother stirred a simmering makhana kheer on a Navratri evening. The kitchen would fill with the sweet aroma of milk thickening with roasted foxnuts, sugar, and a pinch of saffron. As a child, waiting all day during the fast, that first creamy spoonful of kheer at sunset felt nothing short of divine. Even now, the moment I begin to roast makhanas in ghee, I am transported back to those festive nights – the idols adorned in bright clothes, the air filled with prayers, and our family gathered eagerly for the sacred treat after a long day of fasting.
For those unfamiliar, makhana kheer is essentially a traditional Indian pudding made by slow-cooking puffed lotus seeds (also known as makhana or foxnuts) in milk, and sweetening it with sugar. My mother always adds a touch of cardamom and a few strands of saffron, which turn the kheer a beautiful golden hue and infuse it with a delicate aroma. We garnish it generously with nuts – golden almonds and cashews – and plump raisins, which not only elevate the flavor but also add a celebratory crunch and chew in each bite. This creamy dessert isn’t just delicious; it’s a bowl of memories and comfort. Traditionally prepared during Hindu fasting days and festivals, especially Navratri, makhana kheer has a special place in our home rituals. It’s both nourishing and auspicious, a dish that links generations and marks the sweet end of a day of devotion.
When I make makhana kheer now, I do it just like my mother and grandmother did. I roast the foxnuts in a spoonful of ghee until they’re crisp, let them luxuriate in simmering milk until soft, and sweeten the pudding to taste. The process is soothing in itself – the slow stirring, the fragrant steam, the anticipation of a treat. By the time it’s ready, the kheer is rich and velvety, the makhanas have absorbed the sweet milk, and the kitchen feels cozy and filled with love. If you’re looking for a dessert that’s easy to make yet deeply soulful, this Navratri-special makhana kheer might just become a beloved tradition in your family too.
Ingredients
2 tablespoons ghee (clarified butter)
2 cups makhana (foxnuts / popped lotus seeds)
4 cups whole milk (full-fat for best results)
1/4 cup sugar (adjust to taste)
1/2 teaspoon ground cardamom (or 4 green cardamom pods, crushed)
A pinch of saffron strands (about 8–10 strands)
2 tablespoons almonds, slivered (plus extra for garnish)
2 tablespoons cashews, halved (optional, or use instead of almonds)
2 tablespoons raisins (golden raisins preferred)
Instructions
1. Roast the Makhana: In a heavy-bottomed pan, heat the ghee on low flame. Add the makhanas (foxnuts) and roast them in the ghee, stirring continuously. Sauté for about 3–5 minutes until the makhanas turn light golden and crispy. (You’ll hear a slight crunch when you bite one.) Remove the roasted makhanas from the pan and set aside.
2. Toast Nuts & Raisins: In the same pan with remaining ghee, add the slivered almonds and cashews. Roast for 1–2 minutes until they turn golden brown. Add the raisins last and stir for just a few seconds – they will plump up quickly (be careful not to burn them). Remove the toasted nuts and raisins and keep them aside for later.
3. Boil the Milk: In a deep saucepan (or you can use the same pan if large enough), pour in the milk and bring it to a gentle boil over medium heat. Stir occasionally to prevent the milk from scorching at the bottom. Add the saffron strands to the milk as it heats, allowing their color and flavor to steep into the milk.
4. Combine Milk and Makhana: Once the milk comes to a boil, reduce the heat to low. Add the roasted makhanas to the milk. (For a creamier kheer, you can roughly crush or grind half of the roasted makhanas before adding, while keeping the rest whole – this helps thicken the pudding.) Stir everything together.
5. Simmer to Thicken: Let the makhanas simmer in the milk on low heat for about 10–15 minutes. Stir frequently, scraping the sides and bottom of the pan to mix in any thickened milk solids (this makes the kheer richer). The milk will reduce and thicken slightly, and the makhanas will soften as they absorb the sweet saffron-infused milk.
6. Sweeten and Spice: Once the milk has reduced to a creamy consistency (roughly about 3/4 of the original volume), add the sugar. Stir well so it dissolves completely. Next, sprinkle in the ground cardamom. The kitchen should now be filled with the lovely aroma of cardamom and saffron! Let the kheer simmer for another 2–3 minutes after adding sugar and cardamom, so all the flavors meld.
7. Finish with Nuts & Raisins: Turn off the heat. Add most of the toasted almonds, cashews, and raisins into the kheer, saving a few for garnish. Give a final stir. The makhana kheer at this point should be creamy with a pudding-like consistency. (It will thicken further as it cools, which is normal.)
8. Serve: Pour the kheer into serving bowls. Garnish each bowl with the reserved toasted nuts and raisins. Don’t forget to add a couple of saffron strands on top of each as a final festive touch. You can serve makhana kheer warm, which is especially comforting after a fast, or chilled if you prefer it cold and thick. Enjoy the kheer as a rich prasad (offering) during Navratri, or as a dessert to celebrate any special occasion.
Tips
Roast Thoroughly: Always roast the makhanas in ghee until they are crunchy before adding to the milk. This step enhances their nutty flavor and ensures they don’t turn soggy too quickly. Properly roasted foxnuts will absorb the milk nicely while still retaining a good bite.
Grind for Thickness: For an extra creamy texture, grind or powder a portion of the roasted makhanas and then add it to the milk. This ground makhana acts as a natural thickener, giving the kheer a luxurious, rabri-like consistency. (Many families take this approach to make the kheer richer, while still leaving some makhanas whole for texture.)
Stir and Scrape: While simmering the kheer, stir it often and scrape the sides of the pan. This helps reincorporate the thickened milk solids (malai) back into the pudding, making it richer. It also prevents the milk at the bottom from scorching – a little patience here goes a long way in achieving that perfect creamy texture.
Adjust Sweetness and Flavor: Sweeten the kheer to your taste. Sugar can be increased or reduced as per preference. You can even use jaggery for a deeper flavor – just remember to add it after turning off the heat to prevent curdling. Likewise, adjust spices to your liking: a pinch of nutmeg or a few drops of rose water can be added for variation, but cardamom and saffron are the classic choices that give makhana kheer its signature festive aroma.
Serving and Storage: Makhana kheer will thicken as it cools. If it becomes too thick, you can stir in a few tablespoons of warm milk to loosen it to desired consistency before serving. This dessert tastes wonderful warm (when it’s smooth and creamy) and equally delightful chilled (when it sets into a thicker pudding). If you chill it, the makhanas will continue to soften; some people love that custard-like result! Keep any leftovers refrigerated, and finish within 1-2 days for best taste.
Fasting-Friendly Variations: This recipe is naturally gluten-free and perfect for Navratri fasts. For a vegan version, swap the dairy milk with almond milk or coconut milk and use coconut oil instead of ghee – the kheer will still be deliciously creamy (though the flavor will differ slightly). You can also experiment with sweeteners like dates or honey if you avoid refined sugar during fasts.
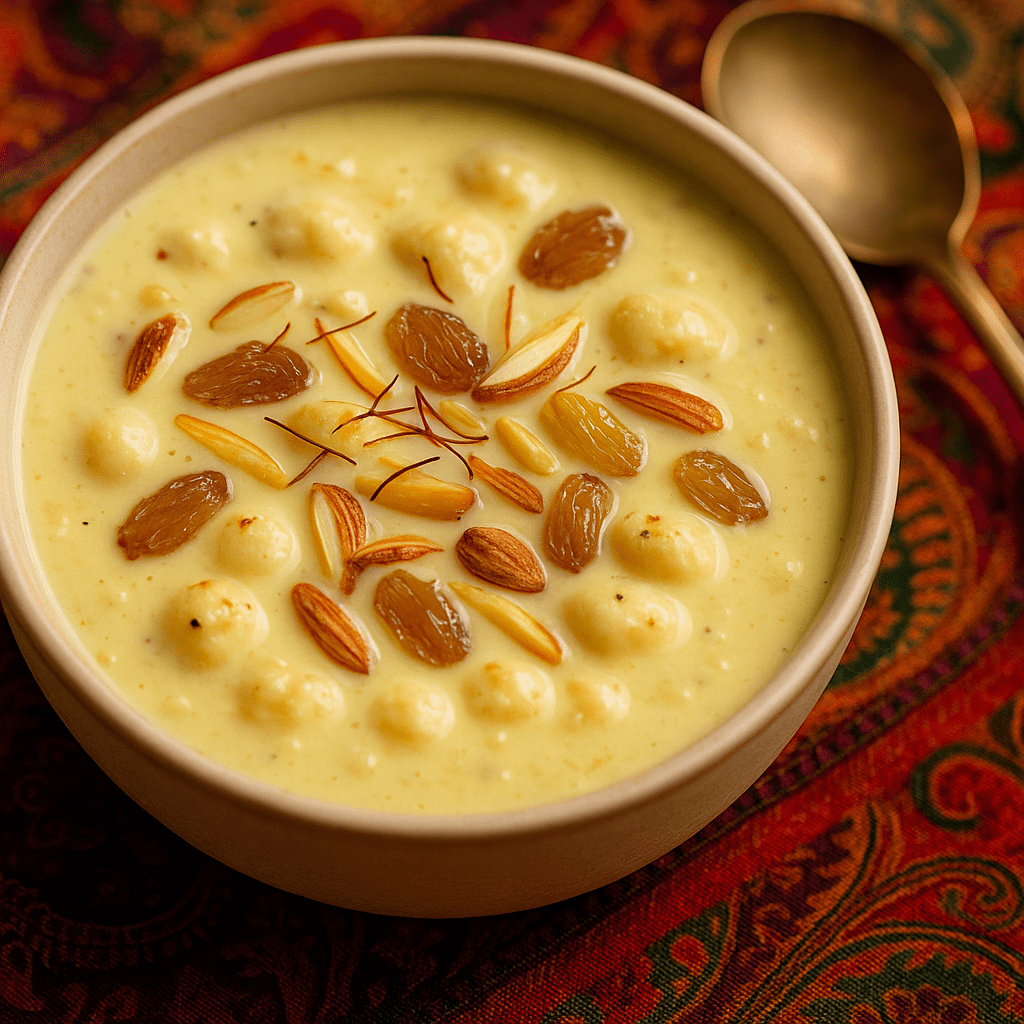
*(Warm kitchen lights cast a soft glow on a bowl of creamy makhana kheer, garnished with saffron strands, almonds, and raisins, resting atop a colorful festive cloth – a picture of comfort and celebration.)*
As I scoop into my own bowl of makhana kheer now, I’m filled with the same warmth and contentment that I felt years ago during those Navratri nights. This Navratri-special dessert is more than just a recipe – it’s a thread connecting me to my heritage, my family, and countless celebrations where this kheer made the moment sweeter. I hope you’ll invite this traditional foxnut pudding into your home and create beautiful memories around it. May each creamy, blissful bite remind you of the joy of tradition and the love that goes into our food. Happy Navratri and happy cooking! 🌼✨
Every Sunday evening, I can still smell my grandmother’s kitchen filled with the rich aroma of butter, garlic, and spices. A big pot of Dal Makhani would be simmering on the stove, its creamy steam promising a hearty, comforting meal. We kids knew it was ready when the bubbling pot slurped gently and she ladled the velvety lentils into bowls. Sitting around the table, passing naan and rice, every bite felt like a warm hug – this slow-cooked black lentil curry was truly food for the soul.
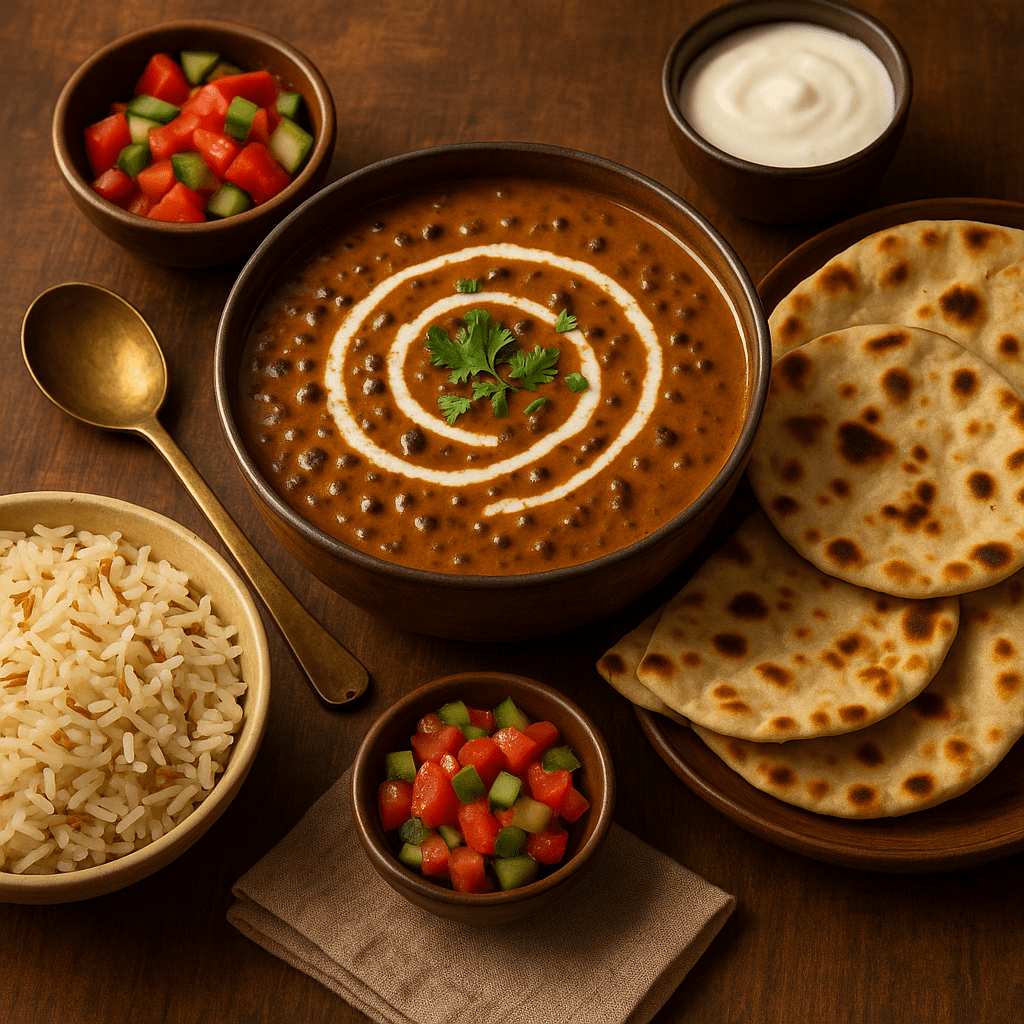
Dal Makhani is renowned in Punjabi cuisine as “a rich, creamy and popular Punjabi dish made with slow-cooked black lentils (urad dal) and kidney beans (rajma), simmered with butter, cream and aromatic spices”. Its very name hints at indulgence – makhani means butter – and indeed “both cream and butter contribute to the richness” of this curry. The result is a luscious, buttery stew that is, as one recipe puts it, almost “bound to be decadent” with its generous dairy and spices. In many North Indian homes, Dal Makhani is considered a “labour of love,” because it’s traditionally left to cook for hours on a gentle flame or over coals until the lentils almost melt into gravy. Legend even credits Delhi’s famous Moti Mahal restaurant for inventing this dish (attributed to Kundan Lal Gujral), but any Punjabi grandmother will tell you the home-cooked version—simply seasoned and slowly simmered—is the true classic. After the long simmer, butter and fresh cream are stirred in to give it that signature thick, creamy finish.
In our family, Dal Makhani always meant we gathered together. We’d serve it piping hot, with plenty of warm, buttered naan or fragrant cumin-spiced rice. The first taste of that creamy dal, draped over a fluffy piece of naan, brings back all those memories of home, warmth, and togetherness.
Ingredients
Whole black urad dal (kali dal): 1 cup (soaked overnight)
Red kidney beans (rajma): ¼ cup (soaked overnight)
Water: about 3 cups (for cooking the lentils)
Ghee or butter: 2–3 tablespoons (plus more for finishing)
Cumin seeds: 1 teaspoon
Whole spices: 2–3 cloves, 2 green cardamoms, 1 black cardamom, 1-inch cinnamon stick, 1 bay leaf (tej patta)
Tomatoes: 2–3 medium, pureed (or 1 cup tomato puree)
Red chili powder: 1 teaspoon (Kashmiri chili for color, or paprika)
Nutmeg: a pinch, freshly grated (optional, for warmth)
Salt: to taste
Water or stock: 1 cup (to adjust consistency if needed)
Heavy cream: ½ cup (or fresh cream/yogurt, for richness)
Kasuri methi (dried fenugreek leaves): ½ teaspoon, crushed (optional)
Fresh cilantro (coriander): chopped, for garnish
Optional (smoky “dhungar”): 1 small piece charcoal (heated red-hot) and 1 tsp ghee
Method
1. Soak the lentils and beans. In a large bowl, cover the urad dal and rajma with plenty of water. Let them soak for 8–10 hours or overnight. Drain and rinse well before cooking.
2. Cook the dal and rajma. Transfer the drained lentils and beans to a pressure cooker. Add about 3 cups of fresh water and a pinch of salt. Cover and cook on high heat until the cooker whistles about 18–20 times (roughly 30–40 minutes). Then turn off the heat and allow the pressure to release naturally. The lentils should be very soft, almost falling apart – “melt in the mouth” tender.
3. Prepare the spice base (tadka). While the lentils cook, heat 2 tablespoons ghee or butter in a heavy-bottomed pot or deep pan over medium heat. Add the cumin seeds, cloves, green cardamoms, black cardamom, cinnamon stick, and bay leaf. Sauté for 30 seconds until fragrant.
4. Sauté onions and aromatics. Add the chopped onion and green chilies to the pot. Cook until the onion is translucent and just beginning to brown. Stir in the ginger-garlic paste and continue cooking for another minute, until the raw smell goes away.
5. Add tomatoes and spices. Pour in the tomato puree and a splash of water. Season with the red chili powder, a pinch of nutmeg, and salt. Cook the mixture, stirring often, until it thickens and the oil begins to separate from the masala.
6. Combine lentils and simmer. Stir the cooked dal and rajma (with its cooking liquid) into the pot. Add extra water or stock if needed to reach your desired consistency. Bring everything to a gentle boil, then reduce the heat to low. Slow simmer uncovered for 20–30 minutes, stirring occasionally. (As one chef notes, *“the more you slow cook it, the better it tastes.”*) This slow cooking helps the dal become creamy and develop a rich flavor.
7. Finish with dairy. Mash a few lentils against the side of the pot to naturally thicken the sauce. Stir in the heavy cream and mix well. Add a knob of butter or a splash of more ghee. Sprinkle in the crushed kasuri methi for a fragrant boost and adjust salt or spices to taste.
8. Optional smoke (dhungar). For the classic smoky aroma, light a piece of charcoal over an open flame until it glows. Carefully place it in a small metal cup or foil in the center of the pot, pour 1 teaspoon ghee over the hot coal, and immediately cover the pot for 2–3 minutes. The resulting smoke will infuse the dal with that restaurant-style smokiness. (Only do this if you’re comfortable with it and watch safety closely.)
9. Garnish and serve. Remove the whole spices if desired. Garnish the Dal Makhani with chopped cilantro and a drizzle of cream. Serve it hot as the star of a family dinner.
Suggested Accompaniments
Soft, buttery naan or garlic naan: Perfect for scooping up every last bit of dal.
Jeera (cumin) rice: Fragrant basmati rice tempered with cumin seeds complements the rich dal.
Roti or paratha: Warm flatbreads are also wonderful if you prefer.
Fresh salad or raita: A simple kachumber salad (chopped cucumber, tomato, onion with lemon) or cool yogurt raita balances the richness.
Pickles and lemon: Mango pickle, mixed achar or lemon wedges add a tangy punch.
Papadums (papads): Crispy lentil crackers make a nice crunchy side.
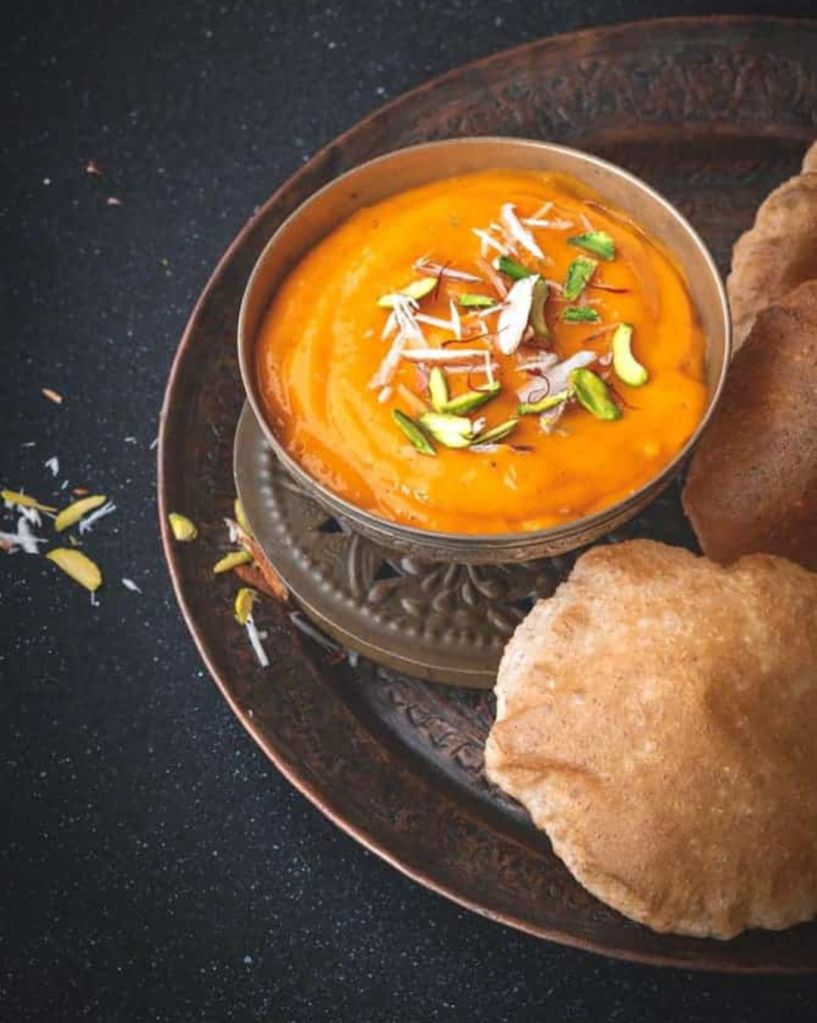
Aamras served with puri, garnished with slivered nuts – a golden summer treat in Maharashtrian and Gujarati cuisine.
There’s a particular joy in summer that comes in the form of mangoes. As the mercury rises, so does the excitement in Indian homes for juicy, ripe mangoes. And nothing captures that sunshiney bliss better than a chilled bowl of Aamras with hot, fluffy puri. Aamras (literally “mango nectar” in Hindi/Marathi) is essentially a silky smooth puree of ripe mangoes, often served as a dessert or side with Indian bread. In western India – especially Maharashtra and Gujarat – this combination of Aamras-Puri isn’t just food, it’s an emotion. It reminds one of school holidays, family gatherings, and festive feasts where everyone’s sitting around a big thali, reaching for yet another puri to scoop up that golden, sweet mango goodness. In this post, let’s dive into this traditional delight – from a warm introduction (because every recipe has a story) to the ingredients, step-by-step method, tips, a quick note on making puri, serving suggestions, and a special section on why I love it so much. Get ready to savor summer on a plate!
Ingredients
Here’s what you’ll need to make aamras (serves 4) – it’s a short and sweet list:
Ripe Mangoes – 2 to 3 large mangoes, approximately 2 cups of chopped mango pieces (Alphonso Hapus works great for its sweetness and color, or use Kesar, Payari, etc.)
Sugar – 2–4 teaspoons, or to taste (adjust depending on the sweetness of the mangoes; you can also use jaggery for a more rustic sweetness)
Milk – 2 tablespoons, optional (to adjust consistency; use cold milk for a creamier aamras, or water for a thinner consistency or a vegan option)
Saffron Strands (Kesar) – a pinch, optional (for garnish and a delicate aroma; soak in a teaspoon of warm milk for a minute to draw out color)
Ghee – 1 teaspoon, optional (for drizzling on top when serving – a traditional touch especially loved in Gujarat)
Note: The above ingredients are for the aamras (mango puree) itself. To enjoy it the traditional way, you’ll also need ingredients for puri (deep-fried whole wheat bread) – see the brief puri recipe below. Typically, puri is made with whole wheat flour, salt, and water, and fried in oil.
Method
1. Prep the Mangoes
Wash the mangoes thoroughly to remove any sap or residues. Peel the mangoes and cut the flesh into small pieces, discarding the seed. The riper the mango, the easier this will be. If you’re using a variety like Alphonso or Kesar, you’ll already notice the rich aroma as you chop – that’s a good sign of delicious aamras to come!
2. Blend into Aamras
Place the mango pieces into a blender or mixer jar. Add sugar (if your mangoes are only mildly sweet) and the ground cardamom. Blend everything until you get a smooth, thick mango puree. The consistency should be pourable but not runny. If the mango flesh is very dense or the blender is struggling, add 1-2 tablespoons of milk (for a creamy touch) or water and blend again. The result should be a glossy, sunset-yellow puree that’s silky on the tongue. (Traditional method: If you’re feeling nostalgic, you can also mash the mango pulp by hand. Simply squeeze and massage the mango pieces in a bowl using your fingers or a wooden whisk (mathani) – it’s labor-intensive but yields a lovely texture, and it’s how our grandmothers did it!)
3. Taste and Adjust
Now, taste the blended aamras. This step is crucial because mangoes can vary in sweetness. If it’s already sweet enough, you’re good to go. If not, add a teaspoon or two more of sugar and blend briefly. Remember, you can always add sweetness but you can’t remove it, so add in small increments. Traditionally, if the mangoes are top-quality and naturally sweet, no extra sugar is needed. Also check the consistency: if you prefer it a bit thinner (especially if you plan to drink it or if it’s too thick to scoop), you can whisk in a little more milk or water. Just be careful not to dilute it too much – aamras is best enjoyed thick enough to coat the back of a spoon.
4. Chill
Pour the prepared mango puree into a serving bowl (or individual small bowls) and cover. Place it in the refrigerator for at least 30 minutes (or even a couple of hours). Aamras is meant to be served chilled – the flavors perk up when it’s cold, and it’s incredibly refreshing on a hot day. (If you’re in a rush, you can pop it in the freezer for 10-15 minutes, but don’t let it freeze solid.) Meanwhile, you can get ready to fry the puris so they’re timed to be hot and fresh when you serve.
5. Prepare the Puris
While the aamras is chilling, it’s time to make some puri (fried puffed bread) to go with it. Skip ahead to the Puri Recipe section for a brief how-to. Essentially, you’ll knead whole wheat flour with a bit of salt and water to make a dough, then roll it into small discs and deep fry until they puff up. This only takes around 20 minutes. The key is to have your puris hot and ready when you serve aamras.
6. Serve and Enjoy
Give the chilled aamras a quick stir just before serving. Then, serve it in small bowls or katoris placed on each plate. Pile up the freshly fried puris in a basket or tray lined with paper (to absorb excess oil). Now for the special touch: if you like, drizzle a few drops of ghee on the surface of each bowl of aamras. This is a Gujarati tradition – the faint nuttiness of ghee on cold mango puree is a game changer, trust me. Garnish with a couple of saffron strands on top for a pop of color (and divine aroma). To eat, tear a hot puri, scoop up some chilled aamras with it, and enjoy the explosion of flavors – the experience is pure bliss, combining the cold, sweet, smooth mango with the warm, slightly salty, flaky puri. It’s a summer marriage made in heaven!
Tips for the Perfect Aamras
Choose the Right Mangoes: Start with quality mangoes because aamras is all about the mango. Fully ripe, juicy mangoes with non-fibrous flesh work best. Varieties like Alphonso (Hapus), Kesar, or Pairi/Payari are ideal for their vibrant color and rich natural sweetness. If the mangoes are a bit fibrous, you can push the puree through a sieve after blending to catch any fibers – but using a good mango avoids this extra step. Seasonal, sweet mangoes = heavenly aamras.
Sweetness Control: Traditionally, if mangoes are very sweet, no extra sugar is added to aamras. Taste your mangoes/puree first, and sweeten only as needed. If you do need to add sweetness, you have options: plain sugar dissolves easily and won’t change the color, whereas jaggery (unrefined cane sugar) can add a deeper, molasses-like flavor – great if you like a rich, earthy sweetness (just know it will make the color a bit darker). Add sweetener in small increments, blending and tasting as you go, so you hit the perfect sweet spot.
Consistency Matters: Aamras should have a slightly thick, pourable consistency – think of a thick smoothie or a flowing custard. It shouldn’t be watery or too thin. If your aamras is too thick (maybe your mangoes were super pulpy or you want a lighter texture), adjust gradually. For a Maharashtrian style tweak, you can stir in a few tablespoons of cold milk to lend a creamier, smooth finish. For a Gujarati style approach (which typically avoids milk), add a spoon or two of water instead – just enough to loosen the puree slightly. Always add a little at a time and check; you can’t undo a watery aamras! Also, remember it thickens a bit after refrigeration, so err on a touch thinner if you plan to chill it long.
Flavor Boosters: The classic aamras is usually just mango, maybe sugar, and cardamom. Cardamom powder is a beloved addition in Maharashtra – it adds a warm, aromatic note that complements mango so well. In Gujarat, some families add a pinch of dry ginger powder (soonth/sonth) for a gentle zesty hint, and often a spoonful of ghee on top while serving. You can try both variations in your kitchen and see what you prefer. Saffron is another luxurious addition – just a few strands can make your aamras look and taste royalty-worthy. If using saffron, soak it in a tiny bit of warm milk and stir that into the aamras for an even infusion of color and flavor. Lastly, though not traditional, a squeeze of lemon or a pinch of salt can be added if your aamras tastes overly sweet or flat – acid and salt are known flavor enhancers (but use very sparingly, only if needed).
Serving Temperature: Always serve aamras chilled. This isn’t the kind of dessert you serve warm or at room temperature. The chill amplifies the refreshing feel. If you’re making it ahead for a party, you can blend it and keep it in the fridge. Just give it a good stir before serving (if it sat for many hours, the top might darken slightly or a bit of liquid might separate – a quick stir will homogenize it again). For outdoor summer picnics, you can even keep the serving bowl of aamras over another bowl of ice to keep it cold.
Storage: Because aamras is essentially fresh fruit puree, it’s best enjoyed within a day or two for the best flavor. If you have leftovers, refrigerate them in a clean, airtight container and try to finish by next day (remember, no preservatives here!). For slightly longer storage or if you have a glut of mangoes, you can make mango pulp in bulk and freeze it. Pour the pure mango puree (no milk or sugar added) into freezer-safe bags or containers and freeze. This frozen mango pulp can last a few months. When you crave aamras out of season, thaw the pulp, blend it smooth (add your sugar and spices at this point), and enjoy. It won’t be as aromatic as fresh, peak-season mango aamras, but it’s still a nice treat. (One pro tip: I often freeze small portions of mango pulp at peak season. Come Diwali or New Year, I surprise the family with aamras-puri when no one’s expecting it!)
Presentation: If you want to dress it up for guests or a festive occasion, get creative with presentation. You can serve aamras in elegant glass bowls or even in the mango skins (for a rustic touch). Top each serving with something pretty and tasty – a few pistachio or almond slivers, a couple of saffron strands, or that drizzle of ghee we discussed. The garnishes not only make it look festive but also add texture (nuts) or aroma (saffron, ghee). And of course, serve alongside puri – the contrast of textures (soft puree vs. puffy bread) and temperatures (cold vs. hot) is what makes this duo legendary.
Making the Puri (Fried Bread)
No aamras-puri experience is complete without the puri – the simple fried bread that becomes a perfect scoop for the mango puree. Here’s a quick guide to make puris at home:
Ingredients (for puri dough): 2 cups whole wheat flour (atta), 1/2 teaspoon salt, about 3/4 cup water (adjust as needed), and oil for deep frying. (Optional: 1 teaspoon of oil or ghee to rub into the dough for extra crisp yet soft puris.)*
Make the Dough: In a mixing bowl, combine the whole wheat flour and salt. Add water little by little and start kneading. You want a firm, stiff dough (firmer than chapati dough). It should not be sticky. Knead for a few minutes until smooth. Coat the dough with a few drops of oil to keep it from drying, cover, and let it rest for about 15 minutes (resting helps gluten develop for better puffing).
Roll it Out: After resting, divide the dough into small balls – roughly the size of a lemon. Flatten a ball and use a rolling pin to roll it into a circle of about 4 inches in diameter. Tip: Don’t use dry flour to roll (as we do for rotis) because that can burn in the oil; if needed, apply a tiny bit of oil on the rolling surface or pin to prevent sticking. The rolled disc should be even and not too thin.
Fry the Puris: Heat oil in a deep kadai or skillet. The oil needs to be hot (around 180°C/350°F if you use a thermometer). Test by dropping a small bit of dough; it should sizzle and rise up immediately. Slide one rolled puri carefully into the oil. It will sink momentarily then puff up. Gently press it with a slotted spoon or skimmer – this helps it puff completely. Fry for about 10-20 seconds on one side, then flip and fry another 10 seconds until puri is puffed and light golden in color. Remove with the slotted spoon, letting excess oil drain, and place on paper towels. Continue with the remaining puris, and remember not to crowd the pan – fry one or two at a time depending on the size of your pan. Keep the fried puris in a single layer so they stay puffy (stacking can flatten them).
Serve: Puris are best enjoyed fresh and hot. They tend to lose their crunch and deflate a bit as they cool, so time them to be done just when you’re about to eat. Pile them in a bowl or dish lined with paper. They’ll disappear fast – especially with a tempting bowl of aamras on the table!
If you prefer a detailed recipe with step-by-step photos for puri, feel free to check out a full Puri Recipe. But the above instructions should work like a charm for a quick batch of puffed puris. Once your puris are ready, dive into the Aamras-Puri feast without delay – hot puris + cold aamras = happiness!
Serving Suggestions
Aamras with puri is such a versatile duo – it can be the highlight of a festive feast or a simple indulgent summer lunch. Here are a few serving ideas and contexts for this delightful dish:
Festive Thali: In many Maharashtrian and Gujarati wedding feasts and festive occasions, aamras-puri is served as part of a traditional thali (a full platter meal). Picture a big plate with spicy veggies, pickles, curries, yogurt and, in the place of honor, a katori of bright orange aamras with a stack of puris. It adds a celebratory vibe and is often the most loved item on the platter. If you’re hosting a special lunch (say for Ganesh Chaturthi or a family get-together in mango season), consider making a mini-thali with aamras-puri as the star – keep the rest of the menu light since this duo is quite rich and filling on its own.
Summer Lunch or Dessert: Honestly, aamras-puri can be a meal in itself. For a laid-back summer lunch, serve yourself a generous bowl of chilled aamras and as many puris as you can eat. You won’t need much else! It’s common in our home to have just aamras and puri for Sunday lunch on scorching days – it’s cooling, satisfying, and puts everyone in a good mood (and then straight into a mango-induced nap 😄). Alternatively, if you’ve made a spicy Indian meal, you can serve aamras as a dessert in the end. In that case, you might serve it without puri, just in small dessert bowls to be eaten on its own like a pudding. But trust me, it’s extra special with puri, so I almost always pair them.
With a Savory Side: While not required, you can add a savory side dish to your aamras-puri meal. A classic combination in Maharashtra is Aamras-Puri with Batatyachi Bhaaji – which is a simple, mild potato stir-fry (turmeric and minimal spices) served alongside. The lightly spiced potatoes complement the sweet aamras and make the meal feel complete. Another traditional accompaniment is a spoonful of mango pickle on the side of your plate. A little bit of tangy, spicy pickle eaten intermittently cuts through the sweetness and elevates the flavors – it might sound odd, but try a tiny lick of pickle in between bites of aamras-puri, it’s wonderful! However, avoid any strongly flavored curries or sabzis with aamras-puri; the mango puree is delicate and should remain the hero of the meal (strong flavors can clash or overwhelm the experience).
Shrikhand-Puri Alternative: If by any chance you’re reading this outside of mango season and still want a similar treat – there’s a popular alternative in Maharashtra: Shrikhand-Puri. Shrikhand is a thick yogurt-based sweet (often flavored with saffron and cardamom) and is also enjoyed with puris, especially when mangoes aren’t around. But as soon as summer arrives and mangoes are aplenty, shrikhand takes a backseat and the glorious aamras takes center stage. Some festive menus even offer both! So, you could serve shrikhand alongside aamras for variety, and let people alternate between the two – both eaten with puris. It’s double indulgence but hey, Indian festivals and summers are meant for enjoying abundance.
Finally, whether you serve it in a grand thali or as a cozy family meal, remember the golden rule: Hot puris and cold aamras. That temperature contrast is key to the experience. So time your meal prep accordingly, and enjoy this simple yet divine pairing that truly celebrates the king of fruits – the mango!
Why I Love It
Every bite of aamras with puri carries me back to the golden summers of my childhood. I remember tumbling into the house after long hours of playing under the harsh sun – face red, hair messy, and stomach growling. The moment I stepped in, I’d be hit by the heavenly fragrance of ripe mangoes wafting from the kitchen. My grandmother would be there, seated on the cool floor, a large bowl in front of her. She’d be squeezing mango pulp by hand with an old wooden masher – a true labor of love that filled the entire house with a sweet, fruity aroma. Nearby, a heap of fluffy puris would be wrapped in a cloth to keep them warm. As soon as I washed my hands (a must-do ritual enforced by grandma!), she’d hand me a katori of chilled aamras and a couple of ghee-brushed puris. I would sit cross-legged on the floor beside her, and dunk a piece of puri into the thick mango puree. That first bite – oh, I can still recall it – the puri’s warmth meeting the cold, luscious mango sweetness – it was pure bliss. I’d devour it with mango dripping down my fingers, and she’d chuckle, wiping my hands with the end of her saree pallu.
What makes aamras-puri so special to me is not just its delectable taste, but the memories and comfort it brings. It’s a reminder of family gatherings during summer vacations, when all of us cousins would sit in a big circle with a huge pot of aamras at the center. We’d compete to see who could eat the most puris with aamras, giggling with mango-streaked lips and sticky fingers. Those afternoons felt endless and joyful.
It’s also the simplicity of the dish that enchants me – just ripe fruit and a basic bread, no elaborate techniques or fancy ingredients – yet it feels like a royal treat meant for the gods. Even today, as soon as the mango season hits its peak, the very first thing I make is aamras. It’s my way of celebrating summer. The creamy sweetness of the mango, the light hint of cardamom, the indulgent aroma of that little drizzle of ghee, and the satisfaction of tearing into a hot puri to scoop it all up… it’s an experience that nourishes the soul as much as the body. This dish is sunshine and nostalgia served on a plate, and that’s why I absolutely love it.