Dessert

Coconut Burfi – A Festive Sweet Full of Simplicity and Soul

Memories of Sweet Aroma and Shimmering Festivals

As a child, I always knew Diwali was near when the kitchen began to smell of roasted coconut and ghee.
Those evenings were magical diyas flickered in every corner, and the air was filled with the warm sweetness of Coconut Burfi cooking on the stove.

I’d sit beside my mother as she grated coconut with her old metal scraper, tiny curls of white piling up like snowflakes. She would roast it slowly in a heavy-bottomed kadai, the fragrance blending with the sound of bubbling sugar syrup. When the mixture turned glossy and thick, she’d spread it onto a greased plate, press it smooth, and let it cool.
The best part came next  she’d cut it into perfect diamonds with a buttered knife, and the first piece was always mine.

Even today, I make Coconut Burfi the same way she did  simple ingredients, patient stirring, and lots of love. It’s not just a sweet; it’s a tradition. Every bite takes me back to those golden Diwali evenings when family, laughter, and the aroma of coconut filled our home.

About This Recipe

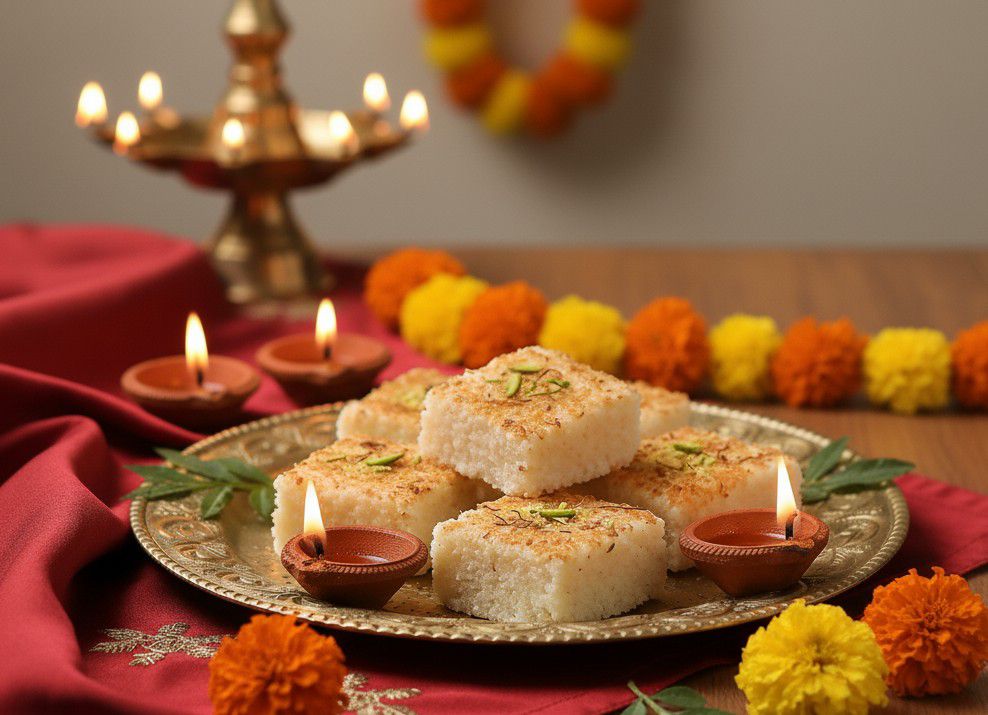
Coconut Burfi (also called Nariyal Barfi in Hindi or Kobbari Mithai in Kannada) is a traditional Indian sweet made with freshly grated coconut, milk, sugar, and cardamom. Some variations use jaggery for an earthy sweetness, while others add a touch of ghee or khoya for richness.

It’s one of those sweets that’s easy to make, quick to set, and always satisfying perfect for festive offerings, gifting, or temple prasad.

Recipe Details

Servings: 10–12 pieces
Prep Time: 10 minutes
Cook Time: 25 minutes
Total Time: 35 minutes

Ingredients

2 cups freshly grated coconut (preferably from medium-aged coconut — not too tender or too dry)

1 cup milk (or ½ cup condensed milk for richer flavor)

1 cup sugar (or adjust to taste; substitute with ¾ cup jaggery for a traditional version)

1 tablespoon ghee

½ teaspoon cardamom powder

5–6 chopped cashews or almonds (optional, for garnish)


Instructions

1. Prepare the Coconut

Grate the coconut using a fine grater only the white portion (avoid the brown shell layer).
Measure 2 cups of grated coconut and keep aside.
(Tip: For extra softness, pulse the grated coconut once in a mixer without adding water.)


2. Start the Base

In a heavy-bottomed kadai or non-stick pan, heat ghee and add the grated coconut.
Roast gently on low flame for 3–4 minutes — just enough to release aroma, without browning.


3. Add Milk and Sugar

Pour in the milk and stir. When it comes to a gentle boil, add sugar (or grated jaggery if using).
Stir continuously until the sugar dissolves completely.
Cook this mixture on medium flame, stirring often, until it thickens and begins to leave the sides of the pan.


4. Flavor It

Add cardamom powder and mix well.
If using condensed milk, you can skip part of the sugar — the mixture will thicken faster.
Continue to stir until it reaches a soft, fudge-like consistency.

(To test: Drop a small portion on a plate it should firm up slightly when cooled, not sticky.)


5. Set the Burfi

Grease a steel or glass plate with ghee.
Pour the thickened mixture and spread evenly using a spatula.
Smooth the surface and sprinkle nuts if desired.
Let it rest for 10–15 minutes, then mark pieces with a greased knife.
Once fully cooled, cut into squares or diamonds and gently lift them out.

Expert Tips

Fresh Coconut Works Best: Always use freshly grated coconut for authentic taste. Frozen coconut works in a pinch just thaw it and squeeze out excess moisture before use.

Texture Control: Roast lightly for soft burfi or a bit longer for a chewy, halwa-like texture.

Jaggery vs Sugar: Jaggery gives a deep, earthy sweetness and slightly darker color, while sugar makes the burfi pure white and clean-flavored.

Avoid Overcooking: Once the mixture starts leaving the sides of the pan, remove immediately  overcooking makes the burfi dry and crumbly.

Shelf Life: Stays fresh for 3–4 days at room temperature, and up to a week refrigerated in an airtight container.

Serving Ideas

Serve Coconut Burfi as part of your Diwali thali with Besan Ladoo, Mysore Pak, and Chiroti.

Wrap individual pieces in butter paper for festive gifting.

Add a thin edible silver leaf (vark) for a traditional festive touch.

Serve warm with a drizzle of ghee for temple-style prasadam vibes.

Closing Note

Every Diwali, when I prepare Coconut Burfi, I still hear my mother’s words echoing  “Stir it patiently, and don’t rush the sweetness.”

It’s a humble sweet, but it carries generations of love in every bite  the laughter of cousins sneaking warm pieces from the tray, the sparkle of diyas, and the gentle glow of home.

So this festive season, skip the store-bought sweets and try this simple, soulful Coconut Burfi.
It takes just 30 minutes, yet the memory of its sweetness will last long after the lights of Diwali fade. 🌙✨

Dessert

Bengali Jilapi (Jalebi) Recipe

Introduction

I still remember celebrating Eid as a child in Dhaka, waking to the smell of frying Jilapi (Bengali jalebi) in my grandmother’s kitchen. My eyes would light up at the sight of hot, coiled sweets – each spiral glistening with sweet syrup. Jilapi (Bengali for jalebi) is a beloved treat in Bengali culture, enjoyed at festivals and street stalls alike. It turns up at weddings, Eid, Durga Puja and other celebratory occasions. In fact, one reference notes that people in Bengal share sweets during Durga Puja, Lakkhi Puja, marriages and more as a way to spread happiness.  Jalebi (In Bengali: jilapi) is traditionally made by deep-frying a wheat-flour batter in pretzel-like spirals and then soaking them in sugar syrup. This spiral dessert is crisp on the outside and sticky-sweet inside – exactly the kind of treat that makes Bengali festivals feel complete.

Ingredients

All-purpose flour (maida): 1 cup (about 125 g)

Gram flour (besan): 2 tablespoons (optional; adds crunch)

Semolina (suji/rava): 1–2 tablespoons (optional, for extra crispness)

Turmeric powder: a pinch (for color)

Plain yogurt: ½ cup (for fermentation; or ½ cup water for instant batter)

Baking powder or baking soda: ½ teaspoon (for the quick method)

Oil or ghee: for deep frying

For the sugar syrup: 2 cups sugar, 2 cups water, a pinch of saffron strands, 4–5 green cardamom pods (or ¼ teaspoon cardamom powder), and 1 teaspoon lemon juice.

Optional garnishes: nuts (pistachios, almonds) or fresh milk/rabri.


Preparation

1. Prepare the batter: In a bowl, whisk together the all-purpose flour, gram flour (or semolina), turmeric and a pinch of baking powder if you are making instant Jilapi. Stir in the yogurt and enough water to form a thick but pourable batter. Beat or whisk thoroughly until smooth. The batter should flow easily but not be very runny.


2. Ferment (traditional) or rest (quick): For a traditional jilapi, cover the batter and let it rest at room temperature for 12–24 hours. The batter should develop a slight sour aroma from the yogurt. For a quicker version, add ½ teaspoon baking soda or baking powder now and skip the resting period. (The leavening will make the coils fluffy.)


3. Make the sugar syrup: Combine the sugar and water in a saucepan. Bring to a boil and simmer until the syrup reaches a single-string consistency (test by dipping a fingertip – a drop of syrup should form a thin thread between your fingers). Remove the pan from heat and stir in the saffron strands, crushed cardamom, and lemon juice. Keep the syrup warm while you fry the jilapi.


4. Heat the oil: In a deep pan or kadhai, heat oil or ghee over medium heat (around 160–170°C). If using neutral oil, add a tablespoon of ghee for extra richness and flavor. The oil should be hot enough that a drop of batter sizzles and rises immediately, but not so hot that the jilapi browns too fast.


5. Fry the coils: Pour the batter into a squeezable bottle or piping bag (or a sturdy ziplock bag with a small corner snipped off). Pipe out spirals or concentric circles directly into the hot oil. You can start from the center and spiral outward, or make loose coil rings. Fry the spirals on medium heat until they turn a deep golden-orange (they will puff up slightly). Fry one test jalebi first: if it puffs up into a thick soft spiral, your batter was too runny – add a little more flour. If it forms a thin, crispy disk, it was too thick – loosen it with a bit of water. Adjust as needed and fry the rest of the batch, turning so they brown evenly.


6. Soak in syrup: As soon as the coils are fried, transfer them to the warm sugar syrup. Make sure the syrup is warm, not boiling hot – very hot syrup will make the jilapi too soft. Let the jilapi soak for about 2–3 minutes, then remove with a slotted spoon, allowing excess syrup to drip off.


7. Serve: Serve the Jilapi hot or warm on plates. They will still be crisp on the outside and gooey inside. (See serving suggestions below for pairing ideas.)


Tips for Perfect Jilapi

Batter consistency: Aim for a batter that is fairly thick but free-flowing. As one recipe notes, “the consistency of the batter must be free-flowing yet thick” for crisp, springy coils. Adjust with small amounts of water or flour while mixing.

Piping and shape: Using a sauce bottle or cloth bag makes it easier to pipe uniform spirals. Hold the bottle close to the oil surface to minimize splatter.

Oil temperature: Fry on medium heat. If the oil is too cool, the jilapi will absorb oil and turn heavy; if too hot, they brown too quickly. You should be able to control a steady sizzle.

Syrup and soaking: Always use warm (not boiling) syrup. Test for “single-string” consistency, and stir in a little lemon juice or saffron as shown. Soak the fried jalebis for only 2–3 minutes; prolonged soaking or overly hot syrup will make them lose their crispness.

Prevent crystallization: A squeeze of lemon juice in the syrup helps keep it from crystallizing. If the syrup cools or crystallizes before soaking, gently reheat it.

Spiral perfection: If a spiral breaks or spreads, adjust batter thickness (add flour or water as mentioned) and try again. With practice, you’ll get the circular shape more uniform.


Serving Suggestions and Variations

Enjoy hot: Bengali Jilapi is traditionally eaten hot or warm. As one source notes, it can be served plain – but in some regions it’s also enjoyed with accompaniments like sweetened condensed milk (rabri), milk or yogurt.

With breakfast: In Bengal, crisp hot jilapi are even eaten alongside semolina pudding or sweet curd (mishti doi) for breakfast.

Garnishes: For a festive touch, serve sprinkled with slivered pistachios or almonds, or garnish the serving plate with fresh rose petals (a Bengali tradition for sweets).

Chanar Jilapi (paneer jalebi): A popular Bengali variant uses fresh chhena (cottage cheese) in the batter. This chhena-based jilapi (often shaped like knotted spirals) is a classic at Bengali sweet shops, with a richer, denser texture.

Sweeteners: You can swap refined sugar for date-palm jaggery (nolen gur) in the syrup for a seasonal twist – it turns the jalebi brownish and gives a caramel-like flavor.

Storage: Leftovers can be gently reheated in a low oven or skillet to regain crispness. However, jilapi are best eaten within a few hours while still crisp and warm.


Enjoy making and sharing this golden spiral sweet – a Bengali festival classic that never fails to spread joy!

Dessert

Gajar Ka Halwa – Traditional Indian Carrot Pudding

Intro: A Bowl of Comfort & Celebration

Some dishes are not just recipes — they are rituals.
Gajar Ka Halwa is one such dessert. Made slowly over hours, stirring patiently, letting carrots soak up milk and ghee until they transform into a soft, glowing pudding.

My memories of Gajar Ka Halwa are tied to winter evenings — cozy sweaters, the smell of cardamom filling the kitchen, and my mother calling us all in to scoop up the first warm bowl.

Ingredients:

4–5 medium carrots (red winter carrots preferred), peeled and grated

2 cups full-fat milk

3–4 tbsp ghee

½ cup sugar (adjust to taste)

4–5 green cardamom pods (crushed)

2–3 tbsp chopped nuts (cashew, almond, pistachio)

Raisins (optional)


Steps to Make Gajar Ka Halwa:

1. Cook the Carrots

Heat 1 tbsp ghee in a thick-bottomed pan.

Add grated carrots and sauté for 5–7 minutes until soft.


2. Simmer with Milk

Add milk.

Simmer on low flame, stirring occasionally, until milk is absorbed (30–40 mins).


3. Sweeten and Flavor

Add sugar and cardamom powder.

Stir and cook until the mixture thickens and starts leaving sides of the pan.


4. Finish with Ghee and Nuts

Add remaining ghee, mix well.

Garnish with nuts and raisins. Serve warm.


Serving Suggestions:

Serve warm as a winter dessert

Tastes great cold too, after setting for a few hours

Pair with vanilla ice cream for a fusion twist


Why I Love It

Gajar Ka Halwa is not just a sweet. It’s warmth, patience, family, and celebration — all captured in a single, glowing bowl.