
Introduction
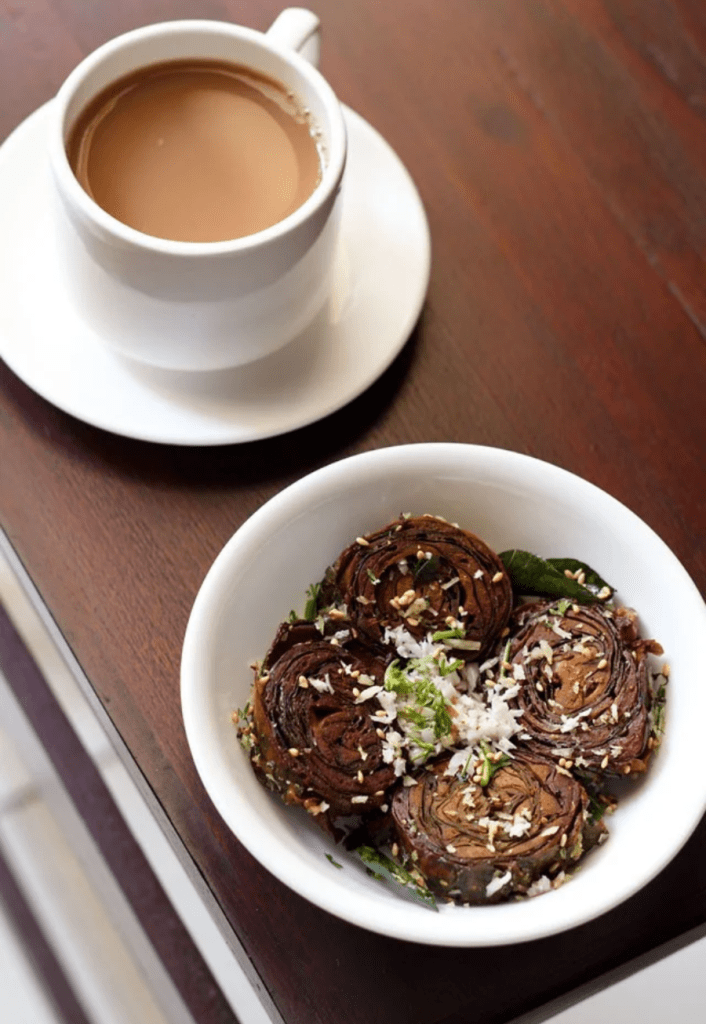
Sliced Patra (Alu Vadi) pinwheels, tempered with sesame seeds and coconut, served with chai – a beloved Gujarati/Maharashtrian snack.
Growing up, many of us have fond memories of Patra, also known as Alu Vadi, being enjoyed during rainy monsoon evenings with a hot cup of masala chai. Patra is a popular Western Indian snack originating from Gujarat, made by rolling tender colocasia (taro) leaves with a spiced gram flour paste, then steaming and often frying them to perfection. In Maharashtra, the same delicacy is called Alu Vadi – note that “alu” in Marathi refers to colocasia leaves, not potato. This treat beautifully balances Gujarati cuisine’s signature flavors: it’s sweet, tangy, and spicy in each bite, thanks to jaggery and tamarind in the batter. Patra is cherished as an heirloom recipe passed down through generations, served as an appetizer or tea-time snack at family gatherings, especially in monsoons and festivals like Ganesh Chaturthi when fresh taro leaves are abundant. Warm, flavorful, and nostalgic – this classic snack is sure to win your heart with its spiral rolls of deliciousness!
Ingredients
Colocasia (Taro) leaves: 15–20 fresh large taro leaves (called arbi ke patte in Hindi, patra ni paan in Gujarati, alu in Marathi). Choose green, tender leaves without black spots; avoid itchy leaves if possible. Trim off the stems.
Gram flour (Besan): 2 cups (about 250 g), to make the spiced batter that will coat the leaves.
Tamarind: 2 tablespoons tamarind paste or about 30 g seedless tamarind pulp (soaked and strained) – this provides the tangy punch.
Jaggery: 3–4 tablespoons grated jaggery (about 50 g) for a mellow sweetness to balance the tamarind.
Ginger and Chilies: 1 teaspoon ginger paste and 2–3 green chilies (ground to a paste). (You can also add 2–3 garlic cloves in the paste for extra flavor, though traditional Gujarati patra often skips garlic.)
Spices (for batter): 1 teaspoon salt (or to taste), 1 teaspoon turmeric powder, 1 teaspoon red chili powder, 2 teaspoons cumin powder, 1 teaspoon coriander powder, 1 teaspoon garam masala, a pinch of hing (asafoetida).
Seeds: 2 tablespoons white sesame seeds (divided) – add 1 tbsp into the batter for nuttiness and reserve 1 tbsp for tempering. 1 tablespoon fennel seeds (saunf) to mix into the batter for a subtle sweet-anise crunch (don’t skip these if possible!).
Oil (for batter): 1 tablespoon vegetable oil to make the batter smooth and keep the rolls moist.
Baking soda: 1/4 teaspoon (a pinch). Optional but highly recommended – it helps soften the leaves and ensures the rolls cook up tender. If using, add at the end with a squeeze of lemon juice to activate it.
Water: ~1/2 to 3/4 cup of water, as needed to make a thick, spreadable batter.
For Tempering: 2 tablespoons oil (for shallow frying/tempering after steaming), 1 teaspoon mustard seeds, 1 teaspoon cumin seeds, 1 tablespoon sesame seeds (including the reserved 1 tbsp), a pinch of hing, 8–10 fresh curry leaves, and 2 dried red chilies (broken).
Garnishes: 2–3 tablespoons fresh grated coconut and a handful of fresh cilantro (coriander) leaves, chopped. These add a lovely presentation and extra flavor at the end.
Instructions
1. Prepare the colocasia leaves: Gently wash the taro leaves and pat them dry. Using a sharp knife, carefully slice off the thick central veins and any thick veins on the back of each leaf without tearing it. This will flatten the leaf and make it easier to roll. Stack the prepped leaves in piles of similar size. (Tip: Organize leaves by size – you’ll be layering the largest to smallest in each roll.)
2. Make the sweet-tangy besan batter: In a small pan, combine the tamarind and jaggery with ~1/2 cup of water and simmer for a few minutes until the jaggery melts. Stir well, then cool and strain to get a sweet tamarind liquid (or use ready-made tamarind paste and dissolve jaggery in it). In a mixing bowl, sift the besan (gram flour). Add the tamarind-jaggery liquid, ginger-chili paste, all the spices (turmeric, red chili, cumin, coriander, garam masala, hing, salt) and the fennel seeds and 1 tbsp sesame seeds. Pour in ~1/2 cup of water gradually and mix everything into a thick, smooth paste. The batter should be spreadable (like peanut butter consistency – not runny). If it’s too thick, add water by the tablespoon; if too thin, add a bit more besan. Finally, add the 1/4 tsp baking soda and 1 tsp lemon juice on top of it – it will fizz slightly – stir it in. This aerates the batter and will help soften the leaves as they cook. Taste the batter and adjust salt, jaggery, or chili to your liking – it should taste sweet, tangy, and spicy all at once.
3. Layer the leaves with batter: Place the largest taro leaf on your work surface with the lighter underside (vein side) facing up. Spread a thin, even layer of the besan batter all over the leaf using your fingers or a spatula. Now place the next largest leaf on top of the first (again vein side up, but rotate it a bit so the leaf tips are not aligned exactly, which helps create an even roll). Spread batter on this second leaf as well. Continue stacking 4–5 leaves (or up to 6 if they are small), each time spreading a thin layer of batter on the new leaf. *(You can make 2–3 separate rolls, depending on the total leaves; e.g., with 15 leaves make 3 rolls of 5 leaves each.)*
4. Roll up the leaves: Starting from the base of the stacked leaves (the end with the stem), fold about 1–2 inches of the sides inward (to encase the filling). Then tightly roll the leaves upward toward the tip into a log, like a jelly roll. Roll firmly so that the roll stays tight and the batter acts as a glue holding the layers together. If any batter squishes out, just smear it on the outside of the roll. You should end up with a neat, compact log. If your roll is large, you can tie it with kitchen string to hold it, but usually if rolled tight enough, it will stay put. Repeat for the remaining leaves to form all your rolls.
5. Steam the rolls: Prepare a steamer setup (steaming pot or idli/pressure cooker without the whistle). Add a few cups of water and bring to a boil. Grease a steamer tray or plate with a bit of oil and place the patra rolls on it, seam-side down (so they don’t unravel). Steam the rolls for about 20–25 minutes on medium heat (if using an Instant Pot, steam for ~25 minutes on venting mode). You can test by inserting a knife or toothpick into the roll – if it comes out mostly clean (no raw batter), the patra is cooked through. Turn off the heat and carefully remove the rolls. Let them cool completely for at least 15 minutes (steamed rolls are delicate and will firm up as they cool). For easiest slicing, you can even refrigerate the cooled rolls for 30 minutes – this makes them firmer and less likely to break apart when cut.
6. Slice into vadis: Using a sharp knife, cut each steamed roll crosswise into pinwheels about 1/2 inch thick. Handle gently so the slices (called vadis) hold their shape. You will see the beautiful spiral of green leaf and golden filling in each slice. If any end pieces are very small or have extra batter, you can pan-fry those as a cook’s treat!
7. Temper and fry the patra: In a large wide pan, heat 2 tbsp of oil on medium heat. When hot, add the mustard seeds and cumin seeds and let them splutter. Then toss in the remaining 1 tbsp of sesame seeds, the dried red chilies, curry leaves, and a pinch of hing, stirring for a few seconds until aromatic. Carefully add the sliced patra vadis in a single layer. Fry them for about 2–3 minutes per side, until they develop a slight golden-brown crust. Flip gently with a spatula to crisp the other side. This tempering step coats the rolls in the flavorful oil and sesame, adding a delightful crunch. (If your pan is not wide enough, temper in batches or do a layer at a time. You can also remove the spices from the oil first, then fry the patra, to prevent the curry leaves and chilies from burning.)
8. Optional – deep fry method: Instead of pan-frying, you may deep fry the slices in hot oil until crispy before tempering. This yields an even crunchier result, though it’s less healthy. In Gujarat, some folks skip frying altogether and eat the patra just steamed and tempered (soft version), whereas others love the fried texture. Feel free to choose your preferred method: simply steamed and tempered for a lower-fat snack, or fried for a indulgent treat. Either way, finish with the tempering spices for authentic flavor.
Tips for Slicing & Frying
Selecting Leaves: Use the most tender colocasia leaves you can find. Older, fibrous leaves tend to be itchier and tougher. If the raw leaf irritates your skin (from calcium oxalate), rub a little oil on your hands while handling and ensure thorough cooking. When available, black-stemmed taro leaves are traditionally preferred for patra as they are less itchy (a tip often passed down from grandmothers – the vendor at the market will know!)😉.
Rolling Technique: Smear the besan paste thinly and evenly – too thick and the rolls may not cook through, too thin and you won’t get the full flavor. Keep the roll tight. If you’re new to rolling, start with smaller rolls (fewer leaves) which are easier to handle. Any holes or tears in leaves can be patched with a bit of batter.
Make Ahead: You can steam the patra rolls in advance (even the day before). Store the whole steamed rolls in the fridge (wrapped) and slice/fry them right before serving. This is great for parties – do the laborious part ahead, then just temper/fry and serve fresh.
Neat Slicing: Always let the rolls cool completely before slicing – this is crucial. A cold roll firms up and cuts into clean spirals without unrolling. Use a sharp serrated knife in a gentle sawing motion to get neat slices. Wipe the knife blade if it gets too sticky.
Shallow Fry vs Deep Fry: For a healthier version, stick to the shallow pan tempering (as in the recipe) – it uses minimal oil but still gives a slight crisp and loads of flavor. For a more indulgent crispy patra, you can deep fry the slices until golden-brown (they puff up a little). Drain on paper towels and then toss them in a hot tempering of mustard, sesame, etc. Both versions taste fantastic! You can even air-fry the slices with a light spray of oil as a modern alternative.
Leftovers: If you somehow have leftovers (rare in our home!), store them refrigerated. Patra can be reheated by re-steaming or microwaving (they will be soft), or re-pan-frying until warm and crisp. They also taste good at room temperature, making them a great travel snack.
Serving Suggestions
Patra/Alu Vadi is best served hot or warm, garnished generously with the fresh grated coconut and chopped coriander for a touch of sweetness and color. Enjoy these savory pinwheels with a side of chutney – they pair beautifully with a zesty green cilantro-mint chutney or a sweet tamarind-date chutney for dipping. In Gujarat, patra is often part of a farsan platter in wedding feasts or festive thalis, alongside other snacks. In Maharashtra, Alu Vadi makes a popular tea-time nibble – a plate of crispy patra and a cup of cutting chai is a match made in heaven on a rainy day! You can also squeeze a bit of fresh lemon juice on top or sprinkle some chaat masala for extra zing. Whether you serve it as a starter at a party, an afternoon snack, or a side dish at dinner, this flavorful Gujarati delicacy will shine. Savory, sweet, and tangy Patra are an absolute delight that tell the story of Gujarati and Maharashtrian culinary tradition in every bite. Enjoy!
