When I think of comfort food from my childhood, Paneer Sukhi Masala instantly comes to mind. I remember the aroma of cumin seeds crackling in hot oil and the sizzle of paneer cubes hitting the pan in my mother’s kitchen. This dish – essentially a sukhi sabzi, meaning a dry vegetable preparation – was a weeknight staple for us. It’s a North Indian-style paneer dish with no heavy gravy, just soft golden paneer (Indian cottage cheese) cubes coated in a thick, flavorful masala. Each bite would take me back to those cozy family dinners, with warm rotis in hand and this spicy paneer sabzi disappearing faster than anything else on the table.
Paneer Sukhi Masala served hot and garnished with fresh coriander. This dry paneer dish has a thick onion-tomato masala clinging to each cube of cheese, making it irresistibly flavorful. The aroma of sautéed cumin, ginger, and garam masala fills the kitchen as it cooks, truly a homestyle sabzi that brings warmth and comfort.
Despite its bold flavors, Paneer Sukhi Masala is a simple recipe that uses minimal ingredients and comes together quickly – perfect for busy days. In fact, you can have this lip-smacking dish on the table in around 30 minutes, making it an ideal last-minute vegetarian main course. Below, I’ll walk you through the ingredients, step-by-step method, and some personal tips to get the best texture and flavor. I’ll also share a few variations (like adding capsicum or a touch of cream) and serving suggestions. Let’s get cooking!

Ingredients
Paneer (Indian cottage cheese) – 250 g, cut into cubes (roughly 2 cups cubed). Use fresh or store-bought; if using refrigerated paneer, see tips for softening. (Paneer is a soft, non-melting fresh cheese common in Indian cuisine.)
Oil or Ghee – 2 tablespoons, for sautéing (use ghee for richer flavor).
Cumin seeds (Jeera) – 1 teaspoon, for tempering.
Ginger & Garlic – 1 teaspoon ginger-garlic paste (or 1 tsp each of freshly grated ginger and minced garlic).
Onions – 2 medium, finely chopped (about 1 cup).
Tomatoes – 2 medium, chopped (or pureed) (about 1 cup puree).
Green Chili – 1, slit or chopped (optional, for extra heat).
Spice Powders:
Turmeric – ½ teaspoon
Red Chili Powder – ½ teaspoon (adjust to taste; use Kashmiri chili powder for milder heat and color)
Coriander Powder – 1 teaspoon
Cumin Powder – ½ teaspoon (optional, for extra cumin flavor)
Garam Masala – 1 teaspoon (a flavorful spice blend)
Kasuri Methi (dried fenugreek leaves) – 1 teaspoon, crushed between your palms (optional but highly recommended for aroma).
Salt – ¾ teaspoon, or to taste.
Fresh Coriander Leaves – 2 tablespoons, chopped, for garnish.
Optional Add-Ins:
Capsicum (Bell Pepper) – 1 small, diced into 1-inch pieces (any color; add for extra flavor and crunch, commonly used in paneer sabzi).
Heavy Cream – 2 tablespoons (optional, to stir in at the end for a richer, slightly creamier finish).
Step-by-Step Method
1. Prep the Paneer: If your paneer is store-bought and firm, cut it into bite-size cubes and soak them in warm water for 5–10 minutes, then drain before cooking. This helps the paneer stay soft and moist. (Do not soak longer than 10 minutes or the cubes can start to break down.)
2. Temper Spices: Heat the oil or ghee in a heavy pan or kadhai over medium heat. Once hot, add the cumin seeds and let them sizzle until they begin to crackle and release their aroma (about 30 seconds). This infuses the oil with a warm, earthy flavor.
3. Sauté Ginger, Garlic, and Chilies: Add the ginger-garlic paste (or minced ginger & garlic). Sauté for a minute until the raw smell disappears. If using green chili for heat, add it now and fry for a few seconds. Be careful not to burn the garlic or spices – keep the heat on medium.
4. Onions: Add the chopped onions and a pinch of salt (salt helps them cook faster). Sauté the onions, stirring often, until they turn golden-brown. This may take about 5–6 minutes. Browning the onions well is key to developing the sabzi’s deep flavor and slight sweetness. If the onions start sticking to the pan, you can sprinkle a teaspoon of water to deglaze and prevent burning.
5. Tomatoes: Stir in the chopped or pureed tomatoes. Cook the mixture (masala) for about 5–7 minutes on medium flame, stirring occasionally, until the tomatoes break down and the masala becomes thick. You want the oil to begin to separate from the sides of the pan and the raw tomato smell to vanish. Cooking the tomato-onion masala thoroughly ensures a rich taste (under-cooked masala can taste bland or raw).
6. Spice Powders: Once the tomatoes have softened and the masala looks well cooked, add the spice powders – turmeric, red chili powder, coriander powder, cumin powder (if using), and garam masala. Also add the remaining salt at this stage. If you are adding capsicum (bell peppers) for a crunch, toss them in now. Mix everything well. Sauté this spiced masala on a medium-low flame for about 2–3 minutes, until it becomes aromatic and the spices are well roasted. Tip: Keep the flame low to medium while frying spices – cooking the masala on a low flame prevents it from burning and turning bitter. You should see the oil start to gleam on the edges of the mix; that’s a sign the spices are cooked. If the masala is too dry or starts to stick, add a few tablespoons of water to deglaze the pan and scrape up any browned bits (this also helps avoid burning).
7. Add Paneer: Reduce heat to low. Add the paneer cubes to the pan, along with the kasuri methi (crush the fenugreek leaves between your fingers as you sprinkle, to release their oils). Gently fold the paneer into the masala, coating each piece with the spices. Be gentle while stirring – paneer is delicate and can break apart if handled roughly. If you prepared the paneer by soaking, it should be soft and will absorb the flavors nicely.
8. Simmer: After mixing, cover the pan and let the paneer simmer on low heat for about 2–3 minutes. This helps the paneer warm through and lets it soak up the flavors of the masala. Keep it on low – remember, paneer doesn’t need long cooking. Overcooking can make it chewy. Just a few minutes is enough for it to heat and meld with the spices.
9. Finish: Remove the lid and give it a final stir. If you opted to use heavy cream for a richer twist, pour in the cream now and gently mix. The cream will coat the paneer and give a slight creamy touch to the masala (this is optional – the traditional recipe is typically dry). Finally, sprinkle the chopped fresh coriander leaves on top and switch off the heat.
10. Taste & Adjust: Taste the Paneer Sukhi Masala and adjust salt or spices if needed. You can squeeze a bit of fresh lemon juice if you want a pop of tanginess to brighten the flavors. A tiny pinch of sugar can also be added if the tomatoes were too acidic, to balance the taste – this is totally up to your preference.
11. Serve: Transfer the paneer sabzi to a serving dish. Serve hot (paneer tastes best when warm and soft). See below for serving suggestions on how to enjoy this dish!
Tips for Texture and Flavor
Keep Paneer Soft: No one likes rubbery paneer. For tender results, use fresh paneer or soften store-bought paneer before cooking. As mentioned, soaking the paneer cubes in hot water for about 5–10 minutes is a simple, hassle-free way to ensure they stay soft. Just be sure not to exceed 10 minutes of soaking, or the paneer can start to lose its structure and creamy texture. Another method is to briefly blanch the cubes in boiling water for 1 minute, then transfer to cold water – but soaking is easiest. Also, avoid frying the paneer for too long; a quick sauté is enough since overcooking will make it firm.
Gentle Handling: Paneer is delicate. Always stir gently after adding the paneer to the masala. We don’t want to break the cubes while mixing. Use a flat spatula to softly turn the pieces over. Coat them with masala by folding instead of vigorous stirring. This way, your paneer cubes remain intact and presentable.
Cook Masala Thoroughly (but Not Too Hot): The key to a flavorful dry paneer masala is a well-cooked onion-tomato base. Take your time to sauté the onions until golden and cook down the tomatoes until you see the oil separating. This step builds a deep flavor. However, do this on a moderate flame. Spices can burn easily and turn bitter, so it’s advised to cook the masala on a low flame to avoid burning. Stir regularly, and if you sense anything catching at the bottom, add a splash of water and lower the heat. A burnt masala will spoil the taste, so slow and steady wins here.
Balancing Flavor: Taste as you go. Once the masala is ready (before adding paneer), taste it. It should be slightly salty and spicy because the paneer will mellow it out. If it tastes too tangy (from tomatoes) or too spicy, you can adjust. Add a pinch of sugar to balance excess tang. If it’s too spicy, a spoonful of yogurt or cream can help tone it down (or use milder Kashmiri chili powder for color without heat). Garam masala can be adjusted at the end – if you feel it needs more warmth, sprinkle a little extra and cook 1 minute. Kasuri methi is a secret weapon for flavor: a small amount added at the end makes the dish very aromatic with a restaurant-like finishing touch. Just don’t overdo it; 1 teaspoon is enough as it’s potent.
Texture: For a true “sukhi” (dry) sabzi, avoid adding too much water. We only deglaze with a few tablespoons if needed, not more. The goal is a thick masala that clings to the paneer, not a curry. If you do accidentally add extra water and the dish looks wetter than desired, you can cook it uncovered on high heat for a minute to evaporate excess moisture. Conversely, if it’s too dry and starting to scorch, that’s when a tiny splash of water comes to rescue. It’s all about that perfect balance where the masala is moist enough to bind everything but there’s no gravy or liquid pooling.
Consistency of Paneer: If you prefer a slightly crisp edge on your paneer, you can pan-fry the cubes in 1 tablespoon oil separately for 2-3 minutes until lightly golden, then add them. This adds a chewiness on the outside. But keep in mind, pan-frying can make the inside of the paneer a bit firmer. If you do this, you might still want to soak the fried paneer in warm salted water for a few minutes to retain softness (yes, you can fry then soak – it’s a trick to get soft yet golden paneer). For the softest result, you can skip the pre-frying and just let the paneer cook in the masala as we did above.
Avoid Overcooking: As a general rule, once paneer is in the pan, do not cook it for too long. Only 2-3 minutes of simmering is needed for it to absorb flavors. Prolonged cooking will make the paneer tough and rubbery. Always add paneer towards the end of the recipe.
Variations
One of the joys of cooking paneer dishes is how versatile they are. Here are a few variations and tweaks you can try with Paneer Sukhi Masala:
Add Capsicum (Bell Peppers): As mentioned, adding capsicum is a popular variation. It brings a lovely aroma and a bit of crunch. You can use green, red, or yellow bell peppers. Slice or dice them and toss in when the onions are halfway done or along with the tomatoes/spices (timing depends on how soft you want them). I usually add them just after the tomatoes but before the powdered spices, so they cook slightly yet remain a bit crisp. Capsicum cooks fast, so 3-4 minutes is enough. This essentially makes the dish similar to a Paneer Tawa Masala or Kadai Paneer style preparation which often includes bell peppers.
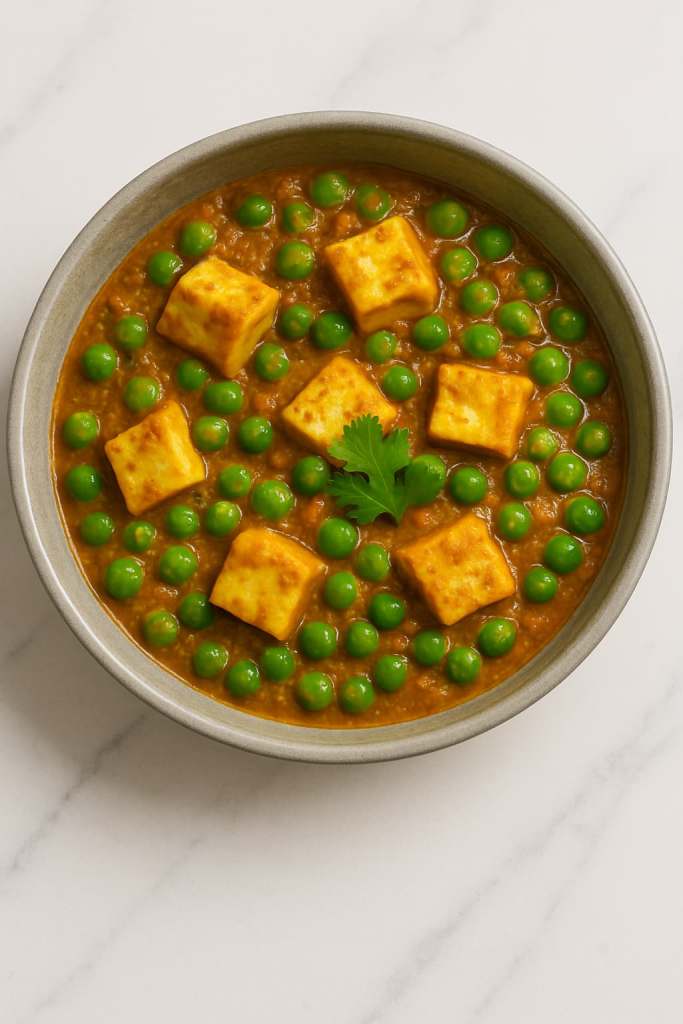
Peas (Matar Paneer Dry): For a variation with some greenery and sweetness, add a handful of green peas. You can use frozen peas (thawed) or fresh peas (boiled until nearly cooked). Stir them in along with the paneer in the final few minutes. Peas pair well with paneer and give you a paneer-matar sukhi sabzi. Just ensure the peas are cooked to your liking (frozen peas usually cook through in 2-3 minutes).
Creamy Twist: If you’re in the mood for a richer flavor, the heavy cream trick at the end works wonders. Even a tablespoon or two of malai (the thick cream that forms on boiled milk) or fresh cream will add a subtle richness that coats the paneer. This is an optional step and turns the dish into more of a semi-dry curry rather than completely dry. It won’t be as creamy as a Paneer Butter Masala (which is a different gravy-based dish), but it adds a touch of luxury. Stir in the cream on low heat and don’t boil the sabzi after adding it to prevent curdling. You could also add a knob of butter at the end for a buttery finish.
Nutty Richness: For special occasions, you can make the masala richer by adding a tablespoon of cashew paste or almond paste (soaked and ground nuts) into the tomato-onion base. This gives a slightly thicker coating on the paneer and a Mughlai touch. It’s not traditional for a sukhi masala, but it’s a nice twist if you want a drier version of shahi paneer vibes.
Achari Paneer Sukhi Masala: Give it a pickled punch by adding achari masala (Indian pickling spices) or even just a teaspoon of your favorite pickle oil (from Indian mango or chili pickle) into the masala. This infuses a tangy, spiced flavor (often with notes of mustard, fennel, nigella) into the dish, making it taste like achari paneer (pickle-style paneer). Add this towards the end of cooking for maximum aroma.
No Onion No Garlic (Jain style): If you follow dietary restrictions or just ran out of onions/garlic, you can still make a delicious Paneer Sukhi Masala. In fact, the famous chef Tarla Dalal has a Jain version where she skips onion and garlic altogether. The trick is to compensate with a freshly ground masala of whole spices. For example, roast 2-3 dried red chilies with a tablespoon of coriander seeds, grind them into a powder, and use that along with tomatoes and capsicum. You start by tempering cumin in oil, then add capsicum, the ground chili-coriander powder, tomatoes, etc. The result is surprisingly flavorful even without alliums. Just ensure you add a pinch of asafoetida (hing) while tempering the cumin to give a subtle onion-like depth if you like.
Vegan Option: The recipe is almost vegan if you simply swap out paneer. You can replace the paneer with tofu cubes for a vegan version (extra-firm tofu works best; pat it dry and pan-fry it slightly for texture). Use oil instead of ghee, and skip the cream or use a non-dairy cream (cashew cream works well). The spices and method remain the same, and you get a tasty tofu sukhi masala that even non-vegans will enjoy.
Feel free to mix and match these ideas. You can truly make this recipe your own by experimenting with different vegetables or seasonings. The base of onion-tomato and spices is like a canvas – for instance, sometimes I throw in a handful of mushrooms or baby corn along with the paneer for variation. As long as you cook the base properly and don’t add too much liquid, it will remain a sukhi sabzi with its signature concentrated flavors.
Serving Suggestions
Paneer Sukhi Masala is a versatile dish that can be enjoyed in a number of ways. Here are some serving ideas to make it a satisfying meal:
With Indian Breads: The most classic way to serve this sabzi is with Indian flatbreads. Soft rotis or chapatis (whole wheat flatbreads) are perfect for scooping up the spiced paneer. It also pairs wonderfully with parathas – especially plain paratha or even a simple flavored one like ajwain (carom seed) paratha. Because the paneer masala is dry, it’s actually an excellent filling for a wrap: you can roll it inside a warm paratha or naan along with some onion slices and make a delicious paneer kathi roll.
With Rice: Serve it as a side alongside rice and dal for a complete meal. In many North Indian households, a dry sabzi like this is served with dal (lentil curry), rice, and roti – part of a wholesome lunch thali. You can pair Paneer Sukhi Masala with plain steamed basmati rice or a mild pulao. Jeera rice (cumin-flavored rice) is also a great companion; its aromatic but not overpowering flavor complements the spiciness of the paneer dish. Take a spoon of paneer masala, some rice, a bit of yogurt or raita on the side – it’s comfort in every bite.
As a Side Dish: This paneer sabzi can work as a main curry or as a side. If you have a larger Indian spread, you might have a gravy dish (like dal or curry) and also a dry sabzi like this on the table. It provides a nice contrast in texture. You can serve it alongside a richer curry such as dal makhani or butter chicken for a non-veg option, or alongside chole (chickpea curry) – the dry paneer balances a gravied dish. It’s also a good option for parties or potlucks where you need a dry item that’s easy to handle and serve.
With Raita: Because this dish packs a punch of spice, a cooling accompaniment goes well. Serve it with a side of raita (yogurt dip). Boondi raita (yogurt with crispy gram flour pearls) or cucumber raita would be lovely. In fact, a photographer on Wikimedia showed paneer sabzi served with boondi raita and roti, highlighting how common that combo is. The creamy cool yogurt tones down the heat and adds a refreshing element.
Lunchbox or Make-Ahead: Paneer Sukhi Masala is quite lunchbox-friendly too. Since it’s dry, it doesn’t leak or make rotis soggy, which is a bonus. You can pack it with parathas for a work or school lunch. Reheating is easy, though paneer might firm up a tad on cooling – a sprinkle of water before reheating will help. It’s also a great picnic or travel food when paired with puri or paratha, because it stays good at room temperature for a few hours.
Light Meal / Snack: You can even serve leftover cold pieces on cocktail picks as a party snack (kind of like paneer tikka, but without the tandoor). Or stuff the paneer masala into a frankie (wrap) or sandwich for a quick snack. Melt some cheese over it in a sandwich and you have an Indo-fusion grilled sandwich!
However you serve it, enjoy it hot for the best texture. The paneer is softest when warm, and the spices are most aromatic. Typically, we would have this dish for dinner with fresh chapatis and maybe a simple salad on the side. It’s the kind of dish that’s hearty enough to be the star of a meal but also flexible enough to pair with other items. And since it’s dry and flavorful, it **goes perfect with roti or paratha, and can also be served as a side with dal-chawal (dal and rice)** – truly a home-style favorite that fits wherever you need it to.
I hope you enjoy this Paneer Sukhi Masala as much as my family does. It’s amazing how a simple dish of spiced paneer can bring such comfort and joy. Happy cooking, and do let me know in the comments if this recipe brings back any memories for you or if you gave it your own twist! 😋