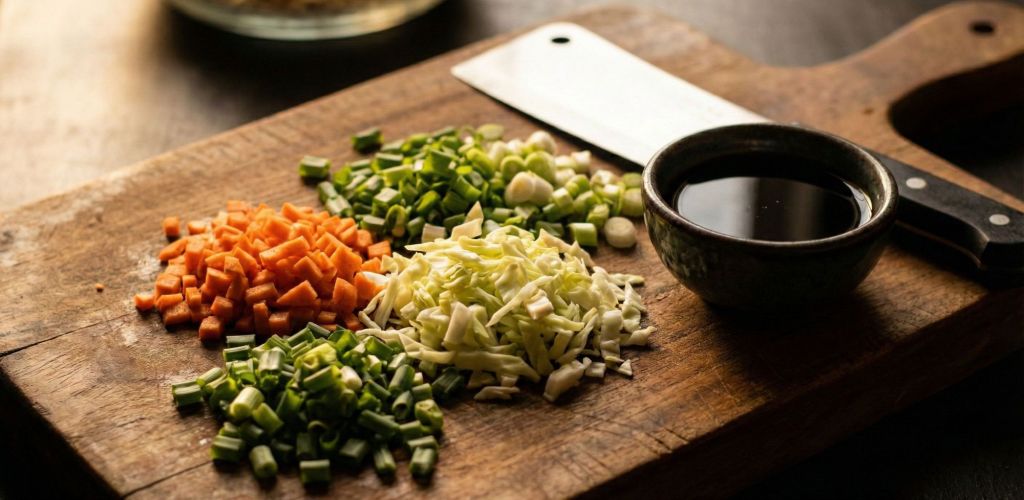
Introduction If you grew up in India, you know that “Chinese food” is an emotion, not just a cuisine. It has little to do with authentic flavors from Beijing and everything to do with Kolkata street carts, high flames, and that distinct aroma of soy sauce hitting a hot wok. Chicken Manchow Soup is the undisputed king of this genre. It is spicy, tangy, loaded with shredded chicken, and most importantly topped with those addictive crunchy fried noodles that get soggy in the best way possible. But here is a fun fact for the “Digital Anthropologist” in you: Manchow Soup is not from Manchuria. It is an entirely Indian invention, likely originating in Meghalaya or the tangled bylanes of Kolkata. It was created to suit the Indian palate we wanted the heat of green chilies, the zing of ginger, and the comfort of a thick soup all in one bowl. Today, we are recreating that exact “Restaurant Style” taste at home. No packets, no msg-laden shortcuts. Just fresh ingredients and a lot of vigorous chopping. The “Desi Chinese” Secret Why does restaurant soup taste different from homemade? The secret lies in the Aromatics Trinity: Ginger, Garlic, and Green Chilies. In this recipe, we use more ginger and garlic than you think is necessary. When sautéed on high heat, they create that smoky base flavor that defines Indo-Chinese cooking. The Recipe Card Prep time: 20 minutes | Cook time: 20 minutes | Servings: 4
Ingredients: 1 Cup Chicken: Boiled and shredded (Use chicken thighs for better flavor). The Aromatics: 2 tbsp Finely Chopped Ginger, 2 tbsp Finely Chopped Garlic, 3-4 Green Chilies (finely chopped). The Veggies: ½ cup Cabbage (finely chopped), ½ cup Carrot (finely chopped), ½ cup Capsicum (finely chopped), ¼ cup Mushrooms (sliced). The Liquids: 4 cups Chicken Stock (or water), 2 tbsp Dark Soy Sauce, 1 tbsp Red Chili Sauce, 1 tbsp Vinegar. Thickener: 3 tbsp Cornflour mixed with ¼ cup water (slurry). The Secret: 1 Egg (beaten) – Optional, but highly recommended for that silky texture. Topping: Fried Noodles and fresh Coriander leaves. Seasoning: Salt, ½ tsp Black Pepper, ½ tsp Sugar (to balance the vinegar). Instructions: The Wok Sear: Heat 1 tbsp oil in a large pot or wok on high heat. Add the ginger, garlic, and green chilies. Sauté for 30 seconds until fragrant. Do not burn them, but let them get golden. Veggie Crunch: Add the cabbage, carrot, capsicum, and mushrooms. Stir-fry on high heat for just 2 minutes. Note: We want the veggies to stay crunchy, not turn into mush. The Base: Add the shredded chicken, soy sauce, red chili sauce, black pepper, and sugar. Mix well. The Simmer: Pour in the chicken stock (or water). Bring it to a rolling boil. Let it bubble for 3-4 minutes so the flavors meld. The Thickening: Lower the heat. Slowly pour in the cornflour slurry while stirring continuously to prevent lumps. The soup will turn glossy and thick. The Egg Drop (Restaurant Style): This step is optional but magical. While the soup is simmering gently, slowly pour the beaten egg in a thin stream while swirling the soup with a fork. This creates beautiful, silky ribbons of egg. The Finish: Turn off the heat. Stir in the vinegar now (adding it at the end keeps the sour kick fresh). Serve: Ladle into bowls. Top generously with fried noodles and fresh coriander. The “Pinch of Thrift” Tip (Zero Waste) Broth from Scraps: Since this recipe requires boiling chicken, do not throw away the water! Boil the chicken bones with the vegetable peels (carrot ends, cabbage cores, ginger skin) to make a nutrient-dense stock. Use this stock as the base for the soup instead of plain water. It deepens the flavor by 10x.
Crispy Corn is a beloved street-food inspired appetizer featuring golden fried corn kernels tossed in a light Indo-Chinese spice mix of tangy chaat masala and chillies. This crunchy vegetarian starter was first introduced by the Barbeque Nation restaurant chain in India and quickly became a crowd favorite. Diners can’t get enough of the sweet-and-spicy flavor and addictive crisp texture – even the kids and picky eaters often polish off an entire bowl in no time! If you’ve ever visited BBQ Nation, you likely remember this famous Crispy Corn appetizer and its burst of flavors.
A Bite of Desi-Chinese Fusion: Crispy Corn embodies the Indo-Chinese fusion vibe – think Indian chaat meets Chinese stir-fry. The corn kernels are fried to a delightful crunch and then tossed with spring onions, chillies, and spice powders that tingle your taste buds. It’s love at first crunch for many of us who tried it at the restaurant, and now this recipe lets you recreate that magic at home. In this blog-style recipe, we’ll walk through how to make perfectly crispy fried corn (with tips to keep the coating light and crunchy), plus a healthier air-fryer/oven variation. Let’s get frying!
Ingredients
For the Crispy Corn Kernels (Coating & Frying):
Sweet corn kernels – 2 cups (fresh or frozen; if frozen, thawed and drained)
Cornflour (corn starch) – 2 tablespoons
Rice flour – 2 tablespoons
All-purpose flour (maida) – 2 tablespoons
Salt – ½ teaspoon (or to taste)
Black pepper powder – ½ teaspoon (to taste)
Oil for deep frying – as needed (about 2-3 cups depending on pan size)
For Spice Mix & Toss:
Red chilli powder – ½ teaspoon (adjust for heat preference)
Ground cumin powder – ¼ teaspoon
Chaat masala – ½ teaspoon (or use ½ tsp dry mango powder/amchur + a pinch of black salt)
Salt – a pinch (to taste, for the toss)
Onion – 2–3 tablespoons, finely chopped (about 1 small onion)
Green chilies – 1, finely chopped (optional, for extra heat)
Capsicum (bell pepper) – 2 tablespoons, finely chopped (optional for color & crunch)
Lemon juice – 2 teaspoons (freshly squeezed, for tangy flavor)
Optional: If you have peri-peri seasoning, you can use ~1 teaspoon of it in place of the chilli and chaat masala for a BBQ Nation authentic twist. If you prefer a saucier Indo-Chinese finish, keep a teaspoon each of soy sauce, tomato ketchup, and honey on hand – but we will mostly stick to the dry spice mix to retain crispiness.
Instructions
1. Prep the Corn: If using fresh corn on the cob, remove the kernels from 2 cobs (approximately 2 cups kernels). Boil the fresh kernels in salted water for 2–3 minutes until just tender, then drain. If using frozen sweet corn, simply thaw and rinse with water, then drain. In either case, make sure to drain the corn thoroughly. The kernels should be moist but not water-logged – excess water will make the coating soggy and can cause oil splatters. Pat the corn dry with a paper towel if needed.
2. Coat with Seasoned Flour: Place the corn kernels in a large mixing bowl. Add a pinch of salt and the black pepper, tossing to lightly season the corn. Now add the cornflour, rice flour, and all-purpose flour to the bowl. Toss everything gently but thoroughly, so all kernels get a thin, even coating of the flour mixture. (Do not add water; the slight dampness of the corn is enough to make the flour stick.) A pro-tip is to put the flour-coated corn in a sieve or colander and shake it – this removes excess loose flour and ensures a light, uniform coating on each kernel. A thin coating is key to the signature crunch, so don’t skip sifting off the extra flour!
3. Heat the Oil: In a deep pan or wok (kadai), heat enough oil for deep frying over medium-high heat. To test the oil, drop in one coated corn kernel – it should sizzle and rise to the surface fairly quickly. The oil needs to be hot (around 170–180°C if you have a thermometer). Hot oil is crucial because frying at high heat will make the corn very crunchy without soaking up too much oil. Tip: Have a lid or splatter screen ready for the next step, as the corn can sometimes pop in the hot oil like popcorn!
4. Deep Fry in Batches: Carefully add a handful of the flour-coated corn kernels to the hot oil to form a single layer. Immediately cover the pan with a lid or mesh splatter guard for the first 30 seconds of frying – corn kernels may burst on contact with hot oil, and the cover will protect you and contain any splashes. After the initial sizzle and popping sounds subside (usually in 30–40 seconds), remove the lid. Fry the corn for about 2–3 minutes total per batch. Stir occasionally once it’s safe (using a long-handled slotted spoon) to ensure even frying. Fry until the kernels turn golden brown and crispy. They will harden further upon cooling, so no need to fry until very dark. Do not overcrowd the pan; fry in small batches so the oil temperature stays high and each kernel crisps up nicely. If you fry too much at once, the oil temperature can drop and the corn may turn out chewy instead of crunchy.
5. Drain Excess Oil: Use a slotted spoon to scoop out the fried corn and transfer it to a plate or tray lined with paper towels (or a wire mesh strainer). This will drain off any extra oil. For best results, you can also place the fried kernels in a clean metal colander so that they remain crisp (sitting on paper for too long can trap steam). Fry the next batch of corn, and repeat until all the corn kernels are fried. Remember to allow the oil to come back up to hot temperature between batches. Patience here yields ultra-crispy corn!
6. Toss with Spice Mix: Now, transfer all the hot fried corn kernels into a large mixing bowl. Sprinkle the prepared spice mix over the corn: add the red chilli powder, cumin powder, and chaat masala (with a pinch of extra salt if needed). Toss or stir the corn so all the fried kernels are well coated with the spices. You’ll notice the gorgeous aroma of the masalas sticking to the hot corn. Next, add the chopped onions, green chillies, capsicum (if using), and fresh coriander. Squeeze the lemon juice over the top. Give everything a final gentle toss to combine – the onions, herbs, and lemon will lend a refreshing kick to the crispy corn. Your BBQ Nation–style crispy corn is now ready!
7. Serve Immediately: Crispy Corn is best enjoyed immediately, while it’s hot and super crunchy. Transfer it to a serving bowl or platter. For an authentic touch, you can serve it in disposable paper cups or bowls (mimicking street-food style). Garnish with a few extra coriander leaves or a sprinkle of chaat masala on top. Pop in a few toothpicks or serve with a spoon and dig in while it’s fresh. This snack tends to lose its crispiness if left to sit too long, so try to prepare it right before serving. Enjoy the explosion of textures and Indo-Chinese flavors in each bite!
Tips for Maximum Crispiness
Maintain a Thin Coating: A thin, uniform flour coating on the corn is key to the crunch. Using a sieve to shake off excess flour ensures you don’t end up with clumpy or chewy fried bits. Excess flour in the oil can also burn, so remove it before frying.
Oil Temperature Matters: Fry at medium-high to high heat. If the oil is not hot enough, the corn may turn soggy with oil. Ideally, the corn should sizzle on contact and crisp up quickly. If you have a kitchen thermometer, aim for ~350°F (180°C). Between batches, let the oil heat up again.
Safety First – Watch out for Popping: As mentioned, corn kernels can pop like popcorn in hot oil. Always use a lid or splatter screen when you first add the corn to oil. After 30 seconds, once the popping stops, you can fry uncovered for better evaporation and crisping. Do not completely cover the pan for the entire fry duration, as trapped steam can drip water into the oil (causing splatters). A half-covered technique works well: cover initially, then slightly ajar the lid to let steam escape. Keep your face and hands at a safe distance and use long tongs or spoon. Frying in small batches also minimizes the popping incidents.
Serve Hot: Like most fried snacks, crispy corn softens as it cools. Plan to serve it right after frying and tossing. If you must wait, you can refry or reheat in an oven/air fryer for a couple of minutes to re-crisp. But fresh is best!
Air-Fryer / Oven Method (Healthier Variation)
If you prefer to avoid deep frying, you can still enjoy a crunchy crispy corn using an air fryer or oven. The results are slightly less evenly browned than oil frying, but much lighter on oil and still delicious. Here’s how:
Air-Fryer Method: Preheat your air fryer to 180°C (360°F). Follow the same preparation steps to boil (if needed) and coat the corn kernels with flour and spices. Lightly grease the air fryer basket or line it with perforated parchment. Spread the coated corn in a single layer (cook in batches if necessary). Spritz the kernels with a little cooking oil spray (or toss them with 1–2 teaspoons of oil to help them crisp). Air-fry the corn for about 12–15 minutes at 180°C, shaking the basket or stirring the corn 2–3 times during cooking. The corn should turn golden and crunchy. Keep an eye in the last few minutes – they can go from crispy to burnt quickly. If not sufficiently crisp, you can air-fry a few minutes longer at 200°C, but check often. Once done, immediately toss the hot corn with the spice mix, onions, etc. (as described in Step 6 above) and serve right away.
Oven Method: Preheat your oven to 200°C (390°F). Line a baking sheet with foil and lightly grease it with oil. Arrange the flour-coated corn kernels on the sheet in a single layer (for best results, brush or spray a little oil over the top of the kernels too). Bake for about 15–20 minutes, stirring once halfway through, until the corn kernels look crispy and lightly browned. For extra crunch, you can switch to the broil/grill setting for the last 1–2 minutes, watching carefully to avoid burning. Once done, toss the baked corn with the spice mix and garnishes. Serve immediately. (Note: Oven-baked corn might not be as evenly golden, but it will still be crunchy. Using the fan-forced convection setting, if available, can help with crispiness.)
Both these methods skip the mess of deep frying and yield a guilt-free version of crispy corn. The kernels won’t be quite as puffed as the deep-fried ones, but the difference is minor when you’re munching them seasoned and hot. Feel free to choose the method that suits your kitchen and mood!
Serving Suggestions
Classic Serving: Serve Crispy Corn hot in a bowl, with a lemon wedge on the side for an extra squeeze of freshness. You can sprinkle a pinch more chaat masala or peri-peri on top for an extra flavor kick right before eating.
Party Appetizer: This makes for an excellent party starter or evening snack. For a fun street-food presentation, serve the crispy corn in small paper cones or cups, and give guests spoons or toothpicks to pick up the kernels. It’s a hit at potlucks and game nights, often disappearing within minutes!
Accompaniments: You can enjoy crispy corn on its own or pair it with a dipping sauce. It goes well with tomato ketchup, schezwan sauce, or even a spicy mayonnaise on the side for dipping. However, it’s already full of flavor and usually doesn’t need any condiments. A cold drink or a hot cup of chai also complements the spicy corn nicely.
Variations: Transform your crispy corn into a larger snack by using it as a component in other dishes. For example, you can make a crispy corn chaat – just toss in some diced tomatoes, cucumber, and a drizzle of sweet-tamarind chutney along with the spices for a more tangy chaat treat. You could also use crispy corn as a crunchy topping for salads, tacos, or wraps to add texture and flavor (it’s a surprisingly versatile garnish!). The possibilities are endless, so get creative if you have leftovers (which is rare, because it’s so tasty!).
Enjoy your BBQ Nation–style Crispy Corn! With its irresistible crunch and zesty seasoning, don’t be surprised if this appetizer vanishes as soon as it’s served. It’s the perfect fusion of Indian and Chinese flavors – truly a chatpata (tangy-spicy) treat that brings street-food charm right to your kitchen. Happy cooking and happy snacking! 😋
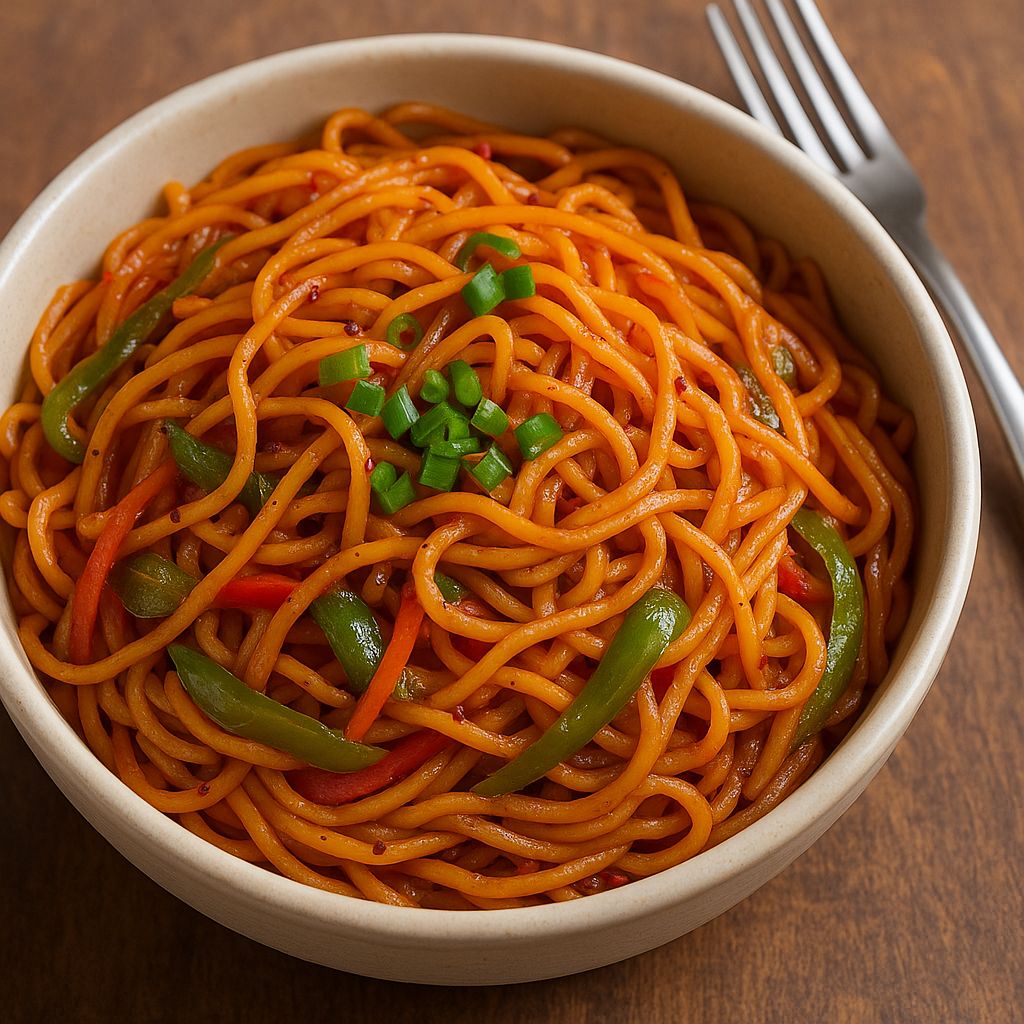
I still remember the first time I slurped up a plate of chili garlic noodles from a street cart – the aroma of garlic and chilies sizzling in the wok was irresistible! This dish is a shining example of Indo-Chinese cuisine, a unique fusion where Chinese cooking techniques meet Indian spices and flavors. It all began in the late 1700s, when Hakka Chinese immigrants in Kolkata started adapting their recipes to suit local Indian tastes. Over time, this spicy, saucy fusion spread across India and became a beloved part of our food culture – today, “Chinese food” in India often actually refers to these desi-Chinese creations loved by everyone.
A bowl of spicy Chili Garlic Noodles, tossed with crunchy veggies in a fiery garlic sauce. This street-style noodle dish is as vibrant in taste as it looks – each strand is coated in a tangy, spicy sauce and dotted with crispy bits of garlic. True to its name, it packs some heat but also surprises you with a hint of sweetness, all balanced by a bold garlic punch in every bite. If you’re craving that iconic Indo-Chinese wok flavor at home, read on – this recipe will bring those restaurant-style chili garlic noodles right to your kitchen!
Ingredients
200 grams Hakka noodles (wheat noodles) – or use lo mein/egg noodles (uncooked weight)
2 tablespoons oil (vegetable or peanut oil for high-heat cooking)
2–3 dried red chilies, broken into halves (or 1 teaspoon red chili flakes, adjust to taste)
1 small onion, thinly sliced (or 1/2 medium onion)
1 cup mixed bell peppers (capsicum), thinly sliced – e.g. 1/2 green and 1/2 red
1 medium carrot, julienned (thin matchsticks)
2 tablespoons soy sauce (light or dark soy)
1 tablespoon red chili sauce (such as Sichuan/Indo-Chinese chili garlic sauce or sambal)
1 tablespoon tomato ketchup (for a touch of tangy sweetness)
2 teaspoons white vinegar
1/2 teaspoon sugar (balances the spice; optional but recommended)
1/2 teaspoon black pepper, ground
Salt – about 1/4 teaspoon, or to taste (remember soy sauce is salty)
2–3 spring onions (scallions), whites chopped and greens sliced (keep greens for garnish)
1/2 teaspoon red chili flakes (for garnish, or more to taste)
Tip: You can also toss in a handful of shredded cabbage for extra crunch, or a pinch of sesame oil for aroma, although these are optional.
Instructions
1. Boil the Noodles: Bring a large pot of water to a boil and salt it lightly. Add the Hakka noodles and cook until al dente (usually 5–6 minutes, or as per package directions). Take care not to overcook the noodles or they will turn mushy. Once cooked, drain the hot water and immediately rinse the noodles under cold running water to stop the cooking process. This keeps the noodles firm and prevents them from sticking together. Drain well.
2. Prep the Noodles: Drizzle a tiny bit of oil (1/2 teaspoon or so, you can use sesame oil for flavor) on the cooled, drained noodles and toss gently. This extra step keeps the noodles from clumping and adds a light gloss. Set the noodles aside while you prepare the stir-fry.
3. Stir-Fry the Aromatics: Heat 2 tablespoons of oil in a large wok or kadai pan over high flame. When the oil is hot, add the minced garlic and broken red chilies. Stir-fry for about 30 seconds until the garlic starts to turn golden and fragrant (be careful not to burn it). The high heat will quickly release that addictive garlic-chili aroma.
4. Add Onions & Veggies: Add the sliced onions (and the chopped white parts of spring onion) to the wok and toss for a minute on high heat. Next, add the julienned carrots and sliced bell peppers. Stir-fry everything on a high flame for 1–2 minutes. Keep the heat high and the movement constant – this quick cooking ensures the veggies stay crisp-tender and helps impart a slight smoky char. (Remember, do not overcook the vegetables; they should retain a bit of crunch.)
5. Add Sauces & Seasoning: Push the veggies to the sides of the wok and pour in the soy sauce, red chili sauce, tomato ketchup, and vinegar. Sprinkle in the sugar, black pepper, and a pinch of salt. Stir everything together with the vegetables, still on high heat. Let the sauces bubble for ~30 seconds so the raw vinegar smell cooks off and the flavors meld. The mixture will turn into a tantalizing spicy-sweet sauce that coats the vegetables.
6. Add Noodles and Toss: Add the cooked and drained noodles into the wok. Using tongs or two spatulas, toss the noodles with the sauce and veggies, combining everything thoroughly. Stir-fry for another minute, ensuring all the noodles are well-coated in the chili-garlic sauce. Pro tip: Maintain a high flame while tossing – this helps the noodles pick up that desirable wok hei (smoky wok flavor) and prevents them from turning soggy.
7. Finish with Garnish: Turn off the heat and add the sliced green parts of the spring onions. Also add the 1/2 teaspoon of chili flakes (or adjust as per your heat preference). Give the noodles one final toss so the scallions and chili flakes are mixed in. The fresh spring onion greens add a pop of color and a mild oniony bite to the dish.
8. Serve: Your Indo-Chinese Chili Garlic Noodles are ready to devour! Serve them immediately while they’re hot and glistening. (Serving suggestions below include some great pairings and extra toppings to enjoy with these noodles.)
Optional Additions
This recipe is deliciously vegetarian as is, but you can easily customize it with protein or other add-ins. Here are some options and tips to incorporate them:
Egg: For an eggy twist (like “Chinese scrambled egg noodles”), push aside the sautéed veggies in the wok and crack in 1–2 eggs. Scramble the eggs quickly on the hot surface until just set, then mix into the veggies before adding the noodles. The egg will coat the noodles lightly and add extra richness. (Remember to slightly under-season the noodles if adding eggs, as they bring their own richness.)
Chicken: Thinly slice about 100–150 g of chicken (breast or thigh) into bite-size pieces. Stir-fry the chicken in 1 teaspoon of oil before adding the garlic and veggies, or along with the onions, until it’s cooked through (it will turn white and lightly golden at edges). Remove and set aside, or push to the side of the wok, then proceed with the recipe. Combine the cooked chicken back in when tossing the noodles. Tip: Marinating the chicken with a bit of soy sauce and ginger-garlic paste for 10 minutes beforehand adds extra flavor. (If using other meats or prawns, similarly cook them first on high heat; ideally, add any meat while stir-frying the veggies so it gets properly cooked before the noodles go in.)
Tofu or Paneer: For a vegetarian protein boost, add cubes of tofu or paneer. You can pan-fry the cubes separately in a little oil until golden (to give them a nice crust) and then toss them in during the final step with the noodles. Or, simply add soft tofu straight into the wok when you add the sauces, gently mixing so it heats through. Tofu will soak up the chili-garlic sauce, making each bite extra tasty. Paneer (Indian cottage cheese) can be treated similarly – lightly pan-fry and add in, or even use fried paneer cubes for a street-food style indulgence.
Feel free to get creative – add mushroom slices, baby corn, or broccoli florets for more veggie goodness, or even a handful of bean sprouts for texture. The beauty of chili garlic noodles is that it’s a flexible dish you can make your own!
Serving Suggestions
Serve Hot: Chili Garlic Noodles are best enjoyed hot off the wok. The flavors are brightest and the noodle texture is perfect when served immediately (if they sit too long, they can dry out or clump). So dish them out as soon as you’re done cooking.
Garnish: Top your noodles with extra spring onion greens, a sprinkle of fresh cilantro, or crushed peanuts/cashews for a fun crunch. You can also drizzle a little chili oil on top for an extra kick and shine.
Condiments: Serve some chili vinegar on the side – plain white vinegar infused with a few slit green chilies is a classic Indo-Chinese table condiment that adds a tangy heat when sprinkled over noodles. Extra chili sauce or soy sauce on the side can be offered for those who like to customize each bite.
Pairings: These noodles are a meal on their own, but you can absolutely serve them alongside other dishes to create a full Indo-Chinese spread. They go wonderfully with manchurian gravies (like gobi manchurian, which is fried cauliflower in a spicy sauce) or chilli paneer. In fact, chili garlic noodles + gobi manchurian is a street-food match made in heaven! You could also serve a bowl of hot and sour soup as a starter to round out the meal.
Leftovers: If you somehow have any leftovers, store them in the refrigerator. Reheat in a hot pan with a touch of oil (or in the microwave) until warmed through. The noodles may absorb sauce over time, so you can splash a bit of soy sauce or water while reheating to loosen them up. But truth be told, this dish is so tasty it rarely lasts that long!
Enjoy your Indo-Chinese Chili Garlic Noodles! With its garlicky goodness, fiery chilies, and that irresistible smoky wok flavor, this dish brings the best of Indian-Chinese fusion straight to your plate. Happy cooking and happy eating! 😋
When I think of Potato 65, I’m flooded with warm memories. Growing up, my mother would fry up a big batch of this spicy, bright-red potato dish for special occasions. The kitchen would fill with the aroma of curry leaves crackling in hot oil and chiles, and we kids would line up eagerly to snag the first crispy bite. Whether it was a family Diwali get-together or a rainy monsoon evening, a platter of Potato 65 instantly made it feel like a celebration, with its vibrant colors and bold flavors bringing joy to everyone.
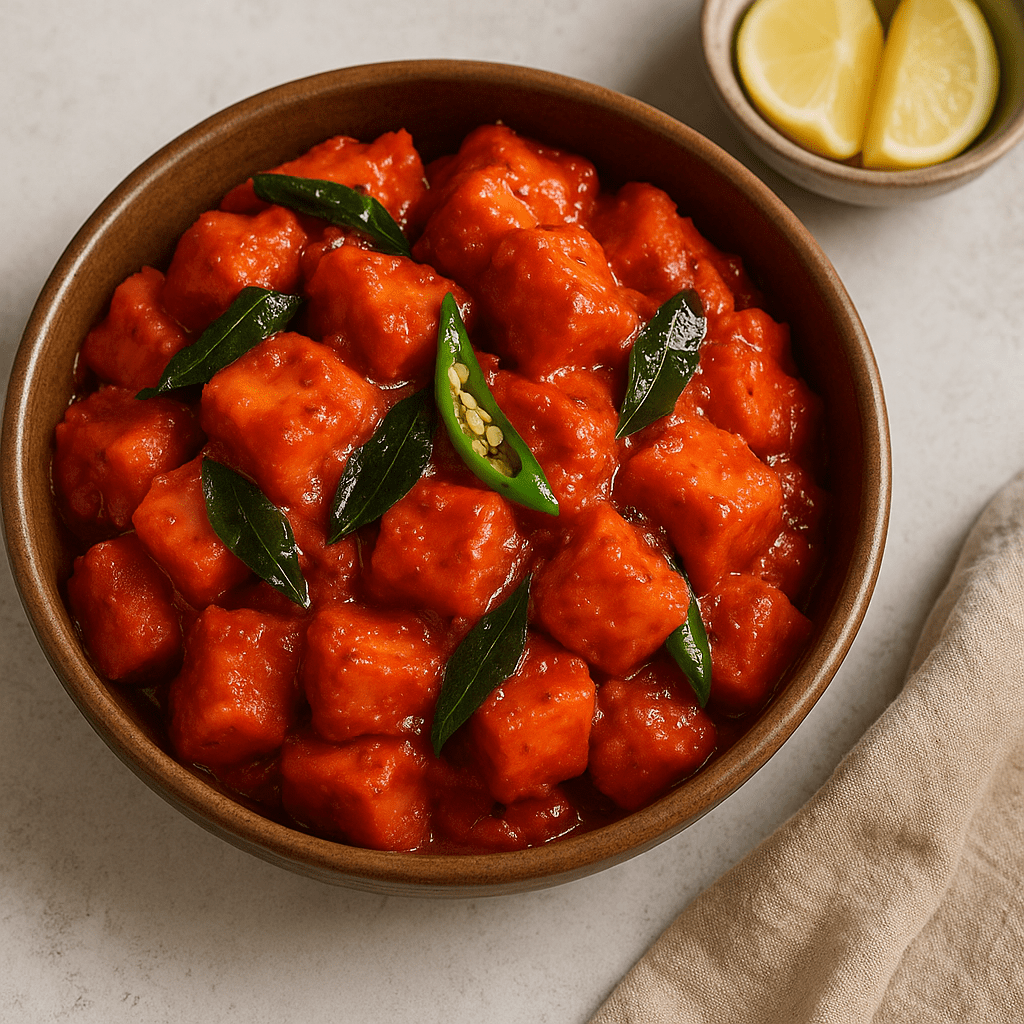
Potato 65 is an Indo-Chinese inspired snack that’s popular across India, especially as a vegetarian take on the famous Chicken 65. It features golden deep-fried potato cubes coated in a spiced batter, then tossed in a tangy, chili-infused yogurt sauce along with curry leaves and chilies. The result is a crispy, spicy, and tangy appetizer that’s finger-licking good. (Ever wondered why it’s called 65? Legend has it the original Chicken 65 got its quirky name either from being item #65 on a Chennai canteen menu or from being introduced in the year 1965. Whatever the true story, all that matters is how delicious these “65” dishes taste!)
Potato 65 served in a bowl, garnished with curry leaves and green chili – a vibrant appetizer that’s crispy, spicy, and irresistibly tangy. In the photo above, you can see how the fried potato cubes are generously coated in the reddish yogurt-chili sauce and dotted with fried curry leaves. Each bite bursts with flavor: the crunch of the batter, the heat of chilies, and a slight tang from that special sauce. It’s no wonder this dish is a crowd-pleaser at parties and family gatherings.
Despite its restaurant-style flair, Potato 65 is quite straightforward to make at home. Below, I’ll guide you through the ingredients and step-by-step instructions, along with plenty of handy tips to ensure your Potato 65 comes out perfectly crispy (and not greasy or soggy!). This festive snack makes a fantastic starter for any party, and also doubles as a flavorful side dish – you can serve it alongside naan or biryani, or even with fried rice and pulao. Now, let’s get cooking this spicy treat!
Ingredients
For the Potatoes & Batter:
Potatoes (boiled) – 3 medium potatoes, peeled and cut into 1-inch cubes (par-boiled until just fork tender).
All-purpose flour (Maida) – ¼ cup (for binding the batter).
Corn flour (Cornstarch) – 3 tablespoons (adds extra crispness).
Rice flour – 1–2 tablespoons (optional, for even more crunch; you can skip if not available).
Ginger-Garlic paste – 2 teaspoons (for robust flavor in the marinade).
Kashmiri red chili powder – 1 teaspoon (mild, for color).
Garam masala – ½ teaspoon (warm spice mix).
Black pepper powder – ½ teaspoon (for a slight kick).
Turmeric powder – ¼ teaspoon (adds color and flavor).
Salt – to taste.
Baking soda – a pinch (helps make the coating light and crisp).
Water – ~¼ cup, or as needed to make a thick batter.
For the Tempering (Yogurt-Chili Sauce):
Oil or Ghee – 2 tablespoons (for tempering the spices).
Cumin seeds – 1 teaspoon (adds a nutty aroma when tempered).
Mustard seeds (optional) – ½ teaspoon (for a South Indian touch, optional).
Garlic – 3–4 cloves, finely chopped.
Onion – 1 small, finely chopped (optional, adds extra flavor in the final toss).
Green chilies – 2, slit lengthwise (for heat and garnish).
Kashmiri red chili powder – ½ teaspoon (for color in the sauce; adjust for spice level).
Coriander powder – 1 teaspoon (adds earthy flavor to the sauce).
Soy sauce – 1 teaspoon (optional, for an Indo-Chinese twist and umami).
Tomato ketchup – 1 teaspoon (optional, adds tangy sweetness in the Indo-Chinese version).
Yogurt (curd) – ¼ cup, thick and whisked (this is the base of the tangy sauce; use plain yogurt or Greek yogurt, at room temperature to avoid curdling).
Salt – a pinch (to season the sauce, remember the batter already has salt).
Sugar – ½ teaspoon (optional, to balance the heat and tang if needed).
For Garnish:
Fresh cilantro (coriander leaves) – a handful, chopped.
Fried curry leaves & chilies – reserved from tempering (they become crispy and aromatic).
Lemon wedges – to serve on the side (a squeeze of lemon before eating elevates the flavors).
Chaat masala – a pinch to sprinkle on top (optional, for a tangy finish).
Tip: Using Kashmiri red chili powder gives a brilliant red color without making the dish too spicy – no artificial food coloring needed. If you prefer extra heat, you can mix in a bit of hotter chili powder or a couple of chopped green chilies to the batter or sauce.
Step-by-Step Instructions
1. Prep the Potatoes: Peel and cut the potatoes into cubes (about 1-inch pieces). Par-boil the potato cubes in salted water until just tender but not mushy. You can boil for about 5–6 minutes or pressure cook for 1 whistle – the potatoes should be cooked through yet firm enough to hold their shape. Tip: Do not overcook the potatoes, or they’ll break apart and soak up oil later, making them soggy. Once done, drain and let the potato cubes cool slightly (excess moisture will also make the batter slip off, so ensure they are not water-logged).
2. Make the Batter: In a mixing bowl, combine the flours (all-purpose, corn flour, and rice flour if using), ginger-garlic paste, Kashmiri chili powder, garam masala, black pepper, turmeric, baking soda, and salt. Add a little water at a time and whisk to form a thick, smooth batter that can coat the potatoes (no big lumps). The batter consistency should be like pancake batter – not too thin (or it won’t cling) and not too thick (or the coating will be dense). Tip: If the batter looks too runny, sprinkle a bit more flour; if too thick, add a spoon of water. Also, taste-test the batter and adjust salt or spice if needed (keeping in mind the sauce will add more flavor later).
3. Batter Coat the Potatoes: Add the boiled potato cubes into the bowl of batter. Gently toss or fold until every potato piece is well coated with the spiced batter. Let it sit for 5–10 minutes while you heat the oil. (This short rest helps the batter adhere better, but don’t leave it too long or the potatoes might start releasing moisture).
4. Deep Fry the Potatoes: Heat oil in a deep kadai or heavy-bottom pan for deep frying. You’ll need enough oil to submerge the potato pieces (about 2 inches of oil depth). Once the oil is hot (around 350°F/180°C; you can test by dropping a bit of batter – it should sizzle and rise immediately), carefully drop in the batter-coated potato cubes in small batches. Do not crowd the pan. Fry on medium-high heat until the potatoes turn crispy and golden-brown on the outside, about 4–5 minutes per batch. Stir occasionally for even frying. Tip: Frying at too low a heat will make the potatoes absorb oil and turn limp, so keep the oil moderately hot. On the other hand, don’t crank the heat to smoking – you want the potatoes to crisp up gradually; they take a little time to get a nice crunchy coating, so be patient. Once done, remove the fried potatoes with a slotted spoon and drain excess oil on paper towels.
5. Prepare the Tempering (Tadka): In a wide pan or wok, heat 2 tablespoons of oil (or ghee for extra flavor) on medium heat. Add the cumin seeds (and mustard seeds, if using). Let them splutter for a few seconds (this releases their aroma). Then toss in the finely chopped garlic, broken dried red chilies, slit green chilies, and fresh curry leaves. Sauté these for a minute until the garlic turns lightly golden and the curry leaves turn crisp. (Careful, this will release spicy fumes – keep your face away!). If using onions, add the chopped onion now and sauté until translucent. Your kitchen should smell divine at this point with all those aromatics frying.
6. Add Spice Powders & Sauce Base: Reduce the heat to low. Now add the spice powders: Kashmiri chili powder (for that bright color), coriander powder, and a pinch of salt to season the masala. If you want the Indo-Chinese twist, also stir in the soy sauce and ketchup at this stage, mixing everything well so the spices and sauces combine. Sauté for just 20–30 seconds – be careful not to burn the powders. Tip: Adding the sauces (soy & ketchup) gives a lovely sweet-spicy kick reminiscent of chili sauce; you can skip them for a more traditional flavor, but they do elevate that Indo-Chinese profile.
7. Stir in the Yogurt: Still on low heat, add the whisked yogurt to the pan. Immediately stir continuously as you add it, allowing it to form a creamy, spiced sauce with the tempered spices. Cook this yogurt-chili sauce for about 30 seconds to a minute on low flame, just until it heats through and thickens slightly. Important Tip: Keep the flame low when adding yogurt to prevent it from curdling or splitting. You can even take the pan off the heat, stir in the yogurt, then return to low heat – this gentler approach helps if you’re worried about curdling. The sauce should be fairly thick and clingy; if it looks too thick or dry, you can stir in a splash of water to loosen it a bit (or if you prefer more “saucy” Potato 65).
8. Toss Fried Potatoes in the Sauce: Now add the fried potato pieces into this yogurt sauce. Increase heat to medium-low and gently toss or fold the potatoes so that each piece is well coated with the tangy, spiced sauce. Do this for a minute until the potatoes are reheated and nicely covered in the masala. You’ll see the potato 65 take on a gorgeous fiery color and shiny glaze from the sauce. Finally, turn off the heat.
9. Garnish and Serve: Transfer the Potato 65 to a serving dish. Sprinkle the chopped fresh cilantro on top. For extra punch, you can sprinkle a pinch of chaat masala over the top and a squeeze of fresh lemon juice. Garnish with the crispy fried curry leaves and green chili pieces from the pan (they’re edible and delicious!). Serve immediately while it’s hot and crispy.
Tip: Potato 65 tastes best when served right away, as that’s when it’s most crispy. If it sits too long, it may soften – but you can re-crisp it in a hot oven or air fryer for a few minutes if needed. Also, if you find the dish too spicy, serve a cooling mango lassi or yogurt raita on the side to balance the heat.
Variations and Tips
Air-Fryer Potato 65: Want a lighter version? You can air-fry the batter-coated potatoes instead of deep frying. Preheat your air fryer to 180°C (350°F). Lightly grease the basket and place the coated potato cubes in a single layer. Spray or brush a little oil on them for extra crispness. Air-fry for about 15–18 minutes, shaking the basket halfway, until the potatoes are crispy and golden. Then, toss them in the prepared yogurt-chili tempering as in the main recipe. (They’ll be slightly less evenly browned than deep-fried, but still delicious!).
Baked Potato 65: Similarly, you can bake the coated potatoes in a conventional oven. Preheat the oven to 200°C (400°F). Arrange the batter-coated potato pieces on a greased or parchment-lined baking sheet, spacing them out. Drizzle or spray a bit of oil on top. Bake for ~25–30 minutes, flipping them once halfway through, until they turn crisp and golden-brown. Then toss in the sauce. Baked Potato 65 will be a bit lighter in texture but is a great option if you want to avoid deep frying.
Pan-Fried (Tawa) Version: If you don’t want to deep fry, you can shallow-fry the potatoes on a tawa (griddle) or wide pan with a few tablespoons of oil. Place the batter-coated potatoes on the hot pan and cook on medium heat, turning them to cook all sides. They may not get uniformly crispy like deep-fried ones, but you can achieve a good golden crust on most sides. Proceed with the tempering and sauce once they are nicely browned. Tip: Ensure your potatoes aren’t over-boiled for this method, as they need to hold up to flipping.
“Chili-Sauce” Base Alternative: While the recipe above uses a yogurt-based sauce, you can make a pure Indo-Chinese style Potato 65 by replacing the yogurt with a chili-garlic sauce base. For example, skip the yogurt and instead add 2–3 tablespoons of schezwan sauce or your favorite bottled chili-garlic sauce (along with the soy sauce and ketchup) into the tempering. Toss the fried potatoes in that; it will give a spicier, stickier coating similar to Chili Potato (another Indo-Chinese dish). This variation packs an extra punch and has no dairy. (If doing this, you can also add a teaspoon of vinegar for a tangy kick instead of yogurt).
Other 65 Variations: The “65” style is so versatile that you can swap out the potato for other ingredients. Cauliflower 65 (Gobi 65) and Paneer 65 are popular variations – using the same marinade and process, just replacing with cauliflower florets or paneer cubes. Even baby corn 65 or mushroom 65 are delicious alternatives. So, feel free to use this recipe as a template and get creative with other veggies or proteins!
Healthier Flour Swap: If you prefer not to use refined flour (maida), you can substitute whole wheat flour for the batter – it works, though the coating might be slightly denser. You can also experiment with using gram flour (besan) for a different flavor, but the texture will change a bit.
Adjusting Spice Levels: Potato 65 is meant to be spicy, but you can always adjust it to your taste. Use fewer chilies (or remove chili seeds) for a milder version. For extra-spicy, add more green chilies in the tempering or a hotter variety of chili powder in the batter. Tasting as you cook is key!
Serving Suggestions
Potato 65 is best enjoyed hot and fresh, when the exterior is still crispy. It makes for an excellent party appetizer – stick toothpicks in the pieces to serve them finger-food style, and watch them disappear in no time! For a party platter, you can serve Potato 65 alongside other Indo-Chinese snacks like spring rolls or Gobi Manchurian, and a bowl of green chutney or ketchup for dipping (although it’s flavorful enough on its own).
For a more substantial meal, pair Potato 65 as a side dish with Indian breads or rice. It goes wonderfully with chapati or naan, since the tangy sauce can be scooped up, almost like a dry curry. I also love it with a mild fried rice, pulao, or even jeera rice, to add a spicy kick on the side. In South India, it’s not unusual to serve it alongside biryani or pilaf as a crunchy contrast.
To balance the spiciness, serve a cooling accompaniment: a simple raita (yogurt dip with cucumber) works well, or the classic mango lassi as mentioned earlier for kids and adults alike. A squeeze of lemon on top of the Potato 65 just before eating also brightens up the flavors and adds extra tang.
If you have any leftovers (a rare occurrence!), you can reheat them in an oven or air fryer to bring back some of the crispiness. However, avoid microwaving, as that will make the batter soft. But honestly, once you put this dish out, there’s seldom anything left to store – it’s that addictive!
Enjoy your homemade Potato 65 – a dish that’s crispy, spicy, tangy, and absolutely unforgettable. It’s the kind of recipe that brings people together, be it at a festive holiday gathering or just a fun weekend snack night. Happy cooking and happy eating! 🎉🥔🔥
Prep Time: 15 mins Cook Time: 20 mins Total Time: 35 mins Serving: 3–4
—
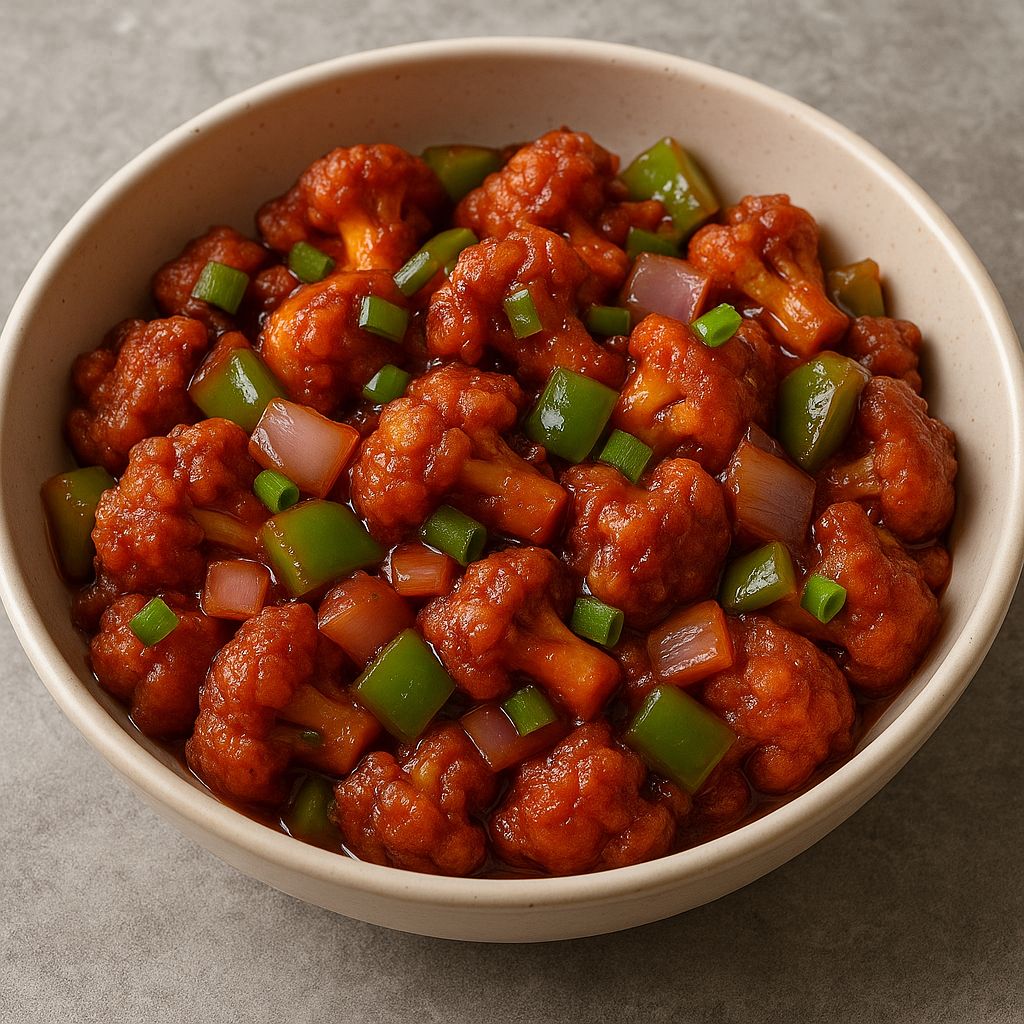
About the Recipe
Gobi Chilli is a crowd-favorite Indo-Chinese fusion dish made with crispy batter-fried cauliflower tossed in a spicy, tangy sauce. It’s bold, addictive, and perfect as a starter, side dish, or even a party snack. Serve it dry as an appetizer or make it semi-gravy for a perfect pairing with fried rice or noodles.
✨ A Dish That’s Both Sweet and Spicy — Just Like Life
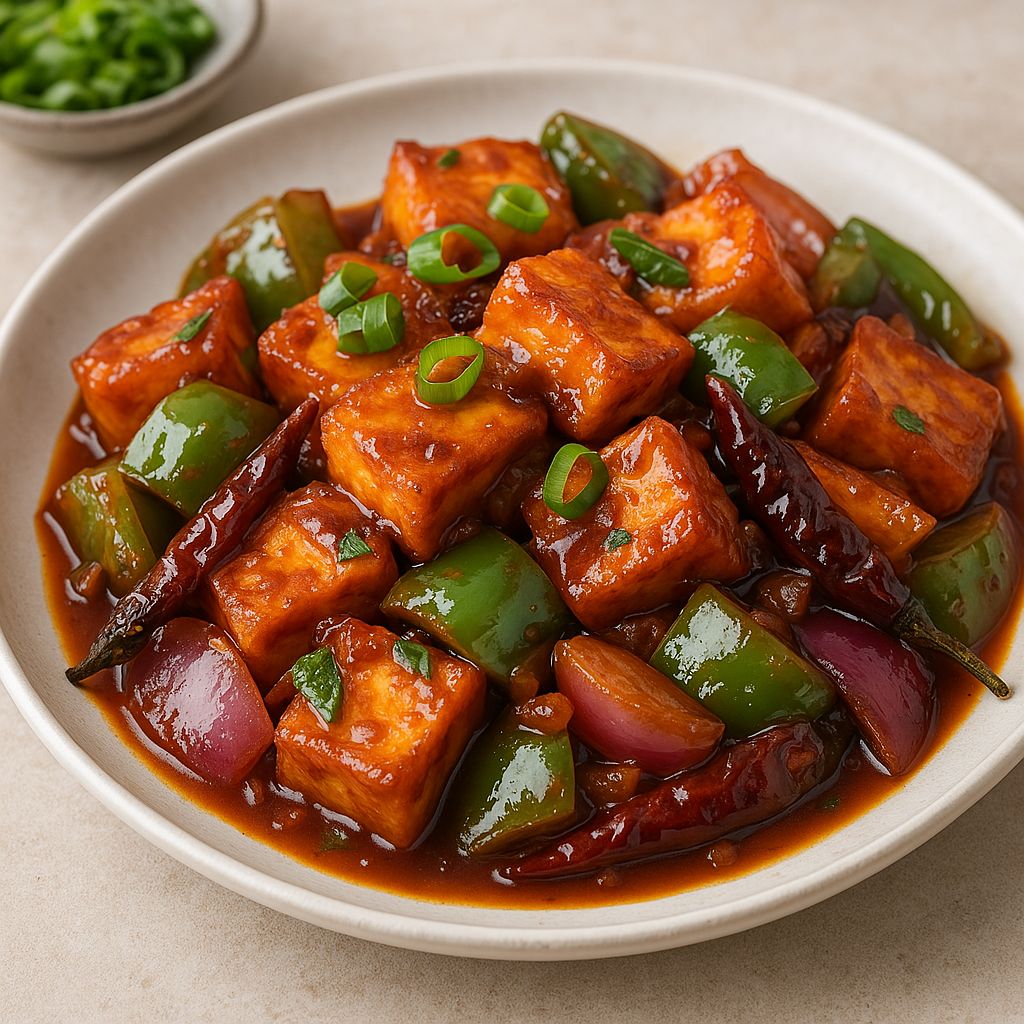
You know that one dish that always made it to the table, no matter how short the menu? Paneer Chilli.
It’s what we ordered when we couldn’t decide between desi and Chinese. It’s the dish that came sizzling on a hot plate in college cafés and late-night dhabas. It’s soft paneer in a bold, saucy coat — sweet, spicy, and perfectly high on drama.
And making it at home? It’s easier (and way better) than you think.
🛒 What You’ll Need (Serves 2–3):
For the paneer:
200g paneer, cubed
2 tbsp cornflour
1 tbsp maida (all-purpose flour)
Salt + pepper to taste
Oil to shallow fry
For the sauce:
1 small onion, cubed
1 small capsicum, cubed
2–3 garlic cloves, finely chopped
1 inch ginger, chopped or grated
1–2 green chilies, slit
1½ tbsp soy sauce
1 tbsp chili sauce
1 tbsp tomato ketchup
½ tsp vinegar
¼ cup water + 1 tsp cornflour (slurry)
1 tsp sugar (optional)
Spring onions + sesame (for garnish)
🍲 How to Make It – Glossy, Spicy & Full of Vibes
1. Crisp the Paneer
Toss paneer cubes in cornflour, maida, salt, and pepper. Shallow fry till golden. Keep aside.
This is that moment when your kitchen starts smelling like the canteen counter.
2. Sizzle the Base
In a hot wok, add 1 tbsp oil. Sauté garlic, ginger, and green chilies till aromatic. Add onions and capsicum. Toss on high flame — keep them crunchy!
3. Make It Saucy
Lower the heat. Add soy sauce, chili sauce, ketchup, vinegar, and sugar. Mix well.
Add the cornflour slurry and stir till it thickens slightly.
4. Toss It All Together
Add the fried paneer and toss quickly so it coats evenly. Garnish with spring onions and sesame.
❤️ Why Paneer Chilli Will Always Be a Mood
Desi soul, Chinese drama
Fast, fun, and full of flavor
Can be dry (starter) or gravy (main)
Because one bite = one flashback to college, cafés, and street stalls
🍜 Scene: A Hot Tawa, Cold Coke, & Full Volume Masala
You’re standing by a chowmein cart. The guy’s got one giant wok, both hands full. There’s cabbage flying. Chilies sizzling. Soy sauce pouring straight from the bottle. And the only rule here? “Thoda aur spicy kar do, bhaiya.”
Chowmein isn’t just a dish. It’s a craving. A post-school snack. A college break meal. It’s what happens when desi hands meet Chinese noodles and go wild with the spice.
🛒 What You’ll Need (Serves 2 Desi Souls):
2 bundles Hakka noodles (or any quick-cook noodles)
1 small onion, thinly sliced
½ cup shredded cabbage
½ cup capsicum, sliced
1 small carrot, julienned
1–2 green chilies, slit
1 tbsp ginger-garlic paste
2 tbsp soy sauce
1 tsp green chili sauce
1 tsp red chili sauce
½ tsp vinegar
Salt and black pepper to taste
2 tbsp oil (sesame or regular)
Spring onions for garnish
🔥 How to Toss It Like a Pro
1. Boil the Noodles Cook as per pack instructions. Rinse under cold water. Toss with a few drops of oil to avoid sticking.
2. Heat the Drama In a wok or kadhai, heat oil on high flame. Add ginger-garlic paste, green chilies. Stir for 10 seconds.
3. Veggie Toss Add onions, cabbage, carrots, capsicum — in that order. Stir-fry fast. Crunchy is king.
4. Sauce It Up Add soy sauce, chili sauces, vinegar, salt, and pepper. Mix well.
5. Noodle In Add the cooked noodles. Toss, flip, stir — let everything mix with the masala. Add a bit more oil if needed. Don’t let it dry out.
6. Finish Strong Garnish with spring onions. Serve hot and loud.
❤️ Why Chowmein Is an Emotion, Not Just a Dish
It’s every school canteen fight
It’s every college adda in a paper plate
It’s a hunger you don’t explain — you just slurp
It’s messy, spicy, and totally perfect the way it is