Fastival Food, Lunch & Dinner

Kashmiri Sweet Pulao: Festive Saffron Rice with Dry Fruits & Nuts

A Sweet Celebration from Kashmir

I still remember the first time I savored Kashmiri Sweet Pulao at a close friend’s Kashmiri wedding. The platter of golden rice, jeweled with nuts and raisins, perfumed the air with saffron and cardamom. Each bite of the warm, sweet rice mixed with crunchy nuts felt like a warm welcome into a Kashmiri home. In Kashmiri culture, this pulao is much more than just rice with dry fruits – it’s often described as “poetry in a pot,” a royal dish that carries the soul of Kashmir’s hospitality.

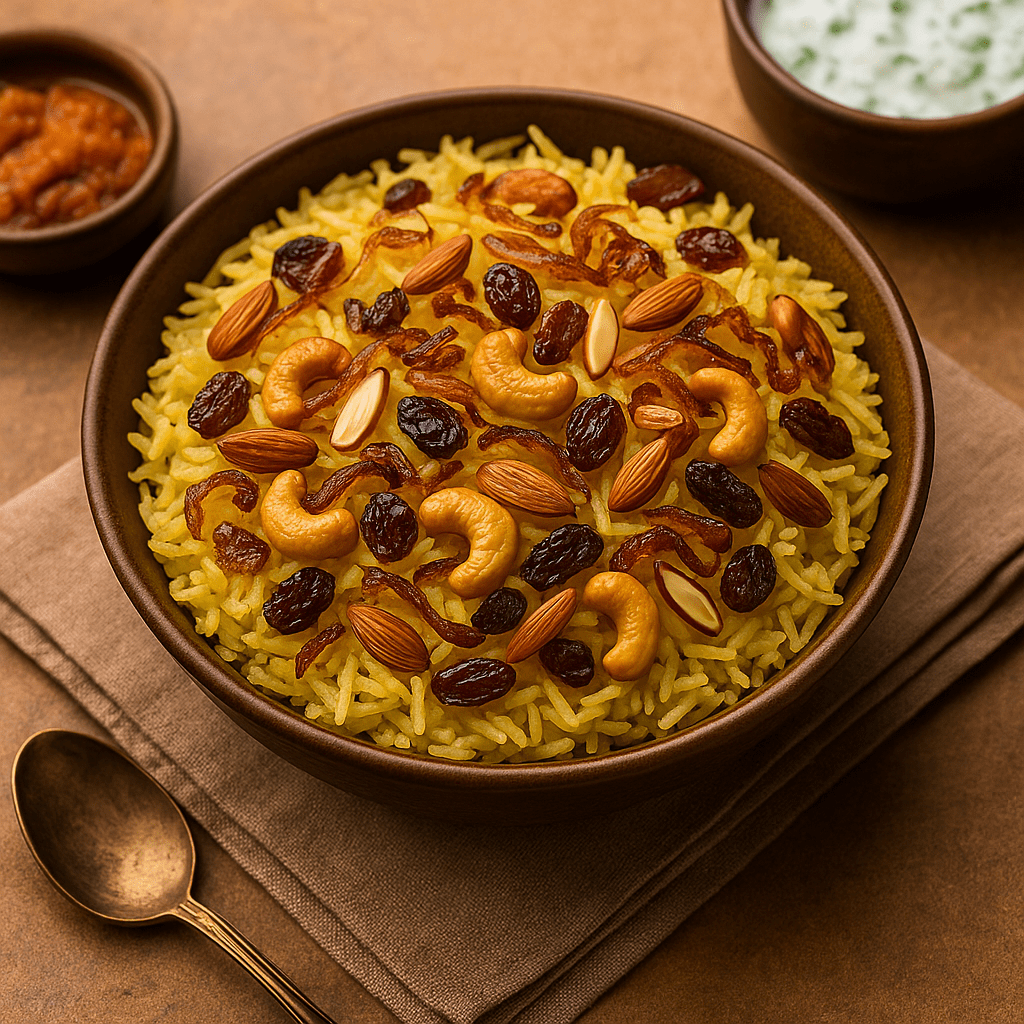
A bowl of Kashmiri sweet pulao garnished with fried nuts and raisins, served alongside a tomato onion raita and lauki yakhni (yogurt-based bottle gourd curry) – classic companions for this festive rice.

Unlike the spicy vegetable pulaos or biryanis common elsewhere in India, Kashmiri pulao stands apart with its mild, faintly sweet profile. Fragrant basmati rice is cooked with a medley of aromatic whole spices (think cinnamon, cardamom, cloves, bay leaf) that remain gentle, not overpowering. A pinch of Kashmiri saffron, sourced from the fields of Pampore, gives the dish its regal golden hue and heavenly aroma. A generous mix of dry fruits and nuts – cashews, almonds, raisins, and sometimes even walnuts or pistachios – provides luxurious texture and natural sweetness. In fact, this pulao is so mellow and rich that traditionally no meat or heavy spice is needed to make it special. Many authentic recipes also include a hint of crushed fennel seeds and a pinch of dry ginger (saunth) for that signature Kashmiri flavor note. The result is an aromatic rice pilaf that’s subtly sweet, delicately spiced, and utterly celebratory.

Kashmiri sweet pulao is often prepared on joyous occasions – it’s usually served at weddings, festivals like Eid, or family get-togethers to symbolize warmth and love. In Kashmiri homes, presenting this pulao to guests is a way of sharing a piece of their culture and hospitality. Now, let’s dive into my tried-and-tested recipe for this festive dish, along with all the tips to get it just right in your kitchen.

Ingredients

Basmati rice – 1 cup, preferably aged long-grain (soaked for 20–30 minutes)

Saffron strands (kesar) – a generous pinch (8–10 strands)

Milk – 3–4 tablespoons, warm (to soak saffron; use water for a vegan option)

Ghee – 2 tablespoons (clarified butter, for authentic flavor)

Mixed nuts – ~2 tablespoons cashew nuts (8–10 pieces) and 2 tablespoons almonds, halved or slivered (you can also add a few pistachios or walnuts)

Raisins – 2 tablespoons (golden or regular)

Whole spices – 1 bay leaf, 3 green cardamom pods, 4 cloves, 1 inch cinnamon stick, 1 teaspoon shahi jeera (caraway seeds) or cumin, 1 small piece of mace and 1 black cardamom (both optional)

Fennel seeds (saunf) – ½ teaspoon (or use ½ teaspoon fennel powder)

Dry ginger powder (saunth) – ¼ teaspoon (optional, for authentic flavor)

Onion – 1 small, thinly sliced (for fried onion garnish)

Sugar – 2 teaspoons (up to 1 tablespoon for a sweeter pulao, optional)

Salt – ½ teaspoon, or to taste

Water – 2 cups (for stovetop cooking; if using a pressure cooker, about 1½ cups is sufficient)


Yield: This ingredient list makes about 3–4 servings of pulao as a side dish.

Instructions

1. Prep the Rice: Rinse the basmati rice in cold water until the water runs clear. Soak the rinsed rice for 20–30 minutes in enough water. This helps the grains cook up fluffy and separate (soaked rice absorbs water and cooks more evenly). Meanwhile, warm the 3–4 tablespoons of milk, add the saffron strands to it, and set aside to let the saffron infuse its color and flavor.


2. Fry Nuts & Onions: Heat 1 tablespoon of ghee in a heavy-bottomed pot on medium heat. Add the cashews and almonds, stirring until they turn light golden. Then toss in the raisins and fry until they puff up. Remove all the nuts and raisins with a slotted spoon and set aside. In the same pot, add the remaining 1 tablespoon ghee. Add the sliced onions and fry, stirring frequently, until they turn golden-brown and caramelized. (Be careful not to burn them; lower the heat if needed toward the end.) Remove the fried onions and set aside on a paper towel. Tip: Frying the garnishes separately ensures they stay crisp and keeps the ghee flavored for the rice.


3. Sauté Spices: In the same pot, there should be a little ghee left. Add a touch more ghee if the pot looks dry. Keep the heat on low-medium. Now add the whole spices – bay leaf, green cardamoms, cloves, cinnamon, shahi jeera (or cumin), mace, and black cardamom. Sauté for a minute until they release their aroma (the spices will sizzle and become fragrant). Next, add the fennel seeds. If using dry ginger powder and/or fennel powder instead of seeds, you can briefly turn off the heat and stir them in now to prevent burning. Stir for just a few seconds to combine the spices with the ghee.


4. Add Rice and Seasonings: Drain the soaked rice completely and gently add it to the pot. Sauté the rice grains with the spices for 1–2 minutes on low heat, stirring carefully to coat each grain of rice with the spiced ghee. This step of frying the rice helps to keep the grains separate and aromatic. Now add the salt and the sugar to the rice and stir. (The sugar is optional, but a small amount gives that subtle sweetness characteristic of Kashmiri pulao.)


5. Cook the Pulao: Pour in the saffron-infused milk along with 2 cups of water (use 1½ cups water if you plan to pressure-cook). Give it a gentle stir. Increase the heat to high and bring the liquid to a boil. As soon as it starts boiling, reduce the heat to low, and cover the pot with a tight-fitting lid. Let the rice cook on low heat until all the water is absorbed and the rice is tender. This should take about 10 minutes. Do not uncover or stir while it’s cooking, to allow proper steam cooking (dum). If using a stovetop pressure cooker, cook for 1 whistle on medium heat, then turn off and let the pressure release naturally.


6. Rest and Fluff: After the rice is cooked (water absorbed), turn off the heat. Keep the pot covered and let the pulao rest for 5–10 minutes. This resting period allows the moisture to redistribute, so each grain turns fluffy without breaking. Remove the lid and gently fluff the rice with a fork, being careful not to mush the grains.


7. Garnish and Serve: Transfer the Kashmiri pulao to a serving dish (or you can serve straight from the pot). Gently fold in the fried cashews, almonds, and raisins. Top with the crispy fried onions. For an authentic touch, you can also garnish with a sprinkle of fresh pomegranate arils or a few small apple or pineapple cubes for a pop of color and extra sweetness (this is optional, but sometimes fresh fruit is added in festive versions of this pulao). Serve the pulao warm and enjoy its aroma!


Serving Suggestions

With Raita: The sweet and aromatic notes of Kashmiri pulao pair wonderfully with a cooling yogurt raita. Serve it with a simple cucumber raita or boondi raita, or even an onion-tomato raita spiced with cumin. The tanginess and creaminess of raita balance the richness of the pulao. In fact, because this pulao is on the sweeter side, it is typically served with a spiced yogurt dish to complement it.

With a Light Curry: For a more elaborate meal, pair the pulao with a mild curry so that the flavors don’t overpower the rice. A classic choice from Kashmiri cuisine is Lauki Yakhni, a delicate curry of bottle gourd in yogurt gravy. Its lightly spiced, tangy sauce is an excellent accompaniment to the sweet pulao. Alternatively, a gentle shahi paneer (paneer in a light creamy gravy) or a navratan korma can work well, providing a savory contrast without being too heavy.

Festive Feast Pairing: At grand Kashmiri gatherings like weddings (or in a traditional Wazwan feast), this pulao often appears alongside richer dishes. It may be served with a flavorful Rogan Josh (a Kashmiri lamb curry) or other spicy meats, acting as a sweet, fragrant counterpoint between spicy courses. If you have meat lovers at the table, a spoonful of a savory curry gravy alongside the pulao gives a delightful sweet-and-spicy contrast in each bite.


Tips for Perfect Fluffy Pulao and Make-Ahead

Choose the Right Rice: Opt for high-quality aged basmati rice for this recipe. Aged basmati has a lower moisture content and stays non-sticky, yielding long, fluffy grains once cooked. Avoid short-grain or new rice, as they can turn mushy.

Rinse & Soak: Always rinse the rice thoroughly 3-4 times to wash off excess starch (which is a culprit for sticky rice). Soaking the rice for at least 20 minutes is key – the grains absorb water and expand, which helps them cook perfectly fluffy and separate later. Just remember to drain the soaking water before cooking.

Low and Slow Cooking: Use a heavy-bottomed pot with a tight lid and cook the rice on a low flame. This slow, gentle cooking (similar to the traditional dum method) ensures the rice cooks evenly without burning. Resist the urge to peek too often or stir, as trapped steam is what cooks the rice fully. Once done, let the rice rest covered for a few minutes off the heat – this steam resting finishes the cooking and makes it easier to fluff the pulao without breaking the grains.

Don’t Skimp on Ghee: Frying the nuts, onions, and rice in ghee not only imparts a rich aroma but also coats the rice grains with a thin layer of fat. This helps in achieving a grain-separated pulao and enhances flavor. If you prefer, you can use half oil and half ghee, but a little ghee truly makes a difference in authenticity and taste.

Adjusting Sweetness: Traditional Kashmiri pulao is mildly sweet. The recipe uses a small amount of sugar for a hint of sweetness, but you can adjust this to your taste. Add an extra teaspoon of sugar if you want it sweeter, or skip the sugar entirely if you prefer the sweetness to come only from the raisins and nuts. The beauty of this dish is in its balance – it should not taste like a dessert, just a whisper of sweetness.

Make-Ahead and Reheating: You can prep parts of this dish in advance. Make-Ahead Garnishes: Fry the nuts and caramelize the onions a day ahead and store them in airtight containers (keep the fried onions in a paper towel to absorb excess oil so they stay crisp). Par-cook Rice: If you need to cook the rice ahead of time, slightly undercook it (leave it a tad firm), spread it on a tray to cool (this stops the cooking and prevents clumping), then refrigerate. When ready to serve, sprinkle 2–3 tablespoons of water or broth over the rice and reheat it gently – either on the stovetop covered (on low heat) or in the microwave covered with a damp paper towel. The added moisture will create steam and revive the rice’s fluffy texture. Once heated through, fluff the rice again and mix in the fried nuts and onions. (For food safety and best texture, reheat only the amount you plan to eat, and avoid reheating multiple times.)


With these tips in hand, you’re ready to create a truly memorable Kashmiri Sweet Pulao. The combination of saffron, nuts, and gentle spices will transport you straight to the Kashmir valley – right from your kitchen. Enjoy this royal, soul-soothing dish with your family, and feel the warmth and tradition of Kashmiri hospitality in every bite!

Snacks, Street Foods

Rajasthani Pyaz Kachori (Onion Kachori) – Monsoon Memories in a Crispy Bite

There’s a magic in the Indian monsoon that isn’t just about the rain – it’s about the cravings it brings. I remember as a child in Jaipur, the moment the earthy scent of first rain (petrichor) rose from the hot ground, my father would rush out to grab a batch of Pyaz Kachoris from the local halwai. We’d huddle under our verandah, warm cups of masala chai in hand, and bite into these golden, onion-stuffed kachoris as the raindrops danced around us. The flaky crust would crumble, giving way to a spiced onion filling that was equal parts fiery and comforting, a perfect contrast to the cool, damp weather. To this day, the monsoon and Pyaz Kachori are inseparable in my memories – one bite and I’m transported to those rain-soaked street corners and the joyful chaos of Jaipur’s monsoon evenings.

In Rajasthan, Pyaz ki Kachori isn’t just a snack; it’s an institution. Steaming hot kachoris are sold at nearly every sweet shop and namkeen stall, typically enjoyed with a dollop of sweet-sour tamarind chutney that balances the spice. These indulgent treats likely originated in the cities of Jaipur and Jodhpur, and they’re so legendary that people go to great lengths to get their hands on them – there’s even a tale of an Air India pilot detouring a flight to pick up her favorite Jodhpur kachoris!. Biting into an authentic Rajasthani Pyaz Kachori is pure bliss: the pastry is brittle, ghee-rich and flaky, giving way to a belly full of spiced onions (and a touch of potato) laced with fiery green chillies, fennel, and a hint of garlic. It’s the kind of street food that defines a place – mention Jaipur to any foodie, and they’ll likely reminisce about Rawat Misthan Bhandar’s famous Pyaz Kachori or the comfort of devouring one straight out of a roadside stall, rain or shine. This recipe is my attempt to bring those warm, nostalgic flavors into your home kitchen. So, let’s dive into making these crispy, stuffed pastries and create some monsoon memories of your own!

Ingredients

For the Kachori Dough:

2 cups all-purpose flour (maida)

1/4 cup ghee (clarified butter), melted

1/2 teaspoon salt (or to taste)

~1/2 to 3/4 cup water (as needed for kneading)


For the Onion Masala Filling:

2 cups onions, finely chopped (about 2 medium onions)

2 tablespoons oil

1 teaspoon nigella seeds (kalonji)

2 teaspoons fennel seeds (saunf)

2 bay leaves (tejpatta)

1–2 green chillies, finely chopped (adjust to spice preference)

2 tablespoons besan (Bengal gram flour) (helps bind the filling)

2 teaspoons ground coriander (dhania powder)

2 teaspoons red chilli powder (adjust to taste)

1 teaspoon garam masala powder

Salt, to taste

2–3 tablespoons fresh coriander leaves, chopped

Oil for deep frying (enough for a deep pan, about 2–3 cups)


Instructions

1. Prepare the Dough: In a large mixing bowl, combine the flour and salt. Pour in the melted ghee and rub it into the flour with your fingertips until the mixture resembles coarse breadcrumbs (this moyan of ghee is what makes the kachori flaky). Gradually add water, a few tablespoons at a time, and knead to form a semi-soft but firm dough. The dough should be pliable and smoother than puri dough, but not sticky. Knead well for about 4–5 minutes to develop gluten. Cover the dough with a damp cloth and let it rest for 15–20 minutes while you prepare the filling.


2. Make the Onion Filling: Heat 2 tablespoons of oil in a broad pan or kadhai over medium flame. Add the nigella seeds and fennel seeds; let them sizzle for a few seconds. Toss in the bay leaves and the chopped green chillies, stirring for a moment. Now add the finely chopped onions. Sauté the onions on medium heat for about 5 minutes until they soften and turn translucent (avoid browning them). Next, sprinkle in the besan and all the spice powders – coriander, red chilli, garam masala – along with salt. Stir everything together and cook for another 2–3 minutes, stirring continuously, until the besan gets lightly roasted and the spices cook off their raw aroma. The mixture will be fairly dry and aromatic, with the besan absorbing excess moisture from the onions. Turn off the heat, then mix in the fresh coriander leaves. Pick out and discard the bay leaves. Spread the filling on a plate to cool down slightly (warm is okay, just not piping hot) for easier handling.


3. Shape the Kachoris: Give the dough a quick knead after resting, then divide it into 10–12 equal portions (each portion will be about the size of a golf ball). Keep the dough balls covered to prevent drying. Working with one portion at a time, roll or press it out into a small disc roughly 3 inches in diameter. Place 1–2 tablespoons of the cooled onion filling in the center of the disc. Bring the edges of the dough up around the filling, pleating as needed, and pinch them together to seal the filling inside (like a money bag). Pinch off any excess dough at the top to avoid a thick lump. Now gently flatten the filled pouch with your palm. Using a rolling pin, very lightly and carefully roll the filled dough ball into a slightly flatter disc of about 2½ inches, taking care not to puncture it or let the filling spill out. (Tip: You can roll from the sealed side very gently, and if a bit of filling does peek through, patch it with a tiny pinch of flour-dough.) Prepare all kachoris this way, keeping the prepared ones covered with a cloth to avoid drying.


4. Deep-Fry the Kachoris: Heat the oil for deep frying in a heavy-bottomed pan or kadhai on medium-low heat. To test the oil, drop a tiny pinch of dough into it – it should sizzle and rise slowly without turning brown instantly. Slide in 2–3 kachoris at a time (do not overcrowd) into the hot oil. For the best crispy results, fry on a low to medium flame: in the first minute, do not disturb the kachoris. They will sink then gradually float up as they puff. Once they float, gently flip and move them around. Fry patiently, turning occasionally, until each kachori is golden brown, crisp and evenly cooked. This frying process can take about 8–10 minutes per batch on a moderate flame – remember, slow-frying is what yields the signature khasta (flakiness) in kachoris. Do not crank up the heat, as high heat will brown the outside too fast while leaving the inside doughy. When done, the kachoris will be a beautiful golden color and feel light and crisp with no soggy spots. Remove them with a slotted spoon and drain excess oil on paper towels. Repeat for all batches. (If you notice the oil temperature dropping too much between batches, let it heat up again, but never to smoking point.)


5. Enjoy: Serve the Pyaz Kachoris immediately while they’re hot and flaky. If you need to fry them a bit in advance, you can crisp them up in a preheated oven at 180°C (350°F) for 5 minutes before serving. See serving suggestions below for classic accompaniments!


Tips for Frying and Storing

Flaky Kachori Secrets: The key to flaky, khasta kachori is the dough. Be generous with the ghee (or oil) when rubbing it into the flour – this shortening makes the crust wonderfully crisp. Knead the dough until it’s smooth, but don’t make it too soft. A firmer, tight dough (with just enough water) ensures the kachori won’t absorb excess oil during frying. Always let the dough rest under a damp cloth; this relaxes the gluten and makes it easier to shape, preventing the kachori from springing back when rolled.

Frying Temperature & Technique: Frying kachoris is a slow dance. Always fry on medium-low heat for even cooking. Patience will reward you – low heat frying cooks the kachori through and produces an evenly golden, crisp shell with tiny flaky layers. If the oil is too hot, the kachori will puff up and turn dark quickly but remain uncooked (doughy) inside. One trick: once the kachori has floated and started to puff, you can gently press it with the frying spoon or a spatula to help it puff completely. Fry until the bubbling subsides significantly – that’s a sign the moisture has cooked out and the crust is crisp.

Onion Filling Tips: Don’t chop the onions too fine. Slightly larger diced onions are ideal because they retain a bit of texture and won’t release water as quickly as very fine onions. This helps avoid a soggy filling. The spoonful of besan in the filling is a traditional touch – it soaks up moisture from the onions and spices, ensuring the filling is dry enough to stay inside the kachori without bursting out. (Some halwais even use a bit of mashed boiled potato or crushed roasted moong dal for the same purpose of binding the filling.)

Variations: While all-purpose flour yields the most authentic crispy texture, you can replace part of the flour with whole wheat flour (atta) for a slightly healthier spin. Many households might not deep fry snacks often, but this treat is worth the indulgence! If you’re experimenting, you can also try other fillings (like spiced lentils or peas) with this same dough – but then it wouldn’t be the classic Pyaz Kachori we know and love.

Storing & Reheating: Pyaz Kachori is best enjoyed fresh, but you can prepare them in advance. These kachoris keep well for a couple of days at room temperature. Let the fried kachoris cool completely, then store them in an airtight container – this prevents them from turning soggy. To reheat, avoid microwaving (which can make them chewy); instead, warm them up in a preheated oven at 180°C (350°F) for about 5–8 minutes. They’ll crisp up almost as good as freshly fried. (If you need to store the uncooked, filled kachoris, you can refrigerate them separated by parchment, but fry within a day for best results.)
Leftover Idea: If by some miracle you have leftover kachoris, you can turn them into a quick kachori chaat! Lightly crush a warmed kachori in a bowl, top with whisked yogurt, drizzle with tamarind and green chutneys, and sprinkle some sev and chopped onions. This street-food style makeover is absolutely delicious.


Serving Suggestions

Classic Chutney Pairing: The traditional way to relish Pyaz Kachori is with chutneys. Tamarind-Date Chutney (imli ki chutney), which is sweet and tangy, is a must – it complements the spicy, pungent onion filling perfectly. Alongside it, serve a bright Green Chutney made from fresh coriander, mint, green chillies and lime. The duo of sweet tamarind and herbaceous green chutney offers a burst of contrasting flavors that elevate each bite of the kachori. Serve the kachoris on a platter with bowls of these chutneys, or drizzle the chutneys inside the opened kachori for a street-style presentation. You can also add a few fried green chillies on the side for those who love extra heat (bite carefully – they’re hot!).

Rajasthani Kadhi (Kadhi Kachori): In some parts of Rajasthan, especially in cities like Ajmer, Pyaz Kachori is famously served with a simple Rajasthani kadhi. This kadhi is a thin, spicy yogurt-based curry (different from the Punjabi kadhi, as it usually has no pakoras and is lighter). To serve, place hot kachoris in small bowls and pour steaming kadhi over them, then top with a drizzle of tamarind and green chutney. Eating kachori soaked in kadhi is a soul-warming experience – the kachori soaks up the savory curry, turning each bite into a soft, flavor-packed dumpling. It’s a lesser-known but delightful way to enjoy this snack as a more filling meal.

Chai Time Delight: No Indian street food story is complete without chai! Serve your Pyaz Kachoris with a pot of hot masala chai on the side. The strong, milky tea cuts through the richness of the kachori and makes for a comforting combination. In fact, many locals swear by kachori with chai as the ultimate rainy day duo. The warmth of the tea and the spice of the kachori filling will surely chase away any chill from the monsoon rain. So, dig in, sip, and enjoy the bliss – as we say in Rajasthan, “Ram ram sa, khaana ho jaye!” (Greetings, let’s eat!).


Enjoy making these Rajasthani Pyaz Kachoris at home! With each crispy bite, you’ll taste the love and legacy of Rajasthan’s street food culture – and if you close your eyes, you might just hear the patter of rain and the chatter of a busy Jaipur market. Happy cooking and happy monsoon! 🌧️✨