
One whiff of Chicken Bhuna Masala simmering on the stove takes me straight back to my childhood kitchen. The aroma of bhuna – spices and aromatics frying slowly in oil – would fill the house and draw everyone to the table. This dish is a classic North Indian curry where chicken is stir-fried and then slow-cooked in a spicy, fragrant onion-tomato masala until tender, each piece coated in a finger-licking flavorful sauce. It’s the kind of rich, hearty curry that warms you from the inside, perfect for a family feast or a cozy dinner reminiscing about home.
The word “bhuna” literally means “to fry” or “to sauté,” referring to the cooking method of patiently frying onions, tomatoes, and spices to build a deep flavor base. In a traditional Bhuna, the chicken is added to this base and slow-cooked in its own juices with little to no added water, intensifying the flavors as the masala reduces. The result is a semi-dry curry – unlike a runny gravy, here a thick, concentrated sauce clings to the chicken instead of pooling around it. The magic of Chicken Bhuna Masala lies in this slow browning and layering of flavors: sweet browned onions, tangy tomatoes cooked down until jammy, and aromatic spices toasted to perfection. The cooking process may take a bit of time and love, but the reward is an irresistibly rich, spicy curry that hits all the right notes.
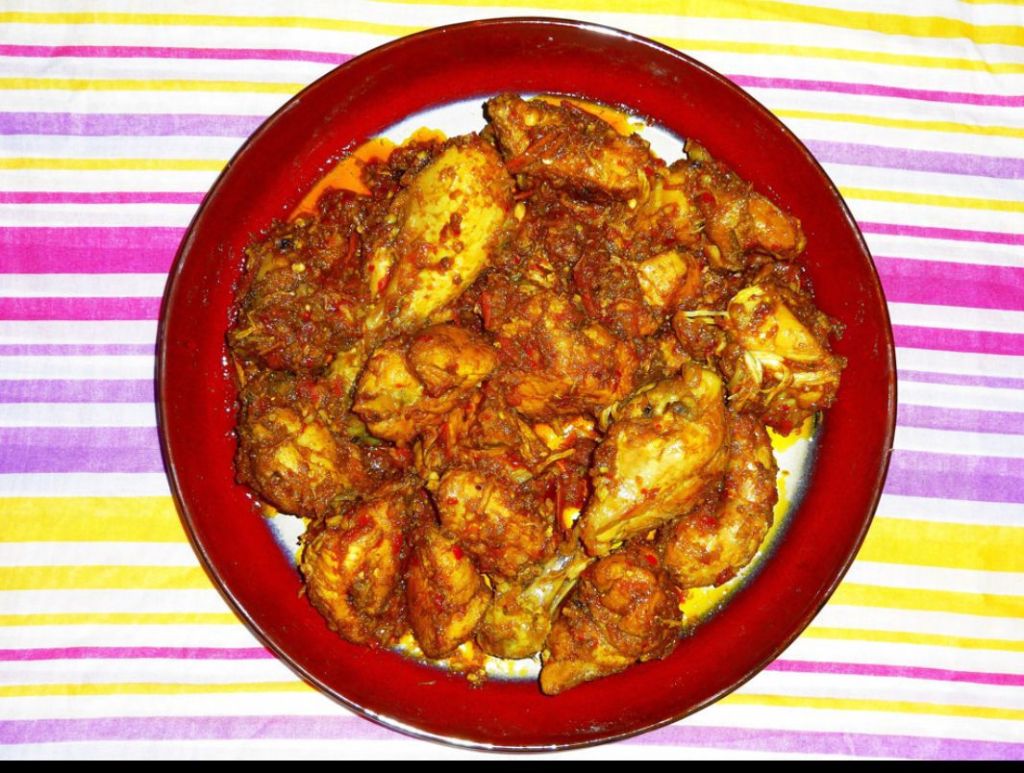
A plate of Chicken Bhuna Masala, a semi-dry curry where the thick masala clings to each piece of chicken. This rich, spicy dish is slow-cooked to achieve its signature deep flavors and thick consistency. Notice how the sauce is reduced and hugging the chicken pieces — that’s exactly what defines a great Bhuna Masala!
Ingredients
1 kg (2.2 lbs) chicken, cut into medium pieces (bone-in preferred for more flavor; you can use boneless, but bone-in yields a richer taste)
1 tbsp ginger-garlic paste, divided (½ for marinating, ½ for cooking) – or use 1-inch ginger + 5 garlic cloves, minced
1 tbsp fresh lemon juice – for marinating the chicken (tenderizes and adds tang)
½ cup plain yogurt (curd) – at room temperature, whisked until smooth
3 tbsp cooking oil (vegetable oil or mustard oil for authenticity; or use 2 tbsp oil + 1 tbsp ghee for extra flavor)
2 large onions, finely chopped (about 2 cups)
3 medium tomatoes, finely chopped (or 1 cup tomato purée)
2 green chilies, slit lengthwise (adjust to taste; these add aroma and heat)
Whole spices: 1 bay leaf, 4 green cardamom pods, 4 cloves, 1-inch cinnamon stick, 2 dried red chilies (optional, for extra smoky heat)
Spice powders:
2 tsp coriander powder
1 tsp cumin powder
½ tsp turmeric powder
2 tsp Kashmiri red chili powder (for a rich red color, mildly spicy) – or 1 tsp regular hot red chili powder (for more heat, adjust to your spice level)
1 to 1½ tsp garam masala, divided (1 tsp for cooking, plus an extra ½ tsp to finish)
1 tsp salt, or to taste (divide: use a pinch for marinating, remainder in the masala)
1 tsp dried fenugreek leaves (Kasuri Methi), crushed between your fingers (optional but highly recommended for a finishing aroma)
Fresh cilantro leaves for garnish (a small handful, chopped)
Tip: Try to cut the chicken into uniform bite-sized pieces. This ensures even cooking throughout.
Instructions
1. Marinate the Chicken: In a large bowl, combine the cleaned chicken pieces with ½ tablespoon of the ginger-garlic paste, 1 teaspoon of salt (or simply a generous pinch, since you’ll add more salt later), and the lemon juice. Rub this all over the chicken. Tip: If you have 30 minutes or more, let the chicken marinate – this helps infuse flavor and keeps it juicy. You can even cover and refrigerate it for several hours or overnight for deeper flavor. (If short on time, even a quick 10-minute marinade while you prep other ingredients is beneficial.)
2. Prepare the Bhuna Masala Base: Heat the oil (or oil+ghee) in a heavy-bottomed pan or kadhai over medium heat. Add the whole spices (bay leaf, cardamoms, cloves, cinnamon, and dried red chilies). Sauté for a minute until they sizzle and release their aroma. Now add the chopped onions and a pinch of salt. Fry the onions on medium heat, stirring frequently, until they turn golden-brown. This will take about 10 minutes – be patient and avoid high heat. Tip: Browning the onions slowly is crucial for a rich bhuna masala; the deep caramelized onions will give sweetness and depth to the curry. Stir often and scrape the bottom of the pan to prevent burning (add a teaspoon of water if the onions start sticking too much).
3. Layer in Ginger, Garlic & Spices: Once the onions are nicely browned, add the remaining ½ tablespoon of ginger-garlic paste. Sauté for about 1 minute until the raw smell disappears. Reduce the heat to low, then add all the ground spice powders except the garam masala (we’ll use that later). This includes the coriander, cumin, turmeric, and red chili powders. Stir them into the onion mixture and fry for 30-60 seconds on low heat. Tip: Keep the heat low at this stage – you want to bhunao (gently roast) the spices in the oil without burning them. This step blooms the spices and layers the oil with flavor, which will coat the chicken later. You should smell the fragrant spices toasting – that’s a sign they’re releasing their goodness.
4. Add Tomatoes and Cook Until Masala is Thick: Stir in the chopped tomatoes (and any tomato paste if using). Increase heat to medium. Cook the tomatoes with the onions and spices, stirring occasionally, until the tomatoes break down completely. This will take another 7-10 minutes. As the tomatoes cook, they’ll release moisture; scrape up any browned bits from the pan so they mix into the sauce. Cook until you see the oil start to separate from the masala or edges of the pan – you’ll notice the paste thickening and darkening in color. This “oil release” is a key indicator that your bhuna masala base is well cooked and the raw tomato flavor is gone. If at any point the masala gets too dry and starts sticking, add a splash (a few tablespoons) of hot water to loosen it. (Don’t worry – adding a little water here won’t make it into a gravy, it’ll just help everything cook down and prevent burning.)
5. Incorporate the Yogurt: Lower the heat to very low. Add the whisked yogurt to the pan, stirring continuously as you pour it in. Mix it well into the onion-tomato masala. Keep sautéing on low heat for 2-3 minutes until the yogurt is fully blended and the masala once again becomes thick and starts to emit oil on the sides. Tip: Adding yogurt on low heat prevents it from splitting. For extra precaution, you can temper the yogurt by stirring a spoonful of the hot tomato-onion mixture into the yogurt bowl first, then pour it all back into the pan. The yogurt adds a lovely tang and richness to the bhuna masala, balancing the heat. Cook this mixture until it’s a thick paste and the oil leaves the sides of the pan – now your base is ready.
6. Add Chicken – The Bhuna (Frying) Step: Increase the heat to medium-high and add the marinated chicken pieces to the pan. Stir well so each piece is coated with the masala. Fry the chicken in the masala for about 5-7 minutes, stirring occasionally. The chicken will initially release some of its juices – let it cook uncovered during this time so that most of these juices evaporate. Tip: This step of briskly stir-frying the chicken with the masala on high heat is essential to bhuna cooking. It helps the spices and aromatics penetrate the meat and intensifies the flavor by reducing excess liquid. You want the chicken to start looking a bit seared on the outside. It’s okay (actually great) if the masala starts sticking to the pan a little – just keep scraping and stirring so it doesn’t burn.
7. Slow-Cook Until Tender: Now that the chicken is well sautéed, add about ¼ to ½ cup of hot water to the pan – just enough to create some steam and prevent scorching (remember, this curry should be semi-dry, not watery). Scrape up any browned bits, then cover the pan with a lid. Reduce the heat to low and let the chicken simmer gently for 15-20 minutes, or until it is fully cooked and tender. Stir occasionally to make sure the masala isn’t catching on the bottom. If it starts to dry out too much, you can add a few more tablespoons of water as needed (add it along the sides of the pan, not directly on the chicken, so you don’t cool the pan too much). The goal is a thick gravy that clings to the chicken. You’ll know it’s done when the oil separates again, the chicken is fork-tender, and the sauce is reduced and nicely coating the pieces. Tip: Traditionally, no extra water is added in a bhuna, but it’s fine to adjust slightly to prevent burning – you won’t dilute the taste. At this stage, taste the masala and adjust seasoning. Add a bit more salt if needed. If the curry tastes too tangy (from the tomatoes and yogurt), stir in a pinch of sugar to balance the flavors.
8. Finish with Aromatics: Once the chicken is cooked and you’re happy with the consistency of the masala, sprinkle the reserved ½ teaspoon of garam masala over the curry. Also add the crushed fenugreek leaves (Kasuri methi) and stir them in. These final touches will release a burst of aroma – the garam masala and fenugreek are your finishing flavor layer. Let the curry simmer for another 2 minutes uncovered, so these flavors infuse. Then turn off the heat. Garnish with freshly chopped cilantro. Optional: For the best flavor, cover the pan and let the Chicken Bhuna Masala rest for 5 minutes before serving. This resting time lets the spices mellow and merge, and you’ll notice the curry tastes even better.
Now your kitchen should be smelling absolutely divine, and it’s time to dig in!
Serving Suggestions
Chicken Bhuna Masala is best enjoyed hot. It pairs wonderfully with Indian breads or rice. Serve it with soft naan, flaky parathas, or simple chapati (roti) – the thick bhuna gravy is perfect for scooping up with bread. It’s equally delightful with a side of steamed basmati rice or fragrant jeera rice (cumin rice), allowing the bold curry flavors to shine. For a complete meal, consider serving a cooling cucumber raita (yogurt dip) or some fresh onion slices and lemon wedges on the side – the cool crunch and citrus will complement the rich, spicy chicken beautifully.
This rich and spicy Chicken Bhuna Masala is a real treat for the taste buds – the chicken is tender, the masala is deeply flavorful, and every bite comes with a punch of spice and tang. It’s the kind of dish that might even taste better the next day, as the flavors continue to develop (if you’re lucky enough to have leftovers!). Enjoy your Chicken Bhuna Masala with your loved ones, and savor each hearty, aromatic bite. Happy cooking!


