Breakfast, Fastival Food

Traditional Chakuli Pitha – An Odisha Festival Pancake

Pancake and a Prayer: Devotion in Odia Kitchens

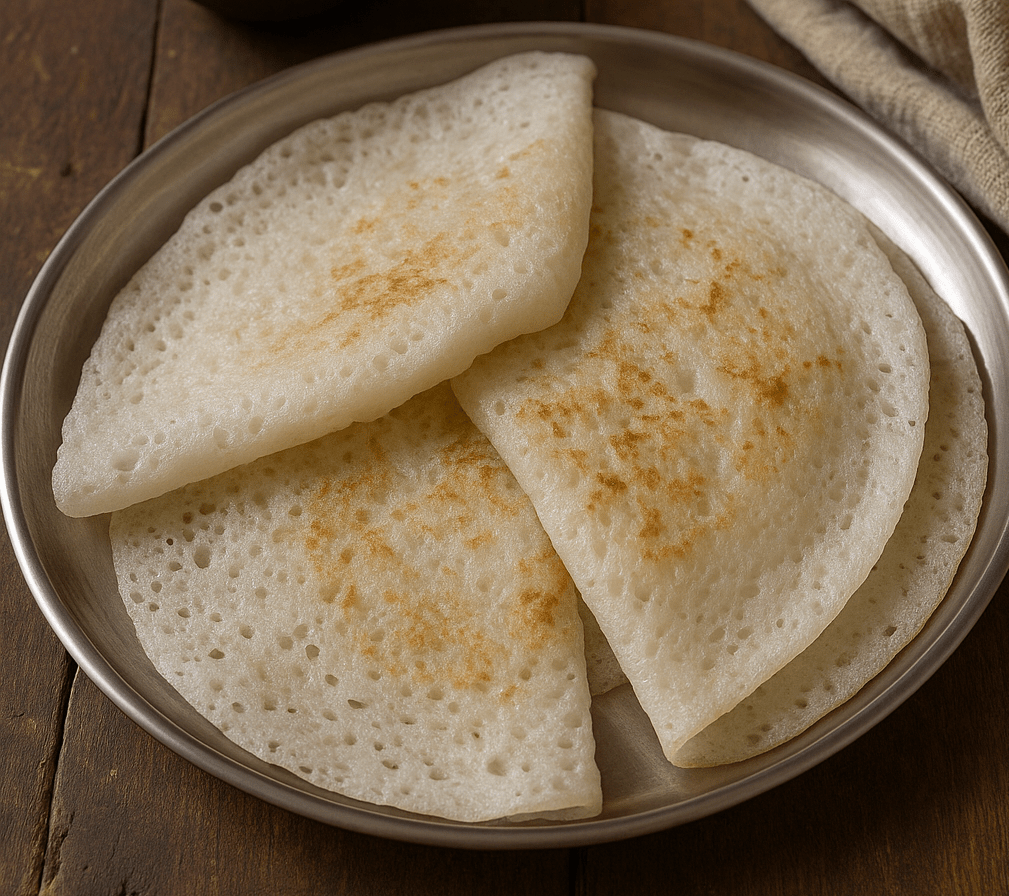
Chakuli Pitha (Odia: ଚକୁଳି ପିଠା) is a flat fermented rice-and-urad-dal pancake that epitomizes the taste of Odisha. This humble pancake is beloved across generations, and on festival mornings its aroma is as comforting and revered as a prayer. In my family home, the first hiss of chakuli on the tawa at dawn meant a celebration was underway – a joyful signal to the village that the women had rested and the day of feasting had begun.

On special occasions like Raja Parba or Pana Sankranti, chakuli pitha is as sacred as any offering. It is customary to offer these tender cakes to Goddess Lakshmi on Manabasa Gurubar, weaving devotion into each bite. The gentle sourness from overnight fermentation feels both grounding and auspicious, linking us to our ancestors and the rice fields that sustain us. Every warm plate of chakuli served in our home carries these loving memories – golden discs that taste of tradition and togetherness.

Chakuli Pitha Recipe

Ingredients:

2 cups parboiled rice (aruarua chaula)

1 cup whole white urad dal (biri dal)

½ tsp salt (or to taste)

Water, for soaking and grinding

Ghee or mustard oil (for cooking)


Steps:

1. Soak & Grind: Rinse the rice and urad dal. Soak them separately in water for 4–6 hours. Drain and grind each to a smooth batter (you can add a little water). Mix the two batters together, add salt, and whisk well until smooth.


2. Ferment: Cover the batter and let it ferment in a warm place for 8–12 hours (overnight is ideal). The batter will rise and develop a light sour aroma – a sign it’s ready.


3. Cook Chakuli: Heat a cast-iron tawa or heavy skillet on medium heat. Grease it lightly with ghee or mustard oil (traditional choices). Pour a ladleful of batter onto the hot tawa and gently spread it into a circle about 5–6 inches wide. Cover and cook for 2–3 minutes. Bubbles will form and edges will lift. Carefully flip (or fold) and cook another minute. The chakuli should be golden and spongy. Repeat with remaining batter.


4. Keep Warm: Stack the hot chakuli on a plate. If you like, smear a little ghee on top so they stay moist and flavorful.


Tips for Perfect Chakuli

Batter Consistency: The batter should pour smoothly but be slightly thicker than dosa batter. Too runny and it won’t hold shape; too stiff and it won’t ferment evenly. A good test is that it coats the ladle and falls slowly. Aim for a pourable, yet thick, consistency.

Fermentation: Warmth is key. Let the batter rest in a mildly warm corner of the kitchen. The ideal is around 25–30°C. In cooler climates, place the covered batter inside a turned-off oven with only the light on – the gentle heat will encourage fermentation. You’ll know it’s properly fermented when it smells slightly tangy.

Cooking: Preheat the skillet well so the chakuli cooks through. After pouring the batter, always cover with a lid; the steam cooks the top while the bottom crisps. Use just a teaspoon of ghee or mustard oil for each pitha to get the characteristic aroma. Avoid flipping back and forth – one flip (or none, if you prefer folding) is usually enough.

Serving Warm: Serve chakuli immediately while they’re soft. Cold chakulis tend to firm up, so keep them wrapped in a clean cloth or covered plate until serving.


Variations: Sweet and Savory Twists

Families across Odisha enjoy creative twists on chakuli. A popular sweet version is Budha (or Burha) Chakuli – literally the “grown-up” pancake – which is richer and thicker. For Budha Chakuli, a spoonful of jaggery (molasses) and grated coconut (and even mashed banana) is mixed into the fermented batter. The result is a dessert-like pancake often reserved for special days. I still remember my grandmother mashing ripe banana and stirring in coconut, turning our morning chakuli into a sweet festival treat.

In contrast, Saru Chakuli is made paper-thin, almost like a dosa. It’s spread very thin on the tawa and fried until crisp; perfect for those who love a lighter texture. Beyond these, you can simply enjoy plain chakuli pitha with spiced fillings or toppings: try folding a hot chakuli around freshly grated sweet coconut or pouring warm jaggery syrup (pani guda) over it for an instant dessert. Even a dollop of curd or coconut chutney provides a delightful contrast to the chakuli’s tang. These variations showcase the versatility of chakuli – from a simple breakfast pancake to a stuffed festival delicacy.

Serving Suggestions

Chakuli Pitha is always served hot. In Odisha, it’s common to present a stack of steaming chakulis alongside simple accompaniments. For a traditional experience, drizzle a little warm ghee on top and accompany the pitha with jaggery or sugar – the sweetness complementing its tang. Spicy sides are equally loved: we often serve chakuli with aloo dum (a potato curry) or guguni (a spiced chickpea curry). A bowl of coconut chutney, dal, or even plain yogurt also pairs nicely. In every case, the soft fermented pancake acts as a perfect vehicle for these flavors, turning humble ingredients into a hearty festival breakfast.

Every bite of chakuli pitha is a journey back to those simple, joyous mornings – a reminder that food can be an offering, a celebration, and a memory all at once. By following this traditional recipe and honoring the small rituals around it, you bring a bit of Odia devotion and nostalgia into your own kitchen. Enjoy cooking and savoring this timeless festival pancake!

Breakfast

Instant Suji Idli (No Ferment) with Classic Coconut Chutney

There’s nothing quite like the comfort of steaming hot idlis on a hectic morning. In my family, we started making suji idlis for breakfast on busy days because “it’s completely hassle-free and the idlis are soft”.  Using semolina (suji) and yogurt means we skip the hours-long fermenting; the batter is ready in minutes.  A pinch of ENO (fruit salt) sprinkled before steaming instantly reacts with the yogurt to leaven the batter, yielding pillowy soft idlis.  These light, spongy cakes are just the kind of comforting food that turns a rushed morning into something special – we even pack extra idlis into kids’ lunchboxes alongside chutney for a quick, nourishing tiffin.

Suji idli is also known as rava idli: it’s essentially steamed semolina cakes instead of the usual rice-and-lentil idli.  “Suji” (cream of wheat) is the coarse wheat flour used here, so there’s no soaking or grinding required.  We simply mix the suji with yogurt, water and seasonings, let it rest briefly, then add ENO and steam.  In practice you can have a batch of these ready in about 15–20 minutes.  The result is a soft, fluffy idli that rivals the traditional kind in taste and texture, and since the batter is so quick to make, these idlis become a go-to on busy mornings or anytime a craving strikes.

Instant Suji Idli (No-Ferment) Recipe

These soft, white idlis are made from semolina (suji/rava) and yogurt without any fermentation.  Serve them hot with coconut chutney and sambar or coffee for a comforting South Indian breakfast.

Ingredients

Suji Batter:

1 cup rava (suji/semolina)

½ cup plain yogurt (dahi)

½ to ¾ cup water (adjust for medium-thick batter)

½ teaspoon salt (or to taste)

1 teaspoon ENO fruit salt (or ¼ teaspoon baking soda)

2 tablespoons grated carrot (optional, for color)

2 tablespoons chopped cilantro (optional)

1 green chili, finely chopped (optional)

1 teaspoon grated ginger (optional)


Tempering (Tadka):

1 tablespoon ghee (clarified butter) or oil

½ teaspoon mustard seeds

½ teaspoon cumin seeds (optional)

1 teaspoon chana dal (split chickpeas) or urad dal, split

A pinch of asafoetida (hing)

8–10 curry leaves


Instructions

1. Spice Tempering: Heat 1 tablespoon ghee or oil in a pan over medium-low heat. Add the mustard seeds and let them splutter. Then add the cumin seeds (if using) and chana dal; fry until the chana dal is golden and fragrant. Add the curry leaves, hing, chopped green chili and ginger (if using) and fry for a few seconds until aromatic. This seasoned ghee infuses the idlis with flavor.


2. Roast the Suji: Add the 1 cup suji (semolina) directly to the spiced oil mixture. Stir well to coat the grains. Roast the suji on low heat for about 5–7 minutes, stirring frequently, until it becomes fragrant and just begins to change color. Be careful not to let it brown. (Roasting the semolina in ghee helps give the idlis a lighter texture.)


3. Mix Batter: Remove the pan from heat. While the suji is still warm, stir in the grated carrot, chopped cilantro, and salt. Then add the ½ cup yogurt and about ½ cup water. Mix thoroughly to form a medium-thick batter. The consistency should be like pancake batter – not too thin or thick. If your yogurt is very thick, you may need up to ¾ cup water; if it’s thin, use less. Cover the batter and let it rest for 15–20 minutes. During this time, the suji will absorb moisture and soften.


4. Prepare the Steamer: While the batter rests, grease an idli mold or cake-pan with a little ghee or oil. Bring 2–2.5 cups of water to a boil in an idli steamer or large pot with a trivet. (You can also use a pressure cooker or instant pot without the weight.)


5. Leaven the Batter: After 15–20 minutes, check the batter; if it has thickened too much, stir in a tablespoon or two of water to loosen it. Sprinkle 1 teaspoon of ENO (fruit salt) evenly over the batter and gently fold it in using a spoon. Quickly but carefully mix the batter just until the ENO is incorporated. You will see bubbles forming – this is the reaction with the yogurt that makes the idlis rise. Work fast because once the ENO is mixed in, you should steam immediately.


6. Steam the Idlis: Pour the batter into the greased idli molds, filling each cavity about 3/4 full. Place the idli stand into the steamer and cover with a lid. Steam the idlis for 10–12 minutes over medium heat. (If using a pressure cooker, do not put the whistle/weight on; steam for 10 minutes.) You can test doneness by inserting a toothpick or fork into an idli – it should come out clean.


7. Finish: When done, remove the idli stand and let the idlis cool for a minute. Gently unmold the hot idlis onto a plate. The result should be soft, spongy cakes that hold together. The tempering and ENO give these idlis their characteristic light, fluffy texture.


Enjoy these instant suji idlis warm, right off the steamer. They make a hearty, wholesome breakfast.

Classic Coconut Chutney

A traditional South Indian coconut chutney is the perfect pairing. It’s made from freshly grated coconut and tempered spices, giving a cool, creamy contrast to the warm idlis.

Ingredients

1 cup fresh grated coconut (about 1 coconut’s white flesh)

2–3 green chilies (adjust to taste)

1-inch piece of ginger (optional)

2 tablespoons roasted chana dal (split chickpeas)

Salt, to taste

Water, as needed for grinding

Tempering:

1 teaspoon oil

½ teaspoon mustard seeds

½ teaspoon urad dal (black gram split and skinned) or chana dal

8–10 curry leaves

A pinch of asafoetida (hing)


Method

1. Grind the Chutney: In a blender or food processor, combine the grated coconut, green chilies, ginger (if using), roasted chana dal and a pinch of salt. Add just enough water to help the ingredients blend. Grind into a smooth (or slightly coarse) paste. Transfer the chutney to a serving bowl. If the chutney is too thick, you can stir in a little more water to reach a spreadable consistency. (As one recipe notes, the basic chutney is made by grinding fresh coconut with chilies and roasted dal.)


2. Prepare the Tadka: Heat 1 teaspoon of oil in a small pan. Add the mustard seeds and let them pop. Then add the urad dal and fry until it turns golden. Finally add the curry leaves and a pinch of hing. Stir briefly until the leaves are crisp.


3. Finish: Pour this hot tempering (tadka) over the prepared coconut chutney. The sizzling mustard seeds, curry leaves and hing will infuse the chutney with aroma and depth. Mix well. Your coconut chutney is ready to serve.


This simple chutney can be made in about 10 minutes and keeps well in the refrigerator for a couple of days. It traditionally accompanies idli, dosa and other South Indian snacks.


Serving Suggestion: Serve the warm idlis immediately with the coconut chutney on the side.  A cup of strong filter coffee or masala chai rounds out the meal beautifully. These idlis are also wonderful with sambar if you have it. Leftover idlis taste great toasted as “fried idli” or tossed with spices for a snack. Enjoy this wholesome, comforting Indian breakfast any time – it’s ideal for busy mornings or when you need a quick, kid-friendly meal.

Breakfast

Easy Methi Paratha Recipe for Beginners


About the Recipe

Methi Paratha is a soft, spiced flatbread made with fresh methi (fenugreek) leaves kneaded directly into whole wheat flour. A regular in North Indian kitchens, this paratha is loved for its slightly bitter, earthy flavor and nutritional value — rich in iron, fiber, and vitamins.

It’s easy to make, ideal for meal prep, and stays soft for hours — making it perfect for tiffin boxes or road trips.

Flaky methi paratha made with fresh fenugreek leaves and whole wheat flour, served with pickle and curd.


Ingredients (Makes 6–8 parathas)

1½ cups whole wheat flour (atta)

1 cup fresh methi leaves, finely chopped

1 green chili, finely chopped (optional)

½ inch ginger, grated

½ tsp ajwain or jeera

½ tsp turmeric powder

½ tsp red chili powder

Salt to taste

1 tbsp oil or ghee

Water to knead

Ghee or oil for roasting


How to Make Methi Paratha (Step-by-Step)

1. Clean & Chop Methi Leaves

Pluck methi leaves from stems, rinse 2–3 times in water, and finely chop.

Optional: Sprinkle a little salt and rest for 5 mins to reduce bitterness, then squeeze gently.


2. Prepare the Dough

1. In a mixing bowl, add flour, chopped methi, ginger, green chili, spices, and salt.


2. Add oil and mix well.


3. Gradually add water and knead into a soft dough.


4. Rest the dough for 15–20 minutes.


3. Roll the Parathas

Divide dough into medium-sized balls.

Roll each ball into a disc, 6–7 inches wide, dusting lightly with flour.


4. Cook the Parathas

Heat a tawa. Place the paratha and cook until golden spots appear on both sides.

Apply ghee or oil and roast until fully done and crisp at the edges.


Serving Suggestions

Serve hot with curd, pickle, or chutney

Great with masala tea for a light meal

Can be packed in foil for lunch or travel


Tips for Best Methi Parathas

Always chop methi finely for even mixing

Use fresh leaves, not overgrown or yellow ones

Resting the dough enhances flavor and softness

Can be frozen half-cooked and reheated when needed


Variations

Add grated paneer or boiled potato for extra protein

Use kasuri methi when fresh methi isn’t available (reduce quantity)

Mix in yogurt while kneading for extra softness

Breakfast

Ragi Paratha Recipe | Soft & Nutritious Finger Millet Flatbread


About the Recipe

Ragi Paratha is a soft, gluten-free flatbread made using ragi flour (finger millet), either on its own or mixed with wheat flour. Mildly spiced, this paratha is light, earthy, and satisfying — ideal for those seeking wholesome, diabetic-friendly or fiber-rich meals.

Pair it with curd, pickle, chutney, or a simple dal for a balanced and delicious meal.


Ingredients (Makes 4–5 parathas)

1 cup ragi flour (nachni)

½ cup whole wheat flour (optional, for better binding)

1 green chili, finely chopped

1 inch ginger, grated

2 tbsp onion, finely chopped (optional)

2 tbsp coriander leaves, chopped

½ tsp ajwain (carom seeds)

Salt to taste

Water to knead

Ghee or oil for roasting


How to Make Ragi Paratha (Step-by-Step)

1. Prepare the Dough

1. In a mixing bowl, add ragi flour, wheat flour (if using), ajwain, salt, ginger, green chili, and coriander.


2. Slowly add warm water and knead into a soft, slightly sticky dough.


3. Apply a little oil on top and rest for 10–15 minutes.


> Note: Ragi flour has no gluten, so use light hands while rolling.


2. Roll the Paratha

1. Divide dough into equal balls. Dust with dry flour.


2. Roll each ball gently into a 5–6 inch disc. If sticky, roll between two sheets of butter paper or plastic.


3. Cook the Paratha

1. Heat a tawa. Place the rolled paratha and cook on one side until bubbles appear.


2. Flip and apply ghee or oil. Roast both sides till cooked and light brown spots appear.


3. Repeat for all parathas.


Serving Suggestions

Serve hot with curd and pickle

Pairs well with dal, chutney, or even jaggery-ghee for kids

Can be rolled and packed for lunchboxes


Tips for Soft Ragi Parathas

Mix wheat flour for easier handling and softness

Use warm water while kneading

Avoid overcooking — it can dry out quickly


Variations

Add mashed potato or grated paneer to the dough

Mix in spinach puree or beetroot for added nutrition

Skip onions to make it Satvik or vrat-friendly

Breakfast

Paneer Paratha – Soft & Spiced Cottage Cheese Stuffed Flatbread

🫓 When Paneer Meets Paratha, It’s a Match Made on the Tawa

Crispy on the outside, soft and creamy inside — Paneer Paratha is a perfect stuffed flatbread made with crumbled paneer, fresh herbs, and gentle spices.

Best served hot with curd, pickle, or a dab of butter, this paratha is a must-have in every Indian kitchen — whether for breakfast, brunch, or a lazy lunch.


🛒 What You’ll Need (Makes 4 parathas):

For the dough:

1½ cups atta (wheat flour)

Pinch of salt

Water to knead

Oil/ghee to roast


For the stuffing:

1 cup grated or crumbled paneer

1 green chili, finely chopped

1 tbsp coriander leaves, chopped

½ tsp roasted cumin powder

¼ tsp red chili powder

Salt to taste

Optional: pinch of garam masala or amchur


🍳 How to Make It – Soft, Spiced & Paneer-Packed

1. Knead the Dough

Mix atta, salt, and water to make a soft, pliable dough. Rest for 15 mins.

2. Make the Stuffing

Combine paneer with chili, coriander, and spices. Mix well.

3. Roll & Stuff

Roll a dough ball into a disc. Place 2–3 tbsp paneer filling in the center, fold the edges, and roll gently into a medium-thick paratha.

4. Cook on Tawa

Heat tawa and cook the paratha on both sides with oil/ghee until golden brown.

5. Serve Hot

With curd, butter, or your favorite pickle. Tastes amazing even when packed in a lunchbox.


❤️ Why Paneer Paratha Is Always a Hit

High in protein and flavor

Great for kids and adults alike

Quick to make if you have paneer ready

Because paratha + paneer is comfort food at its best

Street Foods

Dahi Bara Aloo Dum – Odisha’s Most Beloved Street-Style Combo


🛍️ When Curd-Soaked Vadas Meet Spicy Potatoes on a Leaf Plate

Whether it’s Cuttack’s roadside stalls or Sunday morning cravings, Dahi Bara Aloo Dum is always a win.
The soft, tangy dahi bara cools you down, while the fiery aloo dum wakes up your taste buds — it’s the balance of spice, sourness, and comfort.

Optional but amazing: add ghugni, a sprinkle of sev, and chopped onions on top for that full street-style experience!


🛒 What You’ll Need (Serves 3–4):

For Dahi Bara:

1 cup urad dal, soaked overnight

Salt to taste

½ tsp ginger paste

Oil for frying

1½ cups thick curd

Salt, sugar, roasted cumin powder, black salt for seasoning


For Aloo Dum:

3–4 medium boiled potatoes, cubed

1 onion + 1 tomato, finely chopped

1 tsp ginger-garlic paste

1 tsp red chili powder

½ tsp turmeric

½ tsp cumin + mustard seeds

Salt, oil, and coriander for garnish


Optional: Ghugni (yellow peas curry), chopped onion, green chilies, sev


🧂 How to Make It – Tangy, Spicy & Street-Style Authentic

1. Make the Dahi Bara

Grind soaked urad dal into a fluffy batter with ginger + salt.
Deep fry small vadas until golden. Soak in warm water for 10 mins.
Then transfer to seasoned curd (whisked with salt, sugar, cumin powder, black salt). Let it soak 30 mins or more.

2. Prepare Aloo Dum

Heat oil, temper with cumin + mustard.
Add onion, ginger-garlic, sauté till golden. Add tomato + spices.
Add boiled potatoes, mash some for thickness. Simmer until masala coats well.

3. Assemble the Magic

On a plate or dona leaf, place 2–3 dahi baras.
Top with a generous scoop of aloo dum.
Optional: a spoon of ghugni, chopped onion, sev, coriander, and a dash of black salt.


❤️ Why Dahi Bara Aloo Dum Feels Like Home in a Bite

Combines cool and heat, soft and spicy

Ultimate Odia breakfast/street snack

Can be prepped in advance and served in style

Because some recipes don’t need reinvention — just respect

Breakfast

Bread Omelette – Spicy, Street-Style Breakfast in 5 Minutes


🍳 Because Some Mornings Only Need Egg, Bread & Masala

Crispy toast, fluffy masala omelette, a pinch of chatpata magic —
Bread Omelette is that one pan-wonder that fills your plate and your soul.

From roadside stalls to hostel kitchens, it’s quick, flexible, and always hits the spot. Have it plain, fold it like a sandwich, or stuff it with cheese — there’s no wrong way to love it.


🛒 What You’ll Need (Serves 1 hungry heart):

2 eggs

2 slices bread

1 small onion, finely chopped

1 green chili, finely chopped

1 tbsp coriander, chopped

Salt + red chili powder to taste

¼ tsp turmeric (optional)

1 tsp butter or oil


Optional:

1 slice cheese, ketchup, or a pinch of chaat masala for extra zing


🍳 How to Make It – Fast, Hot, and Chatpata

1. Whisk It Right

Crack eggs in a bowl. Add onion, chili, coriander, turmeric, red chili, and salt. Beat till fluffy.

2. Pour & Toast

Heat a pan with butter or oil. Pour the egg mix. While it cooks slightly, place bread slices over it.

3. Flip & Fry

Once the base is set, flip gently so the bread toasts and the egg cooks through. Press lightly.

4. Fold & Serve

Fold into a sandwich or serve open-style. Add cheese, ketchup, or chutney if you like.


❤️ Why Bread Omelette Is the OG Quick Fix

2 eggs + 2 slices = full breakfast

Customizable with cheese, mayo, sauces

Street food style, made at home

Because some recipes don’t need planning — just a pan and a craving

satvik food

Sabudana Khichdi – Pearls of Peace in a Pan


🌙 When Your Food Doesn’t Need to Shout to Be Felt

Before the world wakes up,
before the oil crackles and the spices bloom,
some mornings just ask for quiet food.

Sabudana Khichdi is that.
Soft, slow, and satvik — it doesn’t chase heat.
It holds space.
For prayers.
For cravings.
For healing.

Tapioca pearls gently tossed with ghee, cumin, green chilies, and roasted peanuts.
Served warm, with lemon on the side.
No fuss. No fire. Just grace on a plate.


🛒 What You’ll Need (Serves 2):

1 cup sabudana (sago/tapioca pearls)

2 small potatoes, peeled & cubed

2 tbsp peanuts, roasted & coarsely crushed

1 tsp cumin seeds

1–2 green chilies, chopped

1–2 tsp ghee or oil

Salt to taste (or sendha namak for vrat)

Juice of ½ lemon

Chopped coriander to finish


🌼 How to Make It – With Patience & Light Hands

1. Rinse & Rest

Wash sabudana 2–3 times till water runs clear.
Soak in just enough water to cover. Let it rest for 5–6 hrs or overnight.
Grains should be soft but separate — not sticky.

2. Prep the Calm

In a pan, heat ghee. Add cumin, green chilies, then potatoes.
Sauté on medium till the potatoes are soft and golden.

3. Toss Gently

Add soaked sabudana, salt, and crushed peanuts.
Stir gently. Cook on low till sabudana turns translucent.
Do not overmix — just enough to let it all come together.

4. Finish with Freshness

Turn off heat. Add lemon juice and chopped coriander.
Cover for 2 mins before serving.


❤️ Why Sabudana Khichdi Is More Than a Fasting Food

Because it reminds you to slow down

Because it’s grounding, clean, and still full of flavor

Because sometimes softness is strength

And because even the simplest food can feel sacred

Breakfast

Vegetable Cheela – My 10-Minute Magic for Busy Mornings

🌄 Intro / Story Section:

In every Indian kitchen, there’s that one recipe — quick, reliable, and always open to interpretation. For me, it’s Vegetable Cheela. Whether it’s leftover veggies or rushed mornings, cheela comes to the rescue like a warm, crispy hug.

My mother called it “desi pancake” when feeding it to us as kids. She’d toss in whatever vegetables were lying around — a bit of grated carrot, chopped onions, maybe some spinach if we were lucky — and serve it hot with green chutney.

Now, it’s part of my own morning rhythm. Wholesome, customizable, and ready in minutes.


🥕 Vegetable Cheela Recipe

Serves: 2
Prep Time: 10 mins
Cook Time: 10 mins


🛒 Ingredients

  • 1 cup besan (gram flour)
  • ¼ tsp turmeric
  • ½ tsp ajwain (carom seeds)
  • 1–2 green chilies, finely chopped
  • ½ tsp red chili powder (optional)
  • Salt to taste
  • Water (enough to make a pourable batter)

🥕 Vegetables (add what you have):

  • ¼ cup grated carrot
  • ¼ cup finely chopped onion
  • ¼ cup chopped spinach/coriander
  • ¼ cup capsicum or cabbage (optional)

👩‍🍳 Instructions

  1. Make the Batter:
    In a bowl, mix besan, turmeric, ajwain, chili powder, salt. Gradually add water to make a smooth, lump-free batter.
  2. Add Vegetables:
    Toss in your chopped/grated veggies. Mix well.
  3. Heat the Pan:
    Heat a tawa or non-stick pan. Lightly grease with oil.
  4. Cook the Cheela:
    Pour a ladleful of batter and spread it gently like a dosa.
    Drizzle a little oil around the edges.
    Cook until golden on both sides.
  5. Serve Hot:
    With green chutney, ketchup, or curd.

💡 Tips & Variations

  • You can also add grated beetroot or zucchini.
  • For extra crispness, rest the batter for 10 mins.
  • Skip chilies for a kid-friendly version.

❤️ Closing Note

Vegetable Cheela isn’t just a recipe — it’s a reminder that something warm, filling, and colorful can still be fast and fuss-free. Try it once, and you’ll keep coming back to it — just like I do.

Breakfast

Steaming Up Mornings: My Mother’s Masala Poha with a Side of Love

There’s something about Indian mornings — the clanging of the tawa, the hiss of tadka, and the smell of curry leaves that can wake you up better than any alarm.

Growing up, our Sundays always began with the sizzle of Masala Poha. My mother would be halfway through her chai, hair tied in a loose bun, already orchestrating magic in the kitchen. She believed breakfast wasn’t just the first meal — it was the mood-setter for the day.

As kids, we didn’t need clocks. The aroma of mustard seeds popping was enough to tell us it was time to get out of bed.

🍛 Recipe: Masala Poha

Servings: 2
Prep Time: 10 minutes
Cook Time: 10 minutes

🛒 Ingredients:

  • 1½ cups flattened rice (poha) – thick variety, rinsed and drained
  • 1 small onion, finely chopped
  • 1 small potato, diced and boiled or parboiled
  • 1–2 green chilies, chopped
  • ½ tsp mustard seeds
  • ½ tsp turmeric powder
  • 1 tsp lemon juice
  • 6–8 curry leaves
  • 2 tbsp peanuts (optional, but highly recommended)
  • 1 tbsp oil
  • Salt to taste
  • Fresh coriander for garnish
  • Sev or bhujia for topping (optional but so good!)

🔪 Instructions:

  1. Prep the poha: Rinse the poha in a colander under running water. Let it sit and drain. It should be soft but not mushy.
  2. Tempering: In a pan, heat oil. Add mustard seeds and let them crackle. Toss in curry leaves and peanuts. Sauté until peanuts are golden.
  3. Aromatics: Add onions and green chilies. Cook till onions are translucent.
  4. Spice it up: Add turmeric, potatoes, and salt. Mix gently.
  5. Add poha: Fold in the soaked poha. Mix well and cook for 2–3 minutes on low heat.
  6. Final touch: Switch off the heat. Squeeze lemon juice. Toss.
  7. Garnish: Sprinkle with coriander and top with sev if desired.

💡 Tips:

  • Add some grated coconut if you like a South Indian twist.
  • Want it spicy? A little red chili powder works well too.
  • Don’t skip the lemon juice — it lifts the whole dish!

❤️ Closing:

This simple masala poha isn’t just food — it’s a hug from my childhood. It reminds me that even the busiest mornings can begin with something warm, nourishing, and made with love.

Give it a try, and maybe share it with someone special.