Breakfast

My Mother’s Pink Ritual: The Story of Our Favorite Winter Beetroot Paratha

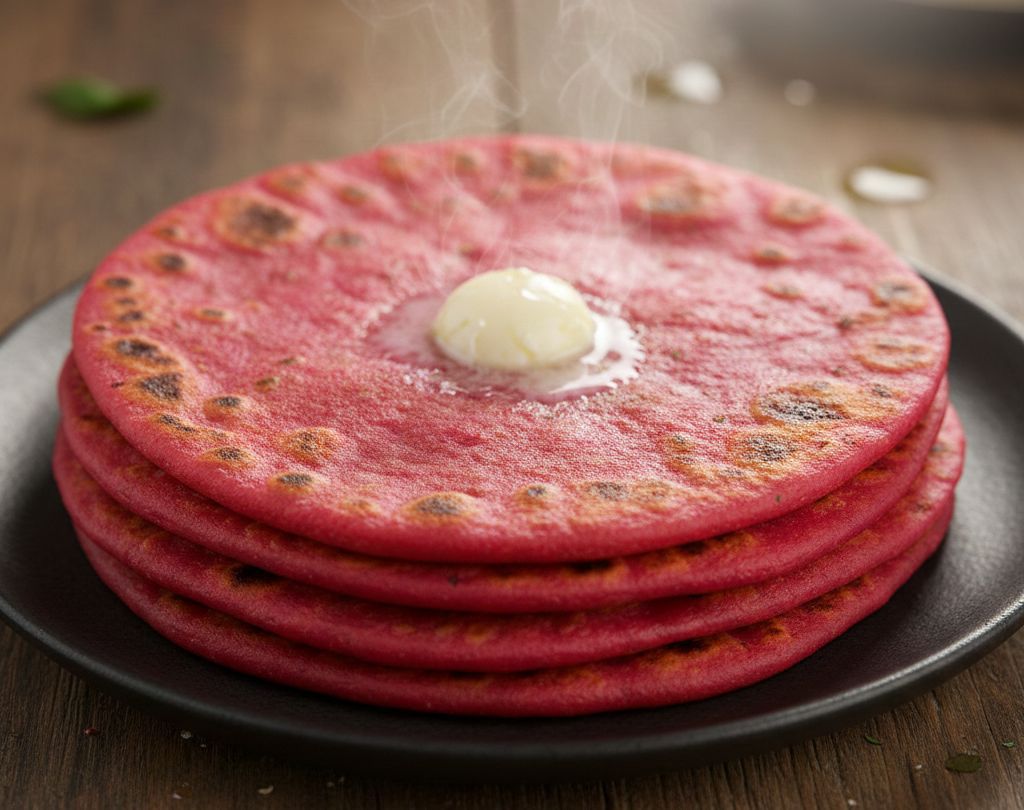
In our home, the arrival of winter was announced by my mother’s pink-stained palms. I remember her sitting in the morning light, a bowl of deep-red beetroots before her. To her, Beetroot Paratha wasn’t just a “healthy alternative”; it was a visual celebration of the season.
She treated the beetroot with a level of precision that felt almost scientific. She believed that the vibrancy of the paratha was a direct reflection of the cook’s patience. “If the color fades, the spirit of the root is gone,” she would say. She taught me that the secret to a royal beetroot paratha lay in the “Quiet Luxury” of a dough that was as smooth as silk and as bright as a winter sunset.
Today, at The Pinch of Masala, we are documenting her technique for a 2026 audience that craves “Ingredient Integrity” and the “Fibremaxxing” power of whole-plant eating.

The primary struggle with beetroot paratha is managing the moisture and the “earthy” raw smell. To master the “Vibrant Pink,” follow my mother’s three non-negotiable rules:

The “Brief Blanch” Rule: To remove the raw, pungent flavor that often puts children off, you must cook the beetroot briefly. My mother would sauté or steam the grated beetroot for just 2 to 3 minutes. Be careful: if you cook it longer than 8–10 minutes, the vibrant red color begins to suffer.

The Mixed-Dough Mastery: While some prefer stuffing, my mother always used the Mixed Dough method, kneading the beetroot puree directly into the wheat flour. This ensures the color is perfectly even and makes it much easier for novice cooks to avoid the hassle of leaking stuffing.

The “Thick Roll” Secret: In 2026, we value “Technical Excellence”. My mother always rolled her parathas slightly thicker than a standard chapati. If you roll them too thin, the beetroot fibers lose their moisture on the tawa, and the paratha will turn hard instead of staying soft and pliable.

Prep time: 15 mins | Resting time: 30 mins | Cook time: 20 mins | Servings: 6 parathas
Diet: Vegan, High-Fiber | Cuisine: North Indian Heritage

Ingredients:

1.5 cups Whole Wheat Flour (Atta): Sifted for a smooth dough.

1 cup Beetroot Puree: Prepared from grated and lightly steamed beets.

The Aromatics: 1 tsp ginger paste, 1 finely chopped green chili.

Spices: 1 tsp Cumin seeds (Jeera), ½ tsp Ajwain (Carom seeds), ½ tsp Garam Masala, and ½ tsp Amchur (Dry Mango Powder).

Fat: Ghee or oil for roasting.

Instructions:

The Prep: Grate your fresh, juicy beetroot grating it first speeds up the cooking process significantly.

The Puree: Sauté or steam the grated beetroot with ginger and chili for just 2–3 minutes until tender. Cool and blend into a smooth paste without adding any extra water.

The Mix: In a large bowl, combine flour, spices, and the vibrant beetroot puree.
The Knead: Knead into a smooth, soft, non-sticky dough. If the dough feels too sticky, add a little extra flour.

The Rest: Cover with a damp cloth and let the dough rest for at least 15–30 minutes to allow the gluten to relax.

Rolling: Divide into balls. Dust with flour and roll into discs that are slightly thicker than a chapati.

The Roast: Place on a hot tawa. When bubbles appear, flip it. Apply ghee or oil and press gently with a spatula to help it puff.

Serve: Cook until golden-brown spots appear. Serve hot with fresh yogurt, raita, or a spicy pickle.

The Nitre-Boost: Beetroots are a superfood rich in nitrates, which research suggests can help regulate blood pressure and improve heart health. By using my mother’s “Brief Blanch” method, you preserve these heat-sensitive antioxidants while enjoying a delicious, fiber-rich meal.

Lunch & Dinner

Authentic Punjabi Sarson Da Saag & Makki Ki Roti: Traditional Winter Recipe

In a Punjabi home, winter doesn’t arrive with the first frost; it arrives with the first bunch of Sarson (mustard greens) on the kitchen counter. I remember my mother spending hours in the morning fog, meticulously cleaning the greens leaf by leaf. She called it the “Season’s Meditation.”
While the world now uses high-speed blenders, she remained loyal to her Ghotna the heavy wooden masher. She believed that a blender “killed the soul” of the greens, whereas the manual mash preserved the coarse, creamy texture that defines a true saag. To her, Makki Ki Roti (cornmeal flatbread) was the essential partner, a “Parasocial Companion” that required the warmth of her palms to hold its shape. Watching her hand-pat the gluten-free dough into perfect circles was a masterclass in “Quiet Luxury” it was slow, it was technical, and it was deeply honest.
Today, at The Pinch of Masala, we are documenting this winter ritual for a 2026 audience that craves “Ingredient Integrity” and the rugged health benefits of “Fibremaxxing”.

The barrier to a perfect saag is often a bitter taste or a watery texture. To master this Punjabi masterpiece, follow my mother’s three non-negotiable rules:
The “Trinity of Greens” Ratio: In 2026, we prioritize balance. My mother used a strict 2:1:1 ratio 2 parts Sarson (mustard) for pungency, 1 part Palak (spinach) for creaminess, and 1 part Bathua (chenopodium) for an earthy depth. This prevents the mustard from becoming overwhelmingly bitter.
The “Allan” Binder: This is the ultimate “Digital Anthropologist” secret. Once the greens are mashed, you must add Makki ka Atta (maize flour) while the saag is simmering. This flour acts as a “binder” (traditionally called Allan), absorbing excess moisture and transforming a loose mash into a velvety, cohesive gravy.
The Hot Water Knead: Makki ka atta is notoriously brittle. To make soft rotis that don’t crack at the edges, you must use boiling hot water to knead the dough. The heat partially gelatinizes the starch, making the dough pliable enough to shape by hand.

Prep time: 30 mins | Cook time: 60 mins | Servings: 4
Diet: Vegetarian, Gluten-Free (Roti) | Cuisine: Punjabi Heritage

Ingredients:

For the Saag:

1 kg Sarson (Mustard Greens): Cleaned, stems included (peel the tough outer skin of thick stems).

250g Palak (Spinach) & 250g Bathua (Chenopodium): Cleaned and sorted.

The Aromatics: 2-inch Ginger (grated), 10 cloves Garlic (crushed), 4-5 Green Chillies (chopped).

The Allan: 3 tbsp Makki ka Atta (Maize Flour).

The Tadka: 3 tbsp Ghee, 2 Dry Red Chillies, 1 Onion (finely chopped), 1 Tomato (optional).

The Finish: A huge dollop of white butter (Makhan).

For the Makki Ki Roti:

2 cups Makki ka Atta: Fine ground yellow cornmeal.

½ cup Radish (Mooli): Grated (for moisture and flavor).

1 tsp Ajwain (Carom seeds): For digestion.

Liquid: Boiling hot water as needed.

Instructions:

The Boil: Add all the greens, ginger, half the garlic, and green chillies to a pressure cooker with 1 cup water and salt. Cook for 2 whistles, then simmer on low for 20 minutes.

The Ghotna Ritual: Once cooked, drain the excess water (save it!). Use a wooden masher (ghotna) or a stick blender (on pulse mode) to mash the greens into a coarse, thick paste. Do not make a smooth puree.

Thicken: Return to the heat. Slowly sprinkle in the 3 tbsp of cornmeal (Allan) while stirring constantly to avoid lumps. Simmer for 10 minutes until the saag looks creamy and glossy.

The Tadka: Heat ghee in a pan. Add dry chillies, remaining garlic, and onions. Sauté until deep golden brown. Add tomatoes and spices. Pour this into the saag and mix well.

The Roti Dough: Mix cornmeal, salt, ajwain, and grated radish. Gradually add boiling water and mix with a spoon. When cool enough to touch, knead vigorously with the heel of your hand for 8 minutes until smooth.

Shape & Roast: Take a ball of dough. Hand-pat it between your palms or roll between two parchment sheets. Roast on a medium-hot tawa with ghee until both sides have golden-brown blisters.

Serve: Serve the saag piping hot, topped with white butter and a piece of jaggery (gud) on the side, with the crispy rotis.

The Saag Water: In the 2026 “Use-Up” economy, we value every nutrient. Never throw away the water drained from the boiled greens! It is packed with iron and minerals. Use this “Green Gold” to knead your Makki ki Roti dough instead of plain water—it adds a subtle earthy flavor and ensures no vitamins are wasted.

Lunch & Dinner

Authentic Maharashtrian Bharli Karela: Traditional Stuffed Bitter Gourd Recipe

In many households, the mention of Karela (Bitter Gourd) sends children running from the dining table. But in our home, it was a dish of anticipation. I remember my mother treating these bumpy, emerald-green vegetables with the care of a master artisan. To her, bitterness wasn’t a flaw to be removed it was a character to be balanced.
She didn’t believe in deep-frying the life out of the vegetable. Instead, she performed a morning ritual of “Zesting and Salting.” She taught me that the secret to a royal Bharli Karli (Maharashtrian Stuffed Karela) lay in the “Quiet Luxury” of the stuffing: a smoky, nutty blend of fire-grilled dry coconut and roasted peanuts. This dish is a “Parasocial Companion” on our table, a testament to my mother’s ability to transform the most challenging ingredients into a masterpiece of Indian heritage cooking.

Today, at The Pinch of Masala, we are documenting her time-tested “No-Bitterness” technique for a 2026 audience that values technical excellence and sustainable, whole-plant eating.

The barrier to enjoying Karela is always the acrid juice. To ensure your stuffed gourd is savory, tangy, and sweet rather than sharp, follow my mother’s three non-negotiable rules:

The “Thumb-Snap” Selection: In 2026, we prioritize “Ingredient Integrity”. My mother only used small, dark green bitter gourds with thin skin. If you can snap the tail end with your thumb easily, it is fresh and tender; if it’s fibrous, it will never soften correctly.

The “Salt & Steam” Purgatory: This is the ultimate “Digital Anthropologist” secret. Most people boil Karela, which turns it mushy. My mother would rub the slit gourds with salt and turmeric and let them sit for 30 minutes to sweat out the bitter enzymes. She then steamed them in an Idli steamer for 10 minutes before stuffing. This locks in the nutrients while softening the texture perfectly.
The Thread Knot: To prevent the precious stuffing from falling out during the “Bhuna” (sautéing) phase, you must tie each gourd with a clean cotton thread. It’s a manual ritual that ensures every bite is packed with spice.

Prep time: 20 mins | Marination/Steaming: 40 mins | Cook time: 15 mins | Servings: 4
Diet: Vegan, Gluten-Free | Cuisine: Maharashtrian Heritage

Ingredients:

10–12 Small Bitter Gourds: Peeled (reserve peels) and slit vertically.

The Stuffing (Grind coarsely):

. 1 cup Peanuts (roasted and skinned)
. ½ cup Dry Coconut (Khopra)—ideally grilled over an open flame until smoky
. 10 Garlic cloves (dry roasted)
. 2 tsp Kala Masala (or Garam Masala)
. 1 tbsp Jaggery (Gudh) and 1 tbsp Tamarind pulp.

Fat: 3 tbsp Peanut oil (for authentic flavor).

The Bloom: 1 tsp Cumin seeds, ½ tsp Turmeric, and a pinch of Hing (Asafoetida).

The Finish: Freshly chopped Cilantro.
Instructions:

The Prep: Scrape the bumpy skin of the Karelas using a peeler. Do not throw the peels away. Make a vertical slit, remove the hard seeds, and rub the inside and outside with salt and turmeric.

The Steam: Let the salted gourds rest for 30 minutes, then rinse under running water to remove the bitter juice. Steam for 10–15 minutes until fork-tender but firm.

The Masala: Blend the peanuts, grilled coconut, and garlic into a coarse powder. Stir in the tamarind, jaggery, spices, and the reserved peels (the “Use-Up” secret).

The Stuffing: Pack the masala tightly into each steamed gourd. Tie them securely with a clean white cotton thread.

The Shallow Fry: Heat oil in a heavy, flat-bottomed pan. Arrange the gourds in a single layer. Cover and cook on low-medium heat for 8–10 minutes, turning once, until the skin is blistered and golden-brown.

The Final Bhuna: If you have leftover stuffing, add it to the pan in the last 2 minutes to crisp up.

Serve: Remember to remove the threads before serving! Enjoy hot with soft Phulkas or Varan-Bhaat (Dal Rice).

The “Karela Bhor” Stir-fry: In the 2026 “Use-Up” economy, we value every scrap. If you chose not to put the scraped peels (the bhor) in the stuffing, sauté them separately with chopped onions and extra fennel seeds. This creates a concentrated, crunchy side-dish that is a favorite among diabetic-friendly diets and fiber-seekers.

Lunch & Dinner

Baingan Bharta: My Mother’s Smoky Winter Ritual of Fire and Soul

In our home, the arrival of winter wasn’t marked by a calendar, but by the scent of charred eggplant skin wafting from the kitchen. I remember my mother standing over the gas stove, her face glowing in the blue flame as she patiently rotated a large, purple globe of brinjal. She called it the “Smoky Soul” of the season.
“You cannot rush the fire,” she would say, explaining that an oven or a microwave could never replicate the deep, primordial aroma of skin meeting an open flame. My mother was a self-taught scientist of flavor; she knew that the char wasn’t just burnt skin it was a signature of authenticity. She viewed this dish as a “Parasocial Companion,” a reliable bridge to her own childhood that she was now documenting for me.
Today, at The Pinch of Masala, we are reclaiming the art of the “Slow Roast.” In a world of 2026 “Quiet Luxury” and “Simplicity with Purpose,” this recipe stands as a testament to the idea that the most profound flavors are often the most technical to achieve.

To ensure your Baingan Bharta has that unmistakable “Dhaba-style” depth without becoming a soggy mess, you must follow my mother’s two non-negotiable rules:
The “Aromatic Infusion” Slit: Most people mash the garlic separately. My mother would make deep gashes in the raw eggplant and tuck whole garlic cloves inside before roasting. As the eggplant chars, the garlic steams in the vegetable’s own juices, softening into a sweet, buttery paste that infuses the entire pulp with flavor.
The “Texture over Mash” Philosophy: In 2026, we value “Ingredient Integrity”. My mother never processed her vegetables into a paste. She insisted on roughly chopping the roasted eggplant and onions to maintain a rustic “hash” texture rather than a smooth puree. This provides a better “mouthfeel” and honors the “Fiber Revolution” by keeping the vegetable structures intact.

Prep time: 15 mins | Cook time: 30 mins | Servings: 4
Diet: Vegan, Gluten-Free | Cuisine: North Indian Heritage

Ingredients:
1 Large Eggplant (Bharta Baingan): Choose one that is light in weight; heavy ones are full of bitter seeds.
4-6 Cloves of Garlic: To be tucked into the eggplant.
2 Green Chillies: Slit.

The Masala Base: 2 Large Onions (roughly chopped), 3 Medium Tomatoes (roughly chopped), and 1 inch Ginger (grated).

Fat: 2 tbsp Mustard Oil (essential for that authentic “Heritage” zing).

Spices: 1 tsp Cumin seeds (Jeera), ½ tsp Turmeric, 1 tsp Kashmiri Red Chili powder, and ½ tsp Garam Masala.

The Finish: A handful of fresh Coriander and a squeeze of Lemon juice.
Instructions:

The Roasting Ritual: Wash and dry the eggplant. Make 3–4 deep slits and insert the garlic cloves. Brush the skin lightly with mustard oil to prevent it from drying out too fast.

Fire Roast: Place the eggplant directly over an open gas flame. Rotate every 2 minutes for about 15–20 minutes until the skin is completely charred and black, and the flesh is very soft.

The Sweat: Remove from heat and place in a covered bowl for 5 minutes. The steam will help loosen the skin for easier peeling.

The Mash: Peel off the charred skin and discard the stem. Mash the eggplant and the roasted garlic with a fork leave it slightly chunky.

The Bhuna Base: Heat mustard oil in a pan until it smokes. Add cumin seeds. Once they sizzle, add the onions and green chillies. Sauté until the onions turn a deep golden brown.

The Red Union: Add the ginger, tomatoes, turmeric, and chili powder. Cook until the tomatoes break down and you see oil separating from the sides.

The Final Mix: Add the mashed eggplant. Stir well and cook uncovered for 5–8 minutes to let the flavors meld.

Serve: Season with salt, garam masala, and lemon juice. Garnish with plenty of fresh coriander.

The Liquid Gold: When you peel the roasted eggplant, you will see flavorful juices pooling on the plate. In the 2026 “Use-Up” economy, we value every drop. Pour those smoky juices back into the pan with the eggplant mash. It holds the most concentrated essence of the fire-roasting process and adds a depth of flavor that no spice can match.

Lunch & Dinner

Dhaba-Style Egg Masala: My Mother’s Golden Spice Ritual

In our family, the humblest of ingredients often received the most royal treatment. I remember my mother standing by the stove on Sunday nights, transforming simple boiled eggs into a “Dhaba-style” masterpiece. She called it her “Anda Masala ritual,” and she believed that an egg was only as good as the texture of its skin.
She never simply dropped a boiled egg into a gravy. To her, that was unfinished work. “The egg must earn its place in the masala,” she would say, as she carefully fried them until they developed a crinkly, golden-blistered exterior. My mother viewed this dish as a “Parasocial Companion” a sturdy, dependable meal that bridged the gap between rustic street food and the warmth of a home kitchen.
Today, at The Pinch of Masala, we are reclaiming the patience of the “Slow Bhuna.” We are moving away from watery, pale curries and returning to the “Quiet Luxury” of a thick, caramelized onion-tomato base that hugs the eggs like a velvet cloak.

The secret to an egg masala that tastes like it came from a highway Dhaba, yet feels refined, lies in my mother’s two non-negotiable rules:
The “Blister and Prick” Rule: Before frying, you must prick the boiled eggs with a fork or make tiny slits with a knife. This is the ultimate “Digital Anthropologist” secret. It serves two purposes: it prevents the eggs from bursting in the hot oil and, more importantly, it allows the spicy gravy to penetrate deep into the yolk, ensuring every bite is seasoned.
The “Slow Bhuna” Foundation: In 2026, we value “Ingredient Integrity”. My mother never rushed the onions. She would sauté them on a low flame for at least 8 to 10 minutes until they reached a deep, jammy translucent pink. This caramelization provides the natural sweetness that balances the sharp heat of the ginger and garlic.

Prep time: 15 mins | Cook time: 30 mins | Servings: 4
Diet: Vegetarian-Friendly (Egg-based), Gluten-Free | Cuisine: North Indian Dhaba

Ingredients:
6 Large Eggs: Hard-boiled and shelled.
The Aromatics: 2 Large Onions (finely chopped), 1 inch Ginger (crushed), 4 Garlic cloves (crushed), and 2 Green Chillies (slit).
The Base: 1 cup Tomato Puree (freshly blended).
Fat: 2 tbsp Ghee or Oil (Mustard oil adds an authentic pungent kick).
Whole Spices (The Bloom): 1 tsp Cumin seeds, 1 Bay leaf, 2 Green Cardamoms, and 1 stick Cinnamon.
Powder Spices: 1 tsp Kashmiri Red Chili powder (for that vibrant Dhaba red), ½ tsp Turmeric, 1 tsp Coriander powder, and ½ tsp Garam Masala.
The Finish: 1 tsp Kasuri Methi (crushed between palms) and a handful of fresh Coriander leaves.
Instructions:
The Prep: Prick the boiled eggs multiple times with a fork.
The Blister: Heat 1 tbsp oil in a pan. Add a pinch of turmeric and chili powder. Sauté the eggs until they are golden-brown and the skin looks slightly blistered. Remove and set aside.
The Bloom: In the same pan, add the remaining oil/ghee. Add the whole spices and let them sizzle until fragrant.
The Onions: Add the onions and sauté patiently on medium-low heat until they turn a deep golden brown. Add the ginger, garlic, and green chillies; sauté for another 2 minutes until the “raw” smell disappears.
The Bhuna: Pour in the tomato puree and salt. Add the turmeric, red chili, and coriander powders. Cook uncovered until the oil begins to separate from the sides of the masala.
The Union: Add 1 cup of warm water to adjust the gravy consistency. Bring to a boil, then slide in the blistered eggs.
The Simmer: Cover and simmer on low heat for 5 minutes to let the flavors meld.
Final Touch: Sprinkle garam masala, Kasuri Methi, and fresh coriander. Stir gently so as not to break the eggs. Serve hot with buttery Naan or Jeera Rice.

Leftover Masala Stir-Fry: In the 2026 “Use-Up” economy, we value concentrated flavor bases. If you have extra gravy left after the eggs are gone, do not discard it! Toss in some boiled potato cubes or chickpeas the next day. The matured flavors of the egg-infused masala will create an instant “Zero-Waste” side dish that tastes even better than the original meal.

Lunch & Dinner

The Sunday Dum Ritual: My Mother’s Signature Chicken Biryani

In our family, Sunday mornings had a specific scent: a heady mix of warming cloves, charred onions, and the earthy perfume of aged Basmati rice. While the recipe traces back to the royal Mughlai kitchens, it was my mother who turned the Chicken Biryani into a weekly ceremony of precision. She didn’t just cook; she performed an act of “Dum” the art of trapping steam and soul inside a single pot.
I remember her standing by the sink, rinsing the rice with a gentleness reserved for something fragile. “Treat the rice like pearls,” she would say. “If you break the grain now, you break the heart of the dish”. My mother believed that a biryani was a “Parasocial Companion” on the table a dish that communicated love through the layers of spice and the tenderness of the meat.
Today, at The Pinch of Masala, we are moving away from the “instant pressure cooker” versions that turn rice into mash. We are returning to the “Quiet Luxury” of slow-reduced masalas and “Ingredient Integrity,” using the technical methods my mother perfected for a world that craves authenticity.

The secret to a biryani where the rice stands long and distinct, and the chicken is “melt-in-the-mouth” soft, lies in my mother’s two non-negotiable rules:
The “90% Rice” Rule: Most home cooks over-boil their rice. My mother insisted that the rice must be parboiled in water flavored with whole spices until it is exactly 90% cooked it should still have a “bite” when pressed between your fingers. The remaining 10% happens during the “Dum” phase, where the rice absorbs the steam from the chicken gravy below.
The “Waterless” Gravy: This is the ultimate “Digital Anthropologist” secret. My mother never added extra water to the chicken marinade. She relied on the natural juices released by the chicken and the yogurt to create a thick, concentrated masala. This prevents the biryani from becoming watery and ensures every grain of rice is coated in pure flavor.

Prep time: 30 mins | Cook time: 60 mins | Servings: 6
Diet: Halal, Gluten-Free | Cuisine: Mughlai Heritage

Ingredients:
The Rice: 2½ cups Aged Extra Long Grain Basmati Rice (soaked for 30 mins).
The Chicken: 1 kg Bone-in chicken pieces (thighs and drumsticks are best for juiciness).
The Marinade: 1 cup fresh Yogurt (Dahi), 1 tbsp Ginger-Garlic paste, 1 tbsp Kashmiri Red Chili powder, ½ tsp Turmeric, 1 tsp Biryani Masala, and a handful of fresh Mint and Cilantro.
The Aromatics: 2 large Onions (sliced and fried into golden Birista), 4 Green cardamoms, 6 Cloves, 1 stick Cinnamon, and 1 Star anise.
The Finish: 2 tbsp Ghee, a pinch of Saffron soaked in ¼ cup warm milk, and 2 boiled eggs (optional).
Instructions:
Marinate: Combine the chicken with all marinade ingredients. Let it rest in the fridge for at least 1 hour (ideally overnight) to ensure the spices penetrate the bone.
The Whole Spices: In a large pot, boil water with whole spices and salt. Add the soaked rice and cook until 90% done. Drain and set aside.
The Base: In a heavy-bottomed pot, heat ghee. Add the marinated chicken and half of the fried onions. Sauté on medium heat for 8-10 minutes until the chicken is firm.
The Layering: Spread the parboiled rice evenly over the chicken. Top with the remaining fried onions, saffron-infused milk, fresh mint, and a drizzle of ghee.
The Dum: Seal the pot tightly with aluminum foil or a dough rim and place the lid on top. Cook on the lowest heat possible for 20-25 minutes.
The Silence: Turn off the heat and let the pot sit undisturbed for 10 minutes. This allows the juices to settle and the rice to firm up.
Serve: Fluff the rice gently from the sides using a flat spoon and serve with a side of cold Raita.

The Bone Stock: In the 2026 “Use-Up” economy, we value every scrap. If you are using boneless chicken for your biryani, do not throw away the bones! Boil them with coriander stems and ginger scraps to create a quick stock. Use this stock instead of plain water when boiling your rice to infuse it with a 10x deeper savory flavor.

starters

Mixed Vegetable Soup: My Mother’s Winter Medicine

In the winter months, our kitchen didn’t just smell like food; it smelled like protection. While the tradition of a warm bowl began with my grandmother, it was my mother who turned the Mixed Vegetable Soup into a ritual of healing. To her, a soup wasn’t just a liquid meal; it was a way to “document the season” in a single pot.
I remember her standing at the wooden counter, her knife-work precise and rhythmic. She believed that the way you chopped a vegetable determined its soul in the broth. “If the carrots are bigger than the beans,” she would say, “the soup has no harmony.” My mother viewed her soup as a “Parasocial Companion” a warm, reliable presence that comforted us during winter colds and rainy nights .
Today, at The Pinch of Masala, we are stepping away from the “novel-length menus” of the modern era and returning to the “Quiet Luxury” of simple, technical, and honest cooking . This is my mother’s medicine, refined for a world that needs intention and longevity .

The most common mistake in home-style soups is a flat, watery flavor. To achieve a “Restaurant Style” depth at home, you must follow my mother’s two non-negotiable rules:
The High-Heat Bloom: Most people boil their vegetables in water immediately. My mother insisted on sautéing the aromatics ginger, garlic, and spring onion whites and then the chopped veggies on a high flame for 2–3 minutes. This “sear” brings out the natural sugars and creates a smoky aroma that serves as the flavor base.
The Starch Integrity: In 2026, we are seeing a move toward “real food sources” rather than “powders and potions” . Instead of using cornstarch or artificial thickeners, my mother would often blend a single boiled potato into a smooth paste and stir it back into the pot. This creates a silky, hearty consistency while remaining 100% natural.

Prep time: 15 mins | Cook time: 25 mins | Servings: 4
Diet: Vegan, Gluten-Free | Cuisine: Indian Homestyle

Ingredients:
The Medley (1.5 to 2 cups): Finely chopped carrots, french beans, cabbage, and sweet corn.
The Aromatics: 1 tbsp garlic (minced), ½ tbsp ginger (minced), and 2 sprigs of spring onion whites.
The Liquid: 3 cups of Scrap Stock (see below) or water.
The Seasoning: ½ tsp black pepper powder, salt to taste, and a pinch of sugar (to balance the acidity).
The Finish: 1 tsp vinegar or lemon juice and a handful of fresh coriander.
Instructions:
The Chop: Rinse all vegetables under running water and chop them into uniform, small pieces. Uniformity ensures even cooking and prevents some veggies from turning mushy while others remain raw.
The Wok Sear: Heat 1 tbsp oil or butter in a heavy pot. Sauté the ginger, garlic, and spring onion whites for 1 minute until fragrant but not browned.
The Flavor Bloom: Add the rest of the chopped vegetables. Crank the heat to high and fry for 2–3 minutes. This brings out the deep, earthy aroma.
The Simmer: Pour in the stock or water. Bring to a rolling boil, then lower the flame. Cover and cook for 10–12 minutes until the veggies are tender but still have a slight “bite”.
The Natural Bind: If you prefer a thicker soup, stir in your blended potato paste (or a cornstarch slurry) and cook until it turns glossy and thick.
The Polish: Add salt, sugar, and crushed black pepper. Turn off the heat and stir in the vinegar or lemon juice.
Serve: Ladle into warm bowls and garnish with coriander. Serve bubbling hot, perhaps with a side of toasted croutons.

The Scrap Stock: In the 2026 “Use-Up” economy, we never cook with plain water. Collect your onion skins, carrot ends, and celery stalks throughout the week. Boil them in water for 20 minutes with a bay leaf to create a homemade vegetable stock. This “zero-cost” liquid adds an enzymatic complexity that transforms a simple soup into a gourmet experience.

Snacks

Heritage Palak Pakora: My Mother’s Rainy Afternoon Ritual

In our family, the first scent of a monsoon rain didn’t come from the earth; it came from the kitchen. I remember my mother reaching for a large bunch of fresh palak the moment the clouds turned charcoal. To her, Palak Pakora wasn’t just a snack; it was a sensory response to the weather.
She believed that spinach had a “memory” of the rain, and frying it was the only way to lock that freshness in. I can still see her standing by the stove, her bangles clinking as she hand-tossed the leaves in a golden mantle of chickpea flour. “Never use a spoon to mix,” she would tell me. “Your fingers need to feel if the leaves are happy.” She taught me that the secret to a perfect pakora lay in the “Quiet Luxury” of a batter that whispered rather than screamed thin enough to see the green, but thick enough to crunch.
Today, at The Pinch of Masala, we are honoring her ritual by avoiding the heavy, doughy fritters of street stalls. We are returning to the “Whole Leaf” heritage style that celebrates the “Ingredient Integrity” of the spinach itself.

The most common grievance with Palak Pakora is that they turn soft and soggy within minutes. To achieve my mother’s “Eternal Crunch,” you must master the Moisture War:
The “No-Water” Rule: This is the ultimate “Digital Anthropologist” secret. Do not add water to your batter. My mother would salt the shredded spinach and let it sit for 5 minutes. The salt creates a hypertonic environment, drawing out the natural juices of the leaves. You then add the besan (gram flour) directly to these juices. This ensures the batter is made of 100% spinach essence, making it impossible for the pakoras to turn soggy.
The Rice Flour Catalyst: In 2026, we value “Technical Excellence”. Adding exactly two tablespoons of rice flour acts as a moisture-wicking agent, creating a glass-like crunch on the exterior that protects the tender “Fibremaxxing” leaves inside.

Prep time: 10 mins | Cook time: 15 mins | Servings: 4
Diet: Vegan, Gluten-Free | Cuisine: North Indian Street Food

Ingredients:
250g Fresh Palak (Spinach): Roughly chopped into wide ribbons.
1 cup Besan (Gram Flour): Sifted for a smooth texture.
2 tbsp Rice Flour: For the signature “Heritage Crunch.”
The Aromatics: 1 Large Onion (thinly sliced), 1 inch Ginger (grated), 2 Green Chillies (chopped).
Spices: 1 tsp Cumin seeds (Jeera), ½ tsp Turmeric, 1 tsp Carom seeds (Ajwain essential for digestion), and Salt to taste.
Fat: Oil for deep frying (Cold-pressed Peanut or Mustard oil is preferred for authenticity).
Instructions:
The Salt Ritual: Place the spinach and sliced onions in a large bowl. Sprinkle with salt and ajwain. Massage the leaves gently with your fingers and let them rest for 5–8 minutes until they look “sweaty.”
The Dry Mix: Add the ginger, chillies, and dry spices.
The Coating: Sift in the besan and rice flour. Mix with your hands. The moisture from the spinach will begin to form a thick, sticky paste that coats the leaves. Do not add water.
The Temperature Test: Heat oil in a heavy-bottomed kadhai. Drop a tiny bit of batter; if it rises immediately with a sizzle, the oil is ready.
The Drop: Take a small, irregular clump of the mixture and drop it into the oil. Do not shape them into perfect balls; the craggy edges are where the crunch lives!
The Gold Standard: Fry on medium heat for 3–4 minutes, turning once, until they are a deep, sun-kissed golden brown.
Serve: Drain on a paper towel and serve immediately with tangy Tamarind Chutney or a steaming glass of Masala Chai.

The “Pakora Choora” (Leftover Crumbs): In the 2026 “Use-Up” economy, nothing is wasted. My mother never threw away the tiny crispy bits of batter left at the bottom of the pan (the choora). Save these in an airtight jar. They make the perfect “zero-waste” topping for your morning Poha or a bowl of Dal, adding a concentrated hit of spice and texture.

Lunch & Dinner

Aloo Matar: My Mother’s Winter Afternoon in a Bowl

In our house, the definitive sound of winter wasn’t the whistling wind; it was the steady pop-pop-tinkle of fresh green peas hitting a steel bowl. I remember my mother sitting on a low stool in the afternoon sun, a mountain of pea pods in her lap. She never rushed the task. To her, shelling peas was a visual meditation a way to ensure that only the sweetest, most “intentional” grains made it into the pot.
“A potato is just earth,” she would say, “but the pea is the spirit.” She taught me that the secret to a royal Aloo Matar wasn’t in the spices, but in the hierarchy of the cook. You had to respect the potato’s need for a headstart and the pea’s delicate desire to remain vibrant. This dish is a “Parasocial Companion” on our lunch table a warm, reliable hug that has survived generations of winter Sundays .
Today, at The Pinch of Masala, we are moving away from the “frozen-bag” culture and returning to the “Quiet Luxury” of hand-shelled winter bounty and my mother’s “Golden Sear” technique.

The most common mistake in Aloo Matar is ending up with a mushy, greyish mash. To keep your sabji looking “emerald and gold,” you must follow my mother’s two technical rules:
The “Golden Sear” Rule: Never boil the potatoes in the gravy from the start. You must sauté the potato cubes in oil or ghee until they develop a thin, golden crust. This “sealing” prevents the starch from leaking into the gravy, keeping it clean and allowing the potatoes to retain their shape.
The “Steam Trap” Finish: In 2026, we prioritize “Simplicity with Purpose”. My mother would never add excess water. She would cover the pan with a tight-fitting lid and cook the vegetables in their own juices. This “Steam Trap” method concentrates the natural sugars of the winter peas, making them taste like candy rather than water.

Prep time: 20 mins | Cook time: 20 mins | Servings: 4
Diet: Vegan, Gluten-Free | Cuisine: North Indian Heritage

Ingredients:
2 cups Fresh Green Peas: Hand-shelled winter peas are best.
3 Medium Potatoes: Peeled and diced into ¾-inch cubes.
The Aromatics: 1 Large Onion (finely chopped), 1 inch Ginger (grated), 3 Garlic cloves (crushed).
The Base: 2 Ripe Tomatoes (pureed).
Fat: 2 tbsp Mustard Oil or Ghee.
Spices: 1 tsp Cumin seeds (Jeera), ½ tsp Turmeric (Haldi), 1 tsp Coriander powder, ½ tsp Red Chili powder, and ½ tsp Garam Masala.
The Finish: A handful of fresh Coriander leaves and a squeeze of Lemon juice.
Instructions:
The Sear: Heat oil in a heavy pan. Add the potatoes and a pinch of salt. Sauté on medium-high for 5–7 minutes until the edges are golden brown. Remove and set aside.
The Bloom: In the same oil, add cumin seeds. Once they sizzle, add the onions. Sauté until they are a deep translucent pink.
The Masala Base: Add the ginger and garlic. Sauté for 30 seconds, then pour in the tomato puree and dry spices. Cook until the oil begins to separate from the sides.
The Union: Add the seared potatoes and the fresh peas. Toss well to coat every piece in the masala.
The Steam Trap: Add only ¼ cup of water (or our Pod Stock, see below). Cover tightly and cook on low heat for 10–12 minutes.
The Reveal: Check if the potatoes are fork-tender. If the gravy is too thin, cook open for 2 minutes to thicken.
Final Touch: Stir in the garam masala and coriander. Squeeze lemon juice just before serving to “brighten” the earthy potatoes.

The Pod Stock: In the 2026 “Use-Up” economy, we value “Ingredient Integrity” . Do not throw away those fresh, green pea pods! Wash them thoroughly and boil them in water with a pinch of salt for 15 minutes. Strain this liquid and use it as the “Pod Stock” for your gravy. It adds a concentrated green sweetness and extra fiber, aligning with the current “Fibremaxxing” movement.

Lunch & Dinner

The Gemstone Pulao: A Mother’s Sunday Ritual of Patient Grains

In our house, Sunday wasn’t Sunday without the scent of cloves and cardamom drifting from the kitchen. While the recipe originally belonged to my grandmother, it was my mother who turned the Veg Pulao into a weekly masterclass of patience. She called it the “Garland of the Garden.” To her, a pulao wasn’t just a side dish; it was a sign of respect for the grain.
I remember her standing over the sink, rinsing the Basmati with a level of focus usually reserved for prayer. “If you don’t wash the starch away,” she’d say, “you’re just making khichdi.” My mother believed that every grain should be a separate pearl a “Parasocial Companion” on the plate that respected its neighbors. She taught me that the secret to a royal pulao wasn’t in the number of vegetables, but in how you treated the rice.
Today, at The Pinch of Masala, we are reclaiming the art of the non-mushy pulao. This is a return to “Quiet Luxury” using aged rice, hand-bloomed spices, and the slow-cook method my mother perfected.

The primary reason home pulao turns into a soggy mash is that the rice is often boiled rather than “toasted.” My mother insisted on two non-negotiable technical steps:
The Sauté Rule: After soaking and draining, you must sauté the raw grains in ghee for 1 to 2 minutes. This coats each grain in fat, creating a moisture barrier that ensures they stay separate and fluffy after cooking.
The Resting Period: 2026 food media emphasizes the “Resting Period” as a hallmark of quality. Once the heat is off, do not touch the rice for at least 10 to 15 minutes. This allows the steam to redistribute, naturally firming up the grains so they don’t break when fluffed.

Prep time: 20 mins | Cook time: 20 mins | Servings: 4
Diet: Vegan-Optional, Gluten-Free | Cuisine: North Indian Heritage
Ingredients:
1.5 Cups Aged Basmati Rice: Grains should be at least 2 years old for maximum length.
2.5 Cups Liquid: Use our Scrap Stock (see below) for a 10x deeper flavor.
The Medley: ½ cup carrots (diced), ½ cup green peas, ½ cup beans, and 1 medium potato (cubed).
The Whole Bloom: 2 Bay leaves, 1-inch Cinnamon stick, 4 Cloves, 3 Green cardamoms, and 1 tsp Cumin seeds (Jeera).
The Green Aroma: A handful of fresh Mint (Pudina) and Coriander.
Fat: 2 tbsp Ghee (Clarified Butter) or oil.
Acid: 1 tsp Lemon juice (helps keep grains bright white and fluffy).
Instructions:
The Purge: Rinse the rice 3-4 times until the water runs completely clear to remove excess starch. Soak for 20-30 minutes.
The Bloom: Heat ghee in a heavy pot. Add the whole spices and allow them to sizzle and release their oils.
The Base: Sauté sliced onions until golden brown. Add 1.5 tsp ginger-garlic paste and cook until the raw aroma disappears.
The Gemstones: Add the veggies and mint. Sauté for 3 minutes to coat them in the flavored fat.
The Rice Toast: Add the drained rice. Stir gently for 2 minutes, ensuring every grain is glistening with ghee.
The Simmer: Pour in the stock (or water), salt, and lemon juice. Bring to a boil, then turn the heat to the lowest setting. Cover with a tight-fitting lid.
The Silence: Cook for 8-10 minutes until water is absorbed. Turn off the heat. Do not open the lid.
The Reveal: Let it rest for 10-15 minutes. Fluff gently with a fork and serve.

The Scrap Stock: Never cook rice in plain water again. In the 2026 “Use-Up” economy, we value onion skins, carrot ends, and coriander stems. Boil these scraps in water for 20 minutes with a pinch of salt to create a savory vegetable stock. This adds a deep umami that plain water simply cannot match.