
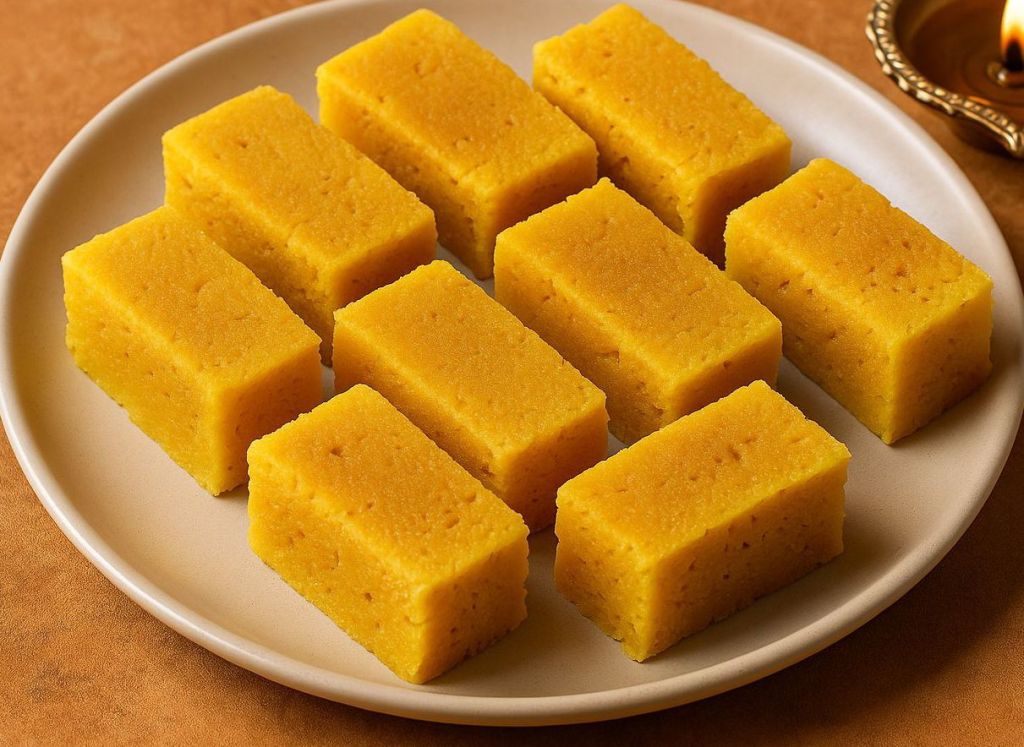
A plate of golden Mysore Pak pieces with a festive oil lamp on the side, showcasing the signature porous texture. I remember the warm glow of clay lamps dancing on the walls during Diwali, and the irresistible aroma of Mysore Pak wafting from my grandmother’s kitchen. This classic sweet – made from besan (gram flour), sugar, and ghee – was always the star of our festive spread. My grandmother would often recount how Mysore Pak was first concocted in a Mysore palace kitchen by a resourceful royal cook for the king. Every bite of this Karnataka specialty tastes like history and festivity combined, with a texture that is porous yet soft-firm, crumbling lightly and then melting in the mouth. In this post, I’ll share the traditional Karnataka-style Mysore Pak recipe (the one with the classic porous texture, not the super-soft version), along with tips, memories, and a bit of festive nostalgia.
Ingredients
Here’s what you need to make Mysore Pak at home. This recipe sticks to the traditional method using a mix of ghee and oil to achieve that porous texture:
Besan (Gram Flour) – 1 cup (about 120 g), sieved to remove lumps.
Sugar – 1¾ cups (350 g) granulated sugar. (You may reduce to ~1½ cups for a less sweet version, but using the full amount gives the authentic texture.)
Water – ½ cup (120 ml), for the sugar syrup.
Ghee (Clarified Butter) – 1 cup (240 ml), plus a teaspoon extra for greasing the tray. Use good quality pure ghee for best aroma.
Oil – ½ cup (120 ml) neutral oil, preferably peanut oil. (Using oil along with ghee is key to getting a light, airy porous structure in traditional Mysore Pak. Don’t worry – good quality oil won’t leave any smell.)
Cardamom – 3 green cardamom pods, seeds crushed (or ¼ teaspoon cardamom powder) for flavor (optional).
Preparation: Grease an 8-inch square pan or plate with a bit of ghee and set it aside. Measure and have all ingredients ready before you start, because the process moves quickly once you begin cooking.
Instructions
Follow these step-by-step instructions to make Mysore Pak. Remember to be cautious and stir continuously – the hot sugar syrup and ghee mixture can bubble vigorously.
1. Sieve the Besan: In a mixing bowl, sift the besan (gram flour) at least twice to break up any lumps. This ensures a smooth mixture later. (Tip: Traditional Mysore Pak doesn’t require pre-roasting the besan; it will cook in the hot syrup, so sieving is enough to remove raw lumps.)
2. Prepare the Ghee+Oil and Sugar Syrup: In one heavy-bottomed kadai (pan), begin heating the ghee and oil together on low heat (Burner 1). In a separate wide pan, combine sugar and water and bring to a boil on medium heat (Burner 2). Stir the sugar syrup until all the sugar dissolves.
3. Cook to One-string Consistency: Boil the sugar-water mixture, stirring occasionally, until it reaches a one-string consistency – this is when a drop of syrup between your thumb and finger pulls into a single thread. (This stage is crucial: the sugar syrup, known as paaka, is the foundation of Mysore Pak’s texture.) Once one-string consistency is reached, keep the syrup on low-medium heat so it continues to bubble gently.
4. Add Besan to Syrup: Quickly but carefully sprinkle the sieved besan into the bubbling syrup in 2-3 batches, stirring vigorously with a spatula as you add it. Ensure there are no lumps – the mixture should be smooth. (Adding the flour gradually while the syrup is boiling prevents clumping.) Cook this besan-syrup mixture on medium heat. You’ll notice it thickens and starts to froth.
5. Incorporate Ghee and Oil in Batches: Now, take the hot ghee-oil mixture from Burner 1. Add one ladle of hot ghee/oil into the besan-syrup mixture and stir continuously. The mixture will sizzle and bubble up lively as the hot fat hits it. Stir until that ghee is fully absorbed and the mixture looks uniform. Repeat this process, adding one ladle of hot ghee-oil at a time and stirring well after each addition. Each addition will cause the mixture to froth and become airy. Continue until almost all the ghee+oil is incorporated. (Keep a few tablespoons of hot ghee/oil reserved in case needed, but you might not use it all.)
6. Watch for the Porous Frothy Stage: As you keep stirring, the mixture will turn glossy and start to lighten in color. After the last addition of ghee, cook a bit more until the whole mass thickens and starts to leave the sides of the pan. You will see the mixture turning very bubbly/foamy with lots of tiny holes (“pores”) appearing. It will also start to come together into one lump and you might hear a faint hissing sound. This is the critical moment – the Mysore Pak is ready to set. (If you stir a few seconds too long here, it can get overcooked; a few seconds too little and it might be slightly soft, so stay focused.)
7. Turn Off and Transfer: The instant you see the mixture looking porous, frothy, and starting to separate from the pan, turn off the heat. Do not add any more ghee at this stage – if you do, it won’t absorb and will make the sweet greasy. Immediately pour the hot mixture into your greased pan. Do not shake, press, or flatten it too much; simply tilt the pan if needed to spread it evenly. (Avoid smoothing out the top with a spatula – leveling it firmly can collapse the air pockets that create the porous texture.)
8. Cool and Cut: Let the slab of Mysore Pak cool for about 5–10 minutes. It should start to set but still be warm to touch. Using a sharp greased knife, gently cut into squares or diamonds (classic shape) while warm. Wiping the knife with a bit of ghee helps to get clean cuts. Allow the pieces to cool completely in the pan – as they cool, they will firm up to the perfect soft-yet-firm consistency. Once fully cooled, lift out the pieces and enjoy!
Tips for Perfect Porous Texture
Getting Mysore Pak right can be tricky, but these tips and tricks will help you achieve that ideal porous, soft-firm texture:
Maintain Ingredient Ratios: The proportion of sugar and ghee/oil is key to texture. Don’t skimp on ghee, and use at least a 1.5:1 ratio of sugar to besan. If you significantly reduce sugar or fat, the Mysore Pak may turn soft like a fudge or come out too brittle. (Traditional recipes often use equal parts besan and sugar, or even more sugar, to get the proper crystallization.)
Use Ghee and Oil: Using a mix of ghee and a bit of oil gives Mysore Pak its light, porous structure. Oil has a higher smoke point and helps create tiny air bubbles as moisture escapes, yielding an airy texture. Don’t worry, the final sweet won’t taste oily (especially if you use a flavorful peanut oil) – it will still be rich in ghee aroma.
Sugar Syrup Mastery: Achieving the correct paaka (sugar syrup consistency) is crucial. One-string consistency means the syrup is neither too thin (which would make the sweet soft or not set) nor too thick (which could make it hard). This stage ensures the Mysore Pak sets with the right firmness and melt-in-mouth feel. Use a heavy pan and medium heat so you don’t overshoot the syrup stage.
Constant Stirring: Once you start adding besan and ghee, stir continuously and briskly. This prevents lumps and ensures even cooking. It also helps distribute the ghee, allowing it to cook the flour and create the hallmark “holes” without any part catching on the bottom.
Timing is Everything: Toward the end, keep a close eye. The moment the mixture turns frothy with porous bubbles and starts to leave the pan, remove it from heat. A few seconds can make the difference between a perfect Mysore Pak and an overcooked one. It’s better to err on the side of slightly under than over – the mixture continues to cook for a bit even after you turn off the stove due to residual heat.
No Pressing Down: When you pour the mixture into the tray, do not press it flat or bang the tray too hard. Minimal spreading is fine, but pressing will compact it and you’ll lose that airy texture. Just pour and let it settle naturally; it will set into a porous slab.
Optional Enhancements: You can stir in the crushed cardamom just as you turn off the heat for a lovely aroma. Some traditional cooks also add a tiny pinch of baking soda right before pouring to enhance porousness (the soda releases extra bubbles), but this isn’t necessary if your technique is good.
Practice Makes Perfect: Don’t be discouraged if your first attempt isn’t perfect. Mysore Pak is famously temperamental – even seasoned cooks take a couple of tries to master the timing and consistency. Every stove and pan is different, so if at first you get a softer burfi or a harder candy, note what might have gone wrong (heat too high, syrup under/overcooked, etc.) and try again. The result is worth it – homemade Mysore Pak has a fresh aroma and authenticity that’s hard to beat!
Serving Suggestions and Shelf Life
Mysore Pak is a festive delight often made for Diwali, weddings, and special occasions. Here’s how you can enjoy and store it:
Serving: Serve Mysore Pak at room temperature. It’s perfect on a festive platter alongside other Indian sweets, or simply on its own with a cup of hot chai or filtered coffee. The pieces have a beautiful golden color and porous look that invites you to take a bite. Because it’s quite rich, you can serve small squares – a little piece goes a long way in flavor. For a special touch, garnish the serving plate with a few toasted nuts or a sprinkle of crushed cardamom to complement the Mysore Pak (though the traditional version is plain).
Gifting: In South India, Mysore Pak is often called the “king of sweets” and is a popular choice for gifting during Diwali and other festivals. You can pack the pieces in decorative boxes – the sweet’s long shelf life makes it travel-friendly and great for sharing.
Storage: Once the Mysore Pak has fully cooled and been cut, store the pieces in an airtight container. It keeps well at room temperature for 2 to 3 weeks, and in fact can last up to about a month without refrigeration if stored properly in a cool, dry place. (The low moisture and high sugar/ghee content act as natural preservatives.) Avoid refrigerating, if possible, as refrigeration can sometimes make the texture denser or cause the sugar to crystallize. Always use a clean, dry spoon or hands to take out pieces, to prevent introducing moisture. Pro tip: If you see the Mysore Pak releasing a bit of ghee while stored, don’t worry – just blot gently with a paper towel. This is normal for homemade ghee sweets and doesn’t affect the taste or shelf life.
Enjoy! This traditional Mysore Pak, with its porous texture and rich aroma, is more than just a sweet – it’s a bite of Karnataka’s heritage and the memories of celebrations. Whether you’re making it for a festival or just to satisfy a sweet craving, I hope this detailed guide helps you create a melt-in-the-mouth Mysore Pak that earns you rave reviews. Happy cooking, and Happy Festivities! 🎉
