Lunch & Dinner

Authentic Punjabi Aloo Gobi: Traditional Dry Sabzi Recipe

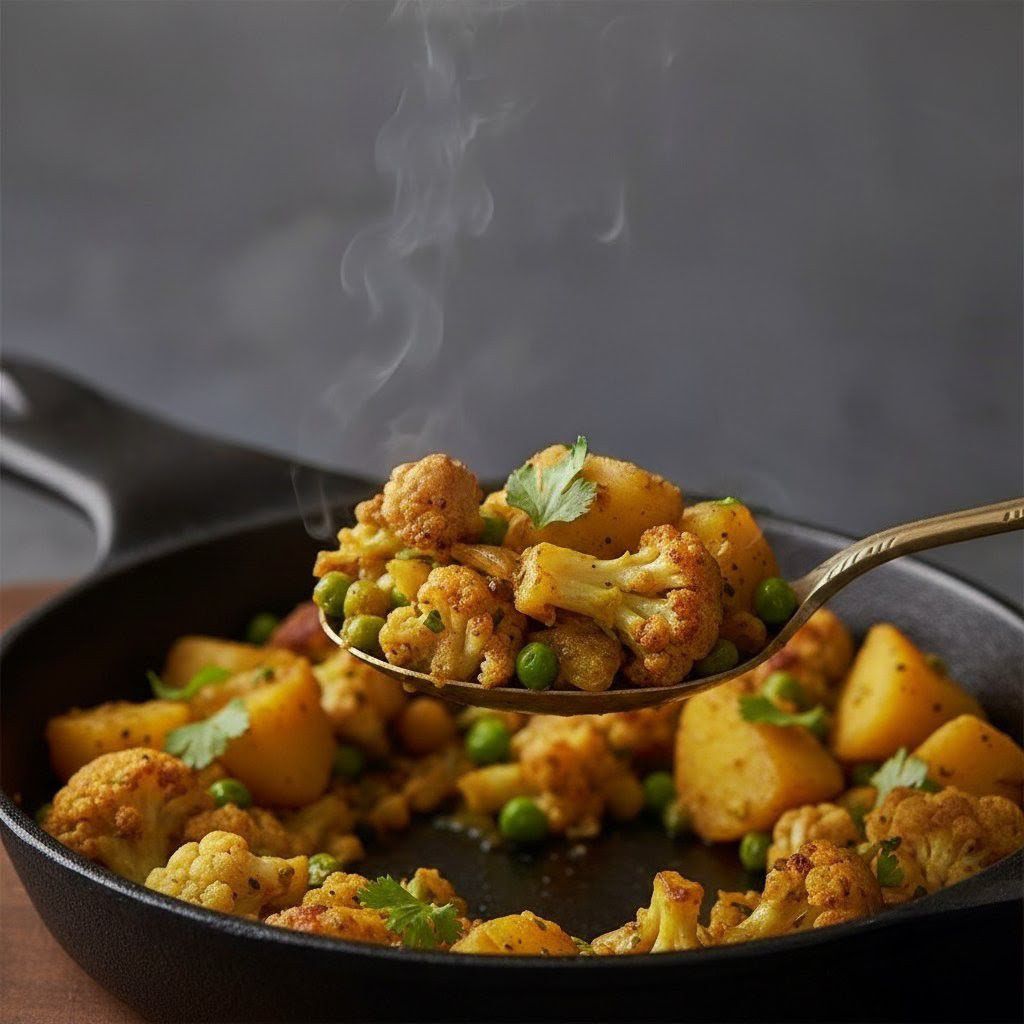
In our house, the definitive sound of a winter Saturday was the crisp thwack of a knife hitting a fresh head of cauliflower. While the recipe for Aloo Gobi (Potato and Cauliflower) was an heirloom from my grandmother, it was my mother who turned it into a masterclass of texture. She believed that a mushy cauliflower was a sign of a cook who didn’t respect the vegetable’s “spirit”.
I remember her sitting in the kitchen as the morning mist cleared, meticulously separating the cauliflower into even-sized florets. She never used a food processor; she believed your hands needed to feel the firmness of the vegetable to know how it would react to the fire. My mother viewed this dish as a “Parasocial Companion” a sturdy, dependable meal that had the power to make a simple Roti feel like a royal feast.
Today, at The Pinch of Masala, we are reclaiming the art of the “Dry Sauté.” We are moving away from the watery, grey mashes of the past and returning to the “Quiet Luxury” of a vibrant, charred-gold sabzi that honors every grain of spice.

The barrier to a perfect Aloo Gobi is the moisture. Cauliflower is approximately 92% water, which can easily turn your stir-fry into a mushy paste. To master the “Eternal Crunch,” follow my mother’s three non-negotiable rules:
The “Headstart” Rule: Potatoes and cauliflower cook at different speeds. My mother always sautéed the potato cubes in oil first for 5 minutes to give them a “seal” and a headstart before the delicate cauliflower florets entered the pan.
The “No-Water” Mandate: This is the ultimate “Digital Anthropologist” secret. Most people add a splash of water to cook the veggies, but my mother believed the steam trapped under a tight lid was all the moisture needed. Adding liquid water ruins the “Bhuna” (roasting) effect and makes the florets soggy.
The “Batch Sear”: To prevent overcrowding which leads to steaming instead of frying she would often fry the cauliflower florets separately until they were golden-spotted before mixing them with the masala base.

Prep time: 15 mins | Cook time: 25 mins | Servings: 4
Diet: Vegan, Gluten-Free | Cuisine: North Indian Heritage

Ingredients:

1 Medium Head Cauliflower (Gobi): Cut into medium-large florets.

2 Medium Potatoes (Aloo): Peeled and chopped into even cubes.

The Aromatics: 1 Large Onion (finely chopped), 1.5 tsp Ginger-Garlic paste, and 2 Green Chillies (slit).

The Base: 1 Ripe Tomato (finely chopped).

Fat: 3 tbsp Oil or Ghee.

The Spice Bloom: 1 tsp Cumin seeds (Jeera), 1 tsp Kasuri Methi (the secret to that restaurant aroma).

Powder Spices: 1 tsp Red Chili powder, ½ tsp Turmeric, 1 tsp Coriander powder, and 1 tsp Aamchur (Dry Mango Powder) for the essential tang.

The Finish: ½ tsp Garam Masala and a handful of fresh Coriander leaves.

Instructions:

The Prep: Rinse cauliflower in warm salted water to remove any impurities. Drain and pat dry completely.

The Golden Fry: Heat 2 tbsp oil in a heavy pan. Sauté cauliflower florets until golden brown edges appear. Remove and set aside. In the same pan, sauté potato cubes until they are 80% cooked and golden. Remove and set aside.

The Bloom: Add the remaining oil. Sizzle cumin seeds and kasuri methi until aromatic. Add onions and sauté until translucent.

The Masala Base: Add ginger-garlic paste and chillies. Sauté for a minute, then add the tomato and dry spices. Cook until the oil separates from the sides.

The Union: Carefully add the fried aloo and gobi back into the pan. Mix gently with a flat spatula to avoid breaking the florets.

The Slow Cook: Lower the heat to its absolute minimum. Cover with a tight-fitting lid and let the vegetables cook in their own steam for 8-10 minutes.

The Reveal: Check if the potatoes are fork-tender. Sprinkle garam masala and toss one last time on high heat for 60 seconds to “sear” the flavors in.

Serve: Garnish with fresh coriander. Serve hot with buttery Phulkas or as a side to Dal-Chawal.


The Stalk Stir-fry: In the 2026 “Use-Up” economy, we value every part of the plant. Do not throw away the thick cauliflower stalks! Peel the tough outer layer, dice the tender inner core, and sauté them with mustard seeds and turmeric for a crunchy, high-fiber side dish the next day.

Lunch & Dinner

Authentic Konkani Prawn Masala: Traditional Kolambi Recipe

In our family, the arrival of fresh prawns wasn’t just a grocery delivery; it was a coastal ritual. I remember my mother heading to the Mumbai jetties as the trawlers docked, her eyes scanning for the translucent shimmer that signaled a “just-caught” catch. She didn’t just buy ingredients; she hand-selected them with the precision of a curator.
Cleaning the prawns was her meditation. She taught me that the effort you put into the prep is what earns the flavor of the dish. “A tired prawn cannot be hidden behind a loud spice,” she would say. My mother viewed her Kolambi Masala (Prawn Masala) as a “Parasocial Companion” on our Sunday table a dish that whispered stories of the red-soiled kitchens of the Konkan and the salty air of the Arabian Sea .
Today, at The Pinch of Masala, we are documenting her method of “Minimalist Precision.” We are moving away from oily restaurant versions and returning to the “Quiet Luxury” of a thick, spice-coated dry-fry that lets the sweetness of the prawns take the lead.


The secret to prawns that are succulent and tender rather than tough and rubbery lies in my mother’s two non-negotiable rules:
The “Opacity” Rule: The biggest mistake in home cooking is over-boiling. Prawns cook in minutes. My mother would add them only at the final stage, simmering them for just 2–3 minutes until they turned opaque. The residual heat of the thick masala is enough to finish them.
The Shallot Foundation: While most recipes use large red onions, my mother insisted on a handful of shallots (chote pyaaz). When ground into a coarse paste with ginger and garlic, they provide a deep, jammy sweetness that offsets the sharp heat of the chili.

Prep time: 20 mins | Cook time: 20 mins | Servings: 4
Diet: Pescatarian, Gluten-Free | Cuisine: Konkani Heritage

Ingredients:

500g Fresh Prawns: Cleaned and deveined. (Leave the tails on for that authentic “Digital Anthropologist” look).

The Masala Base: 1 cup shallots (finely chopped), 1.5 cups tomatoes (finely chopped), 1 tbsp ginger-garlic paste.

The Spice Trinity: 1.5 tbsp Kashmiri red chili powder (for color), ½ tsp turmeric, 1 tsp garam masala.

The Sour Agent: 2 slices of Kokum (or 1 tbsp tamarind extract).

Fat: 2 tbsp Coconut oil (essential for coastal authenticity).

The Finish: 10–12 Fresh curry leaves and a handful of chopped coriander.

Instructions:
The Marinate: Toss the prawns with turmeric and a pinch of salt. Set aside for 15 minutes.

The Tempering: Heat coconut oil in a wide-bottomed pan. Add cumin seeds and let the curry leaves splutter.

The Sauté: Add the shallots and onions. Sauté patiently until they turn deep golden brown. This caramelization is the base of your flavor.

The Bhuna: Add the ginger-garlic paste and tomatoes. Cook until the tomatoes melt and the oil begins to separate from the sides.

The Spice Bloom: Stir in the red chili powder and garam masala. Add a splash of water to prevent the spices from burning. Add the kokum slices.

The Prawn Union: Slide in the marinated prawns. Toss them well to ensure they are fully coated in the thick masala.

The Simmer: Cover and cook for 3–5 minutes max. As soon as the prawns curl into a ‘C’ shape and turn opaque, turn off the heat.

Serve: Garnish with fresh coriander and serve hot with Bhakri or steamed rice.


The Shell Stock: In the 2026 “Use-Up” economy, we value every scrap. Do not discard the prawn shells! Wash them and boil them with ginger scraps and coriander stems for 15 minutes. Strain this liquid and use it as a “Seafood Stock” for your next Veg Pulao. It adds a concentrated oceanic umami that plain water cannot match.

Lunch & Dinner

Baingan Bharta: My Mother’s Smoky Winter Ritual of Fire and Soul

In our home, the arrival of winter wasn’t marked by a calendar, but by the scent of charred eggplant skin wafting from the kitchen. I remember my mother standing over the gas stove, her face glowing in the blue flame as she patiently rotated a large, purple globe of brinjal. She called it the “Smoky Soul” of the season.
“You cannot rush the fire,” she would say, explaining that an oven or a microwave could never replicate the deep, primordial aroma of skin meeting an open flame. My mother was a self-taught scientist of flavor; she knew that the char wasn’t just burnt skin it was a signature of authenticity. She viewed this dish as a “Parasocial Companion,” a reliable bridge to her own childhood that she was now documenting for me.
Today, at The Pinch of Masala, we are reclaiming the art of the “Slow Roast.” In a world of 2026 “Quiet Luxury” and “Simplicity with Purpose,” this recipe stands as a testament to the idea that the most profound flavors are often the most technical to achieve.

To ensure your Baingan Bharta has that unmistakable “Dhaba-style” depth without becoming a soggy mess, you must follow my mother’s two non-negotiable rules:
The “Aromatic Infusion” Slit: Most people mash the garlic separately. My mother would make deep gashes in the raw eggplant and tuck whole garlic cloves inside before roasting. As the eggplant chars, the garlic steams in the vegetable’s own juices, softening into a sweet, buttery paste that infuses the entire pulp with flavor.
The “Texture over Mash” Philosophy: In 2026, we value “Ingredient Integrity”. My mother never processed her vegetables into a paste. She insisted on roughly chopping the roasted eggplant and onions to maintain a rustic “hash” texture rather than a smooth puree. This provides a better “mouthfeel” and honors the “Fiber Revolution” by keeping the vegetable structures intact.

Prep time: 15 mins | Cook time: 30 mins | Servings: 4
Diet: Vegan, Gluten-Free | Cuisine: North Indian Heritage

Ingredients:
1 Large Eggplant (Bharta Baingan): Choose one that is light in weight; heavy ones are full of bitter seeds.
4-6 Cloves of Garlic: To be tucked into the eggplant.
2 Green Chillies: Slit.

The Masala Base: 2 Large Onions (roughly chopped), 3 Medium Tomatoes (roughly chopped), and 1 inch Ginger (grated).

Fat: 2 tbsp Mustard Oil (essential for that authentic “Heritage” zing).

Spices: 1 tsp Cumin seeds (Jeera), ½ tsp Turmeric, 1 tsp Kashmiri Red Chili powder, and ½ tsp Garam Masala.

The Finish: A handful of fresh Coriander and a squeeze of Lemon juice.
Instructions:

The Roasting Ritual: Wash and dry the eggplant. Make 3–4 deep slits and insert the garlic cloves. Brush the skin lightly with mustard oil to prevent it from drying out too fast.

Fire Roast: Place the eggplant directly over an open gas flame. Rotate every 2 minutes for about 15–20 minutes until the skin is completely charred and black, and the flesh is very soft.

The Sweat: Remove from heat and place in a covered bowl for 5 minutes. The steam will help loosen the skin for easier peeling.

The Mash: Peel off the charred skin and discard the stem. Mash the eggplant and the roasted garlic with a fork leave it slightly chunky.

The Bhuna Base: Heat mustard oil in a pan until it smokes. Add cumin seeds. Once they sizzle, add the onions and green chillies. Sauté until the onions turn a deep golden brown.

The Red Union: Add the ginger, tomatoes, turmeric, and chili powder. Cook until the tomatoes break down and you see oil separating from the sides.

The Final Mix: Add the mashed eggplant. Stir well and cook uncovered for 5–8 minutes to let the flavors meld.

Serve: Season with salt, garam masala, and lemon juice. Garnish with plenty of fresh coriander.

The Liquid Gold: When you peel the roasted eggplant, you will see flavorful juices pooling on the plate. In the 2026 “Use-Up” economy, we value every drop. Pour those smoky juices back into the pan with the eggplant mash. It holds the most concentrated essence of the fire-roasting process and adds a depth of flavor that no spice can match.

Lunch & Dinner

Bhindi Bhaja: My Mother’s Ritual of the Eternal Crunch

In our family, the hierarchy of vegetables was clear: the Bhindi (Okra) was the temperamental queen of the kitchen. While the recipe was passed down through generations, it was my mother who mastered the chemistry of it. To her, a slimy bhindi was a sign of a distracted mind.
I remember her sitting in the winter sun, inspecting each green “ladyfinger” with the focus of a jeweler. “If it doesn’t snap at the tip, it’s too old for the pan,” she would say. She taught me that the secret to a royal Bhindi Bhaja wasn’t in the number of spices, but in the silence of the preparation. You had to respect the okra’s hatred of moisture and its need for space. This dish is a “Parasocial Companion” on our table a crisp, reliable comfort that has defined our family lunches for decades.
Today, at The Pinch of Masala, we are moving away from oily, heavy-handed stir-frys and returning to the “Quiet Luxury” of my mother’s “Bone-Dry” technique a method designed for a world that values technical excellence and ingredient integrity.

The most common grievance with Bhindi is the “slime” a natural mucilage that intensifies when it touches water. To achieve my mother’s “Eternal Crunch,” you must win the Moisture War:
The “Bone-Dry” Rule: Never cut okra while it is wet. My mother would wash the whole pods the night before and leave them on a clean cloth to air-dry overnight. If you are in a hurry, you must wipe each individual pod with a paper towel until it is completely dry before your knife touches it.
The “Last Grain” Salting: In 2026, we value “Technical Simplicity”. Salt draws out moisture instantly. My mother never added salt until the bhindi was 90% cooked and crisp. Adding it earlier creates a “steam bath” inside the pan, turning your fry into a soggy mash.

Prep time: 15 mins | Cook time: 15 mins | Servings: 3–4
Diet: Vegan, Gluten-Free | Cuisine: Indian Heritage

Ingredients:
500g Fresh Okra (Bhindi): Tender, thin, and blemish-free.
The Aromatics: 1 Medium Onion (sliced thin), 2 Green Chillies (slit), and 3 Garlic cloves (crushed).
The Sour Agent: 1 tsp Amchur (Dry Mango Powder) or a squeeze of Lemon   this chemically cuts any remaining sliminess.
Fat: 3 tbsp Mustard Oil (for that authentic “Heritage” pungent kick).
Spices: 1 tsp Cumin seeds (Jeera), ½ tsp Turmeric, and ½ tsp Red Chili powder.
The Secret Texture: 1 tbsp Roasted Peanut Powder (optional, for a Maharashtrian twist).
Instructions:
The Preparation: Wash, dry, and slice the bhindi into ¼-inch rounds. Ensure your chopping board and knife are also bone-dry.
The Tempering: Heat oil in a wide, heavy pan (not a deep kadhai) until it smokes. Add cumin seeds and let them sizzle.
The Sauté: Add the sliced onions and chillies. Sauté until they are translucent but not brown.
The Open Sear: Add the okra. Crank the heat to high for 2 minutes to “sear” the exterior. Do not cover the pan. Covering traps steam, which creates slime.
The Slow Crisp: Lower the heat to medium. Stir only 2 or 3 times total. Over-stirring breaks the pods and releases more mucilage.
The Seasoning: Once the okra is dark green and the edges look slightly charred/crisp, add the turmeric, chili powder, and the souring agent (Amchur).
The Final Grain: Add salt in the last 60 seconds of cooking. Toss one last time and turn off the heat.
Serve: Serve immediately with hot Phulkas or Dal-Rice.

The Pakora Choora: In the 2026 “Use-Up” economy, we value concentrated flavor scraps. My mother never threw away the tiny, crunchy, spice-laden bits of onion and okra that settled at the bottom of the pan. Save this “choora” in a small jar; it makes a fantastic, zero-waste topping for Poha or Khichdi the next morning.

starters

Mixed Vegetable Soup: My Mother’s Winter Medicine

In the winter months, our kitchen didn’t just smell like food; it smelled like protection. While the tradition of a warm bowl began with my grandmother, it was my mother who turned the Mixed Vegetable Soup into a ritual of healing. To her, a soup wasn’t just a liquid meal; it was a way to “document the season” in a single pot.
I remember her standing at the wooden counter, her knife-work precise and rhythmic. She believed that the way you chopped a vegetable determined its soul in the broth. “If the carrots are bigger than the beans,” she would say, “the soup has no harmony.” My mother viewed her soup as a “Parasocial Companion” a warm, reliable presence that comforted us during winter colds and rainy nights .
Today, at The Pinch of Masala, we are stepping away from the “novel-length menus” of the modern era and returning to the “Quiet Luxury” of simple, technical, and honest cooking . This is my mother’s medicine, refined for a world that needs intention and longevity .

The most common mistake in home-style soups is a flat, watery flavor. To achieve a “Restaurant Style” depth at home, you must follow my mother’s two non-negotiable rules:
The High-Heat Bloom: Most people boil their vegetables in water immediately. My mother insisted on sautéing the aromatics ginger, garlic, and spring onion whites and then the chopped veggies on a high flame for 2–3 minutes. This “sear” brings out the natural sugars and creates a smoky aroma that serves as the flavor base.
The Starch Integrity: In 2026, we are seeing a move toward “real food sources” rather than “powders and potions” . Instead of using cornstarch or artificial thickeners, my mother would often blend a single boiled potato into a smooth paste and stir it back into the pot. This creates a silky, hearty consistency while remaining 100% natural.

Prep time: 15 mins | Cook time: 25 mins | Servings: 4
Diet: Vegan, Gluten-Free | Cuisine: Indian Homestyle

Ingredients:
The Medley (1.5 to 2 cups): Finely chopped carrots, french beans, cabbage, and sweet corn.
The Aromatics: 1 tbsp garlic (minced), ½ tbsp ginger (minced), and 2 sprigs of spring onion whites.
The Liquid: 3 cups of Scrap Stock (see below) or water.
The Seasoning: ½ tsp black pepper powder, salt to taste, and a pinch of sugar (to balance the acidity).
The Finish: 1 tsp vinegar or lemon juice and a handful of fresh coriander.
Instructions:
The Chop: Rinse all vegetables under running water and chop them into uniform, small pieces. Uniformity ensures even cooking and prevents some veggies from turning mushy while others remain raw.
The Wok Sear: Heat 1 tbsp oil or butter in a heavy pot. Sauté the ginger, garlic, and spring onion whites for 1 minute until fragrant but not browned.
The Flavor Bloom: Add the rest of the chopped vegetables. Crank the heat to high and fry for 2–3 minutes. This brings out the deep, earthy aroma.
The Simmer: Pour in the stock or water. Bring to a rolling boil, then lower the flame. Cover and cook for 10–12 minutes until the veggies are tender but still have a slight “bite”.
The Natural Bind: If you prefer a thicker soup, stir in your blended potato paste (or a cornstarch slurry) and cook until it turns glossy and thick.
The Polish: Add salt, sugar, and crushed black pepper. Turn off the heat and stir in the vinegar or lemon juice.
Serve: Ladle into warm bowls and garnish with coriander. Serve bubbling hot, perhaps with a side of toasted croutons.

The Scrap Stock: In the 2026 “Use-Up” economy, we never cook with plain water. Collect your onion skins, carrot ends, and celery stalks throughout the week. Boil them in water for 20 minutes with a bay leaf to create a homemade vegetable stock. This “zero-cost” liquid adds an enzymatic complexity that transforms a simple soup into a gourmet experience.

Snacks

Heritage Palak Pakora: My Mother’s Rainy Afternoon Ritual

In our family, the first scent of a monsoon rain didn’t come from the earth; it came from the kitchen. I remember my mother reaching for a large bunch of fresh palak the moment the clouds turned charcoal. To her, Palak Pakora wasn’t just a snack; it was a sensory response to the weather.
She believed that spinach had a “memory” of the rain, and frying it was the only way to lock that freshness in. I can still see her standing by the stove, her bangles clinking as she hand-tossed the leaves in a golden mantle of chickpea flour. “Never use a spoon to mix,” she would tell me. “Your fingers need to feel if the leaves are happy.” She taught me that the secret to a perfect pakora lay in the “Quiet Luxury” of a batter that whispered rather than screamed thin enough to see the green, but thick enough to crunch.
Today, at The Pinch of Masala, we are honoring her ritual by avoiding the heavy, doughy fritters of street stalls. We are returning to the “Whole Leaf” heritage style that celebrates the “Ingredient Integrity” of the spinach itself.

The most common grievance with Palak Pakora is that they turn soft and soggy within minutes. To achieve my mother’s “Eternal Crunch,” you must master the Moisture War:
The “No-Water” Rule: This is the ultimate “Digital Anthropologist” secret. Do not add water to your batter. My mother would salt the shredded spinach and let it sit for 5 minutes. The salt creates a hypertonic environment, drawing out the natural juices of the leaves. You then add the besan (gram flour) directly to these juices. This ensures the batter is made of 100% spinach essence, making it impossible for the pakoras to turn soggy.
The Rice Flour Catalyst: In 2026, we value “Technical Excellence”. Adding exactly two tablespoons of rice flour acts as a moisture-wicking agent, creating a glass-like crunch on the exterior that protects the tender “Fibremaxxing” leaves inside.

Prep time: 10 mins | Cook time: 15 mins | Servings: 4
Diet: Vegan, Gluten-Free | Cuisine: North Indian Street Food

Ingredients:
250g Fresh Palak (Spinach): Roughly chopped into wide ribbons.
1 cup Besan (Gram Flour): Sifted for a smooth texture.
2 tbsp Rice Flour: For the signature “Heritage Crunch.”
The Aromatics: 1 Large Onion (thinly sliced), 1 inch Ginger (grated), 2 Green Chillies (chopped).
Spices: 1 tsp Cumin seeds (Jeera), ½ tsp Turmeric, 1 tsp Carom seeds (Ajwain essential for digestion), and Salt to taste.
Fat: Oil for deep frying (Cold-pressed Peanut or Mustard oil is preferred for authenticity).
Instructions:
The Salt Ritual: Place the spinach and sliced onions in a large bowl. Sprinkle with salt and ajwain. Massage the leaves gently with your fingers and let them rest for 5–8 minutes until they look “sweaty.”
The Dry Mix: Add the ginger, chillies, and dry spices.
The Coating: Sift in the besan and rice flour. Mix with your hands. The moisture from the spinach will begin to form a thick, sticky paste that coats the leaves. Do not add water.
The Temperature Test: Heat oil in a heavy-bottomed kadhai. Drop a tiny bit of batter; if it rises immediately with a sizzle, the oil is ready.
The Drop: Take a small, irregular clump of the mixture and drop it into the oil. Do not shape them into perfect balls; the craggy edges are where the crunch lives!
The Gold Standard: Fry on medium heat for 3–4 minutes, turning once, until they are a deep, sun-kissed golden brown.
Serve: Drain on a paper towel and serve immediately with tangy Tamarind Chutney or a steaming glass of Masala Chai.

The “Pakora Choora” (Leftover Crumbs): In the 2026 “Use-Up” economy, nothing is wasted. My mother never threw away the tiny crispy bits of batter left at the bottom of the pan (the choora). Save these in an airtight jar. They make the perfect “zero-waste” topping for your morning Poha or a bowl of Dal, adding a concentrated hit of spice and texture.

Lunch & Dinner

Aloo Matar: My Mother’s Winter Afternoon in a Bowl

In our house, the definitive sound of winter wasn’t the whistling wind; it was the steady pop-pop-tinkle of fresh green peas hitting a steel bowl. I remember my mother sitting on a low stool in the afternoon sun, a mountain of pea pods in her lap. She never rushed the task. To her, shelling peas was a visual meditation a way to ensure that only the sweetest, most “intentional” grains made it into the pot.
“A potato is just earth,” she would say, “but the pea is the spirit.” She taught me that the secret to a royal Aloo Matar wasn’t in the spices, but in the hierarchy of the cook. You had to respect the potato’s need for a headstart and the pea’s delicate desire to remain vibrant. This dish is a “Parasocial Companion” on our lunch table a warm, reliable hug that has survived generations of winter Sundays .
Today, at The Pinch of Masala, we are moving away from the “frozen-bag” culture and returning to the “Quiet Luxury” of hand-shelled winter bounty and my mother’s “Golden Sear” technique.

The most common mistake in Aloo Matar is ending up with a mushy, greyish mash. To keep your sabji looking “emerald and gold,” you must follow my mother’s two technical rules:
The “Golden Sear” Rule: Never boil the potatoes in the gravy from the start. You must sauté the potato cubes in oil or ghee until they develop a thin, golden crust. This “sealing” prevents the starch from leaking into the gravy, keeping it clean and allowing the potatoes to retain their shape.
The “Steam Trap” Finish: In 2026, we prioritize “Simplicity with Purpose”. My mother would never add excess water. She would cover the pan with a tight-fitting lid and cook the vegetables in their own juices. This “Steam Trap” method concentrates the natural sugars of the winter peas, making them taste like candy rather than water.

Prep time: 20 mins | Cook time: 20 mins | Servings: 4
Diet: Vegan, Gluten-Free | Cuisine: North Indian Heritage

Ingredients:
2 cups Fresh Green Peas: Hand-shelled winter peas are best.
3 Medium Potatoes: Peeled and diced into ¾-inch cubes.
The Aromatics: 1 Large Onion (finely chopped), 1 inch Ginger (grated), 3 Garlic cloves (crushed).
The Base: 2 Ripe Tomatoes (pureed).
Fat: 2 tbsp Mustard Oil or Ghee.
Spices: 1 tsp Cumin seeds (Jeera), ½ tsp Turmeric (Haldi), 1 tsp Coriander powder, ½ tsp Red Chili powder, and ½ tsp Garam Masala.
The Finish: A handful of fresh Coriander leaves and a squeeze of Lemon juice.
Instructions:
The Sear: Heat oil in a heavy pan. Add the potatoes and a pinch of salt. Sauté on medium-high for 5–7 minutes until the edges are golden brown. Remove and set aside.
The Bloom: In the same oil, add cumin seeds. Once they sizzle, add the onions. Sauté until they are a deep translucent pink.
The Masala Base: Add the ginger and garlic. Sauté for 30 seconds, then pour in the tomato puree and dry spices. Cook until the oil begins to separate from the sides.
The Union: Add the seared potatoes and the fresh peas. Toss well to coat every piece in the masala.
The Steam Trap: Add only ¼ cup of water (or our Pod Stock, see below). Cover tightly and cook on low heat for 10–12 minutes.
The Reveal: Check if the potatoes are fork-tender. If the gravy is too thin, cook open for 2 minutes to thicken.
Final Touch: Stir in the garam masala and coriander. Squeeze lemon juice just before serving to “brighten” the earthy potatoes.

The Pod Stock: In the 2026 “Use-Up” economy, we value “Ingredient Integrity” . Do not throw away those fresh, green pea pods! Wash them thoroughly and boil them in water with a pinch of salt for 15 minutes. Strain this liquid and use it as the “Pod Stock” for your gravy. It adds a concentrated green sweetness and extra fiber, aligning with the current “Fibremaxxing” movement.

Lunch & Dinner

The Gemstone Pulao: A Mother’s Sunday Ritual of Patient Grains

In our house, Sunday wasn’t Sunday without the scent of cloves and cardamom drifting from the kitchen. While the recipe originally belonged to my grandmother, it was my mother who turned the Veg Pulao into a weekly masterclass of patience. She called it the “Garland of the Garden.” To her, a pulao wasn’t just a side dish; it was a sign of respect for the grain.
I remember her standing over the sink, rinsing the Basmati with a level of focus usually reserved for prayer. “If you don’t wash the starch away,” she’d say, “you’re just making khichdi.” My mother believed that every grain should be a separate pearl a “Parasocial Companion” on the plate that respected its neighbors. She taught me that the secret to a royal pulao wasn’t in the number of vegetables, but in how you treated the rice.
Today, at The Pinch of Masala, we are reclaiming the art of the non-mushy pulao. This is a return to “Quiet Luxury” using aged rice, hand-bloomed spices, and the slow-cook method my mother perfected.

The primary reason home pulao turns into a soggy mash is that the rice is often boiled rather than “toasted.” My mother insisted on two non-negotiable technical steps:
The Sauté Rule: After soaking and draining, you must sauté the raw grains in ghee for 1 to 2 minutes. This coats each grain in fat, creating a moisture barrier that ensures they stay separate and fluffy after cooking.
The Resting Period: 2026 food media emphasizes the “Resting Period” as a hallmark of quality. Once the heat is off, do not touch the rice for at least 10 to 15 minutes. This allows the steam to redistribute, naturally firming up the grains so they don’t break when fluffed.

Prep time: 20 mins | Cook time: 20 mins | Servings: 4
Diet: Vegan-Optional, Gluten-Free | Cuisine: North Indian Heritage
Ingredients:
1.5 Cups Aged Basmati Rice: Grains should be at least 2 years old for maximum length.
2.5 Cups Liquid: Use our Scrap Stock (see below) for a 10x deeper flavor.
The Medley: ½ cup carrots (diced), ½ cup green peas, ½ cup beans, and 1 medium potato (cubed).
The Whole Bloom: 2 Bay leaves, 1-inch Cinnamon stick, 4 Cloves, 3 Green cardamoms, and 1 tsp Cumin seeds (Jeera).
The Green Aroma: A handful of fresh Mint (Pudina) and Coriander.
Fat: 2 tbsp Ghee (Clarified Butter) or oil.
Acid: 1 tsp Lemon juice (helps keep grains bright white and fluffy).
Instructions:
The Purge: Rinse the rice 3-4 times until the water runs completely clear to remove excess starch. Soak for 20-30 minutes.
The Bloom: Heat ghee in a heavy pot. Add the whole spices and allow them to sizzle and release their oils.
The Base: Sauté sliced onions until golden brown. Add 1.5 tsp ginger-garlic paste and cook until the raw aroma disappears.
The Gemstones: Add the veggies and mint. Sauté for 3 minutes to coat them in the flavored fat.
The Rice Toast: Add the drained rice. Stir gently for 2 minutes, ensuring every grain is glistening with ghee.
The Simmer: Pour in the stock (or water), salt, and lemon juice. Bring to a boil, then turn the heat to the lowest setting. Cover with a tight-fitting lid.
The Silence: Cook for 8-10 minutes until water is absorbed. Turn off the heat. Do not open the lid.
The Reveal: Let it rest for 10-15 minutes. Fluff gently with a fork and serve.

The Scrap Stock: Never cook rice in plain water again. In the 2026 “Use-Up” economy, we value onion skins, carrot ends, and coriander stems. Boil these scraps in water for 20 minutes with a pinch of salt to create a savory vegetable stock. This adds a deep umami that plain water simply cannot match.

Lunch & Dinner

Lehsuni Palak: The Emerald Ritual of my Grandmother’s Winter Kitchen

Introduction & Story
There is a specific kind of “Quiet Luxury” in a pile of fresh winter spinach.[1] In our home, it was never just a bag of leaves from a supermarket; it was a morning ritual. I remember my grandmother sitting in the winter sun, a colander between her knees, meticulously sorting through bunches of dark, earthy palak.
“The soil gives it soul,” she would say, explaining why we never threw away the tender stems. She believed that the stems held the “sweetness,” while the leaves held the “strength.”
Today’s recipe, Lehsuni Palak (Garlicky Spinach), is a tribute to that simplicity. It isn’t a heavy, cream-laden Palak Paneer. It is a rustic, gravy-based curry that allows the vibrant, slightly metallic taste of fresh spinach to take center stage, punctuated only by the aggressive, smoky aroma of roasted garlic. This is food that feels like an intentional hug nourishing, sustainable, and built to last.[2]
The “Digital Anthropologist” Technical Secret: Retaining the Emerald
In 2026, we value “Technical Excellence” in the kitchen.[3] The most common mistake in making spinach is overcooking it until it turns a dull, swampy brown. To keep your sabji a brilliant, “Insta-worthy” emerald green, you must master the Blanch and Shock technique:
Blanch: Submerge the leaves in boiling salted water for exactly 2 minutes. Adding a pinch of sugar or baking soda helps lock in the chlorophyll.
Shock: Immediately move the leaves to an ice-water bath. This “shocks” the cooking process to a halt, preserving the texture and the vibrant hue.
The Recipe Card
Prep time: 15 mins | Cook time: 15 mins | Servings: 4
Course: Side Dish | Cuisine: North Indian (Dhaba Style)

Ingredients:
1 Large Bunch Fresh Palak (Spinach): Cleaned and washed thoroughly.
The “Lehsun” (Garlic): 15-20 cloves total. (10 cloves ground into the paste, 5-10 sliced for the final tempering).
The Base Paste: 2 Tomatoes, 2 tbsp Roasted Peanuts, 1 inch Ginger, and 2 Green Chillies.
Thickener: 2 tbsp Besan (Gram Flour)  this provides a rustic “Dhaba” heartiness without the need for cream.
Fat: 2 tbsp Ghee (Clarified Butter) for the richest aroma.
Spices: ½ tsp Cumin seeds (Jeera), a pinch of Hing (Asafoetida), ½ tsp Turmeric, 1 tsp Coriander powder, and Salt to taste.
Instructions:
Prep the Green: Blanch and shock the spinach as described above. Grind half of the spinach into a smooth puree and roughly chop the other half to maintain texture.
The Base: Blend the tomatoes, peanuts, ginger, and 10 garlic cloves into a smooth “Red Puree”.
Sauté: Heat 1 tbsp oil in a kadai. Add cumin and hing. Once they splutter, add the Red Puree and cook until the oil starts to separate.
The Nutty Secret: Add the besan (gram flour) and sauté for 2 minutes until it smells aromatic and nutty.
Combine: Add the spinach puree, the chopped leaves, and the dry spices. Add ½ cup water to adjust the consistency. Cover and simmer for 3-5 minutes so the flavors meld.
The Final “Lehsuni” Tadka: This is the soul of the dish. Heat ghee in a small pan. Add the sliced garlic and fry until it turns deep golden brown (not black). Add a broken dry red chili.
Serve: Pour this sizzling garlic ghee over the spinach and serve immediately with hot Rotis or Makki ki Roti.


The “Pinch of Thrift” Tip (Zero Waste)
The Stem Stock: Don’t discard the fibrous spinach stems! In 2026’s “Use-Up” economy, we value every scrap.[3] Finely chop the tender stems and sauté them along with your onions or tomatoes. They add a wonderful crunch and a concentrated dose of fiber fitting perfectly into the “Fiber Revolution” trend.