Street Foods

Authentic Tandoori Chicken Recipe: A Punjabi-Mughlai Classic

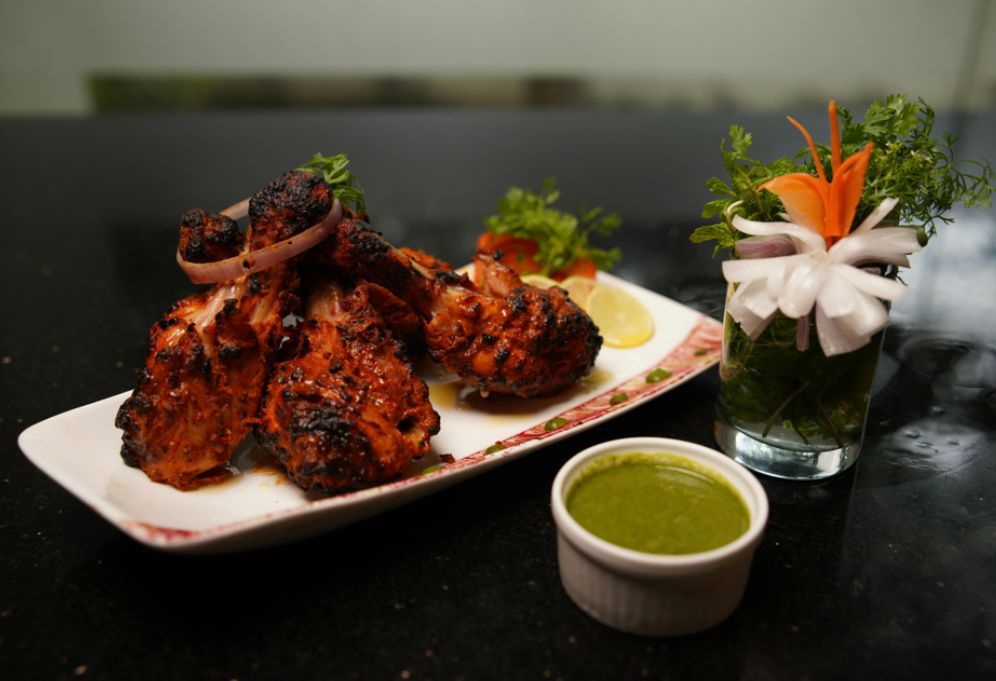
Tandoori Chicken – marinated in yogurt and spices, then grilled to smoky perfection – is a star of North Indian cuisine.  Its vibrant red color and charred edges come from a blend of yogurt, Kashmiri chili, ginger, garlic and aromatic spices, all enhanced by the traditional tandoor (clay oven) cooking method.  This dish straddles Mughlai opulence and Punjabi flavor: yogurt-based marinades were a hallmark of Mughal kitchen feasts, and yet tandoori chicken became a Punjabi specialty after being popularized at legendary eateries like Delhi’s Moti Mahal.  Today it’s celebrated at weddings, festivals, and family gatherings across North India.  Our recipe stays true to tradition – two-stage marinade, high-heat grilling (oven or stovetop), and a final smoky finish – for juicy, tender chicken that truly transports you to a festive Indian table.

I still remember the first time I prepared this recipe at home for Diwali: the moment the chicken hit the hot grill, the air filled with a mouthwatering, smoky aroma that drew everyone out of the kitchen.  As the family gathered around the platter, lemon wedges in hand, the golden-red drumsticks came off the grill with perfect char marks.  There’s something deeply nostalgic about tandoori chicken – it was always the proud centerpiece of my grandmother’s celebrations, and recreating it at home still feels like passing on a beloved tradition.

Ingredients

Chicken: 2–3 lbs bone-in chicken legs or thighs (drumsticks & thighs). These cuts have enough fat to stay moist and juicy.

Yogurt & Dairy: 1 cup thick yogurt (dahi), strained or Greek (for thick marinade). Yogurt tenderizes the meat and adds tang.

Citrus: Juice of 1–2 lemons (adds tang and helps tenderize).

Aromatics: 2–3 tablespoons ginger-garlic paste (or finely minced).

Spices: 2–3 tablespoons Kashmiri red chili powder (for color and mild heat), 1 teaspoon turmeric powder, 1 tablespoon roasted cumin powder, 1 tablespoon coriander powder, 2 teaspoons garam masala.

Others: 1–2 teaspoons salt (to taste), ¼ teaspoon black pepper, 1 teaspoon black salt (kala namak, optional), 2 tablespoons mustard oil (optional, for authentic flavor) or other neutral oil.

Charcoal (for smoke): A small piece of charcoal and 1 teaspoon ghee (clarified butter), for the final “dhungar” smoking (optional but recommended).


Marinade – Two Stages

The secret to super-tender, flavorful tandoori chicken is double marination.  Marinate the chicken twice: first quickly with acidic ingredients, then deeply with the full spice-yogurt mixture.

First Marinade: Combine 2 tablespoons ginger-garlic paste, juice of 1 lemon, 2 tablespoons Kashmiri chili powder, and salt. Whisk into a smooth paste. Massage the chicken pieces with this mixture so they are evenly coated. Cover and refrigerate for 30–45 minutes (this lets the lemon juice and salt begin tenderizing the meat).

Second Marinade: Meanwhile, make the yogurt-spice mix. In a bowl whisk together 1 cup thick yogurt, 1 tablespoon roasted cumin powder, 1 tablespoon coriander powder, 2 teaspoons garam masala, the remaining Kashmiri chili, ¼ teaspoon black pepper and black salt, and 2 tablespoons mustard oil. The mustard oil adds authentic bite (many Punjabi chefs swear by it).  Add any leftover ginger-garlic from the first marinade if desired. Once the first marinade is done, transfer the chicken into this yogurt mixture and coat thoroughly.  Cover and refrigerate overnight or at least 6–8 hours (up to 24 hours is fine) to let the yogurt and spices deeply infuse the meat. Yogurt acts as a meat tenderizer and flavor carrier, ensuring each bite is tender and tangy.


The two-step process — first bright citrus, then rich spiced yogurt — really makes the meat melt-in-your-mouth.  If you’re in a hurry, a single long marination (overnight) will still work, but the double marinade yields the softest, most flavorful chicken.

Tip: When marinating, pierce the chicken in a few places with a fork or make small slits so the marinade penetrates deeply. Remove the chicken from the fridge about 30 minutes before cooking to bring it to room temperature.

Cooking – Tandoor, Oven or Grill

Traditionally, tandoori chicken is cooked at very high heat in a clay tandoor oven (which gives it its characteristic char and smoke).  You can mimic this at home using your oven broiler, grill, or a stovetop grill pan. Regardless of method, preheat to a high temperature (around 220°C/425°F for oven, or hot grill pan).

Oven Method: Line a baking sheet with foil and arrange the chicken pieces on a rack. Grill/bake at 220°C for about 20–25 minutes. Then switch to broil (or a hotter setting) for an additional 5–7 minutes to get a charred crust. Turn the pieces halfway so both sides get nicely browned. Always check that the internal temperature reaches 165°F (74°C) for safety.

Stovetop Grill/Pan: Heat a heavy grill pan or cast-iron skillet over medium-high. Brush it lightly with oil so the chicken doesn’t stick. Place the chicken on the hot grill and cover if possible. Cook 8–10 minutes per side, turning occasionally, until the juices run clear and edges are charred. For an extra smoky flavor, after one side is done, flip to cook the other side with the pan lid on so steam and smoke infuse the meat. Flip again to finish. The goal is a slight char on the outside while remaining juicy inside.

Charcoal Smoked “Dhungar” (optional): For authentic smoky aroma, use the dhungar method. Heat a small piece of charcoal on a flame until red-hot. Place it in a small metal bowl and set the bowl on top of (or next to) the cooked chicken. Pour 1 teaspoon of ghee over the hot coal, and immediately cover the chicken or oven to trap the smoke. Let it smoke for 5–8 minutes. This “smoking” step can be done just before or right after cooking and gives the chicken that classic tandoor-smokiness.


Whether you use oven or pan, remember that real tandoors cook incredibly fast at extreme heat, so a quick flash under a broiler or on a hot flame is key to getting charred edges without drying out the meat.

Garnish & Serve

Once the chicken is cooked through with beautiful char marks, transfer it to a platter. Garnish with thinly sliced red onion rings and fresh cilantro sprigs. Serve with lemon wedges – a squeeze of lime brightens the smoky flavors. No Punjabi platter is complete without naan or roti – soft flatbreads perfect for scooping up the chicken. (As one food blogger notes, *“Serve your tandoori chicken with a stack of naan bread for a filling meal.”*.)

Accompany the chicken with cooling dips: a vibrant green coriander-mint chutney (made of cilantro, mint, green chilies, lemon, and yogurt) is a classic pairing.  The tangy, herby chutney is often called an “unbeatable combo” for grilled chicken. You can also offer a simple onion raita (yogurt mixed with diced onion, cucumber and a pinch of cumin) to balance the heat. Arrange everything on the table – lemon wedges, naan, chutney and raita in small bowls around the platter – and let guests help themselves. The colorful presentation and interplay of smoky, spicy chicken with fresh garnishes is what makes tandoori chicken a crowd-pleaser at any gathering.

Enjoy this Tandoori Chicken hot from the oven or grill, just as it would come from the tandoor, and watch as your family and friends gather around – drawn together by that irresistible smoky aroma and rich flavor of this true North Indian classic.

Lunch & Dinner

Dum-Style Hyderabadi Vegetable Biryani

Dum-style Hyderabadi Vegetable Biryani is more than just a dish—it’s a warm hug from the kitchen. I still remember festive Sundays at my grandma’s house when a sealed handi of biryani would slowly cook on the stove, infusing the whole home with saffron, spices, and the scent of caramelized onions. Biryani was traditionally reserved for celebrations, and as it cooked under a dough-sealed lid, the anticipation built. Every time I lift that lid now, I’m taken back to those childhood moments and smiling faces around the table. The blend of fragrant rice, spiced vegetables, and herbs makes every bite nostalgic and comforting.

Ingredients

For the Rice

2 cups long-grain basmati rice (soaked 30–45 minutes)

4–5 cups water

3–4 whole spices (bay leaves, cinnamon sticks, cardamom pods)

1 tsp caraway (shahjeera) or cumin seeds

1 tbsp ghee or oil

Juice of ½ lemon (to help keep rice grains separate)

Salt, to taste


For the Vegetable Marinade

1 cup plain yogurt (dahi)

2 tbsp ginger-garlic paste

2–3 green chilies, finely chopped

1 tsp chili powder

½ tsp turmeric powder

2 tsp garam masala (or biryani masala)

1 tsp coriander powder

Juice of 1–2 lemons

Salt, to taste

¼ cup fried onions (birista)

¼ cup chopped mint leaves

¼ cup chopped cilantro (coriander leaves)


Vegetables (about 1.2–1.5 kg total)

2 potatoes, cut into 1½-inch cubes

1 cup cauliflower florets (gobi)

1 cup carrot, chopped

1 cup green beans or French beans, chopped

1 cup green peas (fresh or frozen)

1 capsicum (bell pepper), cut into strips

(Optional: mushrooms, capsicum – for variation)*


For the Saffron-Milk Layer

10–15 saffron strands (soaked)

¼ cup warm whole milk (to steep saffron)

Few drops of rosewater (optional, for aroma)

2–3 tbsp ghee or melted butter


Method

1. Marinate the Vegetables. In a large bowl, whisk together yogurt, ginger-garlic paste, chopped green chilies, lemon juice, chili powder, turmeric, coriander powder, garam masala, salt, chopped mint, and cilantro. Add the chopped vegetables (potatoes, carrots, beans, peas, cauliflower, bell pepper) and toss to coat them completely. Cover and let the veggies marinate for at least 15–30 minutes (even a quick 15-minute soak lets the spices meld).


2. Cook the Vegetable Masala. Heat 2 tablespoons ghee or oil in a heavy-bottomed pan over medium heat. Sauté sliced onions until golden brown – this caramelization (Maillard reaction) adds sweet, savory depth. Add a bit of salt to help them sweat. Stir in capsicum strips and fry briefly. Now pour in the marinated vegetables along with all the marinade. Stir well and cover the pan. Cook on medium heat for about 10 minutes, until the veggies are almost tender but still hold their shape. This forms your flavorful biryani base.


3. Parboil the Rice. Rinse the basmati rice under cold water until the water runs clear, then soak it for 30–45 minutes. In a large pot, bring water to a boil. Add whole spices (bay leaves, cinnamon, cardamom), a teaspoon of caraway or cumin, and a teaspoon of ghee for fragrance. Squeeze in lemon juice and salt. When the water boils vigorously, drain the soaked rice and add it to the pot. Cook the rice until it’s about 70–80% done – the grains should still have a slight bite. Drain the rice immediately to halt cooking (rice will finish in the dum).


4. Layer the Biryani. Grease the bottom of a heavy pot or handi with a little oil. Arrange a layer of tomato slices on the bottom – this traditional trick prevents sticking and adds moisture. Spread the cooked vegetable masala evenly over the tomatoes. Sprinkle half of the fried onions, mint, and coriander leaves on top of the veggies. Now add the rice in an even layer over the vegetables. Finally, top with the remaining fried onions, mint, and coriander.


5. Infuse with Saffron and Seal. Warm the milk in a small pan and steep the saffron strands in it (grinding the saffron first releases more color). Add a drop of rosewater if using. Gently pour the saffron-infused milk over the top of the rice, letting it seep through in golden rivulets. Drizzle the last bit of melted ghee or butter over everything. Seal the pot tightly with a heavy lid. Traditionally, a dough seal (chapati dough around the rim) locks in steam.


6. Dum Cook. Place the sealed biryani pot on a hot tawa (griddle) or directly on low heat. Cook on a gentle flame for about 20 minutes – this is the “dum” process. You’ll see a little steam trying to escape at the sides when it’s done. Turn off the heat and let the pot rest, unopened, for another 10–15 minutes (the flavors continue to meld, and the rice firms up). Avoid peeking too soon!


7. Serve with Accompaniments. Carefully mix (fluff) the rice and vegetables together just before serving. Serve this fragrant Dum Hyderabadi Vegetable Biryani hot, accompanied by cooling cucumber-mint raita and spicy Mirchi ka Salan (Hyderabadi chili-peanut curry). A simple kachumber salad of chopped cucumber, tomato, and onion (dressed with lemon) or crisp papadums make nice sides too.


Tips for Perfect Biryani

Choose and Prepare the Rice Right: Always use good-quality aged basmati rice – the longer it’s aged, the stronger and more fragrant its aroma. Soak the rice before boiling to keep grains fluffy. Add a splash of lemon juice and a little fat (ghee or oil) to the boiling water; this keeps the grains separate and non-sticky.

Caramelize Onions Thoroughly: Don’t rush the onions. Cook them until they are a deep golden-brown. The natural sugars caramelize, giving the biryani its rich sweetness and depth.

Layer Thoughtfully: Grease the pot and use tomato or potato slices at the base to prevent burning. Alternate layers: veg mix, then herbs/onions, then rice, then garnish. This ensures even flavor distribution and beautiful color marbling.

Seal and Cook on Dum: Seal the pot well with dough or tight foil – trapping the steam is key. Cook on the lowest flame possible to avoid scorching the bottom. A heavy-bottomed pot helps distribute heat gently.

Infuse with Saffron and Herbs: Don’t skip saffron! Soak strands in warm milk (or water) and sprinkle it over the rice for gorgeous color and aroma. A few drops of rosewater or kewra water can also add that authentic floral note.

Let it Rest: Once cooked, let the biryani sit off the heat for a while (still sealed). This resting period (even 10–15 minutes) lets the flavors settle and makes the rice absorb the steam fully. In fact, Hyderabadi biryani often tastes even better a bit later – it’s a true comfort food that evolves as it rests.

Spice Blend: Using freshly ground biryani masala or garam masala makes a difference. Fresh spices have more potency than store-bought powders.


Serving Suggestions

Cooling Raita: A dollop of cucumber-mint raita or boondi raita complements the heat of the biryani. The yogurt and cucumber cool your palate and add a creamy texture.

Mirchi ka Salan: A traditional Hyderabadi side, this spicy chili-and-peanut curry is almost synonymous with biryani. Its tangy, nutty flavor cuts through the rich rice.

Fresh Salad: A simple kachumber of chopped tomato, cucumber, and onion tossed with lemon and a pinch of salt adds freshness.

Pickles & Papad: Indian mango or lime pickle and crisp papadums are easy extras to round out the meal.


Why I Love It

This Dum-Style Veg Biryani holds a piece of my heart. It’s the family favorite on any special occasion or lazy weekend – from festive Eid lunches to relaxing Sunday dinners. I love that it’s a one-pot wonder that brings everyone together; while it’s cooking, the whole house fills with warm, inviting aromas. When I was little, I’d sneak into the kitchen just to catch a whiff of saffron and spices escaping the pot. Sharing the first bite with loved ones – rice steaming on your fork, crisp fried onions melting with every mouthful – feels like a celebration. It’s a humble dish that makes any day feel special, reminding me of home and warmth. Every time I make it, I taste those memories, and it never fails to make me smile.