
A Nostalgic Introduction
Growing up, Diwali prep in our home meant a day dedicated to making Besan Ladoos. I remember my grandmother patiently roasting the besan (gram flour) in ghee over a low flame, never rushing the process. As she stirred, the nutty aroma of the slow-roasting besan combined with fragrant cardamom would waft through the entire house, drawing everyone into the kitchen. We kids sat nearby, waiting eagerly for a chance to taste the warm mixture before it was shaped into balls. Those moments – the warmth of the kitchen, the heavenly aroma, and the family gathered around – remain some of my sweetest childhood memories.
Festival of lights & sweets: In India, no celebration is complete without sweets, and Diwali is the time for homemade treats. Diwali (also known as Deepavali, literally “a row of lights”) signifies the triumph of light over darkness and good over evil. It’s a time filled with lamps, love, and of course, delicious traditional snacks and sweets. In our family, after the diyas (oil lamps) were lit and firecrackers burst in the night sky, we would exchange platters of goodies with neighbors – with Besan Ladoos always taking center stage. Golden, rich, and redolent of ghee and cardamom, these melt-in-your-mouth sweet balls symbolized the sweetness of togetherness. Each bite brings back a flood of nostalgia – the laughter of cousins, the glow of oil lamps, and the comfort of home.
Besan Ladoo is a humble sweet made from just a few pantry ingredients, yet it carries a legacy of love and tradition. Besan (chickpea flour) is gently roasted in ghee (clarified butter) until it turns a light golden brown and exudes a nutty fragrance. This roasted besan is then sweetened with sugar and perfumed with crushed cardamom seeds to form a delectable dough. Finally, it’s rolled into round ladoos (meaning balls or truffles) that hold their shape once cooled. Whether made for a festive Diwali spread or simply as an everyday treat, besan ladoos have a way of bringing the family together – from the eldest grandparent relishing it with a cup of chai to the youngest child sneaking an extra one from the jar.
Ingredients
Minimal ingredients are needed to make these traditional ladoos – proof that simple things can be most delightful:
Besan (Gram Flour) – 2 cups, preferably fine grind (or ladu besan). This is the base of the sweet. (You can also mix half fine and half coarse besan for a slightly gritty texture, but fine besan yields a smooth, melt-in-mouth ladoo.)
Ghee (Clarified Butter) – 1/2 cup, plus 1–2 tablespoons extra if needed. This imparts richness and moisture, and is used for roasting the besan.
Sugar – 1 cup, powdered. Traditional recipes use boora or tagar (Indian unrefined sugar) for a slightly grainy texture, but regular powdered sugar works perfectly. Adjust the sweetness to taste.
Green Cardamom – 4–5 pods, seeds crushed (or 1/2 teaspoon ground cardamom). This adds the signature warm aroma.
Optional Add-ons: A pinch of saffron (for aroma and a festive touch of color), a grating of nutmeg, and chopped nuts (like pistachios or almonds) for garnish. These are optional and not needed for the basic recipe, but a few family recipes include them for extra flavor.
(Makes about 15–20 medium Besan Ladoos)
Step-by-Step Instructions
1. Roast the Besan: In a heavy-bottomed kadai (wok) or deep pan, melt the ghee on low heat. Add the besan to the warm ghee and begin roasting. Stir continuously with a spatula, using a gentle pressing motion to break up any lumps that form. Be patient and keep the heat low – the besan should slowly toast in the ghee, not fry. After about 10 minutes of stirring, you’ll notice the besan mixture loosening up and becoming light and fluffy. Continue roasting for another 10–15 minutes (20–25 minutes total) until the color turns light golden brown and a nutty aroma fills your kitchen. At this stage, you might see the ghee start to separate slightly from the besan, indicating it’s fully roasted and has released its flavors. (Pro tip: To check if the besan is roasted, sprinkle a few drops of water into the mixture – if it sizzles instantly and the water droplets evaporate leaving little bubbles, it’s done.) Take care not to let the besan brown too much or burn – lower the heat if needed, as undercooked besan can taste raw while overcooked besan can turn bitter.
2. Cool the Mixture: Once the besan is roasted to a golden color and aromatic, turn off the heat. Immediately transfer the hot besan-ghee mixture to a wide bowl to stop further cooking. Spreading it out a bit will help it cool faster. Let it cool down until it’s just warm (comfortable to touch but not hot), which takes around 10–15 minutes. This step is important – if you add sugar while the mix is too hot, the sugar might melt and make the mixture runny or grainy. Cooling it to lukewarm ensures we get a smooth final texture.
3. Add Sugar and Spice: When the roasted besan is warm (not hot), add in the powdered sugar and the cardamom powder (from crushed seeds). If using a pinch of saffron or ground nutmeg, or if you’d like to mix in any finely chopped nuts, add them now as well. With clean hands (or using a spatula), mix everything together thoroughly. It’s best to massage the mixture with your fingertips and palms – this helps the sugar and spices incorporate evenly into the besan. As you blend and press, you’ll notice the mixture turning into a sandy dough that holds shape when pressed (the warmth of your hands also helps the ghee to release slightly, binding the flour and sugar together). The mixture will start looking glossy and clumpy, which is a good sign that it’s ready to shape. (If you prefer, you can also pulse the mixture in a food processor for a few seconds to combine – but traditionally, hand-mixing is the way to go.)
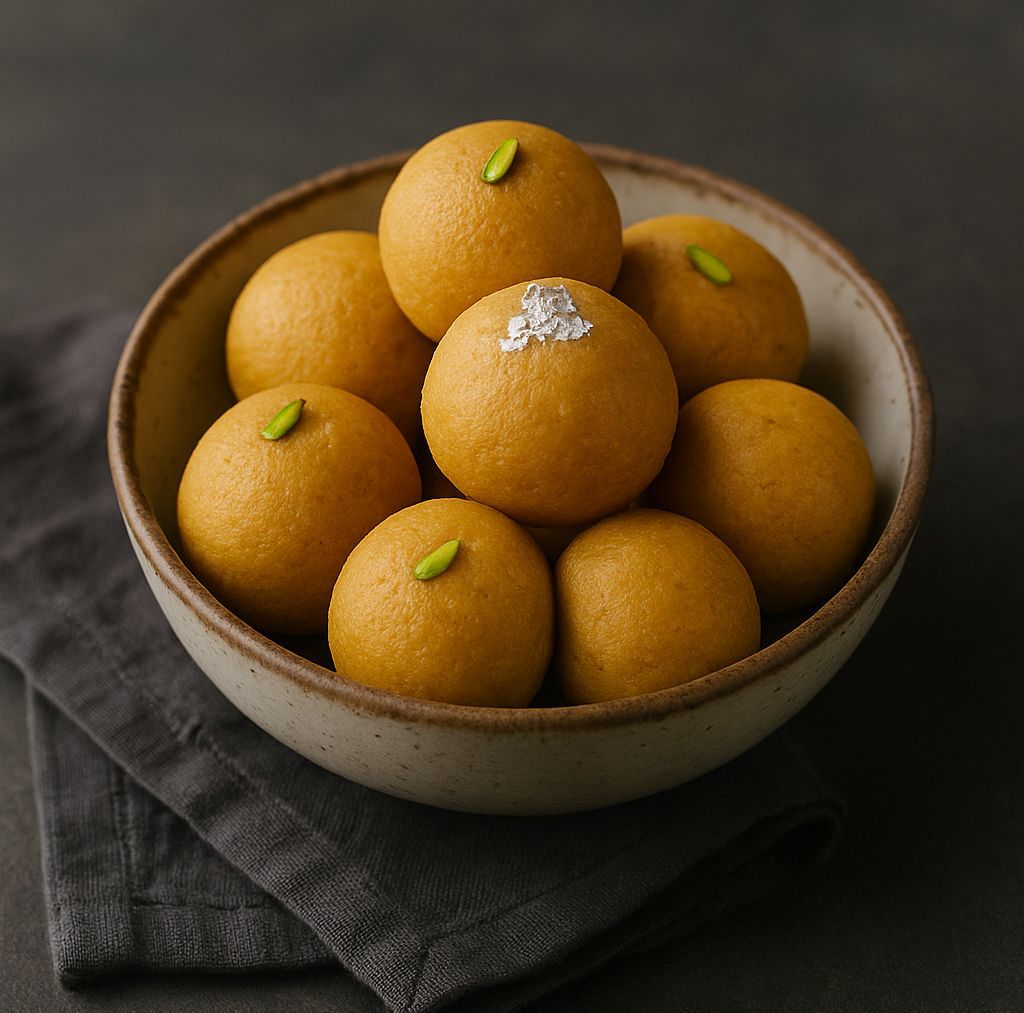
4. Shape into Ladoos: Now for the fun part – shaping the ladoos. Scoop a small portion of the mixture (about 2–3 tablespoons for a medium ladoo, or use a small cookie scoop for uniform size). Gently press and roll the mixture between your palms to form a round ball. The mixture might feel a bit loose at first, but as you press, it should come together. If it crumbles, press harder and it will bind (the ghee solidifying as it cools helps it stick). Shape all the ladoos this way. You should get roughly 15–20 Besan Ladoos from this recipe, depending on size. Place each formed ladoo on a plate or parchment-lined tray. If you like, press a single pistachio or raisin on top of each ball for garnish, or sprinkle a few strands of saffron – this is purely optional but adds a festive touch.
5. Cool and Store: Let the formed ladoos cool completely at room temperature. They will firm up as they cool. Once cooled, you can transfer them to an airtight container. If you can resist eating them all at once, store the ladoos in a cool, dry place. They stay fresh for about 1 to 2 weeks at room temperature. For longer storage, keep them in an airtight box in the refrigerator – they’ll last up to 2-3 weeks chilled. (Tip: If refrigerating, allow the ladoos to come to room temperature before serving, or warm them for 10 seconds in the microwave, so the ghee softens and they regain their melt-in-mouth texture.) Enjoy these ghee-rich delights as an offering to guests or an indulgent treat with your evening chai!
Tips for Perfect Besan Ladoos
Roasting: The key to flavorful besan ladoos is proper roasting. Use a heavy-bottomed pan and low heat, and stir continuously for an even roast. Rushing this step can result in a raw taste or a burnt bitter flavor. The besan is done when it turns golden, smells nutty, and has a light, fluffy texture. You can use the “water test” – sprinkle a few drops of water into the roasted besan; if it sizzles immediately and forms little bubbles, the besan is perfectly roasted. Patience here will reward you with the most aromatic, rich ladoos.
Binding (Mixing in Sugar): Always let the roasted besan cool to a lukewarm temperature before adding sugar. Adding sugar (especially powdered sugar) to very hot besan will cause it to melt and make the mixture too runny or sticky, which can ruin the texture. Once cooled, add sugar and spices and mix thoroughly. Use your hands to massage the mixture – this ensures the ghee, besan, and sugar are well combined and will bind properly when shaped. If the mixture feels too soft or greasy (perhaps the ghee was a bit much or the kitchen is very warm), you can add a couple of tablespoons of dry roasted besan (just roast a bit of besan separately) to fix the consistency. Conversely, if the mixture is too dry/crumbly and not holding together, mix in an extra spoonful of warm melted ghee (or a teaspoon of milk, though adding milk will shorten shelf life) to moisten it. The right consistency is achieved when a portion of the mixture pressed in your palm holds its shape without cracking.
Shaping: It’s easiest to shape the ladoos while the mixture is still warm (but not hot) – if it cools completely to room temp, it may become a bit stiff. While warm, the ghee is semi-liquid and helps the balls form smoothly. Take about 1.5–2 tablespoons of mixture and press it firmly between your palms to form a ball. If you notice the ladoo cracking as you shape, add a tiny bit more ghee or press a bit more firmly. You can lightly grease your palms with ghee to prevent sticking and to give the balls a nice sheen. Roll each ladoo until it’s smooth. Work in batches and if the mixture cools down too much mid-way, you can warm it slightly (for a few seconds in the microwave or covered in a warm place) to soften it again.
Storing: Store besan ladoos in an airtight container in a cool, dry place. They remain fresh and tasty for about 8–10 days at room temperature (in cooler weather, they can last even up to 2 weeks). If you need to keep them longer, refrigerate them – in the fridge they can last for 2 to 3 weeks without spoiling. Just make sure to bring them back to room temperature before eating, because the ghee in the ladoos can solidify when cold, making them harder; once they warm up, they’ll be soft and luscious again. (You can also briefly microwave refrigerated ladoos for 8-10 seconds to quickly soften them, but don’t overdo it, as they can break or release oil if too hot.) Properly stored, these ladoos stay fresh and flavorful, ready to grab whenever you need a sweet treat or to serve unexpected guests.
Serving Suggestions & Gifting Ideas
Besan Ladoos are a versatile sweet treat – you can enjoy them on any day or make them for special occasions. Here are some serving and gifting ideas to make the most of this delightful sweet:
Everyday Enjoyment: Serve these ladoos as an afternoon snack or dessert. In many Indian households, a ladoo with a cup of hot masala chai or a glass of warm milk is the ultimate comfort food. Their rich, nutty flavor pairs beautifully with a bitter-sweet cup of tea. You can also crumble a ladoo over vanilla ice cream for a fusion dessert or stuff one inside a warm chapati to make an impromptu sweet roll (a childhood trick for a quick treat!). Because they are energy-dense, one ladoo can satisfy those post-meal sweet cravings perfectly.
Festive Spreads: During festivals like Diwali, Holi, or family celebrations, arrange the besan ladoos on a decorative plate or in a traditional brass bowl. They hold their own among other sweets and snacks – the golden color and inviting aroma always attract guests. Besan Ladoos are often part of Diwali faral (the assortment of sweets and savories prepared for the festival) and are loved by all ages. You can also offer them as prasad (a blessed offering) during religious ceremonies or prayers. In fact, besan ladoo is a popular choice to give as prasad in Hindu temples and at pujas – it signifies sharing the sweetness of the divine. If you’re performing a Lakshmi Puja or any festive prayer at home, placing a few homemade ladoos as an offering to the deities is a beautiful way to invoke blessings.
Gifting: Homemade sweets make the best gifts, especially during festive seasons. To gift besan ladoos, place them in an attractive decorative box or jar. You can use colorful tissue paper or cupcake liners to separate the ladoos so they don’t stick to each other. Tie the box with a ribbon or attach a small note for a personal touch. In Indian culture, exchanging boxes of sweets during Diwali and weddings is a cherished tradition – it’s a way of sharing joy and goodwill. By gifting handmade besan ladoos, you’re not just giving a sweet treat, but also a bit of your love and effort. These ladoos travel well and won’t spoil easily, so they’re perfect for sending to relatives in other cities as well. Tip: Add a sprinkle of edible silver leaf (vark) on top of each ladoo to make them look truly festive and “gift-worthy.”
Warm, rich, and made with love – Besan Ladoos encapsulate the spirit of Indian festivities and family traditions. Whether you’re making them for a special occasion like Diwali, or simply to relive a grandmother’s recipe on a rainy afternoon, each bite is a celebration of flavor and nostalgia. So go ahead, try this slow-roasted, ghee-kissed besan ladoo recipe and share the sweetness with your loved ones. Happy cooking, and Shubh Deepavali (Have a blessed Diwali)! 🎇
Sources: Historical and recipe details have been adapted from family traditions and contemporary Indian home-cooking resources for authenticity. Cultural notes on Diwali and traditional methods referenced from Indian cooking blogs and Wikimedia Commons, and recipe technique tips are informed by expert home chefs. Enjoy your ladoo-making!


