Dessert

Doi Boondi: Bengali Sweet Curd with Crispy Boondi

For many Bengalis, Doi Boondi is more than just a dessert – it’s a spoonful of nostalgia. In festive times like Durga Puja or wedding feasts, families gather to end the meal on a sweet note. Even Bollywood star Prosenjit Chatterjee fondly recalls “boondi aar doi” (boondi with curd) as “the best sweet dish” of his childhood. Boondi sweets are so woven into Bengali tradition that golden fried boondi is offered as prasad in many Durga Puja celebrations. Each bite of Doi Boondi – creamy yogurt swirled with syrupy boondi balls – evokes memories of home kitchens, summer gatherings, and the soft click of Bengali click-clacks at the dinner table.

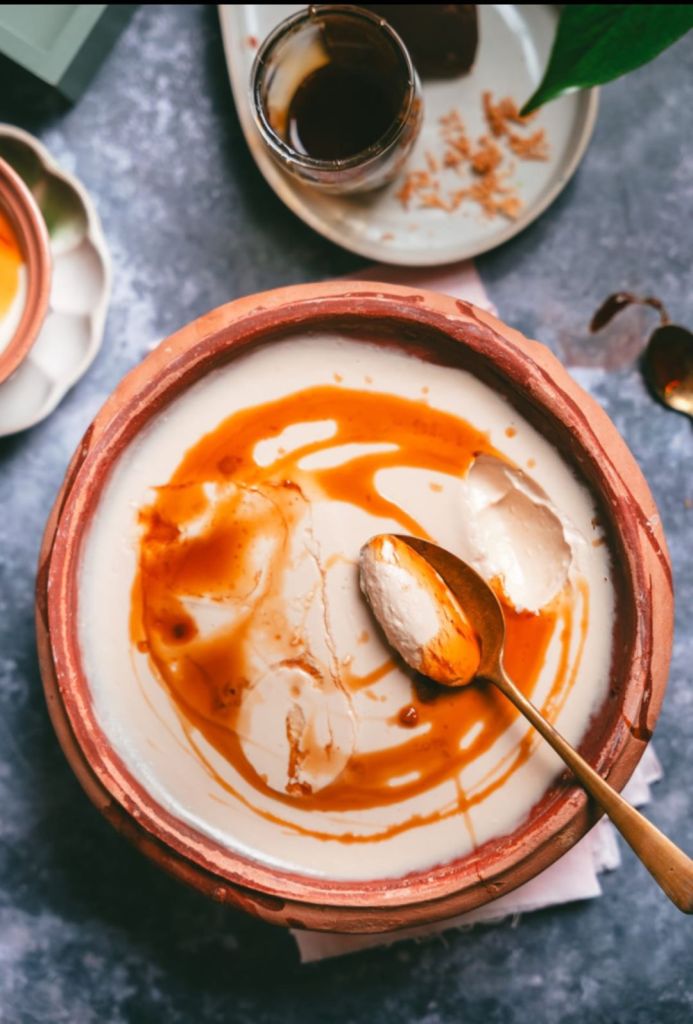
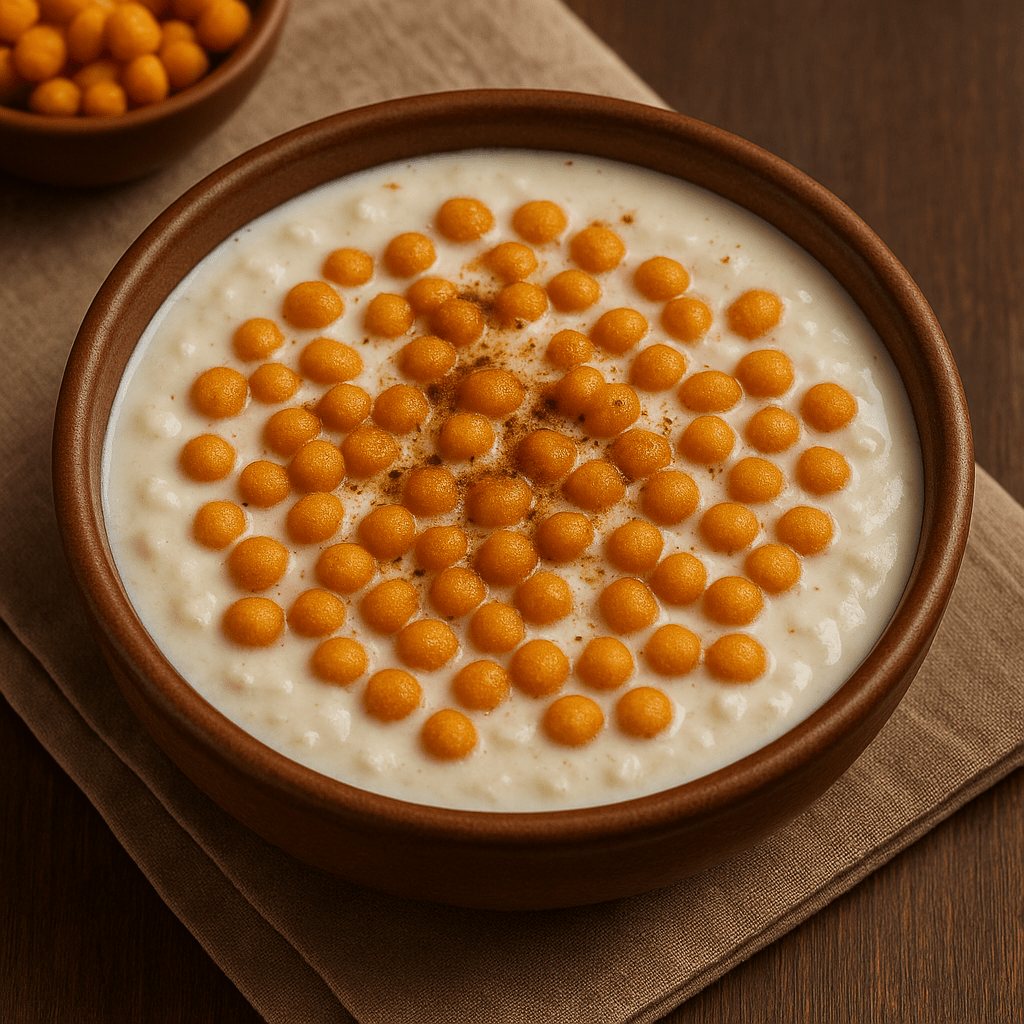
This festive bowl of sweetened curd with crispy boondi is often served chilled, garnished with nuts and rose petals for color. The curd (doi) is lightly sweetened and infused with warm spices, then layered with soft, golden boondi. A hint of cardamom or saffron in the curd gives it a rich aroma. Tradition says to set the sweet curd in an earthen pot (matka) – the porous clay lets extra whey evaporate, yielding a thicker, silkier mishti doi. The result is a cool, refreshing dessert that perfectly balances sweet and tangy flavors.

Ingredients

For boondi: 1 cup besan (gram flour), pinch of baking soda, water (to make a batter), oil or ghee for deep frying.

For sugar syrup: 2 cups sugar, 1½ cups water, 4–6 green cardamom pods (crushed).

For sweet curd (doi): 3 cups plain whole-milk yogurt (use full-fat yogurt for a rich curd), ½ cup sugar (or to taste), a pinch of saffron strands (optional), 3–4 cardamom pods (crushed).

Garnish (optional): Chopped almonds, pistachios or cashews; a few rose petals for color.


Tip: Always use full-fat milk or whole-milk yogurt. As one recipe notes, diluted or low-fat milk yields a runny curd, while full-fat milk gives the thick, creamy texture that Doi Boondi deserves. Setting the sweet curd in an earthen pot will also help absorb moisture and thicken it.

Preparation Steps

1. Make the boondi: Sift the besan and baking soda together. Gradually whisk in water to form a smooth batter (consistency like heavy cream). Heat oil or ghee in a deep kadai or pan. Hold a perforated ladle (boondi jhara) about 3–5 inches above the oil, pour the batter through it, and gently agitate so tiny droplets fall into the oil. Fry the boondi in batches: golden (about 30–40 seconds) is ideal – do not overcook, or they will become too hard. Drain on paper towels. Repeat until all batter is used.


2. Prepare the sugar syrup and soak: In a clean pan, combine sugar and water and bring to a boil. Let it boil 3–4 minutes until just syrupy (keep it thin rather than one-string consistency). Add the crushed cardamom pods. Turn off the heat and immediately stir in the fried boondi; mix well. Cover the pan and let the boondi soak for at least 1 hour at room temperature (or leave overnight). Stir gently every 15–20 minutes if possible. The boondi will plump up as they absorb the sweet syrup.


3. Sweeten the yogurt: While the boondi soaks, make the flavored curd. In a bowl, whisk the yogurt until smooth. Dissolve the sugar in a few tablespoons of warm milk and stir this syrup into the yogurt. (If using saffron, soak it in a tablespoon of warm milk first, then mix in – this gives a lovely color and aroma.) Add a pinch of cardamom. For an extra-thick mishti doi, pour this sweetened yogurt into an earthenware bowl, cover, and let it set in a warm place until firm (often 6–8 hours). Then chill until cold.


4. Assemble the dessert: In serving bowls, spoon some of the sweet curd and top with 2–3 tablespoons of the soaked boondi. You can layer or simply mix them. Cover the bowls and refrigerate for at least 1–2 hours before serving to let the flavors meld and the boondi soften.


Tips and Tricks

Balance the sweetness: Since both the syrup and the curd add sugar, taste the yogurt mixture before setting it. You may use slightly less sugar in the curd if the boondi are very sweet.

Syrup consistency: Keep the sugar syrup on the thinner side. A slightly runny syrup ensures the boondi absorb it well and don’t become overly cloying.

Spices: A pinch of ground cardamom and a few threads of saffron go a long way. One recipe instructs to add cardamom and saffron to the milk-yogurt mix for richness. The gentle perfume of these spices is classic in Bengali desserts.

Frying boondi: Fry quickly on medium heat. As noted, removing the boondi when they’re just golden (and still slightly soft) ensures they won’t turn rock-hard after soaking.

Thick curd: Use full-fat yogurt or whole milk to start. Setting the sweet curd in clay (or an earthenware pot) yields a smoother, drier mishti doi as excess whey seeps into the porous pot.

Chill it: Always serve Doi Boondi chilled. Refrigerate it well (at least 1 hour, preferably 2–3 hours) before serving for the best creamy texture and flavor.


Clay cups and bowls are traditional for serving mishti doi (sweet curd) in Bengal. Serving Doi Boondi in these earthen pots keeps it cool and allows excess moisture to evaporate. Garnish each portion with chopped nuts and rose petals for a festive look.

Serve in small clay cups (matkas) for authenticity. The earthenware not only looks charming but also helps the curd set firm by wicking away extra water.

Before serving, top each bowl with chopped pistachios or sliced almonds and a few rose petals. These touches add color and a hint of crunch or floral aroma to the creamy dessert.

Doi Boondi makes a perfect finale to a spicy Bengali meal. It’s also lovely after lunch on a hot day – the cool yogurt and soft boondi is very refreshing.


By blending homemade sweet yogurt with melt-in-your-mouth boondi, you get a dessert that is simple yet heartwarming. Whether it’s Durga Puja, a family wedding feast or a lazy summer afternoon, a chilled bowl of Doi Boondi – garnished with nuts and flowers – brings everyone to the table with a smile.

Dessert

Bengali Jilapi (Jalebi) Recipe

Introduction

I still remember celebrating Eid as a child in Dhaka, waking to the smell of frying Jilapi (Bengali jalebi) in my grandmother’s kitchen. My eyes would light up at the sight of hot, coiled sweets – each spiral glistening with sweet syrup. Jilapi (Bengali for jalebi) is a beloved treat in Bengali culture, enjoyed at festivals and street stalls alike. It turns up at weddings, Eid, Durga Puja and other celebratory occasions. In fact, one reference notes that people in Bengal share sweets during Durga Puja, Lakkhi Puja, marriages and more as a way to spread happiness.  Jalebi (In Bengali: jilapi) is traditionally made by deep-frying a wheat-flour batter in pretzel-like spirals and then soaking them in sugar syrup. This spiral dessert is crisp on the outside and sticky-sweet inside – exactly the kind of treat that makes Bengali festivals feel complete.

Ingredients

All-purpose flour (maida): 1 cup (about 125 g)

Gram flour (besan): 2 tablespoons (optional; adds crunch)

Semolina (suji/rava): 1–2 tablespoons (optional, for extra crispness)

Turmeric powder: a pinch (for color)

Plain yogurt: ½ cup (for fermentation; or ½ cup water for instant batter)

Baking powder or baking soda: ½ teaspoon (for the quick method)

Oil or ghee: for deep frying

For the sugar syrup: 2 cups sugar, 2 cups water, a pinch of saffron strands, 4–5 green cardamom pods (or ¼ teaspoon cardamom powder), and 1 teaspoon lemon juice.

Optional garnishes: nuts (pistachios, almonds) or fresh milk/rabri.


Preparation

1. Prepare the batter: In a bowl, whisk together the all-purpose flour, gram flour (or semolina), turmeric and a pinch of baking powder if you are making instant Jilapi. Stir in the yogurt and enough water to form a thick but pourable batter. Beat or whisk thoroughly until smooth. The batter should flow easily but not be very runny.


2. Ferment (traditional) or rest (quick): For a traditional jilapi, cover the batter and let it rest at room temperature for 12–24 hours. The batter should develop a slight sour aroma from the yogurt. For a quicker version, add ½ teaspoon baking soda or baking powder now and skip the resting period. (The leavening will make the coils fluffy.)


3. Make the sugar syrup: Combine the sugar and water in a saucepan. Bring to a boil and simmer until the syrup reaches a single-string consistency (test by dipping a fingertip – a drop of syrup should form a thin thread between your fingers). Remove the pan from heat and stir in the saffron strands, crushed cardamom, and lemon juice. Keep the syrup warm while you fry the jilapi.


4. Heat the oil: In a deep pan or kadhai, heat oil or ghee over medium heat (around 160–170°C). If using neutral oil, add a tablespoon of ghee for extra richness and flavor. The oil should be hot enough that a drop of batter sizzles and rises immediately, but not so hot that the jilapi browns too fast.


5. Fry the coils: Pour the batter into a squeezable bottle or piping bag (or a sturdy ziplock bag with a small corner snipped off). Pipe out spirals or concentric circles directly into the hot oil. You can start from the center and spiral outward, or make loose coil rings. Fry the spirals on medium heat until they turn a deep golden-orange (they will puff up slightly). Fry one test jalebi first: if it puffs up into a thick soft spiral, your batter was too runny – add a little more flour. If it forms a thin, crispy disk, it was too thick – loosen it with a bit of water. Adjust as needed and fry the rest of the batch, turning so they brown evenly.


6. Soak in syrup: As soon as the coils are fried, transfer them to the warm sugar syrup. Make sure the syrup is warm, not boiling hot – very hot syrup will make the jilapi too soft. Let the jilapi soak for about 2–3 minutes, then remove with a slotted spoon, allowing excess syrup to drip off.


7. Serve: Serve the Jilapi hot or warm on plates. They will still be crisp on the outside and gooey inside. (See serving suggestions below for pairing ideas.)


Tips for Perfect Jilapi

Batter consistency: Aim for a batter that is fairly thick but free-flowing. As one recipe notes, “the consistency of the batter must be free-flowing yet thick” for crisp, springy coils. Adjust with small amounts of water or flour while mixing.

Piping and shape: Using a sauce bottle or cloth bag makes it easier to pipe uniform spirals. Hold the bottle close to the oil surface to minimize splatter.

Oil temperature: Fry on medium heat. If the oil is too cool, the jilapi will absorb oil and turn heavy; if too hot, they brown too quickly. You should be able to control a steady sizzle.

Syrup and soaking: Always use warm (not boiling) syrup. Test for “single-string” consistency, and stir in a little lemon juice or saffron as shown. Soak the fried jalebis for only 2–3 minutes; prolonged soaking or overly hot syrup will make them lose their crispness.

Prevent crystallization: A squeeze of lemon juice in the syrup helps keep it from crystallizing. If the syrup cools or crystallizes before soaking, gently reheat it.

Spiral perfection: If a spiral breaks or spreads, adjust batter thickness (add flour or water as mentioned) and try again. With practice, you’ll get the circular shape more uniform.


Serving Suggestions and Variations

Enjoy hot: Bengali Jilapi is traditionally eaten hot or warm. As one source notes, it can be served plain – but in some regions it’s also enjoyed with accompaniments like sweetened condensed milk (rabri), milk or yogurt.

With breakfast: In Bengal, crisp hot jilapi are even eaten alongside semolina pudding or sweet curd (mishti doi) for breakfast.

Garnishes: For a festive touch, serve sprinkled with slivered pistachios or almonds, or garnish the serving plate with fresh rose petals (a Bengali tradition for sweets).

Chanar Jilapi (paneer jalebi): A popular Bengali variant uses fresh chhena (cottage cheese) in the batter. This chhena-based jilapi (often shaped like knotted spirals) is a classic at Bengali sweet shops, with a richer, denser texture.

Sweeteners: You can swap refined sugar for date-palm jaggery (nolen gur) in the syrup for a seasonal twist – it turns the jalebi brownish and gives a caramel-like flavor.

Storage: Leftovers can be gently reheated in a low oven or skillet to regain crispness. However, jilapi are best eaten within a few hours while still crisp and warm.


Enjoy making and sharing this golden spiral sweet – a Bengali festival classic that never fails to spread joy!

Dessert

Mishti Doi: A Nostalgic Bengali Yogurt Dessert

Image: A bowl of creamy mishti doi in a traditional clay pot, drizzled with a swirl of date-palm jaggery. One spoonful of this chilled sweet yogurt instantly transports me back to Durga Puja mornings at my grandparents’ home. In those festive days, the puja lunch always ended with Mishti Doi – its rich, creamy texture and caramel notes felt like a blessing after the feast. In Bengal, this dessert is more than a treat; it’s part of the tradition. No Puja or family gathering is complete without mishti doi – “a must-eat dessert in Durga Puja celebrations” – and each earthen pot of it seems to hold a sweet memory. The yogurt ferments slowly and takes on a pale brown hue, its flavor deepened by the fragrant nolen gur (date palm jaggery) or sugar used, making every bite a soulful taste of home.

Ingredients

Whole milk (full-fat) – 1 liter. Full-fat dairy yields the richest, creamiest texture. (You may add ½ cup cream for extra richness.)

Sweetener: ½–1 cup white sugar or ~1 cup grated nolen gur (date palm jaggery). Nolen gur is harvested in winter and gives a caramel-like aroma and flavor unique to Bengali sweets. (Choose sugar for a more neutral sweetness or nolen gur for an authentic winter twist.)

Yogurt starter (curd culture) – 2–3 tablespoons of plain yogurt. It should be thick and whole-milk; strain it through a cloth to remove excess whey so the mishti doi sets firm.

Optional flavorings: A pinch of saffron strands or ¼ tsp ground cardamom for aroma; chopped pistachios or almonds for garnish. These add a festive color and fragrance but aren’t strictly necessary.


Method

1. Heat and reduce the milk: In a heavy-bottomed pan, pour the milk (and cream if using) and warm it on medium heat. Stir often so the milk doesn’t scorch. Let it simmer for about 5–10 minutes until it reduces slightly and a light layer browns at the bottom. (This gentle reduction caramelizes the milk sugars, deepening the flavor.)


2. Add the sweetener: If using sugar, sprinkle it in and stir until it dissolves; you can allow it to turn a light amber by cooking gently first. If using jaggery (nolen gur), grate or break it into small pieces, add to the milk, and stir over low heat until fully melted. The milk will take on a golden-amber hue.


3. Cool the milk mixture: Remove the pan from heat and let the sweetened milk cool until it is just lukewarm – test with a clean finger to make sure it’s warm but not hot. This step is crucial: if the milk is too hot, it will kill the yogurt cultures.


4. Mix in the yogurt: Place the thick yogurt starter in a bowl and whisk in a few spoonfuls of the warm milk to temper it. Then pour the tempered yogurt into the rest of the milk and whisk gently until completely smooth. The mixture should be even and without lumps.


5. Set in containers: Lightly grease small clay pots (or heavy ramekins) with a bit of ghee or a smear of yogurt. Pour the milk–yogurt mixture into the pots. Cover each pot with a lid or foil, then wrap them in a warm towel or blanket. Leave the pots in a warm, undisturbed spot to ferment. In a warm kitchen, this takes 8–12 hours; if it’s cool, it may take up to 24 hours (you can turn on the oven light or use a warm oven as described in some recipes).


6. Chill and enjoy: Once the yogurt has set and become firm (it will have a caramel color), move the pots to the refrigerator and chill them for a few hours. Chilling stops fermentation and makes the mishti doi extra refreshing. When ready to serve, optionally drizzle a little melted jaggery or sprinkled nuts on top.


Tips for Creamy, Caramel Flavor and Perfect Fermentation

Full-fat milk and thick culture: Always use full-cream milk (or add some cream) for a luxuriously smooth mishti doi. Use a thick yogurt strain (low-fat milk often yields a runny set).

Caramelizing: Let the milk simmer long enough to develop a light brown color on the bottom of the pan. This imparts a natural caramel note even before you add sweetener.

Gentle temperature: Never add yogurt starter to piping-hot milk. Cool the milk to lukewarm (finger-warm) first. This preserves the bacteria so the curd can set.

Strain the yogurt: Drain the starter yogurt through cheesecloth for 30–60 minutes to remove excess liquid. Thicker starter means thicker final mishti doi.

Use earthen pots: Traditional clay pots absorb moisture and keep the mixture at just the right temperature, giving a uniquely earthy aroma and thick texture. If you can’t find clay, glass or ceramic will work.

Be patient: Mishti doi takes longer than plain curd to set. Plan for at least 8–12 hours. In cooler climates, place the pots in a warm spot (or inside the oven with just the light on) to help fermentation.

Serving Suggestions

Image: A garnished serving of mishti doi – creamy sweet yogurt topped with slivered nuts and saffron. Mishti Doi is traditionally enjoyed chilled at the end of a celebratory meal. It’s the perfect finale to a festive Bengali thali or Durga Puja feast. In Bengal, families often exchange clay pots of mishti doi as gifts during Puja, symbolizing sweet blessings. It also makes a lovely cooling summer dessert – a simple spoonful of chilled mishti doi is wonderfully refreshing on a hot day. Serve it plain, or sprinkle with chopped pistachios, rose petals or a pinch of extra saffron. Some modern twists include garnishing with fresh fruits (mango, berries) or a crumble of granola for texture. No matter how you present it, this creamy yogurt brings a sweet, soulful touch to any meal – a testament to Bengal’s rich dessert heritage.

Dessert

Rosogolla – Spongy Pearls of Syrupy Bliss


🍥 When One Sweet Becomes a Memory

White.
Soft.
Gentle.
But unforgettable.

Rosogolla is not flashy. It doesn’t crackle or crunch.
It melts. It floats. It absorbs syrup and affection alike.
Bengal’s pride, and every sweet lover’s soft spot.

Made with fresh chenna, shaped into round dumplings, and boiled in sugar syrup until they puff up like snowballs — this is a sweet you don’t just eat, you surrender to.


🛒 What You’ll Need (Makes 10–12 rosogollas):

1 liter full cream milk

2 tbsp lemon juice (or vinegar) + 2 tbsp water

1½ cups sugar

4 cups water

Few cardamom pods (optional)

1 tsp rose water or saffron (optional for aroma)

Ice cubes for setting chenna


🥄 How to Make It – With Patience, and a Little Love

1. Make the Chenna

Boil milk, then turn off heat. Add diluted lemon juice gradually, stirring gently.
When curds separate, strain immediately through a muslin cloth.
Wash under cold water to remove sourness. Squeeze lightly and hang for 30 minutes.

2. Knead the Magic

Place the chenna on a plate and knead gently for 8–10 minutes until smooth and soft — like a dough.
Make 10–12 smooth, crack-free balls.

3. Boil the Syrup

In a wide pan, boil 4 cups water + sugar + cardamom.
Once it boils, add the chenna balls gently. Cover and boil for 15–18 minutes.
They will puff up and double in size.

4. Cool and Rest

Turn off heat. Let them sit in syrup until completely cool.
Add rose water or saffron at the end, if using. Chill before serving.


❤️ Why Rosogolla Always Wins Hearts

It’s soft, light, and guilt-free compared to fried sweets

Every bite is a balance of milk and syrup

It celebrates simplicity

Because even without richness, it feels luxurious