summer Dish

Savory Pineapple Raita – A Creamy, Spiced Summer Delight

Some recipes aren’t just about taste — they’re about moments. One dish that always transports me back to sun-soaked summer holidays is pineapple raita. I remember the first time my mom brought a bowl of this creamy, golden-flecked raita to a family picnic. We’d gathered under the shade of our old mango tree, a feast of spicy biryani and hot parathas laid out, when she unveiled her special raita. At first, a pineapple in a savory yogurt dish seemed surprising – us kids exchanged curious glances. But one cool, tangy spoonful on that sweltering afternoon and we were hooked. The sweetness of the pineapple mingled with salted, roasted cumin and a whisper of chili was pure magic in the heat. Soon, that bowl was scraped clean, and a new family favorite was born.

Even today, whenever I make pineapple raita, it brings back those carefree summer memories. The kitchen fills with the scent of roasted cumin and fresh mint, and I can almost hear the chatter and laughter of those picnic days. Unlike the sweeter pineapple raitas you might have encountered, this version sticks to its savory roots. In Indian cuisine, raita (a yogurt-based side dish) can be either sweet or spicy-savory depending on the add-ins. Many pineapple raita recipes do include a spoonful of sugar for a sweet note, but my family always skipped it – the pineapple’s natural sweet-tartness was just right. In fact, you can simply leave out the sugar for a purely savory profile. What really makes this raita shine are the warm spices and herbs. A dash of roasted cumin and a pinch of kala namak (black salt) add an aromatic, tangy depth that turns simple yogurt and fruit into something extraordinary. If you’ve never tried a savory fruit raita, you’re in for a refreshing treat that might just steal the show at your next meal.

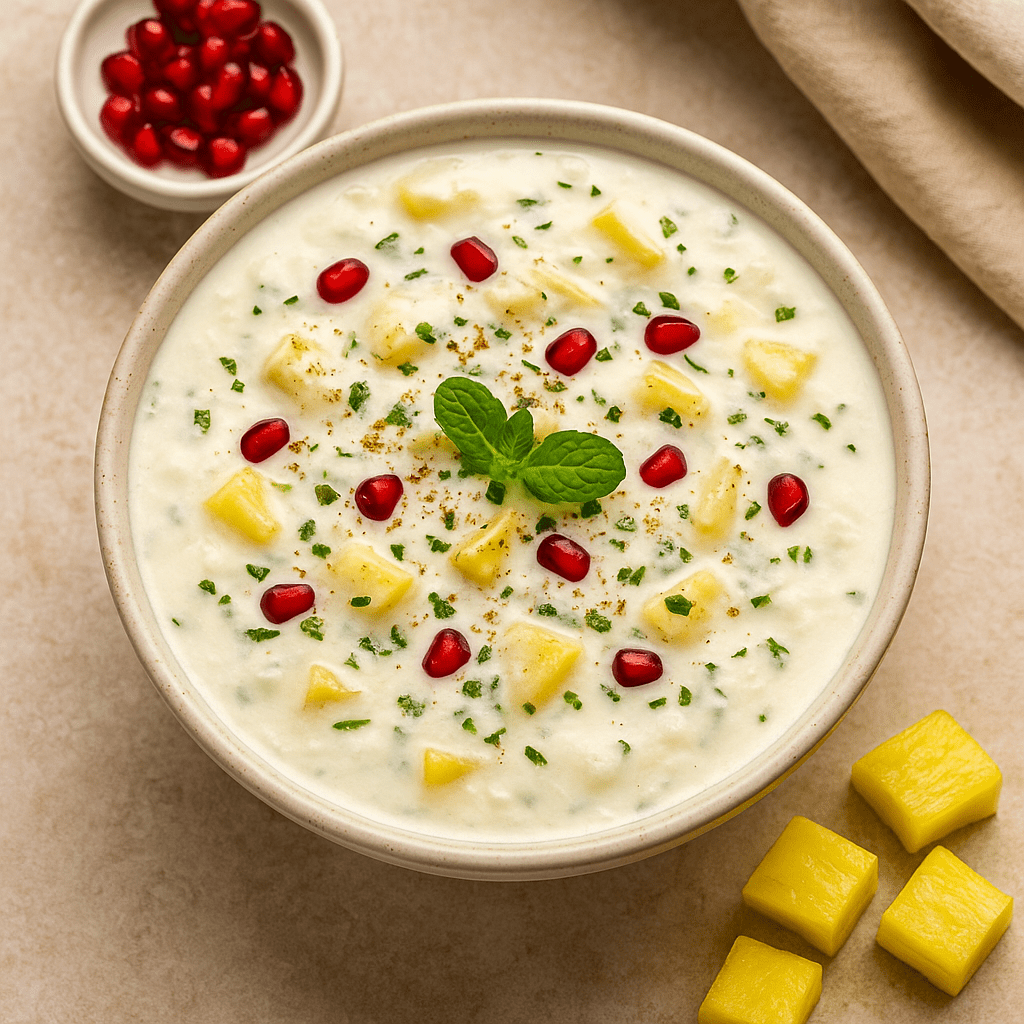
Ingredients (Serves 2–3)

1 cup thick plain yogurt (curd) – whisked until smooth. (Use chilled yogurt for best results.)

1 cup pineapple chunks – fresh (preferred) or canned. If using canned, drain the syrup fully. Fresh pineapple gives a natural tang, but canned works in a pinch.

1/2 teaspoon roasted cumin powder – roast cumin seeds and crush for maximum aroma.

1/4 teaspoon black salt (kala namak) – optional, for a funky tang and authentic flavor. You can use regular salt if unavailable.

Salt to taste – adjust considering black salt adds some saltiness.

1/4 teaspoon black pepper powder – for gentle heat. (Or substitute 1 finely chopped green chili or a pinch of red chili powder, to taste.)

1 tablespoon fresh mint leaves, finely chopped – for freshness. (You can also use chopped coriander leaves, or a mix of both.)

Optional: A pinch of sugar – only if your pineapple is very tart, to balance flavors. This raita is meant to be savory, so skip sugar if the fruit is sweet.

Garnish: A few pomegranate seeds or a sprinkle of more mint/coriander – for a pop of color (optional).


Instructions

1. Prep the Yogurt: In a mixing bowl, add the yogurt and whisk it until it’s smooth and creamy. If the yogurt is too thick, you can stir in 1–2 tablespoons of cold water or milk to achieve a slightly pourable (but still creamy) consistency. Tip: Using thick yogurt yields a rich raita, so consider straining regular yogurt for 15 minutes if it’s watery.


2. Season the Yogurt: Stir in the roasted cumin powder, black salt (if using), and a pinch of regular salt. Add the black pepper (or chili) at this stage. Whisk everything together so the spices are well blended into the yogurt. Take a quick taste and adjust salt or spice as needed.


3. Add Pineapple & Herbs: Fold in the pineapple chunks, gently mixing them into the spiced yogurt. Then add the chopped fresh mint leaves and stir. The mint will infuse a refreshing aroma into the raita. (If you’re adding a finely chopped green chili for extra kick, mix it in now. For a tangier twist, you can also add a pinch of chaat masala at this point, as some recipes do.)


4. Chill: Cover the bowl and let the raita chill in the refrigerator for at least 20–30 minutes before serving. Chilling not only makes it more refreshing, but it also allows the pineapple juices and spices to meld into the yogurt. This little patience makes a big difference – a cold raita is far more soothing and flavorful.


5. Garnish & Serve: Give the raita a gentle stir and transfer it to a serving bowl. Just before serving, sprinkle a pinch of additional roasted cumin on top for aroma. Add a few pomegranate seeds on top or a leaf of mint for a pretty garnish (optional but eye-catching). Serve the pineapple raita chilled and enjoy!


Optional Variations and Tips

South Indian Tadka (Tempering): For an extra layer of flavor, try tempering the raita. Heat a teaspoon of oil in a small pan, add 1/2 teaspoon mustard seeds and a few fresh curry leaves. Let them splutter for a few seconds, then turn off the heat. Drizzle this aromatic tadka over the prepared pineapple raita just before serving. The sizzle of mustard seeds and curry leaves in hot oil gives the raita a delightful nutty aroma (this approach is inspired by South Indian pachadi style pineapple yogurt dishes).

Herb Swaps: Not a fan of mint? Substitute coriander (cilantro) leaves for a different but equally refreshing flavor. In fact, some families prefer a mix of both mint and coriander. Either way, fresh herbs are key to that cooling, herbal note.

Spice It Up or Down: Adjust the heat to your liking. For a spicier kick, add a pinch of red chili flakes or finely chopped green chili (as mentioned earlier). For a milder raita, stick to just a dash of black pepper or skip the chilies entirely. The beauty of raita is its flexibility – it should complement, not overpower.

Add a Dash of Chaat Masala: To elevate the tang, sprinkle a pinch of chaat masala into the raita. This popular Indian spice mix contains dried mango powder and other spices, giving a zesty punch that pairs well with fruit-based raitas.

Richer Texture: For a creamier, indulgent raita, you can mix in a tablespoon of malai (fresh cream) or Greek yogurt into the curd. This makes the raita ultra-smooth and dessert-like (my mom would do this on occasion for guests!). It’s an optional treat if you don’t mind the extra richness.

Use Fresh, Ripe Pineapple: If you can, use sweet ripe pineapple – it yields the best flavor. Fresh pineapple has a slight tang that lifts the raita naturally. If using canned pineapple, choose the one in juice (not syrup) and drain it well; canned pieces are softer and sweeter. Some cooks even lightly grill or roast fresh pineapple chunks to caramelize them for a deeper flavor – a fantastic twist if you have the grill fired up!

Balancing Tartness: Pineapple can sometimes be very tart, which might cause the yogurt to taste a bit bitter over time. If your pineapple is on the sour side, consider adding that tiny pinch of sugar (we won’t tell, promise!) or use vanilla yogurt instead of plain. Also, avoid letting the raita sit out too long at room temperature, as the acidity can increase. Keeping it chilled until serving time is best.


Serving Suggestions

Biryani or Pulao: Pineapple raita makes a perfect side for biryanis and pulaos. The sweet-tangy coolness of the raita beautifully balances out rich, spicy rice dishes. Try it with a spicy vegetable biryani or a simple peas pulao – you’ll love the contrast.

Parathas & Curries: Serve this raita with paratha (flaky Indian flatbread) and a sabzi (vegetable curry) as part of a comforting lunch. It’s especially wonderful on a hot day alongside a spicy curry or dal – the raita acts as a cooling condiment that tones down the heat of the main course.

Grilled Foods & Snacks: Use pineapple raita as a refreshing dipping sauce for tandoori dishes, kebabs, or pakoras. Whether it’s grilled chicken tikka or vegetable kebabs, a spoonful of this chilled raita on the side adds a creamy counterpoint to grilled or fried foods. It’s also a hit at BBQs and potlucks – a little unexpected, but once people try it, they keep coming back for more.

Summer Thali or Picnic: Include this raita in your summer spread. It fits right into a traditional Indian thali (platter) – imagine it next to lemon rice, papad, and a simple salad – or pack it in a chilled container for a picnic. It pairs nicely with just about anything, even alongside sandwiches or as a quick cooling snack by itself.

Solo Snack: Honestly, you can even enjoy a small bowl of this pineapple raita on its own. It’s protein-rich from the yogurt and hydrating – a light savory-sweet snack that’s filling yet easy on the stomach. On days when the heat kills your appetite, a cold cup of pineapple raita can be surprisingly satisfying.


*This Pineapple Raita recipe isn’t just about mixing yogurt and fruit – it’s about preserving a slice of my childhood on a plate. The creamy yogurt, the bursts of pineapple, and that hint of cumin and mint create an experience that’s comforting and special. I hope this recipe finds a way into your home and maybe even into your memories. Serve it up at your next family dinner or summer cookout, and don’t be surprised when this simple side dish becomes the talk of the table – just like it did for us all those years ago.*

summer Dish

The Pineapple Raita That Stole the Summer Show

Some recipes aren’t just about taste — they’re about moments. And for me, pineapple raita is one of them. Every summer during our school holidays, my maasi would bring her famous pineapple raita to our family picnics. We’d all gather under mango trees with baskets of biryani, paratha rolls, pickles, and sweets — but it was always her chilled bowl of pineapple raita that vanished first.

While everyone else carried cucumber or boondi raita, maasi’s raita was different — creamy, chilled curd with juicy, golden pineapple chunks, just a touch of sugar, a sprinkle of roasted cumin, and a handful of fresh mint. I’d hover near the basket, pretending to look for napkins, just waiting for her to take off the lid. That first spoonful was always magic. Sweet, salty, tangy — all in one bite.

Today, I recreate that same raita, and though the setting has changed, the memories haven’t. It’s still the side dish that steals the show — just like it did all those summers ago.

Ingredients (serves 2–3)

1 cup fresh thick curd (yogurt), whisked

½ cup chopped pineapple (fresh or canned)

½ tsp roasted cumin powder

¼ tsp black salt (kala namak)

Salt, to taste

½ tsp sugar (optional, if pineapple is sour)

1 tbsp finely chopped mint leaves

1 green chili, deseeded and finely chopped (optional)

A few pomegranate seeds or coriander leaves for garnish


Steps to Make It

1. Prepare the curd: Whisk curd in a mixing bowl until smooth and creamy. If it’s too thick, add 1–2 tbsp chilled water.


2. Add flavor: Stir in the roasted cumin powder, black salt, sugar (if using), and regular salt. Mix gently.


3. Add pineapple: Fold in the pineapple pieces and chopped mint. If you’re using green chili, add it now for a slight kick.


4. Chill: Cover and refrigerate for at least 30 minutes before serving. This lets the flavors blend beautifully.


5. Garnish: Before serving, sprinkle pomegranate seeds or a few coriander leaves for color and crunch.


Tips for Best Raita

Use fresh pineapple if possible — its slight tang lifts the raita naturally. Canned works, but drain the syrup fully.

Roast your cumin seeds at home and grind — the aroma is unbeatable.

For a richer version, add a spoon of malai or cream to the curd.

Don’t skip the chill time — it really improves flavor.


Serving Suggestions

Perfect side to vegetable biryani, jeera rice, or pulao

Add it to a summer thali meal with paratha, sabzi, and papad

Serve as a sweet-salty cooler with pakhala or grilled dishes

Great even on its own as a light afternoon snack


Why I Love It

I love pineapple raita because it’s more than a recipe — it’s a memory I get to eat. It’s the sound of laughter in summer heat, the smell of mint in cool dahi, the bite of sweet and tangy fruit that made our picnic plates feel fancy. Even today, it brings smiles when I serve it — and I always hear the same thing from guests: “Why didn’t I think of this before?”

It’s simple, quick, and incredibly satisfying — a little sunshine in every spoon.

Lunch & Dinner, summer Dish

Tangy Tomato Rice

Introduction

Summer is here, and I’m loving the bounty of ripe, juicy tomatoes filling the market stalls. There’s something about their bright red color and tangy-sweet flavor that just feels like sunshine on a plate. Tomatoes are also a rich source of vitamin C, perfect for the hot months ahead. In our family, this Tomato Rice has become a go-to summer meal – it’s essentially *“a tangy tomato based rice dish, spiced up with vegetables and masalas”*. Easy, comforting, and bursting with fresh flavor, it’s a simple one-pot meal that always hits the spot after a day in the sun.

Ingredients

1 cup basmati rice, rinsed and soaked for 15-20 minutes

2 tablespoons oil (vegetable oil or ghee)

1 teaspoon cumin seeds

1/2 teaspoon mustard seeds (optional)

1 small onion, thinly sliced

2 cloves garlic, minced

1 tablespoon ginger, grated or minced

2 green chilies, slit (adjust to taste)

4 ripe tomatoes, chopped (about 2 cups)

1/2 cup green peas (fresh or frozen)

1/2 teaspoon turmeric powder

1 teaspoon coriander powder

1/2–1 teaspoon red chili powder (to taste)

Salt, to taste

Pinch of asafoetida (hing) (optional, for extra aroma)

2 cups water (for cooking)

Fresh cilantro (coriander leaves), chopped for garnish

Lemon wedges, to serve

Note: You can also toss in a handful of peanuts or roasted cashews for crunch if you like.

Step-by-Step Preparation

1. Prep the Rice: Drain the soaked rice. In a pan or pot, heat oil over medium heat. Add cumin seeds (and mustard seeds, if using). When they start to sizzle, add the sliced onion and a pinch of salt. Sauté until the onion turns translucent.


2. Aromatics: Stir in the minced garlic, grated ginger, and slit green chilies. Cook for another 30 seconds, stirring constantly, until fragrant (be careful not to burn the garlic).


3. Spices & Tomatoes: Add turmeric, coriander powder, red chili powder, and a pinch of asafoetida. Stir quickly, then add the chopped tomatoes. Cook the tomatoes down until they soften and start releasing juice, about 5-7 minutes. Mash them lightly against the pan to create a saucy base.


4. Add Rice & Veggies: Stir in the green peas. Drain the rice and add it to the pan, gently mixing it so each grain is coated with the tomato-spice mixture.


5. Simmer: Pour in 2 cups of water and add salt to taste. Bring to a boil, then reduce heat to low, cover, and cook for 12-15 minutes, or until the rice is tender and has absorbed all the liquid. (If needed, check near the end and add a splash more water if the rice isn’t done.)


6. Rest & Fluff: Turn off the heat and let it sit, covered, for 5 minutes. Then fluff the rice gently with a fork. Finally, stir in chopped cilantro and a squeeze of lemon juice for brightness, and your tangy Tomato Rice is ready!

Tips for Best Results

Quality Rice: Use good-quality basmati or long-grain rice for fluffy, separate grains. Rinse and soak the rice first to remove excess starch.

Cook Tomatoes Well: Let the tomatoes cook down until very soft and saucy before adding rice. This builds flavor and ensures the rice turns a lovely golden-orange color.

Adjust Seasoning: Taste the tomato sauce before adding rice. If it’s too tangy, add a pinch of sugar; if it needs heat, a little extra chili powder.

One-Pot Shortcuts: For even less cleanup, you can prepare everything in one heavy-bottomed pot (like a Dutch oven) instead of a separate pan. Just be careful with timing so nothing sticks.

Make-Ahead: This rice reheats well, so you can make it ahead and gently reheat on the stove or in a microwave, adding a splash of water if it’s dry.

Serving Suggestions

Yogurt Raita: Serve Tomato Rice with a side of cooling cucumber or onion raita. The creamy yogurt (like the onion raita shown above) balances the tangy spice beautifully.

Crunchy Accompaniments: We love it with crisp roasted papad (pappadum) or masala papad for some crunch. A simple salad of sliced cucumbers, tomatoes, and onions tossed with lemon juice is also lovely.

Pickles and Chutneys: Indian pickles (achar) or a sweet mango chutney add another layer of flavor contrast.

Family Favorites: Pair it with grilled paneer or any veggie curry if you want to stretch it into a larger meal.

Why I Love It


There are so many reasons to adore this Tomato Rice. First, it’s so easy and quick – all cooked in one pot with pantry staples and those bounty-market tomatoes. I remember my mom making this on hot summer afternoons; the aroma of tomatoes, cumin and ginger would fill the kitchen. The vibrant orange-red color always felt like a party on the dinner table.

It’s also unexpectedly versatile: we eat it for lunch, pack leftovers for work, or even enjoy it for a light dinner. The tang from the tomatoes gives it a zest that feels like sunshine. Plus, it’s a great way to use up that big bag of summer tomatoes before they spoil! I love how it comforts the soul — each bite reminds me of fun summer days, family gatherings, and the simple joy of good, homestyle cooking.

summer Dish

Kanji – Odia-Style Fermented Rice Soup with Vegetables

Intro: The Forgotten Health Drink of Our Grandmothers

Before probiotics became a trend, we had Kanji.
This light, fermented rice broth, simmered with vegetables like radish, pumpkin, or spinach, was Odisha’s summer survival secret.
It’s sour, refreshing, and nourishing — soothing to the stomach, and full of memories.

I remember summer afternoons when the tangy smell of kanji would drift from the kitchen. It wasn’t fancy — just clean, earthy, and strangely addictive.

Ingredients:

½ cup cooked rice (preferably a day old)

3 cups water (for fermenting)

1 cup vegetables (pumpkin, radish, or spinach)

½ tsp turmeric

1–2 green chilies (slit)

Salt to taste

1 tsp mustard seeds

1 tsp mustard oil


Steps to Make Kanji:

1. Ferment the Rice Water

Mix cooked rice with water. Leave it covered (but not airtight) for 1–2 days at room temperature to ferment.


2. Cook the Vegetables

In a pan, add fermented water and vegetables.

Add turmeric, salt, and green chilies. Simmer until veggies are soft.


3. Temper the Kanji

Heat mustard oil. Add mustard seeds. Let them splutter.

Pour the tempering into the kanji and stir.


Serving Suggestions:

Serve lukewarm or at room temperature

Best enjoyed with Saga Bhaja, Alu Bharta, and roasted papad

Also served during fasting days and summer lunches


Why I Love It

Kanji tastes like a cool breeze on a hot day. It’s deeply nostalgic, refreshingly sour, and reminds me that simple, slow food is pure magic.