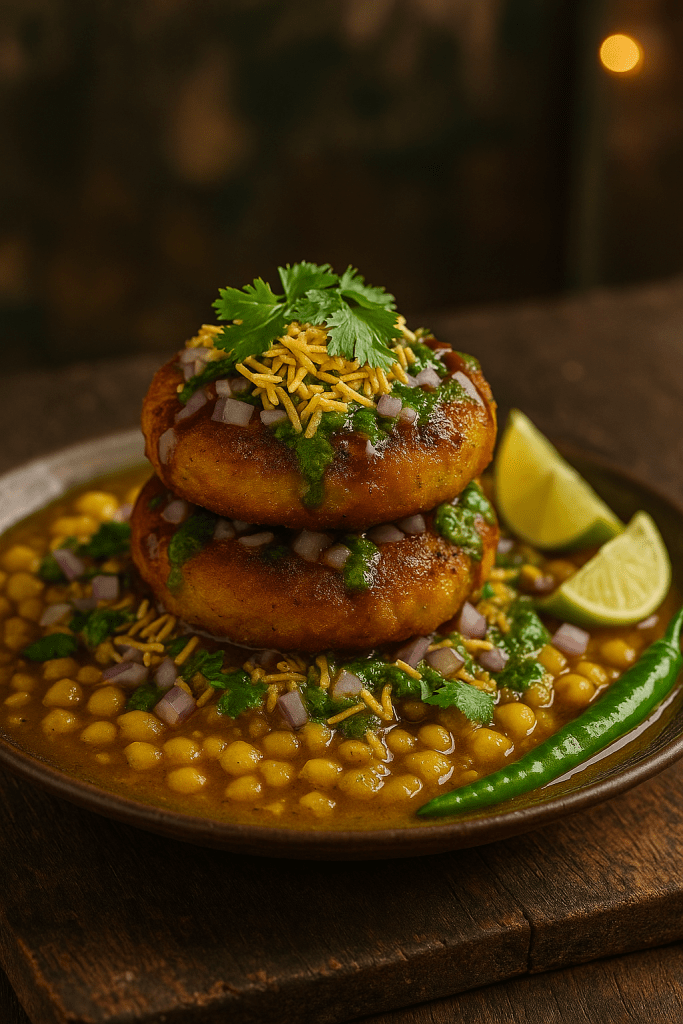
There’s nothing quite like the aroma of freshly fried pattice mixed with the tang of spicy ragda that transports you straight to the buzzing streets of Mumbai. I still remember summer afternoons spent wandering the vibrant streets of Bandra and Colaba, where small vendors would serve up hot, crispy ragda pattice on paper plates. The dish—an incredible fusion of deep-fried, spiced potato patties and a creamy, mildly tangy white peas gravy—became a comforting indulgence on long, sweltering days. For many, it’s not just a snack; it’s a celebration of the city’s energy and diversity. Every bite carries memories of playful banter with friends, the clamor of street vendors, and the undeniable joy of sharing a truly authentic Mumbai treat.
Ingredients
For the Ragda (White Pea Gravy):
1 cup dried white peas (toor dal or moong dal, soaked overnight)
1 medium onion, finely chopped
1-2 green chilies, slit (adjust to taste)
1 teaspoon ginger-garlic paste
1 teaspoon cumin seeds
½ teaspoon turmeric powder
1 teaspoon red chili powder (adjust for heat)
Salt to taste
1-2 tablespoons oil
½ teaspoon garam masala (optional)
Water (for pressure cooking)
For the Pattice:
4-5 medium potatoes, boiled and mashed
1 cup boiled mixed vegetables (carrot, peas – optional)
1-2 green chilies, finely chopped
1 small onion, finely chopped
2 tablespoons gram flour (besan)
½ teaspoon cumin powder
Salt and pepper to taste
Fresh coriander, finely chopped
Oil for shallow frying
Garnish:
Finely chopped onions
Fresh coriander leaves
Tamarind chutney and green chutney on the side
Lemon wedges
Instructions
Preparing the Ragda:
1. Soak and Cook: Drain the soaked white peas. In a pressure cooker, add the peas, a pinch of turmeric, salt, and about 3 cups of water. Pressure cook until the peas are soft and start to break apart (about 3-4 whistles).
2. Prepare the Base: In a heavy pan, heat oil over medium heat. Add cumin seeds and let them splutter. Add the chopped onion and sauté until golden. Stir in the ginger-garlic paste and green chilies and sauté for another minute.
3. Spice It Up: Add the cooked peas along with the water from the pressure cooker. Stir in the red chili powder, a pinch of salt, and additional turmeric if needed. Allow the mixture to simmer for 10–15 minutes, stirring occasionally, until the gravy thickens slightly. (If you prefer a smoother texture, you can mash some of the peas while cooking.)
4. Finish the Gravy: Stir in the garam masala (if using) and adjust the salt to taste. Keep warm.
Preparing the Pattice:
1. Mix the Filling: In a large bowl, combine the boiled, mashed potatoes with the boiled mixed vegetables (if using), chopped onions, green chilies, coriander, cumin powder, salt, pepper, and besan. Mix thoroughly until all ingredients are well incorporated. The besan helps to bind the mixture.
2. Shape the Patties: Divide the mixture into even portions. Roll each portion into smooth balls and flatten them gently into round patties (about ½ inch thick).
3. Shallow Fry: Heat a generous amount of oil in a skillet over medium heat. Fry the patties until golden and crispy on both sides (about 3–4 minutes per side). Remove and drain on paper towels.
Assembling Ragda Pattice:
1. Plate the Pattice: Place 2-3 hot, crispy pattice on a plate.
2. Pour Over Ragda: Generously ladle the hot, flavorful ragda over the pattice.
3. Garnish: Top with finely chopped onions and fresh coriander. Serve with tamarind and green chutney on the side, and a wedge of lemon for a zesty finish.
Serving Suggestions
Traditional Style: Serve Ragda Pattice hot on a paper plate in a casual street-food style, reminiscent of the lively Mumbai streets.
Modern Twist: Plate on a rustic ceramic dish, with small bowls of chutney and a scattering of sliced onions and coriander for that Instagram-worthy touch.
Accompaniments: Pair this dish with a refreshing glass of masala chai for a complete meal experience or as a snack during a leisurely afternoon.
Tips for the Perfect Ragda Pattice
Ragda Consistency: For a thicker, heartier gravy, mash some of the cooked peas during simmering. For a lighter version, leave the peas mostly whole.
Pattice Texture: The besan in the potato mixture is key – too much can make the patties dense, while too little might cause them to crumble. Adjust gradually until you reach the right binding consistency.
Frying: Ensure that your oil is hot enough before frying. A moderate temperature will give you a crispy exterior without over-absorbing oil.
Adjusting Spices: Feel free to modify the heat – if you prefer a milder dish, reduce the number of chilies, or add extra cilantro and lemon juice for a tangy finish.
Final Thoughts
Ragda Pattice is more than just a dish—it’s an experience. From the bustling street vendors of Mumbai to home kitchens reinventing the timeless recipe, each bite serves as a reminder of India’s vibrant culinary culture. Whether you crave a burst of spicy, tangy flavors on a rainy day or a hearty snack for a festive gathering, Ragda Pattice is sure to delight.
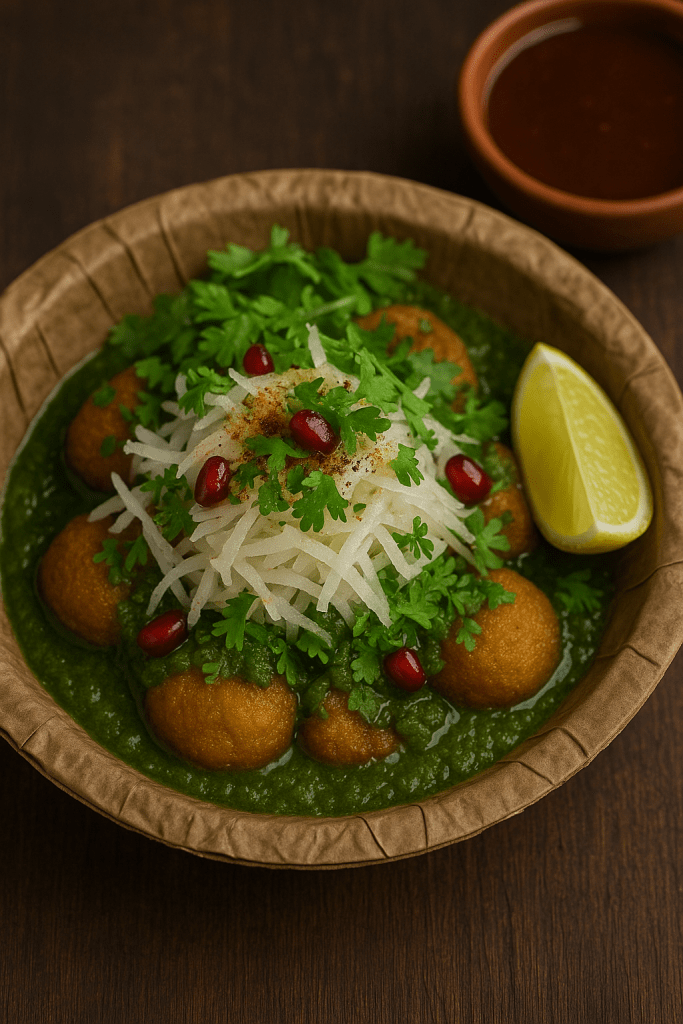
Imagine strolling through the bustling lanes of Old Delhi on a chilly winter evening, your hands wrapped around a small dona (leaf bowl) brimming with piping hot Ram Ladoo. The aroma of fried lentil fritters wafts through the foggy air as you watch the street vendor deftly drizzle vibrant green chutney over the golden bites and top them with a snowy heap of grated radish. During Delhi’s severe winters (and even its monsoons), snacks like Ram Ladoo are in high demand – kiosks selling jalebi, shakarkandi chaat, Ram Ladoo, aloo tikki and more are a common sight in every neighborhood. The experience is pure nostalgia: standing by the roadside with friends, huddling under umbrellas during a surprise drizzle, and relishing the chatpata (tangy-spicy) flavors that burst from these little fritters.
Ram Ladoo isn’t actually a ladoo (sweet) at all – it’s a savory fried pakoda (fritter) made from moong dal batter that’s turned into a chaat. The name might confuse first-timers, but one bite makes it clear why this is one of Delhi’s most beloved street foods. Traditionally, the crispy lentil balls are served as a chaat with all the fixings: fresh white radish (mooli) is the signature topping that defines Ram Ladoo, piled on along with zesty green chutney and a squeeze of lemon. This combination of hot fritter, cool crunchy radish, and spicy-tangy chutneys is absolutely addictive. No wonder Ram Ladoo is especially cherished during North Indian winters and monsoons, when that extra crunch of seasonal radish and the warmth of fried snacks feel most comforting.
Green chutney – (Blend fresh coriander, mint, green chili, garlic, salt, and a dash of lemon into a smooth chutney. You can include a few radish leaves for authenticity.)
Tamarind chutney – sweet-sour imli chutney (optional, for drizzling)
1 teaspoon chaat masala
Lemon wedges, for squeezing on top
(Note: Some vendors also garnish with a few pomegranate seeds (anardana) for a pop of sweetness and color, though this is optional.)
Instructions
1. Soak the Dal: Rinse the moong dal a few times, then soak it in water for about 3–4 hours (or overnight). Proper soaking softens the lentils, ensuring a lighter, fluffier batter. If you plan to mix in a small portion of chana dal (optional for extra crispness), soak it together with the moong dal or separately as needed.
2. Grind into Batter: Drain the soaked dal and transfer it to a grinder or blender. Add the aromatics and spices – ginger, green chilies, cumin seeds, asafoetida, and salt – into the grinder. Grind everything to a coarse paste without adding water (or using only a few teaspoons if absolutely necessary). The batter should be thick; a slightly coarse texture (not completely smooth) is ideal so that the fritters have some bite. Tip: Scrape down the sides of the blender as you go, and avoid over-grinding into a fine paste.
3. Aerate the Batter: Pour the ground dal batter into a mixing bowl. Now, take a whisk (or even just use your hand or a spoon) and beat the batter vigorously for 2–5 minutes in one direction. This whipping incorporates air, making the batter light and fluffy. You will notice the batter increase a bit in volume and turn pale. This step is key to yielding soft, pillowy interiors and helps the fritters puff up nicely when fried.
4. Deep Fry the Fritters: Heat oil in a deep kadai (wok) or heavy pan over medium heat. Once the oil is hot (test by dropping a tiny bit of batter – it should sizzle and rise to the top), carefully drop spoonfuls of the batter into the oil. You can use a wet spoon or your fingers to pinch out small rounds (about 1 to 1½ inches in diameter). Do not overcrowd the pan; fry in small batches so the temperature of the oil stays consistent and the fritters cook evenly. Fry the Ram Ladoo on a medium flame, flipping occasionally, until they turn golden and crisp on the outside. This usually takes about 4–6 minutes per batch. Resist the urge to fry on very high heat – medium heat ensures the insides cook through without the outside browning too fast. When one side is golden, flip the fritters with a slotted spoon and continue frying till all sides are golden and the fritters are crunchy.
5. Drain and Keep Warm: Use a slotted spoon to remove the fried fritters from the oil. Drain them on a plate lined with paper towels to blot excess oil. The Ram Ladoos should be beautifully crisp and golden (avoid frying till dark brown, as that can make them too hard). If not serving immediately, you can keep them warm in an oven at low heat (around 100°C/212°F) so they remain crunchy.
Serving and Presentation
Serving the Chaat: In Delhi, Ram Ladoo is often handed to you in a small steel plate or a disposable leaf bowl (dona), truly embracing its street-food charm. To assemble your Ram Ladoo chaat, arrange 4–5 of the hot moong dal fritters in a small bowl or plate. Then liberally spoon the green chutney over them, completely dousing the fritters in that spicy herby goodness. If you have tamarind chutney, drizzle a couple of teaspoons of the sweet-tangy sauce as well for a nice flavor contrast. Next, pile on a generous amount of grated radish on top of the fritters – don’t be shy, the crunchy mild radish is what makes this chaat unique. Sprinkle a pinch of chaat masala all over, and garnish with the chopped fresh coriander. You can also add a few of the radish leaves themselves as garnish if they’re fresh and tender. Finally, tuck a lemon wedge on the side of the plate for squeezing. The final creation should look irresistible: golden fried balls almost hidden under a mountain of green chutney and white radish, with specks of coriander (and maybe ruby pomegranate arils) on top, just like the street vendors serve it.
When you take a bite, you get everything at once – the crisp exterior of the fritter giving way to a soft, savory center, the zing of green chutney and chaat masala, and the refreshing crunch of radish with a burst of lemon. This medley of textures and flavors is what makes Ram Ladoo such a beloved street snack. Traditionally, the fritters must be enjoyed fresh and hot, smothered in chutneys and topped with radish – that’s the classic way to relish this dish. Some vendors also sprinkle a little black salt or sendha namak on top for extra punch. Serve your Ram Ladoo immediately once assembled, because that’s when they taste best – before they lose heat and crunch.
Tips for the Perfect Ram Ladoo
Soak Well: Plan ahead and soak the moong dal for at least a few hours. Well-soaked lentils grind more easily and yield a smoother, lighter batter. If using a bit of chana dal (e.g. a 3:1 ratio of moong to chana), soak it too – chana dal helps make the fritters even more crisp and fluffy (though you can skip it if you want to keep things simple).
Minimal Water for Grinding: Drain the lentils thoroughly before grinding. Avoid adding water when blending – excess water can make the batter runny, and the fritters won’t hold their shape. Grind in pulses until you get a coarse, thick paste. If absolutely needed, add a teaspoon or two of water, but keep the batter stiff. A thick batter results in round, fluffy fritters, whereas a thin batter would yield flat or greasy ones.
Whip the Batter: Don’t forget to whisk or beat the batter well. This step incorporates air, making the fritters light. A well-aerated batter gives soft interiors and helps the Ram Ladoos puff up nicely. If you skip this, your fritters might turn out dense. So roll up your sleeves and beat the batter for a few minutes until it feels lighter and pale.
Frying Technique: Always fry on medium heat. If the oil is too hot, the fritters will brown too quickly on the outside but remain uncooked inside; too low and they’ll absorb oil and turn soggy. Medium flame ensures they cook through evenly. Also, fry in batches – adding too many spoonfuls of batter at once can crowd the pan and drop the oil temperature, resulting in oily fritters. Fry until the ladoos are just golden (not deep brown) for the best texture. Golden color means they’re perfectly crisp but still tender inside.
Toppings are Key (Don’t Skip the Radish!): The magic of Ram Ladoo lies in its toppings. Fresh grated radish is not just a garnish but a core component – it adds a refreshing crunch and peppery bite that elevates the dish. In fact, the radish is so essential that skipping it is not advisable. Similarly, the green chutney provides spice and moisture, and a dash of tamarind chutney brings a welcome sweetness that balances the flavors. Sprinkle a pinch of chaat masala on top for that final tangy kick. These extras turn simple fritters into an authentic chaat.
Serve Hot: Ram Ladoo is a snack best enjoyed straight out of the oil. Serve them immediately after frying and assembling, while they’re still hot and crunchy. The fritters tend to soften as they cool, especially under the moisture of chutneys. If you need to fry them a little in advance, you can keep the fried balls in a preheated oven (around 90–100°C) or in an airtight container to maintain crispiness. Then quickly assemble with toppings right before eating. But avoid long delays – even the street vendors will assemble a plate and hand it to you to eat right there and then.
Secret Street Vendor Trick: For an extra layer of authentic flavor, try incorporating radish leaves into your preparation. Many Delhi vendors blend a handful of the mooli ke patte (radish greens) into the green chutney, or even finely chop and whisk a spoonful into the batter itself. The radish greens have a sharp, mustardy flavor that can give your Ram Ladoo a distinctive edge. Even if you don’t have the leaves, using radish generously as a topping will do the job – it’s the defining element of this chaat.
With these tips in mind, you’re ready to recreate the Delhi-style Ram Ladoo at home. Each bite will transport you to the lively streets of Delhi, especially on a cold evening or a rainy day, enjoying this warm, crispy, spicy delight. Serve it up in true street-style fashion – in a little leaf bowl or steel saucer – and watch how quickly these moong dal pakodi chaats disappear. Happy cooking and happy snacking!
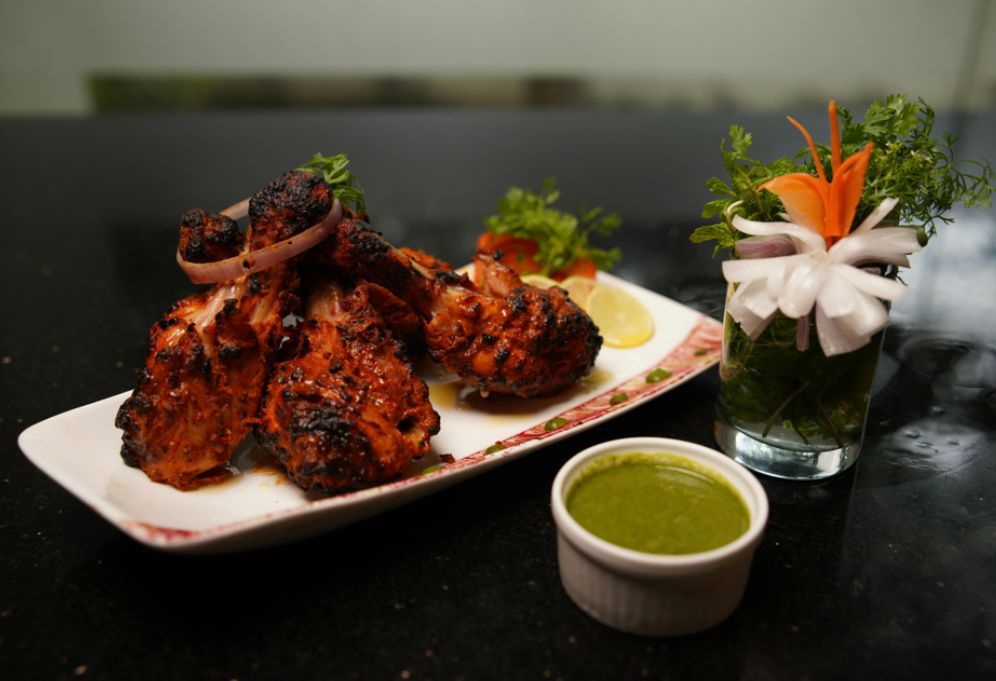
Tandoori Chicken – marinated in yogurt and spices, then grilled to smoky perfection – is a star of North Indian cuisine. Its vibrant red color and charred edges come from a blend of yogurt, Kashmiri chili, ginger, garlic and aromatic spices, all enhanced by the traditional tandoor (clay oven) cooking method. This dish straddles Mughlai opulence and Punjabi flavor: yogurt-based marinades were a hallmark of Mughal kitchen feasts, and yet tandoori chicken became a Punjabi specialty after being popularized at legendary eateries like Delhi’s Moti Mahal. Today it’s celebrated at weddings, festivals, and family gatherings across North India. Our recipe stays true to tradition – two-stage marinade, high-heat grilling (oven or stovetop), and a final smoky finish – for juicy, tender chicken that truly transports you to a festive Indian table.
I still remember the first time I prepared this recipe at home for Diwali: the moment the chicken hit the hot grill, the air filled with a mouthwatering, smoky aroma that drew everyone out of the kitchen. As the family gathered around the platter, lemon wedges in hand, the golden-red drumsticks came off the grill with perfect char marks. There’s something deeply nostalgic about tandoori chicken – it was always the proud centerpiece of my grandmother’s celebrations, and recreating it at home still feels like passing on a beloved tradition.
Ingredients
Chicken: 2–3 lbs bone-in chicken legs or thighs (drumsticks & thighs). These cuts have enough fat to stay moist and juicy.
Yogurt & Dairy: 1 cup thick yogurt (dahi), strained or Greek (for thick marinade). Yogurt tenderizes the meat and adds tang.
Citrus: Juice of 1–2 lemons (adds tang and helps tenderize).
Spices: 2–3 tablespoons Kashmiri red chili powder (for color and mild heat), 1 teaspoon turmeric powder, 1 tablespoon roasted cumin powder, 1 tablespoon coriander powder, 2 teaspoons garam masala.
Others: 1–2 teaspoons salt (to taste), ¼ teaspoon black pepper, 1 teaspoon black salt (kala namak, optional), 2 tablespoons mustard oil (optional, for authentic flavor) or other neutral oil.
Charcoal (for smoke): A small piece of charcoal and 1 teaspoon ghee (clarified butter), for the final “dhungar” smoking (optional but recommended).
Marinade – Two Stages
The secret to super-tender, flavorful tandoori chicken is double marination. Marinate the chicken twice: first quickly with acidic ingredients, then deeply with the full spice-yogurt mixture.
First Marinade: Combine 2 tablespoons ginger-garlic paste, juice of 1 lemon, 2 tablespoons Kashmiri chili powder, and salt. Whisk into a smooth paste. Massage the chicken pieces with this mixture so they are evenly coated. Cover and refrigerate for 30–45 minutes (this lets the lemon juice and salt begin tenderizing the meat).
Second Marinade: Meanwhile, make the yogurt-spice mix. In a bowl whisk together 1 cup thick yogurt, 1 tablespoon roasted cumin powder, 1 tablespoon coriander powder, 2 teaspoons garam masala, the remaining Kashmiri chili, ¼ teaspoon black pepper and black salt, and 2 tablespoons mustard oil. The mustard oil adds authentic bite (many Punjabi chefs swear by it). Add any leftover ginger-garlic from the first marinade if desired. Once the first marinade is done, transfer the chicken into this yogurt mixture and coat thoroughly. Cover and refrigerate overnight or at least 6–8 hours (up to 24 hours is fine) to let the yogurt and spices deeply infuse the meat. Yogurt acts as a meat tenderizer and flavor carrier, ensuring each bite is tender and tangy.
The two-step process — first bright citrus, then rich spiced yogurt — really makes the meat melt-in-your-mouth. If you’re in a hurry, a single long marination (overnight) will still work, but the double marinade yields the softest, most flavorful chicken.
Tip: When marinating, pierce the chicken in a few places with a fork or make small slits so the marinade penetrates deeply. Remove the chicken from the fridge about 30 minutes before cooking to bring it to room temperature.
Cooking – Tandoor, Oven or Grill
Traditionally, tandoori chicken is cooked at very high heat in a clay tandoor oven (which gives it its characteristic char and smoke). You can mimic this at home using your oven broiler, grill, or a stovetop grill pan. Regardless of method, preheat to a high temperature (around 220°C/425°F for oven, or hot grill pan).
Oven Method: Line a baking sheet with foil and arrange the chicken pieces on a rack. Grill/bake at 220°C for about 20–25 minutes. Then switch to broil (or a hotter setting) for an additional 5–7 minutes to get a charred crust. Turn the pieces halfway so both sides get nicely browned. Always check that the internal temperature reaches 165°F (74°C) for safety.
Stovetop Grill/Pan: Heat a heavy grill pan or cast-iron skillet over medium-high. Brush it lightly with oil so the chicken doesn’t stick. Place the chicken on the hot grill and cover if possible. Cook 8–10 minutes per side, turning occasionally, until the juices run clear and edges are charred. For an extra smoky flavor, after one side is done, flip to cook the other side with the pan lid on so steam and smoke infuse the meat. Flip again to finish. The goal is a slight char on the outside while remaining juicy inside.
Charcoal Smoked “Dhungar” (optional): For authentic smoky aroma, use the dhungar method. Heat a small piece of charcoal on a flame until red-hot. Place it in a small metal bowl and set the bowl on top of (or next to) the cooked chicken. Pour 1 teaspoon of ghee over the hot coal, and immediately cover the chicken or oven to trap the smoke. Let it smoke for 5–8 minutes. This “smoking” step can be done just before or right after cooking and gives the chicken that classic tandoor-smokiness.
Whether you use oven or pan, remember that real tandoors cook incredibly fast at extreme heat, so a quick flash under a broiler or on a hot flame is key to getting charred edges without drying out the meat.
Garnish & Serve
Once the chicken is cooked through with beautiful char marks, transfer it to a platter. Garnish with thinly sliced red onion rings and fresh cilantro sprigs. Serve with lemon wedges – a squeeze of lime brightens the smoky flavors. No Punjabi platter is complete without naan or roti – soft flatbreads perfect for scooping up the chicken. (As one food blogger notes, *“Serve your tandoori chicken with a stack of naan bread for a filling meal.”*.)
Accompany the chicken with cooling dips: a vibrant green coriander-mint chutney (made of cilantro, mint, green chilies, lemon, and yogurt) is a classic pairing. The tangy, herby chutney is often called an “unbeatable combo” for grilled chicken. You can also offer a simple onion raita (yogurt mixed with diced onion, cucumber and a pinch of cumin) to balance the heat. Arrange everything on the table – lemon wedges, naan, chutney and raita in small bowls around the platter – and let guests help themselves. The colorful presentation and interplay of smoky, spicy chicken with fresh garnishes is what makes tandoori chicken a crowd-pleaser at any gathering.
Enjoy this Tandoori Chicken hot from the oven or grill, just as it would come from the tandoor, and watch as your family and friends gather around – drawn together by that irresistible smoky aroma and rich flavor of this true North Indian classic.
The Pinch of Masala brings you a tangy, sweet, and spicy Fruit Chaat that’s perfect for festive occasions and hot summer days. This Indian-style fruit salad is more than just a snack – it’s a bowl of nostalgia and vibrant flavors.
Imagine the scene: it’s Holi afternoon, faces smeared with rainbow colors, and the air smells of gulal and wet earth. We cousins would gather around Dadi’s courtyard, giggling and exhausted from play, as she brought out a big steel thali brimming with fruit chaat. The colors of the chopped mangoes, watermelons, and pomegranates mirrored the Holi palette itself. One bite and our mouths would tingle – chatpata (tangy-spicy) magic from that special mix of spices, the chaat masala, hitting our taste buds. The sweetness of ripe fruits, the zing of lime, and a subtle kick of chili would instantly revive us. Fruit chaat, in those moments, wasn’t just food; it was celebration in a bowl, a taste of childhood summers and festival fun.
But fruit chaat isn’t reserved only for Holi. In many North Indian cities (like Delhi), this dish is a popular street food especially during the scorching summers. The word chaat itself comes from the Hindi word chaatna, meaning “to lick,” hinting at how finger-licking good these tangy treats are! Street vendors set up carts with piles of fresh fruits, tossing them with spices for hungry customers. During Navratri, fruit chaat stalls pop up everywhere, since it’s one of the most preferred foods for those observing fasts. High in vitamins and naturally hydrating, a mixed fruit chaat is an immunity booster and a smart way to stay cool in the Indian summer heat. Whether it’s a family picnic under the sun or breaking the Navratri fast in the evening, this delightful salad fits right in.
What makes Indian fruit chaat so special is that pinch of masala (truly living up to our blog’s name!). A generous sprinkle of chaat masala – a zesty spice blend of dried mango powder, cumin, black salt, and other spices – transforms simple cut fruits into an explosion of flavor. Kala namak (Indian black salt) in it has a unique sulfurous tang that gives an earthy depth to the chaat. And a dash of bhuna jeera (roasted cumin) and chilli adds warmth. In the recipe below, we’ll show you how to create this medley at home with seasonal fruits and classic spices. It’s quick, friendly to make in any home kitchen, and will transport your taste buds to the bustling streets of India. Let’s dive in!
Ingredients
Here’s everything you need to make a traditional fruit chaat for about 4 servings. Feel free to mix and match fruits based on season and preference:
Assorted Seasonal Fruits (3–4 cups total), chopped into bite-size pieces: e.g. 1 cup watermelon cubes, 1 ripe mango diced, 1 apple diced, 2 bananas sliced, 1 cup grapes (halved), 1 orange segmented, 1 pear or 1 cup papaya chunks. (Use any juicy fruits available – the more colorful, the better!)
1/2 teaspoon chaat masala – the key spice mix (store-bought or homemade).
1/2 teaspoon roasted cumin powder – (bhuna jeera powder) for an earthy note.
1/4 teaspoon black salt (kala namak) – gives the authentic tang (use sendha namak (rock salt) if making for a fasting/vrat version).
1 small green chili, finely chopped (optional) – for a spicy kick. You can deseed it for less heat, or skip for a milder chaat. (Alternately, use a pinch of red chili powder.)
1 large lemon – juiced. (Approximately 2 tablespoons fresh lemon or lime juice for that tangy freshness.)
1 teaspoon sugar or honey (optional) – if your fruits are more on the tart side or you prefer a slight sweetness balance.
1/4 teaspoon black pepper powder (optional) – for extra warmth (especially if not using green chili).
Fresh mint leaves or coriander leaves – a small handful, chopped, for garnish and extra freshness (optional).
Optional add-ins: 1 medium boiled potato, peeled and diced (you can even lightly fry it) for a Delhi-style twist; a handful of roasted peanuts or cashews for crunch; or a tablespoon each of dates/raisins for a sweet surprise.
Instructions
1. Prep the Fruits: Wash and chop all the fruits into roughly equal bite-sized pieces. Place them in a large mixing bowl. (Tip: If using apples or bananas, chop those last as they brown quickly once cut. You can toss apple slices in a little lemon water to keep them fresh.) Keep the vibrant mix of fruits chilled if possible – a cold fruit chaat is extra refreshing on a hot day!
2. Add Optional Veggies: If you’re adding a boiled potato (or even boiled sweet potato) for extra heft, ensure it’s cooled and diced. Add those cubes to the fruit bowl. They will soak up the spices nicely and make the chaat more filling (this is a common street-style variation in Delhi).
3. Spice It Up: Sprinkle the chaat masala, roasted cumin powder, and black salt evenly over the fruits. If using, also add the chopped green chili (or a pinch of red chili powder) at this stage for heat. For a bit of sweetness, add the sugar or honey now. Using two spoons (or clean hands), gently toss everything so the spices coat the fruit pieces. You’ll notice the fruits starting to glisten as the salt and sugar draw out a little of their juices. (If preparing for a fasting occasion, remember to substitute regular black salt with rock salt as noted above.)
4. Add Lemon Juice: Drizzle the fresh lemon juice all over the spiced fruit mixture. The lemon (or lime) not only prevents fruits like bananas and apples from browning, it also elevates the tanginess – making the flavors pop. Give the chaat a good toss again so the lemon juice is well mixed. Taste and adjust: you can always tweak the balance – add a pinch more chaat masala or salt if needed, or a bit more lemon or honey to your taste. The beauty of chaat is in achieving that perfect sweet-tangy-spicy balance to your liking.
5. Rest (Briefly) & Garnish: Let the fruit chaat rest for 5 minutes in the bowl. This short wait helps the fruits macerate slightly and soak in the masala, making the chaat even more flavorful. (Don’t leave it too long, though – fruits will start releasing more juices if it sits, and you want it fresh and crisp.) Just before serving, toss in the chopped mint or coriander leaves and give a final gentle mix. Garnish by sprinkling a pinch of chaat masala or cumin on top for looks, and adorn with a few whole mint leaves or even some pomegranate arils for a burst of color.
6. Serve: Your The Pinch of Masala special fruit chaat is ready! Serve immediately in small bowls or plates. Each bite will be a medley of flavors – the juiciness of mango and melon, the crunch of apple and grapes, the zing of citrus and spice. Enjoy the symphony of sweet, tangy, and spicy notes dancing on your tongue. This chaat is best enjoyed fresh; if it sits too long, it can become soggy as the fruits release their juice.
Tips and Variations
Mix of Fruits: There are no strict rules for fruit chaat – use any fruit you love or have on hand. Tropical fruits like mango, pineapple, papaya, or local seasonal specialties like chikoo (sapota) or guava all work brilliantly. The best fruit chaat often just uses the freshest seasonal fruits available in your region. Avoid fruits that are overly soft or ones that brown too fast (unless consumed immediately). A mix of textures (some crunchy apple/pear, some soft banana/mango, some juicy melon/orange) gives the best experience.
Falahari (Fasting) Version: If making this during Navratri or any fast, remember to swap out regular black salt with sendha namak (rock salt) as it’s the only salt allowed in many Indian fasts. Also skip any ingredient that isn’t fasting-friendly (for example, if one adds a dash of chili powder, ensure it’s a pure chili powder without added salt or ingredients, or use chopped green chilies instead). This chaat is naturally grain-free and perfect for fasting days.
Spice & Flavor Adjustments: The beauty of chaat is in balancing sweet, spicy, salty, tangy. Taste and tweak the seasoning as you go. If it’s too tangy, a drizzle of honey or an extra pinch of sugar can balance it. If you want more heat, add more chili (powder or finely sliced green chilies). For extra zing, you can grate a bit of fresh ginger into the chaat – it adds a lovely warm kick and aids digestion. A sprinkle of freshly ground black pepper can also add subtle heat and depth.
Add-Ons (Make it Street-Style): To make your fruit chaat more indulgent or closer to what you might get from a street vendor, try adding a few fried elements. Toss in a handful of thinly sliced, fried potato chips or boiled chickpeas to make it a heartier chaat. In Delhi, it’s common to include fried potato chunks in fruit chaat – it sounds unusual but that crispy-salty potato against sweet fruit is surprisingly delicious. You can also sprinkle some sev (crunchy chickpea noodles) on top just before serving for crunch. Another street-style twist is to mix in a spoonful of phalahari green chutney (a cilantro-mint chutney made without garlic or onion) and a drizzle of sweet tamarind chutney over the fruits. This gives an extra layer of sweet-and-sour flavor, essentially turning your fruit salad into a tangy chaat-chaat! If adding chutneys, you might reduce the lemon juice a bit to balance liquids.
Serving & Storage: Fruit chaat is best served immediately. As mentioned, the salt and sugar will cause fruits to shed water. If you must prep ahead, keep the fruits chopped in the fridge and add the spices and lemon right when serving. If you have leftovers (rarely happens because it gets gobbled up!), store in an airtight container in the refrigerator for only a short while. It will become a little syrupy – you can actually blend leftover fruit chaat with ice to make a quick smoothie so nothing goes waste.
This Indian Fruit Chaat is a celebration of India’s love for bold flavors in even the simplest dishes. It’s healthy, vegan, and gluten-free by nature, and loved by kids and adults alike. Make it for your next get-together or when you just want to perk up your day with a burst of flavor. One bowl and you’ll know why we Indians call this snack finger-licking good! Enjoy, and happy cooking!
There was a tiny Chinese van parked outside my college campus in the evenings — always buzzing with hungry students, music playing in the background, the chef tossing noodles with rhythm in a giant wok. For just ₹40, you’d get a steaming plate of spicy Chicken-Egg Hakka Noodles, smoky and slick with soy sauce, spiked with pepper, and topped with an extra fried egg if you were lucky.
Years later, I tried recreating that same flavor at home — and after a few experiments with sauces and stir-frying speed, I finally nailed it. This version is full of heat, packed with protein, and perfect for a quick dinner or indulgent weekend lunch.
📝 Ingredients (Serves 2)
Base:
150g Hakka noodles (boiled and tossed in 1 tsp oil)
1 cup shredded cooked chicken (grilled or boiled)
2 eggs, beaten
1 tbsp oil + extra
Vegetables:
1 medium onion, sliced
½ cup capsicum (any color), sliced
½ cup cabbage, shredded
1 small carrot, julienned
2 green chilies, slit
1 tbsp spring onions (for garnish)
Sauces & Seasoning:
1½ tbsp soy sauce
1 tbsp green chili sauce
1 tbsp red chili sauce
1 tsp vinegar
½ tsp crushed black pepper
Salt to taste
🔥 Instructions
1. Scramble the Eggs Heat ½ tbsp oil in a wok. Add beaten eggs and scramble. Remove and set aside.
2. Stir-Fry Chicken & Veggies In the same pan, add remaining oil. Stir-fry onions, capsicum, cabbage, carrots, and green chilies on high flame for 2–3 mins (they should stay crunchy). Add the chicken and toss well.
3. Add Sauces Add soy, chili sauces, vinegar, salt, and pepper. Mix everything quickly over high heat.
4. Combine Noodles Add the boiled noodles and scrambled eggs. Toss everything quickly using tongs or forks. Ensure the noodles are coated well.
5. Finish & Serve Garnish with spring onions and serve piping hot. Add an optional fried egg on top for extra richness.
There’s something undeniably comforting about the smell of pizza baking—yeast, cheese, and warmth rising in the air. But for me, pizza isn’t just about cheese and crust. It’s about memories.
I remember a rainy evening during the first year of my marriage. It was one of those days when everything outside was grey, and the roads were too wet for takeout. We were craving something indulgent, and my husband said, “Why don’t we make pizza at home?” I had never tried it before—no fancy oven, no pizza stone, not even mozzarella back then. Just trust, maida, and the kind of enthusiasm only newlyweds and food lovers share.
We kneaded the dough together, laughed at the mess we made, and layered our first pizza with capsicum, onion, and processed cheese. We didn’t know how it would turn out, but when it came off the tawa—golden, cheesy, and slightly smoky—it tasted better than any pizza chain ever could. It tasted like effort, joy, and shared discovery.
Since that day, our home style pizza has been our thing—made on lazy Sundays, birthdays, and even when the world outside feels too loud. It’s not gourmet. It’s not picture-perfect. But it’s ours.
And now, it can be yours too.
Home Style Pizza (Tawa Method)
Yield: 2 medium pizzas | Prep Time: 90 mins | Cook Time: 15 mins
Ingredients
For the Dough:
2 cups all-purpose flour (maida)
1 tsp sugar
1 tsp instant dry yeast
½ tsp salt
¾ cup warm water (approx.)
2 tbsp oil
For the Toppings:
½ cup pizza sauce (store-bought or homemade)
1 ½ cups mozzarella cheese, grated
1 onion, thinly sliced
1 capsicum, thinly sliced
¼ cup boiled sweet corn
Chili flakes, oregano to taste
Pinch of salt
Instructions
🌾 Step 1: Making the Dough
In a small bowl, combine warm water, sugar, and yeast. Let it sit for 10 minutes until frothy.
In a larger mixing bowl, add flour and salt. Make a well in the center and pour in the yeast mixture and oil. Mix and knead for 8–10 minutes until soft and springy.
Cover and let the dough rise for about 1 hour or until doubled in size. Use this time to prepare your toppings and maybe sip a warm cup of chai.
—
🍅 Step 2: Shaping the Pizza
Punch down the dough and divide it into 2 equal balls. Roll each into a medium-sized thick round—don’t aim for perfection. Home pizzas are beautifully rustic.
Place on a hot tawa and toast each side for 2–3 minutes until slightly puffed and golden. This preps the base for the toppings.
🧀 Step 3: Assemble & Cook
Spread pizza sauce evenly on the cooked side. Add cheese, toppings, and herbs. Place the pizza back on a tawa, cover with a lid, and cook on low heat for 8–10 minutes until cheese is melted and the crust is crispy at the bottom.
Serve hot with love, laughter, and (if you’re like me) a glass of chilled cola or a warm masala chai.
—
❤️ Tips & Variations
No yeast? Use curd and baking soda instead. It’ll be softer, almost like a naan-pizza hybrid.
Add-ins: Paneer tikka, olives, mushrooms, or jalapeños add lovely twists.
Extra cheesy? Stuff a bit of cheese inside the crust before toasting. Instant cheese burst!
📖 Why I Keep Coming Back to This Recipe
This is more than a pizza. It’s my reminder that we don’t always need to go out or order in to treat ourselves. We can build joy in our kitchens—flour on our hands, love in the dough, and stories baked into every slice.
When you make this recipe, don’t worry about symmetry or standards. Let it bubble over, toast unevenly, brown a little more on one side. That’s the beauty of home-style food. It’s not trying to impress. It’s just trying to nourish you—with flavor and feeling.
So the next time you want a slice of comfort, skip the delivery app. Just turn up your favorite music, roll out the dough, and make this pizza your own. ❤️
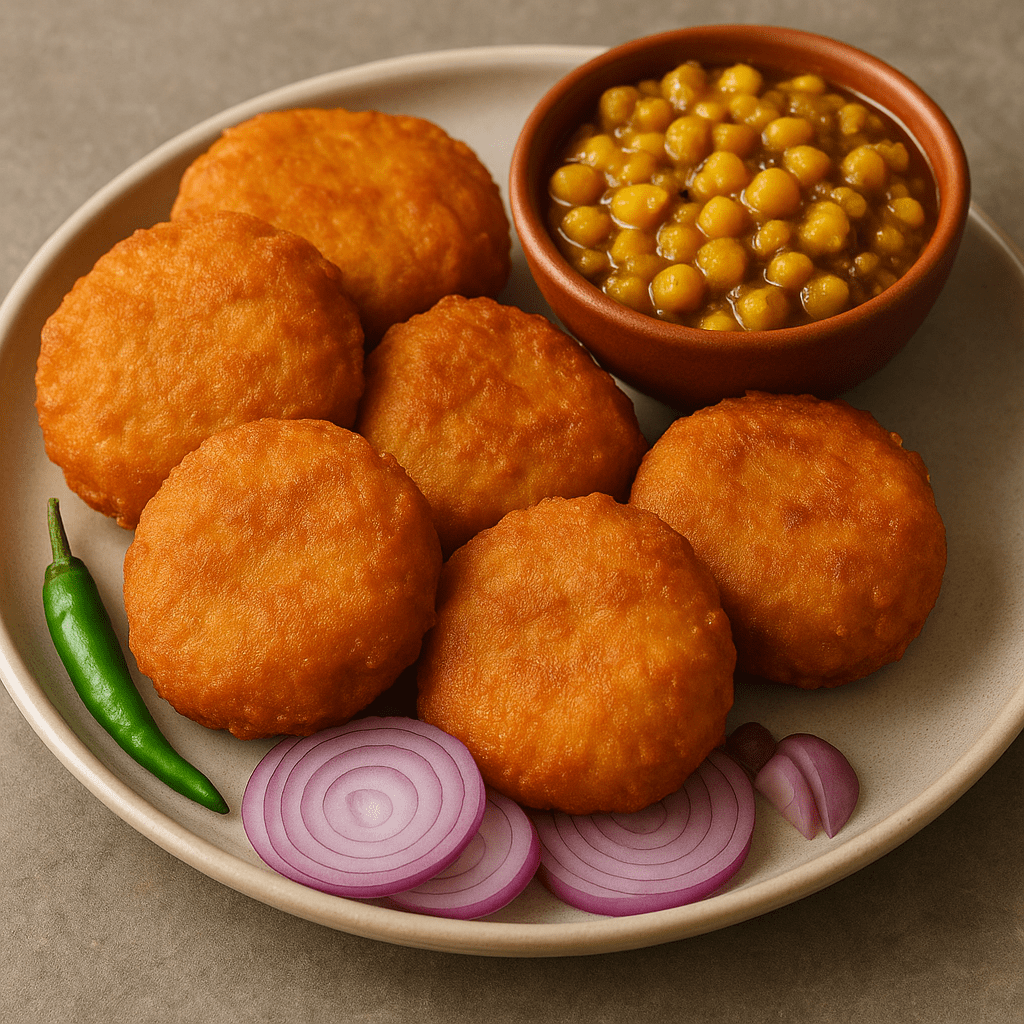
Some foods aren’t just about hunger — they’re about celebration. Chole Bhature is that loud, bold, satisfying dish you crave when you want a full heart and a full stomach.
When I first visited Delhi, I stood outside a busy corner shop, watching huge bhaturas puff up in bubbling oil like golden balloons, while the spicy smell of chole hit my nose. One plate, one squeeze of lemon, a side of pickled onions — and I understood why people are willing to stand in line for this!
Ingredients:
For Chole (Chickpea Curry):
1 cup chickpeas (kabuli chana) – soaked overnight
1 onion (finely chopped)
1 tomato (pureed)
1 tbsp ginger-garlic paste
1 tsp cumin seeds
1 tsp turmeric powder
1 tsp red chili powder
1½ tsp chole masala or garam masala
1–2 black cardamoms
Salt to taste
2 tbsp oil or ghee
For Bhature:
2 cups maida (all-purpose flour)
2 tbsp semolina (sooji)
1 tsp sugar
1 tsp salt
½ cup curd (yogurt)
1 tsp baking powder or ½ tsp baking soda
Water to knead
Oil for deep frying
Steps to Make Chole Bhature:
1. Cook the Chole
Pressure cook soaked chickpeas until soft.
In a pan, heat oil. Sauté cumin, onion, ginger-garlic paste.
Add turmeric, chili, tomato puree, chole masala.
Add cooked chickpeas and simmer with water until thick and flavorful.
2. Prepare the Bhature Dough
Mix maida, sooji, sugar, salt, baking powder.
Add curd and knead into a soft dough (use little water if needed).
Cover and let it rest for 2 hours.
3. Fry the Bhature
Divide dough into balls. Roll into discs (thicker than puris).
Deep fry one at a time in hot oil until golden and puffed.
Serving Suggestions:
Serve piping hot chole with fluffy bhaturas
Add pickled onions, green chilies, and lemon wedges on the side
Optional: a glass of sweet lassi to complete the feast!
Why I Love It
Because one plate of Chole Bhature isn’t just food. It’s boldness, indulgence, joy, and festival spirit — all rolled into one giant, puffy bhatura.
If I close my eyes and think of happiness, I hear the sound of puris cracking, water splashing, and friends laughing. Pani Puri (or golgappa, puchka, gupchup depending where you are) is more than food. It’s competition, craving, and chaos — standing around a tiny cart, one hand holding the plate, the other hand ready for the next.
I still remember the first time I challenged my cousin — “Let’s see who eats 10 pani puris faster!” Of course, we both lost because we were too busy laughing at the spice hitting us!
Pani Puri is not just a snack. It’s friendship in a crispy shell, bursting with flavor and memory.
Ingredients:
For Puris:
Readymade puris or homemade semolina puris
For Spicy Pani:
1 cup mint leaves
½ cup coriander leaves
1 green chili
1-inch ginger
1 tsp roasted cumin powder
½ tsp black salt
1 tbsp lemon juice
3 cups cold water
Salt to taste
For Filling:
2 boiled potatoes (mashed)
½ cup boiled chickpeas or white peas
Chopped onion (optional)
Tamarind chutney (optional for sweet-spicy flavor)
Steps to Make Pani Puri:
1. Prepare the Spicy Pani
Blend mint, coriander, green chili, ginger, cumin powder, lemon juice, and salt with little water.
Strain and add to cold water. Adjust spice and tanginess.
2. Prepare the Filling
Mix mashed potatoes, chickpeas, salt, and a pinch of cumin powder.
3. Assemble
Crack a puri gently at the top.
Fill with potato-chickpea mixture.
Dip in spicy pani (and sweet chutney if using).
Serve immediately and enjoy the burst!
Serving Suggestions:
Serve chilled pani puri as evening snack
Offer sweet tamarind chutney on the side for those who prefer “meetha pani”
Add boondi (tiny fried balls) into the pani for extra crunch
Why I Love It
Because no matter where you are, one bite of pani puri feels like you’re 12 again, standing at a street corner, laughing with friends over who can handle the most spice.
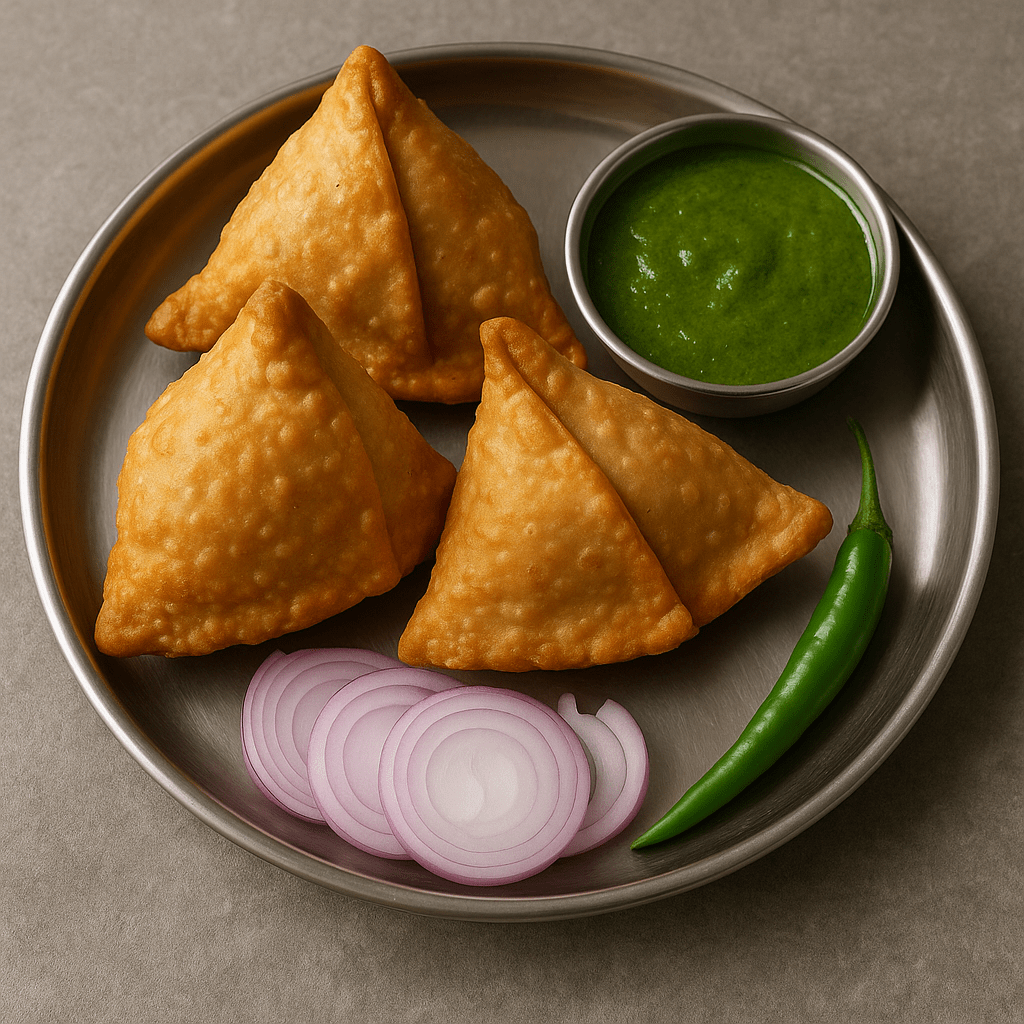
In Odisha, we don’t always call it samosa — we call it Singada. And there’s something so nostalgic about watching it being folded at tea stalls, with the smell of mustard oil and hing in the air.
Singada has a thinner, crispier crust than the North Indian version and a simpler spice mix. It’s not fiery — it’s flavorful. Served with ghugni, chutney, or even pakhala in some homes, it’s both a snack and a memory.
Ingredients:
For Dough:
1 cup maida (all-purpose flour)
2 tbsp oil or ghee
Salt to taste
Water to knead
Ajwain (optional)
For Filling:
2–3 potatoes (boiled & mashed)
¼ cup boiled green peas
1 green chili (chopped)
½ tsp grated ginger
½ tsp turmeric
½ tsp red chili powder
½ tsp cumin seeds
Salt to taste
1 tsp mustard oil
Coriander leaves (chopped)
Steps to Make Singada:
1. Make the Dough
Mix flour, salt, ajwain, and oil until crumbly.
Add water and knead into a firm dough. Rest for 20 mins.
2. Make the Filling
Heat mustard oil. Add cumin, ginger, chili.
Add turmeric, chili powder, mashed potatoes, peas, and salt.
Cook until dry and aromatic. Cool and mix in coriander.
3. Shape the Singadas
Divide dough into small balls. Roll into ovals.
Cut in half, form a cone, stuff with filling, seal the edges.
4. Deep Fry Until Golden
Fry on medium heat until crisp and golden. Drain and serve hot.
Serving Suggestions:
With green chutney or tamarind chutney
Alongside ghugni, or even tea and pakhala
Sprinkle with black salt or chopped onions for street-style flair
Why I Love It
Singada is not just a snack — it’s what school tiffins, railway stations, and home kitchens smell like in the evening. Crispy outside, warm inside, full of flavor.
It’s evening. The sky’s turning orange, and there’s a crowd forming near the local tea stall. You can hear the sizzle of oil, smell the spices, and know exactly what’s frying — Alu Chop.
Crispy outside, soft and spicy inside, Alu Chop is Odisha’s answer to a bad day, a tea break, or a friend dropping by. I grew up watching vendors flip them with bare fingers, serve them on newspaper with a green chili, and somehow make every bite feel just right.
Ingredients:
For Filling:
3 boiled potatoes
1 small onion (chopped)
1 tsp ginger-garlic paste
1 green chili (chopped)
½ tsp turmeric
½ tsp chili powder
Salt to taste
Coriander leaves (chopped)
1 tsp mustard oil
For Batter:
¾ cup besan (gram flour)
A pinch of turmeric & red chili powder
Salt to taste
A pinch of baking soda (optional)
Water to make a thick batter
Oil for deep frying
Steps to Make Alu Chop:
1. Prepare the Filling
Mash potatoes.
In mustard oil, sauté onion, chili, and ginger-garlic.
Add turmeric, chili powder, salt, and mashed potato.
Add coriander. Cool and shape into small balls or flat patties.
2. Prepare the Batter
Mix besan, salt, spices, and water into a thick coating batter.
3. Fry the Chops
Dip each ball in batter and deep fry until golden and crisp.
Drain on paper and serve hot.
Serving Suggestions:
Serve with Ghugni, Green Chutney, or just a green chili
Also delicious with pakhala or as a side with evening tea
Why I Love It
Alu Chop is not fancy, but it’s faithful. It’s the taste of childhood, roadside stalls, and home kitchens all in one crispy bite.