Snacks, Street Foods

Vada Pav – Mumbai’s Beloved Street Snack

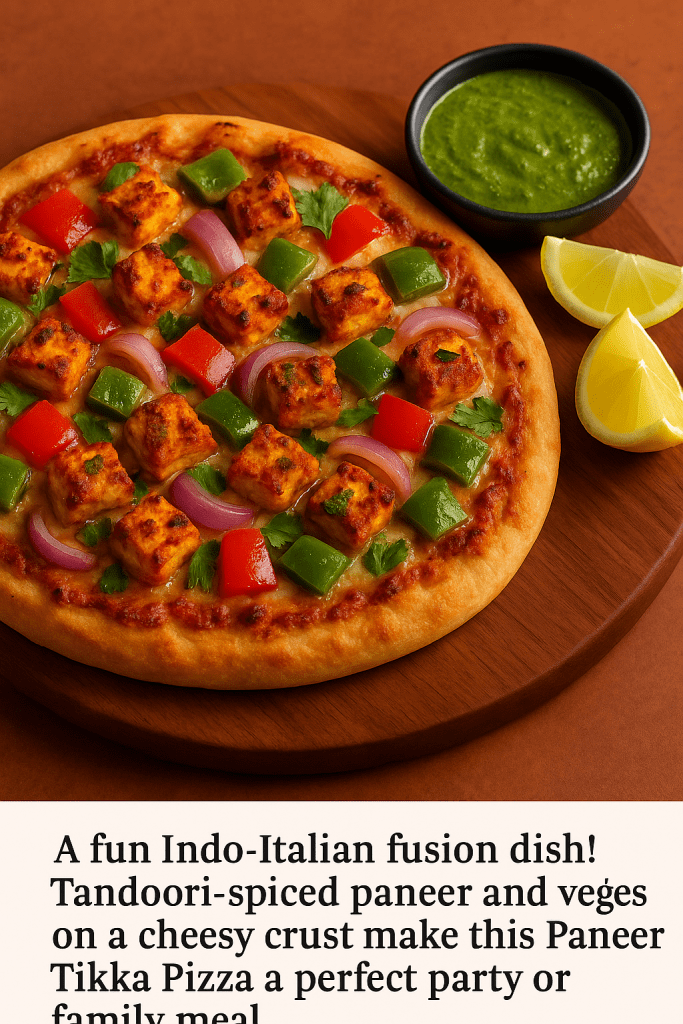
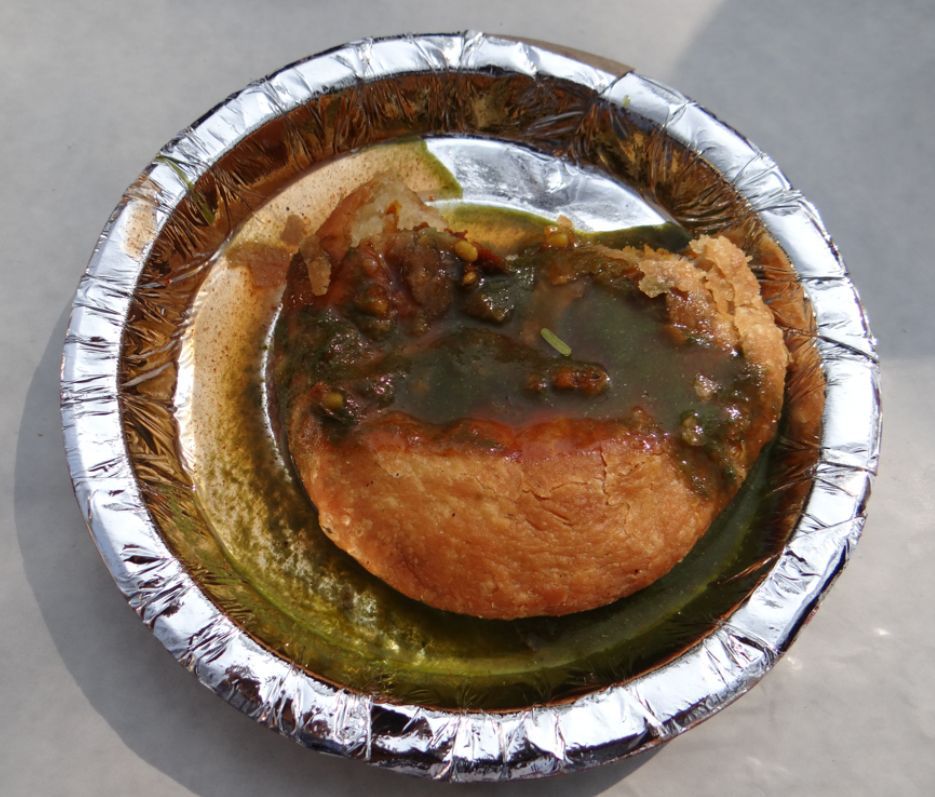
I still remember the first time I bit into a sizzling hot Bada Pao (Vada Pav) on a rainy Mumbai afternoon. The spicy potato vada – crunchy and golden – nestled inside a pillowy soft pav bun, hit all the right notes. As I walked along the busy street, steam rising from the paper wrapper, the pungent aroma of garlic and chili chutneys filled the air. It was a simple pleasure, but one I’ll never forget. Bada Pao (also spelled Vada Pav) is, as one food blogger puts it, “Mumbai’s beloved street food sensation” often nicknamed the “Indian burger”.  In essence, it’s a vegetarian fast-food sandwich: a deep-fried spicy mashed-potato fritter placed inside a sweet bun and typically served with a green chili and flavorful chutneys.  This humble snack has become so iconic that it’s said to be the most famous street food of Mumbai – so famous, in fact, that August 23 is even celebrated as World Vada Paav Day.

Growing up, I watched my mum prepare the potato filling with care. She would boil and mash potatoes, then sauté mustard seeds, curry leaves, ginger, garlic and green chilies in a little oil. A pinch of turmeric and salt went in for color and taste, and the mixture was stirred into the potatoes along with chopped coriander. After it cooled, she shaped the spicy mash into round patties. Meanwhile, we’d whisk gram flour (besan) into a batter with a little water – sometimes adding a pinch of baking soda or rice flour for extra fluff. Each patty was coated in that batter and deep-fried until golden and crispy on the outside.

No Vada Pav is complete without chutney. I always smear the split pav with homemade green cilantro-mint chutney and a dry garlic-chili (lasun) chutney – the classic accompaniments. The combination of tangy cilantro, pungent garlic, and heat from chilies is what really makes each bite pop. The first time I made this at home, it transported me back to the streets of Mumbai – and even reminded me that this was originally an affordable snack for mill workers in the 1960s. Today it’s a cultural symbol; one of my favorite childhood memories is sharing Bada Pao with my friends after school.

Now let’s bring those Mumbai flavors into your kitchen. The ingredients and steps below will guide you through a delicious homemade Bada Pao (Vada Pav). Enjoy!

Ingredients

Pav buns: 4 soft dinner rolls (Indian pav)

Potatoes: 4 medium russet or red potatoes, boiled and mashed

For the potato filling: 1 tsp mustard seeds, pinch of asafoetida (hing), ¼ tsp turmeric, 2 tsp ginger (grated), 3 cloves garlic (minced), 2–3 green chilies (chopped), 12–15 curry leaves, salt to taste, and handful of chopped fresh coriander (cilantro)

Gram flour batter: ¾ cup besan (gram flour), pinch of baking soda (optional for fluffiness), pinch of turmeric, pinch of red chili powder, salt to taste, and water to make a thick batter

Oil: for deep frying

Chutneys & toppings: Homemade or store-bought green cilantro-mint chutney and dry garlic-peanut chutney (lasun chutney); sliced onions and fried green chilies (optional) for serving


Instructions

1. Make the potato masala: In a pan, heat 1–2 tbsp oil and add mustard seeds. When they splutter, add hing, curry leaves, ginger, garlic and green chilies. Sauté for a minute until fragrant. Stir in the turmeric, salt and mashed potatoes, then mix well. Cook for 1–2 minutes, then turn off the heat and stir in chopped coriander. Let the mixture cool slightly. Divide it into 4–6 equal portions and shape each into a round patty about 1½–2 inches wide and ½ inch thick.


2. Prepare the batter: In a bowl, whisk together gram flour, a pinch of salt, baking soda (if using), turmeric and chili powder. Gradually add water and whisk to make a smooth, lump-free batter that coats the back of a spoon (it should be neither too thick nor too runny).


3. Fry the vadas: Heat oil in a deep skillet or kadhai over medium-high heat. When the oil is hot (test by dropping a bit of batter – it should sizzle and rise), dip each potato patty into the batter, ensuring an even coat. Use a slotted spoon to gently lower it into the oil. Fry 2–3 vadas at a time, turning occasionally, until they are golden brown and crisp all over (about 3–4 minutes). Remove and drain on paper towels.


4. Warm the pav buns: While the vadas fry, warm a griddle (tawa) over medium heat. Slice each pav bun horizontally, leaving one edge attached. Lightly toast the buns on the griddle (you can spread a bit of butter if you like) until they are just golden. Remove and keep warm.


5. Assemble the Bada Pao: Spread a generous layer of green chutney on one side of each bun and sprinkle some dry garlic-chili chutney on the other side. Place a hot vada (batata vada) inside the bun, pressing lightly. If desired, add sliced raw onion or a fried green chili inside for extra crunch and heat. Serve the assembled Bada Paos immediately – they are best enjoyed hot and fresh!


Tips

Adjust the spice: You can control the heat by adding fewer green chilies to the potato mix or reducing the chili powder in the batter. If cooking for kids, omit extra chilies and serve hot sauce on the side.

Make it extra crispy: For crunchier vadas, stir in 1–2 tablespoons of rice flour into the gram flour batter. Also, ensure the batter is not too thick – a thinner coating fries up lighter.

Even coating trick: Use a spoon to tap off any excess batter from the vada before frying. A slotted spoon is handy for lowering the batter-coated vada into hot oil smoothly.

Chutneys in advance: Both green cilantro chutney and dry garlic chutney can be made a day or two ahead and refrigerated. This saves time and lets flavors meld. Add a swirl of sweet tamarind-chutney for a tangy twist if you like.

Use fresh pav: Authentic Vada Pav has soft, slightly sweet buns. If you can find Indian pav rolls (like from a bakery or Indian grocery), that’s ideal. Otherwise, plain soft dinner rolls work; avoid very sweet hamburger buns.

Serve hot: Vada Pav is best enjoyed immediately. The vada should be hot from the fryer and the chutneys vibrant. If storing leftovers, reheat vadas in a pan to crisp them up, then assemble.


Enjoy your homemade Bada Pao with a cup of masala chai for the full Mumbai experience. Each bite of spicy potato vada and tangy chutneys will transport you to the bustling streets of Mumbai just like it did for me. I hope this recipe brings you the same joy and nostalgia it brings me – happy cooking!

Street Foods

Paneer Tikka Pizza

Our Indian-Italian fusion Paneer Tikka Pizza is a festive, family-friendly twist on classic pizza. It marries the beloved comfort of pizza with vibrant Indian flavors: cubes of tandoori-spiced paneer (Indian cottage cheese) mixed with crunchy bell peppers and onions, all topped with a blanket of melted mozzarella. This vegetarian delight proves pizza can be both homely and adventurous. Indian fusion dishes are all about bringing people together around bold flavors – this pizza is sure to become a party favorite whether you’re celebrating a festival or just making dinner fun for the kids.

Ingredients

Pizza Base: 1 (about 10-inch) round pizza dough (homemade or store-bought).

Paneer Tikka Marinade: 250 grams paneer (Indian cottage cheese), cut into 1-inch cubes; 3 tablespoons thick yogurt (hung curd or Greek yogurt); 1 teaspoon ginger-garlic paste; 1 small onion, finely chopped; 1/2 teaspoon Kashmiri red chili powder (or paprika); 1/2 teaspoon coriander powder; 1/4 teaspoon turmeric; 1/2 teaspoon garam masala (or tandoori masala); 1/4 teaspoon cumin powder; 1/4 teaspoon chaat masala; 1/2 teaspoon salt (or to taste); 1 teaspoon lemon juice.

Toppings: 1 small bell pepper (capsicum), diced; 1/2 small onion, sliced; 1-2 tomatoes, chopped (optional); 1 to 1½ cups shredded mozzarella cheese; 2 tablespoons chopped fresh cilantro (coriander) leaves; oil or melted butter for brushing.

Sauce (optional): 1 cup pizza sauce or plain tomato puree (season with basil and oregano); alternately use 2 tbsp ketchup + 2 tbsp mint-cilantro chutney for a tangy Indian twist.

Baking Aids: 1 tablespoon roasted gram flour (besan) optional (this thickens the marinade and helps it cling to the paneer and veggies).


Marinade & Topping Prep

Make the Tandoori Yogurt Marinade: In a mixing bowl, whisk the thick yogurt until smooth. Stir in the ginger-garlic paste, chili powder, coriander, turmeric, garam masala, cumin, chaat masala, salt, and lemon juice. (If the mix seems runny, add the roasted gram flour – it gives the marinade some body and helps it stick.) Mix thoroughly until creamy; a properly thick marinade should coat the back of a spoon.

Marinate Paneer and Veggies: Add the paneer cubes to the yogurt-spice mix and gently toss to coat every piece. Also add the chopped bell pepper and onions, mixing well so the veggies are slicked with marinade. Cover the bowl and refrigerate for at least 30 minutes (1 hour or even overnight for the best flavor). The longer it marinates, the deeper the tandoori flavor in the cheese and onions.

Prepare Other Toppings: Slice or chop any remaining veggies and have the mozzarella ready. If using a homemade sauce, whisk that up now. Preheat your oven or air fryer so it’s hot by the time you assemble the pizza.


Making the Pizza Dough (for Homemade Base)

Homemade Dough: If you’re making your own crust, combine 3 cups flour (whole wheat or all-purpose) with 2 teaspoons instant yeast, 1/2 teaspoon sugar, and 1/2 teaspoon salt. Gradually add 1 to 1¼ cups warm water and 2 tablespoons olive oil. Knead until smooth and elastic. Let the dough rest in a warm place, covered, until it doubles in size (about 1–2 hours). Punch it down and roll it into a 10-inch round, making the edges slightly thicker. Poke the base all over with a fork to keep it from puffing up.

Store-Bought Base: For convenience, use a ready-made pizza crust, garlic naan, or flatbread of similar size. Simply place it on a baking sheet. Lightly brush the surface (especially the edges) with a bit of oil or butter for a golden finish.


Assembling & Baking

Sauce First: Spread a thin layer of the pizza sauce (or ketchup-chutney blend) evenly over the rolled-out dough, leaving a 1/2-inch border at the edges.

Add the Toppings: Scatter the marinated paneer, peppers, onions and (if using) tomatoes on top of the sauce. Try to distribute them evenly so every slice gets a colorful mix.

Cheese It Up: Generously sprinkle the shredded mozzarella (and any other cheese) over the paneer and veggies. Don’t be shy – the cheese will bubble and meld with the toppings.


Oven Method

Place the pizza on a parchment-lined baking sheet and slide it into a preheated oven (220–250°C, or 425–480°F). Bake for about 12–20 minutes until the crust edges are golden and the cheese is melted and bubbly. (If your crust is very thin – for example, if using naan – you can bake at 175°C (350°F) for just 8–10 minutes.) Rotate the pan midway if your oven has hot spots. For an extra-toasty top, switch to the broil/grill setting for the last 1–2 minutes; watch it closely so it doesn’t burn.

Air Fryer Method

For a quick crisp, cook the pizza in an air fryer. Set the fryer to 325°F (160°C). Place one pizza (or cut it in half if needed) in the basket and cook for about 7–8 minutes, checking after 7 minutes. The pizza is done when the crust looks crisp at the edges and the cheese has fully melted. (There’s no need to preheat most air fryers; just keep an eye so it doesn’t overbake.)

Stovetop (Tawa) Method

A tawa (heavy skillet) can make a great pizza pan on the stove. Heat a large, heavy-bottomed pan on medium-low and brush the surface with a little oil. Lay the rolled-out dough in the pan. Cook the bottom until lightly browned (1–2 minutes), then flip the dough. Quickly spread your sauce and toppings on the now-cooked side, sprinkle the cheese on top, and immediately cover the pan with a lid. Let it cook on low for another 4–6 minutes, until the crust underneath is crisp and the cheese melts. This method mimics a grill with lid, giving you that pizza feel without an oven.

Cheese Melting Tips

Be generous with the cheese for gooey pull! For an extra-bubbly brown finish, finish the pizza under a hot broiler or griller for 1–2 minutes. Keep a close eye so the cheese just gets golden brown spots. You can also brush the crust edges with melted butter or garlic butter right after baking for a restaurant-style shine and flavor boost.

Serving Suggestions

Slice the Paneer Tikka Pizza right away while it’s hot and the cheese is stretchily delicious. Serve each slice with your favorite Indian-style dips. Cooling mint-cilantro chutney or a tangy tamarind-date chutney are classics – a spoonful on the side is heavenly. A simple yogurt raita (cucumber-yogurt salad) also complements the spicy tikka flavors. For drinks, a sweet mango lassi, chilled lemonade or even a cold beer contrast nicely with the spice. This pizza is bold enough to stand on its own, but it loves company – think colorful salads, more chutneys (or ketchup) and festive beverages to round out the meal. Leftovers keep in the fridge for a day or two; to reheat, just crisp them up again on a pan or in the air fryer so the crust stays crunchy.

Enjoy your homemade Paneer Tikka Pizza – it’s a guaranteed crowd-pleaser that brings fun and flavor to any table

Snacks, Street Foods

Prawn Pakora – Crispy Indian Shrimp Fritters with Gram Flour & Spices

As the monsoon rain patters against the window, I’m transported back to my childhood kitchen. My mother would whip up Prawn Pakoras on those cozy rainy afternoons – the sizzle of batter hitting hot oil and the irresistible aroma of spices filled our home. These golden shrimp fritters were more than just a snack; they were a warm hug on a dreary day, served with stories and steaming cups of chai. Every bite brings back nostalgic memories of laughter, wet socks drying by the stove, and plates piled high with crispy pakoras.

Piping hot Prawn Pakoras served with zesty green chutney – an inviting treat on a monsoon evening.
Pakoras are a classic Indian fritter made primarily with gram flour (besan). A touch of rice flour or cornstarch is often added to the batter to give extra crunch. Prawn Pakora takes this beloved snack to the next level – succulent prawns are marinated in aromatic spices and fresh herbs, then dipped in a spiced besan batter and deep-fried until golden and crisp. The result is a tantalizing combination of textures and flavors: crunchy on the outside with tender, juicy shrimp inside. It’s the kind of appetizer that disappears as soon as it’s out of the oil, especially when served with a tangy chutney or a squeeze of lemon. In this North Indian-style recipe, we’ll walk through marinating the prawns, preparing the perfect batter, and frying them to crispy perfection.

Ingredients

Here’s everything you need to make Prawn Pakora at home. Measure and prep the ingredients before you start:

Prawns (Shrimp): 300 g small or medium prawns (about ½ lb), peeled and deveined. (Smaller prawns are extra flavorful, but use any size – just ensure they’re cleaned well.)

Gram Flour (Besan): 1 cup chickpea flour. This forms the base of the batter, giving pakoras their distinctive nutty flavor.

Rice Flour: 2 tablespoons. Mixing a bit of rice flour with besan helps make the fritters extra crispy.

Ginger-Garlic Paste: 2 teaspoons (or 1 teaspoon each of freshly grated ginger and minced garlic). This infuses warm, pungent flavor into the marination.

Green Chilies: 2, finely chopped. Adjust to taste for heat. (You can substitute ½ teaspoon red chili powder or a pinch of black pepper if you prefer less heat.)

Fresh Herbs: 2 tablespoons chopped fresh coriander leaves (cilantro) for brightness. (Optional: 5–6 curry leaves, finely chopped, for a South Indian twist of aroma.)

Spices:

Red Chili Powder: 1 teaspoon, for heat and color (adjust to your spice preference).

Turmeric Powder: ½ teaspoon, for earthy flavor and a warm golden color.

Cumin Powder: 1 teaspoon, adds a nutty, smoky note (cumin seeds lightly crushed can also be used).

Coriander Powder: 1 teaspoon, for a fragrant citrusy hint.

Garam Masala: ½ teaspoon (optional), for a complex warmth. Use sparingly so it doesn’t overpower the shrimp’s delicate taste.

Ajwain (Carom Seeds): ¼ teaspoon (optional), lightly crushed. A traditional North Indian touch that adds a lovely aroma and helps in digesting the besan batter.


Lemon Juice: 2 teaspoons. The acidity tenderizes the prawns and adds tanginess. (If using, don’t marinate for too long as the acid can start “cooking” the shrimp.)

Baking Soda: a pinch (optional). Helps lighten the batter for a fluffier, soft-inside texture, but use very little to avoid oil absorption.

Salt: 1 teaspoon (adjust to taste). Divided use – some for marinating prawns, the rest for the batter.

Oil: for deep frying (about 2–3 cups of a neutral oil like vegetable or peanut oil, enough for a depth of 2–3 inches in your pan).


Step-by-Step Instructions

Follow these steps to make perfectly crispy prawn pakoras. We’ll start by marinating the shrimp, then prepare the batter, and finally fry the pakoras until golden-brown.

1. Marinate the Prawns: In a mixing bowl, add the cleaned prawns. Pat them dry with a paper towel to remove excess water. Stir in ½ teaspoon salt, ½ teaspoon red chili powder, and the ½ teaspoon turmeric. Add the ginger-garlic paste, half of the chopped green chilies, and the lemon juice. Toss everything well so the prawns are evenly coated in this spice mix. Let them marinate for about 15 minutes (this infuses flavor, but avoid marinating much longer, especially if using lemon, as the shrimp can turn mushy if left too long). While the prawns are marinating, you can prep the batter ingredients.


2. Prepare the Pakora Batter: In a separate bowl, combine the dry ingredients – gram flour, rice flour, remaining ½ teaspoon salt, ½ teaspoon red chili powder, cumin powder, coriander powder, and garam masala (if using). Mix these dry spices and flours together. Now add the chopped fresh coriander leaves, remaining green chilies, and ajwain (if using) to the bowl. Pour in water gradually (around ½ cup to start), whisking or stirring continuously to avoid lumps, until you get a smooth, thick batter. The batter should be of a coating consistency – not as thin as crepe batter and not as thick as dough. Lift the spoon: the batter should cling and coat the back of a spoon thickly. If it’s too thick, add a tablespoon of water at a time; if too thin, sprinkle a bit more besan. Finally, mix in a pinch of baking soda (optional) and give the batter a last good stir.


3. Coat Prawns in Batter: Add the marinated prawns (along with any juices from the marinade) into the batter. Stir gently to coat each prawn well with the batter. The moisture from the prawns and lemon juice usually is enough to loosen the batter slightly; if the mixture looks very thick or dry, you can add a teaspoon or two of water. Ensure the prawns, along with bits of chili and herb, are evenly dispersed in the batter. (If you used small prawns, you might find they clump together with batter – that’s okay, you can fry small clusters or individual pieces as you prefer.)


4. Heat the Oil: Heat oil in a deep kadhai (wok) or heavy-bottomed pan. You need enough oil for deep frying (about 2 inches deep). Heat the oil on medium flame until it’s hot but not smoking (around 350–360°F if you have a thermometer). To test without a thermometer, drop a tiny bit of batter into the oil – it should sizzle and rise to the top immediately but not turn brown instantly. Tip: Keep the flame at medium-high once the oil is hot; this ensures the pakoras cook through and turn crispy without soaking up oil.


5. Fry the Prawn Pakoras: Once the oil is ready, it’s time to fry in batches. Do not overcrowd the pan (adding too many at once can lower the oil temperature and make the fritters oily or cause the batter to disperse). Using your fingers or a spoon, carefully drop battered prawns into the hot oil. You can fry them one by one or in small clusters (for example, a spoonful of batter that has 2–3 small prawns plus some onions/herbs from the batter). Be cautious as you slide them in to avoid splashes. Fry on medium-high heat. After about 2–3 minutes, the pakoras will start to turn golden on the bottom; gently flip each piece using a slotted spoon. Continue frying another 2–3 minutes on the other side until the pakoras are golden brown and crispy. The prawns cook quickly, so total frying time is usually 5–6 minutes per batch (larger prawns might need an extra minute). Remember, prawns can toughen if overcooked, so aim to remove them once the crust is just golden and the bubbling of oil has slightly reduced.


6. Drain and Repeat: Using a slotted spoon, lift out the fried pakoras, letting excess oil drip back into the pan. Place the fried prawn pakoras on a plate lined with paper towels or (even better) on a wire rack set over a tray, which keeps them crisp by allowing excess oil to drain away. Let the oil reheat to the right temperature between batches if needed. Continue frying the remaining prawns in batches the same way. Optional: For an extra-crispy result, you can double-fry the pakoras. Once all batches are done, put the already fried pakoras back into the hot oil for just 30–60 seconds and remove. This second fry makes them superbly crunchy. (It’s an optional step if you want that restaurant-like crunch.)


7. Serve: Transfer the hot prawn pakoras to a serving platter. Sprinkle a pinch of chaat masala on top for a tangy kick (optional but highly recommended). Serve immediately while they’re hot and crisp – see below for serving ideas and accompaniments.


Tips for Extra Crispy Pakoras

Making pakoras is simple, but a few tips can help ensure they turn out extra crispy and delicious:

Dry the Prawns: Excess moisture is the enemy of crispiness. After washing the prawns, pat them very dry. If using frozen prawns, thaw completely and drain well. Any water released from the prawns can thin out the batter and prevent it from coating properly, resulting in a soft exterior.

Besan + Rice Flour: Always use fresh gram flour (besan) for best flavor. Mix in a bit of rice flour or cornstarch with the besan – this yields a crunchier texture in the fried pakoras. The combination of flours helps the fritters stay crisp even after cooling for a bit.

Batter Consistency: Make sure your batter is moderately thick. A runny batter won’t cling and will produce flat, oily pakoras, while an overly thick batter can make them doughy. It should be just thick enough to coat the prawns generously.

Hot Oil, Medium-High Flame: The oil temperature should be hot (around 350°F/175°C). If the oil isn’t hot enough, the pakoras will absorb more oil and turn soggy. Conversely, if oil is too hot, they’ll brown quickly outside but the prawn inside may remain undercooked. Maintain a medium-high flame for even cooking – this way the prawns cook through while the outside gets crunchy.

Fry in Batches, Don’t Crowd: Fry the pakoras in small batches. Crowding the pan will drop the oil temperature and cause uneven cooking (and greasier fritters). Give the pakoras enough space to float and fry freely. Between batches, let the oil come back up to temperature.

Double Fry Technique: For the ultimate crispiness, try double frying. This is a trick where you fry the pakoras until almost done, take them out to rest for a minute, and then fry them again briefly. This extra step dries out any excess moisture and makes the pakoras exceptionally crunchy. It’s the secret to restaurant-style crunch, especially great if you plan to serve the pakoras after a while.

Use a Wire Rack: If you have one, let fried pakoras rest on a wire rack instead of paper towels. This prevents them from sitting in oil and steaming themselves soft. If using paper towels, don’t leave them piled up for too long.

Serving Immediately: Pakoras are best enjoyed fresh. They will gradually soften as they cool (due to moisture from the prawn and ambient humidity), so plan to serve them hot and within 10-15 minutes of frying for the best texture.


Serving Suggestions

Prawn pakoras truly shine when paired with the right accompaniments. Here are some serving ideas to complete the experience:

Chutneys: The classic pairing is a vibrant Mint-Coriander Chutney, which offers a cool herby contrast to the hot, spicy pakoras. Tamarind-Date Chutney is another favorite – its sweet-tangy notes complement the savory fritters beautifully. If you have imli (tamarind) or mint chutney on hand, put out a bowl for dipping. Even a simple ketchup or chili-garlic sauce can do the trick for kids or those who prefer it.

Masala Chai: In North India, there’s nothing like crunchy pakoras with a cup of hot masala chai on a rainy day. The spiced tea and these shrimp fritters make for a cozy combination, especially during monsoon evenings.

Salad & Lemon: Serve some thinly sliced onion rings and cucumber on the side, with lemon wedges to spritz over the pakoras. A little fresh onion salad adds crunch and the lemon juice brightens up the flavors, much like street-food style servings. You can also sprinkle a bit of extra chaat masala on the onions for tang.

As an Appetizer: Prawn pakoras make a great start to any Indian meal. You can serve them before a main course (think of an Indian dinner with curries and naan) or as a party appetizer. They stay fairly crisp for a while, especially if double-fried, so you can fry a big batch and keep them warm in a low oven (around 100°C/212°F) until serving.

Rainy Day Snack: Lastly, enjoy these pakoras just on their own as a delightful snack. Whether it’s a rainy afternoon or a chilly evening, pile them up on a platter, grab your favorite dipping sauce, and enjoy the crispy, spicy goodness. Don’t be surprised if they vanish quickly – you might want to make a double batch!


Enjoy! Each bite of these Prawn Pakoras is a burst of nostalgic flavor – crunchy, spicy, and deeply satisfying. It’s a recipe that brings together the comfort of home-cooking and the excitement of Indian street food in one delicious platter. Happy cooking and happy eating!

Snacks, Street Foods

Honey Chilli Potatoes (Crispy Indo-Chinese Snack)

Introduction

Walking through a bustling Indian street market, the aroma of garlic, chiles, and sizzling sauces draws you to a roadside stall. Here, the vendor is tossing Honey Chilli Potatoes – golden fried potato fingers – in a big wok, coating them with a sticky, sweet-and-spicy glaze. This dish is a beloved Indo-Chinese snack, meaning it’s a fusion of Chinese cooking techniques with Indian flavors. Honey Chilli Potatoes feature crunchy fried potato sticks coated in a tangy-sweet-spicy sauce made from honey, chili sauce, garlic, and soy sauce. Each bite is crispy, delicious, and usually topped with a sprinkle of sesame seeds and chopped spring onions for extra flavor and crunch. In cities like Delhi, it’s a top vegetarian street food – crunchy, sugary, and zesty – that locals adore, whether grabbed from a street stall or enjoyed at a restaurant. One bite of these hot, sticky, honey-glazed potatoes and you’ll understand why this Indo-Chinese classic is absolutely addictive!

A bowl of freshly made Honey Chilli Potatoes, glistening with a sweet-spicy honey chili sauce and garnished with sesame seeds and spring onions. These crispy fried potato fingers are tossed in the sticky sauce just before serving, so they remain crunchy inside and coated with flavor on the outside.

Ingredients

For crispy potatoes: (Serves 3-4)

3 large potatoes, peeled and cut into thick fingers (French-fry style)

2 tablespoons cornflour (cornstarch)

2 tablespoons all-purpose flour (maida)

1/2 teaspoon salt

1/2 teaspoon black pepper powder

Oil, for deep frying (enough for deep or shallow fry as preferred)


For honey-chili sauce:

2 tablespoons oil (for stir-frying)

1 inch ginger, finely chopped

4 cloves garlic, finely chopped

2 green chilies, finely sliced (adjust to taste)

1/2 medium onion, thinly sliced (optional, for crunch)

1/2 green bell pepper (capsicum), thinly sliced (optional)

2 tablespoons tomato ketchup

2 tablespoons soy sauce (light soy works well)

2 tablespoons white vinegar

2 teaspoons red chili sauce (such as Schezwan sauce or any hot chili sauce)

1/2 teaspoon red chili powder (Indian chili powder or cayenne, optional for extra heat)

1/2 teaspoon salt (adjust to taste, as soy sauce is salty)

1 teaspoon cornflour mixed with 2 tablespoons water (cornstarch slurry, for thickening)

2 tablespoons honey (add more or less to taste)

1 teaspoon sesame seeds (toasted, plus extra for garnish)

2 spring onions, chopped (for garnish)


Step-by-Step Instructions

1. Prep the Potatoes: Peel the potatoes and cut them into finger-like strips about 2–3 inches long (like thick fries). Place the sliced potatoes in a bowl of cold water and soak for 10-15 minutes to remove excess starch. This step helps the potatoes crisp up better. Drain the water, then parboil the potato fingers in salted boiling water for about 3 minutes until half-cooked. Drain and let them cool completely (cooling prevents them from breaking and helps them fry up extra crispy).


2. Coat with Flour and Spices: In a large mixing bowl, take the cooled half-cooked potato fingers. Add the cornflour, all-purpose flour, 1/2 teaspoon salt, and 1/2 teaspoon pepper. Toss or gently mix until all the potato pieces are well-coated with the dry mixture. The potatoes should have a thin dusty coating – this will turn into a crispy crust when fried. If the mixture looks wet or the potatoes are releasing water, you can sprinkle a bit more cornflour.


3. First Fry – Make Potatoes Crispy: Heat oil in a deep pan or wok over medium-high flame. Once the oil is hot (test by dropping a small piece of potato; it should sizzle immediately), carefully drop in the coated potato fingers in batches. Do not overcrowd the pan. Fry the potatoes on medium to medium-high heat, stirring occasionally, until they turn golden brown and crunchy on the outside. This should take a few minutes per batch. Remove fried potatoes with a slotted spoon and drain on paper towels. (Tip: For ultra-crispy results, you can double-fry the potatoes. Fry them first until lightly golden and almost cooked, take them out to cool for a few minutes, then fry again on high heat until deeply golden and extra crispy. This two-stage frying is the secret that many restaurants use to keep the potatoes crunchy even after tossing in sauce!【6†L73-L80})


4. Stir-Fry Aromatics: In a separate large wok or frying pan, heat 2 tablespoons of oil over high heat. Add the chopped ginger, garlic, green chilies, and sesame seeds. Stir-fry these aromatics for about 30–60 seconds until fragrant (you’ll smell the garlic and ginger – be careful not to burn them). This forms a flavorful base for the sauce.


5. Add Veggies (Optional): Toss in the sliced onions and bell pepper (capsicum). Stir-fry on high flame for another minute until they soften slightly yet remain crunchy. Cooking on high heat helps to sear the veggies while keeping their color and crunch, much like classic Chinese stir-fry.


6. Pour in the Sauces: Now add the tomato ketchup, soy sauce, vinegar, red chili sauce, chili powder, and a pinch of salt to the wok. The pan will sizzle! Stir everything together on high heat for about 1 minute. You’ll notice the sauce bubbling and releasing a tangy-spicy aroma as it cooks. This mixture of ketchup, chili sauce, honey, and soy is what gives the dish its signature tangy-sweet-spicy punch.


7. Thicken the Sauce: Give the prepared cornflour slurry a quick stir and pour it into the center of the wok. Mix it immediately with the sauces. The slurry will thicken the sauce within seconds, making it glossy and coat the back of a spoon. If it gets too thick, you can add a tablespoon of water. If it’s too thin, cook a few seconds longer – you want a consistency that will cling to the potatoes.


8. Toss Potatoes in Sauce: Add the fried potato fingers into the wok. Drizzle the honey over the potatoes. Stir and toss everything on high heat for about 30 seconds to 1 minute, just until the potatoes are well coated with the sticky sauce. Do not cook too long after adding the fried potatoes and honey, or the coating will turn soggy. The heat should be just enough to warm the honey and help the sauce caramelize onto the fries without softening them.


9. Garnish and Serve: Turn off the heat. Sprinkle the chopped spring onions and additional toasted sesame seeds over the honey chilli potatoes. Give a final toss. The dish should look glossy and irresistible, with each potato piece shiny from the sauce and studded with sesame. Serve immediately while piping hot and crispy for the best taste and texture. Enjoy your homemade street-style honey chilli potatoes!


Serving Suggestions

Serve Hot: Honey Chilli Potatoes taste best when served immediately, hot and crispy. As with any fried dish, they may lose some crunch as they cool, so dig in while they’re fresh.

Street-Style Snack or Starter: These potatoes make a great party appetizer or an evening snack. Stick toothpicks in them for a fun finger-food presentation. The sweet-spicy flavor is kid-friendly yet exciting for adults.

Pair with Main Course: Turn it into a meal by pairing with other Indo-Chinese dishes. It goes well as a side with schezwan fried rice, hakka noodles, or even alongside Chili Paneer and Manchurian for an Indo-Chinese feast. You can also serve them as a side to fried rice or noodles to balance a fuller dinner.

Customize the Heat: Serve extra chili sauce or chili flakes on the side for those who love more heat, and a small bowl of sweet chili sauce or ketchup for those who prefer extra sweetness. A cold drink or a fizzy beverage also pairs nicely, as honey chilli potatoes can be quite spicy and bold in flavor.


Enjoy this crispy, sweet, and spicy treat that brings the vibe of Indian street food straight to your kitchen. Happy cooking! 😋

Street Foods

Indo-Chinese Chili Garlic Noodles – Spicy Street-Style Delight

Introduction

I still remember the first time I slurped up a plate of chili garlic noodles from a street cart – the aroma of garlic and chilies sizzling in the wok was irresistible! This dish is a shining example of Indo-Chinese cuisine, a unique fusion where Chinese cooking techniques meet Indian spices and flavors. It all began in the late 1700s, when Hakka Chinese immigrants in Kolkata started adapting their recipes to suit local Indian tastes. Over time, this spicy, saucy fusion spread across India and became a beloved part of our food culture – today, “Chinese food” in India often actually refers to these desi-Chinese creations loved by everyone.

A bowl of spicy Chili Garlic Noodles, tossed with crunchy veggies in a fiery garlic sauce. This street-style noodle dish is as vibrant in taste as it looks – each strand is coated in a tangy, spicy sauce and dotted with crispy bits of garlic. True to its name, it packs some heat but also surprises you with a hint of sweetness, all balanced by a bold garlic punch in every bite. If you’re craving that iconic Indo-Chinese wok flavor at home, read on – this recipe will bring those restaurant-style chili garlic noodles right to your kitchen!

Ingredients

200 grams Hakka noodles (wheat noodles) – or use lo mein/egg noodles (uncooked weight)

2 tablespoons oil (vegetable or peanut oil for high-heat cooking)

8 cloves garlic, finely minced (about 2 tablespoons)

2–3 dried red chilies, broken into halves (or 1 teaspoon red chili flakes, adjust to taste)

1 small onion, thinly sliced (or 1/2 medium onion)

1 cup mixed bell peppers (capsicum), thinly sliced – e.g. 1/2 green and 1/2 red

1 medium carrot, julienned (thin matchsticks)

2 tablespoons soy sauce (light or dark soy)

1 tablespoon red chili sauce (such as Sichuan/Indo-Chinese chili garlic sauce or sambal)

1 tablespoon tomato ketchup (for a touch of tangy sweetness)

2 teaspoons white vinegar

1/2 teaspoon sugar (balances the spice; optional but recommended)

1/2 teaspoon black pepper, ground

Salt – about 1/4 teaspoon, or to taste (remember soy sauce is salty)

2–3 spring onions (scallions), whites chopped and greens sliced (keep greens for garnish)

1/2 teaspoon red chili flakes (for garnish, or more to taste)


Tip: You can also toss in a handful of shredded cabbage for extra crunch, or a pinch of sesame oil for aroma, although these are optional.

Instructions

1. Boil the Noodles: Bring a large pot of water to a boil and salt it lightly. Add the Hakka noodles and cook until al dente (usually 5–6 minutes, or as per package directions). Take care not to overcook the noodles or they will turn mushy. Once cooked, drain the hot water and immediately rinse the noodles under cold running water to stop the cooking process. This keeps the noodles firm and prevents them from sticking together. Drain well.


2. Prep the Noodles: Drizzle a tiny bit of oil (1/2 teaspoon or so, you can use sesame oil for flavor) on the cooled, drained noodles and toss gently. This extra step keeps the noodles from clumping and adds a light gloss. Set the noodles aside while you prepare the stir-fry.


3. Stir-Fry the Aromatics: Heat 2 tablespoons of oil in a large wok or kadai pan over high flame. When the oil is hot, add the minced garlic and broken red chilies. Stir-fry for about 30 seconds until the garlic starts to turn golden and fragrant (be careful not to burn it). The high heat will quickly release that addictive garlic-chili aroma.


4. Add Onions & Veggies: Add the sliced onions (and the chopped white parts of spring onion) to the wok and toss for a minute on high heat. Next, add the julienned carrots and sliced bell peppers. Stir-fry everything on a high flame for 1–2 minutes. Keep the heat high and the movement constant – this quick cooking ensures the veggies stay crisp-tender and helps impart a slight smoky char. (Remember, do not overcook the vegetables; they should retain a bit of crunch.)


5. Add Sauces & Seasoning: Push the veggies to the sides of the wok and pour in the soy sauce, red chili sauce, tomato ketchup, and vinegar. Sprinkle in the sugar, black pepper, and a pinch of salt. Stir everything together with the vegetables, still on high heat. Let the sauces bubble for ~30 seconds so the raw vinegar smell cooks off and the flavors meld. The mixture will turn into a tantalizing spicy-sweet sauce that coats the vegetables.


6. Add Noodles and Toss: Add the cooked and drained noodles into the wok. Using tongs or two spatulas, toss the noodles with the sauce and veggies, combining everything thoroughly. Stir-fry for another minute, ensuring all the noodles are well-coated in the chili-garlic sauce. Pro tip: Maintain a high flame while tossing – this helps the noodles pick up that desirable wok hei (smoky wok flavor) and prevents them from turning soggy.


7. Finish with Garnish: Turn off the heat and add the sliced green parts of the spring onions. Also add the 1/2 teaspoon of chili flakes (or adjust as per your heat preference). Give the noodles one final toss so the scallions and chili flakes are mixed in. The fresh spring onion greens add a pop of color and a mild oniony bite to the dish.


8. Serve: Your Indo-Chinese Chili Garlic Noodles are ready to devour! Serve them immediately while they’re hot and glistening. (Serving suggestions below include some great pairings and extra toppings to enjoy with these noodles.)


Optional Additions

This recipe is deliciously vegetarian as is, but you can easily customize it with protein or other add-ins. Here are some options and tips to incorporate them:

Egg: For an eggy twist (like “Chinese scrambled egg noodles”), push aside the sautéed veggies in the wok and crack in 1–2 eggs. Scramble the eggs quickly on the hot surface until just set, then mix into the veggies before adding the noodles. The egg will coat the noodles lightly and add extra richness. (Remember to slightly under-season the noodles if adding eggs, as they bring their own richness.)

Chicken: Thinly slice about 100–150 g of chicken (breast or thigh) into bite-size pieces. Stir-fry the chicken in 1 teaspoon of oil before adding the garlic and veggies, or along with the onions, until it’s cooked through (it will turn white and lightly golden at edges). Remove and set aside, or push to the side of the wok, then proceed with the recipe. Combine the cooked chicken back in when tossing the noodles. Tip: Marinating the chicken with a bit of soy sauce and ginger-garlic paste for 10 minutes beforehand adds extra flavor. (If using other meats or prawns, similarly cook them first on high heat; ideally, add any meat while stir-frying the veggies so it gets properly cooked before the noodles go in.)

Tofu or Paneer: For a vegetarian protein boost, add cubes of tofu or paneer. You can pan-fry the cubes separately in a little oil until golden (to give them a nice crust) and then toss them in during the final step with the noodles. Or, simply add soft tofu straight into the wok when you add the sauces, gently mixing so it heats through. Tofu will soak up the chili-garlic sauce, making each bite extra tasty. Paneer (Indian cottage cheese) can be treated similarly – lightly pan-fry and add in, or even use fried paneer cubes for a street-food style indulgence.


Feel free to get creative – add mushroom slices, baby corn, or broccoli florets for more veggie goodness, or even a handful of bean sprouts for texture. The beauty of chili garlic noodles is that it’s a flexible dish you can make your own!

Serving Suggestions

Serve Hot: Chili Garlic Noodles are best enjoyed hot off the wok. The flavors are brightest and the noodle texture is perfect when served immediately (if they sit too long, they can dry out or clump). So dish them out as soon as you’re done cooking.

Garnish: Top your noodles with extra spring onion greens, a sprinkle of fresh cilantro, or crushed peanuts/cashews for a fun crunch. You can also drizzle a little chili oil on top for an extra kick and shine.

Condiments: Serve some chili vinegar on the side – plain white vinegar infused with a few slit green chilies is a classic Indo-Chinese table condiment that adds a tangy heat when sprinkled over noodles. Extra chili sauce or soy sauce on the side can be offered for those who like to customize each bite.

Pairings: These noodles are a meal on their own, but you can absolutely serve them alongside other dishes to create a full Indo-Chinese spread. They go wonderfully with manchurian gravies (like gobi manchurian, which is fried cauliflower in a spicy sauce) or chilli paneer. In fact, chili garlic noodles + gobi manchurian is a street-food match made in heaven! You could also serve a bowl of hot and sour soup as a starter to round out the meal.

Leftovers: If you somehow have any leftovers, store them in the refrigerator. Reheat in a hot pan with a touch of oil (or in the microwave) until warmed through. The noodles may absorb sauce over time, so you can splash a bit of soy sauce or water while reheating to loosen them up. But truth be told, this dish is so tasty it rarely lasts that long!


Enjoy your Indo-Chinese Chili Garlic Noodles! With its garlicky goodness, fiery chilies, and that irresistible smoky wok flavor, this dish brings the best of Indian-Chinese fusion straight to your plate. Happy cooking and happy eating! 😋

Lunch & Dinner, Street Foods

Potato 65 – Crispy, Spicy & Tangy Indo-Chinese Appetizer

When I think of Potato 65, I’m flooded with warm memories. Growing up, my mother would fry up a big batch of this spicy, bright-red potato dish for special occasions. The kitchen would fill with the aroma of curry leaves crackling in hot oil and chiles, and we kids would line up eagerly to snag the first crispy bite. Whether it was a family Diwali get-together or a rainy monsoon evening, a platter of Potato 65 instantly made it feel like a celebration, with its vibrant colors and bold flavors bringing joy to everyone.

Potato 65 is an Indo-Chinese inspired snack that’s popular across India, especially as a vegetarian take on the famous Chicken 65. It features golden deep-fried potato cubes coated in a spiced batter, then tossed in a tangy, chili-infused yogurt sauce along with curry leaves and chilies. The result is a crispy, spicy, and tangy appetizer that’s finger-licking good. (Ever wondered why it’s called 65? Legend has it the original Chicken 65 got its quirky name either from being item #65 on a Chennai canteen menu or from being introduced in the year 1965. Whatever the true story, all that matters is how delicious these “65” dishes taste!)

Potato 65 served in a bowl, garnished with curry leaves and green chili – a vibrant appetizer that’s crispy, spicy, and irresistibly tangy. In the photo above, you can see how the fried potato cubes are generously coated in the reddish yogurt-chili sauce and dotted with fried curry leaves. Each bite bursts with flavor: the crunch of the batter, the heat of chilies, and a slight tang from that special sauce. It’s no wonder this dish is a crowd-pleaser at parties and family gatherings.

Despite its restaurant-style flair, Potato 65 is quite straightforward to make at home. Below, I’ll guide you through the ingredients and step-by-step instructions, along with plenty of handy tips to ensure your Potato 65 comes out perfectly crispy (and not greasy or soggy!). This festive snack makes a fantastic starter for any party, and also doubles as a flavorful side dish – you can serve it alongside naan or biryani, or even with fried rice and pulao. Now, let’s get cooking this spicy treat!

Ingredients

For the Potatoes & Batter:

Potatoes (boiled) – 3 medium potatoes, peeled and cut into 1-inch cubes (par-boiled until just fork tender).

All-purpose flour (Maida) – ¼ cup (for binding the batter).

Corn flour (Cornstarch) – 3 tablespoons (adds extra crispness).

Rice flour – 1–2 tablespoons (optional, for even more crunch; you can skip if not available).

Ginger-Garlic paste – 2 teaspoons (for robust flavor in the marinade).

Kashmiri red chili powder – 1 teaspoon (mild, for color).

Garam masala – ½ teaspoon (warm spice mix).

Black pepper powder – ½ teaspoon (for a slight kick).

Turmeric powder – ¼ teaspoon (adds color and flavor).

Salt – to taste.

Baking soda – a pinch (helps make the coating light and crisp).

Water – ~¼ cup, or as needed to make a thick batter.


For the Tempering (Yogurt-Chili Sauce):

Oil or Ghee – 2 tablespoons (for tempering the spices).

Cumin seeds – 1 teaspoon (adds a nutty aroma when tempered).

Mustard seeds (optional) – ½ teaspoon (for a South Indian touch, optional).

Garlic – 3–4 cloves, finely chopped.

Onion – 1 small, finely chopped (optional, adds extra flavor in the final toss).

Green chilies – 2, slit lengthwise (for heat and garnish).

Dried red chilies – 2, broken into pieces.

Curry leaves – 1 sprig (about 8–10 fresh curry leaves).

Kashmiri red chili powder – ½ teaspoon (for color in the sauce; adjust for spice level).

Coriander powder – 1 teaspoon (adds earthy flavor to the sauce).

Soy sauce – 1 teaspoon (optional, for an Indo-Chinese twist and umami).

Tomato ketchup – 1 teaspoon (optional, adds tangy sweetness in the Indo-Chinese version).

Yogurt (curd) – ¼ cup, thick and whisked (this is the base of the tangy sauce; use plain yogurt or Greek yogurt, at room temperature to avoid curdling).

Salt – a pinch (to season the sauce, remember the batter already has salt).

Sugar – ½ teaspoon (optional, to balance the heat and tang if needed).


For Garnish:

Fresh cilantro (coriander leaves) – a handful, chopped.

Fried curry leaves & chilies – reserved from tempering (they become crispy and aromatic).

Lemon wedges – to serve on the side (a squeeze of lemon before eating elevates the flavors).

Chaat masala – a pinch to sprinkle on top (optional, for a tangy finish).


Tip: Using Kashmiri red chili powder gives a brilliant red color without making the dish too spicy – no artificial food coloring needed. If you prefer extra heat, you can mix in a bit of hotter chili powder or a couple of chopped green chilies to the batter or sauce.

Step-by-Step Instructions

1. Prep the Potatoes: Peel and cut the potatoes into cubes (about 1-inch pieces). Par-boil the potato cubes in salted water until just tender but not mushy. You can boil for about 5–6 minutes or pressure cook for 1 whistle – the potatoes should be cooked through yet firm enough to hold their shape. Tip: Do not overcook the potatoes, or they’ll break apart and soak up oil later, making them soggy. Once done, drain and let the potato cubes cool slightly (excess moisture will also make the batter slip off, so ensure they are not water-logged).


2. Make the Batter: In a mixing bowl, combine the flours (all-purpose, corn flour, and rice flour if using), ginger-garlic paste, Kashmiri chili powder, garam masala, black pepper, turmeric, baking soda, and salt. Add a little water at a time and whisk to form a thick, smooth batter that can coat the potatoes (no big lumps). The batter consistency should be like pancake batter – not too thin (or it won’t cling) and not too thick (or the coating will be dense). Tip: If the batter looks too runny, sprinkle a bit more flour; if too thick, add a spoon of water. Also, taste-test the batter and adjust salt or spice if needed (keeping in mind the sauce will add more flavor later).


3. Batter Coat the Potatoes: Add the boiled potato cubes into the bowl of batter. Gently toss or fold until every potato piece is well coated with the spiced batter. Let it sit for 5–10 minutes while you heat the oil. (This short rest helps the batter adhere better, but don’t leave it too long or the potatoes might start releasing moisture).


4. Deep Fry the Potatoes: Heat oil in a deep kadai or heavy-bottom pan for deep frying. You’ll need enough oil to submerge the potato pieces (about 2 inches of oil depth). Once the oil is hot (around 350°F/180°C; you can test by dropping a bit of batter – it should sizzle and rise immediately), carefully drop in the batter-coated potato cubes in small batches. Do not crowd the pan. Fry on medium-high heat until the potatoes turn crispy and golden-brown on the outside, about 4–5 minutes per batch. Stir occasionally for even frying. Tip: Frying at too low a heat will make the potatoes absorb oil and turn limp, so keep the oil moderately hot. On the other hand, don’t crank the heat to smoking – you want the potatoes to crisp up gradually; they take a little time to get a nice crunchy coating, so be patient. Once done, remove the fried potatoes with a slotted spoon and drain excess oil on paper towels.


5. Prepare the Tempering (Tadka): In a wide pan or wok, heat 2 tablespoons of oil (or ghee for extra flavor) on medium heat. Add the cumin seeds (and mustard seeds, if using). Let them splutter for a few seconds (this releases their aroma). Then toss in the finely chopped garlic, broken dried red chilies, slit green chilies, and fresh curry leaves. Sauté these for a minute until the garlic turns lightly golden and the curry leaves turn crisp. (Careful, this will release spicy fumes – keep your face away!). If using onions, add the chopped onion now and sauté until translucent. Your kitchen should smell divine at this point with all those aromatics frying.


6. Add Spice Powders & Sauce Base: Reduce the heat to low. Now add the spice powders: Kashmiri chili powder (for that bright color), coriander powder, and a pinch of salt to season the masala. If you want the Indo-Chinese twist, also stir in the soy sauce and ketchup at this stage, mixing everything well so the spices and sauces combine. Sauté for just 20–30 seconds – be careful not to burn the powders. Tip: Adding the sauces (soy & ketchup) gives a lovely sweet-spicy kick reminiscent of chili sauce; you can skip them for a more traditional flavor, but they do elevate that Indo-Chinese profile.


7. Stir in the Yogurt: Still on low heat, add the whisked yogurt to the pan. Immediately stir continuously as you add it, allowing it to form a creamy, spiced sauce with the tempered spices. Cook this yogurt-chili sauce for about 30 seconds to a minute on low flame, just until it heats through and thickens slightly. Important Tip: Keep the flame low when adding yogurt to prevent it from curdling or splitting. You can even take the pan off the heat, stir in the yogurt, then return to low heat – this gentler approach helps if you’re worried about curdling. The sauce should be fairly thick and clingy; if it looks too thick or dry, you can stir in a splash of water to loosen it a bit (or if you prefer more “saucy” Potato 65).


8. Toss Fried Potatoes in the Sauce: Now add the fried potato pieces into this yogurt sauce. Increase heat to medium-low and gently toss or fold the potatoes so that each piece is well coated with the tangy, spiced sauce. Do this for a minute until the potatoes are reheated and nicely covered in the masala. You’ll see the potato 65 take on a gorgeous fiery color and shiny glaze from the sauce. Finally, turn off the heat.


9. Garnish and Serve: Transfer the Potato 65 to a serving dish. Sprinkle the chopped fresh cilantro on top. For extra punch, you can sprinkle a pinch of chaat masala over the top and a squeeze of fresh lemon juice. Garnish with the crispy fried curry leaves and green chili pieces from the pan (they’re edible and delicious!). Serve immediately while it’s hot and crispy.


Tip: Potato 65 tastes best when served right away, as that’s when it’s most crispy. If it sits too long, it may soften – but you can re-crisp it in a hot oven or air fryer for a few minutes if needed. Also, if you find the dish too spicy, serve a cooling mango lassi or yogurt raita on the side to balance the heat.

Variations and Tips

Air-Fryer Potato 65: Want a lighter version? You can air-fry the batter-coated potatoes instead of deep frying. Preheat your air fryer to 180°C (350°F). Lightly grease the basket and place the coated potato cubes in a single layer. Spray or brush a little oil on them for extra crispness. Air-fry for about 15–18 minutes, shaking the basket halfway, until the potatoes are crispy and golden. Then, toss them in the prepared yogurt-chili tempering as in the main recipe. (They’ll be slightly less evenly browned than deep-fried, but still delicious!).

Baked Potato 65: Similarly, you can bake the coated potatoes in a conventional oven. Preheat the oven to 200°C (400°F). Arrange the batter-coated potato pieces on a greased or parchment-lined baking sheet, spacing them out. Drizzle or spray a bit of oil on top. Bake for ~25–30 minutes, flipping them once halfway through, until they turn crisp and golden-brown. Then toss in the sauce. Baked Potato 65 will be a bit lighter in texture but is a great option if you want to avoid deep frying.

Pan-Fried (Tawa) Version: If you don’t want to deep fry, you can shallow-fry the potatoes on a tawa (griddle) or wide pan with a few tablespoons of oil. Place the batter-coated potatoes on the hot pan and cook on medium heat, turning them to cook all sides. They may not get uniformly crispy like deep-fried ones, but you can achieve a good golden crust on most sides. Proceed with the tempering and sauce once they are nicely browned. Tip: Ensure your potatoes aren’t over-boiled for this method, as they need to hold up to flipping.

“Chili-Sauce” Base Alternative: While the recipe above uses a yogurt-based sauce, you can make a pure Indo-Chinese style Potato 65 by replacing the yogurt with a chili-garlic sauce base. For example, skip the yogurt and instead add 2–3 tablespoons of schezwan sauce or your favorite bottled chili-garlic sauce (along with the soy sauce and ketchup) into the tempering. Toss the fried potatoes in that; it will give a spicier, stickier coating similar to Chili Potato (another Indo-Chinese dish). This variation packs an extra punch and has no dairy. (If doing this, you can also add a teaspoon of vinegar for a tangy kick instead of yogurt).

Other 65 Variations: The “65” style is so versatile that you can swap out the potato for other ingredients. Cauliflower 65 (Gobi 65) and Paneer 65 are popular variations – using the same marinade and process, just replacing with cauliflower florets or paneer cubes. Even baby corn 65 or mushroom 65 are delicious alternatives. So, feel free to use this recipe as a template and get creative with other veggies or proteins!

Healthier Flour Swap: If you prefer not to use refined flour (maida), you can substitute whole wheat flour for the batter – it works, though the coating might be slightly denser. You can also experiment with using gram flour (besan) for a different flavor, but the texture will change a bit.

Adjusting Spice Levels: Potato 65 is meant to be spicy, but you can always adjust it to your taste. Use fewer chilies (or remove chili seeds) for a milder version. For extra-spicy, add more green chilies in the tempering or a hotter variety of chili powder in the batter. Tasting as you cook is key!


Serving Suggestions

Potato 65 is best enjoyed hot and fresh, when the exterior is still crispy. It makes for an excellent party appetizer – stick toothpicks in the pieces to serve them finger-food style, and watch them disappear in no time! For a party platter, you can serve Potato 65 alongside other Indo-Chinese snacks like spring rolls or Gobi Manchurian, and a bowl of green chutney or ketchup for dipping (although it’s flavorful enough on its own).

For a more substantial meal, pair Potato 65 as a side dish with Indian breads or rice. It goes wonderfully with chapati or naan, since the tangy sauce can be scooped up, almost like a dry curry. I also love it with a mild fried rice, pulao, or even jeera rice, to add a spicy kick on the side. In South India, it’s not unusual to serve it alongside biryani or pilaf as a crunchy contrast.

To balance the spiciness, serve a cooling accompaniment: a simple raita (yogurt dip with cucumber) works well, or the classic mango lassi as mentioned earlier for kids and adults alike. A squeeze of lemon on top of the Potato 65 just before eating also brightens up the flavors and adds extra tang.

If you have any leftovers (a rare occurrence!), you can reheat them in an oven or air fryer to bring back some of the crispiness. However, avoid microwaving, as that will make the batter soft. But honestly, once you put this dish out, there’s seldom anything left to store – it’s that addictive!

Enjoy your homemade Potato 65 – a dish that’s crispy, spicy, tangy, and absolutely unforgettable. It’s the kind of recipe that brings people together, be it at a festive holiday gathering or just a fun weekend snack night. Happy cooking and happy eating! 🎉🥔🔥

Snacks, Street Foods

KFC-Style Crispy Fried Chicken Drumsticks Recipe

When I think of a festive family treat, crispy fried chicken drumsticks always come to mind. I still remember the excitement of biting into my first KFC drumstick as a kid – the crunch of that golden crust and the juicy, flavorful meat inside was pure bliss. Today, I bring that joy to my own kitchen. No more drive-thru needed – with a little patience and the right spices, you can recreate those famous KFC-style drumsticks at home, and even add your own pinch of masala to make them extra special. (Fun fact: the original KFC recipe is actually pressure-fried chicken seasoned with 11 secret herbs and spices, but don’t worry, we’ll get amazing results with simple tools and techniques!)

Two crunchy, golden-brown fried chicken drumsticks served with a creamy dipping sauce. The perfectly fried crust hides tender, juicy chicken inside – a homemade KFC-style delight.

Just looking at these crispy drumsticks makes my mouth water. Each piece is coated in a spiced crunchy crust that shatters pleasantly with every bite, giving way to succulent, well-seasoned meat inside. The aroma of warm spices fills the kitchen as they fry, instantly bringing back memories of festive family dinners and fun weekend feasts. Whether it’s a rainy day indulgence or a game-night centerpiece, these fried chicken drumsticks always disappear fast – they’re that good. In the recipe below, I’ll walk you through how to marinate the chicken for ultimate juiciness, coat it for the perfect crunch, and fry it to golden perfection. Plus, I’ve included all my tried-and-true tips (learned over many batches of frying!) to ensure your homemade fried chicken is a finger-licking success. Let’s get frying! 🍗🎉

Ingredients

Chicken Drumsticks – 8 to 10 pieces, skin-on. (Using drumsticks and thighs is ideal for juicy results; everyone loves a drumstick!)

Buttermilk – 2 cups (or make your own by mixing 2 cups milk with 4 Tbsp lemon juice/vinegar, let it sit until it curdles).

Eggs – 2, beaten (helps bind the coating and adds extra crunch).

All-Purpose Flour (Maida) – 2 cups, for the coating.

Cornstarch – 1/2 cup, for the coating (secret to a crispier crust).

Baking Powder – 1 teaspoon (helps create a light, airy crust).

Spices and Seasonings:

Salt – 2 teaspoons for the marinade + 1 teaspoon for the coating (divided). Salt is critical for flavor and juiciness (acts as a simple brine).

Black Pepper – 1 teaspoon for marinade + 1/2 teaspoon for coating.

Paprika or Kashmiri Red Chili Powder – 1 to 2 teaspoons for marinade (adds color and mild heat) + 1 teaspoon for coating.

Garlic Powder – 1 teaspoon for coating (you can also add 1 Tbsp fresh garlic paste to the marinade for extra flavor).

Onion Powder – 1 teaspoon for coating.

Dried Mixed Herbs (Italian seasoning or thyme/basil/oregano blend) – 1 to 2 teaspoons in marinade + 1 teaspoon in coating (mimics those “11 herbs” in KFC).

(Optional) Garam Masala – 1/2 teaspoon in marinade (optional, for an Indian twist – it adds a warm, spicy depth if you like a hint of masala in your chicken).

(Optional) Cayenne Pepper or Red Chili Powder – 1/2 teaspoon in coating (for extra kick, adjust to taste).


Oil for Frying – about 1.5 to 2 liters of a neutral high-heat oil (like vegetable, canola, or peanut oil). Enough to deep-fry in a heavy pot or deep pan.


Step-by-Step Instructions

1. Marinate the Chicken: Rinse and pat dry the drumsticks. In a large bowl, combine the buttermilk, beaten eggs, 2 tsp salt, 1 tsp black pepper, paprika, and the mixed herbs (plus garlic/ginger paste if using). Submerge the chicken pieces in this marinade. Cover and refrigerate for at least 4 hours, or for best results, overnight. (Longer marination makes the chicken ultra moist and flavorful.)


2. Prep the Coating: In a separate mixing bowl, whisk together the flour, cornstarch, baking powder, 1 tsp salt, 1/2 tsp black pepper, 1 tsp paprika, garlic powder, onion powder, and 1 tsp mixed herbs. This dry mixture will be the crispy coating. Make sure it’s well combined.


3. Dredge the Drumsticks: Remove the marinated drumsticks from the fridge about 30 minutes before frying (letting them come closer to room temp prevents the oil temperature from plummeting when frying). One by one, let the excess marinade drip off each piece, then roll the chicken in the flour mixture. Press the flour onto the chicken to form a nice even coat. You can do a single coat or, for extra crunch, do a double dredge: dip the flour-coated piece back into the buttermilk marinade, then coat in flour again for a thicker crust. Place the coated pieces on a plate or rack and rest them for 5-10 minutes (this helps the coating adhere before frying).


4. Heat the Oil: In a deep heavy pot or Dutch oven, pour in oil to a depth of about 2-3 inches and heat it to 350°F (175°C). Use a thermometer for accuracy if possible. (A heavy pot with high sides is safest for frying and helps maintain temperature.) Adjust the heat to keep the oil around [330–350°F] during frying – this is the sweet spot for a golden crust and fully cooked interior.


5. Fry the Chicken: Fry the drumsticks in batches; do not overcrowd the pan (frying too many at once can lower the oil temperature and make the chicken greasy or soggy). Add 2-3 drumsticks at a time to the hot oil. You should see a lively sizzle. Fry for about 12–15 minutes per batch, turning occasionally for even color, until the drumsticks are deep golden-brown. If you have an instant-read thermometer, check that the thickest part of the meat reaches 165°F (this ensures the chicken is cooked through). The crust will be nicely browned before 12 minutes, but make sure the meat inside is done. Tip: Maintain that 350°F oil temperature – if it drops too low, the chicken can turn out oily; keeping a steady 350°F cooks the chicken through without greasiness.


6. Drain and Rest: Using tongs, carefully remove the fried drumsticks and let excess oil drip back into the pot. Place the fried chicken on a wire rack set over a baking sheet (or on paper towels, but a wire rack is better to keep it crispy). Let them rest for 5 minutes. This brief rest helps the juices settle and keeps the crust crunchy (don’t cover or wrap them; that would trap steam). Pro tip: Draining on a wire rack instead of paper towels keeps that hard-won crust crisp by preventing steam buildup.


7. Serve: Time to dig in! Pile up those gorgeous crispy drumsticks on a platter. Garnish with a sprinkle of extra paprika or fresh herbs if you like. Serve hot with your favorite dipping sauces and sides (see suggestions below). Get ready for rave reviews as everyone bites into that juicy, crunchy goodness. Enjoy! 🎊🍗


Marination Tips for Juicy Meat

Buttermilk Brine Magic: Marinate the chicken in a buttermilk-based marinade for the best tenderness and juiciness. The slight acidity in buttermilk tenderizes the meat and infuses flavor, keeping the chicken moist. If you don’t have buttermilk, mix milk with lemon juice or even use yogurt thinned with a bit of water – the goal is a tangy dairy bath for the chicken.

Give It Time: Plan ahead! A longer marination (overnight if possible) is worth it. Let those drumsticks soak for at least 4 hours (or up to 12 hours in the fridge). This extended marinating time allows the salt and spices to penetrate deeply, resulting in meat that is seasoned all the way to the bone and super moist when cooked. (In a pinch, even 30 minutes of marinating is better than nothing, but longer is better for that juicy inside.)

Season Generously: Don’t skimp on the salt in your marinade. Salt acts as a brine, drawing flavors into the meat and helping it retain moisture during frying. Along with salt, add spices (pepper, paprika, herbs, etc.) to the marinade so the chicken is flavorful from within. For example, I add garlic and a touch of mixed herbs or even a pinch of garam masala in the marinade – it’s my little twist that makes the meat itself taste amazing.

Marinate in the Fridge, Finish at Room Temp: Always marinate chilled in the refrigerator to keep the chicken safe. When ready to fry, let the marinated pieces sit out for 20-30 minutes to lose their chill. Frying very cold chicken can lead to uneven cooking and oil temp drops. Bringing it closer to room temp ensures the chicken cooks evenly and stays succulent (and it prevents that sudden temperature plunge in the oil that can make fried foods greasy).


Coating Tips for a Perfect Crust

The Cornstarch Secret: For extra crisp fried chicken, mix cornstarch into your flour dredge. I typically use about 1/4 to 1/3 of the total coating as cornstarch (e.g. 1/2 cup cornstarch with 1+1/2 cups flour). This combo creates a lighter, crunchier crust – cornstarch weakens the all-purpose flour’s glutens just enough to make the coating more tender and flaky. The result? A crust that’s not hard or heavy, but perfectly crispy-crunchy with lovely little craggy bits.

Add a Pinch of Baking Powder: It’s an old trick, but it works wonders. A bit of baking powder in the dredge helps puff up the crust ever so slightly, giving you that sought-after airy crispness. As the chicken fries, the baking powder reacts and creates tiny bubbles, making the crust texture light instead of dense. (Just don’t overdo it – about 1 teaspoon per 2 cups of flour is plenty.)

Double Dredge = Double Crunch: If you love an extra-thick, crunchy crust, consider double dredging your chicken. This means after the first flour coating, you dip the chicken back into a wet mixture (egg wash or the buttermilk marinade), and then coat in flour again. This builds a robust crust with more flavor and crunch in every bite. Many Southern cooks swear by the flour → egg → flour method for the ultimate crispy fried chicken. Tip: When double coating, mix a bit of buttermilk into your beaten eggs or use the marinade itself – it helps the second coat stick better and adds tangy flavor.

Shake Off Excess & Don’t Rush: After coating (whether once or twice), gently shake off any excess flour before frying. A loose excess flour layer can cause the oil to get dirty/burnt and also create a pasty coating. What you want is a nice even coat that clings well. Let the coated drumsticks rest for a few minutes on a rack or plate before frying – this little rest hydrates the flour and helps it adhere, reducing the chance of the breading falling off. You’ll be rewarded with a crust that stays attached in beautiful, crunchy glory.


Frying Tips for Golden Crispiness

Use the Right Equipment: A deep, heavy-bottomed pot (like a Dutch oven or a deep cast-iron pan) is ideal for frying. The high sides reduce oil splatter and the heavy material helps keep the oil temperature steady as you fry. Also, have a spider strainer or tongs handy for safe handling of the hot chicken, and a wire rack ready for draining.

Oil Temperature is Key: For perfectly fried drumsticks, heat the oil to about 350°F (175°C) and try to maintain that temperature throughout. If possible, use a thermometer to monitor the oil. When you add chicken, the oil temp will drop a bit; adjust your heat to keep it in the 325°–350°F range. Frying at the right temp ensures the chicken cooks through without the crust burning. Pro tip: avoid the common mistake of overheating then lowering the flame too much – consistently frying at ~350°F yields far less greasy results. In fact, a steady 350°F for roughly 12-15 minutes is a tried-and-true formula for crispy outside, fully-cooked (and non-greasy) inside.

Don’t Overcrowd the Pot: Fry in small batches. Putting too many pieces in the oil at once can cause the temperature to drop dramatically and also leads to crowding (the pieces can bump and knock off each other’s breading). Frying just a few drumsticks at a time ensures they actually fry instead of steam, which is crucial for that crispy exterior. It also makes it easier to manage and flip them if needed. Between batches, let the oil come back up to 350°F before adding the next round. Yes, it takes a bit longer, but your reward will be perfectly golden, crunchy chicken every time.

Know When It’s Done: How to tell when the chicken is cooked? The drumsticks will be a deep golden-brown all over and should float to the surface when they’re nearly done. If you have an internal meat thermometer, use it – the chicken is ready when it hits 165°F in the thickest part near the bone. (Piercing to the bone and seeing clear juices, not pink, is the old-school test.) Avoid overcooking beyond 165-170°F, as the meat can start to dry out. With medium-sized drumsticks at ~350°F, about 12 minutes is usually right, but always go by the look and internal temp if unsure.

Let Fried Chicken Rest (Briefly): It’s oh-so-tempting to bite in immediately, but let your fried drumsticks rest on a wire rack for about 5 minutes after frying. This short rest not only keeps you from burning your tongue, but also helps the crust set. Crucially, using a wire rack allows excess oil to drip off and prevents the bottom from getting soggy – unlike paper towels, which can trap steam against the crust. By the time they’ve cooled just slightly, your chicken will still be hot and crispy, but the juices inside will have redistributed, meaning every bite will be incredibly moist and delicious.


(Safety note: Always be cautious when deep frying. Keep the oil at a safe level in the pot (never more than half full) and have a lid nearby just in case. Frying should be done by adults with care – but trust me, the results are absolutely worth it!)

Serving Suggestions

These KFC-style crispy fried drumsticks are a showstopper on their own, but pairing them with the right sides and dips can turn it into an unforgettable meal. Here are some serving ideas to complete your fried chicken feast:

Creamy Coleslaw: A cool, creamy coleslaw is the classic companion to fried chicken. The tangy crunch of cabbage and carrot in a lightly sweet mayo dressing complements the savory, salty chicken. It’s the perfect refreshing contrast to cut through the richness of fried drumsticks.

Fries or Potato Wedges: You can’t go wrong with golden fries! Whether classic French fries or thick-cut potato wedges, a side of potatoes (maybe with a sprinkle of seasoning or peri-peri spice) makes this feel like a true diner or picnic basket meal. For a healthier twist, try sweet potato fries.

Mashed Potatoes & Gravy: If you’re channeling the whole KFC experience, serve with creamy mashed potatoes and a generous pour of brown gravy. The combination of crispy chicken, silky potatoes, and savory gravy is comfort food at its best – your family might think they’re at a famous chicken joint!

Buttered Corn on the Cob: Crunchy fried chicken and sweet buttered corn – it’s a match made in heaven. Grill or steam some corn cobs and slather with butter (and a pinch of chaat masala or salt and pepper). The juicy pop of corn kernels adds a nice texture contrast.

Biscuits or Dinner Rolls: Warm, fluffy buttermilk biscuits (or even simple dinner rolls) are fantastic to round out the meal. They’re great for sopping up any extra juices or just enjoying on the side with a dab of butter or honey.

Dips & Sauces: Ketchup is a kid-friendly classic, but you can elevate the dip game with homemade honey mustard, smoky barbecue sauce, or a spicy Sriracha-mayo. A creamy ranch or blue cheese dip can also be delightful with the hot crunch. If you want to add an Indian flair to your serving, try a mint yogurt raita or tangy cilantro chutney on the side – they provide a cooling counterpoint to the fried chicken’s spice.

Fresh Salad or Slaw: To lighten things up, consider a side salad – even a simple lettuce, cucumber, and tomato salad with a vinaigrette, or a zesty cucumber-onion salad. The acidity and freshness will balance the richness of the fried chicken. A vinegar-based slaw (like a vinegar coleslaw without mayo) is also excellent for cutting through the grease and adding crunch.


Finally, don’t forget to serve your crispy fried drumsticks hot and fresh for the best experience. The crunch is most pronounced right after frying, and the chicken is juiciest. If you need to hold them for a short while before serving, you can keep the fried chicken warm in a 250°F (120°C) oven on a wire rack. But honestly, in my home, the challenge is not keeping them warm – it’s keeping eager hands from snatching them off the plate before meal time! 😄

Enjoy your homemade KFC-style fried chicken drumsticks, and be prepared for everyone to ask for seconds. These crispy, juicy drumsticks, made with love and a sprinkle of secret spices, are bound to become a new family favorite. Happy cooking and happy crunching! 🥳🍗

Snacks, Street Foods

Crispy KFC-Style Chicken Popcorn (Homemade Recipe)

Introduction: A Nostalgic Crunch in Every Bite

There’s nothing quite like the joy of KFC-style chicken popcorn to transport me back to childhood movie nights and weekend mall trips. I still remember the excitement of opening that red-and-white box, the aroma of fried spices wafting out, and popping those crispy little chicken pieces into my mouth one after another. Recreating this at home brings back those warm memories – only now I get to add my own pinch of masala to the mix. In this recipe, tender bite-sized chicken pieces are marinated in tangy buttermilk and spices (a little secret for extra juiciness) and then double-coated in a seasoned flour mix before frying to golden perfection. The result? Juicy inside, crunchy outside chicken popcorn that’s just as addictive as the takeaway classic, with a homemade touch of love. Whether you’re making these for a family game night, a fun weekend snack, or to impress guests with a crowd-pleasing appetizer, this recipe is bound to become a favorite in your household.

Ingredients

For the Chicken & Marinade:

500g boneless chicken breast or thighs, cut into small bite-sized chunks (about 1-inch pieces)

1 cup buttermilk (for marinade)

1 teaspoon salt (for marinade)

1/2 teaspoon black pepper (for marinade)

1/2 teaspoon red chili powder or paprika (for marinade, optional for heat)

For the Seasoned Flour Coating:

1 cup all-purpose flour

1/4 cup cornflour (cornstarch) – helps add extra crispiness to the coating

1 teaspoon garlic powder

1 teaspoon onion powder

1 teaspoon paprika (or red chili powder)

1/2 teaspoon dried thyme or oregano (crush between your palms for flavor)

1/2 teaspoon dried basil (optional, for that KFC herb mix feel)

1/2 teaspoon mustard powder (optional, adds depth to the “secret spice mix”)

1/2 teaspoon celery salt (optional, for authentic KFC-style seasoning)

1 teaspoon salt (adjust to taste, considering marinade salt)

1/2 teaspoon ground black pepper

For Frying:

Oil for deep frying (vegetable or peanut oil works best for high heat)

(Optional) A few extra tablespoons of buttermilk in a bowl (if doing a double coating step)

To Serve (Optional):

Your favorite dipping sauce (ketchup, mayo, honey mustard, spicy chili sauce, etc.)

Lemon wedges or chaat masala for an extra zing when serving (optional)

Recipe Method

1. Marinate the Chicken: In a large bowl, whisk together the buttermilk, salt, black pepper, and chili powder (if using). Add the chicken pieces and stir to ensure each piece is submerged in the spiced buttermilk. Cover and marinate in the refrigerator for at least 30 minutes, or for 2-3 hours for deeper flavor. (Overnight marination is ideal for maximum tenderness and flavor.) The buttermilk’s slight acidity and enzymes will tenderize the chicken and keep it moist, so don’t skip this step for juicy popcorn chicken!

2. Prepare the Seasoned Coating: In a shallow dish or large plate, combine all the coating ingredients: flour, cornflour, and all the spices/herbs (paprika, garlic powder, onion powder, thyme/oregano, basil, mustard powder, celery salt, salt, pepper). Mix thoroughly with a fork or whisk to evenly distribute the seasoning. This seasoned flour mix is the key to packing flavor into every crispy bite – it’s inspired by the Colonel’s 11 secret herbs and spices (think paprika, garlic, oregano, etc., blended to perfection).

3. Dredge the Chicken – First Coating: Working in batches, lift a few chicken pieces from the buttermilk marinade, allowing excess marinade to drip off, and roll them in the seasoned flour mix. Press the flour onto the chicken firmly so it adheres well, fully coating each piece. Arrange the coated pieces on a plate or tray. This initial dredge gives the chicken its base layer of flavor and crunch.

4. (Optional) Double Coating for Extra Crunch: If you want ultra-crispy, KFC-level crunch, give each floured chicken piece a second round of coating. Dip the flour-coated chicken piece quickly back into either the reserved buttermilk (or simply use the marinade bowl) and then coat it again in the flour mix. You can even repeat this process one more time for a triple coating if you’re feeling indulgent. Each additional layer builds up a thicker, craggier crust that stays crunchy. (Pro tip: Double coating is how restaurants get that extra crispy shell – the flour->buttermilk->flour routine traps more breading on the chicken for an amazing crunch.)

5. Rest the Coated Chicken: Place the breaded chicken popcorn pieces on a wire rack or a parchment-lined tray and let them rest for about 5-10 minutes while you heat the oil. Letting the coated chicken sit briefly helps the coating adhere better and dry out a bit, which means less fall-off when frying and a crunchier result.

6. Heat the Oil: In a deep heavy-bottomed pan, kadhai or cast iron skillet, pour in enough oil to come about 1 to 2 inches up the sides. Heat the oil on medium-high until it reaches about **350°F (175°C)**. If you don’t have a thermometer, test the oil by dropping a tiny pinch of the flour batter mix or a small piece of bread – it should sizzle gently and rise to the top. Tip: Maintaining the oil around 350°F is ideal for frying; too low and the chicken will absorb oil and turn soggy, too high and the coating might burn before the inside cooks.

7. Fry the Popcorn Chicken: Carefully add a batch of the coated chicken pieces into the hot oil. Do not overcrowd the pan – each piece should have a bit of space around it (crowding will drop the oil temperature and make the pieces soggy or cause the coating to fall off due to steam). Fry in batches if necessary. Fry the chicken for about 4-5 minutes, turning occasionally with a slotted spoon, until they turn golden brown and crispy on the outside. The chicken will cook quickly since the pieces are small. If unsure, check that the internal temperature of a larger piece reaches 165°F (74°C). The sizzling sound should be steady; if it slows dramatically, your oil may have cooled – adjust heat between batches as needed.

8. Drain and Season: Using a slotted spoon or spider, remove the fried chicken popcorn from the oil, letting excess oil drip back into the pan. Transfer them to a wire rack set over a baking sheet to drain – this keeps them from sitting in oil and ensures they stay crisp (placing directly on paper towels can make the bottom soggy, though you can blot the tops with a paper towel if needed). While the pieces are still hot, sprinkle a pinch of fine salt or chaat masala over them for an extra pop of flavor (seasoning right after frying helps the salt stick better). If frying multiple batches, you can keep the earlier batches warm in a low oven (200°F/95°C) on a wire rack until all are done.

9. Repeat: Continue frying the remaining batches of chicken, making sure the oil comes back to temperature between batches. Remember not to overcrowd the pan with each new batch. Patience is key – frying in small batches will give you perfectly crispy, non-greasy popcorn chicken every time.

10. Serve: Pile up your homemade crispy chicken popcorn in a bowl or basket. Serve hot for best texture (they’re crispiest right after frying). Enjoy the crunch as-is or pair with your favorite dips and sides (see below for ideas). Watch them disappear fast!

Tips for Perfect Crispiness

Marinate for Moisture: The buttermilk marinade isn’t just for flavor – its mild acidity breaks down proteins, tenderizing the chicken and locking in moisture. Even a 30-minute soak makes a difference, but a longer marination (several hours or overnight) yields ultra-juicy chicken that stays tender even after frying.

Double (or Triple) Dredge for Extra Crunch: For that signature KFC crunch, double-coat your chicken pieces. After the first flour coating, dip them back in buttermilk and coat with flour again. This double dredging builds a thick, craggy crust that delivers more flavor and crunch in every bite. It’s a little extra work, but trust me, the satisfying crispy exterior is worth it. If you prefer a lighter coating, a single dredge is fine – but for crunch enthusiasts, the more layers the better!

Season Your Coating Well: Ever wonder why KFC popcorn chicken is so flavorful? It’s the seasoned flour. Don’t be shy with the spices in your flour mix – add enough salt and spices so that the mixture tastes boldly seasoned. Remember, only a fraction of that seasoning ends up on each piece of chicken. A good mix of paprika, garlic & onion powders, pepper, and herbs gives an authentic taste. You can even toss in a pinch of your favorite spice blend (garam masala or chat masala) for a fun twist.

Right Oil Temperature: Keep the oil at a steady 350-365°F (175-185°C) for frying. If the oil is too cool, the chicken will soak up oil and turn out greasy instead of crispy. Too hot, and the outside will brown (or burn) before the inside cooks. Use a thermometer if possible, or do small test fritters to gauge the heat. A consistent medium-high heat will give you that perfect golden brown crust.

Fry in Batches & Don’t Crowd: It’s better to fry in multiple small batches than one big batch. Overcrowding the pan causes the oil temperature to plummet and the pieces to stick together or steam instead of fry. Give your chicken enough space to bob around happily in the oil. This ensures even cooking and maximum crispiness. Between batches, let the oil come back up to temperature before adding the next round.

Use a Wire Rack to Drain: Instead of piling your fried chicken on paper towels (which can make the bottoms soggy from sitting in oil), place them on a cooling rack set over a tray. This allows excess oil to drip away and air to circulate around the pieces, keeping that wonderful crunch intact. You can line the tray underneath with paper towels to catch the drips. If you need to hold the chicken before serving, keep it on a wire rack in a warm oven so it stays crisp.

Salt Immediately: A light sprinkle of salt or your favorite seasoning right after frying will stick to the hot, just-fried chicken popcorn and enhance the flavor. This little restaurant trick makes sure every bite is well-seasoned from the first to the last.

Dipping Sauce Ideas & Serving Suggestions

Classic Combos: Serve your crispy chicken popcorn with classic dips like ketchup or barbecue sauce. A side of honey mustard or ranch dressing also pairs wonderfully, offering a sweet or creamy contrast to the spiciness.

Spicy Kick: Mix mayonnaise with a dash of hot sauce or sriracha to create a quick spicy mayo dip. This creamy, fiery dip is perfect for those who love a bit of heat with their chicken. Alternatively, a tangy buffalo sauce or sweet chili sauce can coat the popcorn chicken for a zesty twist – toss the fried pieces in the sauce to make your own boneless “wings” style appetizer.

Desi Twist: Given our Pinch of Masala vibe, you can’t go wrong with some mint-coriander chutney or tamarind chutney on the side for an Indian twist. The fresh herby notes or sweet-sour tang of chutneys can complement the savory fried chicken. A sprinkle of chaat masala on the hot fried popcorn chicken along with a squeeze of lemon juice can instantly give an extra burst of flavor reminiscent of Indian street food.

Serving Ideas: This chicken popcorn is a versatile snack. Pile it into paper cones or baskets for a fun party treat, or serve it as a meal with French fries, coleslaw, or a fresh salad on the side (think of it as a homemade KFC combo!). You can also use these popcorn chicken pieces to stuff wraps or tacos, or as a topping over a bowl of mac and cheese for a decadent treat.

Finally, gather everyone around and dig in while these Crispy KFC-Style Chicken Popcorn bites are hot and crunchy. Each bite delivers a satisfying crunch followed by tender, flavorful chicken – and perhaps a flood of nostalgia for those KFC outings. Enjoy your homemade popcorn chicken with your favorite people and sauces, and don’t be surprised when it becomes a frequently requested snack. Happy frying and happy munching! 🥳🍗

Lunch & Dinner, Street Foods

Homestyle Chhole Kulcha Recipe

Introduction

There’s a special kind of warmth in the air when chhole kulcha is on the stove. I remember my mother soaking chickpeas overnight and simmering a pot of chhole on lazy Sunday mornings, the aroma of onions, ginger, and garlic filling our home. This dish is a homestyle spin on the Punjabi classic – tender chickpeas simmered in a thick, mildly spiced onion-tomato masala with notes of bright tomato and warm cumin. Unlike the fiery restaurant versions, this everyday chhole is gentle on heat yet full of flavor, perfect for family lunches or weeknight dinners.

On the side, we have kulchas – soft leavened flatbreads that are the perfect vehicle to scoop up the curry. Kulcha dough traditionally uses all-purpose flour and a leavening (yeast or baking soda), and the breads are cooked in a tandoor (clay oven) or even on a skillet at home. My family often bought plain kulchas from the local bakery and oven-warmed them with a dab of butter until soft and aromatic. The combination of buttery hot kulcha with flavorful chhole is pure comfort on a plate. In North India, such chickpea curries with bread are a staple meal – hearty, nourishing, and made from simple pantry staples. This recipe stays true to that spirit of simplicity. It uses common ingredients you likely have on hand (no hard-to-find spices required) yet yields a deeply satisfying meal.

Pull up a chair as I share our family-style chhole kulcha recipe – complete with a few nostalgic tips, easy shortcuts, and optional sides like tangy pickled onions and mint chutney. It’s a story of comfort cooking, perfect for when you crave something warm, homely, and delicious.

Ingredients

For the Chhole (Chickpea Curry)

Chickpeas (Chana) – 1 cup dried white chickpeas (Kabuli chana), soaked overnight and drained. (Or use 2–3 cups cooked/canned chickpeas for convenience – drain and rinse if canned.)

Onions – 2 medium, finely chopped (for a sweet depth in the gravy).

Tomatoes – 2 large, ripe tomatoes, pureed or finely chopped (provides the tangy, thick base).

Ginger & Garlic – 1-inch ginger and 4–5 cloves garlic, minced or made into paste (aromatics that build flavor).

Green Chili – 1–2, slit (optional, for heat; skip or use less for a mild curry).

Whole Spices (optional) – 1 bay leaf and 1 small cinnamon stick (for subtle warm aroma, optional for everyday cooking).

Ground Spices – 1 teaspoon cumin seeds (jeera), 1 teaspoon coriander powder, ½ teaspoon turmeric powder, 1 teaspoon red chili powder (or Kashmiri chili powder for milder heat and color), 1 teaspoon garam masala (or chole masala if available – a Punjabi chickpea spice blend that’s actually milder than regular garam masala). Adjust chili to taste.

Salt – to taste (about 1½ teaspoons, divided).

Oil or Ghee – 2 tablespoons (for sautéing the masala).

Kasuri Methi – 1 teaspoon dried fenugreek leaves, crushed (optional, add at end for fragrance).

Amchur (Dry Mango Powder) – ½ teaspoon (or juice of ½ lemon, for tangy finish).

Fresh Coriander Leaves – a handful, chopped (for garnish).


For the Kulchas (Flatbread)

(This is a quick no-yeast kulcha dough using pantry staples. Feel free to use store-bought kulchas and see reheating instructions below.)

Flour – 2 cups all-purpose flour (maida). You can swap half with whole wheat flour for a healthier twist (kulchas will be slightly denser).

Leavening – 1 teaspoon baking powder + ¼ teaspoon baking soda (this combo will help the dough rise in place of yeast).

Dairy – ¼ cup plain yogurt (dahi). Yogurt makes kulchas soft and adds a slight tang; it helps ferment the dough quickly. (Use unsweetened yogurt. If avoiding dairy, you can use warm water or a non-dairy yogurt alternative, though yogurt is traditional for soft texture.)

Sugar – 1 teaspoon (feeds the leavening and gives a mild sweetness).

Salt – ½ teaspoon.

Oil – 2 teaspoons (neutral vegetable oil or ghee; adds moisture to the dough).

Warm Water – ~¾ cup (as needed to knead a soft dough).

Toppings (optional) – 1–2 teaspoons nigella seeds (kalonji) or sesame seeds, and/or 2 tablespoons chopped fresh coriander, to press on top of kulchas for a traditional touch.

Butter or Ghee – 2 tablespoons, melted (for brushing hot kulchas).


Step-by-Step Instructions

Preparing the Chhole (Chickpea Curry)

1. Soak and Boil Chickpeas: Rinse the dried chickpeas and soak them in ample water overnight (at least 8 hours). They will double in size. Drain the next day. In a pressure cooker or pot, add the soaked chana with fresh water to cover by a few inches. If using, drop in a bay leaf (and cinnamon stick). Add ½ teaspoon salt and ¼ teaspoon turmeric. Cook until chickpeas are very soft – about 2–3 whistles in a pressure cooker (or ~45–60 minutes simmering in a pot, adding a pinch of baking soda to help soften). The chickpeas should be soft enough to easily mash between fingers. (Tip: If you forgot to soak, you can quick-soak by pouring boiling hot water over the chickpeas and letting them sit for 1–2 hours.) Once cooked, reserve 1 cup of the cooking liquid and drain the rest. (If using canned chickpeas, skip the soaking/boiling – just drain and rinse them. You’ll add them directly to the masala and simmer a bit less.)


2. Make the Masala Base: Heat 2 tablespoons of oil or ghee in a deep pan on medium heat. Add the cumin seeds and let them sizzle for a few seconds. If you reserved a bay leaf from boiling, you can toss it in now for extra aroma. Next, add the finely chopped onions. Sauté the onions for about 5–7 minutes until they turn golden brown. Stir often so they cook evenly. This slow browning of onions forms a flavorful base.


3. Ginger, Garlic & Chilies: Add the minced ginger and garlic to the onions (and green chilies, if using). Sauté for 1–2 minutes until the raw smell disappears. Be careful not to burn the garlic.


4. Tomato and Spices: Stir in the chopped or pureed tomatoes. Cook this mixture for about 5–8 minutes, stirring frequently, until the tomatoes break down into a sauce and you see oil starting to separate from the sides of the pan. This step, called “bhuno”, cooks off raw tomato flavor. Now add the ground spices: coriander powder, the remaining turmeric, red chili powder, and garam masala (or chole masala). Also add 1 teaspoon salt (or to taste). Mix well and cook the masala for another 2–3 minutes. Tip: Frying the spices in the tomato-onion base releases their flavors – patience here is key to a tasty chhole. If the masala gets too dry or starts sticking, sprinkle a tablespoon of water and scrape the pan.


5. Simmer Chickpeas in Masala: Add the boiled chickpeas to the masala and stir to coat them well. Pour in about 1 cup of the reserved cooking liquid (or plain hot water) to reach your desired curry consistency (for a thick gravy, you might not use all the liquid). Mash a few chickpeas with the back of the spoon to thicken the curry. Cover and simmer on low heat for 10–15 minutes, allowing the chickpeas to absorb the flavors. If you used canned chickpeas, simmer for only about 10 minutes since they are already soft. Stir occasionally to prevent sticking. The curry will become beautifully thick and aromatic.


6. Finish and Garnish: Turn off the heat. Crush the kasuri methi between your palms and stir it in (if using). Add the amchur powder and give a final mix (if you don’t have amchur, squeeze in lemon juice to taste for that bright tang). Check seasoning and adjust salt or chili if needed. Let the chhole rest covered for 5 minutes. Just before serving, garnish with lots of fresh coriander leaves. The chickpea curry is now ready – it should be a hearty, mildly spiced gravy clinging to the soft chickpeas, rather than a thin soup.


7. Serving: Serve the chhole hot, topped with a few rings of raw onion and a lemon wedge on the side. This homestyle curry is delicious scooped up with warm kulchas. (It also goes well with rice or other breads if you have leftovers.)


Preparing the Kulchas (Flatbread)

Option A: Homemade No-Yeast Kulchas
(If making from scratch, start the dough before you cook the chhole, since the dough needs to rest.)

1. Make the Dough: In a large mixing bowl, combine the dry ingredients – flour, baking powder, baking soda, sugar, and salt. Pour in the yogurt and the 2 teaspoons of oil. Mix slightly. Now gradually add warm water, a few tablespoons at a time, and start kneading. Knead until a soft, smooth dough forms (it will be slightly sticky at first – that’s okay). You may need around ¾ cup water; add just enough for a pliable dough. The yogurt and leavening will react to make the dough light. Knead for about 5 minutes, stretching and folding, until the dough is elastic and not lumpy. Rub a light coat of oil over the dough ball.


2. Rest the Dough: Cover the dough with a damp cloth or plastic wrap and let it rest in a warm place for 2 hours. The dough will rise a bit and become airy (though not as much as a yeast dough). This resting time yields softer kulchas. (If you’re in a hurry, even 30-60 minutes rest will do, but texture improves with longer rest.)


3. Divide and Shape: After resting, punch down the dough to release air. Divide it into equal portions – about 6–8 pieces for medium kulchas. Roll each portion into a smooth ball. Keep the dough balls covered to prevent drying. On a lightly floured surface, take one ball and roll it out with a rolling pin into an oval or circle about ¼-inch thick (not too thin). If the dough springs back, let it rest another 5 minutes. Optional: Sprinkle a pinch of nigella seeds or chopped coriander on the rolled dough and press lightly so they stick (gives that traditional look and flavor).


4. Cook on Stovetop: Heat a tawa or heavy skillet over medium-high flame. Place the rolled kulcha on the hot skillet. Cook for about 30–40 seconds until you see bubbles forming on the surface. Flip the kulcha to the other side and cook for another minute or so, pressing gently with a spatula, until you see golden-brown spots on both sides. You can flip once or twice more as needed. (The kulcha may puff up in places – that’s good!). If you want a more charred finish, you can use tongs to briefly roast the kulcha directly over a gas flame after pan-cooking it, but this step is optional. Remove the kulcha and immediately brush one side with melted butter or ghee. Wrap it in a clean kitchen towel (or foil) to keep warm while you cook the remaining kulchas. Repeat for all dough balls, and serve hot.


5. Alternative – Bake in Oven: For a less hands-on method, you can bake the kulchas. Preheat your oven to 220°C (475°F). Place the rolled out kulchas on a baking sheet lined with parchment. Bake for ~8–10 minutes until they puff up and get light brown on top. (No need to flip in the oven.) Remove from oven, brush with butter, and stack in a towel to keep soft. Oven-baked kulchas won’t char as much, but they will be soft and perfect to accompany chhole.


Option B: Reheating Store-Bought Kulchas
If you have pre-made or store-bought kulchas, preparing them is even easier:

Oven Method: Wrap the kulchas in foil to prevent drying out and place in a preheated 175°C (350°F) oven for about 5–7 minutes. Then unwrap and heat for 1–2 minutes more to get a bit of crispness on the edges. This will make them soft, warm, and almost like freshly made.

Stovetop Method: Heat a tawa or skillet on medium. Lightly sprinkle a few drops of water on the kulcha (this reintroduces moisture). Place on the hot tawa and warm each side for about 1–2 minutes, pressing down gently. This refreshes the bread. Again, finish with a brush of butter. (Avoid microwaving kulchas – it can make them tough or chewy.)


Now your soft, buttery kulchas are ready to serve alongside the chhole. Keep them wrapped or covered until serving to maintain warmth and pliability.

Serving Suggestions (Optional Sides)

A plate of chhole kulcha is often accompanied by a few simple sides that add extra zing and freshness to the meal:

Pickled Onions (Sirke Wale Pyaaz): These are a classic accompaniment. You can make a quick onion salad by tossing thinly sliced red onions with a dash of lemon juice and a sprinkle of chaat masala. Let them sit for 15–20 minutes. The onions turn lightly pickled and add a crunchy, tangy bite that cuts through the richness of the chickpeas. (For a more intense pickle, soak the onion rings in vinegar, salt, and a pinch of sugar for an hour.) Serve a small bowl of these on the side or simply top your chhole with a few onion slices and a squeeze of lemon.

Mint Coriander Chutney: A vibrant green chutney brings freshness to each bite. Blend a handful of fresh mint leaves, an equal amount of fresh coriander (cilantro) leaves, 1–2 green chilies, a clove of garlic (optional), juice of one lemon, and salt to taste into a smooth paste. This mint-coriander chutney is zingy and herby, and a spoonful of it livens up the chhole. Drizzle some on top of your serving or use it as a dip for the kulcha.

Others: A dollop of plain yogurt or cucumber raita can be served alongside to cool the palate (especially if your chhole ended up spicier than intended). And if you have an Indian pickle like mango pickle, a small piece on the side can provide a spicy-sour kick that pairs wonderfully with the chickpeas.


Feel free to mix and match these sides. The combination of creamy chhole, soft kulcha, crunchy spiced onions, and cool chutney/yogurt creates a symphony of flavors and textures on your plate.

Meal Prep and Leftover Tips

Cooking chhole kulcha can fit into a busy schedule with a little planning, and leftovers are something to celebrate rather than dread! Here are some practical tips:

Make Ahead Chickpeas: You can cook a big batch of chickpeas in advance (either by pressure cooking or boiling) and freeze them in portions. Cooked chickpeas store well in the freezer for up to 3 months – keep them in airtight containers or freezer bags with a bit of their cooking liquid. This way, you have soft chickpeas ready to go for a quick weeknight chhole. (Alternatively, keep a few cans of chickpeas in your pantry for instant cravings.)

Prep in Advance: If you plan to serve this for dinner, you can do a lot beforehand. Soak the chickpeas the night before. You can even boil them earlier in the day and refrigerate (or use an Instant Pot to cook them quickly). The dough for kulcha can also be made earlier in the day – let it slow-rise in the fridge after the initial 2-hour counter rise. When it’s time to cook, the heavy lifting is already done.

Chhole Tastes Better Next Day: Believe it or not, chickpea curries often taste even better the next day! The spices deepen and the flavors meld overnight. So feel free to cook the chhole a day ahead of serving – it will reward you with an even richer taste. This also means leftovers are delightful. Store leftover chhole in the refrigerator for 2 to 3 days in a sealed container. Reheat gently on the stovetop (you may need to add a splash of water as it thickens in the fridge).

Storing Kulchas: Kulchas are best fresh, but you can keep leftovers too. If you made fresh kulchas and have extras, let them cool completely. Then store in an airtight container at room temperature for up to 1 day, or in the fridge for 1–2 days. Place a piece of parchment or a cloth between them to prevent sticking. For longer storage, wrap each kulcha in foil and freeze for up to 3–4 weeks. To reheat, use the skillet or oven methods described above (thaw frozen kulchas for 10 minutes on the counter or just heat from frozen, adding a minute or two extra).

Reinventing Leftovers: If you find yourself with a bowl of leftover chhole and a couple of kulchas the next day, you’re in for a treat. One simple idea is to make chhole toasties or sandwiches – spoon the thickened chhole onto a slice of bread (or inside a slit kulcha), top with some sliced onions and maybe cheese, and grill it into a hot sandwich. The spiced chickpeas make for a satisfying filling. You can also use leftover chhole as a topping for a baked potato or as a protein-rich stuffing for a wrap or dosa (I’ve even spread leftover chana masala inside a dosa for a fusion twist, as some home cooks do!). Get creative: turn it into a quick chaat by adding chopped onions, tomatoes, chutney and sev (crunchy noodles) on top of warmed chhole for a snack. Remember, this dish started as street food too – so those flavors lend themselves to fun street-style snacks with leftovers.

Scaling and Storing: This recipe is easy to scale up for a crowd or to meal-prep for the week. You can double the curry and it will freeze well (freeze just the chhole, not the kulchas). When reheating frozen chhole, do it gently over low heat, stirring occasionally, until it’s bubbling and hot. The kulcha dough can also be doubled; any extra dough can be kept in the fridge for a day (punch it down if it over-rises). Freshly cooked kulchas can be cooled and frozen, as noted.


By following these tips, you’ll find that chhole kulcha isn’t just a one-time meal – it’s two or three different meals in one! From the main dinner to next day’s lunch, it keeps on giving. And with a little prep, it can be a quick comfort food even on a busy evening.


Enjoy this homestyle chhole kulcha, and happy cooking! Each bite – the soft bread, the spiced chickpeas, the zing of onion and mint – tells a story of North Indian kitchens and family dinners. It’s amazing how such simple ingredients from the pantry can come together to create something so heart-warming and satisfying. I hope this recipe brings the same warmth to your home as it does to mine. Serve it up, share with your loved ones, and bask in the delicious nostalgia of this classic meal.

Snacks, Street Foods

Rajasthani Pyaz Kachori (Onion Kachori) – Monsoon Memories in a Crispy Bite

There’s a magic in the Indian monsoon that isn’t just about the rain – it’s about the cravings it brings. I remember as a child in Jaipur, the moment the earthy scent of first rain (petrichor) rose from the hot ground, my father would rush out to grab a batch of Pyaz Kachoris from the local halwai. We’d huddle under our verandah, warm cups of masala chai in hand, and bite into these golden, onion-stuffed kachoris as the raindrops danced around us. The flaky crust would crumble, giving way to a spiced onion filling that was equal parts fiery and comforting, a perfect contrast to the cool, damp weather. To this day, the monsoon and Pyaz Kachori are inseparable in my memories – one bite and I’m transported to those rain-soaked street corners and the joyful chaos of Jaipur’s monsoon evenings.

In Rajasthan, Pyaz ki Kachori isn’t just a snack; it’s an institution. Steaming hot kachoris are sold at nearly every sweet shop and namkeen stall, typically enjoyed with a dollop of sweet-sour tamarind chutney that balances the spice. These indulgent treats likely originated in the cities of Jaipur and Jodhpur, and they’re so legendary that people go to great lengths to get their hands on them – there’s even a tale of an Air India pilot detouring a flight to pick up her favorite Jodhpur kachoris!. Biting into an authentic Rajasthani Pyaz Kachori is pure bliss: the pastry is brittle, ghee-rich and flaky, giving way to a belly full of spiced onions (and a touch of potato) laced with fiery green chillies, fennel, and a hint of garlic. It’s the kind of street food that defines a place – mention Jaipur to any foodie, and they’ll likely reminisce about Rawat Misthan Bhandar’s famous Pyaz Kachori or the comfort of devouring one straight out of a roadside stall, rain or shine. This recipe is my attempt to bring those warm, nostalgic flavors into your home kitchen. So, let’s dive into making these crispy, stuffed pastries and create some monsoon memories of your own!

Ingredients

For the Kachori Dough:

2 cups all-purpose flour (maida)

1/4 cup ghee (clarified butter), melted

1/2 teaspoon salt (or to taste)

~1/2 to 3/4 cup water (as needed for kneading)


For the Onion Masala Filling:

2 cups onions, finely chopped (about 2 medium onions)

2 tablespoons oil

1 teaspoon nigella seeds (kalonji)

2 teaspoons fennel seeds (saunf)

2 bay leaves (tejpatta)

1–2 green chillies, finely chopped (adjust to spice preference)

2 tablespoons besan (Bengal gram flour) (helps bind the filling)

2 teaspoons ground coriander (dhania powder)

2 teaspoons red chilli powder (adjust to taste)

1 teaspoon garam masala powder

Salt, to taste

2–3 tablespoons fresh coriander leaves, chopped

Oil for deep frying (enough for a deep pan, about 2–3 cups)


Instructions

1. Prepare the Dough: In a large mixing bowl, combine the flour and salt. Pour in the melted ghee and rub it into the flour with your fingertips until the mixture resembles coarse breadcrumbs (this moyan of ghee is what makes the kachori flaky). Gradually add water, a few tablespoons at a time, and knead to form a semi-soft but firm dough. The dough should be pliable and smoother than puri dough, but not sticky. Knead well for about 4–5 minutes to develop gluten. Cover the dough with a damp cloth and let it rest for 15–20 minutes while you prepare the filling.


2. Make the Onion Filling: Heat 2 tablespoons of oil in a broad pan or kadhai over medium flame. Add the nigella seeds and fennel seeds; let them sizzle for a few seconds. Toss in the bay leaves and the chopped green chillies, stirring for a moment. Now add the finely chopped onions. Sauté the onions on medium heat for about 5 minutes until they soften and turn translucent (avoid browning them). Next, sprinkle in the besan and all the spice powders – coriander, red chilli, garam masala – along with salt. Stir everything together and cook for another 2–3 minutes, stirring continuously, until the besan gets lightly roasted and the spices cook off their raw aroma. The mixture will be fairly dry and aromatic, with the besan absorbing excess moisture from the onions. Turn off the heat, then mix in the fresh coriander leaves. Pick out and discard the bay leaves. Spread the filling on a plate to cool down slightly (warm is okay, just not piping hot) for easier handling.


3. Shape the Kachoris: Give the dough a quick knead after resting, then divide it into 10–12 equal portions (each portion will be about the size of a golf ball). Keep the dough balls covered to prevent drying. Working with one portion at a time, roll or press it out into a small disc roughly 3 inches in diameter. Place 1–2 tablespoons of the cooled onion filling in the center of the disc. Bring the edges of the dough up around the filling, pleating as needed, and pinch them together to seal the filling inside (like a money bag). Pinch off any excess dough at the top to avoid a thick lump. Now gently flatten the filled pouch with your palm. Using a rolling pin, very lightly and carefully roll the filled dough ball into a slightly flatter disc of about 2½ inches, taking care not to puncture it or let the filling spill out. (Tip: You can roll from the sealed side very gently, and if a bit of filling does peek through, patch it with a tiny pinch of flour-dough.) Prepare all kachoris this way, keeping the prepared ones covered with a cloth to avoid drying.


4. Deep-Fry the Kachoris: Heat the oil for deep frying in a heavy-bottomed pan or kadhai on medium-low heat. To test the oil, drop a tiny pinch of dough into it – it should sizzle and rise slowly without turning brown instantly. Slide in 2–3 kachoris at a time (do not overcrowd) into the hot oil. For the best crispy results, fry on a low to medium flame: in the first minute, do not disturb the kachoris. They will sink then gradually float up as they puff. Once they float, gently flip and move them around. Fry patiently, turning occasionally, until each kachori is golden brown, crisp and evenly cooked. This frying process can take about 8–10 minutes per batch on a moderate flame – remember, slow-frying is what yields the signature khasta (flakiness) in kachoris. Do not crank up the heat, as high heat will brown the outside too fast while leaving the inside doughy. When done, the kachoris will be a beautiful golden color and feel light and crisp with no soggy spots. Remove them with a slotted spoon and drain excess oil on paper towels. Repeat for all batches. (If you notice the oil temperature dropping too much between batches, let it heat up again, but never to smoking point.)


5. Enjoy: Serve the Pyaz Kachoris immediately while they’re hot and flaky. If you need to fry them a bit in advance, you can crisp them up in a preheated oven at 180°C (350°F) for 5 minutes before serving. See serving suggestions below for classic accompaniments!


Tips for Frying and Storing

Flaky Kachori Secrets: The key to flaky, khasta kachori is the dough. Be generous with the ghee (or oil) when rubbing it into the flour – this shortening makes the crust wonderfully crisp. Knead the dough until it’s smooth, but don’t make it too soft. A firmer, tight dough (with just enough water) ensures the kachori won’t absorb excess oil during frying. Always let the dough rest under a damp cloth; this relaxes the gluten and makes it easier to shape, preventing the kachori from springing back when rolled.

Frying Temperature & Technique: Frying kachoris is a slow dance. Always fry on medium-low heat for even cooking. Patience will reward you – low heat frying cooks the kachori through and produces an evenly golden, crisp shell with tiny flaky layers. If the oil is too hot, the kachori will puff up and turn dark quickly but remain uncooked (doughy) inside. One trick: once the kachori has floated and started to puff, you can gently press it with the frying spoon or a spatula to help it puff completely. Fry until the bubbling subsides significantly – that’s a sign the moisture has cooked out and the crust is crisp.

Onion Filling Tips: Don’t chop the onions too fine. Slightly larger diced onions are ideal because they retain a bit of texture and won’t release water as quickly as very fine onions. This helps avoid a soggy filling. The spoonful of besan in the filling is a traditional touch – it soaks up moisture from the onions and spices, ensuring the filling is dry enough to stay inside the kachori without bursting out. (Some halwais even use a bit of mashed boiled potato or crushed roasted moong dal for the same purpose of binding the filling.)

Variations: While all-purpose flour yields the most authentic crispy texture, you can replace part of the flour with whole wheat flour (atta) for a slightly healthier spin. Many households might not deep fry snacks often, but this treat is worth the indulgence! If you’re experimenting, you can also try other fillings (like spiced lentils or peas) with this same dough – but then it wouldn’t be the classic Pyaz Kachori we know and love.

Storing & Reheating: Pyaz Kachori is best enjoyed fresh, but you can prepare them in advance. These kachoris keep well for a couple of days at room temperature. Let the fried kachoris cool completely, then store them in an airtight container – this prevents them from turning soggy. To reheat, avoid microwaving (which can make them chewy); instead, warm them up in a preheated oven at 180°C (350°F) for about 5–8 minutes. They’ll crisp up almost as good as freshly fried. (If you need to store the uncooked, filled kachoris, you can refrigerate them separated by parchment, but fry within a day for best results.)
Leftover Idea: If by some miracle you have leftover kachoris, you can turn them into a quick kachori chaat! Lightly crush a warmed kachori in a bowl, top with whisked yogurt, drizzle with tamarind and green chutneys, and sprinkle some sev and chopped onions. This street-food style makeover is absolutely delicious.


Serving Suggestions

Classic Chutney Pairing: The traditional way to relish Pyaz Kachori is with chutneys. Tamarind-Date Chutney (imli ki chutney), which is sweet and tangy, is a must – it complements the spicy, pungent onion filling perfectly. Alongside it, serve a bright Green Chutney made from fresh coriander, mint, green chillies and lime. The duo of sweet tamarind and herbaceous green chutney offers a burst of contrasting flavors that elevate each bite of the kachori. Serve the kachoris on a platter with bowls of these chutneys, or drizzle the chutneys inside the opened kachori for a street-style presentation. You can also add a few fried green chillies on the side for those who love extra heat (bite carefully – they’re hot!).

Rajasthani Kadhi (Kadhi Kachori): In some parts of Rajasthan, especially in cities like Ajmer, Pyaz Kachori is famously served with a simple Rajasthani kadhi. This kadhi is a thin, spicy yogurt-based curry (different from the Punjabi kadhi, as it usually has no pakoras and is lighter). To serve, place hot kachoris in small bowls and pour steaming kadhi over them, then top with a drizzle of tamarind and green chutney. Eating kachori soaked in kadhi is a soul-warming experience – the kachori soaks up the savory curry, turning each bite into a soft, flavor-packed dumpling. It’s a lesser-known but delightful way to enjoy this snack as a more filling meal.

Chai Time Delight: No Indian street food story is complete without chai! Serve your Pyaz Kachoris with a pot of hot masala chai on the side. The strong, milky tea cuts through the richness of the kachori and makes for a comforting combination. In fact, many locals swear by kachori with chai as the ultimate rainy day duo. The warmth of the tea and the spice of the kachori filling will surely chase away any chill from the monsoon rain. So, dig in, sip, and enjoy the bliss – as we say in Rajasthan, “Ram ram sa, khaana ho jaye!” (Greetings, let’s eat!).


Enjoy making these Rajasthani Pyaz Kachoris at home! With each crispy bite, you’ll taste the love and legacy of Rajasthan’s street food culture – and if you close your eyes, you might just hear the patter of rain and the chatter of a busy Jaipur market. Happy cooking and happy monsoon! 🌧️✨