In our family, the first scent of a monsoon rain didn’t come from the earth; it came from the kitchen. I remember my mother reaching for a large bunch of fresh palak the moment the clouds turned charcoal. To her, Palak Pakora wasn’t just a snack; it was a sensory response to the weather. She believed that spinach had a “memory” of the rain, and frying it was the only way to lock that freshness in. I can still see her standing by the stove, her bangles clinking as she hand-tossed the leaves in a golden mantle of chickpea flour. “Never use a spoon to mix,” she would tell me. “Your fingers need to feel if the leaves are happy.” She taught me that the secret to a perfect pakora lay in the “Quiet Luxury” of a batter that whispered rather than screamed thin enough to see the green, but thick enough to crunch. Today, at The Pinch of Masala, we are honoring her ritual by avoiding the heavy, doughy fritters of street stalls. We are returning to the “Whole Leaf” heritage style that celebrates the “Ingredient Integrity” of the spinach itself.
The most common grievance with Palak Pakora is that they turn soft and soggy within minutes. To achieve my mother’s “Eternal Crunch,” you must master the Moisture War: The “No-Water” Rule: This is the ultimate “Digital Anthropologist” secret. Do not add water to your batter. My mother would salt the shredded spinach and let it sit for 5 minutes. The salt creates a hypertonic environment, drawing out the natural juices of the leaves. You then add the besan (gram flour) directly to these juices. This ensures the batter is made of 100% spinach essence, making it impossible for the pakoras to turn soggy. The Rice Flour Catalyst: In 2026, we value “Technical Excellence”. Adding exactly two tablespoons of rice flour acts as a moisture-wicking agent, creating a glass-like crunch on the exterior that protects the tender “Fibremaxxing” leaves inside.
Prep time: 10 mins | Cook time: 15 mins | Servings: 4 Diet: Vegan, Gluten-Free | Cuisine: North Indian Street Food
Ingredients: 250g Fresh Palak (Spinach): Roughly chopped into wide ribbons. 1 cup Besan (Gram Flour): Sifted for a smooth texture. 2 tbsp Rice Flour: For the signature “Heritage Crunch.” The Aromatics: 1 Large Onion (thinly sliced), 1 inch Ginger (grated), 2 Green Chillies (chopped). Spices: 1 tsp Cumin seeds (Jeera), ½ tsp Turmeric, 1 tsp Carom seeds (Ajwain essential for digestion), and Salt to taste. Fat: Oil for deep frying (Cold-pressed Peanut or Mustard oil is preferred for authenticity). Instructions: The Salt Ritual: Place the spinach and sliced onions in a large bowl. Sprinkle with salt and ajwain. Massage the leaves gently with your fingers and let them rest for 5–8 minutes until they look “sweaty.” The Dry Mix: Add the ginger, chillies, and dry spices. The Coating: Sift in the besan and rice flour. Mix with your hands. The moisture from the spinach will begin to form a thick, sticky paste that coats the leaves. Do not add water. The Temperature Test: Heat oil in a heavy-bottomed kadhai. Drop a tiny bit of batter; if it rises immediately with a sizzle, the oil is ready. The Drop: Take a small, irregular clump of the mixture and drop it into the oil. Do not shape them into perfect balls; the craggy edges are where the crunch lives! The Gold Standard: Fry on medium heat for 3–4 minutes, turning once, until they are a deep, sun-kissed golden brown. Serve: Drain on a paper towel and serve immediately with tangy Tamarind Chutney or a steaming glass of Masala Chai.
The “Pakora Choora” (Leftover Crumbs): In the 2026 “Use-Up” economy, nothing is wasted. My mother never threw away the tiny crispy bits of batter left at the bottom of the pan (the choora). Save these in an airtight jar. They make the perfect “zero-waste” topping for your morning Poha or a bowl of Dal, adding a concentrated hit of spice and texture.
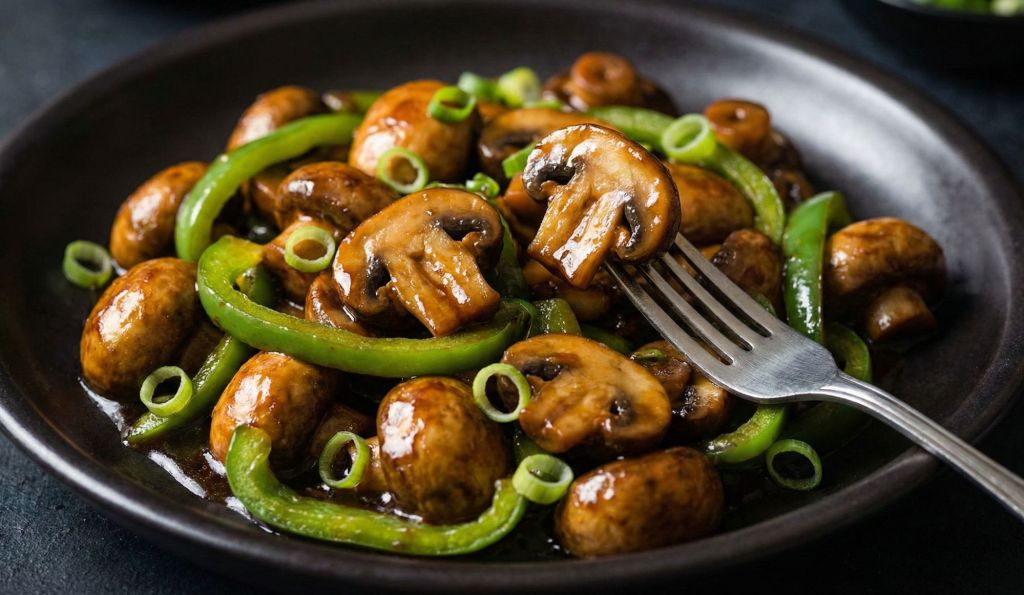
Introduction If you walk into any classic Indo-Chinese restaurant in India, from the legendary spots in Kolkata’s Tangra to the busy streets of Mumbai, the aroma is unmistakable. It’s a mix of smoky soy sauce, sizzling garlic, and high-heat wok frying. While Chilli Chicken gets all the glory, the Chilli Mushroom is the unsung hero of the “Desi Chinese” menu. When made correctly, button mushrooms mimic the texture of meat juicy on the inside, enclosed in a crispy, spicy batter that soaks up that glossy, umami-laden sauce. But here is the problem: Homemade Chilli Mushroom often turns into a soggy mess. The mushrooms release water, the batter falls off, and the crunch disappears. Today, I am sharing the Restaurant Secret to keeping them crispy. This recipe delivers that sticky, spicy, dry version that is perfect as a party starter. The “Crispy” Secret (The Double Coat) Mushrooms are 90% water. To get that restaurant crunch, you need to follow two rules: Do Not Wash (Wipe Instead): If you wash mushrooms under a tap, they act like sponges. Wipe them clean with a damp cloth instead. The Flour Ratio: We use a mix of Cornflour (Corn Starch) for crunch and Maida (All-Purpose Flour) for binding. If you use only cornflour, it gets too hard; only maida, and it gets soft. The balance is key. The Recipe Card Prep time: 15 mins | Cook time: 15 mins | Servings: 2-3
Ingredients: The Crispy Mushrooms: 200g Button Mushrooms: Cleaned and cut into quarters (keep small ones whole). 3 tbsp Cornflour: The crisping agent. 2 tbsp Maida (All-Purpose Flour): The binding agent. ½ tsp Black Pepper Powder: Freshly crushed. ½ tsp Ginger-Garlic Paste: For flavor inside the batter. Salt: To taste. Oil: For deep frying. The “Tangra” Sauce: 1 tbsp Garlic: Finely chopped (use lots of garlic!). 1 inch Ginger: Finely chopped. 2-3 Green Chilies: Slit lengthwise. 1 Medium Onion: Cut into square petals (bulbs). 1 Medium Capsicum (Green Bell Pepper): Cut into squares. The Sauce Mix: 1 tbsp Dark Soy Sauce, 1 tbsp Red Chilli Sauce, 1 tsp Vinegar, 1 tsp Tomato Ketchup (to balance the heat). Spring Onion Greens: Finely chopped for garnish. Instructions: The Batter: In a bowl, mix the mushrooms, ginger-garlic paste, salt, and pepper. Let it sit for 2 minutes. The mushrooms will release a tiny bit of moisture. Now, sprinkle the cornflour and maida dry over the mushrooms. Toss them well. Sprinkle a few drops of water only if needed to coat the flour. Tip: We want a thin, sticky coating, not a thick pakoda-like batter. The Fry: Heat oil in a deep pan. When the oil is hot, drop the mushrooms in one by one (don’t clump them). Fry on medium-high heat until they are golden and sound hollow when tapped. Drain and keep aside. The Wok Sear: In a separate wok or wide pan, heat 1 tbsp oil on High Heat. Add the chopped ginger, garlic, and green chilies. Sauté for 30 seconds until the garlic turns golden. The Crunch Veggies: Add the onion petals and capsicum. Toss on high flame for just 1 minute. They must remain crunchy. The Sauces: Lower the heat slightly. Add the soy sauce, chili sauce, vinegar, and ketchup. Add a pinch of salt (be careful, soy is salty) and black pepper. Mix well. The Toss: Add the fried mushrooms to the pan. Increase the heat to high. Toss quickly for 30 seconds so the sauce coats the mushrooms evenly. Do not cook for too long, or they will soften. Finish: Turn off the heat. Stir in the spring onion greens. Serve immediately.
The “Pinch of Thrift” Tip (Zero Waste) Flavored Oil: After deep-frying the mushrooms, do not discard the oil! Filter it through a sieve. This oil now has the aroma of mushrooms and ginger-garlic. How to use: Use this oil to make Fried Rice or Stir-fry Noodles the next day. It adds that authentic “restaurant flavor” base that fresh oil lacks.
I still remember the first time I bit into a sizzling hot Bada Pao (Vada Pav) on a rainy Mumbai afternoon. The spicy potato vada – crunchy and golden – nestled inside a pillowy soft pav bun, hit all the right notes. As I walked along the busy street, steam rising from the paper wrapper, the pungent aroma of garlic and chili chutneys filled the air. It was a simple pleasure, but one I’ll never forget. Bada Pao (also spelled Vada Pav) is, as one food blogger puts it, “Mumbai’s beloved street food sensation” often nicknamed the “Indian burger”. In essence, it’s a vegetarian fast-food sandwich: a deep-fried spicy mashed-potato fritter placed inside a sweet bun and typically served with a green chili and flavorful chutneys. This humble snack has become so iconic that it’s said to be the most famous street food of Mumbai – so famous, in fact, that August 23 is even celebrated as World Vada Paav Day.
Growing up, I watched my mum prepare the potato filling with care. She would boil and mash potatoes, then sauté mustard seeds, curry leaves, ginger, garlic and green chilies in a little oil. A pinch of turmeric and salt went in for color and taste, and the mixture was stirred into the potatoes along with chopped coriander. After it cooled, she shaped the spicy mash into round patties. Meanwhile, we’d whisk gram flour (besan) into a batter with a little water – sometimes adding a pinch of baking soda or rice flour for extra fluff. Each patty was coated in that batter and deep-fried until golden and crispy on the outside.
No Vada Pav is complete without chutney. I always smear the split pav with homemade green cilantro-mint chutney and a dry garlic-chili (lasun) chutney – the classic accompaniments. The combination of tangy cilantro, pungent garlic, and heat from chilies is what really makes each bite pop. The first time I made this at home, it transported me back to the streets of Mumbai – and even reminded me that this was originally an affordable snack for mill workers in the 1960s. Today it’s a cultural symbol; one of my favorite childhood memories is sharing Bada Pao with my friends after school.
Now let’s bring those Mumbai flavors into your kitchen. The ingredients and steps below will guide you through a delicious homemade Bada Pao (Vada Pav). Enjoy!
Ingredients
Pav buns: 4 soft dinner rolls (Indian pav)
Potatoes: 4 medium russet or red potatoes, boiled and mashed
For the potato filling: 1 tsp mustard seeds, pinch of asafoetida (hing), ¼ tsp turmeric, 2 tsp ginger (grated), 3 cloves garlic (minced), 2–3 green chilies (chopped), 12–15 curry leaves, salt to taste, and handful of chopped fresh coriander (cilantro)
Gram flour batter: ¾ cup besan (gram flour), pinch of baking soda (optional for fluffiness), pinch of turmeric, pinch of red chili powder, salt to taste, and water to make a thick batter
Oil: for deep frying
Chutneys & toppings: Homemade or store-bought green cilantro-mint chutney and dry garlic-peanut chutney (lasun chutney); sliced onions and fried green chilies (optional) for serving
Instructions
1. Make the potato masala: In a pan, heat 1–2 tbsp oil and add mustard seeds. When they splutter, add hing, curry leaves, ginger, garlic and green chilies. Sauté for a minute until fragrant. Stir in the turmeric, salt and mashed potatoes, then mix well. Cook for 1–2 minutes, then turn off the heat and stir in chopped coriander. Let the mixture cool slightly. Divide it into 4–6 equal portions and shape each into a round patty about 1½–2 inches wide and ½ inch thick.
2. Prepare the batter: In a bowl, whisk together gram flour, a pinch of salt, baking soda (if using), turmeric and chili powder. Gradually add water and whisk to make a smooth, lump-free batter that coats the back of a spoon (it should be neither too thick nor too runny).
3. Fry the vadas: Heat oil in a deep skillet or kadhai over medium-high heat. When the oil is hot (test by dropping a bit of batter – it should sizzle and rise), dip each potato patty into the batter, ensuring an even coat. Use a slotted spoon to gently lower it into the oil. Fry 2–3 vadas at a time, turning occasionally, until they are golden brown and crisp all over (about 3–4 minutes). Remove and drain on paper towels.
4. Warm the pav buns: While the vadas fry, warm a griddle (tawa) over medium heat. Slice each pav bun horizontally, leaving one edge attached. Lightly toast the buns on the griddle (you can spread a bit of butter if you like) until they are just golden. Remove and keep warm.
5. Assemble the Bada Pao: Spread a generous layer of green chutney on one side of each bun and sprinkle some dry garlic-chili chutney on the other side. Place a hot vada (batata vada) inside the bun, pressing lightly. If desired, add sliced raw onion or a fried green chili inside for extra crunch and heat. Serve the assembled Bada Paos immediately – they are best enjoyed hot and fresh!
Tips
Adjust the spice: You can control the heat by adding fewer green chilies to the potato mix or reducing the chili powder in the batter. If cooking for kids, omit extra chilies and serve hot sauce on the side.
Make it extra crispy: For crunchier vadas, stir in 1–2 tablespoons of rice flour into the gram flour batter. Also, ensure the batter is not too thick – a thinner coating fries up lighter.
Even coating trick: Use a spoon to tap off any excess batter from the vada before frying. A slotted spoon is handy for lowering the batter-coated vada into hot oil smoothly.
Chutneys in advance: Both green cilantro chutney and dry garlic chutney can be made a day or two ahead and refrigerated. This saves time and lets flavors meld. Add a swirl of sweet tamarind-chutney for a tangy twist if you like.
Use fresh pav: Authentic Vada Pav has soft, slightly sweet buns. If you can find Indian pav rolls (like from a bakery or Indian grocery), that’s ideal. Otherwise, plain soft dinner rolls work; avoid very sweet hamburger buns.
Serve hot: Vada Pav is best enjoyed immediately. The vada should be hot from the fryer and the chutneys vibrant. If storing leftovers, reheat vadas in a pan to crisp them up, then assemble.
Enjoy your homemade Bada Pao with a cup of masala chai for the full Mumbai experience. Each bite of spicy potato vada and tangy chutneys will transport you to the bustling streets of Mumbai just like it did for me. I hope this recipe brings you the same joy and nostalgia it brings me – happy cooking!
Ragi (finger millet) is an ancient whole grain prized for its nutritional value. Like other millets, it’s rich in protein, fiber, and antioxidants, yet naturally gluten-free. Finger millet stands out for its exceptionally high calcium content – higher than any other common cereal – making it a boon for bone and muscle health. Its low glycemic index and abundant fiber also help support steady blood sugar levels. With an earthy, nutty flavor and hearty texture, ragi is a versatile base for both sweet and savory Indian dishes. It’s long been used in South India for porridge, rotis and dosas, and now makes a deliciously nutritious pancake too.
Sweet Ragi Pancakes (Banana & Jaggery)
These sweet ragi pancakes combine mashed banana and jaggery for natural sweetness and moisture. The result is a fluffy, caramel-scented pancake with a hint of nutty whole-grain flavor. They make an indulgently healthy breakfast or snack, especially paired with fresh berries, yogurt, or a drizzle of honey.
Ingredients (Sweet Version)
1 cup ragi flour (finger millet flour)
½ cup whole wheat flour (or oat flour for a gluten-free option)
2 tablespoons jaggery powder (or brown sugar)
2 ripe bananas, mashed
½ teaspoon baking powder
Pinch of salt
1 teaspoon ground cardamom (optional, for warm flavor)
¾–1 cup milk (dairy or plant-based, as needed for batter consistency)
1 teaspoon oil or melted butter (to add to batter)
Additional oil or butter for cooking
Instructions (Sweet Version)
1. Mix wet ingredients: In a bowl, mash the bananas thoroughly. Stir in the jaggery powder until well combined. Pour in the milk and add the oil, whisking until smooth. (Warming the milk slightly can help dissolve the jaggery.)
2. Combine dry ingredients: In a separate bowl, whisk together the ragi flour, whole wheat flour, baking powder, salt, and cardamom. Gradually add the dry mix to the banana-milk mixture, stirring continuously. Mix until you have a thick, pourable batter. If it seems too stiff, add a splash more milk to adjust.
3. Rest the batter: Let the batter rest for 5–10 minutes. Ragi absorbs liquid, so resting helps hydrate the flour and makes the pancakes fluffier.
4. Cook the pancakes: Heat a non-stick skillet or griddle over medium heat and lightly grease it. Pour about 1/4 cup of batter per pancake onto the skillet. Cook for 2–3 minutes, until bubbles form on the surface and the edges look set. Flip carefully and cook the other side for another 1–2 minutes, until golden brown. Repeat with the remaining batter, adding a little oil to the pan as needed.
5. Keep warm: Stack the cooked pancakes on a plate and keep them warm (cover loosely with foil) while you cook the rest.
These sweet ragi pancakes are naturally eggless and use the banana as a binder. You can top them with yogurt, fresh fruit, maple syrup or a smear of peanut or almond butter for extra flavor and protein.
Savory Ragi Pancakes (Veggie & Spice)
Enjoy a savory twist on pancakes by mixing ragi flour with spices and vegetables. This batter is flavored with turmeric, cumin, and ginger, and studded with veggies like carrots and onions for extra color and nutrients. These hearty pancakes are satisfying on their own, or serve them with chutney or yogurt for a wholesome meal.
Ingredients (Savory Version)
1 cup ragi flour
¼ cup semolina (sooji) or rice flour (for a slightly crisp texture)
3/4 cup plain yogurt (curd) (dairy or plant-based; thinned with water if needed)
Water as needed (about ½ cup) to make a thick batter
¼ cup finely chopped onion
¼ cup grated carrot
¼ cup chopped spinach or other greens
2 tablespoons chopped fresh cilantro (optional)
Oil or ghee for cooking
Instructions (Savory Version)
1. Prepare the batter: In a bowl, whisk together the ragi flour, semolina, salt, cumin, turmeric, and chili powder. Stir in the ginger-garlic paste. Add the yogurt and about ½ cup of water, mixing until a thick, smooth batter forms. Add a bit more water if necessary to achieve a pourable consistency (similar to pancake batter).
2. Add vegetables: Fold the chopped onion, grated carrot, spinach, and cilantro into the batter. Stir well to distribute the vegetables evenly. (For extra tenderness, you can let the batter rest 5–10 minutes to soften the veggies.)
3. Cook the pancakes: Heat a lightly oiled skillet over medium heat. Pour a ladleful of batter onto the skillet and gently spread into a small circle (about 4–5 inches across). Cover with a lid and cook for 2–3 minutes, or until the edges start to brown and the top is mostly set. Drizzle a little oil or ghee around the edges. Flip the pancake and cook the other side for another 2 minutes, until golden and cooked through.
4. Repeat: Continue with the remaining batter, adding more oil between pancakes as needed. Serve each pancake hot off the skillet.
These savory ragi pancakes have a light crisp edge and soft interior. They can be made vegetarian and dairy-free by using plant-based yogurt.
Optional Add-ins & Swaps
Eggless: Both versions above are naturally egg-free. The mashed banana (in the sweet pancakes) and yogurt (in the savory pancakes) help bind the batter. You can also stir in 1 tablespoon of ground flaxseed or chia seeds mixed with 3 tablespoons water (let sit 5 min) as an “egg” substitute if you like.
Vegan: Make it fully vegan by using plant-based milk (almond, soy, oat) and replacing butter/ghee with coconut oil or vegetable oil. For the sweet pancakes, maple syrup or extra mashed banana can sweeten in place of honey or dairy honey. For the savory version, use a dairy-free yogurt or thin the batter with water instead of yogurt.
Flour alternatives: Feel free to substitute some or all of the whole wheat flour with almond flour, oat flour, or extra ragi flour (though 100% ragi can be dense, so a mix is usually best). You can also use buckwheat or millet flours in place of wheat for a gluten-free mix.
Extra add-ins: Customize your batter by stirring in extras. In the sweet batter, try adding chopped nuts (almonds, walnuts), seeds (sunflower, chia) or dried fruits (raisins, chopped dates). In the savory batter, add finely diced bell pepper, peas, grated zucchini, or chopped scallions. A sprinkle of sesame seeds or nigella seeds on top while cooking can add texture and flavor.
Serving Suggestions
Sweet pancakes: These taste great with a drizzle of honey or maple syrup, or a dollop of yogurt or nut butter. Top them with fresh fruits like berries or banana slices for a beautiful breakfast stack. A spoonful of jam or fruit compote is also delicious.
Savory pancakes: Serve hot with Indian-style condiments. Coconut-cilantro chutney or spicy tomato chutney make perfect accompaniments. Plain yogurt (or raita) and pickles (achar) also complement the nutty pancakes nicely. A squeeze of fresh lemon juice over the savory pancakes brightens the flavors.
Whether you choose the sweet banana version or the spiced vegetable version, these Ragi Pancakes are a warm, wholesome way to start the day. Packed with whole-grain goodness and flavor, they’re sure to become a favorite healthy breakfast or snack in your home. Enjoy!
Sources: Ragi (finger millet) nutrition facts and health benefits are supported by nutrition research. For example, finger millet has an exceptionally high calcium content and millets are rich in fiber, protein, and antioxidants. These qualities make ragi a nutritious choice for gluten-free diets and blood sugar management. Techniques for vegan substitutions are adapted from expert recipes.
Tandoori-style marinated broccoli florets are a modern Indian appetizer staple – perfect as a party snack or a fusion starter. Inspired by classic tandoori kebabs, this recipe uses hung curd (strained yogurt) spiced with chili, cumin, garam masala and ginger-garlic to coat broccoli pieces. After a short rest, the florets are oven-roasted, grilled or air-fried until tender with charred edges, giving them that coveted smoky flavor. This crunchy, flavorful snack is especially welcome in cooler months when broccoli is in season, and it’s easy to prepare at home as a crowd-pleasing vegetarian bite.
Ingredients
Broccoli: 1 large head (about 300–350 g), cut into bite-sized florets
Hung curd (strained yogurt): ½ cup (makes marinade creamy; can use plain Greek yogurt)
Gram flour (besan): 1 tablespoon (helps the marinade coat the florets and prevents sticking)
Ginger–garlic paste: 1 tablespoon (freshly ground or store-bought)
Turmeric powder: ¼ teaspoon
Kashmiri red chili powder: 1 teaspoon (or paprika for color; adjust spice to taste)
Cumin powder: ½ teaspoon
Garam masala: ½ teaspoon (or tandoori masala powder)
Oil: 1 tablespoon (neutral oil like vegetable or mustard oil; plus extra for grilling or air-frying)
Salt: to taste (about ½–1 teaspoon)
Optional add-ins: For a richer “malai” version, whisk in 2–3 tablespoons cream or grated cheese into the marinade.
Marinade Preparation and Marinating
1. Prepare the broccoli: Bring a pot of salted water to a boil. Add broccoli florets and blanch for 1–2 minutes, until just bright green. Immediately plunge them into ice water to stop cooking, then drain and pat dry. (This quick blanch keeps broccoli crisp-tender and helps the marinade adhere.)
2. Make the marinade: In a large bowl, whisk together hung curd, besan, ginger–garlic paste, turmeric, chili powder, cumin, garam masala, chaat masala, kasuri methi, lemon juice, 1 tbsp oil, and salt until smooth. Adjust salt and spice to taste. Tip: Roasting the gram flour briefly before mixing (about 1–2 minutes on low heat) gives a nuttier flavor and prevents a raw taste.
3. Coat the broccoli: Add the blanched broccoli to the marinade bowl. Gently toss until each floret is fully coated. Scrape any leftover marinade on the sides.
4. Marinate: Cover and refrigerate for at least 15–20 minutes, ideally 30–45 minutes. (Longer marinating – up to a few hours – deepens the flavor.) The broccoli will absorb the tangy spice mix; the besan helps the marinade cling and crisp up later. If time allows, an hour or more gives a richer taste.
Cooking Methods
After marinating, cook the broccoli by air fryer, oven, or grill. Each method yields charred edges and a smoky hint; choose your equipment:
Air Fryer: Preheat to 180°C (360°F). Arrange marinated florets in a single layer in the basket (work in batches to avoid crowding). Lightly brush with oil. Air-fry for 8–10 minutes, shaking the basket halfway, until edges brown and crisp. The florets should be tender with some charred spots.
Oven: Preheat oven to 218°C (425°F). Line a baking sheet with parchment. Spread marinated broccoli evenly on the sheet. Bake for about 15–20 minutes, then switch to broil (grill) for the last 2–3 minutes to char the tips. Turn once halfway through. (Alternatively, bake at 170°C for 12–15 minutes, then broil 1–2 minutes.) The result is soft inside, crispy outside.
Grill or Grill Pan: Thread broccoli onto soaked skewers or arrange on a hot grill pan. Brush or spray with oil. Grill over medium-high heat, turning occasionally, until each side is golden and charred (about 3–5 minutes per side). You can also use a stovetop “naan grill” or cast-iron griddle: heat it well, drizzle with oil, and cook skewers on direct flame – this adds a lovely tandoori smoke. Tip: If you have a barbecue grill, this is ideal for extra smokiness (preheat to ~200°C).
Stove-Top Tawa (if no oven/grill): Heat a skillet or tawa on medium-high. Add a dash of oil, then place broccoli florets in a single layer. Cook for a few minutes on each side until charred, flipping gently. Covering briefly can steam them through. A splash of water can prevent burning if using the stove.
Always watch closely near the end so they don’t burn. The florets should be fork-tender yet crisp, with charred tips – this is what gives the “tandoori” appeal.
Tips for Smoky Tandoori Flavor
To mimic authentic tandoor smokiness at home, try one of these hacks:
Dhungar (Charcoal Smoke): Wrap a small piece of hot charcoal in foil, place in the bowl with cooked broccoli, and cover for a few minutes. The smoke infuses the florets.
Liquid Smoke or Smoked Spices: A drop of liquid smoke or a pinch of smoked paprika in the marinade can add a subtle char flavor.
Smoked Salt or Paprika: Finishing with smoked sea salt or smoked chili powder boosts the barbecue taste.
Earthen Pot Method: Preheat a small clay pot over flame, pour a teaspoon of ghee in it, and invert over the broccoli (covered) for a minute – an old-school trick for a smoky aroma.
Black Cardamom: Swap green cardamom in the marinade for ½ teaspoon ground black cardamom; it imparts natural smokiness.
Finally, after cooking, squeeze lemon over the broccoli and sprinkle a little chat masala for an extra kick.
Serving Suggestions and Dips
Tandoori broccoli shines with cool, creamy condiments. A mint-cilantro yogurt chutney (mint raita) or a simple yogurt sauce is classic and balances the heat. The tangy mint yogurt chutney, made of mint leaves, coriander, yogurt, and spices, is traditionally served alongside tandoori dishes. Other good pairings:
Yogurt Sauce or Raita: Whisk plain yogurt with chopped cucumber, mint/cilantro, a pinch of salt and chaat masala.
Green Chutney: Mint-coriander chutney (with jalapeño, lime, and yogurt) adds freshness.
Tamarind Chutney: Its sweet-tanginess complements spicy bites.
Onion Salad: Thinly sliced onions and lemon wedges, sprinkled with salt and pepper, add crunch.
Beverages: Serve with a cooling drink – try a sweet mango lassi or a spiced chai to complete the spread.
For a full starter platter, include additional appetizers like paneer or cauliflower tikka. These bites also work well on wraps or sandwiches, paired with coleslaw or pickled veg.
Expert Tips: Cut florets to uniform size for even cooking. Shake the air-fryer basket or turn the skewers for even browning. Don’t skip the marinade resting time – even 15–30 minutes makes a big flavor difference. The besan in the marinade helps everything crisp up beautifully without sticking.
Enjoy this healthy, flavorful appetizer that turns humble broccoli into a show-stopping tandoori broccoli tikka. Your guests will love the charred, spice-coated florets as much as classic paneer or chicken tikka – with the bonus of extra fiber and vitamins!
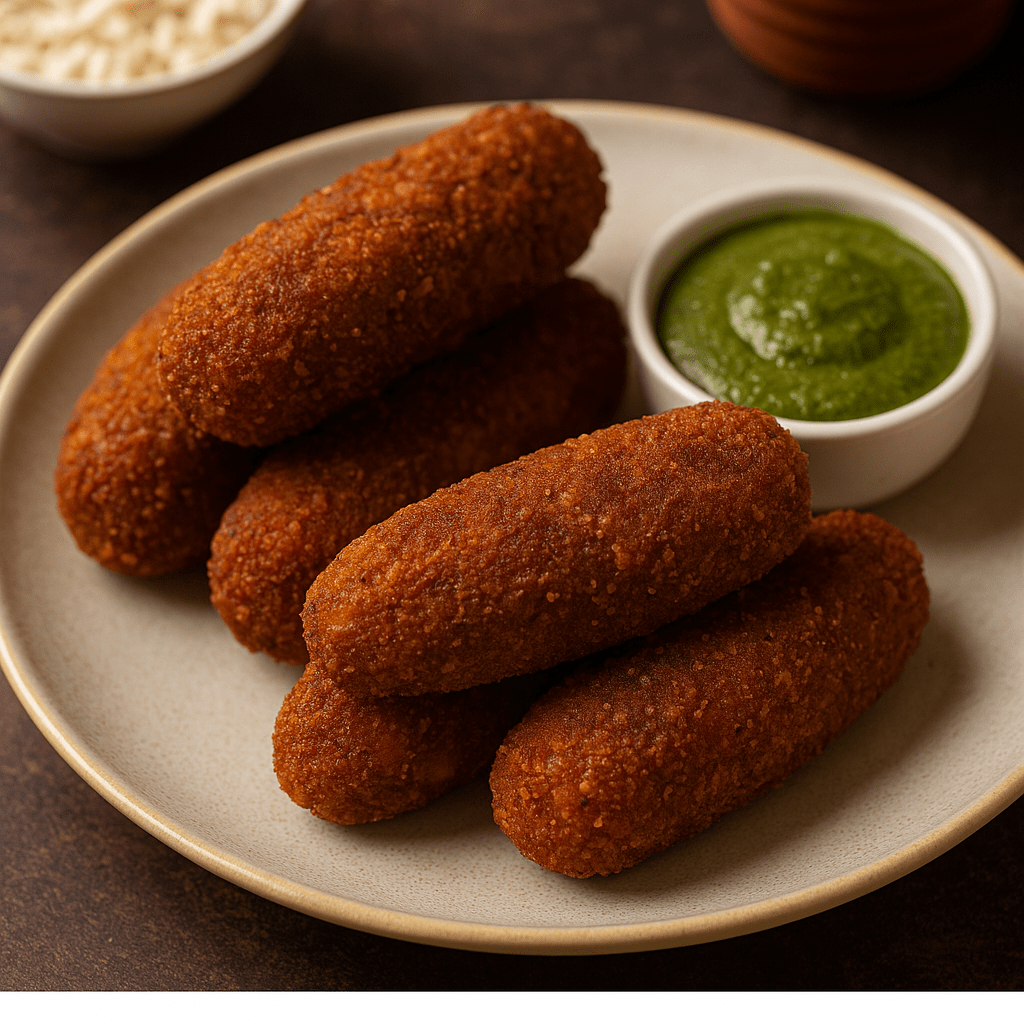
Banana Flower Cutlets (Mochar Chop) served with puffed rice and tea – a beloved Bengali snack. Banana Flower Cutlet, or Mochar Chop, is a beloved Bengali snack featuring banana blossom (mocha) combined with mashed potatoes and aromatic spices, coated in breadcrumbs and fried to golden perfection. It’s a popular street food in Bengal and a staple at Bengali eateries. Preparing the banana flower is a labor of love – cleaning and separating each floret is tedious, but the end result is well worth the effort. Each bite of Mochar Chop is filled with rich traditional flavors and a touch of nostalgia.
Growing up in a Bengali household, this delicacy often made appearances during family gatherings and festivals. I fondly recall Durga Puja evenings with food stalls serving hot mochar chops to eager visitors, wrapped in paper and topped with a dab of mustard sauce. On rainy afternoons, nothing beat enjoying these cutlets with a steaming cup of chai (tea), often accompanied by muri (puffed rice) for an authentic touch.
Traditionally, Mochar Chop is prepared niramish (without onion or garlic), making it suitable for vegetarian diets and auspicious days. Instead, ginger and a special roasted spice blend known as bhaja masala provide a depth of flavor. The banana blossom itself lends a unique earthy taste, balanced by the sweetness of raisins and the crunch of peanuts inside the cutlet. All of these are encased in a crisp breadcrumb coating that shatters deliciously with each bite. It’s a harmony of soft and crunchy, spicy and sweet – truly a classic Bengali treat.
Preparing the Banana Flower (Mocha)
Cleaning the banana flower is the first and most important step. Here are some tips to prep the banana blossom before cooking:
Grease Your Hands: Banana flower sap can stain hands and surfaces. Rub a little oil on your palms and cutting board to prevent staining while cleaning the flower.
Remove Outer Bracts: Peel off the tough purple outer petals (bracts) to reveal the yellowish-white florets underneath. As you remove each bract, pluck out the cluster of florets attached inside and collect them in a bowl. (You can reserve the large bracts – they are sometimes used as natural serving plates for the chops!)
Discard Inedible Parts: For each floret, remove two parts – the papery outer cover (tepal) and the long thin strand with a bulbous tip (the stigma/style). These parts are not digestible and can make the dish bitter, so discard them. Cleaning each little floret takes time, but it’s necessary for a tasty result.
Soak in Acidic Water: Keep a bowl of water mixed with a few tablespoons of yogurt or lemon juice (or buttermilk) nearby. As you clean and chop the banana florets, immerse them in this acidic water to prevent discoloration (the blossoms oxidize and turn dark quickly in air). A pinch of turmeric can also be added to the water.
Chop and Prepare: Once all florets (and the tender inner heart) are cleaned, chop them finely. Continue to keep the chopped banana flower submerged in the acidic water until you’re ready to cook. If not cooking immediately, you can refrigerate the soaked banana flower – it will stay good for a day or two without turning black.
“Crispy Banana Flower Cutlets (Mochar Chop) – a Bengali delicacy made with banana blossom, potato, and spices, served hot with green chutney for the perfect tea-time snack.”
Ginger – 1 inch piece, grated (about 1 tablespoon)
Green chillies – 2 to 3, finely chopped (adjust to taste)
Peanuts – ¼ cup, roughly chopped or left whole (use roasted or fried)
Raisins (kishmish) – 2 tablespoons, optional (adds a touch of sweetness)
Coconut – 2 tablespoons, finely chopped or grated (optional; traditionally used fried)
Bhaja masala – 2 teaspoons (Bengali roasted spice mix of cumin, coriander, chili, fennel, clove, cinnamon, etc.)
Sugar – 1 teaspoon (or to taste, balances bitterness)
Salt – to taste
Mustard oil – 2 tablespoons (for sautéing; substitute any cooking oil if needed)
Oil for deep/shallow frying – as needed (mustard oil or vegetable oil)
For Coating:
All-purpose flour (maida) – ¼ cup, for dusting
Gram flour (besan) – ½ cup
Rice flour – 2 tablespoons
Baking soda – a pinch
Turmeric powder – ¼ teaspoon (for batter)
Red chili powder – ¼ teaspoon (for batter, optional)
Salt – a pinch (for batter)
Breadcrumbs – ~1 to 2 cups, or as needed for coating (preferably dried bread crumbs or panko)
> Note: If you don’t have bhaja masala ready, you can use a mix of ½ tsp cumin powder, ½ tsp coriander powder, and a pinch of garam masala as a substitute. Also, using mustard oil for cooking the filling gives an authentic flavor, but you can use any neutral oil if you prefer.
Instructions
1. Boil the Banana Flower: Drain the chopped banana flower from its soaking water. In a pressure cooker, add the banana flower along with 1½ cups of fresh water, a pinch of salt, and ¼ tsp turmeric. Cook for about 3–4 whistles until the florets are tender. (Alternatively, boil the banana flower in a pot of water until soft – this may take 15–20 minutes. Add a pinch of turmeric to the boiling water to reduce the flower’s bitterness.) Once cooked, drain the water completely. Allow the banana flower to cool and then squeeze or press out any excess moisture. Set aside.
2. Boil and Mash Potatoes: While the banana flower cooks, boil the potatoes separately until they are fork-tender. Peel them and mash thoroughly in a large mixing bowl. There should be no lumps. Keep aside.
3. Prepare the Cutlet Mixture: In a pan, heat 2 tablespoons of mustard oil on medium flame. Add the peanuts and fry for a minute until they turn lightly golden. Then add the raisins and stir for a few seconds until they puff up. Add the grated ginger and sauté for 5–10 seconds until its raw aroma disappears. Now add the boiled banana flower and the mashed potatoes to the pan. Sprinkle in the bhaja masala, ½ tsp salt (or to taste), and sugar, along with an extra ¼ tsp turmeric (from the remaining divided turmeric) and the chopped green chillies. Mix everything together. Cook this mixture, stirring continuously, until it becomes fairly dry and starts to clump together (about 5–8 minutes). The goal is to evaporate excess moisture so the cutlets hold shape. Once the mixture is well-combined and dry, turn off the heat. Check seasoning and adjust salt or sugar if needed. Spread the mixture on a plate and let it cool to room temperature.
4. Shape the Cutlets: When the banana flower-potato mixture has cooled, grease your palms with a bit of oil. Take a portion of the mixture (about the size of a small lemon or 2–3 tablespoons) and shape it into a cutlet. You can make them oval or cylindrical patties about ½-inch thick, as per your preference. (In many traditional homes, Mochar Chop is shaped like a cylinder or elongated oval). Place the shaped patty on a plate and repeat with the remaining mixture to form all the chops.
5. Prepare the Coating: In a small bowl, prepare the batter for coating. Combine the gram flour (besan), rice flour, baking soda, ¼ tsp turmeric, ¼ tsp red chili powder, and a pinch of salt. Add water a little at a time, whisking with a fork or whisk, to make a smooth, thick batter with no lumps. The batter should be of pouring consistency but not too thin – it should coat the back of a spoon. Spread the ¼ cup of all-purpose flour on a flat plate for dusting. Also spread the breadcrumbs on a separate plate.
6. Bread the Cutlets: Take each shaped chop and first roll it lightly in the dry all-purpose flour, dusting off any excess. Next, dip it into the besan batter, coating all sides. Lift it out and allow any excess batter to drip off, then place it onto the breadcrumbs. Roll and press the chop in the breadcrumbs so that it gets fully coated with a layer of crumbs. The cutlet should be entirely covered in breadcrumbs for a crunchy crust. Place the breaded cutlet on a tray. Repeat this process for all the cutlets. Tip: If a cutlet feels soft or starts to break while coating, you can dip it again in batter and add a second coating of breadcrumbs to reinforce it.
7. Rest (Chill) the Cutlets: For the best results, let the breaded cutlets rest before frying. You can cover the tray and refrigerate the chops for at least 30 minutes (or even 1–2 hours) so that the coating sets. This resting time helps the breading adhere firmly and prevents the cutlets from falling apart during frying. If you’re in a hurry, even a 15-minute rest in the fridge or a cool corner will help. (You can also prepare the cutlets in advance up to this stage – refrigerate overnight and fry them fresh when needed.)
8. Fry the Cutlets: Heat oil in a deep pan or kadai for frying. If deep-frying, you need enough oil to fully submerge the cutlets (2–3 inches of oil). If shallow frying, add oil to about half the height of the cutlets and remember to flip them midway. Heat the oil on medium-high until it’s hot but not smoking (you can test by dropping a small breadcrumb – it should sizzle and rise immediately). Gently slide in a few cutlets at a time; do not overcrowd the pan, as that will reduce the oil temperature. Fry in batches if necessary. Let the chops fry on one side for about 2–3 minutes (until golden brown), then flip (if shallow frying) or gently stir if deep-frying, and cook the other side until equally golden-brown and crisp. Maintain a medium heat – too high and the outside may burn while inside remains cold, too low and the cutlets can turn soggy by absorbing oil. When the chops are evenly fried to a rich golden color, remove them with a slotted spoon. Drain excess oil by placing the fried cutlets on paper towels.
9. Serve: Your delicious Mochar Chop is ready to serve! (See Serving Suggestions below for ideas on how to enjoy these banana flower cutlets at their best.)
Frying Tips for a Perfectly Crispy Texture
To ensure your banana flower cutlets turn out crispy and not oily, keep these frying tips in mind:
Chill Before Frying: Always let the breaded chops rest (in the refrigerator or a cool place) for at least 30 minutes before frying. This helps the coating adhere better and form a firm crust, so it’s less likely to fall apart or absorb too much oil during frying.
Proper Oil Temperature: Fry at the right oil temperature (around 350°F or 175°C if you use a thermometer). If the oil is not hot enough, the cutlets will soak up oil and turn soggy; if too hot, the crumbs will burn quickly. A simple test is to drop a small piece of bread or batter into the oil – it should sizzle and rise to the top immediately. Maintain a steady medium heat while frying.
Do Not Overcrowd: Fry the chops in small batches. Adding too many at once will drop the oil temperature and lead to greasy, less crispy results. Give each cutlet enough space to fry evenly. Between batches, allow the oil to heat back up to the optimal temperature.
Golden Brown Perfection: Fry until the cutlets are a deep golden brown on all sides. They should feel crisp when tapped with a spoon. For shallow frying, gently flip each cutlet once to cook both sides evenly. For deep frying, occasional gentle stirring or flipping is enough to ensure uniform color.
Extra Crunch Option: If you want an even thicker, crunchier crust, you can double-coat your cutlets. After the first breadcrumb coating, dip them once more in the batter and coat again with breadcrumbs. This double coating will make the crust extra crunchy (just be sure the initial coating is firm so the chop doesn’t break). This is optional – a single coat is traditional and usually sufficient.
Draining: As soon as the chops are fried, remove them to a paper towel-lined plate or a wire rack to drain excess oil. Don’t stack them while hot, or they might steam and soften.
By following these tips – chilling the breaded chops, frying at proper heat, and not crowding the pan – you’ll get perfectly crisp mochar chops that stay crunchy even as they start to cool.
Serving Suggestions
Classic Bengali Style: Serve Banana Flower Cutlets hot with a side of kasundi, which is a pungent Bengali mustard sauce, for an authentic flavor. If kasundi isn’t available, serve with good old tomato ketchup. Traditionally, mochar chop is accompanied by a few slices of red onion or cucumber on the side as a refreshing bite. A sprinkle of chaat masala on top of the hot cutlets just before serving adds a lovely tangy kick.
With Chutney: You can also pair these cutlets with a green chutney, such as a coriander-mint chutney, or even a tangy tamarind-date chutney. The fresh herby taste of green chutney or the sweetness of tamarind chutney complements the savory chops nicely.
Evening Tea Snack: Mochar Chop is a favorite tea-time snack in Bengali homes. Enjoy them with a cup of hot chai (tea) in the late afternoon or evening. Bengalis often serve chops or cutlets with muri (lightly salted puffed rice) on the side – take a bite of chop, then pop some muri into your mouth for a delightful textural contrast. This combination, along with tea, brings on a wave of nostalgia and is especially comforting on a rainy day.
Party Appetizer: These cutlets make for an excellent vegetarian appetizer. You can make them slightly smaller in size and serve with toothpicks as party snacks. Garnish with sliced onions, a wedge of lemon, and fresh coriander leaves for presentation.
Serve the Banana Flower Cutlets immediately while they’re hot and crispy. Savor the medley of flavors – the subtle bitterness of the mocha balanced by aromatic spices, the crunch of the outer layer, and the surprise of peanuts and raisins in each bite. Whether you’re enjoying them on a festive evening or as a special family snack, Mochar Chop is sure to bring warmth and a taste of Bengal to your plate. Bon Appétit!
As the monsoon rain patters against the window, I’m transported back to my childhood kitchen. My mother would whip up Prawn Pakoras on those cozy rainy afternoons – the sizzle of batter hitting hot oil and the irresistible aroma of spices filled our home. These golden shrimp fritters were more than just a snack; they were a warm hug on a dreary day, served with stories and steaming cups of chai. Every bite brings back nostalgic memories of laughter, wet socks drying by the stove, and plates piled high with crispy pakoras.
Piping hot Prawn Pakoras served with zesty green chutney – an inviting treat on a monsoon evening. Pakoras are a classic Indian fritter made primarily with gram flour (besan). A touch of rice flour or cornstarch is often added to the batter to give extra crunch. Prawn Pakora takes this beloved snack to the next level – succulent prawns are marinated in aromatic spices and fresh herbs, then dipped in a spiced besan batter and deep-fried until golden and crisp. The result is a tantalizing combination of textures and flavors: crunchy on the outside with tender, juicy shrimp inside. It’s the kind of appetizer that disappears as soon as it’s out of the oil, especially when served with a tangy chutney or a squeeze of lemon. In this North Indian-style recipe, we’ll walk through marinating the prawns, preparing the perfect batter, and frying them to crispy perfection.
Ingredients
Here’s everything you need to make Prawn Pakora at home. Measure and prep the ingredients before you start:
Prawns (Shrimp): 300 g small or medium prawns (about ½ lb), peeled and deveined. (Smaller prawns are extra flavorful, but use any size – just ensure they’re cleaned well.)
Gram Flour (Besan): 1 cup chickpea flour. This forms the base of the batter, giving pakoras their distinctive nutty flavor.
Rice Flour: 2 tablespoons. Mixing a bit of rice flour with besan helps make the fritters extra crispy.
Ginger-Garlic Paste: 2 teaspoons (or 1 teaspoon each of freshly grated ginger and minced garlic). This infuses warm, pungent flavor into the marination.
Green Chilies: 2, finely chopped. Adjust to taste for heat. (You can substitute ½ teaspoon red chili powder or a pinch of black pepper if you prefer less heat.)
Fresh Herbs: 2 tablespoons chopped fresh coriander leaves (cilantro) for brightness. (Optional: 5–6 curry leaves, finely chopped, for a South Indian twist of aroma.)
Spices:
Red Chili Powder: 1 teaspoon, for heat and color (adjust to your spice preference).
Turmeric Powder: ½ teaspoon, for earthy flavor and a warm golden color.
Cumin Powder: 1 teaspoon, adds a nutty, smoky note (cumin seeds lightly crushed can also be used).
Coriander Powder: 1 teaspoon, for a fragrant citrusy hint.
Garam Masala: ½ teaspoon (optional), for a complex warmth. Use sparingly so it doesn’t overpower the shrimp’s delicate taste.
Ajwain (Carom Seeds): ¼ teaspoon (optional), lightly crushed. A traditional North Indian touch that adds a lovely aroma and helps in digesting the besan batter.
Lemon Juice: 2 teaspoons. The acidity tenderizes the prawns and adds tanginess. (If using, don’t marinate for too long as the acid can start “cooking” the shrimp.)
Baking Soda: a pinch (optional). Helps lighten the batter for a fluffier, soft-inside texture, but use very little to avoid oil absorption.
Salt: 1 teaspoon (adjust to taste). Divided use – some for marinating prawns, the rest for the batter.
Oil: for deep frying (about 2–3 cups of a neutral oil like vegetable or peanut oil, enough for a depth of 2–3 inches in your pan).
Step-by-Step Instructions
Follow these steps to make perfectly crispy prawn pakoras. We’ll start by marinating the shrimp, then prepare the batter, and finally fry the pakoras until golden-brown.
1. Marinate the Prawns: In a mixing bowl, add the cleaned prawns. Pat them dry with a paper towel to remove excess water. Stir in ½ teaspoon salt, ½ teaspoon red chili powder, and the ½ teaspoon turmeric. Add the ginger-garlic paste, half of the chopped green chilies, and the lemon juice. Toss everything well so the prawns are evenly coated in this spice mix. Let them marinate for about 15 minutes (this infuses flavor, but avoid marinating much longer, especially if using lemon, as the shrimp can turn mushy if left too long). While the prawns are marinating, you can prep the batter ingredients.
2. Prepare the Pakora Batter: In a separate bowl, combine the dry ingredients – gram flour, rice flour, remaining ½ teaspoon salt, ½ teaspoon red chili powder, cumin powder, coriander powder, and garam masala (if using). Mix these dry spices and flours together. Now add the chopped fresh coriander leaves, remaining green chilies, and ajwain (if using) to the bowl. Pour in water gradually (around ½ cup to start), whisking or stirring continuously to avoid lumps, until you get a smooth, thick batter. The batter should be of a coating consistency – not as thin as crepe batter and not as thick as dough. Lift the spoon: the batter should cling and coat the back of a spoon thickly. If it’s too thick, add a tablespoon of water at a time; if too thin, sprinkle a bit more besan. Finally, mix in a pinch of baking soda (optional) and give the batter a last good stir.
3. Coat Prawns in Batter: Add the marinated prawns (along with any juices from the marinade) into the batter. Stir gently to coat each prawn well with the batter. The moisture from the prawns and lemon juice usually is enough to loosen the batter slightly; if the mixture looks very thick or dry, you can add a teaspoon or two of water. Ensure the prawns, along with bits of chili and herb, are evenly dispersed in the batter. (If you used small prawns, you might find they clump together with batter – that’s okay, you can fry small clusters or individual pieces as you prefer.)
4. Heat the Oil: Heat oil in a deep kadhai (wok) or heavy-bottomed pan. You need enough oil for deep frying (about 2 inches deep). Heat the oil on medium flame until it’s hot but not smoking (around 350–360°F if you have a thermometer). To test without a thermometer, drop a tiny bit of batter into the oil – it should sizzle and rise to the top immediately but not turn brown instantly. Tip: Keep the flame at medium-high once the oil is hot; this ensures the pakoras cook through and turn crispy without soaking up oil.
5. Fry the Prawn Pakoras: Once the oil is ready, it’s time to fry in batches. Do not overcrowd the pan (adding too many at once can lower the oil temperature and make the fritters oily or cause the batter to disperse). Using your fingers or a spoon, carefully drop battered prawns into the hot oil. You can fry them one by one or in small clusters (for example, a spoonful of batter that has 2–3 small prawns plus some onions/herbs from the batter). Be cautious as you slide them in to avoid splashes. Fry on medium-high heat. After about 2–3 minutes, the pakoras will start to turn golden on the bottom; gently flip each piece using a slotted spoon. Continue frying another 2–3 minutes on the other side until the pakoras are golden brown and crispy. The prawns cook quickly, so total frying time is usually 5–6 minutes per batch (larger prawns might need an extra minute). Remember, prawns can toughen if overcooked, so aim to remove them once the crust is just golden and the bubbling of oil has slightly reduced.
6. Drain and Repeat: Using a slotted spoon, lift out the fried pakoras, letting excess oil drip back into the pan. Place the fried prawn pakoras on a plate lined with paper towels or (even better) on a wire rack set over a tray, which keeps them crisp by allowing excess oil to drain away. Let the oil reheat to the right temperature between batches if needed. Continue frying the remaining prawns in batches the same way. Optional: For an extra-crispy result, you can double-fry the pakoras. Once all batches are done, put the already fried pakoras back into the hot oil for just 30–60 seconds and remove. This second fry makes them superbly crunchy. (It’s an optional step if you want that restaurant-like crunch.)
7. Serve: Transfer the hot prawn pakoras to a serving platter. Sprinkle a pinch of chaat masala on top for a tangy kick (optional but highly recommended). Serve immediately while they’re hot and crisp – see below for serving ideas and accompaniments.
Tips for Extra Crispy Pakoras
Making pakoras is simple, but a few tips can help ensure they turn out extra crispy and delicious:
Dry the Prawns: Excess moisture is the enemy of crispiness. After washing the prawns, pat them very dry. If using frozen prawns, thaw completely and drain well. Any water released from the prawns can thin out the batter and prevent it from coating properly, resulting in a soft exterior.
Besan + Rice Flour: Always use fresh gram flour (besan) for best flavor. Mix in a bit of rice flour or cornstarch with the besan – this yields a crunchier texture in the fried pakoras. The combination of flours helps the fritters stay crisp even after cooling for a bit.
Batter Consistency: Make sure your batter is moderately thick. A runny batter won’t cling and will produce flat, oily pakoras, while an overly thick batter can make them doughy. It should be just thick enough to coat the prawns generously.
Hot Oil, Medium-High Flame: The oil temperature should be hot (around 350°F/175°C). If the oil isn’t hot enough, the pakoras will absorb more oil and turn soggy. Conversely, if oil is too hot, they’ll brown quickly outside but the prawn inside may remain undercooked. Maintain a medium-high flame for even cooking – this way the prawns cook through while the outside gets crunchy.
Fry in Batches, Don’t Crowd: Fry the pakoras in small batches. Crowding the pan will drop the oil temperature and cause uneven cooking (and greasier fritters). Give the pakoras enough space to float and fry freely. Between batches, let the oil come back up to temperature.
Double Fry Technique: For the ultimate crispiness, try double frying. This is a trick where you fry the pakoras until almost done, take them out to rest for a minute, and then fry them again briefly. This extra step dries out any excess moisture and makes the pakoras exceptionally crunchy. It’s the secret to restaurant-style crunch, especially great if you plan to serve the pakoras after a while.
Use a Wire Rack: If you have one, let fried pakoras rest on a wire rack instead of paper towels. This prevents them from sitting in oil and steaming themselves soft. If using paper towels, don’t leave them piled up for too long.
Serving Immediately: Pakoras are best enjoyed fresh. They will gradually soften as they cool (due to moisture from the prawn and ambient humidity), so plan to serve them hot and within 10-15 minutes of frying for the best texture.
Serving Suggestions
Prawn pakoras truly shine when paired with the right accompaniments. Here are some serving ideas to complete the experience:
Chutneys: The classic pairing is a vibrant Mint-Coriander Chutney, which offers a cool herby contrast to the hot, spicy pakoras. Tamarind-Date Chutney is another favorite – its sweet-tangy notes complement the savory fritters beautifully. If you have imli (tamarind) or mint chutney on hand, put out a bowl for dipping. Even a simple ketchup or chili-garlic sauce can do the trick for kids or those who prefer it.
Masala Chai: In North India, there’s nothing like crunchy pakoras with a cup of hot masala chai on a rainy day. The spiced tea and these shrimp fritters make for a cozy combination, especially during monsoon evenings.
Salad & Lemon: Serve some thinly sliced onion rings and cucumber on the side, with lemon wedges to spritz over the pakoras. A little fresh onion salad adds crunch and the lemon juice brightens up the flavors, much like street-food style servings. You can also sprinkle a bit of extra chaat masala on the onions for tang.
As an Appetizer: Prawn pakoras make a great start to any Indian meal. You can serve them before a main course (think of an Indian dinner with curries and naan) or as a party appetizer. They stay fairly crisp for a while, especially if double-fried, so you can fry a big batch and keep them warm in a low oven (around 100°C/212°F) until serving.
Rainy Day Snack: Lastly, enjoy these pakoras just on their own as a delightful snack. Whether it’s a rainy afternoon or a chilly evening, pile them up on a platter, grab your favorite dipping sauce, and enjoy the crispy, spicy goodness. Don’t be surprised if they vanish quickly – you might want to make a double batch!
Enjoy! Each bite of these Prawn Pakoras is a burst of nostalgic flavor – crunchy, spicy, and deeply satisfying. It’s a recipe that brings together the comfort of home-cooking and the excitement of Indian street food in one delicious platter. Happy cooking and happy eating!
Crispy Corn is a beloved street-food inspired appetizer featuring golden fried corn kernels tossed in a light Indo-Chinese spice mix of tangy chaat masala and chillies. This crunchy vegetarian starter was first introduced by the Barbeque Nation restaurant chain in India and quickly became a crowd favorite. Diners can’t get enough of the sweet-and-spicy flavor and addictive crisp texture – even the kids and picky eaters often polish off an entire bowl in no time! If you’ve ever visited BBQ Nation, you likely remember this famous Crispy Corn appetizer and its burst of flavors.
A Bite of Desi-Chinese Fusion: Crispy Corn embodies the Indo-Chinese fusion vibe – think Indian chaat meets Chinese stir-fry. The corn kernels are fried to a delightful crunch and then tossed with spring onions, chillies, and spice powders that tingle your taste buds. It’s love at first crunch for many of us who tried it at the restaurant, and now this recipe lets you recreate that magic at home. In this blog-style recipe, we’ll walk through how to make perfectly crispy fried corn (with tips to keep the coating light and crunchy), plus a healthier air-fryer/oven variation. Let’s get frying!
Ingredients
For the Crispy Corn Kernels (Coating & Frying):
Sweet corn kernels – 2 cups (fresh or frozen; if frozen, thawed and drained)
Cornflour (corn starch) – 2 tablespoons
Rice flour – 2 tablespoons
All-purpose flour (maida) – 2 tablespoons
Salt – ½ teaspoon (or to taste)
Black pepper powder – ½ teaspoon (to taste)
Oil for deep frying – as needed (about 2-3 cups depending on pan size)
For Spice Mix & Toss:
Red chilli powder – ½ teaspoon (adjust for heat preference)
Ground cumin powder – ¼ teaspoon
Chaat masala – ½ teaspoon (or use ½ tsp dry mango powder/amchur + a pinch of black salt)
Salt – a pinch (to taste, for the toss)
Onion – 2–3 tablespoons, finely chopped (about 1 small onion)
Green chilies – 1, finely chopped (optional, for extra heat)
Capsicum (bell pepper) – 2 tablespoons, finely chopped (optional for color & crunch)
Lemon juice – 2 teaspoons (freshly squeezed, for tangy flavor)
Optional: If you have peri-peri seasoning, you can use ~1 teaspoon of it in place of the chilli and chaat masala for a BBQ Nation authentic twist. If you prefer a saucier Indo-Chinese finish, keep a teaspoon each of soy sauce, tomato ketchup, and honey on hand – but we will mostly stick to the dry spice mix to retain crispiness.
Instructions
1. Prep the Corn: If using fresh corn on the cob, remove the kernels from 2 cobs (approximately 2 cups kernels). Boil the fresh kernels in salted water for 2–3 minutes until just tender, then drain. If using frozen sweet corn, simply thaw and rinse with water, then drain. In either case, make sure to drain the corn thoroughly. The kernels should be moist but not water-logged – excess water will make the coating soggy and can cause oil splatters. Pat the corn dry with a paper towel if needed.
2. Coat with Seasoned Flour: Place the corn kernels in a large mixing bowl. Add a pinch of salt and the black pepper, tossing to lightly season the corn. Now add the cornflour, rice flour, and all-purpose flour to the bowl. Toss everything gently but thoroughly, so all kernels get a thin, even coating of the flour mixture. (Do not add water; the slight dampness of the corn is enough to make the flour stick.) A pro-tip is to put the flour-coated corn in a sieve or colander and shake it – this removes excess loose flour and ensures a light, uniform coating on each kernel. A thin coating is key to the signature crunch, so don’t skip sifting off the extra flour!
3. Heat the Oil: In a deep pan or wok (kadai), heat enough oil for deep frying over medium-high heat. To test the oil, drop in one coated corn kernel – it should sizzle and rise to the surface fairly quickly. The oil needs to be hot (around 170–180°C if you have a thermometer). Hot oil is crucial because frying at high heat will make the corn very crunchy without soaking up too much oil. Tip: Have a lid or splatter screen ready for the next step, as the corn can sometimes pop in the hot oil like popcorn!
4. Deep Fry in Batches: Carefully add a handful of the flour-coated corn kernels to the hot oil to form a single layer. Immediately cover the pan with a lid or mesh splatter guard for the first 30 seconds of frying – corn kernels may burst on contact with hot oil, and the cover will protect you and contain any splashes. After the initial sizzle and popping sounds subside (usually in 30–40 seconds), remove the lid. Fry the corn for about 2–3 minutes total per batch. Stir occasionally once it’s safe (using a long-handled slotted spoon) to ensure even frying. Fry until the kernels turn golden brown and crispy. They will harden further upon cooling, so no need to fry until very dark. Do not overcrowd the pan; fry in small batches so the oil temperature stays high and each kernel crisps up nicely. If you fry too much at once, the oil temperature can drop and the corn may turn out chewy instead of crunchy.
5. Drain Excess Oil: Use a slotted spoon to scoop out the fried corn and transfer it to a plate or tray lined with paper towels (or a wire mesh strainer). This will drain off any extra oil. For best results, you can also place the fried kernels in a clean metal colander so that they remain crisp (sitting on paper for too long can trap steam). Fry the next batch of corn, and repeat until all the corn kernels are fried. Remember to allow the oil to come back up to hot temperature between batches. Patience here yields ultra-crispy corn!
6. Toss with Spice Mix: Now, transfer all the hot fried corn kernels into a large mixing bowl. Sprinkle the prepared spice mix over the corn: add the red chilli powder, cumin powder, and chaat masala (with a pinch of extra salt if needed). Toss or stir the corn so all the fried kernels are well coated with the spices. You’ll notice the gorgeous aroma of the masalas sticking to the hot corn. Next, add the chopped onions, green chillies, capsicum (if using), and fresh coriander. Squeeze the lemon juice over the top. Give everything a final gentle toss to combine – the onions, herbs, and lemon will lend a refreshing kick to the crispy corn. Your BBQ Nation–style crispy corn is now ready!
7. Serve Immediately: Crispy Corn is best enjoyed immediately, while it’s hot and super crunchy. Transfer it to a serving bowl or platter. For an authentic touch, you can serve it in disposable paper cups or bowls (mimicking street-food style). Garnish with a few extra coriander leaves or a sprinkle of chaat masala on top. Pop in a few toothpicks or serve with a spoon and dig in while it’s fresh. This snack tends to lose its crispiness if left to sit too long, so try to prepare it right before serving. Enjoy the explosion of textures and Indo-Chinese flavors in each bite!
Tips for Maximum Crispiness
Maintain a Thin Coating: A thin, uniform flour coating on the corn is key to the crunch. Using a sieve to shake off excess flour ensures you don’t end up with clumpy or chewy fried bits. Excess flour in the oil can also burn, so remove it before frying.
Oil Temperature Matters: Fry at medium-high to high heat. If the oil is not hot enough, the corn may turn soggy with oil. Ideally, the corn should sizzle on contact and crisp up quickly. If you have a kitchen thermometer, aim for ~350°F (180°C). Between batches, let the oil heat up again.
Safety First – Watch out for Popping: As mentioned, corn kernels can pop like popcorn in hot oil. Always use a lid or splatter screen when you first add the corn to oil. After 30 seconds, once the popping stops, you can fry uncovered for better evaporation and crisping. Do not completely cover the pan for the entire fry duration, as trapped steam can drip water into the oil (causing splatters). A half-covered technique works well: cover initially, then slightly ajar the lid to let steam escape. Keep your face and hands at a safe distance and use long tongs or spoon. Frying in small batches also minimizes the popping incidents.
Serve Hot: Like most fried snacks, crispy corn softens as it cools. Plan to serve it right after frying and tossing. If you must wait, you can refry or reheat in an oven/air fryer for a couple of minutes to re-crisp. But fresh is best!
Air-Fryer / Oven Method (Healthier Variation)
If you prefer to avoid deep frying, you can still enjoy a crunchy crispy corn using an air fryer or oven. The results are slightly less evenly browned than oil frying, but much lighter on oil and still delicious. Here’s how:
Air-Fryer Method: Preheat your air fryer to 180°C (360°F). Follow the same preparation steps to boil (if needed) and coat the corn kernels with flour and spices. Lightly grease the air fryer basket or line it with perforated parchment. Spread the coated corn in a single layer (cook in batches if necessary). Spritz the kernels with a little cooking oil spray (or toss them with 1–2 teaspoons of oil to help them crisp). Air-fry the corn for about 12–15 minutes at 180°C, shaking the basket or stirring the corn 2–3 times during cooking. The corn should turn golden and crunchy. Keep an eye in the last few minutes – they can go from crispy to burnt quickly. If not sufficiently crisp, you can air-fry a few minutes longer at 200°C, but check often. Once done, immediately toss the hot corn with the spice mix, onions, etc. (as described in Step 6 above) and serve right away.
Oven Method: Preheat your oven to 200°C (390°F). Line a baking sheet with foil and lightly grease it with oil. Arrange the flour-coated corn kernels on the sheet in a single layer (for best results, brush or spray a little oil over the top of the kernels too). Bake for about 15–20 minutes, stirring once halfway through, until the corn kernels look crispy and lightly browned. For extra crunch, you can switch to the broil/grill setting for the last 1–2 minutes, watching carefully to avoid burning. Once done, toss the baked corn with the spice mix and garnishes. Serve immediately. (Note: Oven-baked corn might not be as evenly golden, but it will still be crunchy. Using the fan-forced convection setting, if available, can help with crispiness.)
Both these methods skip the mess of deep frying and yield a guilt-free version of crispy corn. The kernels won’t be quite as puffed as the deep-fried ones, but the difference is minor when you’re munching them seasoned and hot. Feel free to choose the method that suits your kitchen and mood!
Serving Suggestions
Classic Serving: Serve Crispy Corn hot in a bowl, with a lemon wedge on the side for an extra squeeze of freshness. You can sprinkle a pinch more chaat masala or peri-peri on top for an extra flavor kick right before eating.
Party Appetizer: This makes for an excellent party starter or evening snack. For a fun street-food presentation, serve the crispy corn in small paper cones or cups, and give guests spoons or toothpicks to pick up the kernels. It’s a hit at potlucks and game nights, often disappearing within minutes!
Accompaniments: You can enjoy crispy corn on its own or pair it with a dipping sauce. It goes well with tomato ketchup, schezwan sauce, or even a spicy mayonnaise on the side for dipping. However, it’s already full of flavor and usually doesn’t need any condiments. A cold drink or a hot cup of chai also complements the spicy corn nicely.
Variations: Transform your crispy corn into a larger snack by using it as a component in other dishes. For example, you can make a crispy corn chaat – just toss in some diced tomatoes, cucumber, and a drizzle of sweet-tamarind chutney along with the spices for a more tangy chaat treat. You could also use crispy corn as a crunchy topping for salads, tacos, or wraps to add texture and flavor (it’s a surprisingly versatile garnish!). The possibilities are endless, so get creative if you have leftovers (which is rare, because it’s so tasty!).
Enjoy your BBQ Nation–style Crispy Corn! With its irresistible crunch and zesty seasoning, don’t be surprised if this appetizer vanishes as soon as it’s served. It’s the perfect fusion of Indian and Chinese flavors – truly a chatpata (tangy-spicy) treat that brings street-food charm right to your kitchen. Happy cooking and happy snacking! 😋
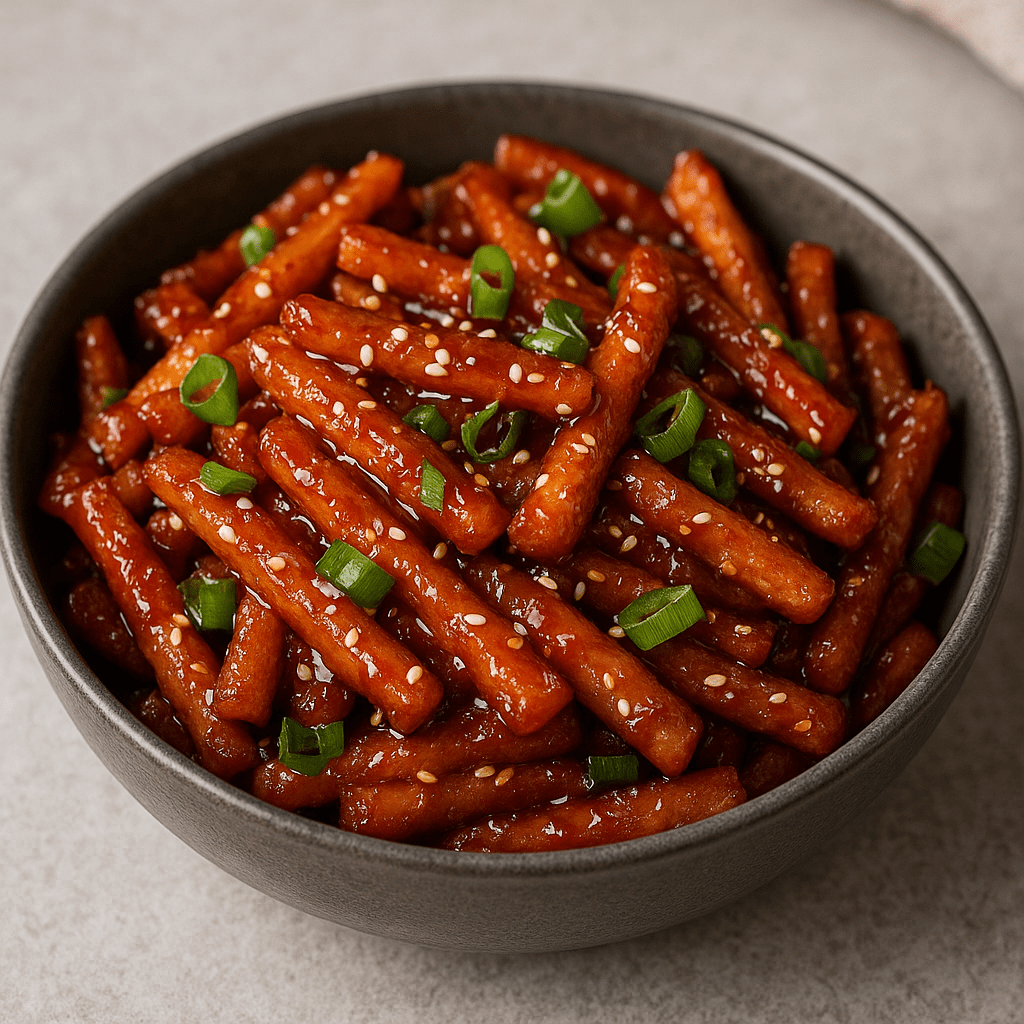
Walking through a bustling Indian street market, the aroma of garlic, chiles, and sizzling sauces draws you to a roadside stall. Here, the vendor is tossing Honey Chilli Potatoes – golden fried potato fingers – in a big wok, coating them with a sticky, sweet-and-spicy glaze. This dish is a beloved Indo-Chinese snack, meaning it’s a fusion of Chinese cooking techniques with Indian flavors. Honey Chilli Potatoes feature crunchy fried potato sticks coated in a tangy-sweet-spicy sauce made from honey, chili sauce, garlic, and soy sauce. Each bite is crispy, delicious, and usually topped with a sprinkle of sesame seeds and chopped spring onions for extra flavor and crunch. In cities like Delhi, it’s a top vegetarian street food – crunchy, sugary, and zesty – that locals adore, whether grabbed from a street stall or enjoyed at a restaurant. One bite of these hot, sticky, honey-glazed potatoes and you’ll understand why this Indo-Chinese classic is absolutely addictive!
A bowl of freshly made Honey Chilli Potatoes, glistening with a sweet-spicy honey chili sauce and garnished with sesame seeds and spring onions. These crispy fried potato fingers are tossed in the sticky sauce just before serving, so they remain crunchy inside and coated with flavor on the outside.
Ingredients
For crispy potatoes: (Serves 3-4)
3 large potatoes, peeled and cut into thick fingers (French-fry style)
2 tablespoons cornflour (cornstarch)
2 tablespoons all-purpose flour (maida)
1/2 teaspoon salt
1/2 teaspoon black pepper powder
Oil, for deep frying (enough for deep or shallow fry as preferred)
For honey-chili sauce:
2 tablespoons oil (for stir-frying)
1 inch ginger, finely chopped
4 cloves garlic, finely chopped
2 green chilies, finely sliced (adjust to taste)
1/2 medium onion, thinly sliced (optional, for crunch)
1/2 green bell pepper (capsicum), thinly sliced (optional)
2 tablespoons tomato ketchup
2 tablespoons soy sauce (light soy works well)
2 tablespoons white vinegar
2 teaspoons red chili sauce (such as Schezwan sauce or any hot chili sauce)
1/2 teaspoon red chili powder (Indian chili powder or cayenne, optional for extra heat)
1/2 teaspoon salt (adjust to taste, as soy sauce is salty)
1 teaspoon cornflour mixed with 2 tablespoons water (cornstarch slurry, for thickening)
2 tablespoons honey (add more or less to taste)
1 teaspoon sesame seeds (toasted, plus extra for garnish)
2 spring onions, chopped (for garnish)
Step-by-Step Instructions
1. Prep the Potatoes: Peel the potatoes and cut them into finger-like strips about 2–3 inches long (like thick fries). Place the sliced potatoes in a bowl of cold water and soak for 10-15 minutes to remove excess starch. This step helps the potatoes crisp up better. Drain the water, then parboil the potato fingers in salted boiling water for about 3 minutes until half-cooked. Drain and let them cool completely (cooling prevents them from breaking and helps them fry up extra crispy).
2. Coat with Flour and Spices: In a large mixing bowl, take the cooled half-cooked potato fingers. Add the cornflour, all-purpose flour, 1/2 teaspoon salt, and 1/2 teaspoon pepper. Toss or gently mix until all the potato pieces are well-coated with the dry mixture. The potatoes should have a thin dusty coating – this will turn into a crispy crust when fried. If the mixture looks wet or the potatoes are releasing water, you can sprinkle a bit more cornflour.
3. First Fry – Make Potatoes Crispy: Heat oil in a deep pan or wok over medium-high flame. Once the oil is hot (test by dropping a small piece of potato; it should sizzle immediately), carefully drop in the coated potato fingers in batches. Do not overcrowd the pan. Fry the potatoes on medium to medium-high heat, stirring occasionally, until they turn golden brown and crunchy on the outside. This should take a few minutes per batch. Remove fried potatoes with a slotted spoon and drain on paper towels. (Tip: For ultra-crispy results, you can double-fry the potatoes. Fry them first until lightly golden and almost cooked, take them out to cool for a few minutes, then fry again on high heat until deeply golden and extra crispy. This two-stage frying is the secret that many restaurants use to keep the potatoes crunchy even after tossing in sauce!【6†L73-L80})
4. Stir-Fry Aromatics: In a separate large wok or frying pan, heat 2 tablespoons of oil over high heat. Add the chopped ginger, garlic, green chilies, and sesame seeds. Stir-fry these aromatics for about 30–60 seconds until fragrant (you’ll smell the garlic and ginger – be careful not to burn them). This forms a flavorful base for the sauce.
5. Add Veggies (Optional): Toss in the sliced onions and bell pepper (capsicum). Stir-fry on high flame for another minute until they soften slightly yet remain crunchy. Cooking on high heat helps to sear the veggies while keeping their color and crunch, much like classic Chinese stir-fry.
6. Pour in the Sauces: Now add the tomato ketchup, soy sauce, vinegar, red chili sauce, chili powder, and a pinch of salt to the wok. The pan will sizzle! Stir everything together on high heat for about 1 minute. You’ll notice the sauce bubbling and releasing a tangy-spicy aroma as it cooks. This mixture of ketchup, chili sauce, honey, and soy is what gives the dish its signature tangy-sweet-spicy punch.
7. Thicken the Sauce: Give the prepared cornflour slurry a quick stir and pour it into the center of the wok. Mix it immediately with the sauces. The slurry will thicken the sauce within seconds, making it glossy and coat the back of a spoon. If it gets too thick, you can add a tablespoon of water. If it’s too thin, cook a few seconds longer – you want a consistency that will cling to the potatoes.
8. Toss Potatoes in Sauce: Add the fried potato fingers into the wok. Drizzle the honey over the potatoes. Stir and toss everything on high heat for about 30 seconds to 1 minute, just until the potatoes are well coated with the sticky sauce. Do not cook too long after adding the fried potatoes and honey, or the coating will turn soggy. The heat should be just enough to warm the honey and help the sauce caramelize onto the fries without softening them.
9. Garnish and Serve: Turn off the heat. Sprinkle the chopped spring onions and additional toasted sesame seeds over the honey chilli potatoes. Give a final toss. The dish should look glossy and irresistible, with each potato piece shiny from the sauce and studded with sesame. Serve immediately while piping hot and crispy for the best taste and texture. Enjoy your homemade street-style honey chilli potatoes!
Serving Suggestions
Serve Hot: Honey Chilli Potatoes taste best when served immediately, hot and crispy. As with any fried dish, they may lose some crunch as they cool, so dig in while they’re fresh.
Street-Style Snack or Starter: These potatoes make a great party appetizer or an evening snack. Stick toothpicks in them for a fun finger-food presentation. The sweet-spicy flavor is kid-friendly yet exciting for adults.
Pair with Main Course: Turn it into a meal by pairing with other Indo-Chinese dishes. It goes well as a side with schezwan fried rice, hakka noodles, or even alongside Chili Paneer and Manchurian for an Indo-Chinese feast. You can also serve them as a side to fried rice or noodles to balance a fuller dinner.
Customize the Heat: Serve extra chili sauce or chili flakes on the side for those who love more heat, and a small bowl of sweet chili sauce or ketchup for those who prefer extra sweetness. A cold drink or a fizzy beverage also pairs nicely, as honey chilli potatoes can be quite spicy and bold in flavor.
Enjoy this crispy, sweet, and spicy treat that brings the vibe of Indian street food straight to your kitchen. Happy cooking! 😋
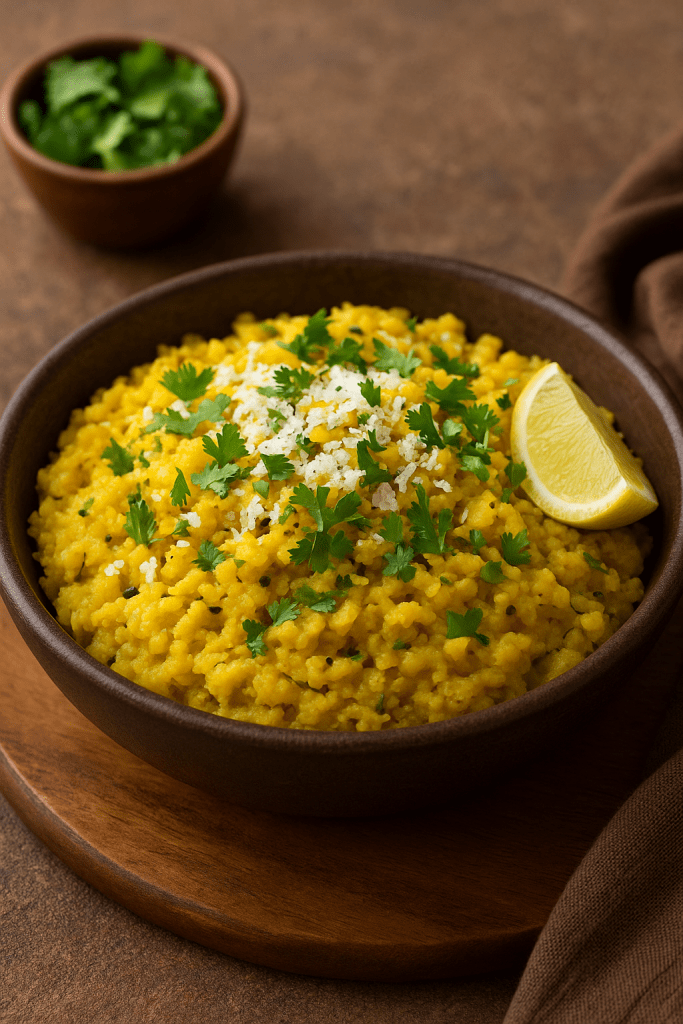
Growing up in Madhya Pradesh, the first crack of thunder during monsoons meant one thing in our household: it was time for Bhutte ka Kees. This traditional grated corn dish is Indore’s pride and joy, found bubbling away in street-side pans all over the city. My earliest memory of it is from a rainy evening at Indore’s Sarafa Bazaar, where the aroma of spiced corn drew me to a busy stall. The vendor handed me a dona (leaf bowl) brimming with golden Bhutte ka Kees, topped with coconut and a squeeze of lime. One warm spoonful and I was hooked – it was creamy, mildly sweet, and tingling with spices, the perfect comfort on a wet day.
Bhutte ka Kees served in traditional leaf bowls, garnished with fresh coconut, cilantro, and a lemon wedge. For the uninitiated, Bhutte ka Kees gets its name from the Hindi word bhutta (corn) and Marathi kees (grated). As the name suggests, juicy corn kernels are grated and slow-cooked with milk and a medley of spices until they form a rich, savory mash. The dish strikes a beautiful balance of flavors – naturally sweet corn, the kick of green chilies, warmth of turmeric, and tang from lemon. In fact, with every mouthful you get a bit of sweet, salty, sour, and spicy all at once. No wonder Bhutte ka Kees has remained an immensely popular street food in Indore for generations. It’s a staple at family get-togethers during the rainy season and a must-have for visitors exploring Indore’s vibrant food scene.
When you make Bhutte ka Kees at home, you’re not just cooking a snack – you’re recreating a piece of Indore’s culinary heritage. It’s comfort food with a cultural story, best enjoyed piping hot on a cozy evening. Now, let’s dive into the recipe so you can bring this Indori delight to your kitchen!
2 small green chilies, finely chopped (adjust to taste)
1 teaspoon ginger, grated
¼ teaspoon turmeric powder (haldi)
½ cup milk (preferably whole milk)
1 teaspoon sugar (optional, see tips)
Salt to taste
1 tablespoon lemon juice (or 1 lemon cut into wedges, for serving)
3 tablespoons fresh grated coconut, for garnish
2 tablespoons fresh cilantro (coriander leaves), chopped, for garnish
Jeeravan masala, a pinch for garnish (optional – Indori spice mix, see tips)
Instructions
1. Prepare the corn: If using fresh corn, hold each cob upright in a large plate and grate the kernels off using a box grater (use medium holes). Grate only the tender kernels, not the hard cob center. You will get a juicy grated corn mash. Alternatively, you can slice off the kernels with a knife and pulse them in a blender without water to get a coarse paste. (Do not grind too fine; a bit of texture is ideal.)
2. Heat the fat and temper: In a deep pan or kadhai, heat the ghee (or oil) on medium flame. Add the mustard seeds; when they begin to splutter, add the cumin seeds and let them crackle. Next, reduce heat to low and add a pinch of asafoetida. Immediately toss in the chopped green chilies and grated ginger. Sauté for a minute until the raw aroma of ginger fades. Stir in the turmeric powder (and a pinch of red chili powder for extra heat, if desired) and cook for a few seconds, being careful not to burn the spices.
3. Add and sauté corn: Tip in the grated corn (along with any “corn milk” juice from it) into the pan. Mix well so the spiced tempering coats all the corn. Sauté the corn mixture on low to medium heat for about 5–8 minutes, stirring frequently. The corn will begin to cook and its color may brighten; this step helps develop flavor.
4. Cook with milk: Pour in the ½ cup of milk and stir. The milk adds creaminess and helps cook the corn into a porridge-like consistency. If your corn was very dry or starchy, you can add a splash of extra milk or water as needed to cover the corn. Add the sugar now (if using, see Tips below about when to add sugar). Season with salt to taste and mix well.
5. Simmer until done: Cover the pan with a lid and let the Bhutte ka Kees simmer on low heat for about 8–10 minutes. Every few minutes, stir the mixture to prevent sticking at the bottom. Cook until the corn is soft and the mixture has thickened. You’re aiming for a texture similar to a soft upma or thick porridge – it should not be runny, but there should be some moisture (it will thicken further upon cooling). If it looks too dry, you can add a few more spoonfuls of hot milk or water and mix in. Once the corn is fully cooked and the consistency is to your liking, turn off the heat.
6. Finish with lemon and serve: Finally, stir in the lemon juice (½ to 1 tablespoon, or to taste) and give a good mix. Lemon brightens up the flavors at the end. Ladle the hot Bhutte ka Kees into serving bowls. Garnish generously with the fresh grated coconut and chopped cilantro. If you have Indori jeeravan masala, sprinkle a pinch on top for an authentic touch. Serve immediately, with extra lemon wedges on the side for squeezing. Enjoy this snack hot for the best taste and texture – Bhutte ka Kees is meant to be savored warm, when its sweet and spicy flavors are most vibrant.
Tips & Suggestions
Choosing Fresh Corn: Always use the freshest, juiciest corn you can find for Bhutte ka Kees. Tender desi corn (local Indian white corn) is ideal, but sweet corn works well too. To check freshness, peel back the husk and press a kernel with your nail – it should release milky juice, a sign of a juicy corn cob. The more “milk” in the kernels, the better the flavor and creaminess of your Bhutte ka Kees. If the corn is too mature or dry, the dish may turn out less creamy.
Grating vs. Blending: Traditionally, corn is hand-grated to extract all its juices. This yields a coarse mixture of kernels and corn milk that defines the dish’s texture. If grating is hard, you can pulse the kernels in a mixer – but do it carefully. Pulse without adding water and stop while the corn is still coarse (you don’t want a fine puree). Avoid using a high-speed blender continuously, as it can liquefy the corn or make it too fine. Some texture is desirable in Bhutte ka Kees, so that you get tiny pops of corn and a nice mouthfeel.
Balancing Sweet and Spice: One of Bhutte ka Kees’ secrets is its balanced flavor profile – every spoonful gives you sweet, spicy, and tangy notes. If you’re using sweet corn (the yellow variety), it’s naturally quite sweet, so you might skip or use very little added sugar. However, if you have local white corn (which is less sweet), add about ½–1 teaspoon of sugar while cooking to enhance the sweetness. The heat comes from green chilies – feel free to adjust the quantity of chilies to your spice tolerance (Indore locals do enjoy a bit of kick!). Don’t skimp on the lemon juice at the end; that tangy squeeze elevates the dish and balances the sweetness and richness. Always taste and adjust salt, sugar, and lemon to get that perfect sweet-salty-tangy balance that makes this snack so crave-worthy.
Serving Suggestions: Bhutte ka Kees is best enjoyed hot off the stove. Serve it in small bowls or the traditional leaf dona bowls if you have them, for an authentic touch. It’s quite filling despite being light on the stomach, so a small or medium bowl per person is usually sufficient. Before serving, don’t forget to heap on the garnishes – fresh grated coconut adds lovely texture and subtle sweetness, and chopped cilantro lends a burst of freshness. A sprinkle of red chili powder or a dash of chaat masala on top can be added if someone likes extra zing. This snack is often enjoyed on its own in the evenings, but you can pair it with a cup of hot masala chai, especially on a rainy day, for the ultimate monsoon experience!
Authentic Indore Touch – Jeeravan Masala: If you want to go the extra mile and enjoy Bhutte ka Kees just like in Indore, try to get hold of Jeeravan masala. This special spice mix (famous in Indore for sprinkling on everything from poha to salads) typically contains roasted cumin, black salt, pepper, cloves, ajwain, etc., and adds a boost of flavor. Street vendors in Indore often dust a pinch of jeeravan on top of Bhutte ka Kees before serving. If you can’t find jeeravan masala, a little chaat masala mixed with a pinch of roasted cumin powder and red chili can mimic it. It’s an optional step, but it truly gives an authentic Indori kick to the dish.
Enjoy making Bhutte ka Kees at home! With its warm spices and creamy corn goodness, this dish brings a slice of Indore’s street food magic right to your kitchen. Happy cooking and happy eating! 😋