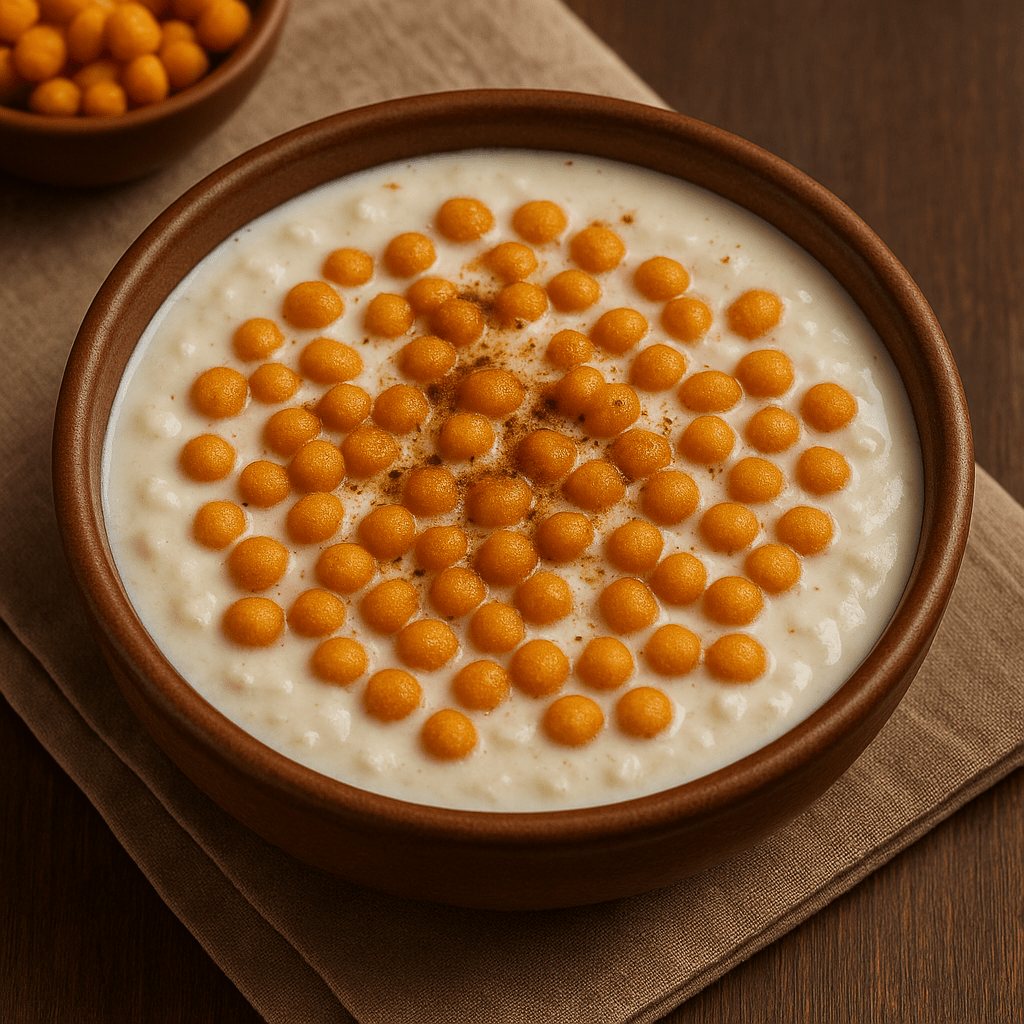
For many Bengalis, Doi Boondi is more than just a dessert – it’s a spoonful of nostalgia. In festive times like Durga Puja or wedding feasts, families gather to end the meal on a sweet note. Even Bollywood star Prosenjit Chatterjee fondly recalls “boondi aar doi” (boondi with curd) as “the best sweet dish” of his childhood. Boondi sweets are so woven into Bengali tradition that golden fried boondi is offered as prasad in many Durga Puja celebrations. Each bite of Doi Boondi – creamy yogurt swirled with syrupy boondi balls – evokes memories of home kitchens, summer gatherings, and the soft click of Bengali click-clacks at the dinner table.
This festive bowl of sweetened curd with crispy boondi is often served chilled, garnished with nuts and rose petals for color. The curd (doi) is lightly sweetened and infused with warm spices, then layered with soft, golden boondi. A hint of cardamom or saffron in the curd gives it a rich aroma. Tradition says to set the sweet curd in an earthen pot (matka) – the porous clay lets extra whey evaporate, yielding a thicker, silkier mishti doi. The result is a cool, refreshing dessert that perfectly balances sweet and tangy flavors.
Ingredients
For boondi: 1 cup besan (gram flour), pinch of baking soda, water (to make a batter), oil or ghee for deep frying.
For sugar syrup: 2 cups sugar, 1½ cups water, 4–6 green cardamom pods (crushed).
For sweet curd (doi): 3 cups plain whole-milk yogurt (use full-fat yogurt for a rich curd), ½ cup sugar (or to taste), a pinch of saffron strands (optional), 3–4 cardamom pods (crushed).
Garnish (optional): Chopped almonds, pistachios or cashews; a few rose petals for color.
Tip: Always use full-fat milk or whole-milk yogurt. As one recipe notes, diluted or low-fat milk yields a runny curd, while full-fat milk gives the thick, creamy texture that Doi Boondi deserves. Setting the sweet curd in an earthen pot will also help absorb moisture and thicken it.
Preparation Steps
1. Make the boondi: Sift the besan and baking soda together. Gradually whisk in water to form a smooth batter (consistency like heavy cream). Heat oil or ghee in a deep kadai or pan. Hold a perforated ladle (boondi jhara) about 3–5 inches above the oil, pour the batter through it, and gently agitate so tiny droplets fall into the oil. Fry the boondi in batches: golden (about 30–40 seconds) is ideal – do not overcook, or they will become too hard. Drain on paper towels. Repeat until all batter is used.
2. Prepare the sugar syrup and soak: In a clean pan, combine sugar and water and bring to a boil. Let it boil 3–4 minutes until just syrupy (keep it thin rather than one-string consistency). Add the crushed cardamom pods. Turn off the heat and immediately stir in the fried boondi; mix well. Cover the pan and let the boondi soak for at least 1 hour at room temperature (or leave overnight). Stir gently every 15–20 minutes if possible. The boondi will plump up as they absorb the sweet syrup.
3. Sweeten the yogurt: While the boondi soaks, make the flavored curd. In a bowl, whisk the yogurt until smooth. Dissolve the sugar in a few tablespoons of warm milk and stir this syrup into the yogurt. (If using saffron, soak it in a tablespoon of warm milk first, then mix in – this gives a lovely color and aroma.) Add a pinch of cardamom. For an extra-thick mishti doi, pour this sweetened yogurt into an earthenware bowl, cover, and let it set in a warm place until firm (often 6–8 hours). Then chill until cold.
4. Assemble the dessert: In serving bowls, spoon some of the sweet curd and top with 2–3 tablespoons of the soaked boondi. You can layer or simply mix them. Cover the bowls and refrigerate for at least 1–2 hours before serving to let the flavors meld and the boondi soften.
Tips and Tricks
Balance the sweetness: Since both the syrup and the curd add sugar, taste the yogurt mixture before setting it. You may use slightly less sugar in the curd if the boondi are very sweet.
Syrup consistency: Keep the sugar syrup on the thinner side. A slightly runny syrup ensures the boondi absorb it well and don’t become overly cloying.
Spices: A pinch of ground cardamom and a few threads of saffron go a long way. One recipe instructs to add cardamom and saffron to the milk-yogurt mix for richness. The gentle perfume of these spices is classic in Bengali desserts.
Frying boondi: Fry quickly on medium heat. As noted, removing the boondi when they’re just golden (and still slightly soft) ensures they won’t turn rock-hard after soaking.
Thick curd: Use full-fat yogurt or whole milk to start. Setting the sweet curd in clay (or an earthenware pot) yields a smoother, drier mishti doi as excess whey seeps into the porous pot.
Chill it: Always serve Doi Boondi chilled. Refrigerate it well (at least 1 hour, preferably 2–3 hours) before serving for the best creamy texture and flavor.
Clay cups and bowls are traditional for serving mishti doi (sweet curd) in Bengal. Serving Doi Boondi in these earthen pots keeps it cool and allows excess moisture to evaporate. Garnish each portion with chopped nuts and rose petals for a festive look.
Serve in small clay cups (matkas) for authenticity. The earthenware not only looks charming but also helps the curd set firm by wicking away extra water.
Before serving, top each bowl with chopped pistachios or sliced almonds and a few rose petals. These touches add color and a hint of crunch or floral aroma to the creamy dessert.
Doi Boondi makes a perfect finale to a spicy Bengali meal. It’s also lovely after lunch on a hot day – the cool yogurt and soft boondi is very refreshing.
By blending homemade sweet yogurt with melt-in-your-mouth boondi, you get a dessert that is simple yet heartwarming. Whether it’s Durga Puja, a family wedding feast or a lazy summer afternoon, a chilled bowl of Doi Boondi – garnished with nuts and flowers – brings everyone to the table with a smile.
I still remember celebrating Eid as a child in Dhaka, waking to the smell of frying Jilapi (Bengali jalebi) in my grandmother’s kitchen. My eyes would light up at the sight of hot, coiled sweets – each spiral glistening with sweet syrup. Jilapi (Bengali for jalebi) is a beloved treat in Bengali culture, enjoyed at festivals and street stalls alike. It turns up at weddings, Eid, Durga Puja and other celebratory occasions. In fact, one reference notes that people in Bengal share sweets during Durga Puja, Lakkhi Puja, marriages and more as a way to spread happiness. Jalebi (In Bengali: jilapi) is traditionally made by deep-frying a wheat-flour batter in pretzel-like spirals and then soaking them in sugar syrup. This spiral dessert is crisp on the outside and sticky-sweet inside – exactly the kind of treat that makes Bengali festivals feel complete.
Semolina (suji/rava): 1–2 tablespoons (optional, for extra crispness)
Turmeric powder: a pinch (for color)
Plain yogurt: ½ cup (for fermentation; or ½ cup water for instant batter)
Baking powder or baking soda: ½ teaspoon (for the quick method)
Oil or ghee: for deep frying
For the sugar syrup: 2 cups sugar, 2 cups water, a pinch of saffron strands, 4–5 green cardamom pods (or ¼ teaspoon cardamom powder), and 1 teaspoon lemon juice.
Optional garnishes: nuts (pistachios, almonds) or fresh milk/rabri.
Preparation
1. Prepare the batter: In a bowl, whisk together the all-purpose flour, gram flour (or semolina), turmeric and a pinch of baking powder if you are making instant Jilapi. Stir in the yogurt and enough water to form a thick but pourable batter. Beat or whisk thoroughly until smooth. The batter should flow easily but not be very runny.
2. Ferment (traditional) or rest (quick): For a traditional jilapi, cover the batter and let it rest at room temperature for 12–24 hours. The batter should develop a slight sour aroma from the yogurt. For a quicker version, add ½ teaspoon baking soda or baking powder now and skip the resting period. (The leavening will make the coils fluffy.)
3. Make the sugar syrup: Combine the sugar and water in a saucepan. Bring to a boil and simmer until the syrup reaches a single-string consistency (test by dipping a fingertip – a drop of syrup should form a thin thread between your fingers). Remove the pan from heat and stir in the saffron strands, crushed cardamom, and lemon juice. Keep the syrup warm while you fry the jilapi.
4. Heat the oil: In a deep pan or kadhai, heat oil or ghee over medium heat (around 160–170°C). If using neutral oil, add a tablespoon of ghee for extra richness and flavor. The oil should be hot enough that a drop of batter sizzles and rises immediately, but not so hot that the jilapi browns too fast.
5. Fry the coils: Pour the batter into a squeezable bottle or piping bag (or a sturdy ziplock bag with a small corner snipped off). Pipe out spirals or concentric circles directly into the hot oil. You can start from the center and spiral outward, or make loose coil rings. Fry the spirals on medium heat until they turn a deep golden-orange (they will puff up slightly). Fry one test jalebi first: if it puffs up into a thick soft spiral, your batter was too runny – add a little more flour. If it forms a thin, crispy disk, it was too thick – loosen it with a bit of water. Adjust as needed and fry the rest of the batch, turning so they brown evenly.
6. Soak in syrup: As soon as the coils are fried, transfer them to the warm sugar syrup. Make sure the syrup is warm, not boiling hot – very hot syrup will make the jilapi too soft. Let the jilapi soak for about 2–3 minutes, then remove with a slotted spoon, allowing excess syrup to drip off.
7. Serve: Serve the Jilapi hot or warm on plates. They will still be crisp on the outside and gooey inside. (See serving suggestions below for pairing ideas.)
Tips for Perfect Jilapi
Batter consistency: Aim for a batter that is fairly thick but free-flowing. As one recipe notes, “the consistency of the batter must be free-flowing yet thick” for crisp, springy coils. Adjust with small amounts of water or flour while mixing.
Piping and shape: Using a sauce bottle or cloth bag makes it easier to pipe uniform spirals. Hold the bottle close to the oil surface to minimize splatter.
Oil temperature: Fry on medium heat. If the oil is too cool, the jilapi will absorb oil and turn heavy; if too hot, they brown too quickly. You should be able to control a steady sizzle.
Syrup and soaking: Always use warm (not boiling) syrup. Test for “single-string” consistency, and stir in a little lemon juice or saffron as shown. Soak the fried jalebis for only 2–3 minutes; prolonged soaking or overly hot syrup will make them lose their crispness.
Prevent crystallization: A squeeze of lemon juice in the syrup helps keep it from crystallizing. If the syrup cools or crystallizes before soaking, gently reheat it.
Spiral perfection: If a spiral breaks or spreads, adjust batter thickness (add flour or water as mentioned) and try again. With practice, you’ll get the circular shape more uniform.
Serving Suggestions and Variations
Enjoy hot: Bengali Jilapi is traditionally eaten hot or warm. As one source notes, it can be served plain – but in some regions it’s also enjoyed with accompaniments like sweetened condensed milk (rabri), milk or yogurt.
With breakfast: In Bengal, crisp hot jilapi are even eaten alongside semolina pudding or sweet curd (mishti doi) for breakfast.
Garnishes: For a festive touch, serve sprinkled with slivered pistachios or almonds, or garnish the serving plate with fresh rose petals (a Bengali tradition for sweets).
Chanar Jilapi (paneer jalebi): A popular Bengali variant uses fresh chhena (cottage cheese) in the batter. This chhena-based jilapi (often shaped like knotted spirals) is a classic at Bengali sweet shops, with a richer, denser texture.
Sweeteners: You can swap refined sugar for date-palm jaggery (nolen gur) in the syrup for a seasonal twist – it turns the jalebi brownish and gives a caramel-like flavor.
Storage: Leftovers can be gently reheated in a low oven or skillet to regain crispness. However, jilapi are best eaten within a few hours while still crisp and warm.
Enjoy making and sharing this golden spiral sweet – a Bengali festival classic that never fails to spread joy!
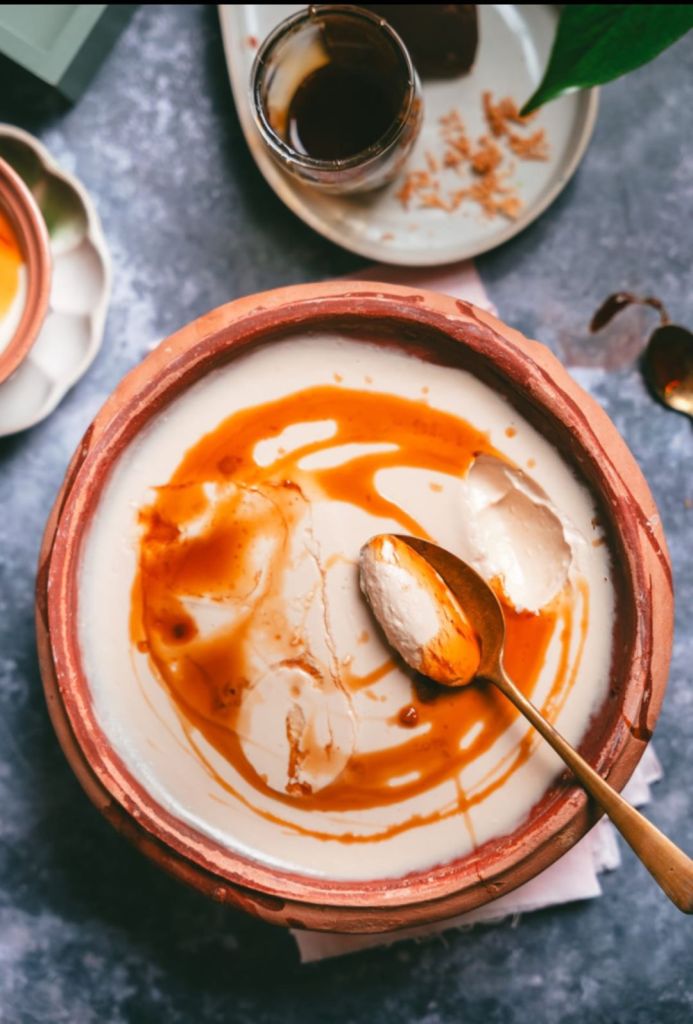
Image: A bowl of creamy mishti doi in a traditional clay pot, drizzled with a swirl of date-palm jaggery. One spoonful of this chilled sweet yogurt instantly transports me back to Durga Puja mornings at my grandparents’ home. In those festive days, the puja lunch always ended with Mishti Doi – its rich, creamy texture and caramel notes felt like a blessing after the feast. In Bengal, this dessert is more than a treat; it’s part of the tradition. No Puja or family gathering is complete without mishti doi – “a must-eat dessert in Durga Puja celebrations” – and each earthen pot of it seems to hold a sweet memory. The yogurt ferments slowly and takes on a pale brown hue, its flavor deepened by the fragrant nolen gur (date palm jaggery) or sugar used, making every bite a soulful taste of home.
Ingredients
Whole milk (full-fat) – 1 liter. Full-fat dairy yields the richest, creamiest texture. (You may add ½ cup cream for extra richness.)
Sweetener: ½–1 cup white sugar or ~1 cup grated nolen gur (date palm jaggery). Nolen gur is harvested in winter and gives a caramel-like aroma and flavor unique to Bengali sweets. (Choose sugar for a more neutral sweetness or nolen gur for an authentic winter twist.)
Yogurt starter (curd culture) – 2–3 tablespoons of plain yogurt. It should be thick and whole-milk; strain it through a cloth to remove excess whey so the mishti doi sets firm.
Optional flavorings: A pinch of saffron strands or ¼ tsp ground cardamom for aroma; chopped pistachios or almonds for garnish. These add a festive color and fragrance but aren’t strictly necessary.
Method
1. Heat and reduce the milk: In a heavy-bottomed pan, pour the milk (and cream if using) and warm it on medium heat. Stir often so the milk doesn’t scorch. Let it simmer for about 5–10 minutes until it reduces slightly and a light layer browns at the bottom. (This gentle reduction caramelizes the milk sugars, deepening the flavor.)
2. Add the sweetener: If using sugar, sprinkle it in and stir until it dissolves; you can allow it to turn a light amber by cooking gently first. If using jaggery (nolen gur), grate or break it into small pieces, add to the milk, and stir over low heat until fully melted. The milk will take on a golden-amber hue.
3. Cool the milk mixture: Remove the pan from heat and let the sweetened milk cool until it is just lukewarm – test with a clean finger to make sure it’s warm but not hot. This step is crucial: if the milk is too hot, it will kill the yogurt cultures.
4. Mix in the yogurt: Place the thick yogurt starter in a bowl and whisk in a few spoonfuls of the warm milk to temper it. Then pour the tempered yogurt into the rest of the milk and whisk gently until completely smooth. The mixture should be even and without lumps.
5. Set in containers: Lightly grease small clay pots (or heavy ramekins) with a bit of ghee or a smear of yogurt. Pour the milk–yogurt mixture into the pots. Cover each pot with a lid or foil, then wrap them in a warm towel or blanket. Leave the pots in a warm, undisturbed spot to ferment. In a warm kitchen, this takes 8–12 hours; if it’s cool, it may take up to 24 hours (you can turn on the oven light or use a warm oven as described in some recipes).
6. Chill and enjoy: Once the yogurt has set and become firm (it will have a caramel color), move the pots to the refrigerator and chill them for a few hours. Chilling stops fermentation and makes the mishti doi extra refreshing. When ready to serve, optionally drizzle a little melted jaggery or sprinkled nuts on top.
Tips for Creamy, Caramel Flavor and Perfect Fermentation
Full-fat milk and thick culture: Always use full-cream milk (or add some cream) for a luxuriously smooth mishti doi. Use a thick yogurt strain (low-fat milk often yields a runny set).
Caramelizing: Let the milk simmer long enough to develop a light brown color on the bottom of the pan. This imparts a natural caramel note even before you add sweetener.
Gentle temperature: Never add yogurt starter to piping-hot milk. Cool the milk to lukewarm (finger-warm) first. This preserves the bacteria so the curd can set.
Strain the yogurt: Drain the starter yogurt through cheesecloth for 30–60 minutes to remove excess liquid. Thicker starter means thicker final mishti doi.
Use earthen pots: Traditional clay pots absorb moisture and keep the mixture at just the right temperature, giving a uniquely earthy aroma and thick texture. If you can’t find clay, glass or ceramic will work.
Be patient: Mishti doi takes longer than plain curd to set. Plan for at least 8–12 hours. In cooler climates, place the pots in a warm spot (or inside the oven with just the light on) to help fermentation.
Serving Suggestions
Image: A garnished serving of mishti doi – creamy sweet yogurt topped with slivered nuts and saffron. Mishti Doi is traditionally enjoyed chilled at the end of a celebratory meal. It’s the perfect finale to a festive Bengali thali or Durga Puja feast. In Bengal, families often exchange clay pots of mishti doi as gifts during Puja, symbolizing sweet blessings. It also makes a lovely cooling summer dessert – a simple spoonful of chilled mishti doi is wonderfully refreshing on a hot day. Serve it plain, or sprinkle with chopped pistachios, rose petals or a pinch of extra saffron. Some modern twists include garnishing with fresh fruits (mango, berries) or a crumble of granola for texture. No matter how you present it, this creamy yogurt brings a sweet, soulful touch to any meal – a testament to Bengal’s rich dessert heritage.
Every year, when Raja Parba (a traditional Odia festival celebrating womanhood and mother earth) arrives in June, our home comes alive with laughter, swinging on hand-made jhulas, and the aroma of fresh sweets wafting from the kitchen. Among pithas and pooris, one dish always stood out — Khus Khus Kheer.
My mother would soak the tiny white poppy seeds the night before. She said khus khus must rest before it blooms into flavor. The next morning, she ground it into a paste, boiled milk patiently, and stirred slowly while humming old Odia songs. When she finally ladled it into brass bowls and sprinkled cardamom, we knew a celebration had truly begun.
It’s not just a sweet. It’s a memory. A ritual. A bowl of tradition served warm with love.
🧂 Ingredients
½ cup white poppy seeds (khus khus)
2 cups full cream milk
3–4 tablespoons jaggery (or sugar, to taste)
¼ teaspoon cardamom powder
1 tablespoon cashews or almonds, chopped (optional)
1 teaspoon ghee
A few saffron strands soaked in warm milk (optional)
🔪 Instructions
1. Soak & Grind: Soak khus khus in warm water for 2–3 hours or overnight. Drain and grind into a smooth paste using very little water.
2. Roast Nuts (Optional): In a heavy-bottomed pan, heat ghee and lightly roast cashews until golden. Set aside.
3. Cook the Paste: In the same pan, add the khus khus paste. Roast on low flame for 4–5 minutes until it gives off a nutty aroma and thickens slightly.
4. Add Milk & Simmer: Slowly add milk while stirring. Let it simmer gently on low flame for 10–15 minutes, stirring occasionally. The kheer will thicken and develop a rich, creamy texture.
5. Sweeten & Flavor: Add jaggery (or sugar) and mix well. Simmer for another 3–4 minutes. Turn off the heat and add cardamom powder. Stir in saffron and roasted nuts, if using.
6. Serve: Serve warm in traditional bowls or chill in the fridge for a cooler treat. The texture becomes thicker as it cools — that’s when it tastes the best!
🍽️ Serving Notes
This kheer is satvik and grain-free, perfect for festivals, fasting, or pooja prasad.
For a deeper festive flavor, use jaggery and saffron.
If you want to modernize it, top with chopped dates or pistachio slivers.
✨ Why This Recipe Belongs on Your Table
In the world of flashy desserts and instant mixes, this slow-cooked pudding whispers of patience and love. Khus Khus Kheer isn’t meant to impress — it’s meant to comfort. Its creamy richness is not cloying but soulful, making it perfect for a quiet evening or a festive gathering alike.
Every summer, the holy city of Puri in Odisha comes alive with the roar of chariots and the scent of sweets during Ratha Yatra. One aroma that signals festival time is that of Khaja (Khoja) – a crispy, layered pastry soaked in sugar syrup. This iconic Odia sweet is multi-layered, crisp and flaky by design, and it is more than just a dessert – it’s a symbol of devotion and tradition. In fact, Khaja is one of the 56 offerings (Chhappan Bhog) served daily to Lord Jagannath as Mahaprasad. Pilgrims often buy baskets of Khaja from the Jagannath Temple bazaar (Ananda Bazar) to carry home and share with neighbors and family. For many Odias, no visit to Jagannath is complete without that first reverent bite of Khaja.
During Ratha Yatra, temple kitchens prepare special sweets like Poda Pitha and Rasabali – and Khaja is offered as a festive treat to the deities. It symbolizes the sweetness of divine blessings as the snack is ceremonially served on the chariot or as temple prasadam. Devotees fondly recall childhood scenes: watching the grand chariot procession, then coming home to the warm, honeyed smell of freshly-fried Khaja. Many Odia families make or purchase Khaja during the festival to distribute as prasad at home. In fact, tradition holds that even a Khaja bought from a shop is treated with reverence – many Odias instinctively touch their head with gratitude at the first bite. This affectionate respect underlines how deeply Khaja is woven into the Ratha Yatra experience.
The Temple Tradition and Cultural Significance
Khaja’s roots are ancient and pan-Indian, but it has become uniquely Odia through Jagannath worship. By the time Khaja was included in the 12th-century Jagannath Temple offerings, Odia cooks had adapted the recipe to local tastes and resources. They added refined wheat flour (maida) to the dough along with ghee. The addition of maida gave the pastry extra elasticity and crisp layers that trap sugar syrup in every fold. This technique yields the flaky texture that Puri’s Khaja is famous for.
Anand Bazaar on the temple grounds is famous for its khaja stalls: devotees queue up to receive a piece as Mahaprasad (sacred food). The crispy sweet, also known as Feni, is emblematic of Jagannath culture. Indeed, Odisha’s daily offering of 56 dishes to Lord Jagannath always includes Khaja, making it a symbol of faith and cultural pride. After darshan, families often bring home wicker baskets of Khaja to share – a tradition that bonds communities. In villages and cities alike, the sight of Tulsi leaves or banana leaves beneath fresh Khaja is a familiar one on festive mornings, and every bite is considered a little blessing from the Lord.
Ingredients (for Flaky Khaja)
All-purpose flour (maida) – 2 cups
Ghee (clarified butter) – 3–4 tablespoons melted (plus extra for brushing)
Salt – a pinch
Warm water – as needed to knead the dough
Oil or ghee – for deep frying
Sugar syrup: 1 cup sugar dissolved in ½ cup water (boiled to a light thread consistency)
Cardamom powder – ¼ teaspoon (optional, for fragrance)
Chopped nuts or saffron – a few strands for garnish (optional)
(Notes: The refined flour and ghee help create the signature layers. Traditionally, maida alone was used in the temple version for a creamier color and texture.)
Method
1. Make the dough: In a mixing bowl, combine the flour and salt. Add the melted ghee and use your fingers to mix until the flour resembles coarse crumbs. Optionally add a pinch of cardamom powder for aroma. Gradually pour warm water and knead into a firm, smooth dough. Cover and let it rest for about 30 minutes.
2. Prepare sugar syrup: While the dough rests, make the syrup. In a pan, dissolve the sugar in ½ cup water and bring to a boil. You may add a teaspoon of lemon juice to prevent crystallization. Simmer until the syrup reaches a light one-thread consistency. Keep the syrup warm.
3. Roll out layers: Divide the dough into 4–5 equal balls. Roll each ball into a very thin circle (like a chapati). Brush the surface of one circle lightly with ghee, and dust a little extra flour (or cornflour) to prevent sticking. Place a second rolled circle on top and brush with ghee again. Stack all rolled circles (brushing each) into a layered stack.
4. Form the rolls: Roll the stacked layers tightly into a cylinder log. Seal the edge by pressing a little water if needed. Trim the ends and cut the log width-wise into 8–10 short rolls (each about 1–1.5 inches long).
5. Flatten the pieces: Take each little roll and press gently down its center with your finger or a rolling pin, so it flattens slightly but keeps its layered shape.
6. Deep-fry: Heat oil in a deep wok over medium heat. Fry the prepared pieces on medium-low heat first, then increase to medium. Fry slowly until they turn a rich golden-brown on all sides, turning carefully so both sides crisp evenly. (Low-to-medium heat ensures the layers puff up and cook through.) Remove the fried Khaja and drain on paper towels.
7. Soak in syrup: While the Khaja is still hot, dip each piece into the warm sugar syrup for 1–2 minutes, coating it fully. Lift them out and arrange on a rack or plate. As they cool, the syrup will crystallize slightly on the surface, giving that final delicate crunch.
8. Serve: Once cool, transfer the flaky Khaja to a serving platter. Optionally, sprinkle with chopped nuts or saffron strands for color. Serve with warm tea, or pack them as prasad – the Khaja stays fresh and crisp for days thanks to its syrup coating.
Enjoy the crisp layers and sweet fragrance of homemade Khaja, a festival favorite from Odisha. Each bite of this temple treat carries a touch of history and devotion – a true Chhappan Bhog delight.
Each August, as the monsoon brings cooler evenings, our home lights up in anticipation of Janmashtami, the celebration of Lord Krishna’s birth. The festival is marked by fasting through the day and jubilant puja at midnight. We decorate the puja room with diyas, rangoli designs, and peacock feathers (symbols of Krishna), waiting eagerly to break the fast with a special bhog of sweets. In my childhood memories, the most magical part of Janmashtami night was the kitchen filled with the aroma of milk, cardamom, and saffron. My mother would gently simmer khoya (reduced milk solids) with sugar, cardamom and saffron, chanting childhood prayers, as we peeped into the pot, mouths watering for the first bite of warm pedas.
The saffron-hued pedas on a traditional brass plate, dotted with bright green pistachios and lit by oil lamps, capture the golden glow of Janmashtami celebrations. Pedas like these are more than sweets; they are offerings to the child-god. It is believed that Krishna loved milk sweets, and one legend explains how peda was “born”: Krishna’s mother Yashoda accidentally left a pan of boiling milk on too long, then mixed in sugar to salvage it, creating the first peda. Krishna loved it so much that offering peda to him became tradition in Mathura (his birthplace). Indeed, Mathura’s famous Mathura pedas are a Janmashtami specialty. In fact, tradition holds that preparing and offering sweets like pedas to Lord Krishna brings prosperity and happiness.
Drawing on these memories, we make kesar (saffron) khoya pedas each Janmashtami. A few saffron strands steeped in warm milk lend the pedas their rich golden hue and delicate aroma – an apt nod to the “kesari” color often associated with sacred Hindu festivities. As Sharmili’s Kitchen notes, the traditional recipe uses khoya, sugar, saffron, and cardamom to evoke Krishna’s favorite flavors. Crumbled with love and shaped by hand, these sweet milk pedas are soft, melt-in-the-mouth, and crowned with slivers of pistachio for crunch and color.
Ingredients
1 cup (about 200 g) khoya (mawa), grated (use fresh or store-bought evaporated milk solids)
1/2 cup sugar (adjust to taste)
1/2 teaspoon cardamom powder
A pinch of saffron strands (5–6 strands), soaked in 1–2 tablespoons warm milk for color and aroma
2–3 tablespoons whole milk (to help mix/soften)
1–2 tablespoons ghee (clarified butter), optional (for richness and to prevent sticking)
Chopped pistachios (or slivered almonds) for garnish
Instructions
1. Prepare saffron milk: Soak the saffron strands in warm milk for 10–15 minutes to release color and flavor. This will tint the pedas a golden hue.
2. Cook khoya mixture: In a heavy-bottomed pan on low heat, crumble the grated khoya and add sugar and cardamom. Stir gently to combine. (Pro tip: cook on very low heat so the khoya doesn’t brown too much.) Add the saffron-infused milk and ghee. Stir continuously. You’ll first see the sugar melt and the mixture become moist, then slowly thickening. Keep stirring to prevent sticking or burning. Continue cooking until the mixture turns into a soft, pliable dough and starts to pull away from the sides of the pan. This step can take several minutes but is key for smooth pedas.
3. Cool and knead: Remove the pan from heat and let the mixture cool slightly until it’s warm enough to handle. If it feels too sticky, you can stir in a little more warm milk or ghee. Once warm (but not hot), knead the khoya mixture with a spatula or lightly with your hands until smooth. It should hold together without crumbling.
4. Shape the pedas: Divide the mixture into small portions (about 12 for medium pedas). Roll each portion between your palms into a smooth ball, then flatten slightly into a thick disc. You can use a traditional peda mold or simply press a fork or the back of a spoon to make a pattern on top. Garnish each peda by gently pressing a few slivered pistachios or almonds onto the surface.
5. Finish and serve: Arrange the pedas on a decorative plate. They will firm up as they cool. You can serve them immediately (still soft and warm) or refrigerate for a couple of hours to set. The pedas keep for a few days in an airtight container at room temperature, but they’re at their creamiest on the first day.
“With these tender saffron-khoya pedas, each bite feels like a blessing passed down from childhood,” I remember thinking with every Janmashtami. The warm golden sweets symbolize the joy and devotion of the festival. Serving them on a brass thali with lit diyas and maybe a peacock feather nearby brings the story of Krishna’s playful, sweet-loving youth right into our home each year. Enjoy this peda recipe as a festive offering or simply a nostalgic treat that connects us to the pure sweetness of Lord Krishna’s teachings.
Aamras served with puri, garnished with slivered nuts – a golden summer treat in Maharashtrian and Gujarati cuisine.
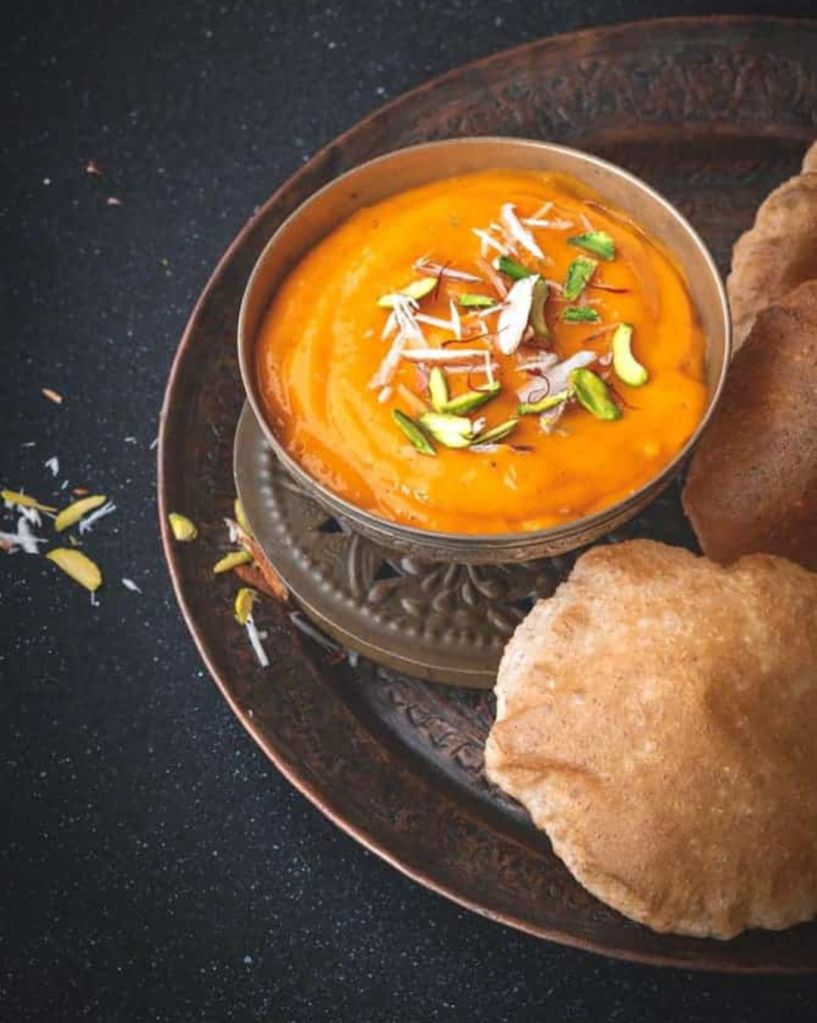
There’s a particular joy in summer that comes in the form of mangoes. As the mercury rises, so does the excitement in Indian homes for juicy, ripe mangoes. And nothing captures that sunshiney bliss better than a chilled bowl of Aamras with hot, fluffy puri. Aamras (literally “mango nectar” in Hindi/Marathi) is essentially a silky smooth puree of ripe mangoes, often served as a dessert or side with Indian bread. In western India – especially Maharashtra and Gujarat – this combination of Aamras-Puri isn’t just food, it’s an emotion. It reminds one of school holidays, family gatherings, and festive feasts where everyone’s sitting around a big thali, reaching for yet another puri to scoop up that golden, sweet mango goodness. In this post, let’s dive into this traditional delight – from a warm introduction (because every recipe has a story) to the ingredients, step-by-step method, tips, a quick note on making puri, serving suggestions, and a special section on why I love it so much. Get ready to savor summer on a plate!
Ingredients
Here’s what you’ll need to make aamras (serves 4) – it’s a short and sweet list:
Ripe Mangoes – 2 to 3 large mangoes, approximately 2 cups of chopped mango pieces (Alphonso Hapus works great for its sweetness and color, or use Kesar, Payari, etc.)
Sugar – 2–4 teaspoons, or to taste (adjust depending on the sweetness of the mangoes; you can also use jaggery for a more rustic sweetness)
Milk – 2 tablespoons, optional (to adjust consistency; use cold milk for a creamier aamras, or water for a thinner consistency or a vegan option)
Saffron Strands (Kesar) – a pinch, optional (for garnish and a delicate aroma; soak in a teaspoon of warm milk for a minute to draw out color)
Ghee – 1 teaspoon, optional (for drizzling on top when serving – a traditional touch especially loved in Gujarat)
Note: The above ingredients are for the aamras (mango puree) itself. To enjoy it the traditional way, you’ll also need ingredients for puri (deep-fried whole wheat bread) – see the brief puri recipe below. Typically, puri is made with whole wheat flour, salt, and water, and fried in oil.
Method
1. Prep the Mangoes
Wash the mangoes thoroughly to remove any sap or residues. Peel the mangoes and cut the flesh into small pieces, discarding the seed. The riper the mango, the easier this will be. If you’re using a variety like Alphonso or Kesar, you’ll already notice the rich aroma as you chop – that’s a good sign of delicious aamras to come!
2. Blend into Aamras
Place the mango pieces into a blender or mixer jar. Add sugar (if your mangoes are only mildly sweet) and the ground cardamom. Blend everything until you get a smooth, thick mango puree. The consistency should be pourable but not runny. If the mango flesh is very dense or the blender is struggling, add 1-2 tablespoons of milk (for a creamy touch) or water and blend again. The result should be a glossy, sunset-yellow puree that’s silky on the tongue. (Traditional method: If you’re feeling nostalgic, you can also mash the mango pulp by hand. Simply squeeze and massage the mango pieces in a bowl using your fingers or a wooden whisk (mathani) – it’s labor-intensive but yields a lovely texture, and it’s how our grandmothers did it!)
3. Taste and Adjust
Now, taste the blended aamras. This step is crucial because mangoes can vary in sweetness. If it’s already sweet enough, you’re good to go. If not, add a teaspoon or two more of sugar and blend briefly. Remember, you can always add sweetness but you can’t remove it, so add in small increments. Traditionally, if the mangoes are top-quality and naturally sweet, no extra sugar is needed. Also check the consistency: if you prefer it a bit thinner (especially if you plan to drink it or if it’s too thick to scoop), you can whisk in a little more milk or water. Just be careful not to dilute it too much – aamras is best enjoyed thick enough to coat the back of a spoon.
4. Chill
Pour the prepared mango puree into a serving bowl (or individual small bowls) and cover. Place it in the refrigerator for at least 30 minutes (or even a couple of hours). Aamras is meant to be served chilled – the flavors perk up when it’s cold, and it’s incredibly refreshing on a hot day. (If you’re in a rush, you can pop it in the freezer for 10-15 minutes, but don’t let it freeze solid.) Meanwhile, you can get ready to fry the puris so they’re timed to be hot and fresh when you serve.
5. Prepare the Puris
While the aamras is chilling, it’s time to make some puri (fried puffed bread) to go with it. Skip ahead to the Puri Recipe section for a brief how-to. Essentially, you’ll knead whole wheat flour with a bit of salt and water to make a dough, then roll it into small discs and deep fry until they puff up. This only takes around 20 minutes. The key is to have your puris hot and ready when you serve aamras.
6. Serve and Enjoy
Give the chilled aamras a quick stir just before serving. Then, serve it in small bowls or katoris placed on each plate. Pile up the freshly fried puris in a basket or tray lined with paper (to absorb excess oil). Now for the special touch: if you like, drizzle a few drops of ghee on the surface of each bowl of aamras. This is a Gujarati tradition – the faint nuttiness of ghee on cold mango puree is a game changer, trust me. Garnish with a couple of saffron strands on top for a pop of color (and divine aroma). To eat, tear a hot puri, scoop up some chilled aamras with it, and enjoy the explosion of flavors – the experience is pure bliss, combining the cold, sweet, smooth mango with the warm, slightly salty, flaky puri. It’s a summer marriage made in heaven!
Tips for the Perfect Aamras
Choose the Right Mangoes: Start with quality mangoes because aamras is all about the mango. Fully ripe, juicy mangoes with non-fibrous flesh work best. Varieties like Alphonso (Hapus), Kesar, or Pairi/Payari are ideal for their vibrant color and rich natural sweetness. If the mangoes are a bit fibrous, you can push the puree through a sieve after blending to catch any fibers – but using a good mango avoids this extra step. Seasonal, sweet mangoes = heavenly aamras.
Sweetness Control: Traditionally, if mangoes are very sweet, no extra sugar is added to aamras. Taste your mangoes/puree first, and sweeten only as needed. If you do need to add sweetness, you have options: plain sugar dissolves easily and won’t change the color, whereas jaggery (unrefined cane sugar) can add a deeper, molasses-like flavor – great if you like a rich, earthy sweetness (just know it will make the color a bit darker). Add sweetener in small increments, blending and tasting as you go, so you hit the perfect sweet spot.
Consistency Matters: Aamras should have a slightly thick, pourable consistency – think of a thick smoothie or a flowing custard. It shouldn’t be watery or too thin. If your aamras is too thick (maybe your mangoes were super pulpy or you want a lighter texture), adjust gradually. For a Maharashtrian style tweak, you can stir in a few tablespoons of cold milk to lend a creamier, smooth finish. For a Gujarati style approach (which typically avoids milk), add a spoon or two of water instead – just enough to loosen the puree slightly. Always add a little at a time and check; you can’t undo a watery aamras! Also, remember it thickens a bit after refrigeration, so err on a touch thinner if you plan to chill it long.
Flavor Boosters: The classic aamras is usually just mango, maybe sugar, and cardamom. Cardamom powder is a beloved addition in Maharashtra – it adds a warm, aromatic note that complements mango so well. In Gujarat, some families add a pinch of dry ginger powder (soonth/sonth) for a gentle zesty hint, and often a spoonful of ghee on top while serving. You can try both variations in your kitchen and see what you prefer. Saffron is another luxurious addition – just a few strands can make your aamras look and taste royalty-worthy. If using saffron, soak it in a tiny bit of warm milk and stir that into the aamras for an even infusion of color and flavor. Lastly, though not traditional, a squeeze of lemon or a pinch of salt can be added if your aamras tastes overly sweet or flat – acid and salt are known flavor enhancers (but use very sparingly, only if needed).
Serving Temperature: Always serve aamras chilled. This isn’t the kind of dessert you serve warm or at room temperature. The chill amplifies the refreshing feel. If you’re making it ahead for a party, you can blend it and keep it in the fridge. Just give it a good stir before serving (if it sat for many hours, the top might darken slightly or a bit of liquid might separate – a quick stir will homogenize it again). For outdoor summer picnics, you can even keep the serving bowl of aamras over another bowl of ice to keep it cold.
Storage: Because aamras is essentially fresh fruit puree, it’s best enjoyed within a day or two for the best flavor. If you have leftovers, refrigerate them in a clean, airtight container and try to finish by next day (remember, no preservatives here!). For slightly longer storage or if you have a glut of mangoes, you can make mango pulp in bulk and freeze it. Pour the pure mango puree (no milk or sugar added) into freezer-safe bags or containers and freeze. This frozen mango pulp can last a few months. When you crave aamras out of season, thaw the pulp, blend it smooth (add your sugar and spices at this point), and enjoy. It won’t be as aromatic as fresh, peak-season mango aamras, but it’s still a nice treat. (One pro tip: I often freeze small portions of mango pulp at peak season. Come Diwali or New Year, I surprise the family with aamras-puri when no one’s expecting it!)
Presentation: If you want to dress it up for guests or a festive occasion, get creative with presentation. You can serve aamras in elegant glass bowls or even in the mango skins (for a rustic touch). Top each serving with something pretty and tasty – a few pistachio or almond slivers, a couple of saffron strands, or that drizzle of ghee we discussed. The garnishes not only make it look festive but also add texture (nuts) or aroma (saffron, ghee). And of course, serve alongside puri – the contrast of textures (soft puree vs. puffy bread) and temperatures (cold vs. hot) is what makes this duo legendary.
Making the Puri (Fried Bread)
No aamras-puri experience is complete without the puri – the simple fried bread that becomes a perfect scoop for the mango puree. Here’s a quick guide to make puris at home:
Ingredients (for puri dough): 2 cups whole wheat flour (atta), 1/2 teaspoon salt, about 3/4 cup water (adjust as needed), and oil for deep frying. (Optional: 1 teaspoon of oil or ghee to rub into the dough for extra crisp yet soft puris.)*
Make the Dough: In a mixing bowl, combine the whole wheat flour and salt. Add water little by little and start kneading. You want a firm, stiff dough (firmer than chapati dough). It should not be sticky. Knead for a few minutes until smooth. Coat the dough with a few drops of oil to keep it from drying, cover, and let it rest for about 15 minutes (resting helps gluten develop for better puffing).
Roll it Out: After resting, divide the dough into small balls – roughly the size of a lemon. Flatten a ball and use a rolling pin to roll it into a circle of about 4 inches in diameter. Tip: Don’t use dry flour to roll (as we do for rotis) because that can burn in the oil; if needed, apply a tiny bit of oil on the rolling surface or pin to prevent sticking. The rolled disc should be even and not too thin.
Fry the Puris: Heat oil in a deep kadai or skillet. The oil needs to be hot (around 180°C/350°F if you use a thermometer). Test by dropping a small bit of dough; it should sizzle and rise up immediately. Slide one rolled puri carefully into the oil. It will sink momentarily then puff up. Gently press it with a slotted spoon or skimmer – this helps it puff completely. Fry for about 10-20 seconds on one side, then flip and fry another 10 seconds until puri is puffed and light golden in color. Remove with the slotted spoon, letting excess oil drain, and place on paper towels. Continue with the remaining puris, and remember not to crowd the pan – fry one or two at a time depending on the size of your pan. Keep the fried puris in a single layer so they stay puffy (stacking can flatten them).
Serve: Puris are best enjoyed fresh and hot. They tend to lose their crunch and deflate a bit as they cool, so time them to be done just when you’re about to eat. Pile them in a bowl or dish lined with paper. They’ll disappear fast – especially with a tempting bowl of aamras on the table!
If you prefer a detailed recipe with step-by-step photos for puri, feel free to check out a full Puri Recipe. But the above instructions should work like a charm for a quick batch of puffed puris. Once your puris are ready, dive into the Aamras-Puri feast without delay – hot puris + cold aamras = happiness!
Serving Suggestions
Aamras with puri is such a versatile duo – it can be the highlight of a festive feast or a simple indulgent summer lunch. Here are a few serving ideas and contexts for this delightful dish:
Festive Thali: In many Maharashtrian and Gujarati wedding feasts and festive occasions, aamras-puri is served as part of a traditional thali (a full platter meal). Picture a big plate with spicy veggies, pickles, curries, yogurt and, in the place of honor, a katori of bright orange aamras with a stack of puris. It adds a celebratory vibe and is often the most loved item on the platter. If you’re hosting a special lunch (say for Ganesh Chaturthi or a family get-together in mango season), consider making a mini-thali with aamras-puri as the star – keep the rest of the menu light since this duo is quite rich and filling on its own.
Summer Lunch or Dessert: Honestly, aamras-puri can be a meal in itself. For a laid-back summer lunch, serve yourself a generous bowl of chilled aamras and as many puris as you can eat. You won’t need much else! It’s common in our home to have just aamras and puri for Sunday lunch on scorching days – it’s cooling, satisfying, and puts everyone in a good mood (and then straight into a mango-induced nap 😄). Alternatively, if you’ve made a spicy Indian meal, you can serve aamras as a dessert in the end. In that case, you might serve it without puri, just in small dessert bowls to be eaten on its own like a pudding. But trust me, it’s extra special with puri, so I almost always pair them.
With a Savory Side: While not required, you can add a savory side dish to your aamras-puri meal. A classic combination in Maharashtra is Aamras-Puri with Batatyachi Bhaaji – which is a simple, mild potato stir-fry (turmeric and minimal spices) served alongside. The lightly spiced potatoes complement the sweet aamras and make the meal feel complete. Another traditional accompaniment is a spoonful of mango pickle on the side of your plate. A little bit of tangy, spicy pickle eaten intermittently cuts through the sweetness and elevates the flavors – it might sound odd, but try a tiny lick of pickle in between bites of aamras-puri, it’s wonderful! However, avoid any strongly flavored curries or sabzis with aamras-puri; the mango puree is delicate and should remain the hero of the meal (strong flavors can clash or overwhelm the experience).
Shrikhand-Puri Alternative: If by any chance you’re reading this outside of mango season and still want a similar treat – there’s a popular alternative in Maharashtra: Shrikhand-Puri. Shrikhand is a thick yogurt-based sweet (often flavored with saffron and cardamom) and is also enjoyed with puris, especially when mangoes aren’t around. But as soon as summer arrives and mangoes are aplenty, shrikhand takes a backseat and the glorious aamras takes center stage. Some festive menus even offer both! So, you could serve shrikhand alongside aamras for variety, and let people alternate between the two – both eaten with puris. It’s double indulgence but hey, Indian festivals and summers are meant for enjoying abundance.
Finally, whether you serve it in a grand thali or as a cozy family meal, remember the golden rule: Hot puris and cold aamras. That temperature contrast is key to the experience. So time your meal prep accordingly, and enjoy this simple yet divine pairing that truly celebrates the king of fruits – the mango!
Why I Love It
Every bite of aamras with puri carries me back to the golden summers of my childhood. I remember tumbling into the house after long hours of playing under the harsh sun – face red, hair messy, and stomach growling. The moment I stepped in, I’d be hit by the heavenly fragrance of ripe mangoes wafting from the kitchen. My grandmother would be there, seated on the cool floor, a large bowl in front of her. She’d be squeezing mango pulp by hand with an old wooden masher – a true labor of love that filled the entire house with a sweet, fruity aroma. Nearby, a heap of fluffy puris would be wrapped in a cloth to keep them warm. As soon as I washed my hands (a must-do ritual enforced by grandma!), she’d hand me a katori of chilled aamras and a couple of ghee-brushed puris. I would sit cross-legged on the floor beside her, and dunk a piece of puri into the thick mango puree. That first bite – oh, I can still recall it – the puri’s warmth meeting the cold, luscious mango sweetness – it was pure bliss. I’d devour it with mango dripping down my fingers, and she’d chuckle, wiping my hands with the end of her saree pallu.
What makes aamras-puri so special to me is not just its delectable taste, but the memories and comfort it brings. It’s a reminder of family gatherings during summer vacations, when all of us cousins would sit in a big circle with a huge pot of aamras at the center. We’d compete to see who could eat the most puris with aamras, giggling with mango-streaked lips and sticky fingers. Those afternoons felt endless and joyful.
It’s also the simplicity of the dish that enchants me – just ripe fruit and a basic bread, no elaborate techniques or fancy ingredients – yet it feels like a royal treat meant for the gods. Even today, as soon as the mango season hits its peak, the very first thing I make is aamras. It’s my way of celebrating summer. The creamy sweetness of the mango, the light hint of cardamom, the indulgent aroma of that little drizzle of ghee, and the satisfaction of tearing into a hot puri to scoop it all up… it’s an experience that nourishes the soul as much as the body. This dish is sunshine and nostalgia served on a plate, and that’s why I absolutely love it.
In every Indian home during Makar Sankranti, the kitchen fills with the nutty aroma of sesame roasting and the sweet caramel smell of jaggery melting.
As kids, we used to gather around the big brass pot, waiting to roll hot sticky ladoos between our palms, giggling when we burned our fingers a little because we couldn’t wait.
Til ke Ladoo are not just sweets — they are tiny bundles of tradition, warmth, and love shared between generations.
Ingredients:
1 cup sesame seeds (til)
¾ cup jaggery (gur), grated
1–2 tbsp water
1 tsp cardamom powder (optional)
2 tsp ghee (for greasing palms)
Steps to Make Til Ke Ladoo:
1. Roast the Sesame Seeds
Dry roast sesame seeds on low flame until golden and aromatic.
Keep stirring to avoid burning. Set aside to cool.
2. Prepare the Jaggery Syrup
In a heavy pan, melt jaggery with 1–2 tbsp water.
Cook until you get a sticky, soft-ball stage (test by dropping a little syrup in cold water — it should form a soft ball).
3. Mix and Roll
Quickly add roasted sesame seeds and cardamom powder.
Mix well.
Grease your palms with ghee.
While the mixture is still warm, take small portions and shape into round ladoos.
Serving Suggestions:
Best enjoyed fresh, during winter evenings
Store in airtight container for up to 2 weeks
Why I Love It
Because Til ke Ladoo are warmth you can hold in your hand — simple, pure, nourishing bites of winter.
In every Indian home, when Gujiyas are being fried, you know festivals are near.
As a kid, the kitchen would transform during Holi. Large plates of kneaded dough, sweet khoya stuffing laid out, and the entire family — aunts, cousins, grandmothers — sitting together, shaping gujiyas by hand, sealing the edges, and sneaking tastes of raw filling when no one was watching!
One bite into a warm, crispy gujiya — flaky outside, soft and rich inside — and it feels like celebrating life itself.
Ingredients:
For Dough:
2 cups maida (all-purpose flour)
4 tbsp ghee (for moyan)
Water (to knead)
A pinch of salt
For Filling:
1 cup khoya (mawa)
¼ cup powdered sugar
2 tbsp chopped nuts (almond, cashew, pistachio)
2 tbsp desiccated coconut
1 tsp cardamom powder
Raisins (optional)
For Frying:
Oil or ghee
Steps to Make Gujiya:
1. Prepare the Dough
Mix maida, ghee, and salt.
Rub to form a breadcrumb texture.
Knead into a stiff dough using water. Cover and rest for 30 mins.
2. Prepare the Filling
Roast khoya lightly until it turns slightly golden. Cool.
Some dishes are not just recipes — they are rituals. Gajar Ka Halwa is one such dessert. Made slowly over hours, stirring patiently, letting carrots soak up milk and ghee until they transform into a soft, glowing pudding.
My memories of Gajar Ka Halwa are tied to winter evenings — cozy sweaters, the smell of cardamom filling the kitchen, and my mother calling us all in to scoop up the first warm bowl.
Ingredients:
4–5 medium carrots (red winter carrots preferred), peeled and grated
2 cups full-fat milk
3–4 tbsp ghee
½ cup sugar (adjust to taste)
4–5 green cardamom pods (crushed)
2–3 tbsp chopped nuts (cashew, almond, pistachio)
Raisins (optional)
Steps to Make Gajar Ka Halwa:
1. Cook the Carrots
Heat 1 tbsp ghee in a thick-bottomed pan.
Add grated carrots and sauté for 5–7 minutes until soft.
2. Simmer with Milk
Add milk.
Simmer on low flame, stirring occasionally, until milk is absorbed (30–40 mins).
3. Sweeten and Flavor
Add sugar and cardamom powder.
Stir and cook until the mixture thickens and starts leaving sides of the pan.
4. Finish with Ghee and Nuts
Add remaining ghee, mix well.
Garnish with nuts and raisins. Serve warm.
Serving Suggestions:
Serve warm as a winter dessert
Tastes great cold too, after setting for a few hours
Pair with vanilla ice cream for a fusion twist
Why I Love It
Gajar Ka Halwa is not just a sweet. It’s warmth, patience, family, and celebration — all captured in a single, glowing bowl.