Gulab jamun is a beloved sweet throughout India and beyond, and creative chefs have been fusing this iconic dessert with Western-style treats. The Eggless No-Bake Gulab Jamun Cheesecake is one such indulgent fusion: a rich, creamy cake flavored with rose, cardamom, and saffron, studded with spongy jamun dumplings. As one food blogger notes, this dessert “perfectly captures the spirit of culinary fusion,” bringing together the best of both worlds in a way that’s “innovative, indulgent, and utterly delicious”. It’s a festive, showstopping dessert that would brighten any celebration, from Diwali to birthdays.
Ingredients
Crust: 1¾ cups (about 200g) crushed digestive biscuits or graham crackers, 4 tablespoons (½ stick) melted butter, ½ teaspoon ground cardamom (optional).
Filling: 16 ounces (450g) full-fat cream cheese (room temperature), 1 can (14 oz/400g) sweetened condensed milk, ¾ cup (180ml) heavy whipping cream (cold), ½ cup (120g) Greek yogurt or sour cream, ¼ cup (30g) powdered sugar, 1–2 teaspoons rose water (or 1 tablespoon rose/gulab jamun syrup), ½ teaspoon ground cardamom, pinch of saffron strands (soaked in 1 tablespoon warm milk), 1 tablespoon cornstarch (or 1 teaspoon gelatin/agar agar powder) dissolved in 2 tablespoons warm milk, 1 tablespoon lemon juice.
Gulab Jamuns: 10–12 ready-made gulab jamuns, well drained. Reserve 8–10 (halved) to gently fold into the filling and set aside a few whole or halved ones for garnish.
Toppings/Garnish (optional): Whole or halved gulab jamuns, chopped pistachios, edible rose petals, saffron threads, whipped cream or cool-whip swirls, and extra rose/gulab jamun syrup for drizzling.
Instructions
1. Prep: Lightly grease an 8-inch (20cm) springform pan and line the bottom with parchment. Drain the gulab jamuns on paper towels. Cut 8–10 gulab jamuns in half. Soak a pinch of saffron in 1 tablespoon of warm milk to bloom. Set these aside, and chill the pan while you make the crust.
2. Make the crust: In a food processor, pulse the biscuits into fine crumbs. Mix in melted butter and cardamom until evenly coated. Press the mixture firmly into the bottom (and ¼–½ inch up the sides, if desired) of the prepared pan. Freeze or refrigerate for 10–15 minutes to set.
3. Whip the cream: In a cold bowl, whip the heavy cream with 2–3 tablespoons powdered sugar to stiff peaks. Set aside – this will lighten the filling.
4. Mix the filling: Beat the softened cream cheese until smooth. Add condensed milk, yogurt (or sour cream), powdered sugar (if using), rose water (or syrup), cardamom, saffron-milk, lemon juice, and the dissolved cornstarch or gelatin. Beat until creamy and lump-free. If using gelatin/agar, stir it in now.
5. Combine cream and jamuns: Gently fold the whipped cream into the cream cheese mixture until fully incorporated. Then fold in the drained halved gulab jamuns, distributing them throughout the batter.
6. Assemble and chill: Pour half the batter into the crust and smooth the top. Arrange the remaining halved gulab jamuns in a single layer over it, then pour in the rest of the batter. Tap the pan on the counter to remove air bubbles. Cover and refrigerate for at least 6 hours (preferably overnight) until fully set. For a quicker set, you may place it in the freezer for 30–60 minutes, then return to the fridge.
7. Finish and serve: When set, run a hot knife around the edges before releasing the springform to get clean slices. To serve, garnish with a dollop of whipped cream and extra gulab jamuns. Sprinkle chopped pistachios, saffron threads, and dried rose petals on top. Drizzle with a little extra gulab jamun/rose syrup if desired. Keep the cheesecake chilled until serving – it is best enjoyed cold.
Tips
Use full-fat, room-temperature cream cheese (and warm the cream/lemon juice slightly) so the filling is smooth. Cold ingredients can lead to lumps or curdling.
Drain the gulab jamuns well (or pat them dry) before adding to the batter to avoid a runny filling. Excess syrup can make the cheesecake too wet.
For a firmer set in a whole cake, you may bloom a sheet of gelatin or 1 teaspoon of powdered gelatin (or agar agar) in warm water and stir it into the batter. Otherwise, the filling will still firm up by refrigeration.
Make sure to chill the cheesecake thoroughly. Allow at least 6–8 hours (or overnight) for the flavors to meld and texture to firm up. You can even make it a day ahead. Keep it covered and refrigerated – it will hold well for 4–5 days.
When cutting, use a hot clean knife: dip the blade in hot water between slices and wipe it clean each time to get neat edges.
Adding whipped cream (or whipped topping) really lightens the texture of the filling, making it fluffy rather than dense. Fold it in gently to avoid deflating the batter.
This no-bake cheesecake is “instant” in the sense that no baking is required. As soon as it’s fully chilled, it’s ready to serve – ideal for any festive occasion.
Toppings & Garnish
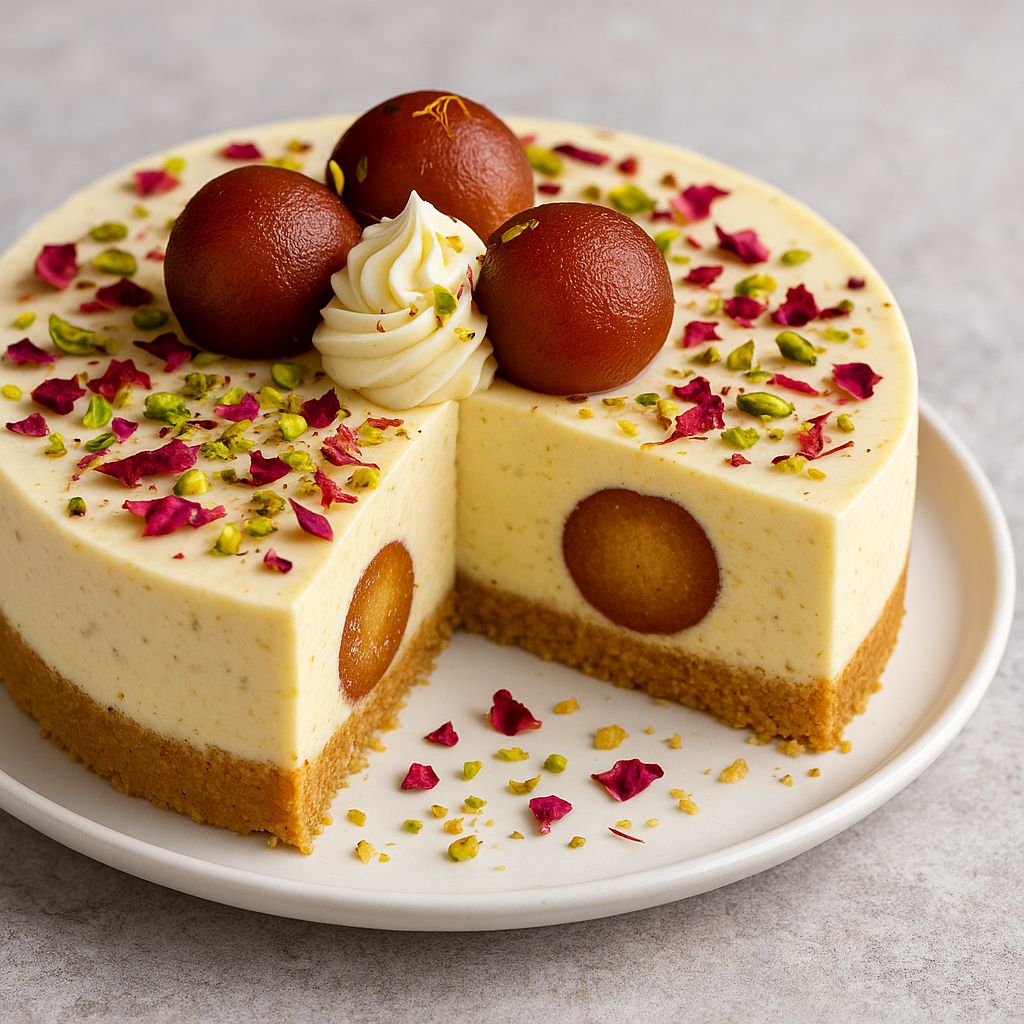
A slice of eggless Gulab Jamun Cheesecake adorned with a whole gulab jamun, rose petals, and chopped pistachios – an indulgent fusion dessert perfect for festive occasions.
Each slice of cheesecake can be dressed up as a showstopper. We love garnishing it with a chilled gulab jamun and a swirl of whipped cream on top, then sprinkling chopped pistachios, saffron threads, and dried rose petals for color. A light drizzle of extra rose syrup or warm gulab jamun syrup over the top adds shine and intensifies the exotic aroma. Serve each portion on a festive platter or cake stand to highlight the saffron-speckled filling and golden crust. This decadent dessert pairs beautifully with masala chai or cardamom coffee, making it perfect for Diwali, Eid, or any celebration.
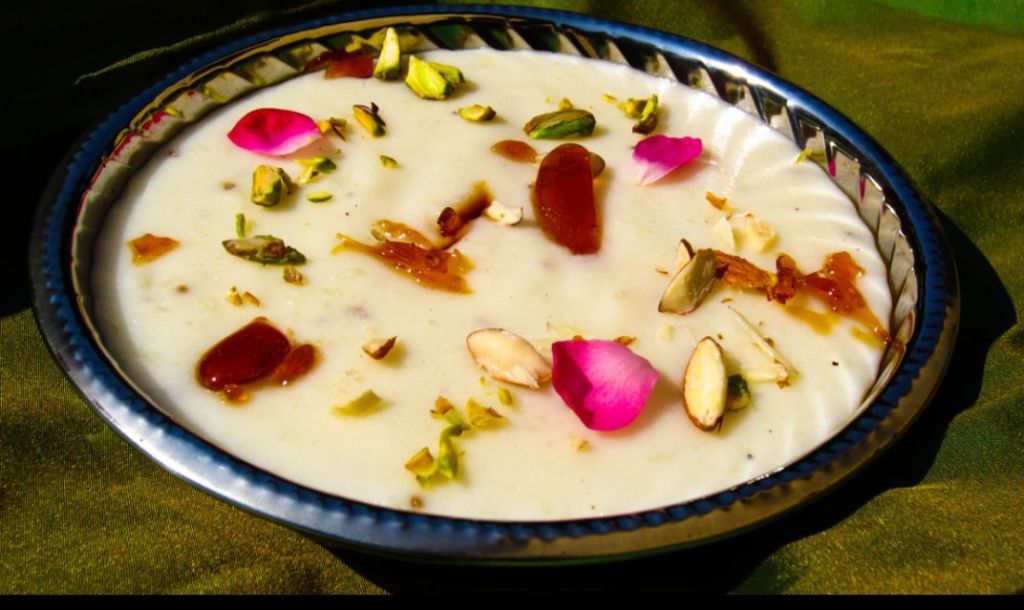
Bowl of chilled phirni garnished with pistachios, almonds, and rose petals. Phirni (also known as firni) is a beloved North Indian dessert—a thick, creamy rice pudding cooked with milk and sugar, delicately flavored with saffron and cardamom. This classic treat is traditionally prepared during joyous celebrations like Diwali and Eid, and no family gathering feels complete without it. I remember my grandmother slow-cooking phirni on the stovetop, filling the house with the sweet aroma of simmering milk and spices, and then pouring it into small clay bowls to set. It’s believed that phirni has its roots in ancient Persia and was brought to India by the Mughal emperors. Over generations, it has become totally ingrained in Indian cuisine – a dessert that evokes nostalgia and warm family memories with every spoonful.
Ingredients
Basmati rice (raw) – ¼ cup (about 50 grams), rinsed and soaked
Almonds – 2 tablespoons, blanched and sliced (reserve some for garnish)
Pistachios – 2 tablespoons, sliced (for garnish)
Rose water (optional) – 1 teaspoon, for extra fragrance
Rose petals (optional) – a few, for garnish (washed, organic)
Earthen bowls (optional) – traditional clay bowls for setting and serving
Instructions
1. Prepare the Rice: Drain the soaked basmati rice and spread it on a clean cloth or plate to air-dry for 10-15 minutes. Once slightly dry, grind the rice into a coarse powder – aim for a texture like fine semolina (sooji). (You can also skip drying and grind the soaked rice directly to a paste, but a coarse texture is key for authentic phirni.)
2. Heat the Milk: In a heavy-bottomed pot, bring the milk to a gentle boil. Lower the heat to medium. Stir occasionally to prevent the milk from scorching at the bottom or forming a skin on top.
3. Mix in Rice: Take a few tablespoons of the hot milk and mix it with the ground rice to make a lump-free slurry. Slowly pour this rice-milk mixture into the simmering milk, stirring continuously. This step helps disperse the rice evenly and prevents any clumps from forming.
4. Cook the Pudding: Cook the rice and milk on low heat, stirring often with a spatula. As the mixture simmers, the ground rice will cook and the milk will begin to thicken. Scrape the sides and bottom of the pot regularly to avoid sticking. After about 10-15 minutes, the phirni will start to attain a velvety, thick consistency.
5. Sweeten and Flavor: When the rice is completely soft and the pudding has thickened, stir in the sugar until it dissolves. Add the crushed cardamom seeds and the saffron along with the infused milk. The saffron will impart a lovely golden hue and fragrance. Continue to cook for another 2-3 minutes, ensuring the sugar is fully dissolved and the flavors are well combined.
6. Finish with Nuts: Stir in the chopped or ground almonds (if using) and cook for another minute. Turn off the heat. The phirni should be creamy and thick, yet of pouring consistency (it will set further upon cooling).
7. Pour and Set: Pour the hot phirni into serving bowls. For an authentic touch, use small earthenware bowls (matka or shikora). The clay bowls naturally absorb excess moisture and enhance the texture and aroma of the phirni.
8. Chill: Let the bowls cool to room temperature, then cover them (with lids or foil) and refrigerate for at least 2 hours, or until the phirni is nicely chilled and firm. Phirni is always served cold for the best flavor and texture.
9. Garnish and Serve: Before serving, garnish each bowl of phirni with the reserved sliced almonds and pistachios. You can also sprinkle a few dried rose petals on top for a festive look. Serve the phirni chilled and enjoy the creamy, delicate flavors.
Tips for Texture and Flavor
Consistency of Rice: Grind the rice coarsely, not into a fine flour. A slightly grainy rice powder gives phirni its signature texture – creamy yet with a bit of body. If the rice is too finely ground, the pudding can become pasty; too coarse and it might be gritty, so aim for a happy medium.
Slow Cooking: Patience is key. Cook the phirni on a low flame and stir regularly. Slow cooking allows the milk to reduce and the flavors to concentrate, resulting in a richer taste. A heavy-bottomed pan is recommended to prevent burning.
Use Full-Fat Milk: Traditional phirni uses whole milk for a creamy richness. Skim milk won’t give the same results. For an extra indulgent version, you can even replace a portion of the milk with evaporated milk or add a couple of tablespoons of condensed milk, but the classic recipe is wonderful as is.
Flavor Enhancements: Saffron and cardamom are the classic flavorings – don’t skimp on them. Always bloom the saffron in warm milk before adding, to extract maximum color and aroma. If you don’t have saffron, a few drops of rose water or kewra (screw pine) essence can be added at the end of cooking for an aromatic twist.
Avoid Lumps: To prevent lumps, remember to stir the ground rice into milk slowly and whisk as you go. Creating a slurry with a bit of milk (as mentioned in the steps) is a handy trick to ensure a smooth result. If at any point you find lumps, you can also whisk vigorously or use an immersion blender briefly (off the heat) to smooth the pudding.
Sweetness Check: Phirni is meant to be sweet but not cloying. Taste the cooked mixture and adjust sugar if needed before setting it to chill. Keep in mind the cold temperature will slightly mellow the sweetness.
Serving and Storage Suggestions
Traditional Serving: For the most authentic experience, serve phirni in clay bowls. These bowls, called sakoras or matkas, not only look charming but also help thicken the dessert by absorbing moisture and add an earthy aroma. If you have them, soak the clay bowls in water for 30 minutes before use, which helps keep the phirni cold and prevents the bowls from drawing out too much liquid.
Garnish: Always top phirni with chopped nuts like almonds and pistachios for a lovely crunch that contrasts with the creamy pudding. Edible rose petals or a small sheet of edible silver leaf (chandi varq) can be added during festivals or weddings to make it look royal. A pinch of saffron strands on top of each bowl not only looks beautiful but hints at the flavor inside.
When to Serve: Phirni is best served chilled. Make it ahead of your event – it actually tastes better after a few hours as the flavors meld together. It’s a perfect dessert for festive occasions like Diwali, Eid, or family celebrations, and also a refreshing summer treat.
Storage: Keep phirni refrigerated until serving. If covered and kept cold, it stays fresh for about 2 to 3 days in the fridge. For longer storage, you can freeze phirni for up to a week, but the texture might turn slightly grainier upon thawing. Always store it in a well-sealed container or cover the bowls with cling film to prevent the pudding from absorbing any fridge odors.
Leftover Ideas: If you somehow have leftover phirni (which is rare in our home!), you can use it as a stuffing for pancakes or toast the next day for a fun fusion dessert. But generally, every last bit of this delicious pudding gets scraped clean from the bowl!
Enjoy your traditional homemade Phirni, and happy feasting! 😋
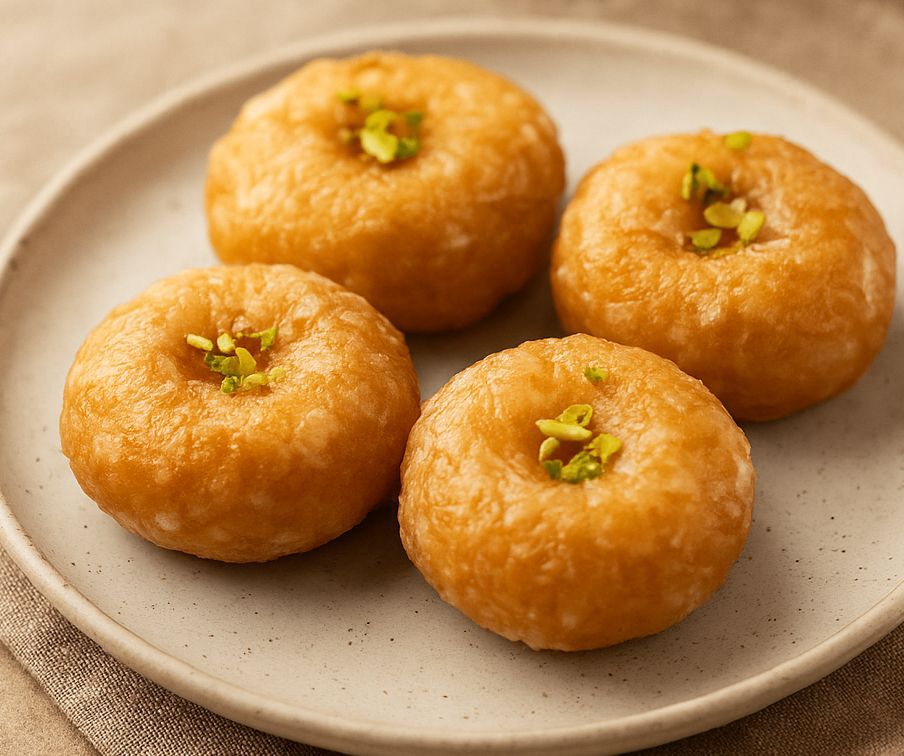
Balushahi is a dessert that instantly transports me back to childhood Diwalis and family weddings. I remember the crunch of its sugar-glazed exterior and the soft, syrup-soaked interior with each bite. In many Indian households, recipes like Balushahi are heirlooms passed down through generations, evoking warm memories of grandmothers patiently frying these treats in ghee. Indeed, Balushahi holds a special place in celebrations – its appealing flakiness and rich taste make it an integral part of Diwali, Holi, weddings, and other festive occasions.
Often dubbed the “Indian doughnut” for its shape, Balushahi (known as Badusha in South India) is similar to a doughnut only in looks, but differs in texture and taste – it’s much denser, crispier, and richly infused with ghee and cardamom syrup. This traditional North Indian mithai (sweet) is usually prepared for auspicious events and even offered as prasad (sacred offering) in temples. From grand wedding dessert spreads to Diwali sweet boxes, Balushahi’s presence is a symbol of celebration and nostalgia. Its Mughal-era origins and enduring popularity across India speak to its timeless appeal. Get ready to learn how to make this flaky, golden delight at home, and bring a taste of festive nostalgia to your kitchen!
Saffron strands – a pinch (optional, for aroma and color)
Lemon juice – 1/2 teaspoon (a few drops, to prevent crystallization of syrup)
For frying & garnish:
Ghee or oil for deep-frying – about 2 cups (enough for ~2-inch depth in pan)
Nuts for garnish – 2 tablespoons chopped pistachios or almonds (optional)
(Makes about 12–15 Balushahi)
Step-by-Step Instructions
1. Cream the ghee and yogurt: In a mixing bowl, add the semi-solid ghee. Using a spoon or whisk, beat the ghee vigorously for a few minutes until it becomes light, smooth, and fluffy. The ghee will turn a pale cream color as air incorporates. Add the chilled yogurt to the creamed ghee and whisk them together until well combined and silky. This step of “creaming” the ghee with curd is crucial for the Balushahi’s flaky texture.
2. Combine dry ingredients: Sift the all-purpose flour into the bowl with the ghee-yogurt mixture. Add in the baking powder, baking soda, and salt. Gently mix the dry ingredients with the ghee-yogurt base using a spatula or your fingertips. The mixture will start to resemble coarse crumbs (similar to a pie crust or biscuit dough).
3. Form a soft dough: Sprinkle cold water a few tablespoons at a time into the flour mixture. Use light hands to bring the mixture together into a dough – do not knead vigorously. Add just enough water (around 7–9 Tbsp in total) so that the dough holds together and is soft but not sticky. It should form a ball that might have slight cracks (that’s okay). Over-kneading will develop gluten and make the Balushahi tough, so simply gather the dough until it just comes together. Cover the dough and let it rest for about 15 minutes at room temperature (this resting period helps hydrate the flour and gives a better texture).
4. Shape the Balushahi: After resting, divide the dough into small portions. For medium-sized Balushahi, each portion can be about the size of a ping-pong ball (roughly 2 tablespoons of dough). Smooth each portion between your palms and then press your thumb in the center to make a deep indent (doughnut-like shape). The disc should be about 2 inches wide and not too thick. The indentation in the middle ensures the inside cooks evenly. If the dough cracks at the edges while shaping, just smooth them gently – small cracks are fine and will contribute to the flaky layers.
5. Deep-fry on low heat: Heat the ghee or oil in a deep, heavy-bottomed kadai or pan over low to medium-low heat. To test the temperature, drop a tiny pinch of dough into the oil – it should slowly rise to the surface without turning brown immediately. Slide in 3–4 shaped Balushahi at a time, careful not to overcrowd the pan (frying too many can cool the oil and lead to uneven cooking). Fry slowly and patiently – the Balushahi will sink then float up as they cook. Keep the flame low: it will take several minutes for each side to turn a rich golden brown. Avoid the temptation to increase heat, as high heat will brown the outside too fast while leaving the inside undercooked. You can gently flip them occasionally for even coloring. It usually takes about 8–10 minutes per batch for them to fry to a beautiful golden hue. Tip: If you notice the oil getting too hot (sweets darkening too quickly), briefly lift the pan off the stove or lower the heat to regulate the temperature. Once the Balushahi are crisp and golden, remove them with a slotted spoon, allowing excess oil to drain, and set them aside on a plate. Continue frying the remaining batches in the same way.
6. Prepare the sugar syrup: While the Balushahi are frying (or immediately after frying, using the still-warm stove), start making the syrup. In a saucepan, combine the sugar and water. Heat on medium, stirring until the sugar completely dissolves. Once it dissolves, add the crushed cardamom and saffron strands to the syrup. Bring the syrup to a gentle boil and then reduce to a simmer. Simmer until it reaches one-string consistency: this means if you dip a spoon and let a drop of syrup cool a bit, it should feel sticky between your fingers and form a single thread when pulled apart. (You can also test by dropping a bit of syrup from the spoon – the last drop should form a thin thread). This stage is usually reached when the syrup thickens slightly and turns glossy. Be vigilant and do not over-boil – we want a syrup that is sticky but still liquid, not a hard caramel. Stir in the lemon juice toward the end of boiling (this helps prevent sugar crystallization). Once one-string consistency is reached, turn off the heat. Note: It’s important to keep the syrup warm; if it cools and thickens too much before use, you can reheat it gently with a splash of water.
7. Soak the fried Balushahi: Make sure your syrup is hot or warm (reheat if it has cooled). Now, gently place the fried Balushahi into the warm sugar syrup. If your pan is wide, you can soak several at once without overlapping (or do this in batches if needed). The syrup should cover them or you can spoon syrup over the top of each. Let each Balushahi soak for about 2–5 minutes per side. Flip them halfway through to ensure both sides absorb the syrup evenly. They will not get as soft as something like a gulab jamun – instead, they’ll drink in just enough syrup to coat the outside and impart sweetness inside. After a few minutes of soaking, they’ll become glossy and slightly heavier.
8. Garnish and cool: Using a fork or slotted spoon, carefully lift each Balushahi out of the syrup, allowing excess syrup to drip off. Place them on a plate or tray lined with parchment or a rack. While they are still sticky, garnish the tops with chopped pistachios or almonds (the nuts will stick to the syrupy glaze). Allow the Balushahi to cool down to room temperature. As they cool, the sugar syrup on the outside will set into a fine white sugary coating that gives that characteristic slight crunch. The inside will remain soft and moist. Your Balushahi are now ready to serve!
Tips for Achieving the Perfect Texture
The hallmark of a great Balushahi is a crisp, flaky exterior with a soft, tender inside that’s fully cooked and lightly infused with syrup. Keep these tips in mind to get that perfect texture:
Don’t over-knead the dough: Mix just until the ingredients come together, and avoid developing too much gluten. A gently combined dough yields a flaky, melt-in-mouth Balushahi, whereas over-kneading can make it hard or bready. Let the dough rest before shaping to relax it.
Shape with a dent: Always form a dimple or hole in the center of each dough round. Making the Balushahi with an indentation (and not too thick overall) ensures it cooks evenly all the way through. If it’s a solid ball with no dent, the inside might remain undercooked. This little trick helps achieve that delicate, fully cooked interior.
Slow fry at low heat: Patience is key when frying. Cook the Balushahi on low to medium-low heat rather than high. It should bubble gently in the oil, not aggressively. Slow frying gives it time to cook through to the center and develop that signature flaky crust. The result is a golden, crisp outside and a thoroughly cooked soft inside – much like how traditional halwais (confectioners) do it. Also, fry in small batches; adding too many at once can drop the oil temperature. Maintain an even heat for uniform frying.
Perfect sugar syrup absorption: For a Balushahi that is sweet yet not soggy, get the sugar syrup right. Simmer the syrup to a one-string consistency and keep it warm – this way, the Balushahi will readily absorb a thin coating of syrup without turning mushy. If the syrup is too thick (beyond one-string), it won’t soak in; too thin and it could make the sweets overly soft. Soak the fried Balushahi in warm syrup for a few minutes on each side. A warm, correctly prepared syrup infuses just the right amount of sweetness and gives that subtle sheen on the outside.
Serving and Storage
Serving: Balushahi is best enjoyed at room temperature once the sugar glaze has set. The outside will be crisp and sweet, while the inside remains soft and slightly flaky. They make a delightful addition to any festive spread – serve them on a decorative platter, perhaps lined with festive foil or banana leaf. You can even garnish with a touch of varq (edible silver leaf) on top of each for an authentic royal touch. Balushahi pairs wonderfully with a cup of masala chai or as a dessert after a traditional Indian meal. During festivals like Diwali, you can serve Balushahi along with other sweets and snacks as part of the celebrations, or pack them in boxes as a sugary gift for friends and family.
Storage: Once completely cooled, store the Balushahi in an airtight container at room temperature. They have a good shelf life and actually taste even better a day later, as the syrup has fully penetrated. In a cool, dry place, they stay fresh for about 5 to 6 days without refrigeration. (In fact, the high sugar content acts as a preservative.) Be sure to keep them away from humidity to prevent the sugar from melting. Avoid refrigerating Balushahi, as this can cause the sugar to crystallize and the texture to harden. If you need to store them longer than a week, you might refrigerate in a pinch and then allow them to come to room temperature before eating, but fresh is always best. Enjoy this indulgent treat as a make-ahead sweet for festivals – it’s a joy to bite into a Balushahi and savor the celebratory spirit it brings!
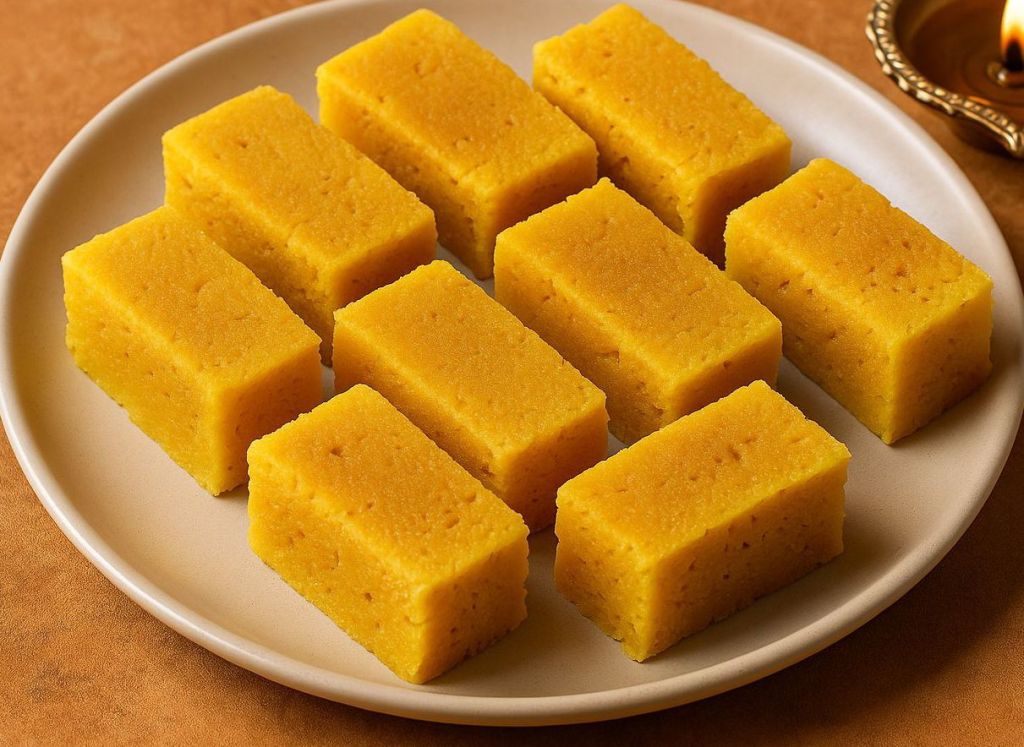
A plate of golden Mysore Pak pieces with a festive oil lamp on the side, showcasing the signature porous texture. I remember the warm glow of clay lamps dancing on the walls during Diwali, and the irresistible aroma of Mysore Pak wafting from my grandmother’s kitchen. This classic sweet – made from besan (gram flour), sugar, and ghee – was always the star of our festive spread. My grandmother would often recount how Mysore Pak was first concocted in a Mysore palace kitchen by a resourceful royal cook for the king. Every bite of this Karnataka specialty tastes like history and festivity combined, with a texture that is porous yet soft-firm, crumbling lightly and then melting in the mouth. In this post, I’ll share the traditional Karnataka-style Mysore Pak recipe (the one with the classic porous texture, not the super-soft version), along with tips, memories, and a bit of festive nostalgia.
Ingredients
Here’s what you need to make Mysore Pak at home. This recipe sticks to the traditional method using a mix of ghee and oil to achieve that porous texture:
Besan (Gram Flour) – 1 cup (about 120 g), sieved to remove lumps.
Sugar – 1¾ cups (350 g) granulated sugar. (You may reduce to ~1½ cups for a less sweet version, but using the full amount gives the authentic texture.)
Water – ½ cup (120 ml), for the sugar syrup.
Ghee (Clarified Butter) – 1 cup (240 ml), plus a teaspoon extra for greasing the tray. Use good quality pure ghee for best aroma.
Oil – ½ cup (120 ml) neutral oil, preferably peanut oil. (Using oil along with ghee is key to getting a light, airy porous structure in traditional Mysore Pak. Don’t worry – good quality oil won’t leave any smell.)
Cardamom – 3 green cardamom pods, seeds crushed (or ¼ teaspoon cardamom powder) for flavor (optional).
Preparation: Grease an 8-inch square pan or plate with a bit of ghee and set it aside. Measure and have all ingredients ready before you start, because the process moves quickly once you begin cooking.
Instructions
Follow these step-by-step instructions to make Mysore Pak. Remember to be cautious and stir continuously – the hot sugar syrup and ghee mixture can bubble vigorously.
1. Sieve the Besan: In a mixing bowl, sift the besan (gram flour) at least twice to break up any lumps. This ensures a smooth mixture later. (Tip: Traditional Mysore Pak doesn’t require pre-roasting the besan; it will cook in the hot syrup, so sieving is enough to remove raw lumps.)
2. Prepare the Ghee+Oil and Sugar Syrup: In one heavy-bottomed kadai (pan), begin heating the ghee and oil together on low heat (Burner 1). In a separate wide pan, combine sugar and water and bring to a boil on medium heat (Burner 2). Stir the sugar syrup until all the sugar dissolves.
3. Cook to One-string Consistency: Boil the sugar-water mixture, stirring occasionally, until it reaches a one-string consistency – this is when a drop of syrup between your thumb and finger pulls into a single thread. (This stage is crucial: the sugar syrup, known as paaka, is the foundation of Mysore Pak’s texture.) Once one-string consistency is reached, keep the syrup on low-medium heat so it continues to bubble gently.
4. Add Besan to Syrup: Quickly but carefully sprinkle the sieved besan into the bubbling syrup in 2-3 batches, stirring vigorously with a spatula as you add it. Ensure there are no lumps – the mixture should be smooth. (Adding the flour gradually while the syrup is boiling prevents clumping.) Cook this besan-syrup mixture on medium heat. You’ll notice it thickens and starts to froth.
5. Incorporate Ghee and Oil in Batches: Now, take the hot ghee-oil mixture from Burner 1. Add one ladle of hot ghee/oil into the besan-syrup mixture and stir continuously. The mixture will sizzle and bubble up lively as the hot fat hits it. Stir until that ghee is fully absorbed and the mixture looks uniform. Repeat this process, adding one ladle of hot ghee-oil at a time and stirring well after each addition. Each addition will cause the mixture to froth and become airy. Continue until almost all the ghee+oil is incorporated. (Keep a few tablespoons of hot ghee/oil reserved in case needed, but you might not use it all.)
6. Watch for the Porous Frothy Stage: As you keep stirring, the mixture will turn glossy and start to lighten in color. After the last addition of ghee, cook a bit more until the whole mass thickens and starts to leave the sides of the pan. You will see the mixture turning very bubbly/foamy with lots of tiny holes (“pores”) appearing. It will also start to come together into one lump and you might hear a faint hissing sound. This is the critical moment – the Mysore Pak is ready to set. (If you stir a few seconds too long here, it can get overcooked; a few seconds too little and it might be slightly soft, so stay focused.)
7. Turn Off and Transfer: The instant you see the mixture looking porous, frothy, and starting to separate from the pan, turn off the heat. Do not add any more ghee at this stage – if you do, it won’t absorb and will make the sweet greasy. Immediately pour the hot mixture into your greased pan. Do not shake, press, or flatten it too much; simply tilt the pan if needed to spread it evenly. (Avoid smoothing out the top with a spatula – leveling it firmly can collapse the air pockets that create the porous texture.)
8. Cool and Cut: Let the slab of Mysore Pak cool for about 5–10 minutes. It should start to set but still be warm to touch. Using a sharp greased knife, gently cut into squares or diamonds (classic shape) while warm. Wiping the knife with a bit of ghee helps to get clean cuts. Allow the pieces to cool completely in the pan – as they cool, they will firm up to the perfect soft-yet-firm consistency. Once fully cooled, lift out the pieces and enjoy!
Tips for Perfect Porous Texture
Getting Mysore Pak right can be tricky, but these tips and tricks will help you achieve that ideal porous, soft-firm texture:
Maintain Ingredient Ratios: The proportion of sugar and ghee/oil is key to texture. Don’t skimp on ghee, and use at least a 1.5:1 ratio of sugar to besan. If you significantly reduce sugar or fat, the Mysore Pak may turn soft like a fudge or come out too brittle. (Traditional recipes often use equal parts besan and sugar, or even more sugar, to get the proper crystallization.)
Use Ghee and Oil: Using a mix of ghee and a bit of oil gives Mysore Pak its light, porous structure. Oil has a higher smoke point and helps create tiny air bubbles as moisture escapes, yielding an airy texture. Don’t worry, the final sweet won’t taste oily (especially if you use a flavorful peanut oil) – it will still be rich in ghee aroma.
Sugar Syrup Mastery: Achieving the correct paaka (sugar syrup consistency) is crucial. One-string consistency means the syrup is neither too thin (which would make the sweet soft or not set) nor too thick (which could make it hard). This stage ensures the Mysore Pak sets with the right firmness and melt-in-mouth feel. Use a heavy pan and medium heat so you don’t overshoot the syrup stage.
Constant Stirring: Once you start adding besan and ghee, stir continuously and briskly. This prevents lumps and ensures even cooking. It also helps distribute the ghee, allowing it to cook the flour and create the hallmark “holes” without any part catching on the bottom.
Timing is Everything: Toward the end, keep a close eye. The moment the mixture turns frothy with porous bubbles and starts to leave the pan, remove it from heat. A few seconds can make the difference between a perfect Mysore Pak and an overcooked one. It’s better to err on the side of slightly under than over – the mixture continues to cook for a bit even after you turn off the stove due to residual heat.
No Pressing Down: When you pour the mixture into the tray, do not press it flat or bang the tray too hard. Minimal spreading is fine, but pressing will compact it and you’ll lose that airy texture. Just pour and let it settle naturally; it will set into a porous slab.
Optional Enhancements: You can stir in the crushed cardamom just as you turn off the heat for a lovely aroma. Some traditional cooks also add a tiny pinch of baking soda right before pouring to enhance porousness (the soda releases extra bubbles), but this isn’t necessary if your technique is good.
Practice Makes Perfect: Don’t be discouraged if your first attempt isn’t perfect. Mysore Pak is famously temperamental – even seasoned cooks take a couple of tries to master the timing and consistency. Every stove and pan is different, so if at first you get a softer burfi or a harder candy, note what might have gone wrong (heat too high, syrup under/overcooked, etc.) and try again. The result is worth it – homemade Mysore Pak has a fresh aroma and authenticity that’s hard to beat!
Serving Suggestions and Shelf Life
Mysore Pak is a festive delight often made for Diwali, weddings, and special occasions. Here’s how you can enjoy and store it:
Serving: Serve Mysore Pak at room temperature. It’s perfect on a festive platter alongside other Indian sweets, or simply on its own with a cup of hot chai or filtered coffee. The pieces have a beautiful golden color and porous look that invites you to take a bite. Because it’s quite rich, you can serve small squares – a little piece goes a long way in flavor. For a special touch, garnish the serving plate with a few toasted nuts or a sprinkle of crushed cardamom to complement the Mysore Pak (though the traditional version is plain).
Gifting: In South India, Mysore Pak is often called the “king of sweets” and is a popular choice for gifting during Diwali and other festivals. You can pack the pieces in decorative boxes – the sweet’s long shelf life makes it travel-friendly and great for sharing.
Storage: Once the Mysore Pak has fully cooled and been cut, store the pieces in an airtight container. It keeps well at room temperature for 2 to 3 weeks, and in fact can last up to about a month without refrigeration if stored properly in a cool, dry place. (The low moisture and high sugar/ghee content act as natural preservatives.) Avoid refrigerating, if possible, as refrigeration can sometimes make the texture denser or cause the sugar to crystallize. Always use a clean, dry spoon or hands to take out pieces, to prevent introducing moisture. Pro tip: If you see the Mysore Pak releasing a bit of ghee while stored, don’t worry – just blot gently with a paper towel. This is normal for homemade ghee sweets and doesn’t affect the taste or shelf life.
Enjoy! This traditional Mysore Pak, with its porous texture and rich aroma, is more than just a sweet – it’s a bite of Karnataka’s heritage and the memories of celebrations. Whether you’re making it for a festival or just to satisfy a sweet craving, I hope this detailed guide helps you create a melt-in-the-mouth Mysore Pak that earns you rave reviews. Happy cooking, and Happy Festivities! 🎉
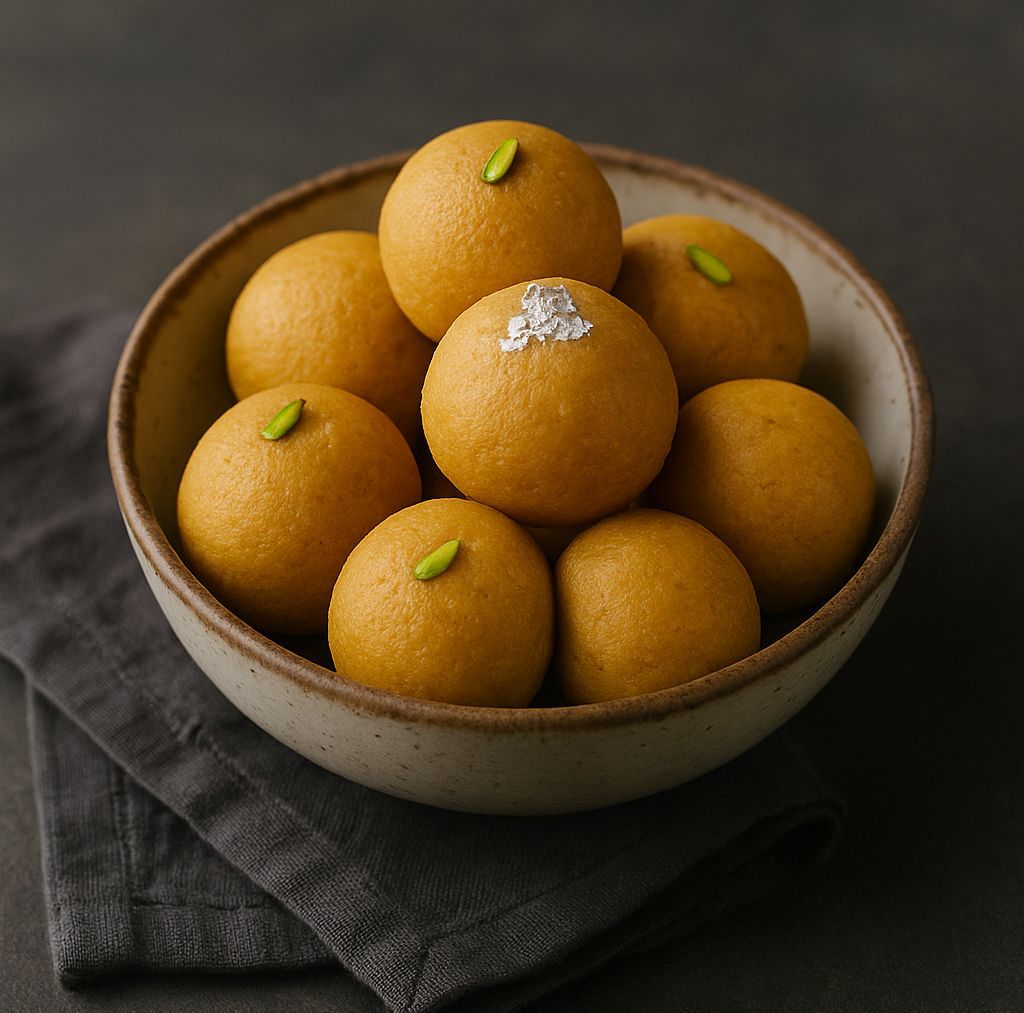
Growing up, Raksha Bandhan was always a day filled with laughter, love, and homemade sweets. I still remember waking up to the aroma of simmering milk and saffron wafting through our home as my mother prepared fresh peda in the early morning. Peda (also known as doodh peda or mawa peda) are traditional Indian milk fudge sweets that have graced festive tables for generations. Originating from Mathura, these creamy, cardamom-kissed confections have become a staple for celebrations across India.
On Raksha Bandhan – the festival celebrating the bond between brothers and sisters – exchanging sweets is as important as the sacred rakhi thread itself. My sister and I would team up in the kitchen to make Kesar Malai Peda for our brothers. The term “Kesar” means saffron, and “Malai” means cream – together they signify the rich, luxurious flavor of this peda. We’d stir the milk powder and cream mixture patiently, excitedly waiting for it to turn into soft khoya (milk solids). I can never forget how special it felt to shape the warm dough into pedas, garnish them with vibrant saffron strands and pistachios, and present them to my brothers as a homemade token of love. The saffron-infused golden color of these pedas always reminded me of the auspiciousness of the occasion.
A batch of homemade Kesar Malai Peda, garnished with pistachios and saffron, ready to be enjoyed during Raksha Bandhan.
Fast forward to today, I carry on that tradition in my own kitchen. This instant Kesar Malai Peda recipe is a quicker take on the classic – perfect for busy festival days when you want a delicious sweet without spending hours in the kitchen. Traditionally, peda is made by slowly simmering milk for hours to create mawa or khoya, then adding sugar and flavorings. But with this quick recipe, we shortcut the process using milk powder and heavy cream to mimic that rich khoya in minutes. The result is a melt-in-your-mouth peda that tastes just like the traditional version – creamy, slightly grainy, and scented with cardamom and saffron. It’s amazing how a handful of simple ingredients can come together so quickly to create something so festive and delightful.
Whether you’re making these pedas to share with your siblings on Rakhi or to gift to friends and family, the process itself is filled with joy. So, let’s get started on this warm, nostalgic journey of crafting Kesar Malai Peda at home!
Saffron strands (kesar) – A generous pinch (about 15–20 strands)
Milk – 1 tablespoon (warm, for soaking saffron)
Green cardamom powder – 1/2 teaspoon (freshly ground from about 4–5 pods for best aroma)
Chopped pistachios or almonds – 2 tablespoons (for garnishing, optional)
Notes on Ingredients: The combination of milk powder and heavy cream forms an instant mawa (milk solids) base for our peda, saving hours of traditional simmering. Saffron lends a beautiful golden hue and delicate aroma, while cardamom provides warm, classic flavor. Ghee is used to enrich the mixture and to grease your palms for easy shaping. Feel free to use full-fat dairy for the creamiest peda. If you have mawa/khoya available, see the Variations section for using that directly.
Step-by-Step Instructions
1. Soak the Saffron: In a small bowl, soak the saffron strands in 1 tablespoon of warm milk. Set this aside to bloom while you prepare the peda mixture. (This helps extract maximum color and flavor from the saffron.)
2. Begin the Mixture: In a heavy-bottomed non-stick pan, melt 1 tablespoon of ghee over low heat. Once the ghee is warm, pour in the heavy cream and stir for a minute until the cream is just slightly warm (do not boil).
3. Add Milk Powder: Gradually add the milk powder to the warm cream, stirring continuously to prevent any lumps. It will form a smooth, thick batter-like consistency as the milk powder absorbs the cream. Tip: Use a spatula to scrape the sides and bottom of the pan regularly, so nothing sticks or scorches.
4. Cook into Khoya: Continue to cook this mixture on low to medium-low heat, stirring constantly. In about 8–12 minutes, it will begin to thicken and come together like a soft dough or lump (instant khoya). Keep the heat gentle – the mixture should not brown, just cook until it starts to leave the sides of the pan and you have a moist dough that can hold its shape. The texture will be somewhat lumpy or grainy, which is perfect.
5. Flavor with Saffron & Cardamom: Once the mixture has reached a soft dough stage, reduce the heat to low. Add in the soaked saffron along with the milk it’s in, and sprinkle the cardamom powder over the mixture. Stir well to incorporate; you’ll see the dough turn a lovely golden hue from the saffron. Cook for another 1–2 minutes on low heat to let the saffron and cardamom infuse into the dough. Optional: You can also add 1 more teaspoon of ghee at this stage for extra gloss and richness (especially if the dough looks very dry).
6. Cool the Mixture: Turn off the heat and transfer the peda mixture (khoya dough) to a plate. Spread it out a bit and let it cool until it is warm-lukewarm but not hot to the touch. This cooling step is important – if the mixture is too hot when you add sugar, the sugar will melt and make the dough runny or sticky. Give it about 5–10 minutes to cool down. It should still be pliable, just comfortably warm.
7. Add Sugar and Knead: Once the dough is lukewarm, add the 1/2 cup of sugar. Using your hands (grease them with a bit of ghee first), knead the sugar into the dough thoroughly. At first it might seem dry or crumbling, but keep kneading; the sugar will blend in and the dough will become soft and smooth. Tip: Knead just until everything is well combined and the dough is coming together – over-kneading isn’t needed. The final peda “dough” should be soft yet firm enough to hold shape, with a slight grainy texture (danedar) from the milk solids. (If the mix feels too dry/crumbly and isn’t coming together, sprinkle a teaspoon of warm milk or cream and knead again. If it feels too sticky or soft, you can add a spoonful of milk powder or almond powder to adjust. Avoid the temptation to reheat the dough at this point, as that can make the pedas hard or chewy.)
8. Shape the Pedas: Grease your palms with a little ghee. Pinch off small portions of the dough (about the size of a large marble or walnut). Roll each portion between your palms to form a smooth ball. Gently press the ball to flatten it into the classic peda shape – a thick disc. If you like, use your thumb to make a small indent in the center of each peda (this is traditional and also a nice spot to nestle a nut or saffron strand). You can also use decorative peda molds or cookie stamps to emboss designs on the pedas for a festive touch, but this is optional. (As one popular tip suggests, having a peda press can make them look uniform and fancy, but it’s not mandatory – shaping with hands works just as well.)
9. Garnish: Press a sliver of chopped pistachio or almond in the center of each peda for garnish. You can also place an extra strand of saffron on top of each peda to highlight the saffron flavor. The garnishes not only make the pedas look inviting but also add a nice little crunch and contrast of color.
10. Set and Serve: Allow the Kesar Malai Pedas to set at room temperature for 15–20 minutes. As they cool completely, they will firm up slightly. Now your pedas are ready to enjoy! Serve them fresh at room temperature for the best soft, melt-in-mouth texture.
Serving & Gifting Suggestions
Serving: Kesar Malai Peda is best served at room temperature. Arrange the pedas on a decorative plate or mithai platter. They make a wonderful dessert after a festive meal or a sweet accompaniment to your afternoon chai. The saffron and cardamom flavors truly shine when the pedas are not too cold, so if you’ve stored them chilled, let them sit out for a few minutes before serving.
Gifting: These pedas are a beautiful homemade gift, especially for Raksha Bandhan. Place each peda in a small cupcake liner or butter paper cup to prevent sticking, and arrange them in a decorative gift box. Tie the box with a ribbon – perhaps alongside a handwritten note or a rakhi – for a personal touch. The golden-yellow pedas flecked with green pistachios look as delightful as they taste, making them perfect for gifting to siblings, relatives, or friends to show your love.
Festive Presentation: For a special Rakhi presentation, you can include the pedas as part of a Raksha Bandhan thali. On a thali (plate), place the pedas alongside the rakhi, a small diya (lamp), rice grains and kumkum (for the tikka), and perhaps a few other sweets. It creates a beautiful, traditional arrangement to carry out the Rakhi ceremony. The pedas can be offered as prasad (sacred offering) after the rakhi tying ritual, symbolizing the sweetness of the sibling bond.
Storage: Kesar Malai Pedas will stay fresh for about 3 to 4 days at room temperature (in cooler weather) and up to 1 to 2 weeks refrigerated. Store them in an airtight container so they don’t dry out. If refrigerating, bring them to room temperature before serving for the best texture. (Although, I’ll admit, in my house these pedas rarely last beyond a day because everyone finishes them off quickly!) For longer storage, refrigeration is recommended, especially in warm climates, to keep the dairy-based pedas fresh.
Optional Variations
While Kesar Malai Peda in its saffron-and-cream glory is a treat on its own, you can easily tweak this recipe or try different variations to suit your taste or ingredient availability:
Traditional Khoya Peda: If you have store-bought khoya (mawa) or want to make peda the traditional way, you can skip the milk powder and cream base. Instead, use about 250 grams of crumbled khoya. Heat 1 tablespoon ghee in a pan, add the khoya and cook on low flame for a few minutes until it softens and releases aroma. Then add sugar (start with 1/2 cup, adjust to taste) and the soaked saffron + cardamom. Cook until the mixture thickens and leaves the pan, just like in the main recipe. Let it cool and proceed to knead and shape. Using khoya yields an even richer dairy flavor and is the classic method. (In fact, many sweet shops make peda purely from khoya.) This variation is great if you want to experience the authentic Mathura peda made from milk solids.
Condensed Milk Version: For an ultra-quick method, you can replace sugar with sweetened condensed milk. Cook 1 cup milk powder with 1/2 cup condensed milk and 2 tablespoons cream (plus a bit of ghee) on low heat until it forms the dough. You won’t need to add sugar later since condensed milk is sweet. Add saffron and cardamom toward the end of cooking. This yields a very moist, fudgy peda. (Be sure to cook on low and stir constantly, as condensed milk can scorch easily.) Using condensed milk is a handy shortcut that also avoids any issues of sugar not dissolving.
Cardamom-Only Peda (Doodh Peda): If you prefer a simpler flavor or don’t have saffron on hand, you can omit the saffron entirely to make classic doodh peda. Follow the same recipe minus the saffron – you’ll have milky white pedas with just the fragrant elaichi (cardamom) flavor. These are just as delightful, with the cardamom’s warmth shining through. You can still garnish with nuts, or even add a tiny drop of yellow food color if you want the look of kesar without the saffron. Cardamom-only pedas are a bit more economical but no less traditional.
Flavor Twists: Beyond saffron and cardamom, pedas are quite versatile. You can knead a teaspoon of rose water or a few drops of kewra (screw pine) essence into the dough along with the sugar for a floral twist. For Chocolate Peda, divide the dough and mix a spoon of cocoa powder into half of it, then shape – kids love this dual-color treat. Another variation is Kesar Badam Peda – add 2 tablespoons of almond flour to the mixture (especially if it’s a bit soft; it also adds a nice nutty taste). Feel free to get creative with shapes and toppings: you can use silver vark (edible silver leaf) to adorn the pedas for a truly festive presentation.
Celebrating Raksha Bandhan with Homemade Sweets: There’s something truly special about making a traditional sweet at home for your loved ones. This Raksha Bandhan, as you tie the rakhi on your brother’s wrist (or give a warm hug to your sister), share a Kesar Malai Peda and relive those sweet childhood memories. The creamy richness of the peda, the aroma of saffron and cardamom, and the love with which it’s made — all of it embodies the spirit of Raksha Bandhan. I hope this recipe brings a bit of that warmth and festivity to your home. Enjoy these pedas with your family, and Happy Raksha Bandhan! 🎉🎊
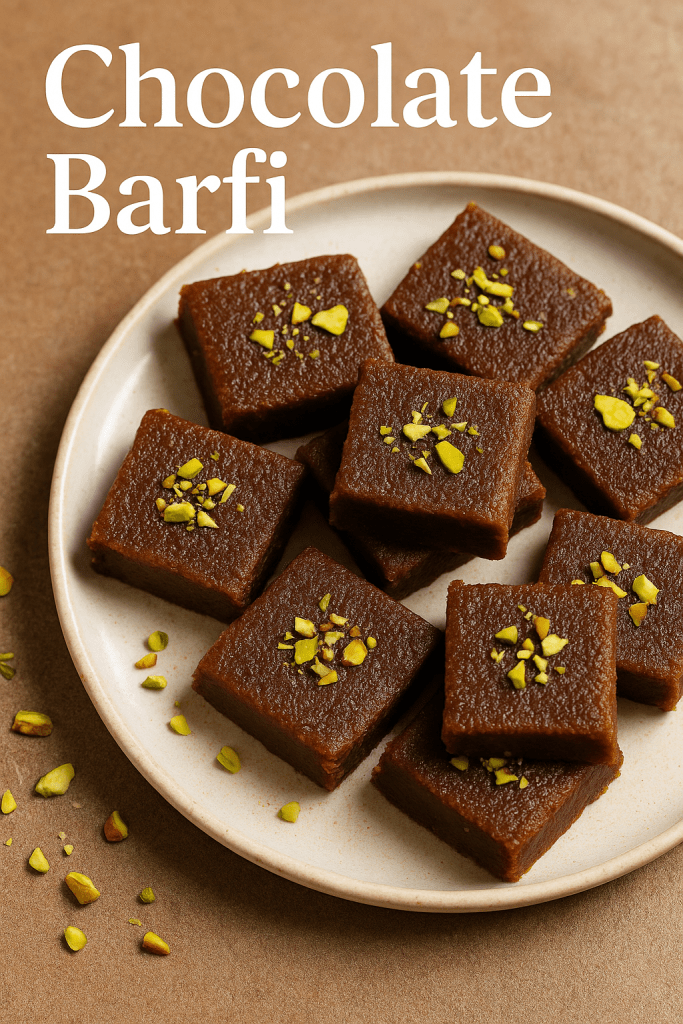
Growing up, Raksha Bandhan was always a day of laughter, friendly banter, and of course, sweets. I remember waking up to the aroma of simmering milk and sugar in our kitchen as my mom prepared homemade treats. After my sister tied a rakhi on my wrist and we exchanged gifts, she would lovingly feed me a piece of my favorite mithai (sweet). One year, to my delightful surprise, that sweet was Chocolate Barfi – an Indian fudge made with milk solids and sugar, jazzed up with cocoa. It was the perfect East-meets-West treat, combining the traditional milky richness of barfi with the irresistible allure of chocolate. From that Rakhi onward, chocolate barfi became our sibling tradition – a symbol of our sweet (and sometimes chocolatey!) bond.
*Festive Chocolate Barfi squares garnished with nuts and sprinkles – a perfect treat for Raksha Bandhan.*
Fast forward to today, I carry on the tradition by making Chocolate Barfi every Raksha Bandhan. This recipe is a quick version that uses milk powder instead of the traditional khoya (milk solids), significantly cutting down the cooking time without compromising taste. The result is a fudge-like barfi that sets into firm, chocolaty squares – ideal for gifting or serving to family during the festivities. And trust me, it’s always a hit! Chocolate barfi has become a favorite of both kids and grown-ups in recent years, proving that sometimes a modern twist on a classic sweet can create new festive memories alongside the old. So, let’s get started on this easy recipe and add a little extra sweetness to your Raksha Bandhan celebrations.
Ingredients (Makes about 8–10 pieces)
Milk Powder – 1¼ cups (unsweetened dairy milk powder). This acts as an “instant mawa,” giving the barfi its rich milky base.
Cocoa Powder – 3 tablespoons (unsweetened). This brings the chocolate flavor. Use good quality cocoa for the best taste.
Powdered Sugar – ½ cup. Powdered (confectioners’) sugar dissolves quickly, ensuring a smooth mixture. Adjust slightly to taste if you prefer a very sweet or less sweet barfi.
Milk – ¼ cup (whole milk). Helps to hydrate the milk powder and form a fudgy dough. (You can use full-cream milk for a richer result.)
Ghee (Clarified Butter) – ¼ cup. Provides moisture and a lovely aroma. Ghee brings the mixture together into a smooth barfi and adds richness. (Plus, a little extra for greasing the pan.)
Flavorings (optional): A pinch of cardamom powder for a traditional aroma, especially if you love a hint of Indian flavor with chocolate. You can also add ½ teaspoon of vanilla extract for a chocolate-vanilla vibe (optional).
Garnish: Chopped pistachios or almonds, or festive sprinkles/silver balls. Nuts not only add a pop of color and crunch but also make the barfi look festive. Sprinkles are fun if making for kids!
Step-by-Step Instructions
1. Prep the Pan: Grease a small square pan or plate with ghee and line it with parchment paper (for easy removal). Keep it ready before you start cooking, as the barfi mixture sets quickly. Also, measure all ingredients in advance – once you start cooking, things move fast!
2. Melt Ghee: In a heavy-bottomed non-stick pan, heat the ¼ cup of ghee on low flame. Let it melt completely but do not let it smoke.
3. Combine Milk & Powders: Add the milk powder and cocoa powder into the melted ghee. Stir them together thoroughly so that the ghee coats the powders. It will look like a moist crumbly mixture at first. Keep the flame low to avoid burning the milk solids.
4. Add Milk: Pour in the ¼ cup milk and immediately start stirring. The mixture will loosen up at first, then thicken as the milk powder absorbs the liquid. Stir continuously to avoid any lumps or sticking at the bottom. In about 2–3 minutes, it should come together into a thick, smooth paste.
5. Sweeten the Mixture: Add the ½ cup of powdered sugar. The heat should remain low. Mix it in; the sugar will melt and make the mixture a bit runnier initially. Continue to stir. After another 2–3 minutes, you will notice the mixture becoming glossy and thick again as it cooks.
6. Cook to Fudge Consistency: Keep stirring on low heat until the mixture thickens and starts to leave the sides of the pan. This takes roughly 5–7 minutes in total (from the time you added sugar) but can vary. You’ll see the mass clumping together; if you tilt the pan, it might even slide as one blob. To test doneness, drop a small bit on a plate or greased surface – it should set and not be runny. You can also roll a cooled bit between your fingers; it should form a soft ball that isn’t sticky. Do not over-cook – turn off the heat as soon as it reaches this stage, or the barfi may become dry or crumbly. (If you do overcook slightly and the mixture looks dry/crumbly, don’t panic – stir in 1–2 extra tablespoons of milk to rescue it.)
7. Flavor (optional): Once off the heat, quickly stir in the cardamom powder (if using) for an Indian touch. You can also mix in a few drops of vanilla extract at this point for extra flavor. The mixture will be thick, so mix fast and well.
8. Transfer and Set: Immediately transfer the hot barfi mixture into your prepared greased pan. Use a spatula (greased with a bit of ghee) to spread and press the mixture evenly into the pan. Flatten the top smoothly to your desired thickness (about ¾ inch thick is good for fudge-like squares).
9. Garnish: While the mixture is still warm and soft, sprinkle the chopped nuts or sprinkles on top. Gently press the nuts in so they stick. This not only adds festive color but also a nice crunch in each bite.
10. Cool and Cut: Let the barfi set at room temperature for at least 20–30 minutes, or until firm. (For faster setting, you can pop the pan in the refrigerator for 15–20 minutes). Once set, use a sharp knife to cut the barfi into squares or diamond shapes. Wipe the knife with a little ghee for cleaner cuts, if needed.
11. Serve and Enjoy: Gently lift the pieces out of the pan. Your chocolate barfi should hold its shape like soft fudge. Serve them on a decorative plate and enjoy! 🎊
Tips for Perfect Texture and Flavor
Low Heat & Constant Stirring: Always cook on low flame and stir continuously while making barfi. Milk and sugar can burn easily, so patience is key for a smooth texture. Use a heavy non-stick pan to prevent scorching.
Work Quickly with the Mixture: Once the barfi mixture thickens and leaves the pan sides, act fast. Turn off the heat promptly – overcooking can make it dry or grainy. Immediately transfer it to the tray because it will start setting as it cools. Smooth it out quickly before it hardens.
Know When It’s Done: The cue for doneness is when the mixture starts forming a mass and doesn’t spread like halwa. A quick test: take a small bit of the cooked mixture and roll it between greased fingers; it should form a soft ball that isn’t sticky. If it’s too sticky or loose, cook a minute longer. If it’s dry or crumbly, you’ve gone a bit far – fix it by mixing in a spoon of milk while still on low heat.
Use Powdered Sugar: Always use powdered (icing) sugar rather than granulated sugar for this recipe. Powdered sugar dissolves faster and helps the barfi set without needing extra liquid or time. This ensures a smooth, velvety texture with no graininess. (If you only have regular sugar, grind it in a mixer first).
Quality Ingredients: With such simple ingredients, quality makes a difference. Use a good-quality cocoa powder for a rich chocolatey flavor (cheap cocoa can taste flat or bitter). Likewise, using fresh ghee will impart a wonderful aroma to the sweet.
Extra Ghee for Softness: If you prefer a really melt-in-mouth barfi, you can mix in an extra tablespoon of ghee into the hot mixture. A bit more ghee makes the barfi even softer and creamier (especially helpful since cocoa can slightly dry the mixture). Don’t add too much, though – 1 or 2 tablespoons extra at most, or the barfi might be too soft to set.
Flavor Variations: While chocolate is the star, you can tweak the flavor. A tiny pinch of salt can enhance the chocolate taste (optional). For a mocha twist, add 1 teaspoon of instant coffee powder along with cocoa. Or swirl in a tablespoon of Nutella or melted chocolate at the end for extra richness. Just be cautious with extra liquids, as they can affect setting.
Layered Barfi Option: If you’re feeling adventurous, you can make a two-layer barfi (like some halwai shops do) – plain white layer and chocolate layer. Simply make a double batch of the mixture, leave half plain (with a bit of cardamom), and mix cocoa into the other half. Layer them and let set. It looks beautiful, though it’s a bit more work and needs quick hands to layer before setting!
Serving and Storage Suggestions
Raksha Bandhan is all about sharing sweetness, so serve this Chocolate Barfi with love. Arrange the pieces on a festive platter or Rakhi thali alongside the rakhi, roli, and diya. It’s traditional for the sister to offer a sweet bite to her brother right after tying the rakhi, symbolizing sweet wishes for his well-being. These chocolate barfi squares are perfect for that moment – they add a fun twist to the usual traditional sweets. You can also place them in colorful wrappers or mini cupcake liners for a neat presentation (and less sticky fingers for younger siblings!).
Chocolate Barfi also makes a thoughtful homemade gift. If your brother or sister has a sweet tooth, pack a dozen pieces in a decorative box tied with a ribbon. Barfi is an excellent choice for gifting because you can assort different flavors in one box and it stays fresh longer than cream-based desserts. Gifting a box of homemade barfi represents the affection and effort you put into celebrating your sibling – a sweet gesture in the literal sense!
Storage: In case you have leftovers (a rare case, honestly!), store the barfi in an airtight container. Because it is made with milk powder and milk, it’s best to refrigerate it for longer shelf life. It will stay good for about 1 to 2 weeks in the fridge – possibly even up to 2-3 weeks, though it’s so tasty it usually gets finished much sooner. For the best texture, bring refrigerated barfi to room temperature for 10-15 minutes before serving (this helps soften it back to fudgy). If you need to store it longer, you can freeze the barfi. Wrap the pieces in parchment and place in a freezer-safe box; they can last a couple of months frozen. Thaw in the fridge or counter before eating. Do note, freezing might make the texture a bit more crumbly when thawed, but the taste will still be delicious.
Finally, enjoy your Chocolate Barfi with your loved ones. It’s amazing how a simple sweet can evoke so many warm feelings and memories. Here’s wishing you a Happy Raksha Bandhan – may your day be filled with laughter, nostalgia, and plenty of chocolatey sweetness. Enjoy each bite of this homemade treat as you celebrate the special bond between brothers and sisters. ❤️
Growing up, Pineapple Kesari was more than just a sweet dish – it was a symbol of celebration in our home. I remember my grandmother patiently stirring a pot of semolina on the stovetop, as the aroma of ghee and cardamom filled the kitchen. She’d make this golden, velvety kesari whenever there was “something to celebrate” – be it a festival morning or just a surprise visit from relatives. Each spoonful felt like a warm hug, instantly transporting us to simpler times filled with family gatherings and festive music.
Pineapple Kesari is not just delicious but also visually inviting with its vibrant saffron hue. It’s often garnished with roasted cashews and raisins for extra texture, making it a feast for both the eyes and palate. This beloved South Indian dessert is commonly served during weddings and special functions, where its tropical pineapple flavor and rich aroma always stand out.
Pineapple Kesari (also known as pineapple sheera or kesari bath) is essentially a fruity twist on the traditional rava kesari. Kesari means saffron in many Indian languages, referring to the saffron strands that lend the dish its signature golden color and name. It’s a popular treat across South India – from Karnataka to Tamil Nadu – often prepared during festivals like Ugadi and other auspicious occasions. The addition of pineapple gives a delightful sweet-tart surprise in each bite, perfectly balancing the richness of ghee and the sweetness of sugar. No wonder it’s a favorite at many South Indian homes and celebrations!
½ cup fresh pineapple, finely chopped (use ripe pineapple for best flavor)
¾ cup sugar (adjust to your sweetness preference)
¼ cup ghee (clarified butter), divided
8–10 cashew nuts
1 tbsp raisins (optional)
¼ tsp cardamom powder (Elaichi)
A pinch of saffron strands (kesar) – soak in 2 tbsp warm water or milk
1½ cups water
Pinch of salt (optional, to balance sweetness)
Instructions:
1. Prep the Pineapple & Nuts: Heat 1 tablespoon of ghee in a pan on low heat. Add cashew nuts and fry until golden. If using raisins, toss them in for a few seconds until they puff up. Remove the nuts and raisins, set aside for garnish. In the same ghee, sauté the chopped pineapple for 2–3 minutes until it softens slightly (this helps release its juices and enhance flavor). Remove the pineapple and set aside.
2. Roast the Semolina: In the same pan, add another 1–2 tablespoons of ghee. Add the semolina (sooji) and roast on low-medium heat. Stir continuously until the rava turns aromatic and light golden. This step is key for a fluffy kesari – roasting prevents it from turning lumpy or sticky later. Once roasted, turn off the heat and keep the semolina aside.
3. Boil the Liquid: In a separate pot, bring 1½ cups of water to a boil. Stir in the saffron along with its soaking liquid, so the water turns a lovely yellow. (If you want an extra bright hue, you can add a tiny pinch of yellow food color, but saffron usually does the job.) Add the sugar to the boiling water and let it dissolve. You can also toss in a pinch of salt to elevate the sweetness. Once the sugar-water is boiling and slightly syrupy, add the sautéed pineapple pieces into it. Allow the pineapple to cook in the syrup for a minute.
4. Cook the Kesari: Reduce the heat to low. Gradually add the roasted semolina into the boiling pineapple syrup, stirring continuously with a spatula. Be careful – the mixture will bubble and thicken quickly. Stirring constantly helps avoid any lumps. Cook for about 4–5 minutes, until the semolina absorbs the liquid and the mixture starts to thicken into a pudding-like consistency.
5. Finish with Flavor: Once the kesari is thick and the semolina is cooked (no longer grainy), add the remaining ghee and the cardamom powder. Stir well to combine. You’ll notice the dessert becoming glossy as the ghee gets absorbed. Toss in half of the fried cashews and raisins, mixing them in. Cook for another minute until the kesari starts to leave the sides of the pan (it will easily slide off the pan when stirred). Turn off the heat.
6. Garnish and Serve: Pineapple Kesari is ready when it’s thick but still spoonable. Serve it warm, garnished with the reserved cashews and raisins on top. You can enjoy it as is, or spread it in a greased plate and cut into squares or diamonds once it sets slightly. Savor the kesari warm for the best melt-in-mouth texture, or at room temperature as a delightful afternoon sweet.
Variations:
Mix-and-Match Fruits: While pineapple gives a unique tropical twist, you can replace it with other fruits to make different kesari varieties. Rava kesari is often made with banana, mango, or even jackfruit for regional variations. Simply swap the pineapple with an equal amount of your fruit of choice (cooking times may vary slightly with different fruits).
No Fresh Pineapple? If fresh pineapple is not available, you can use canned pineapple tidbits. Just be sure to drain the syrup and perhaps reduce the sugar in the recipe, since canned pineapple is pre-sweetened. Pat the pieces dry and proceed – it works in a pinch! (For an intense pineapple aroma, a drop or two of pineapple essence can be added at the end, but use sparingly to avoid overpowering the dessert.)
Natural vs. Color: Traditional kesari often gets its hallmark color from a tiny pinch of food coloring, but using saffron threads not only colors the sweet naturally but also adds a delicate fragrance. If you don’t have saffron, you may use a pinch of kesar food color for that classic bright look. The taste remains delicious either way.
Richness & Vegan swaps: For extra richness, some like to cook the semolina in half milk and half water. However, with pineapple’s acidity, it’s best to stick to water to avoid curdling. To make this dessert vegan, swap out ghee with a neutral vegetable oil or vegan butter – the texture will be slightly different, but it will still come out tasty.
Sweetness Adjustments: The traditional ratio for kesari is 1:2 for rava to sugar, which makes it quite sweet. Feel free to adjust the sugar to your taste. You can go down to 1:1 ratio (semolina:sugar) for a milder sweetness. Likewise, you can increase or decrease the ghee quantity – more ghee yields a smoother, silkier kesari.
Storage & Serving Tips:
Make-Ahead and Storage: Pineapple Kesari stays good for 1–2 days at room temperature, and up to about 3–5 days when refrigerated in an airtight container. (Since this recipe doesn’t include milk, it has a better shelf life.) If you plan to store it, spread the kesari in a shallow dish – this helps it cool and set evenly.
Reheating: This dessert tends to firm up as it cools (the semolina will set into a semi-solid pudding). Don’t worry – simply warm it gently on the stovetop or in the microwave before serving. Add a teaspoon of water or milk while reheating to loosen it up, and stir well. Warming restores the soft, glossy texture and revives the flavors (always serve kesari slightly warm for the best experience).
Serving Suggestions: Pineapple Kesari is delightful on its own, but you can get creative. Serve it warm with a scoop of vanilla ice cream for a fusion twist, or with a savory upma on the side for a traditional South Indian “sweet and savory” combo. It’s commonly part of festive menus, often enjoyed as a dessert or even a special breakfast treat paired with khara bath (spicy upma) in Karnataka’s famous chow chow bath duo.
Bonus Tip: If your pineapple is a bit too tart, try this trick from experienced home cooks – toss the chopped pineapple with 1–2 tablespoons of sugar and let it sit for a couple of hours before cooking. This draws out the fruit’s juices and mellows its acidity, ensuring your kesari has a pleasant sweet pineapple taste without any tangy surprises.
Closing Note: Pineapple Kesari is more than just a dessert – it’s a dose of nostalgia served on a plate. Every family has its own little twist to the recipe, but the love and warmth it embodies remain the secret ingredients. Whether you make it for a festival, a family get-together, or simply to relive old memories, this pineapple-infused semolina pudding is sure to fill your home with a heavenly aroma and your heart with sweet joy. Enjoy each spoonful of this South Indian delight, and happy cooking!
Growing up, Diwali prep in our home meant a day dedicated to making Besan Ladoos. I remember my grandmother patiently roasting the besan (gram flour) in ghee over a low flame, never rushing the process. As she stirred, the nutty aroma of the slow-roasting besan combined with fragrant cardamom would waft through the entire house, drawing everyone into the kitchen. We kids sat nearby, waiting eagerly for a chance to taste the warm mixture before it was shaped into balls. Those moments – the warmth of the kitchen, the heavenly aroma, and the family gathered around – remain some of my sweetest childhood memories.
Festival of lights & sweets: In India, no celebration is complete without sweets, and Diwali is the time for homemade treats. Diwali (also known as Deepavali, literally “a row of lights”) signifies the triumph of light over darkness and good over evil. It’s a time filled with lamps, love, and of course, delicious traditional snacks and sweets. In our family, after the diyas (oil lamps) were lit and firecrackers burst in the night sky, we would exchange platters of goodies with neighbors – with Besan Ladoos always taking center stage. Golden, rich, and redolent of ghee and cardamom, these melt-in-your-mouth sweet balls symbolized the sweetness of togetherness. Each bite brings back a flood of nostalgia – the laughter of cousins, the glow of oil lamps, and the comfort of home.
Besan Ladoo is a humble sweet made from just a few pantry ingredients, yet it carries a legacy of love and tradition. Besan (chickpea flour) is gently roasted in ghee (clarified butter) until it turns a light golden brown and exudes a nutty fragrance. This roasted besan is then sweetened with sugar and perfumed with crushed cardamom seeds to form a delectable dough. Finally, it’s rolled into round ladoos (meaning balls or truffles) that hold their shape once cooled. Whether made for a festive Diwali spread or simply as an everyday treat, besan ladoos have a way of bringing the family together – from the eldest grandparent relishing it with a cup of chai to the youngest child sneaking an extra one from the jar.
Ingredients
Minimal ingredients are needed to make these traditional ladoos – proof that simple things can be most delightful:
Besan (Gram Flour) – 2 cups, preferably fine grind (or ladu besan). This is the base of the sweet. (You can also mix half fine and half coarse besan for a slightly gritty texture, but fine besan yields a smooth, melt-in-mouth ladoo.)
Ghee (Clarified Butter) – 1/2 cup, plus 1–2 tablespoons extra if needed. This imparts richness and moisture, and is used for roasting the besan.
Sugar – 1 cup, powdered. Traditional recipes use boora or tagar (Indian unrefined sugar) for a slightly grainy texture, but regular powdered sugar works perfectly. Adjust the sweetness to taste.
Green Cardamom – 4–5 pods, seeds crushed (or 1/2 teaspoon ground cardamom). This adds the signature warm aroma.
Optional Add-ons: A pinch of saffron (for aroma and a festive touch of color), a grating of nutmeg, and chopped nuts (like pistachios or almonds) for garnish. These are optional and not needed for the basic recipe, but a few family recipes include them for extra flavor.
(Makes about 15–20 medium Besan Ladoos)
Step-by-Step Instructions
1. Roast the Besan: In a heavy-bottomed kadai (wok) or deep pan, melt the ghee on low heat. Add the besan to the warm ghee and begin roasting. Stir continuously with a spatula, using a gentle pressing motion to break up any lumps that form. Be patient and keep the heat low – the besan should slowly toast in the ghee, not fry. After about 10 minutes of stirring, you’ll notice the besan mixture loosening up and becoming light and fluffy. Continue roasting for another 10–15 minutes (20–25 minutes total) until the color turns light golden brown and a nutty aroma fills your kitchen. At this stage, you might see the ghee start to separate slightly from the besan, indicating it’s fully roasted and has released its flavors. (Pro tip: To check if the besan is roasted, sprinkle a few drops of water into the mixture – if it sizzles instantly and the water droplets evaporate leaving little bubbles, it’s done.) Take care not to let the besan brown too much or burn – lower the heat if needed, as undercooked besan can taste raw while overcooked besan can turn bitter.
2. Cool the Mixture: Once the besan is roasted to a golden color and aromatic, turn off the heat. Immediately transfer the hot besan-ghee mixture to a wide bowl to stop further cooking. Spreading it out a bit will help it cool faster. Let it cool down until it’s just warm (comfortable to touch but not hot), which takes around 10–15 minutes. This step is important – if you add sugar while the mix is too hot, the sugar might melt and make the mixture runny or grainy. Cooling it to lukewarm ensures we get a smooth final texture.
3. Add Sugar and Spice: When the roasted besan is warm (not hot), add in the powdered sugar and the cardamom powder (from crushed seeds). If using a pinch of saffron or ground nutmeg, or if you’d like to mix in any finely chopped nuts, add them now as well. With clean hands (or using a spatula), mix everything together thoroughly. It’s best to massage the mixture with your fingertips and palms – this helps the sugar and spices incorporate evenly into the besan. As you blend and press, you’ll notice the mixture turning into a sandy dough that holds shape when pressed (the warmth of your hands also helps the ghee to release slightly, binding the flour and sugar together). The mixture will start looking glossy and clumpy, which is a good sign that it’s ready to shape. (If you prefer, you can also pulse the mixture in a food processor for a few seconds to combine – but traditionally, hand-mixing is the way to go.)
4. Shape into Ladoos: Now for the fun part – shaping the ladoos. Scoop a small portion of the mixture (about 2–3 tablespoons for a medium ladoo, or use a small cookie scoop for uniform size). Gently press and roll the mixture between your palms to form a round ball. The mixture might feel a bit loose at first, but as you press, it should come together. If it crumbles, press harder and it will bind (the ghee solidifying as it cools helps it stick). Shape all the ladoos this way. You should get roughly 15–20 Besan Ladoos from this recipe, depending on size. Place each formed ladoo on a plate or parchment-lined tray. If you like, press a single pistachio or raisin on top of each ball for garnish, or sprinkle a few strands of saffron – this is purely optional but adds a festive touch.
5. Cool and Store: Let the formed ladoos cool completely at room temperature. They will firm up as they cool. Once cooled, you can transfer them to an airtight container. If you can resist eating them all at once, store the ladoos in a cool, dry place. They stay fresh for about 1 to 2 weeks at room temperature. For longer storage, keep them in an airtight box in the refrigerator – they’ll last up to 2-3 weeks chilled. (Tip: If refrigerating, allow the ladoos to come to room temperature before serving, or warm them for 10 seconds in the microwave, so the ghee softens and they regain their melt-in-mouth texture.) Enjoy these ghee-rich delights as an offering to guests or an indulgent treat with your evening chai!
Tips for Perfect Besan Ladoos
Roasting: The key to flavorful besan ladoos is proper roasting. Use a heavy-bottomed pan and low heat, and stir continuously for an even roast. Rushing this step can result in a raw taste or a burnt bitter flavor. The besan is done when it turns golden, smells nutty, and has a light, fluffy texture. You can use the “water test” – sprinkle a few drops of water into the roasted besan; if it sizzles immediately and forms little bubbles, the besan is perfectly roasted. Patience here will reward you with the most aromatic, rich ladoos.
Binding (Mixing in Sugar): Always let the roasted besan cool to a lukewarm temperature before adding sugar. Adding sugar (especially powdered sugar) to very hot besan will cause it to melt and make the mixture too runny or sticky, which can ruin the texture. Once cooled, add sugar and spices and mix thoroughly. Use your hands to massage the mixture – this ensures the ghee, besan, and sugar are well combined and will bind properly when shaped. If the mixture feels too soft or greasy (perhaps the ghee was a bit much or the kitchen is very warm), you can add a couple of tablespoons of dry roasted besan (just roast a bit of besan separately) to fix the consistency. Conversely, if the mixture is too dry/crumbly and not holding together, mix in an extra spoonful of warm melted ghee (or a teaspoon of milk, though adding milk will shorten shelf life) to moisten it. The right consistency is achieved when a portion of the mixture pressed in your palm holds its shape without cracking.
Shaping: It’s easiest to shape the ladoos while the mixture is still warm (but not hot) – if it cools completely to room temp, it may become a bit stiff. While warm, the ghee is semi-liquid and helps the balls form smoothly. Take about 1.5–2 tablespoons of mixture and press it firmly between your palms to form a ball. If you notice the ladoo cracking as you shape, add a tiny bit more ghee or press a bit more firmly. You can lightly grease your palms with ghee to prevent sticking and to give the balls a nice sheen. Roll each ladoo until it’s smooth. Work in batches and if the mixture cools down too much mid-way, you can warm it slightly (for a few seconds in the microwave or covered in a warm place) to soften it again.
Storing: Store besan ladoos in an airtight container in a cool, dry place. They remain fresh and tasty for about 8–10 days at room temperature (in cooler weather, they can last even up to 2 weeks). If you need to keep them longer, refrigerate them – in the fridge they can last for 2 to 3 weeks without spoiling. Just make sure to bring them back to room temperature before eating, because the ghee in the ladoos can solidify when cold, making them harder; once they warm up, they’ll be soft and luscious again. (You can also briefly microwave refrigerated ladoos for 8-10 seconds to quickly soften them, but don’t overdo it, as they can break or release oil if too hot.) Properly stored, these ladoos stay fresh and flavorful, ready to grab whenever you need a sweet treat or to serve unexpected guests.
Serving Suggestions & Gifting Ideas
Besan Ladoos are a versatile sweet treat – you can enjoy them on any day or make them for special occasions. Here are some serving and gifting ideas to make the most of this delightful sweet:
Everyday Enjoyment: Serve these ladoos as an afternoon snack or dessert. In many Indian households, a ladoo with a cup of hot masala chai or a glass of warm milk is the ultimate comfort food. Their rich, nutty flavor pairs beautifully with a bitter-sweet cup of tea. You can also crumble a ladoo over vanilla ice cream for a fusion dessert or stuff one inside a warm chapati to make an impromptu sweet roll (a childhood trick for a quick treat!). Because they are energy-dense, one ladoo can satisfy those post-meal sweet cravings perfectly.
Festive Spreads: During festivals like Diwali, Holi, or family celebrations, arrange the besan ladoos on a decorative plate or in a traditional brass bowl. They hold their own among other sweets and snacks – the golden color and inviting aroma always attract guests. Besan Ladoos are often part of Diwali faral (the assortment of sweets and savories prepared for the festival) and are loved by all ages. You can also offer them as prasad (a blessed offering) during religious ceremonies or prayers. In fact, besan ladoo is a popular choice to give as prasad in Hindu temples and at pujas – it signifies sharing the sweetness of the divine. If you’re performing a Lakshmi Puja or any festive prayer at home, placing a few homemade ladoos as an offering to the deities is a beautiful way to invoke blessings.
Gifting: Homemade sweets make the best gifts, especially during festive seasons. To gift besan ladoos, place them in an attractive decorative box or jar. You can use colorful tissue paper or cupcake liners to separate the ladoos so they don’t stick to each other. Tie the box with a ribbon or attach a small note for a personal touch. In Indian culture, exchanging boxes of sweets during Diwali and weddings is a cherished tradition – it’s a way of sharing joy and goodwill. By gifting handmade besan ladoos, you’re not just giving a sweet treat, but also a bit of your love and effort. These ladoos travel well and won’t spoil easily, so they’re perfect for sending to relatives in other cities as well. Tip: Add a sprinkle of edible silver leaf (vark) on top of each ladoo to make them look truly festive and “gift-worthy.”
Warm, rich, and made with love – Besan Ladoos encapsulate the spirit of Indian festivities and family traditions. Whether you’re making them for a special occasion like Diwali, or simply to relive a grandmother’s recipe on a rainy afternoon, each bite is a celebration of flavor and nostalgia. So go ahead, try this slow-roasted, ghee-kissed besan ladoo recipe and share the sweetness with your loved ones. Happy cooking, and Shubh Deepavali (Have a blessed Diwali)! 🎇
Sources: Historical and recipe details have been adapted from family traditions and contemporary Indian home-cooking resources for authenticity. Cultural notes on Diwali and traditional methods referenced from Indian cooking blogs and Wikimedia Commons, and recipe technique tips are informed by expert home chefs. Enjoy your ladoo-making!
Gujiya is more than just a sweet—it’s nostalgia folded into a golden crescent, crisp on the outside and meltingly rich on the inside. In North Indian households, especially during Holi and Diwali, the making of gujiya isn’t a solitary kitchen task—it’s a celebration in itself. Women gather, gossip brews alongside the simmering sugar syrup, and children wait for the first batch to cool just enough to sneak a bite. The Khoya Gujiya, in particular, is a royal version stuffed with sweetened mawa (evaporated milk solids), dried fruits, and grated coconut. Its aroma alone—rich, buttery, and nutty—is enough to transport you back to a family courtyard decked in colors, laughter, and tradition.
📜 Ingredients (makes approx. 15-18 gujiyas)
For the Dough:
2 cups all-purpose flour (maida)
4 tbsp ghee (clarified butter)
Water (as needed)
A pinch of salt
For the Filling:
1 cup khoya/mawa (crumbled or grated)
1/3 cup powdered sugar
2 tbsp desiccated coconut (optional but traditional)
In a large mixing bowl, add maida, a pinch of salt, and ghee. Rub it together until the flour resembles breadcrumbs—this step ensures flaky gujiyas. Slowly add water and knead into a stiff yet pliable dough. Cover with a damp cloth and let it rest for 30 minutes.
2. Making the Filling
In a non-stick pan, roast khoya on low flame for 3–4 minutes until it becomes aromatic and light golden. Turn off the heat. Add sugar, coconut, chopped nuts, raisins, cardamom, and saffron. Mix well and let the filling cool completely.
3. Shaping the Gujiya
Roll the dough into small lemon-sized balls. Flatten and roll into small 4-inch discs. Place 1 tablespoon of filling in the center, fold into a half-moon, and seal the edges. Use a fork or gujiya mold to create decorative crimps. Make sure the edges are well-sealed to avoid bursting while frying.
4. Frying the Gujiyas
Heat ghee/oil in a kadhai over medium heat. Fry gujiyas in batches until they turn crisp and golden on both sides. Drain on kitchen paper.
Optional: Dust with powdered sugar or drizzle sugar syrup and garnish with nuts and dried rose petals.
💡 Serving Tip & Story Twist
Serve warm or at room temperature with a glass of warm saffron milk or thandai during festivals. For a modern twist, some even dip gujiyas halfway in white chocolate and sprinkle with pistachio dust—fusion meets tradition!
💬 “In our home, gujiya wasn’t just a dessert; it was my dadi’s love letter to Holi. She would hum old Bollywood songs while crimping the edges with perfection, and every gujiya bore the same seal of affection. Making them now with my daughter feels like passing down a joyful, flaky heirloom.”
In the grand courts of the Nizams of Hyderabad, where every dish was a statement of luxury, Shahi Tukda was the crown jewel of dessert platters. With its rich blend of saffron-infused milk, golden-fried bread, and fragrant cardamom, this royal indulgence was once served only to nobility. Today, it graces our homes during Eid, Diwali, and weddings – a sweet echo of India’s regal culinary heritage.
Growing up, I remember my grandmother making this during Eid. She would slowly simmer full-fat milk into thick, luscious rabri, fry slices of bread to a crisp golden brown, and drizzle it all with sugar syrup infused with rose water. The entire house would smell of ghee and cardamom – and we knew a celebration was about to begin.
📝 Ingredients
For the bread base:
6 slices of white bread (preferably a day old)
Ghee or oil for deep frying
For the sugar syrup:
½ cup sugar
½ cup water
2–3 cardamom pods, crushed
A few drops of rose water (optional)
For the rabri:
1 liter full-fat milk
¼ cup sugar
½ tsp cardamom powder
A few saffron strands (soaked in warm milk)
2 tbsp chopped pistachios and almonds
Garnish:
Slivered almonds, pistachios, edible silver leaf (optional), rose petals
👩🍳 Instructions
Step 1: Prepare the Rabri
1. Boil the milk in a heavy-bottomed pan. Lower the flame and simmer, stirring often, until it reduces to one-third of its volume.
2. Add sugar, saffron milk, and cardamom powder. Simmer for 5 more minutes.
3. Add chopped dry fruits and let it cool. Chill before use.
> Tip: Stir frequently and scrape the sides of the pan to mix the cream (malai) back into the milk – this gives the rabri its rich texture.
Step 2: Make the Sugar Syrup
1. In a small pan, combine sugar, water, and cardamom.
2. Bring to a boil and simmer until slightly sticky (no string consistency needed).
3. Add rose water and turn off the heat.
Step 3: Fry the Bread
1. Cut the bread slices into triangles or squares.
2. Deep fry in ghee or oil on medium heat until golden and crisp. Drain on paper towels.
> Alternative: You can also bake or air-fry the bread slices with ghee for a healthier version.
Step 4: Assemble the Shahi Tukda
1. Dip each fried bread slice in warm sugar syrup for 5–10 seconds.
2. Place on a serving tray. Pour chilled rabri generously over the slices.
3. Garnish with nuts, rose petals, and edible silver leaf if desired.
4. Serve chilled or slightly warm – either way, it’s divine.
🍴 Serving Suggestions
Shahi Tukda is best served slightly chilled, with extra rabri on the side.
Make it a day ahead for richer flavor – the bread soaks up the syrup beautifully overnight.
Pairs perfectly with a cup of strong masala chai or after a biryani feast.
💡 Quick Tips
Use day-old bread for crispier texture.
Don’t over-soak the bread in syrup; it should stay crisp on the outside and soft inside.
Use full-fat milk for the rabri – this is not the time to cut corners!