Dessert, Traditional Food

Authentic Makara Chaula: Traditional Odisha Sankranti Recipe

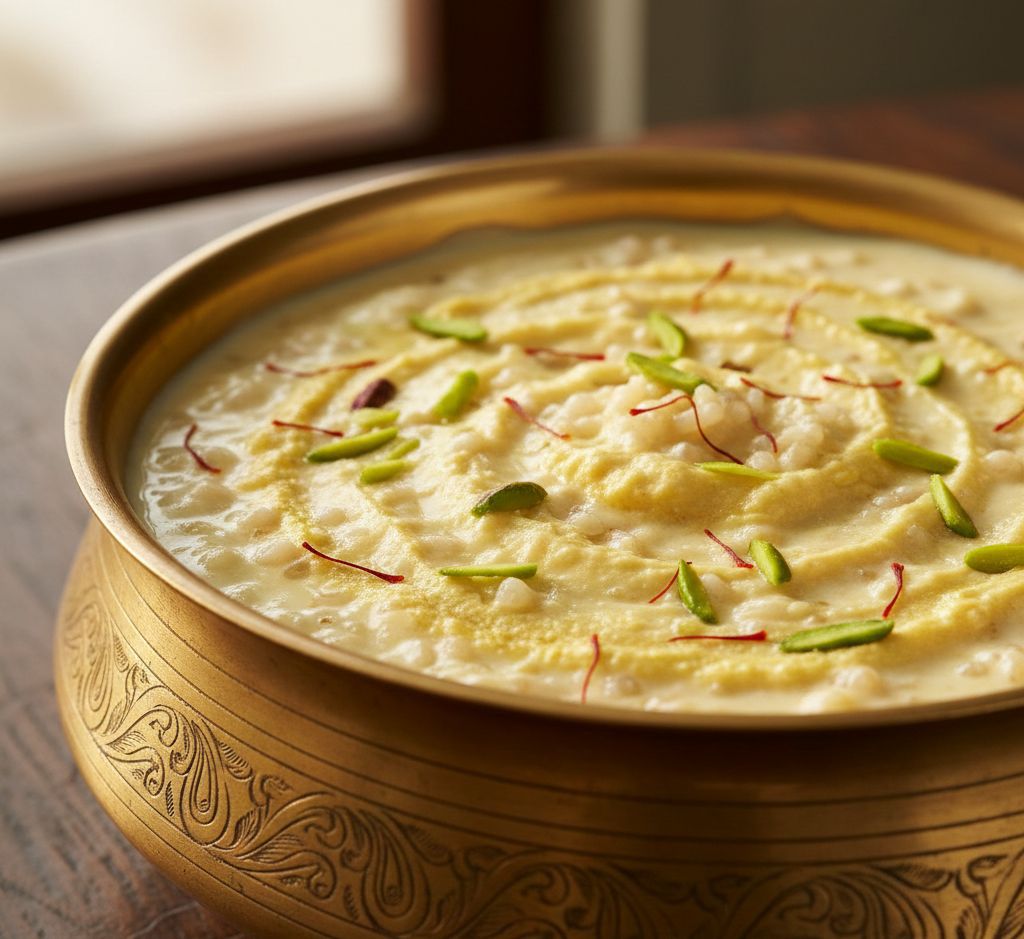
In our home, the year didn’t begin with a calendar flip; it began when the sun entered the zodiac of Makara (Capricorn). While the recipe for Makara Chaula is an ancient heirloom documented in temple chronicles like the Madala Panji, it was my mother who taught me the spiritual weight of this “no-cook” dish.
I remember her waking before dawn in the mid-January chill, performing her ritual bath before touching the newly harvested Arua Chaula (raw rice). She believed that because this dish was uncooked, every ingredient had to be in its state of highest purity. “Cooking with fire changes a grain,” she would say, “but Makara Chaula is a direct conversation between the farmer and the Sun God.” She viewed this dish as a “Parasocial Companion” a sweet, wholesome anchor that transformed neighbors into “Makar” friends through a sacred bond of shared food.
Today, at The Pinch of Masala, we are documenting this agrarian ritual for a 2026 audience that values “Ingredient Integrity” and the “Quiet Luxury” of heritage soul-food.

The barrier to a perfect Makara Chaula is often the texture getting it creamy and cohesive without turning the raw rice into a gritty powder. To master this sacred custard, follow my mother’s three non-negotiable rules:
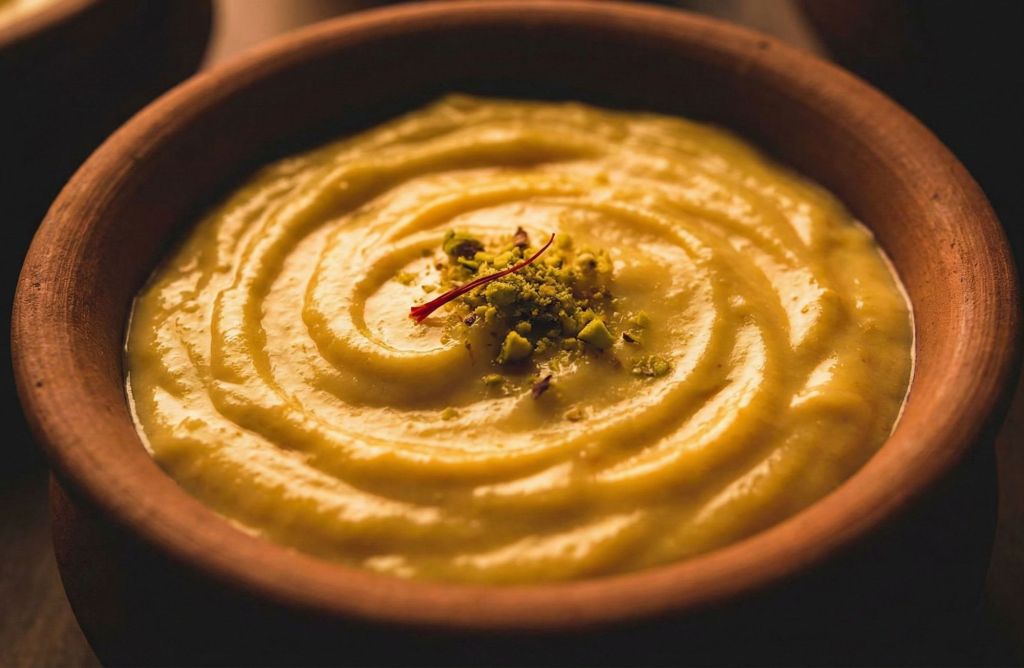
The “Dardara” Pulse: This is the ultimate “Digital Anthropologist” secret. The rice should never be ground into a fine flour. It must be pulsed until it reaches a coarse, “semolina-like” texture known as dardara. This provides the signature “crunch” that contrasts with the creamy chhena and soft bananas.
The Temperature Balance: In 2026, we prioritize holistic wellness. My mother always added black pepper (golmarich) and grated ginger to the mixture. Because raw rice is considered “cold” in nature, these warming aromatics are essential to balance the dish for the winter digestive system.
The “Hand-Mashing” Bond: She never used a mixer for the final assembly. She insisted that the heat from your palms as you mash the bananas, jaggery, and chhena into the rice is what “awakens” the flavors and creates a velvety, natural bind.

Prep time: 15 mins | Soaking: 4 hours | Servings: 6
Diet: Vegetarian, Gluten-Free, No-Cook | Cuisine: Odia Heritage

Ingredients:

1 cup Newly Harvested Arua Chaula (Raw Rice): Soaked for 3-4 hours and drained completely.

½ cup Freshly Grated Coconut: (Nadia) for richness.

½ cup Fresh Chenna (Cottage Cheese): Homemade is best for prosperity.

2 Ripe Bananas (Kadali): Smashed to act as a binder.

½ cup Jaggery (Guda): Adjust to taste (symbolizes happiness).

The Aromatics: 1 tsp grated Ginger, ½ tsp crushed Black Pepper, and a tiny pinch of Edible Camphor (Karpura).

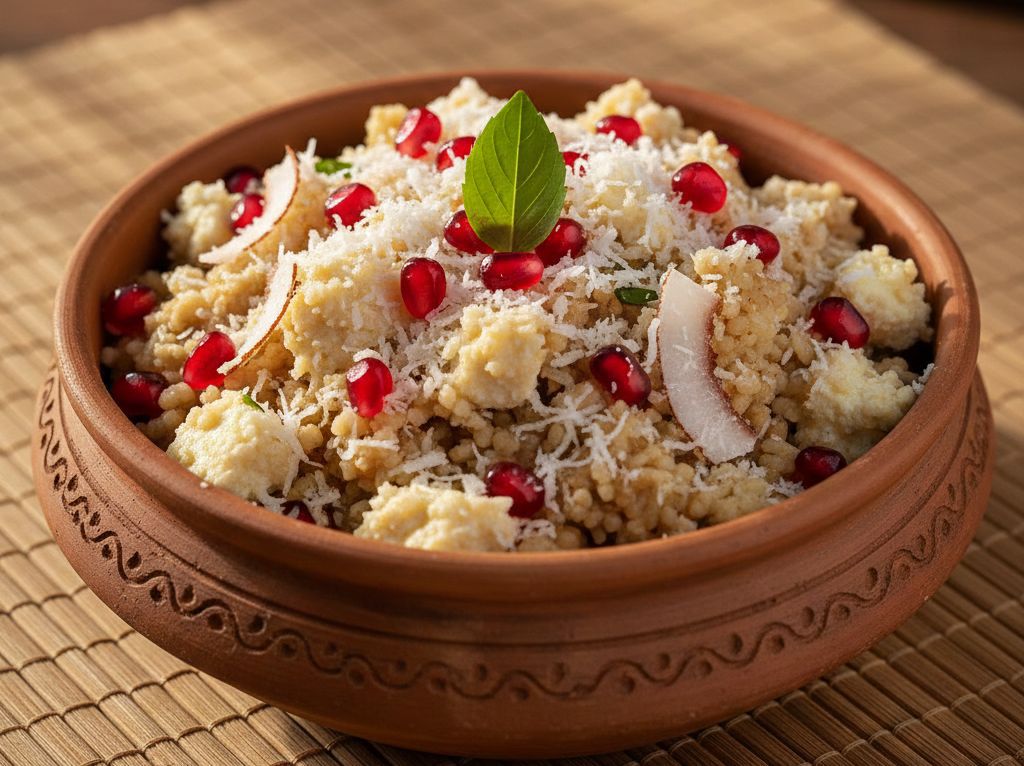
The Seasonal Medley: Sliced sugarcane pieces, pomegranate pearls, grapes, and orange segments.

The Sacred Finish: 5-6 Tulsi leaves (for devotion) and ¼ cup whole milk (optional, for a softer texture).

Instructions:

The Grind: Pulse the soaked and dried rice in a blender (or use a traditional stone mortar) until it is coarsely ground (dardara). Mix in the grated coconut and pulse again for 5 seconds.

The Creamy Base: In a large bowl, combine the smashed bananas, chhena, and jaggery. Mash with your hands until the jaggery dissolves into a smooth, creamy paste.

The Union: Add the coarse rice-coconut mixture to the base.

The Heat & Spice: Fold in the grated ginger, crushed black pepper, and the pinch of camphor. The pepper is crucial for winter vitality.

The Bounty: Add the milk (if using) and toss in all the seasonal fruits and sugarcane pieces.

The Offering: Garnish with Tulsi leaves. Traditionally, this is offered to the Sun God (Surya Dev) before being shared among family and friends.

The Pod Stock: In the 2026 “Use-Up” economy, we value every scrap. If you are using fresh sugarcane, save the fibrous skins and tough ends. Boil them in water to create a sweet “Sugarcane Tea” or use it as a base for a Winter Kadha. It adds a natural, mineral-rich sweetness that perfectly aligns with current sustainability trends.

Dessert

Heritage Rice Kheer: The 2,500-Year-Old “Sweetness of Prosperity”

In our home, the smell of Rice Kheer slow-bubbling on the stove was the true soundtrack of a celebration. My grandmother (Nani) didn’t just see it as a dessert; she saw it as a blessing. She often reminded us that in the ancient texts of Ayurveda, this sweetened milk preparation then called Rasala was considered medicine for the soul.
I remember her standing by the heavy brass uruli, her wooden ladle moving in slow, meditative circles. She never rushed the milk. “Kheer is not a dish of ingredients,” she would say, “it is a dish of patience.” Whether it was for a child’s first solid food ceremony (Annaprashana) or the peak of Diwali, the Kheer was the anchor.
Today, at The Pinch of Masala, we are documenting the authentic, slow-cooked method. We are moving away from the “instant” condensed-milk hacks of the last few years and returning to the “Quiet Luxury” of milk reduced by time, heat, and devotion.
The “Digital Anthropologist” Technical Secret: The Starch Secret
To achieve a kheer that is “creamy like a cloud” rather than a watery mess, you must choose the right rice. While many use long-grain Basmati, Nani preferred medium-grain white rice or broken Basmati (Tukda).
Why? Long grains are designed to stay separate. For Kheer, we want the rice to “bleed” its starch into the milk, naturally thickening the pudding without the need for artificial thickeners.
The Ghee Toasted Start: Before adding the rice to the milk, lightly fry it in a teaspoon of ghee until the grains turn translucent. This adds a nutty depth that defines heritage Kheer.
****
Prep Time: 15 mins | Cook Time: 45 mins | Servings: 4-6
Diet: Vegetarian, Gluten-Free | Cuisine: North Indian Heritage

Ingredients:
1 Liter Full-Fat Milk: Organic cow or buffalo milk is preferred for the richest “malai” texture.
¼ Cup Short-to-Medium Grain Rice: (e.g., Gobindobhog or Sona Masoori) washed and soaked for 20 minutes.
1 tsp Ghee: For roasting the rice.
½ Cup Sugar: Adjust to taste. Raw sugar or jaggery powder works too (add jaggery only after the kheer cools slightly to avoid curdling).
4-5 Green Cardamom Pods: Freshly crushed.
10-12 Saffron Strands: Soaked in 2 tbsp warm milk.
¼ Cup Sliced Nuts: Almonds, pistachios, and cashews.
Instructions:
The Nutty Base: Heat ghee in a heavy-bottomed pot. Add the soaked and drained rice. Sauté for 3 minutes until the rice smells toasted and looks translucent.
The Simmer: Pour the milk into the pot. Bring to a rolling boil, then immediately turn the heat to its lowest setting.
The Slow Reduction: Let the milk simmer for 30-40 minutes. Stir every 4-5 minutes to prevent the rice from sticking to the bottom.
The “Malai” Scraping: As the milk boils, a layer of cream will form on the sides of the pot. Use your spatula to scrape this back into the milk. This is the secret to a thick, “Rabri-like” consistency.
Flavoring: Once the rice is so soft it mashes easily between your fingers and the milk has reduced significantly, add the sugar, saffron milk, and crushed cardamom.
The Finish: Simmer for another 5-8 minutes until the sugar dissolves and the kheer reaches your desired thickness. Remember, Kheer thickens further as it cools.
The Crunch: In a tiny pan, fry your nuts in a drop of ghee until golden and pour them over the Kheer before serving.


The “Pinch of Thrift” Tip (Zero Waste)
Liquid Gold Garnish: If you have the creamy residue that has slightly “burnt” or caramelized at the very bottom of the pot (known as khurchan), do not discard it! Scrape it out carefully and serve it right on top of a single bowl. In 2026’s “Use-Up” economy, these caramelized bits are considered the “truffles” of the Indian kitchen pure, concentrated flavor.

Dessert

Shrikhand: The Ancient Dessert of Gods and Warriors

Introduction
In a world obsessed with complicated patisserie and 20-ingredient cakes, Shrikhand stands as a testament to the power of minimalism. It is, in essence, just two things: Yogurt and Sugar. But to say that is like saying the Taj Mahal is just marble.
Growing up, Shrikhand wasn’t just a dessert; it was a ritual of patience. I remember the muslin cloth hanging from a hook in the kitchen for hours, slowly dripping whey into a brass bowl below. My grandmother would say that the cloth was doing the cooking, not the stove.
Today, we are documenting the traditional method. While you can use store-bought Greek Yogurt, true Shrikhand the kind that melts on your tongue like flavored clouds comes from the art of making Chakka (hung curd) at home.
The Mythology: A Dessert Created in Exile
Did you know this humble dessert might have roots in the Mahabharata?
According to legend, when the Pandavas were in exile, Bhima the strongest brother worked as a cook in the kingdom of Virata. He is said to have invented a dish called Shikharini by straining curd and mixing it with sugar and saffron to create a rich, energy-dense food.
Over centuries, Shikharini evolved into Shrikhand (derived from the Sanskrit Ksheer for milk and Persian Qand for sweet). When you eat this, you aren’t just having a sweet treat; you are tasting a piece of Indian history that has survived empires.
The Secret Technique: “Chakka”
The heart of this recipe is Chakka yogurt that has been drained of all its water (whey) until it becomes as thick as cream cheese.
The Texture Rule: If you rush the draining, your Shrikhand will be runny. If you drain it too long, it becomes chalky. The sweet spot is usually 4 to 6 hours of hanging.
The Sieve: My grandmother insisted on pushing the chakka through a fine mesh sieve (or a Puran Yantra) to break down any lumps. This is the secret to that glossy, restaurant-style finish.
The Recipe Card
Prep time: 15 minutes | Passive time: 6 hours (for hanging) | Servings: 4

Ingredients:
1 kg Fresh Curd (Dahi): Use full-fat milk curd. It should be fresh and not too sour.
¾ Cup Powdered Sugar: Adjust to taste. Note: Do not use granulated sugar; it will make the mixture watery.
A generous pinch of Saffron (Kesar): Soaked in 1 tbsp warm milk.
½ tsp Cardamom Powder (Elaichi): Freshly pounded is non-negotiable.
A pinch of Nutmeg (Jaiphal): The secret ingredient in traditional Maharashtrian Shrikhand.
Nuts for Garnish: Charoli (Chironji) is traditional, but pistachios work beautifully too.
Instructions:
The Hanging Ritual: Line a strainer with a clean muslin cloth (or a men’s cotton handkerchief, as is tradition in many homes!). Pour the fresh curd into it. Tie the edges tightly and hang it over a bowl in a cool place (or in the fridge if it’s a hot day) for 5-6 hours.
The Transformation: Untie the cloth. What you have inside is a solid ball of creamy yogurt solids. This is the Chakka.
The Smooth-Out: Transfer the Chakka to a bowl. Optional but recommended: Press it through a sieve to ensure it’s silky smooth.
Flavoring: Add the powdered sugar, saffron milk, cardamom, and nutmeg.
The Whisk: Whisk vigorously. You want to incorporate air into the mixture to make it light and fluffy.
Chill: Shrikhand tastes best when chilled for at least 2 hours before serving. This allows the saffron to release its golden color fully.
The “Pinch of Thrift” Tip (Zero Waste)
Liquid Gold (Whey): The greenish water collected in the bowl below your hanging curd is called Whey. Do not pour it down the sink! It is packed with protein and probiotics.
How to use it: Use it to knead the dough for your Rotis or Parathas. It makes the rotis incredibly soft and adds a subtle tang. You can also add it to curries (like Kadhi) instead of water.

Dessert

The Winter Ritual: Nani’s Slow-Cooked Gajar Ka Halwa

Introduction
In my family, winter didn’t officially begin when the calendar turned to December. It began when the vegetable market turned red.
I am talking about the arrival of Delhi Gajar those long, ruby-red, sweet carrots that are only available for a few precious months of the year. My grandmother (Nani) used to say that making Gajar Ka Halwa with orange carrots was a crime against the season. “Orange carrots are for salads,” she would say, dismissing them with a wave of her hand. “Red carrots are for the soul.”
This recipe is not the “instant” version you see on TikTok. There is no condensed milk, no microwave, and no shortcuts. This is an act of preservation a “Digital Anthropologist” attempt to document the way it was made before we all got too busy. It is slow, it uses just milk and patience, and it tastes exactly like a winter afternoon in a sunlit courtyard.
Why We Cook It Slowly
In 2026, we talk a lot about “slow living,” but our grandmothers invented it. The magic of this dish lies in the Maillard reaction the caramelization of the milk solids as they slowly reduce into khoya (dried milk solids) right inside the pot.
When you cook the carrots in milk for an hour, they don’t just get soft; they absorb the richness of the dairy until they turn into jewel-like confections. It requires time, but I promise you, the first bite is worth every second.
The Recipe Card
Prep time: 20 minutes | Cook time: 60 minutes | Servings: 4

Ingredients:
1 kg Red Winter Carrots (Delhi Gajar): Washed, peeled, and grated. Tip: Hand grating gives a better texture than a food processor.
1.5 Liters Full-Fat Milk: Do not use skim milk. We need the fat content for that rich mouthfeel.
4 tbsp Ghee (Clarified Butter): Plus a little extra for frying nuts.
3/4 Cup Sugar: The red carrots are naturally sweet, so we use less sugar than standard recipes.
1 tsp Cardamom Powder (Elaichi): Freshly pounded.
A handful of Cashews & Almonds: Chopped.
1 tbsp Kishmish (Raisins): Optional, but traditional.
Instructions:
The “Bhuna” Start: Heat 1 tablespoon of ghee in a heavy-bottomed Kadhai (wok). Add the grated carrots and sauté on medium heat for 8-10 minutes. This releases the moisture and deepens the red color.
The Milk Bath: Pour in the milk. Bring it to a gentle boil, then turn the heat down to low. Now, let it simmer. Stir it every few minutes so it doesn’t stick to the bottom.
The Reduction: This is where patience comes in. Cook until the milk has almost completely evaporated. You will see tiny grains of milk solids mixing with the carrots. This takes about 45 minutes.
Sweetening: Add the sugar. The mixture will turn glossy and liquid again as the sugar melts. Keep cooking until the liquid evaporates once more.
The Ghee Finish: Add the remaining ghee, cardamom powder, and nuts. Roast (bhuna) the mixture for another 10 minutes. The halwa should leave the sides of the pan and have a deep, reddish-brown shine.
Serve: Serve piping hot.
The “Pinch of Thrift” Tip (Zero Waste)
Leftover Magic: If you have leftover Halwa that is a few days old, don’t throw it away! Use it to make “Gajar Halwa Spring Rolls.” Stuff a spoonful of cold halwa into a spring roll wrapper, fry it until crisp, and serve with vanilla ice cream. It gives the traditional dish a modern, crunchy texture and ensures nothing goes to waste.

Dessert

Adhirasam – The Heritage Sweet of Diwali

A Sweet That Smells Like Diwali Mornings

When I was little, Diwali mornings in our home began long before sunrise. The smell of incense and fried ghee sweets filled the air before the first diya was even lit. Among all the festive treats, one sweet stood apart the deep, caramel aroma of Adhirasam sizzling in ghee.

My grandmother would prepare the jaggery syrup the day before, stirring it patiently until it reached that magical soft ball consistency. She’d say, “You can’t rush Adhirasam it needs your time, your warmth, and your love.”
She would knead the rice flour and syrup into a glossy dough and let it rest overnight, covered with a clean white cloth. That resting period, she said, was what gave the sweet its softness and soul.

The next morning, as ghee heated in her heavy brass kadai, she’d shape the dough into flat discs, press a small hole in the center, and fry them until golden. The moment one came out of the ghee, we’d all wait because she’d always give the first piece to the house temple, and the second to whoever helped grind the rice!

Even today, when I make Adhirasam, that memory comes alive the warm kitchen, the glow of diyas, and the sweet comfort of a recipe that’s older than memory itself.

About This Recipe

Adhirasam is a heritage sweet from Tamil Nadu and Karnataka, traditionally made during Diwali, Karthigai Deepam, and temple festivals.
It’s made with homemade rice flour, jaggery syrup, and ghee, then deep-fried until golden brown.

The beauty of Adhirasam lies in its texture — crispy on the outside, soft and chewy inside, with a rich flavor of jaggery and cardamom.

It’s said that Adhirasam was offered to Lord Ganesha and Goddess Lakshmi during the Chola period, making it one of South India’s most sacred and ancient sweets.

Recipe Details

Servings: 12–15 pieces
Prep Time: 30 minutes (plus resting time)
Cook Time: 30 minutes
Resting Time: 12–24 hours

Ingredients

1 cup raw rice (preferably sona masoori or similar short grain)

¾ cup jaggery (grated or powdered)

¼ cup water (for syrup)

½ teaspoon cardamom powder

1 tablespoon ghee (for dough)

Oil or ghee (for deep frying)


Optional: A pinch of dry ginger powder (saunth) for aroma, or sesame seeds for texture.


Step-by-Step Instructions

1. Prepare Rice Flour

Wash and soak the rice for 1–2 hours.

Drain and spread it on a clean cloth for about 30 minutes until slightly damp not fully dry.

Grind it to a fine powder in a mixer while still moist.

Sieve the flour and set aside. (This freshly ground flour gives the signature texture.)


2. Make the Jaggery Syrup

In a heavy-bottomed pan, add jaggery and ¼ cup of water.

Heat until the jaggery melts completely.

Strain to remove impurities and pour it back into the pan.

Boil again until it reaches a soft ball consistency when a drop in cold water forms a soft, pliable ball between your fingers.

Turn off the heat.


3. Form the Dough

Immediately add the cardamom powder and 1 tablespoon ghee to the jaggery syrup.

Slowly add the rice flour, stirring continuously with a wooden ladle.

Mix until it forms a thick, sticky dough (like halwa).

Cover it with a cloth and let it rest overnight or at least 8 hours.
(Resting develops the right texture soft inside, crisp outside.)


4. Shape the Adhirasams

After resting, knead the dough gently with greased hands.

Pinch small balls (lemon-sized) and flatten them into discs (about 2–3 inches wide).

Make a small hole in the center with your thumb  this helps them cook evenly.


5. Fry the Adhirasams

Heat oil or ghee in a deep pan over medium flame.

Once hot (not smoking), gently slide one Adhirasam at a time.

Fry until golden brown on both sides.

Remove and press between two slotted ladles to remove excess oil.

Cool slightly before serving.


Expert Tips for Authentic Texture

Rice Flour Freshness: Always use freshly ground, slightly moist rice flour store-bought flour won’t give the same chewy texture.

Syrup Consistency: The soft ball stage is key. If overcooked, the dough turns hard; if undercooked, it won’t bind.

Resting Time: Minimum 8 hours, preferably overnight this step transforms the texture.

Oil Temperature: Keep the flame medium-low; frying too hot will burn the outside before the inside cooks.

Pressing Method: Always press fried Adhirasam gently between ladles — this removes excess oil without losing shape.

Storage: Stays fresh for up to a week in an airtight container. The flavor deepens over time.


Serving Ideas

Serve Adhirasam warm, with a drizzle of ghee for a divine festive treat.

Pair with Coconut Burfi and Boondi Laddoo on your Diwali sweet platter.

Offer as prasadam during Lakshmi Pooja or Navratri it’s considered auspicious.


Closing Note

Every time I make Adhirasam, I’m reminded that some recipes aren’t written in books they’re whispered through generations.

It’s not just about rice and jaggery; it’s about patience, devotion, and the love that binds families across time. When the dough rests overnight, it’s as though the sweetness deepens, just like old memories mellowing with warmth.

So this Diwali, try this heirloom recipe in your kitchen. Feel the rhythm of stirring syrup, shaping dough, and watching golden discs puff up in ghee.
Because Adhirasam isn’t just made for festivals it is the festival.

Dessert

Dry Fruit Halwa – The Royal Sweet of Diwali

A Bite of Luxury and Love

When I think of Diwali sweets, I think of color  golden diyas, crimson rangoli, and the deep amber shine of Dry Fruit Halwa.

In my childhood home, this halwa was a once-a-year indulgence. My mother would prepare it in her heavy brass kadai on the day before Diwali, while the kitchen glistened with ghee and the air carried the fragrance of roasted cashews. I remember her saying, “Halwa is like gold  it shines only when stirred with patience.”

We’d all wait by the stove, watching the mixture turn from milky white to a translucent golden sheet. When it was finally spread on a greased tray and sprinkled with pistachios, it looked like a pane of edible glass. The first bite was always chewy, nutty, and sweet with just a touch of ghee a flavor so rich, it felt like Diwali itself.

Even now, when I make it, that memory comes alive  my mother’s bangles jingling as she stirred, my father sneaking a warm piece from the tray, and the sound of laughter echoing through our glowing home.

About This Recipe

Dry Fruit Halwa, also known as Karachi Halwa or Bombay Halwa, is a traditional Indian sweet famous for its chewy, translucent texture and nutty richness. It’s made from cornflour (or arrowroot), ghee, sugar, and dry fruits, resulting in a glossy halwa that looks as stunning as it tastes.

Unlike milk-based sweets, this halwa stays fresh longer, making it ideal for festive gifting and travel-friendly treats.

Recipe Details

Servings: 10–12 pieces
Prep Time: 10 minutes
Cook Time: 25 minutes
Setting Time: 2 hours

Ingredients

For the Halwa

½ cup cornflour (cornstarch)

2 cups water (for slurry)

1½ cups sugar

¾ cup water (for syrup)

¼ cup ghee (use more as needed)

¼ teaspoon cardamom powder

1 pinch saffron strands (optional, soaked in 1 tbsp warm water)

2–3 drops natural food color (orange or red, optional)


For the Dry Fruits

2 tablespoons cashews, chopped

2 tablespoons almonds, slivered

2 tablespoons pistachios, chopped
(You can also add melon seeds or raisins for variation.)

Step-by-Step Instructions

1. Prepare the Cornflour Slurry

In a bowl, mix cornflour with 2 cups of water until smooth and lump-free. Set aside.
(Tip: Stir just before using as the mixture tends to settle at the bottom.)


2. Make the Sugar Syrup

In a heavy-bottomed kadai, add sugar and ¾ cup water.
Stir over medium heat until the sugar dissolves completely and forms a clear syrup.
Add the saffron water and a few drops of food color, if desired.


3. Cook the Halwa Mixture

Lower the heat and gradually pour in the cornflour slurry, stirring continuously to prevent lumps.
As the mixture begins to thicken, add 1 tablespoon of ghee at a time.
Keep stirring patiently the mixture will turn glossy and start to leave the sides of the pan.
This process takes around 15–20 minutes.

(Tip: The halwa should look shiny, translucent, and stretchy that’s when you know it’s ready!)


4. Add Nuts and Flavoring

Mix in the chopped cashews, almonds, and pistachios along with cardamom powder.
Stir well and cook for another 2–3 minutes until everything is combined evenly.


5. Set and Cool

Grease a steel or glass tray with ghee.
Pour the halwa mixture into it and spread evenly with a spatula.
Smooth the top, sprinkle extra nuts, and let it rest for 2–3 hours at room temperature to set.

Once firm, cut into neat squares or diamond shapes with a sharp, greased knife.

Expert Tips for Perfect Halwa

Stir Constantly: Halwa thickens quickly — keep stirring to avoid lumps and ensure even cooking.

Ghee Gradually: Add ghee in intervals; this helps the halwa achieve its glossy finish and prevents sticking.

Texture Check: When the halwa turns transparent and pulls away from the sides, it’s perfectly cooked.

Nuts Variation: You can use roasted cashews, walnuts, or dried figs for a richer version.

Flavor Twist: Try adding rose water or a drop of kewra essence for a royal aroma.

Storage: Stays fresh for up to 10 days at room temperature, or longer when refrigerated.

Serving & Gifting Ideas

Pack square pieces of Dry Fruit Halwa in small butter-paper wrappers or festive boxes for gifting.

Serve it alongside Boondi Laddoo and Coconut Burfi for a complete Diwali dessert platter.

Warm slightly before serving to enjoy its soft, melt-in-mouth texture.

Closing Note

Making Dry Fruit Halwa is like watching alchemy in your kitchen a simple mixture of cornflour, sugar, and ghee transforms into a jewel-toned delicacy.
Each glossy piece holds the sweetness of memories, the crunch of celebration, and the shimmer of Diwali lights.

Every time I prepare it, I’m reminded of my mother’s patience, of the golden glow of diyas, and of how festival sweets are more than recipes  they’re traditions passed down through love and time.

So this Diwali, take an hour to make this royal treat yourself.
As you stir, breathe in the aroma, feel the ghee coat your spoon, and remember — the real sweetness of a festival lies not in the sugar, but in the hands that make it. ✨

Dessert

Boondi Laddoo – A Sweet Circle of Celebration and Nostalgia

Sweet Memories of Diwali Evenings

If there’s one sweet that embodies the joy, chaos, and warmth of Indian festivals, it’s the Boondi Laddoo.
For me, its story begins in the heart of our family kitchen where laughter mingled with the sound of bubbling sugar syrup and the rhythmic tap-tap of the ladle as tiny golden boondis rained into hot ghee.

Every Diwali, my grandmother would take charge of the sweet-making marathon. The house turned into a miniature sweet factory trays lined with ladoos, besan aroma floating through the air, and me stealing half-made boondis when she wasn’t looking.
When she finally rolled the warm boondis into perfect spheres, her hands worked like art precise, practiced, full of love.

The laddoos glistened like marigold orbs, fragrant with cardamom and saffron, and no store-bought sweet could ever match their warmth. For us, Boondi Laddoo wasn’t just dessert; it was the taste of family, devotion, and celebration.

About This Recipe

Boondi Laddoo (also called Motichoor Ladoo when made with finer boondi) is one of India’s most loved festive sweets.
It’s made by frying tiny gram flour pearls (boondis), soaking them in aromatic sugar syrup, and shaping them into soft, golden laddoos.

Every region adds its twist from the coarse-textured Temple-style Laddoo of South India to the delicate Motichoor version of North India — but the essence remains the same: warmth, sweetness, and tradition in every bite.

Recipe Details

Servings: 12–15 laddoos
Prep Time: 15 minutes
Cook Time: 30 minutes
Setting Time: 20 minutes

Ingredients

For the Boondi

1 cup gram flour (besan), sifted

½ cup water (approx., to make smooth batter)

A pinch of baking soda (optional, for puffier boondi)

Ghee or oil, for deep frying


For the Sugar Syrup

1 cup sugar

½ cup water

3–4 cardamom pods, crushed

5–6 saffron strands (optional, for festive aroma and color)

1 teaspoon lemon juice (to prevent crystallization)


For Flavor and Garnish

1 tablespoon ghee

2 tablespoons chopped cashews and raisins (lightly fried in ghee)

1–2 drops orange or yellow food color (optional, for festive hue)

Step-by-Step Instructions

1. Prepare the Batter

In a large bowl, sift gram flour and add water gradually.
Whisk until you get a smooth, lump-free batter with a flowing consistency neither too thick nor runny.
Add a pinch of baking soda and whisk once more.
(Tip: The consistency should be similar to pancake batter it should fall in droplets when poured through a slotted spoon.)

2. Fry the Boondi

Heat ghee or oil in a deep frying pan over medium heat.
Hold a perforated ladle (boondi jhara) over the pan.
Pour a ladleful of batter over it and gently tap the edge so small droplets fall evenly into the oil.

Fry the boondis for 30–40 seconds, until they puff up slightly but remain soft not crisp.
Remove with another slotted spoon and drain on paper towels.
Repeat for remaining batter.
(Tip: Do not over-fry we need soft boondis so they can absorb the syrup later.)

3. Prepare the Sugar Syrup

In another pan, combine sugar and water.
Boil until you reach a one-thread consistency when a drop pressed between your fingers forms a thin thread.
Add cardamom, saffron, and lemon juice.
Turn off the heat once syrup slightly thickens.

4. Combine Boondi and Syrup

Add the fried boondi directly into the warm syrup.
Mix gently until all boondis are well coated.
Add fried cashews and raisins.
Cover and let the mixture rest for 10–15 minutes so the boondis absorb the syrup.


5. Shape the Laddoos

Once the mixture cools slightly (it should be warm, not hot), grease your palms with ghee.
Take a handful of mixture and gently press it into a round ball.
If the mixture feels too loose, cook it for 2–3 more minutes to thicken before shaping.

Place the laddoos on a plate and allow them to set completely.

Expert Tips for Perfect Laddoos

Consistency of batter: The key to perfect boondi lies in the batter smooth, free-flowing, and lump-free.

Temperature of oil: Medium heat works best. Too hot, and the boondis will become hard; too cold, and they’ll absorb oil.

Syrup stage: One-thread consistency is ideal. Over-thick syrup will make the boondis dry; too thin will make laddoos sticky.

Softness factor: Don’t fry boondis too long soft, porous ones make melt-in-mouth laddoos.

Flavor magic: A pinch of cardamom, ghee-fried cashews, and a few saffron strands bring divine aroma especially when offered as prasad.

Storage: Store laddoos in an airtight box at room temperature for up to a week.

Serving Suggestions

Offer warm Boondi Laddoos as prasad during Diwali, Ganesh Chaturthi, or weddings.

Pair with Coconut Burfi or Rava Ladoo for a perfect festive sweet platter.

Wrap them in decorative foil or paper cups for gifting.

Closing Note

The process of making Boondi Laddoo is like crafting joy slow, rhythmic, and full of meaning.
Each tiny boondi represents a drop of sweetness, and when bound together, they form something whole much like family during festivals.

When I make laddoos now, I remember my grandmother’s voice  “Keep your patience, beta. Syrup listens to love, not hurry.”
And truly, when stirred with love, these humble gram flour pearls turn into golden spheres of happiness.

So this Diwali, light your diyas, let the aroma of cardamom fill your kitchen, and roll a few laddoos with your own hands.
Because some sweetness is best when made  and shared from the heart. ✨

Dessert

Coconut Burfi – A Festive Sweet Full of Simplicity and Soul

Memories of Sweet Aroma and Shimmering Festivals

As a child, I always knew Diwali was near when the kitchen began to smell of roasted coconut and ghee.
Those evenings were magical diyas flickered in every corner, and the air was filled with the warm sweetness of Coconut Burfi cooking on the stove.

I’d sit beside my mother as she grated coconut with her old metal scraper, tiny curls of white piling up like snowflakes. She would roast it slowly in a heavy-bottomed kadai, the fragrance blending with the sound of bubbling sugar syrup. When the mixture turned glossy and thick, she’d spread it onto a greased plate, press it smooth, and let it cool.
The best part came next  she’d cut it into perfect diamonds with a buttered knife, and the first piece was always mine.

Even today, I make Coconut Burfi the same way she did  simple ingredients, patient stirring, and lots of love. It’s not just a sweet; it’s a tradition. Every bite takes me back to those golden Diwali evenings when family, laughter, and the aroma of coconut filled our home.

About This Recipe

Coconut Burfi (also called Nariyal Barfi in Hindi or Kobbari Mithai in Kannada) is a traditional Indian sweet made with freshly grated coconut, milk, sugar, and cardamom. Some variations use jaggery for an earthy sweetness, while others add a touch of ghee or khoya for richness.

It’s one of those sweets that’s easy to make, quick to set, and always satisfying perfect for festive offerings, gifting, or temple prasad.

Recipe Details

Servings: 10–12 pieces
Prep Time: 10 minutes
Cook Time: 25 minutes
Total Time: 35 minutes

Ingredients

2 cups freshly grated coconut (preferably from medium-aged coconut — not too tender or too dry)

1 cup milk (or ½ cup condensed milk for richer flavor)

1 cup sugar (or adjust to taste; substitute with ¾ cup jaggery for a traditional version)

1 tablespoon ghee

½ teaspoon cardamom powder

5–6 chopped cashews or almonds (optional, for garnish)


Instructions

1. Prepare the Coconut

Grate the coconut using a fine grater only the white portion (avoid the brown shell layer).
Measure 2 cups of grated coconut and keep aside.
(Tip: For extra softness, pulse the grated coconut once in a mixer without adding water.)


2. Start the Base

In a heavy-bottomed kadai or non-stick pan, heat ghee and add the grated coconut.
Roast gently on low flame for 3–4 minutes — just enough to release aroma, without browning.


3. Add Milk and Sugar

Pour in the milk and stir. When it comes to a gentle boil, add sugar (or grated jaggery if using).
Stir continuously until the sugar dissolves completely.
Cook this mixture on medium flame, stirring often, until it thickens and begins to leave the sides of the pan.


4. Flavor It

Add cardamom powder and mix well.
If using condensed milk, you can skip part of the sugar — the mixture will thicken faster.
Continue to stir until it reaches a soft, fudge-like consistency.

(To test: Drop a small portion on a plate it should firm up slightly when cooled, not sticky.)


5. Set the Burfi

Grease a steel or glass plate with ghee.
Pour the thickened mixture and spread evenly using a spatula.
Smooth the surface and sprinkle nuts if desired.
Let it rest for 10–15 minutes, then mark pieces with a greased knife.
Once fully cooled, cut into squares or diamonds and gently lift them out.

Expert Tips

Fresh Coconut Works Best: Always use freshly grated coconut for authentic taste. Frozen coconut works in a pinch just thaw it and squeeze out excess moisture before use.

Texture Control: Roast lightly for soft burfi or a bit longer for a chewy, halwa-like texture.

Jaggery vs Sugar: Jaggery gives a deep, earthy sweetness and slightly darker color, while sugar makes the burfi pure white and clean-flavored.

Avoid Overcooking: Once the mixture starts leaving the sides of the pan, remove immediately  overcooking makes the burfi dry and crumbly.

Shelf Life: Stays fresh for 3–4 days at room temperature, and up to a week refrigerated in an airtight container.

Serving Ideas

Serve Coconut Burfi as part of your Diwali thali with Besan Ladoo, Mysore Pak, and Chiroti.

Wrap individual pieces in butter paper for festive gifting.

Add a thin edible silver leaf (vark) for a traditional festive touch.

Serve warm with a drizzle of ghee for temple-style prasadam vibes.

Closing Note

Every Diwali, when I prepare Coconut Burfi, I still hear my mother’s words echoing  “Stir it patiently, and don’t rush the sweetness.”

It’s a humble sweet, but it carries generations of love in every bite  the laughter of cousins sneaking warm pieces from the tray, the sparkle of diyas, and the gentle glow of home.

So this festive season, skip the store-bought sweets and try this simple, soulful Coconut Burfi.
It takes just 30 minutes, yet the memory of its sweetness will last long after the lights of Diwali fade. 🌙✨

Dessert

Kharwas – A Rare Delicacy Steeped in Tradition

Memories of Kharwas
I remember the first time I tasted kharwas. I was seven, spending summer at my grandmother’s farm in Maharashtra. One misty dawn, Aaji (grandma) gently woke me with excitement — the neighbor’s cow had calved, and that meant one thing: kharwas for everyone. In our village, whenever a calf was born, the excess colostrum (first milk) was shared among neighbors so that every household could make this cherished pudding. That first milk, so thick and golden, would be mixed with regular milk, grated jaggery, and fragrant spices like cardamom (and sometimes a pinch of pepper) before being steamed until it set into a tender custard. I watched in awe as Aaji stirred the viscous kharvas doodh (colostrum) with jaggery and cardamom, poured it into a steel tiffin, and placed it in our big idli steamer. The kitchen soon filled with the sweet, earthy aroma of caramelized jaggery and spice.

When she finally opened the lid, there it was – a gently jiggling pudding with a light saffron hue. She cut it into squares and slipped a piece onto my plate. The first spoonful was pure magic: creamy and delicately sweet, with the warmth of cardamom. It melted in my mouth, yet had a subtle, cheese-like firmness that was utterly new to me. Kharwas isn’t an everyday sweet – it’s made only on special days like this, when nature provides that rare first milk. It’s not just a dessert; it’s a celebration. In Maharashtrian culture, this simple steamed pudding symbolizes gratitude for new life and the sharing of abundance. To me, that taste of kharwas will forever be intertwined with the laughter of family before sunrise and my grandmother’s loving hands. It’s more than a sweet – it’s a memory, a ritual, a bowl of tradition passed down with love.

Recipe: Kharwas (Colostrum Milk Pudding)

Servings: 4
Prep Time: 10 minutes
Cook Time: 30 minutes

Ingredients (Serves 4)

2 cups colostrum milk (first-day milk after calving)

1 cup whole milk (use if colostrum is very thick; omit for later-day colostrum)

3/4 cup jaggery, grated or crumbled (traditional sweetener, or use sugar)

1/2 teaspoon cardamom powder (for aroma)

1 pinch nutmeg powder or black pepper powder (optional, traditional touch)

A few saffron strands (optional, for a richer color and aroma)


Instructions

1. Mix the Milk Base: In a large bowl, pour the colostrum milk. If using first-day colostrum (which is very thick and rich), stir in the regular whole milk to dilute it slightly. Add the grated jaggery to the milk and mix well. Keep stirring until the jaggery dissolves completely (you can also warm the milk gently to help the jaggery melt). Once dissolved, add the cardamom powder and mix. (If any impurities from the jaggery remain, you can strain the mixture through a sieve.)


2. Prepare Steaming Dish: Grease a deep stainless steel plate or bowl (or lidded container) with a few drops of ghee or oil. This will help the pudding release easily after cooking. Pour the sweetened milk mixture into the prepared dish. If using saffron, sprinkle the strands on top. Also sprinkle the tiny pinch of nutmeg or black pepper powder on the mixture for subtle flavor (optional).


3. Cover: Cover the dish with a lid or aluminum foil. This is important to prevent any water droplets from the steam from falling into the pudding and ruining its smooth texture.


4. Steam Cook: Prepare your steamer setup – you can use an idli steamer, pressure cooker (without whistle), or any large pot. Add about 2 inches of water to the steamer and bring it to a simmer. Place the covered dish on a trivet or stand inside the steamer. Close the lid. Steam on medium heat for about 25–30 minutes. Avoid high heat, as vigorous boiling can cause water to splash into the pudding. After about 25 minutes, carefully open and insert a toothpick or knife into the center of the pudding; if it comes out clean, the kharwas is set. If not, steam for another 5–10 minutes and check again.


5. Cool and Set: Once the pudding is cooked and has a slight jiggle but is firm to touch, turn off the heat. Remove the dish from the steamer using tongs (be careful, it’s hot). Let it cool to room temperature. As it cools, the pudding will firm up further. For the best texture, once cooled, refrigerate the kharwas for at least 2 hours (cover it while refrigerating). Chilling helps it set into a nice sliceable custard.


6. Serve: When fully set and chilled, run a knife around the edges of the pudding to loosen it. Invert it onto a plate (or you can even serve directly from the bowl). Cut the kharwas into squares or wedges. Serve chilled for the classic feel – the cool, silky texture is unbelievably comforting. You can also enjoy it slightly warm if you prefer, but traditionally it’s served cold, often as a treat after meals.


Tips

Colostrum Milk: Colostrum is the nutrient-rich first milk produced by a cow or buffalo after giving birth. If you are lucky enough to have first-day colostrum (which is very thick), dilute it with some normal milk (even up to a 1:6 ratio of colostrum to milk) so that the pudding sets with a tender texture. Colostrum from the second or third day is thinner; you can often use it without dilution.

Sweetener Choices: Authentic kharwas is made with jaggery, which lends a gentle caramel flavor and a light beige hue to the pudding. If you don’t have jaggery, you can use sugar or sweetened condensed milk, but jaggery truly gives that rustic, traditional taste. (Using jaggery also makes the pudding a tad healthier and more earthy in flavor.) Remember to dissolve and strain jaggery if it’s impure.

Steaming Tips: Always cover the container of the milk mixture before steaming to avoid water droplets entering. Steam on medium heat; a high rolling boil can cause water to seep in or the milk to overflow. If using a pressure cooker, do not put the weight/whistle on – just steam it like you would idlis. Typically, 25–30 minutes of steaming is sufficient for a medium bowl; a larger quantity might take a bit longer.

No Colostrum? Instant Kharwas: Can’t find colostrum milk? You can still enjoy a similar pudding. Mix 1 cup full-fat milk, 1 cup thick yogurt (curd), 1/2–1 cup sweetened condensed milk, and 2 teaspoons of custard powder (or corn flour). Whisk until smooth (no lumps) and steam this mixture just like above. This yields a soft, blancmange-like milk pudding that’s remarkably close to true kharwas. It’s an ingenious substitute for those of us who crave kharwas without access to colostrum.

Flavor Variations: Traditional kharwas is often simply flavored with cardamom (and occasionally a touch of nutmeg). For a Goan twist, some people place a piece of turmeric leaf while steaming or add a pinch of turmeric for a lovely aroma and yellow tint – this is called “posu” in Konkani. You can also infuse a few strands of saffron in warm milk and add to the mix for a richer fragrance. Garnishing the finished pudding with chopped pistachios or almonds can add a pleasant crunch to the silky pudding, though purists usually enjoy it plain.


Every time I make kharwas, I’m transported back to that early morning in my Aaji’s kitchen – the softness of her cotton sari against my cheek as we peered into the steamer, the dew on the air, and the irresistible scent of sweet milk filling the courtyard. In a world where desserts often come from bakeries or boxes, this humble, home-steamed pudding feels like a hug from the past. It’s amazing how one simple dessert can hold a lifetime of memories and tradition. I hope this recipe brings a bit of that farmhouse warmth into your home. Serve it to your loved ones and share the story – because kharwas isn’t just about indulging a sweet tooth, it’s about savoring a piece of our heritage with each creamy, cardamom-kissed bite. Happy cooking! ❤️

Dessert

Makhana Kheer | Navratri Special Foxnut Pudding


I can still remember the gentle clink of the pot as my mother stirred a simmering makhana kheer on a Navratri evening. The kitchen would fill with the sweet aroma of milk thickening with roasted foxnuts, sugar, and a pinch of saffron. As a child, waiting all day during the fast, that first creamy spoonful of kheer at sunset felt nothing short of divine. Even now, the moment I begin to roast makhanas in ghee, I am transported back to those festive nights – the idols adorned in bright clothes, the air filled with prayers, and our family gathered eagerly for the sacred treat after a long day of fasting.

For those unfamiliar, makhana kheer is essentially a traditional Indian pudding made by slow-cooking puffed lotus seeds (also known as makhana or foxnuts) in milk, and sweetening it with sugar. My mother always adds a touch of cardamom and a few strands of saffron, which turn the kheer a beautiful golden hue and infuse it with a delicate aroma. We garnish it generously with nuts – golden almonds and cashews – and plump raisins, which not only elevate the flavor but also add a celebratory crunch and chew in each bite. This creamy dessert isn’t just delicious; it’s a bowl of memories and comfort. Traditionally prepared during Hindu fasting days and festivals, especially Navratri, makhana kheer has a special place in our home rituals. It’s both nourishing and auspicious, a dish that links generations and marks the sweet end of a day of devotion.

When I make makhana kheer now, I do it just like my mother and grandmother did. I roast the foxnuts in a spoonful of ghee until they’re crisp, let them luxuriate in simmering milk until soft, and sweeten the pudding to taste. The process is soothing in itself – the slow stirring, the fragrant steam, the anticipation of a treat. By the time it’s ready, the kheer is rich and velvety, the makhanas have absorbed the sweet milk, and the kitchen feels cozy and filled with love. If you’re looking for a dessert that’s easy to make yet deeply soulful, this Navratri-special makhana kheer might just become a beloved tradition in your family too.

Ingredients

2 tablespoons ghee (clarified butter)

2 cups makhana (foxnuts / popped lotus seeds)

4 cups whole milk (full-fat for best results)

1/4 cup sugar (adjust to taste)

1/2 teaspoon ground cardamom (or 4 green cardamom pods, crushed)

A pinch of saffron strands (about 8–10 strands)

2 tablespoons almonds, slivered (plus extra for garnish)

2 tablespoons cashews, halved (optional, or use instead of almonds)

2 tablespoons raisins (golden raisins preferred)


Instructions

1. Roast the Makhana: In a heavy-bottomed pan, heat the ghee on low flame. Add the makhanas (foxnuts) and roast them in the ghee, stirring continuously. Sauté for about 3–5 minutes until the makhanas turn light golden and crispy. (You’ll hear a slight crunch when you bite one.) Remove the roasted makhanas from the pan and set aside.


2. Toast Nuts & Raisins: In the same pan with remaining ghee, add the slivered almonds and cashews. Roast for 1–2 minutes until they turn golden brown. Add the raisins last and stir for just a few seconds – they will plump up quickly (be careful not to burn them). Remove the toasted nuts and raisins and keep them aside for later.


3. Boil the Milk: In a deep saucepan (or you can use the same pan if large enough), pour in the milk and bring it to a gentle boil over medium heat. Stir occasionally to prevent the milk from scorching at the bottom. Add the saffron strands to the milk as it heats, allowing their color and flavor to steep into the milk.


4. Combine Milk and Makhana: Once the milk comes to a boil, reduce the heat to low. Add the roasted makhanas to the milk. (For a creamier kheer, you can roughly crush or grind half of the roasted makhanas before adding, while keeping the rest whole – this helps thicken the pudding.) Stir everything together.


5. Simmer to Thicken: Let the makhanas simmer in the milk on low heat for about 10–15 minutes. Stir frequently, scraping the sides and bottom of the pan to mix in any thickened milk solids (this makes the kheer richer). The milk will reduce and thicken slightly, and the makhanas will soften as they absorb the sweet saffron-infused milk.


6. Sweeten and Spice: Once the milk has reduced to a creamy consistency (roughly about 3/4 of the original volume), add the sugar. Stir well so it dissolves completely. Next, sprinkle in the ground cardamom. The kitchen should now be filled with the lovely aroma of cardamom and saffron! Let the kheer simmer for another 2–3 minutes after adding sugar and cardamom, so all the flavors meld.


7. Finish with Nuts & Raisins: Turn off the heat. Add most of the toasted almonds, cashews, and raisins into the kheer, saving a few for garnish. Give a final stir. The makhana kheer at this point should be creamy with a pudding-like consistency. (It will thicken further as it cools, which is normal.)


8. Serve: Pour the kheer into serving bowls. Garnish each bowl with the reserved toasted nuts and raisins. Don’t forget to add a couple of saffron strands on top of each as a final festive touch. You can serve makhana kheer warm, which is especially comforting after a fast, or chilled if you prefer it cold and thick. Enjoy the kheer as a rich prasad (offering) during Navratri, or as a dessert to celebrate any special occasion.


Tips

Roast Thoroughly: Always roast the makhanas in ghee until they are crunchy before adding to the milk. This step enhances their nutty flavor and ensures they don’t turn soggy too quickly. Properly roasted foxnuts will absorb the milk nicely while still retaining a good bite.

Grind for Thickness: For an extra creamy texture, grind or powder a portion of the roasted makhanas and then add it to the milk. This ground makhana acts as a natural thickener, giving the kheer a luxurious, rabri-like consistency. (Many families take this approach to make the kheer richer, while still leaving some makhanas whole for texture.)

Stir and Scrape: While simmering the kheer, stir it often and scrape the sides of the pan. This helps reincorporate the thickened milk solids (malai) back into the pudding, making it richer. It also prevents the milk at the bottom from scorching – a little patience here goes a long way in achieving that perfect creamy texture.

Adjust Sweetness and Flavor: Sweeten the kheer to your taste. Sugar can be increased or reduced as per preference. You can even use jaggery for a deeper flavor – just remember to add it after turning off the heat to prevent curdling. Likewise, adjust spices to your liking: a pinch of nutmeg or a few drops of rose water can be added for variation, but cardamom and saffron are the classic choices that give makhana kheer its signature festive aroma.

Serving and Storage: Makhana kheer will thicken as it cools. If it becomes too thick, you can stir in a few tablespoons of warm milk to loosen it to desired consistency before serving. This dessert tastes wonderful warm (when it’s smooth and creamy) and equally delightful chilled (when it sets into a thicker pudding). If you chill it, the makhanas will continue to soften; some people love that custard-like result! Keep any leftovers refrigerated, and finish within 1-2 days for best taste.

Fasting-Friendly Variations: This recipe is naturally gluten-free and perfect for Navratri fasts. For a vegan version, swap the dairy milk with almond milk or coconut milk and use coconut oil instead of ghee – the kheer will still be deliciously creamy (though the flavor will differ slightly). You can also experiment with sweeteners like dates or honey if you avoid refined sugar during fasts.


*(Warm kitchen lights cast a soft glow on a bowl of creamy makhana kheer, garnished with saffron strands, almonds, and raisins, resting atop a colorful festive cloth – a picture of comfort and celebration.)*

As I scoop into my own bowl of makhana kheer now, I’m filled with the same warmth and contentment that I felt years ago during those Navratri nights. This Navratri-special dessert is more than just a recipe – it’s a thread connecting me to my heritage, my family, and countless celebrations where this kheer made the moment sweeter. I hope you’ll invite this traditional foxnut pudding into your home and create beautiful memories around it. May each creamy, blissful bite remind you of the joy of tradition and the love that goes into our food. Happy Navratri and happy cooking! 🌼✨