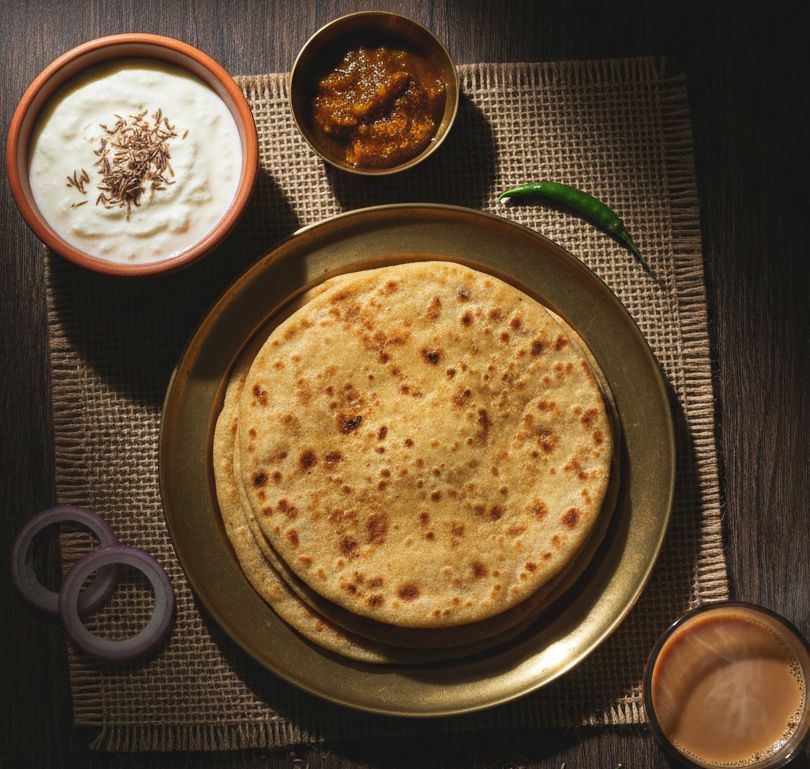
In our house, the arrival of winter was signaled by a very specific aroma: the sharp, herbal scent of fresh fenugreek leaves being chopped on a wooden board. I remember my mother sitting near the window every January morning, a massive pile of Methi (fenugreek) in front of her. She didn’t just pluck the leaves; she performed a “leaf-picking ritual,” separating the tender heart from the fibrous stalks with the focus of a scientist. “The bitterness is where the health lives,” she would say, “but the softness is where the love is.” She taught me that a royal Methi Paratha wasn’t just about mixing leaves into flour; it was about the “Quiet Luxury” of a dough that felt like silk and tasted like a winter morning. Watching her knead the emerald-flecked dough was a masterclass in patience she believed that the dough needed to “breathe” before it was ready for the fire. Today, at The Pinch of Masala, we are documenting this heritage breakfast for a 2026 audience that values “Ingredient Integrity” and the digestive power of “Fibremaxxing”.
The primary challenge with methi paratha is either a lingering harsh bitterness or a dry, cardboard-like texture. To master the “Eternal Softness,” follow my mother’s three non-negotiable rules: The “Curd Catalyst”: This is the ultimate “Digital Anthropologist” secret. My mother never used plain water to knead the dough. She used fresh curd (yogurt) or even slightly sour buttermilk. The lactic acid in the curd doesn’t just tenderize the gluten for a melt-in-the-mouth texture; it chemically neutralizes the sharp bitterness of the fenugreek without removing its health benefits. The “Fibremaxxing” Stem-Chop: In 2026, we don’t discard nutrients. While most recipes tell you to throw away the stems, my mother insisted on using the tender, thin stalks. She would mince them so finely that they vanished into the dough, providing a concentrated hit of fiber and a deeper aroma that leaves alone cannot provide. The 30-Minute Rest: Flour needs time to hydrate. My mother would cover the dough with a damp muslin cloth and let it rest for exactly 30 minutes. This “Relaxation Period” ensures the parathas stay soft for hours, making them the perfect “Parasocial Companion” for tiffin boxes or long journeys.
Prep time: 20 mins | Resting time: 30 mins | Cook time: 20 mins | Servings: 4 Diet: Vegetarian, High-Fiber | Cuisine: North Indian Heritage
Ingredients:
2 cups Whole Wheat Flour (Atta): Sifted for a smooth dough.
1.5 cups Fresh Methi Leaves: Finely chopped (include tender stems for extra fiber).
The “Softness” Agent: ¼ cup Fresh Curd (Yogurt) or Buttermilk.
The Aromatics: 1 tbsp Ginger-Garlic paste, 2 Green Chillies (finely chopped).
Spices: 1 tsp Carom seeds (Ajwain—essential for digestion), ½ tsp Turmeric, 1 tsp Red Chili powder, and Salt to taste.
Fat: 2 tbsp Oil for the dough + Ghee for roasting.
Instructions:
The Cleanse: Wash the methi leaves 3-4 times to remove all grit. Shake off excess water and chop them as finely as possible.
The Mix: In a large bowl, combine the flour, chopped methi, ginger-garlic paste, chillies, and all dry spices. Mix well with your fingers to ensure the leaves are coated in flour.
The Knead: Add the curd and 2 tsp oil. Gradually add warm water and knead into a soft, pliable, non-sticky dough.
The Rest: Cover with a damp cloth and let the dough rest for 30 minutes.
Shape: Take a medium-sized ball of dough. Roll it into a round circle (or a triangle for a layered heritage look).
The Roast: Heat a tawa on medium-high. Place the paratha and cook for 30 seconds until tiny bubbles appear. Flip and apply a teaspoon of ghee.
The Gold Finish: Press down with a spatula until golden-brown “beauty spots” appear on both sides and the edges are slightly crisp.
Serve: Stack them to keep them soft. Serve piping hot with a blob of white butter, chilled curd, and a tangy mango pickle.
The Whey Secret: In the 2026 “Use-Up” economy, every drop of nutrition counts. If you are straining your own yogurt to make hung curd for another dish (like Shrikhand), use the leftover Whey (the liquid) to knead this methi dough. It is packed with protein and minerals, and it makes the parathas even softer than plain water.
In a Punjabi household, the sound of winter isn’t the wind it’s the rhythmic skritch-skritch of a grater against a fresh head of cauliflower. Winter gobi is different. As the season shifts, the cauliflower sweetens, becoming tender and fragrant in a way that summer gobi never quite manages. I remember my grandmother (Nani) sitting in the kitchen as the morning fog lifted, her hands white with flour. She didn’t just make recipes; she performed rituals. One bite of her Gobi Paratha with its crisp, ghee-brushed edges and a soft, spiced center was proof that love really could be kneaded into dough. But she was also a scientist of the kitchen. She knew that cauliflower is 92% water. If you don’t respect that moisture, your paratha will tear, your tawa will smoke, and your breakfast will be a mess. Today, I’m sharing her three-step secret to the perfect, dry, flavor-packed stuffing that never leaks.
To master the Gobi Paratha, you must win the war against moisture. Here are Nani’s golden rules: The Room Temp Rule: Never grate cold cauliflower straight from the fridge. It releases more juice. Let it come to room temperature first. The Salting Ritual: After grating, add a pinch of salt and wait 15 minutes. The salt draws the water out. Then, place the gratings in a muslin cloth and squeeze with all your might. That “cauliflower water” is liquid gold keep it for your dough! The Ajwain Touch: Always add a pinch of Ajwain (carom seeds). Not only does it add a January-coded warmth, but it also helps digest the cauliflower.
Prep Time: 20 mins | Cook Time: 25 mins | Servings: 4
Ingredients: For the Dough: 2 cups Whole Wheat Atta, a pinch of salt, 1 tsp ghee, and the reserved cauliflower water (or plain water). For the Stuffing: 2 cups Cauliflower (grated and squeezed dry). 1 tsp Ajwain (carom seeds). 1 tbsp Ginger (finely chopped). 2 Green Chillies (chopped). ½ tsp Amchur (dry mango powder) for tang. ½ tsp Garam Masala. A handful of Fresh Coriander (chopped). For Roasting: Ghee or butter. Instructions: Knead: Mix flour, salt, and ghee. Gradually add water to form a soft, pliable dough. Let it rest for 15 minutes this “relaxes” the gluten so it stretches without tearing. Prep Stuffing: Mix the dried cauliflower with spices and herbs just before you are ready to roll. If the mixture sits too long, it will start releasing water again. Stuff: Take a lemon-sized ball of dough, flatten it, and place 2-3 tbsp of stuffing in the center. Pleat the edges together, pinch off the excess dough, and seal it tight. Roll: Sprinkle some flour and roll gently. Use a “left-forward, right-backward” motion to spread the filling evenly to the edges. Roast: Place on a medium-hot tawa. Once bubbles appear, flip it. Apply ghee to both sides and press down with a spatula until golden-brown spots appear and the edges are crisp. Serve: Top with a blob of white butter. Serve with chilled dahi (yogurt) and tangy lemon pickle.
Stalk Sabzi: Don’t discard the thick cauliflower stalks! In the 2026 “Use-Up” economy, we value every part of the plant. Peel the tough outer layer of the stalks, dice the tender inner core, and sauté them with mustard seeds and turmeric for a crunchy side dish the next day.
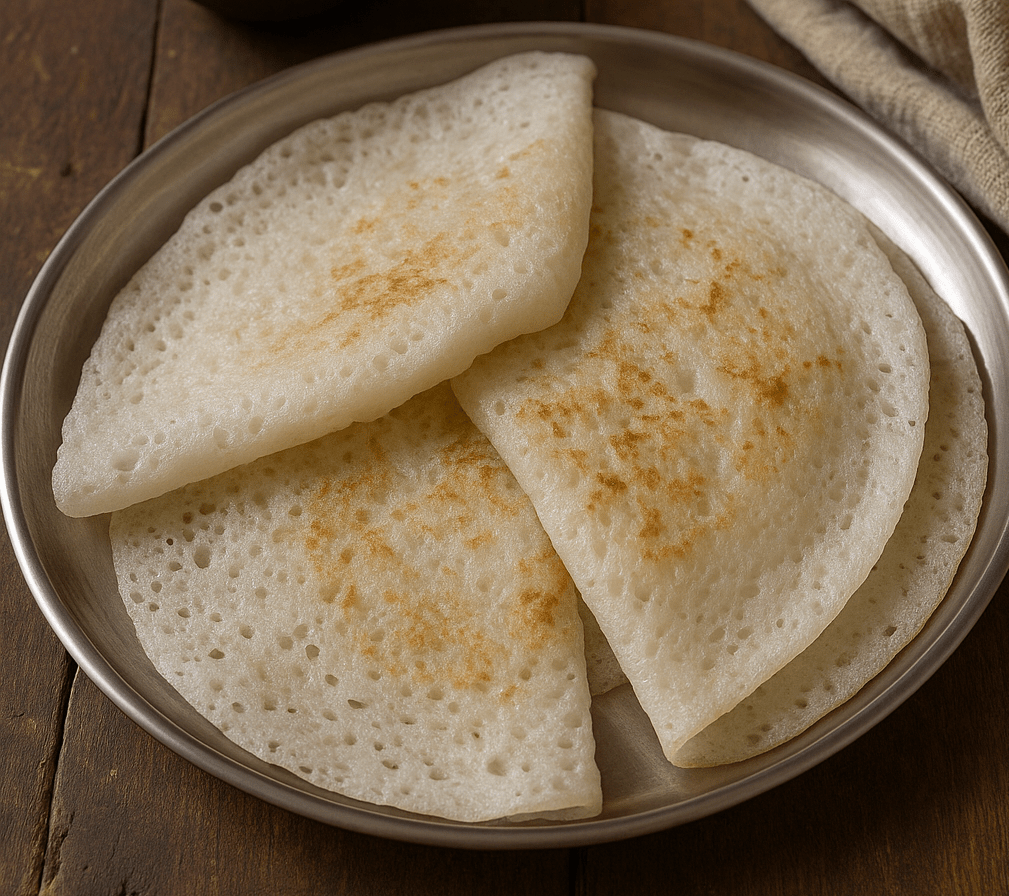
Chakuli Pitha (Odia: ଚକୁଳି ପିଠା) is a flat fermented rice-and-urad-dal pancake that epitomizes the taste of Odisha. This humble pancake is beloved across generations, and on festival mornings its aroma is as comforting and revered as a prayer. In my family home, the first hiss of chakuli on the tawa at dawn meant a celebration was underway – a joyful signal to the village that the women had rested and the day of feasting had begun.
On special occasions like Raja Parba or Pana Sankranti, chakuli pitha is as sacred as any offering. It is customary to offer these tender cakes to Goddess Lakshmi on Manabasa Gurubar, weaving devotion into each bite. The gentle sourness from overnight fermentation feels both grounding and auspicious, linking us to our ancestors and the rice fields that sustain us. Every warm plate of chakuli served in our home carries these loving memories – golden discs that taste of tradition and togetherness.
Chakuli Pitha Recipe
Ingredients:
2 cups parboiled rice (aruarua chaula)
1 cup whole white urad dal (biri dal)
½ tsp salt (or to taste)
Water, for soaking and grinding
Ghee or mustard oil (for cooking)
Steps:
1. Soak & Grind: Rinse the rice and urad dal. Soak them separately in water for 4–6 hours. Drain and grind each to a smooth batter (you can add a little water). Mix the two batters together, add salt, and whisk well until smooth.
2. Ferment: Cover the batter and let it ferment in a warm place for 8–12 hours (overnight is ideal). The batter will rise and develop a light sour aroma – a sign it’s ready.
3. Cook Chakuli: Heat a cast-iron tawa or heavy skillet on medium heat. Grease it lightly with ghee or mustard oil (traditional choices). Pour a ladleful of batter onto the hot tawa and gently spread it into a circle about 5–6 inches wide. Cover and cook for 2–3 minutes. Bubbles will form and edges will lift. Carefully flip (or fold) and cook another minute. The chakuli should be golden and spongy. Repeat with remaining batter.
4. Keep Warm: Stack the hot chakuli on a plate. If you like, smear a little ghee on top so they stay moist and flavorful.
Tips for Perfect Chakuli
Batter Consistency: The batter should pour smoothly but be slightly thicker than dosa batter. Too runny and it won’t hold shape; too stiff and it won’t ferment evenly. A good test is that it coats the ladle and falls slowly. Aim for a pourable, yet thick, consistency.
Fermentation: Warmth is key. Let the batter rest in a mildly warm corner of the kitchen. The ideal is around 25–30°C. In cooler climates, place the covered batter inside a turned-off oven with only the light on – the gentle heat will encourage fermentation. You’ll know it’s properly fermented when it smells slightly tangy.
Cooking: Preheat the skillet well so the chakuli cooks through. After pouring the batter, always cover with a lid; the steam cooks the top while the bottom crisps. Use just a teaspoon of ghee or mustard oil for each pitha to get the characteristic aroma. Avoid flipping back and forth – one flip (or none, if you prefer folding) is usually enough.
Serving Warm: Serve chakuli immediately while they’re soft. Cold chakulis tend to firm up, so keep them wrapped in a clean cloth or covered plate until serving.
Variations: Sweet and Savory Twists
Families across Odisha enjoy creative twists on chakuli. A popular sweet version is Budha (or Burha) Chakuli – literally the “grown-up” pancake – which is richer and thicker. For Budha Chakuli, a spoonful of jaggery (molasses) and grated coconut (and even mashed banana) is mixed into the fermented batter. The result is a dessert-like pancake often reserved for special days. I still remember my grandmother mashing ripe banana and stirring in coconut, turning our morning chakuli into a sweet festival treat.
In contrast, Saru Chakuli is made paper-thin, almost like a dosa. It’s spread very thin on the tawa and fried until crisp; perfect for those who love a lighter texture. Beyond these, you can simply enjoy plain chakuli pitha with spiced fillings or toppings: try folding a hot chakuli around freshly grated sweet coconut or pouring warm jaggery syrup (pani guda) over it for an instant dessert. Even a dollop of curd or coconut chutney provides a delightful contrast to the chakuli’s tang. These variations showcase the versatility of chakuli – from a simple breakfast pancake to a stuffed festival delicacy.
Serving Suggestions
Chakuli Pitha is always served hot. In Odisha, it’s common to present a stack of steaming chakulis alongside simple accompaniments. For a traditional experience, drizzle a little warm ghee on top and accompany the pitha with jaggery or sugar – the sweetness complementing its tang. Spicy sides are equally loved: we often serve chakuli with aloo dum (a potato curry) or guguni (a spiced chickpea curry). A bowl of coconut chutney, dal, or even plain yogurt also pairs nicely. In every case, the soft fermented pancake acts as a perfect vehicle for these flavors, turning humble ingredients into a hearty festival breakfast.
Every bite of chakuli pitha is a journey back to those simple, joyous mornings – a reminder that food can be an offering, a celebration, and a memory all at once. By following this traditional recipe and honoring the small rituals around it, you bring a bit of Odia devotion and nostalgia into your own kitchen. Enjoy cooking and savoring this timeless festival pancake!
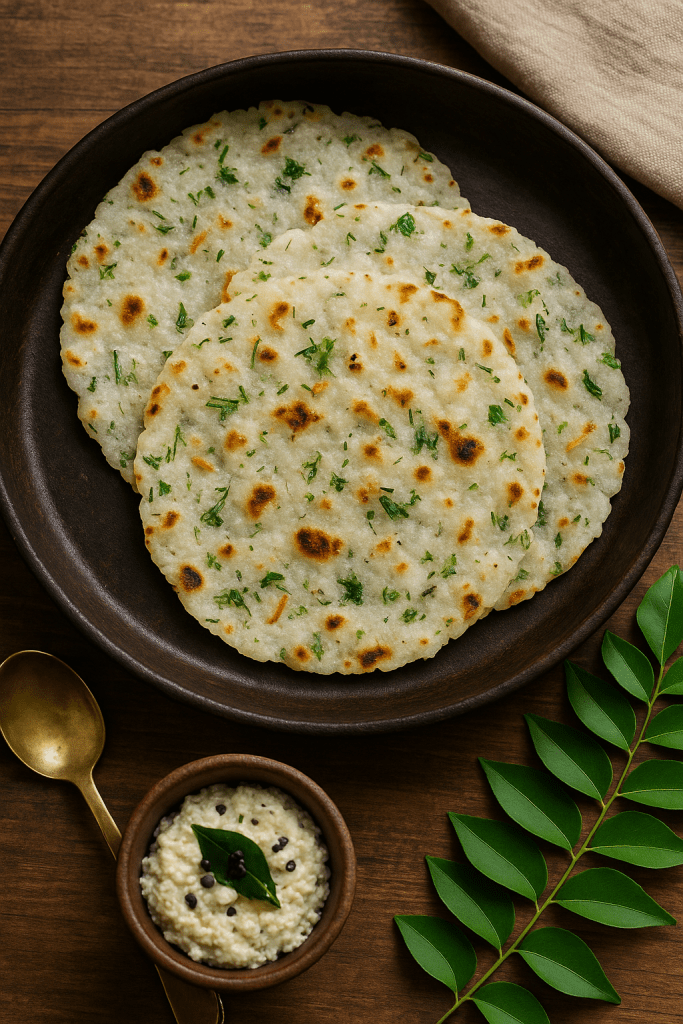
I can still smell the smoky aroma of akki rotti wafting from the clay stove of my childhood home in Karnataka. In the early morning light, my grandmother would knead rice flour with onions, chili, coconut and herbs, then pat the dough into thin rounds on a greased banana leaf. The sizzle as each roti hit the hot iron tawa is a sound I’ll never forget. The crispy-edged flatbread, soft and pillowy inside, was our simple but beloved breakfast – eaten hot with a slather of butter or a spoonful of spicy chutney. Even my youngest memory of that rural kitchen is tied up in the taste of those rotis, golden brown and studded with dill and grated carrot.
Back then I didn’t know the name, but I would come to learn it’s called akki rotti – literally “rice pancake” in Kannada. It’s a staple of Karnataka cuisine: a naturally gluten-free flatbread made from rice flour, spices and veggies. As noted in a popular recipe, “Akki Roti are gluten-free flatbreads… a popular breakfast from Karnataka. Serve them with chutney”. In other words, this humble roti is vegan, hearty, and perfect with tangy coconut or tomato chutney. Over the years I’ve learned little tricks – a pinch of cumin for warmth, a handful of fresh coriander or dill for aroma – that make each bite more fragrant. Now I’m excited to share this comforting recipe so you can bring a bit of that village-kitchen nostalgia to your own table.
Servings: 4 akki roti
Prep Time: 10 minutes
Cook Time: 15 minutes
Ingredients:
1 cup rice flour (finely ground)
½ teaspoon cumin seeds, crushed
¼ teaspoon salt (or to taste)
1 small onion, finely chopped
2 green chilies, finely chopped (adjust to taste)
½ small carrot, grated (or grated coconut, optional)
Handful fresh coriander leaves, chopped
1–2 tablespoons dill leaves (sabsige soppu) or curry leaves (optional)
½ teaspoon grated ginger (optional)
Water, as needed to form dough
1–2 tablespoons oil or ghee (for cooking)
Instructions:
1. Mix dry ingredients: In a large bowl, combine the rice flour, crushed cumin, and salt. Add the chopped onion, green chilies, grated carrot (or coconut), coriander (and dill or curry leaves if using). Stir everything together until well mixed.
2. Form the dough: Pour in a little warm water at a time and stir to make a soft dough. It should be moist and sticky (not dry). Knead gently until smooth; the texture will be pliable like a pancake batter. Cover the dough and let it rest for a couple of minutes if it seems too wet.
3. Divide the dough: Divide the dough into 4 equal balls. Flatten each ball slightly on your palm. If you plan to make thicker rotis, you can leave them a bit thicker now and make holes (see Tip).
4. Heat the pan: Heat a heavy flat skillet or tawa over medium heat. Grease it lightly with oil. For each roti: if using a banana leaf or plastic sheet (or parchment), grease it slightly and place one dough ball on it. Moisten your fingers and gently pat and spread the dough into a thin round (about 6–7 inches across). If cracks appear, wet your fingers and smooth them out.
5. Transfer to pan: Carefully lift the leaf or sheet and invert it onto the hot skillet so the uncooked side of the roti faces the pan. Gently peel off the leaf. (If you don’t use a leaf, you can grease the cool pan and press the dough directly on it, then set it on the burner.)
6. Cook first side: Cook on medium heat until the bottom firms up and light brown speckles appear (about 1–2 minutes). Don’t let it burn; adjust heat as needed.
7. Flip and cook second side: Flip the roti. Drizzle a teaspoon of oil or ghee around the edges and on top, then press gently with a spatula. Cook for another minute or so until golden brown and crisp spots form.
8. Finish cooking: Flip once more briefly if needed to brown the other side. Remove when golden. Repeat with remaining dough, using a second pan or waiting for the first pan to cool slightly if needed.
Tips:
Use a very fine, smooth rice flour. Coarse flour can make the roti hard or prone to breaking. If your flour seems gritty, sift or grind it finer. Always keep a little water on hand to moisten your fingers – this prevents the dough from sticking and helps join any cracks as you spread it.
Add veggies and herbs. Feel free to stir in finely chopped veggies for nutrition and color. Traditional additions include grated carrot, chopped onion, and coconut. A few chopped fresh herbs (dill/sabbige, coriander, or mint) or curry leaves really lift the flavor. Even green moong or soaked chana dal can be mixed in for protein (as some home cooks do).
Even cooking: If your roti is a bit thick, poke a few holes with your finger (or a fork) so it cooks through evenly. This lets steam escape and prevents underdone centers.
Oiling: A light drizzle of oil or ghee on each side makes the edges crisp and golden. Don’t over-oil – just enough to coat the surface. Pressing the roti with a flat spatula also helps it cook uniformly.
Serve immediately: Akki roti is best eaten fresh off the pan. These rotis harden as they cool, so enjoy them hot. Serve them with coconut chutney or any spicy South Indian pickle, as is traditional. Leftovers can be reheated or crumbled into a curry for flavor.
❤️ Closing Note: Akki roti isn’t just a recipe – it’s a bite of childhood and tradition. Every time I make it, I’m transported back to those misty Karnataka mornings with my family sitting around and filling our bellies with these warm, rice-flour flatbreads. The simple act of mixing flour with the day’s first rays of sun, patting dough between wet palms, and inhaling that toasty aroma of cooking rice has always felt like a warm hug from home. I hope this easy recipe brings some of that same comfort into your kitchen – whether you grew up in Karnataka or not – and that each crisp, chewy bite reminds you of family, togetherness, and the joy of homemade food. Enjoy your akki roti with loved ones, and maybe share with someone who’d appreciate a little taste of Karnataka nostalgia. Happy cooking and namaskara!
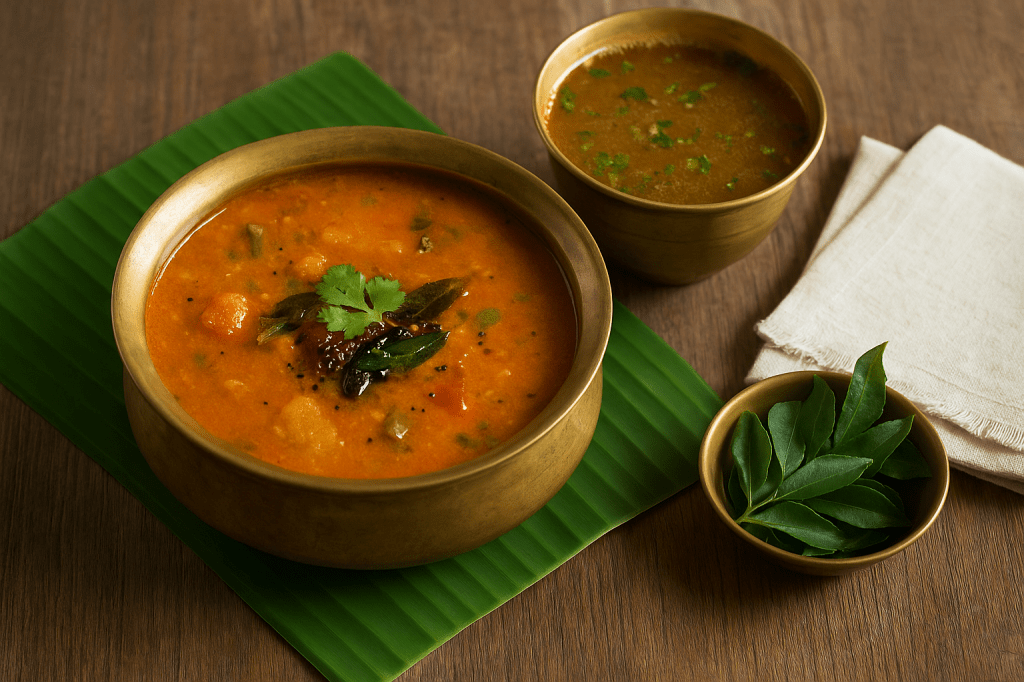
I still remember tagging along to my grandfather’s home in Udupi as a child and inhaling the aroma of sambar and rasam simmering in the kitchen. After morning temple prayers, my grandmother would serve a simple banana-leaf thali: steaming rice topped with our local sambar and rasam, a pat of ghee, and crispy fried peppers. Those humble temple-style dishes – fragrant with coconut, cumin and curry leaves, and completely free of onion or garlic – felt like pure comfort food. In Udupi cuisine, everything is prepared satvik (pure and vegetarian), so the sambar masala is based on coconut and spices, and the rasam is bright with tomato, tamarind and a touch of jaggery instead of pungent aromatics. These are the dishes I grew up loving, and I’m excited to share my version of Udupi-style Sambar and Rasam with you.
Udupi-Style Sambar
Servings: 4
Prep Time: 15 minutes
Cook Time: 30 minutes
Ingredients
For the Sambar:
1 cup toor dal (split pigeon peas), washed
~2 cups mixed vegetables (e.g. ½ cup chopped pumpkin or squash, 1 drumstick cut into pieces, ½ cup potato, 2 small eggplants), chopped
1 small tomato, chopped
2½–3 cups water
2 tbsp tamarind paste (or a small ball of tamarind, soaked)
½ tsp turmeric powder
½ tsp jaggery (optional, for a hint of sweetness)
Salt to taste
For the Masala Paste:
¼ cup fresh grated coconut (or frozen/thawed)
1 tbsp coriander seeds
1 tsp cumin seeds
1 tsp split urad dal (optional)
1 tsp split chana dal (optional)
2–3 dried red chilies (preferably mild Byadgi or Kashmiri)
½ tsp black peppercorns
½ tsp fenugreek seeds
5–6 fresh curry leaves
1 tbsp coconut or sesame oil (for roasting)
Water, as needed for grinding
For Tempering:
2 tsp coconut or sesame oil
½ tsp mustard seeds
½ tsp cumin seeds
A pinch of asafoetida (hing)
8–10 fresh curry leaves
Instructions
1. Cook the dal: In a pressure cooker or pot, combine the washed toor dal with a pinch of turmeric and 2 cups of water. Cook until very soft (about 3–4 whistles in a pressure cooker). Mash the dal and set aside.
2. Prepare the masala paste: In a small pan, heat 1 tbsp oil over medium heat. Add the coriander seeds, cumin, dals, fenugreek, peppercorns, and dried chilies. Roast, stirring, until aromatic and lightly golden. Add the grated coconut and curry leaves, and roast briefly until the coconut starts to brown. Let cool, then grind this mix to a smooth paste with a little water.
3. Cook vegetables: In a large pot or Dutch oven, heat a tablespoon of oil. Add the turmeric and the chopped vegetables and tomato. Stir for a minute, then pour in 2 cups of water, add salt, and bring to a boil. Reduce heat, cover, and simmer until the vegetables are almost tender (about 10–12 minutes).
4. Add tamarind and dal: Stir in the tamarind paste and jaggery. Once it comes to a boil and the raw tamarind smell disappears, add the mashed toor dal and mix well.
5. Add the spice paste: Pour the ground coconut-spice paste into the simmering pot. Stir and simmer gently for 3–5 minutes so all flavors meld. (The sambar will thicken as it sits – add a little water to adjust consistency as needed.)
6. Tempering: In a small pan, heat the remaining 2 tsp oil. Add mustard seeds; when they splutter, add cumin, a pinch of hing, and the curry leaves. Pour this hot seasoning over the simmering sambar, cover the pot, and let it sit for a minute to infuse. Stir once more and taste; add salt or jaggery if needed.
7. Serve: Garnish with fresh chopped coriander and a dash of lime juice if you like. Serve the sambar hot with rice, idlis, or dosas, and enjoy the mellow coconutty aroma of this Udupi specialty.
Udupi-Style Rasam
Servings: 4
Prep Time: 10 minutes
Cook Time: 20 minutes
Ingredients
Main Ingredients:
2 large ripe tomatoes, chopped
½ cup water (plus more during cooking)
2 cups water (for cooking the rasam)
1 tbsp tamarind paste (or soaked tamarind pulp)
1 tbsp jaggery or brown sugar
½ tsp turmeric powder
2 slit green chilies (adjust to taste)
1/4 cup toor dal (washed, then cooked until very soft)
2 tbsp Udupi-style rasam powder (store-bought or homemade)
Salt to taste
For Garnish:
A few curry leaves
Chopped coriander leaves
(Optional) 1 tsp freshly grated coconut
For Tempering:
1 tbsp coconut oil or ghee
1 tsp mustard seeds
½ tsp cumin seeds
A pinch of asafoetida (hing)
Instructions
1. Cook the dal: Pressure-cook the ¼ cup toor dal with a pinch of turmeric and enough water until very soft. Mash and set aside.
2. Boil tomatoes: In a saucepan, bring 2 cups of water to a boil with the chopped tomatoes, green chilies, turmeric and a little salt. When the tomatoes are very soft, mash them in the pot to release their juices.
3. Add seasonings: Stir in the tamarind paste, jaggery, and the rasam powder. Add the mashed dal and mix well. Add more water to reach your desired soup-like consistency. Bring the mixture to a gentle boil and simmer for 5–7 minutes so the flavors meld.
4. Finishing touches: Turn off heat and add a few curry leaves. (Optionally, stir in the grated coconut for richness.)
5. Tempering: In a small pan, heat the oil or ghee. Add mustard seeds; when they begin to pop, add cumin and a pinch of hing. Pour this fragrant seasoning over the hot rasam. Cover the saucepan and let the aromas infuse for a minute.
6. Serve: Give the rasam a final stir. Garnish with chopped coriander and serve piping hot. Udupi rasam is traditionally slightly sweet-spicy – the jaggery and hing give it that signature warmth. Enjoy it as a soup or ladle it over steamed rice with a drizzle of ghee.
Tips
Use fresh coconut and spices: Roasting the spice mix and freshly grated coconut brings out a nutty richness in the sambar. Don’t skimp on this step – it’s what gives Udupi sambar its deep flavor.
Choose your chilies: Udupi sambar is known for its mild, brick-red color. Using Byadgi or Kashmiri red chilies (with maybe one spicy chili) will give color without too much heat. Adjust the mix if you prefer it hotter or milder.
Balance jaggery and hing: The little bit of jaggery and hing in the rasam might seem odd, but they balance the tamarind’s sourness with sweetness and aroma. Be sure to include at least a pinch of each for authenticity.
Use coconut oil for tempering: Authentic Udupi rasam often uses coconut oil (or ghee) for the final seasoning, as it adds a subtle tropical fragrance.
Adjust consistency: Remember these dishes thicken as they sit. If your sambar or rasam becomes too thick after resting, simply add a little hot water and reheat to loosen it.
Closing Note
These Udupi-style sambar and rasam are a tribute to the simple temple cuisine of coastal Karnataka. The flavors are subtle but soulful – no onions or garlic, just wholesome lentils, fresh coconut, coriander, and traditional masalas. I hope this recipe brings you the same comfort it did for me, whether you’re enjoying a South Indian breakfast of idlis and dosas or a warm bowl over rice. Remember, the slow simmering and tempering are key: be patient as the ingredients meld, and your kitchen will soon be filled with that nostalgic aroma of home. Enjoy these healthy, vegan delights with family and friends, and maybe light a lamp or two – after all, this food was born in the light of temple faith and tradition!
Quinoa Upma blends ancient South Indian culinary traditions with modern superfood nutrition. Upma – a savory porridge typically made from roasted semolina (sooji) – has been a staple breakfast (and anytime meal) across India for centuries. Over time, cooks across regions adapted this simple dish, adding local grains, spices, and vegetables. Today’s health-conscious twist replaces semolina with protein-packed quinoa, a gluten-free “pseudocereal” seed rich in fiber, vitamins and minerals. Quinoa provides about 8 g protein and 5 g fiber per cup of cooked grains, and it contains all nine essential amino acids. By using quinoa, this upma becomes a one-pot vegan, gluten-free breakfast that still carries the familiar fragrance of mustard seeds, curry leaves and spices. In effect, Quinoa Upma honors the comforting spice-tempered flavors of traditional upma while boosting nutrition.
A vibrant bowl of Quinoa Upma with vegetables and cashews, garnished with lime and curry leaves.
Ingredients
1 cup quinoa – rinsed in cold water (removes bitterness).
2 cups water – for cooking (adjust if needed for fluffiness).
2 tablespoons oil (or ghee/coconut oil) – for tempering. Neutral oils like canola or sunflower also work well.
1 teaspoon mustard seeds – for traditional South Indian tempering.
1 teaspoon cumin seeds – adds aroma and flavor.
Pinch of asafoetida (hing) – optional (ensures gluten-free; gives umami).
4–5 curry leaves – fresh or frozen, for authentic flavor.
1 small onion, finely chopped – adds sweetness and texture.
1–2 green chilies, slit or chopped – or to taste (adds heat).
½ teaspoon grated ginger – optional (for warmth and digestion).
1 cup mixed vegetables, finely chopped – carrots, peas, bell peppers, green beans, corn, etc. (mix and match seasonal veggies).
Salt to taste.
Turmeric (optional) – a pinch for color and health benefits.
Handful of cashews or peanuts – optional (adds protein and crunch).
Fresh coriander (cilantro) – chopped, for garnish.
1–2 teaspoons lemon juice – optional, to brighten the flavor when serving.
Instructions
1. Rinse the quinoa: Place the quinoa in a fine-mesh strainer and rinse under cold running water until the water runs clear. This removes the natural saponin coating and any bitterness. Drain well.
2. Heat the tempering: In a deep skillet or saucepan, heat the oil over medium heat. When hot, add the mustard seeds and cumin seeds. Wait for the mustard to crackle and pop (about 30 seconds). Stir in the hing (if using), curry leaves, green chilies and grated ginger, and sauté for a few seconds until fragrant.
3. Sauté onions and vegetables: Add the chopped onion and a pinch of salt, and sauté 2–3 minutes until the onion turns translucent. Toss in the mixed vegetables and cashews (if using) and cook for another 3–4 minutes until the vegetables begin to soften.
4. Add quinoa and seasoning: Add the rinsed quinoa to the pan, stirring to coat it with the spices and oil. Season with salt and turmeric (if using). Stir everything together so the quinoa begins to toast lightly (1–2 minutes).
5. Cook the quinoa: Pour in the 2 cups of water and stir well. Increase heat to bring the mixture to a gentle boil. Then reduce to low heat, cover tightly, and let it simmer for 15–20 minutes (or until quinoa is tender and the water is absorbed). (If needed, check once or twice and add a splash more water to ensure the grains fully cook and stay fluffy.)
6. Steam and fluff: Once the quinoa grains look translucent and have little “tails,” remove the pan from heat. Keep it covered and let it rest for 5 minutes. Finally, uncover and fluff the quinoa upma gently with a fork. Stir in fresh lemon juice (if using) and garnish with chopped coriander. Serve hot.
Notes and Substitutions
Vegetables: Feel free to mix in any seasonal veggies you like. Common additions include shredded carrots, green peas, green beans, diced bell peppers, corn, broccoli or cabbage. For a simpler upma, use just onions, carrots and peas.
Spices: You can adjust the spice profile by adding chopped ginger, a pinch of turmeric, or even a few dried red chilies along with the mustard seeds. A dash of garam masala at the end adds warmth. For extra crunch, toss in roasted peanuts or fried cashews.
Tempering oils: A neutral vegetable oil works well. To deepen the South Indian flavor, you can use coconut oil or add a teaspoon of ghee at the end for aroma.
Grains alternative: While this recipe uses quinoa, you can also make a similar upma with oats, broken wheat (dalia), millets (like sorghum/jowar or foxtail millet), or even rava (semolina) if gluten is not a concern. Each substitute will change cooking time slightly.
Protein boost: Quinoa is already high in protein, but you can stir in tofu cubes or boiled chickpeas for an even heartier meal.
Make it vegan: This recipe is naturally vegan (no dairy). Just ensure your asafoetida is gluten-free if needed.
Tips for Fluffy Quinoa
Rinse well: Always rinse quinoa thoroughly in a fine-mesh strainer to remove the bitter-tasting saponin coating. This ensures a clean taste.
Water ratio: Use about 2 cups of water for every cup of uncooked quinoa. This 1:2 ratio (grain to liquid) reliably cooks quinoa through.
Cooking method: Keep the heat low once boiling and cook covered. Resist the urge to stir too often – just let the quinoa steam quietly. When the grains swell and “tails” appear, it’s done.
Rest before fluffing: After turning off the heat, leave the lid on and let the pan stand for 5 minutes. This steaming step lets any excess water absorb and yields plump, separate grains.
Fluff with fork: Use a fork to gently fluff the quinoa upma before serving, which helps separate any stuck grains. Avoid mashing – you want a light, fluffy texture.
Use hot water (optional): Some cooks use hot water or stock for the cooking liquid to speed up cooking. Just ensure it’s simmering before covering.
Batch cooking: You can prepare quinoa in advance (using the same 1:2 water ratio) and refrigerate it. For day-old quinoa, simply heat it in the pan with the spice tempering and skip the boiling step; cover for a few minutes to warm through.
Serving Suggestions
Quinoa Upma is best enjoyed hot, paired with classic South Indian accompaniments. Try serving it with coconut chutney or a tangy lemon pickle on the side. These condiments complement the upma’s savory, nutty flavors. Other great pairings include tomato-onion chutney, peanut (groundnut) chutney, or plain yogurt. For a complete breakfast spread, you might add a boiled egg or a side of sambar. In South India, a glass of fresh juice or filter coffee/masala chai also goes wonderfully with upma.
No matter how you serve it, this Quinoa Upma makes a warm, comforting, and nourishing start to the day – a modern, healthy twist on an Indian breakfast classic.
Ragi (finger millet) is an ancient whole grain prized for its nutritional value. Like other millets, it’s rich in protein, fiber, and antioxidants, yet naturally gluten-free. Finger millet stands out for its exceptionally high calcium content – higher than any other common cereal – making it a boon for bone and muscle health. Its low glycemic index and abundant fiber also help support steady blood sugar levels. With an earthy, nutty flavor and hearty texture, ragi is a versatile base for both sweet and savory Indian dishes. It’s long been used in South India for porridge, rotis and dosas, and now makes a deliciously nutritious pancake too.
Sweet Ragi Pancakes (Banana & Jaggery)
These sweet ragi pancakes combine mashed banana and jaggery for natural sweetness and moisture. The result is a fluffy, caramel-scented pancake with a hint of nutty whole-grain flavor. They make an indulgently healthy breakfast or snack, especially paired with fresh berries, yogurt, or a drizzle of honey.
Ingredients (Sweet Version)
1 cup ragi flour (finger millet flour)
½ cup whole wheat flour (or oat flour for a gluten-free option)
2 tablespoons jaggery powder (or brown sugar)
2 ripe bananas, mashed
½ teaspoon baking powder
Pinch of salt
1 teaspoon ground cardamom (optional, for warm flavor)
¾–1 cup milk (dairy or plant-based, as needed for batter consistency)
1 teaspoon oil or melted butter (to add to batter)
Additional oil or butter for cooking
Instructions (Sweet Version)
1. Mix wet ingredients: In a bowl, mash the bananas thoroughly. Stir in the jaggery powder until well combined. Pour in the milk and add the oil, whisking until smooth. (Warming the milk slightly can help dissolve the jaggery.)
2. Combine dry ingredients: In a separate bowl, whisk together the ragi flour, whole wheat flour, baking powder, salt, and cardamom. Gradually add the dry mix to the banana-milk mixture, stirring continuously. Mix until you have a thick, pourable batter. If it seems too stiff, add a splash more milk to adjust.
3. Rest the batter: Let the batter rest for 5–10 minutes. Ragi absorbs liquid, so resting helps hydrate the flour and makes the pancakes fluffier.
4. Cook the pancakes: Heat a non-stick skillet or griddle over medium heat and lightly grease it. Pour about 1/4 cup of batter per pancake onto the skillet. Cook for 2–3 minutes, until bubbles form on the surface and the edges look set. Flip carefully and cook the other side for another 1–2 minutes, until golden brown. Repeat with the remaining batter, adding a little oil to the pan as needed.
5. Keep warm: Stack the cooked pancakes on a plate and keep them warm (cover loosely with foil) while you cook the rest.
These sweet ragi pancakes are naturally eggless and use the banana as a binder. You can top them with yogurt, fresh fruit, maple syrup or a smear of peanut or almond butter for extra flavor and protein.
Savory Ragi Pancakes (Veggie & Spice)
Enjoy a savory twist on pancakes by mixing ragi flour with spices and vegetables. This batter is flavored with turmeric, cumin, and ginger, and studded with veggies like carrots and onions for extra color and nutrients. These hearty pancakes are satisfying on their own, or serve them with chutney or yogurt for a wholesome meal.
Ingredients (Savory Version)
1 cup ragi flour
¼ cup semolina (sooji) or rice flour (for a slightly crisp texture)
3/4 cup plain yogurt (curd) (dairy or plant-based; thinned with water if needed)
Water as needed (about ½ cup) to make a thick batter
¼ cup finely chopped onion
¼ cup grated carrot
¼ cup chopped spinach or other greens
2 tablespoons chopped fresh cilantro (optional)
Oil or ghee for cooking
Instructions (Savory Version)
1. Prepare the batter: In a bowl, whisk together the ragi flour, semolina, salt, cumin, turmeric, and chili powder. Stir in the ginger-garlic paste. Add the yogurt and about ½ cup of water, mixing until a thick, smooth batter forms. Add a bit more water if necessary to achieve a pourable consistency (similar to pancake batter).
2. Add vegetables: Fold the chopped onion, grated carrot, spinach, and cilantro into the batter. Stir well to distribute the vegetables evenly. (For extra tenderness, you can let the batter rest 5–10 minutes to soften the veggies.)
3. Cook the pancakes: Heat a lightly oiled skillet over medium heat. Pour a ladleful of batter onto the skillet and gently spread into a small circle (about 4–5 inches across). Cover with a lid and cook for 2–3 minutes, or until the edges start to brown and the top is mostly set. Drizzle a little oil or ghee around the edges. Flip the pancake and cook the other side for another 2 minutes, until golden and cooked through.
4. Repeat: Continue with the remaining batter, adding more oil between pancakes as needed. Serve each pancake hot off the skillet.
These savory ragi pancakes have a light crisp edge and soft interior. They can be made vegetarian and dairy-free by using plant-based yogurt.
Optional Add-ins & Swaps
Eggless: Both versions above are naturally egg-free. The mashed banana (in the sweet pancakes) and yogurt (in the savory pancakes) help bind the batter. You can also stir in 1 tablespoon of ground flaxseed or chia seeds mixed with 3 tablespoons water (let sit 5 min) as an “egg” substitute if you like.
Vegan: Make it fully vegan by using plant-based milk (almond, soy, oat) and replacing butter/ghee with coconut oil or vegetable oil. For the sweet pancakes, maple syrup or extra mashed banana can sweeten in place of honey or dairy honey. For the savory version, use a dairy-free yogurt or thin the batter with water instead of yogurt.
Flour alternatives: Feel free to substitute some or all of the whole wheat flour with almond flour, oat flour, or extra ragi flour (though 100% ragi can be dense, so a mix is usually best). You can also use buckwheat or millet flours in place of wheat for a gluten-free mix.
Extra add-ins: Customize your batter by stirring in extras. In the sweet batter, try adding chopped nuts (almonds, walnuts), seeds (sunflower, chia) or dried fruits (raisins, chopped dates). In the savory batter, add finely diced bell pepper, peas, grated zucchini, or chopped scallions. A sprinkle of sesame seeds or nigella seeds on top while cooking can add texture and flavor.
Serving Suggestions
Sweet pancakes: These taste great with a drizzle of honey or maple syrup, or a dollop of yogurt or nut butter. Top them with fresh fruits like berries or banana slices for a beautiful breakfast stack. A spoonful of jam or fruit compote is also delicious.
Savory pancakes: Serve hot with Indian-style condiments. Coconut-cilantro chutney or spicy tomato chutney make perfect accompaniments. Plain yogurt (or raita) and pickles (achar) also complement the nutty pancakes nicely. A squeeze of fresh lemon juice over the savory pancakes brightens the flavors.
Whether you choose the sweet banana version or the spiced vegetable version, these Ragi Pancakes are a warm, wholesome way to start the day. Packed with whole-grain goodness and flavor, they’re sure to become a favorite healthy breakfast or snack in your home. Enjoy!
Sources: Ragi (finger millet) nutrition facts and health benefits are supported by nutrition research. For example, finger millet has an exceptionally high calcium content and millets are rich in fiber, protein, and antioxidants. These qualities make ragi a nutritious choice for gluten-free diets and blood sugar management. Techniques for vegan substitutions are adapted from expert recipes.
Introduction: There’s nothing like starting the day with a warm, crispy dosa. Lately, I’ve been experimenting with healthier twists on traditional recipes, and that’s how I fell in love with Whole Chana Dosa. This unique South Indian crepe swaps the usual urad dal for whole black chickpeas (kala chana), creating a high-protein, high-fiber batter that yields delicious dosas without any fermentation wait time. The first time I tried it, I was amazed by how crispy and flavorful the dosas turned out, with a nutty aroma from the chickpeas. It reminded me of pesarattu (the Andhra moong dosa) but with an entirely different taste – and it stays tasty even after cooling down, making it great for lunch boxes too!
Using kala chana in a dosa is a game-changer for health-conscious foodies. These black chickpeas are often called a powerhouse of nutrition, packed with plant-based protein and dietary fiber. In fact, 100 grams of kala chana provides roughly 20 g of protein and 12 g of fiber, which help keep you full longer and energized throughout the day. The combination of fiber and low-glycemic carbs in chana means this dosa offers steady, slow-release energy without spiking blood sugar levels. As someone who’s always on the lookout for diabetic-friendly or weight-management recipes, this has quickly become a favorite. Plus, it’s completely vegan and gluten-free, fitting perfectly into a variety of healthy diets.
Another thing I adore about Whole Chana Dosa is the ease of preparation. Unlike traditional dosa batter that needs overnight fermentation, this recipe only requires a bit of planning to soak the ingredients, and then you can blend and cook – no fermentation required. On busy mornings, I simply soak the rice and chana the night before. By breakfast time, the ingredients are ready to be ground into a batter and turned into golden-brown dosas in minutes. It’s instant gratification for dosa lovers! The batter doesn’t need to sit and sour (though you can ferment if you prefer a slight tang), so it’s perfect for those days when you want homemade dosas without the long wait. Despite the shortcut, the dosas come out soft on the inside and crispy on the edges, and my family can’t really tell the difference from regular dosas. In fact, this recipe uses a higher proportion of protein-rich chana to rice, making it a nourishing breakfast choice for both kids and adults.
Now, let’s get into the details of how you can make this Whole Chana Dosa at home. I’ll walk you through the ingredients, step-by-step instructions (with some handy tips), a few fun variations, and how best to serve and enjoy these dosas. Whether you’re a seasoned cook or a beginner, you’ll find this recipe straightforward and rewarding. Let’s get cooking this wholesome, protein-packed dosa!
Ingredients
To make approximately 8–10 Whole Chana Dosas (Black Chickpea Dosas), you will need:
Whole black chickpeas (kala chana) – 1 cup (dried measure).
Raw rice – 1 cup. You can use regular short-grain rice or idli/dosa rice.
Fenugreek seeds (methi) – ½ teaspoon (optional, for flavor and aiding digestion).
Water – for soaking and grinding (around 2 to 3 cups, as needed).
Salt – ~1 teaspoon (or to taste).
Oil – as needed for greasing and roasting the dosas (use any neutral oil or traditional sesame/gingelly oil for authentic flavor).
Optional add-ins (for extra flavor, can be blended into the batter):
Fresh ginger – 1 inch piece.
Green chilies – 1–2, or to taste (for a spicy kick).
Cumin seeds – ½ teaspoon.
A few curry leaves or coriander leaves – for herbal aroma.
A pinch of turmeric – for color and subtle earthiness.
These optional ingredients will give your chana dosa a lovely savory flavor, almost like a spiced adai. You can omit them for a plain version (which will have a mild nutty taste from the chickpeas).
Step-by-Step Instructions
1. Soaking: In a large bowl, combine the whole kala chana and rice (add the fenugreek seeds here if using). Rinse them thoroughly a couple of times. Pour in enough fresh water to cover the grains and legumes by a few inches. Soak for at least 6–8 hours or overnight. Soaking is crucial – it softens the chickpeas (which are quite hard when dry) and ensures they grind up easily. (Tip: If you’re short on time, use hot water to soak and give at least 4 hours, but overnight is best for smooth grinding.)
2. Grinding the Batter: After soaking, drain the water and rinse the chana and rice once more. Transfer them to a blender or wet grinder. If you soaked everything together, you can grind together; if you soaked separately for any reason, you can combine them now. Add the optional ginger, chilies, and cumin seeds at this stage for a spiced version. Pour in ¼ to ½ cup of water to help with grinding, and grind the mixture. Stop to scrape down the sides and add more water as needed. Grind to a batter that is mostly smooth – it can be slightly coarse (a bit of graininess can make the dosa crispier), but there should be no whole chana bits. Aim for a consistency similar to regular dosa batter: pourable but not super thin. (If using a smaller mixer, grind in batches to avoid overheating.)
3. No Fermentation Needed: Once the batter is ready, transfer it to a bowl. At this point, unlike a traditional dosa, you do not need to ferment it. This batter can be used immediately to make dosas – a huge time-saver! Just add salt (about 1 teaspoon or adjust to taste) and mix the batter well. You’ll notice the batter is a light brownish-beige from the black chickpeas. If you prefer, you can let the batter rest for 10–15 minutes while you preheat the pan, but lengthy fermentation isn’t required. (If you do like a hint of sourness, you could let it sit for 4–6 hours in a warm place, or even overnight in the fridge; but this is purely optional.)
4. Preparing the Pan: Heat a dosa tawa or flat griddle on medium heat. Cast-iron tawas work great for crisp dosas (ensure it’s well seasoned), or you can use a non-stick pan for ease. Once the pan is hot, grease it lightly with a few drops of oil. You can use a half onion or paper towel to spread the oil evenly. The pan should be hot but not smoking – you can test by sprinkling a few drops of water; they should sizzle and evaporate quickly.
5. Spreading the Dosa: Stir your batter (it tends to thicken a bit on standing; add a tablespoon of water if it has become too thick). Pour a ladleful of batter onto the center of the hot pan. Using the back of the ladle, spread the batter in a spiral motion. Because of the chickpeas, you might find it a tad thicker to spread than a regular dosa batter – that’s okay. You can make it slightly thick like an uttapam or thin like a crepe, as you prefer (thin ones will be crisper, thick ones will be soft). Note: You might not get paper-thin dosas; chana dosas usually can’t be as ultra-thin as plain dosas, but they will still turn out crisp. Aim for a medium-thin circle about 6–8 inches in diameter.
6. Cooking: Drizzle a little oil (½ tsp to 1 tsp) around the edges of the dosa and a few drops on top. This helps it crisp up and release from the pan. Let the dosa cook on medium heat until the bottom side is golden-brown. You’ll see the edges turning crisp and lifting slightly from the pan. Because this batter has dal (chickpeas) but no urad, it may take a bit longer to cook and achieve that golden color – be patient and avoid high heat (which can burn it). Once the bottom is nicely browned (about 2–3 minutes), gently slide a spatula under the dosa. If you spread it thin, you might not need to flip it. For slightly thicker dosas, or just to ensure even cooking, flip the dosa and cook the other side for another 1 minute until lightly cooked. Roast both sides on a medium flame for the best texture (especially if the dosa is thick or you added onions/herbs on one side). When done, it should be crispy at the edges and cooked through in the middle.
7. Repeat: Transfer the cooked dosa to a plate. Before making the next one, check if the pan is too hot (reduce heat slightly or splash a bit of water and wipe, if needed, to cool it down so the batter spreads evenly). Stir the batter each time before pouring, as ground chana can settle a bit. Continue spreading and cooking dosas with the remaining batter. You do not need to ferment or wait – just make dosas one after the other. If the batter becomes too thick as it sits, mix in a spoon or two of water. If it’s too thin and not forming shape on the pan, you can mix in a tablespoon of rice flour to thicken it slightly.
8. Serving: Serve the hot Whole Chana Dosas immediately for the best taste and texture (they’re crisp outside and soft inside when hot). They pair beautifully with chutneys and other sides – see Serving Suggestions below for ideas. Enjoy your healthy, homemade protein-rich dosas!
Optional Variations and Tips
Spice & Herb Variations: As mentioned, you can customize the batter by blending in aromatics. For a spicy kick, grind 1–2 dry red chilies or extra green chilies with the batter (this can turn it into a “adai” style dosa with heat). You can also stir in finely chopped onions, curry leaves, or coriander leaves into the finished batter for extra flavor and texture. A pinch of asafoetida (hing), as used in some traditional recipes, can add a nice depth (especially if you skip onions/garlic). These additions make the dosa even more flavorful and aromatic.
Ratio of Rice to Chana: The recipe above uses 1:1 ratio for simplicity and balance. You can experiment with ratios – some recipes use more chana and less rice for an even higher protein dose. For example, using 1 cup chana with ½ cup rice will still work and yield slightly softer dosas that are super high in chickpea content. If you prefer extra crisp dosas, you can increase the rice portion (e.g., 2 parts rice to 1 part chana, as some do), but keep in mind this reduces the protein percentage. Feel free to find your perfect balance between crispiness and protein richness.
Using Sprouted Chana: If you have time, try sprouting the kala chana before making dosa. Sprouted legumes can be even more nutritious and easier to digest. You would soak the chana, then drain and let them sprout for a day or two. Sprouted chana can be used in the same way to grind the batter – it’s a great way to boost nutrient absorption.
Texture Tips: If your dosas are coming out too thick or chewy, try grinding the batter a bit smoother and thinning it with a little more water. A smooth batter will allow you to spread thinner, resulting in crisper dosas. Conversely, if you want soft, spongy dosas, you can keep the batter slightly thick and even cover the dosa while cooking to trap steam. Remember, chana dosa batter ferments quickly on its own if left out (thanks to naturally occurring bacteria on legumes). If you make the batter ahead and refrigerate it, it might develop a mild fermentation by next day – still tasty, but the fresh batter flavor is best.
No Blender? If you don’t have a powerful blender, you can try using chickpea flour (besan) for an instant version of this dosa (though the taste will differ). Mix 1 cup besan with ¼ cup rice flour, add spices, and water to make a batter. This can be cooked immediately as a quick fix. However, for authentic flavor and nutrition, using whole soaked chana is recommended.
Leftover Batter: You can store any leftover batter in the fridge for a day. It may thicken; just add water to bring it to consistency before use. The batter might acquire slight sour notes as it sits (which some people enjoy). If it smells overly fermented or foamy, add a pinch of baking soda and stir – this will refresh the batter and also make dosas a bit lighter. If the batter became too thin, a tablespoon of rice flour can help thicken it back up.
Serving Suggestions
Whole Chana Dosa is best enjoyed hot off the griddle. Here are some serving ideas to complement its hearty, nutty flavor:
Coconut Chutney: A classic accompaniment for any dosa. The cool, creamy coconut chutney (try it with a hint of ginger or mint) goes wonderfully with the earthy taste of chana dosa. Tip: Ginger chutney (allam chutney) or peanut chutney also make great pairings.
Spicy Tomato or Onion Chutney: Tangy and spicy chutneys (like tomato-onion chutney or red chili chutney) add a nice zing. The sweetness of tomato balances the dosa’s nuttiness.
Sambar: For a more filling meal, serve these dosas with a bowl of hot sambar (South Indian lentil-vegetable stew). The protein in the dosa and the protein in sambar (made from lentils) make it an incredibly satisfying combo.
Dry Chutney Powders (Podi): You can sprinkle molagapodi (spiced lentil powder, aka “gunpowder”) on the dosa and drizzle with a touch of ghee or oil. This turns the chana dosa into a flavorful, spicy treat.
Stuffing Option: Transform your chana dosa into a masala dosa by stuffing it! As suggested by some, you can fill it with a simple potato masala (spiced potato filling) to make a Chana Masala Dosa. The crispy chickpea dosa with soft curried potatoes inside is a match made in heaven. Just remember to make the dosas slightly thicker if adding a moist filling, so they hold up.
Chutney Powder & Jaggery: For kids, sometimes a sprinkle of peanut chutney powder and a tiny bit of jaggery (unrefined cane sugar) on the dosa can be enjoyable – a mix of sweet and savory on the high-protein base.
Don’t forget a cup of hot South Indian filter coffee or masala chai on the side to complete the experience if you’re serving this for breakfast! However you serve it, relish each bite knowing you’re getting a dose of health with deliciousness.
Conclusion & Personal Take
Whole Chana Dosa has become a regular in my home for all the right reasons – it’s healthy, easy, and incredibly tasty. With its crispy edges, soft center, and rich savory flavor, it’s hard to believe this dosa is made with just soaked chickpeas and rice without the typical fermentation. It’s a great way to include the goodness of legumes in your diet in a fun, appetizing form. After learning about how nutritious black chickpeas are – loaded with protein, fiber, and even aiding in appetite control and blood sugar management – I appreciate this dish even more.
I often tell my friends who are looking to add more protein to their vegetarian diet about this recipe. It’s also an excellent option for those who have trouble digesting traditional dosa (which uses urad dal) or want to avoid the fermentation process. Each bite of this dosa feels like comfort food and health food combined. Plus, it’s beginner-friendly – even if you’re new to making dosas, this batter is quite forgiving. My advice is to definitely give Whole Chana Dosa a try. You might be pleasantly surprised, just like I was, at how such a simple ingredient swap can lead to a breakfast that’s both nourishing and delightful. Happy cooking, and enjoy your protein-packed dosa!
References: Nutritional benefits of kala chana (black chickpeas) have been highlighted from reliable sources to emphasize the healthfulness of this recipe. This dosa is inspired by traditional Indian recipes and personal experimentation, combining the wisdom of Indian home cooking with a healthy twist. Enjoy your meal!
Rainy mornings in my hometown meant two things: wet slippers and warm breakfasts. And if there were leftover idlis from the previous night, Amma would grin mischievously and say, “Don’t open the tiffin today — I’ve packed something special.”
Instead of tossing those cold, plain idlis, she would slice them up, toss them with onions, curry leaves, and a fiery tomato masala, and turn them into something magical: Masala Idli Fry.
It wasn’t just a recipe; it was a reminder that no food should ever go to waste — not when a little tadka and love can turn it into a brand-new dish.
📝 Ingredients
Main:
6–8 Leftover idlis (chilled works best)
1 tbsp oil
1 tsp mustard seeds
½ tsp urad dal (optional, for crunch)
1 sprig curry leaves
1 medium onion, chopped
1–2 green chilies, slit
1 small tomato, finely chopped
¼ tsp turmeric powder
½ tsp red chili powder
½ tsp sambar powder (or pav bhaji masala)
Salt to taste
Fresh coriander leaves, chopped
Lemon juice (optional)
🔪 Method
1. Prep the Idlis
Cut idlis into bite-sized cubes.
If they’re soft or fresh, refrigerate for 20–30 minutes before frying. Chilled idlis hold their shape better.
2. Fry the Idli (Optional but yummy!)
In a pan, add 1 tsp oil and shallow fry the idli cubes until they’re golden on the edges. Set aside. This adds texture and prevents them from turning mushy later.
3. Make the Masala
In the same pan, heat the remaining oil. Add mustard seeds. Let them crackle.
Add urad dal and curry leaves. Sauté for 10 seconds.
Add chopped onions and green chilies. Sauté till golden brown.
Add tomatoes and cook until soft and pulpy.
Add turmeric, red chili powder, sambar or pav bhaji masala, and salt.
Mix well and let the masala cook for 1–2 minutes on medium flame.
4. Toss the Idlis
Add the fried (or plain) idli cubes into the masala.
Gently toss until each piece is coated in the spicy mix.
Cook for 2 more minutes on low flame so the idlis soak in the flavors.
5. Finish
Turn off the flame. Garnish with coriander leaves.
Squeeze a bit of lemon juice for that extra zing (optional).
🍽️ Serving Suggestions
Best served hot with a cup of ginger tea or filter coffee.
Makes a great after-school snack, evening tiffin, or even a quick lunchbox filler.
For variation, you can add capsicum, boiled corn, or paneer cubes.
💡 Tips & Tricks
Always use cold or day-old idlis — they hold shape better when tossed.
Want it crispier? Air-fry or deep-fry the idlis before mixing with masala.
No leftover idlis? Just steam a fresh batch and let them cool before using.
❤️ Why I Love This Recipe
This is not just a way to use leftovers — it’s a reminder that creativity in the kitchen often starts when we look at something ordinary and decide to treat it like gold.
Masala Idli Fry is humble, homey, and full of heart — just like the best kind of food always is.
Bedmi Pooris (crispy urad-dal-stuffed puris) with a bowl of hot Aloo Sabzi – a classic combination that instantly transports many North Indians to festive mornings of their childhood. In the lanes and dhabas of Delhi, Agra and Mathura, this duo is celebrated as a comforting breakfast. In fact, recipe writers note that “Bedmi Puri is a favourite street food of Delhi, Agra, [and] Mathura”, often paired with spicy potato curry. It’s known by many names (Bedai Puri, Bedvi Puri) and hails from Uttar Pradesh—Agra, Mathura and Aligarh in particular. Each crispy, wheat-and-dal puri is filled with a warmly spiced urad-dal mixture, so that every bite is both crunchy and deeply savory. The dish tastes best when paired with spicy, chatpati aloo sabzi – a thin, tangy potato curry that perfectly balances the richness of the puris.
Ingredients
For the Bedmi Poori: Whole wheat flour (atta) – about 2 cups; semolina (sooji) – ~½ cup; a pinch of baking soda; salt to taste; 2–3 tbsp oil or ghee. Stuffing: 1 cup dhuli urad dal (split black gram, soaked 4–5 hours); finely chopped 1–2 green chilies; 1-inch ginger (grated); a few tablespoons chopped cilantro; ¼ tsp each red chili powder, garam masala, amchur (dry mango) powder; a big pinch of asafoetida (hing); salt. (These spices in the dal paste give the stuffing its characteristic tangy, spicy flavor.)
For the Aloo Sabzi: 3–4 medium potatoes (boiled, peeled, roughly crushed); 3–4 ripe tomatoes (pureed) or 2/3 cup canned tomato purée; 2 tbsp oil. Whole spices for tempering: 1 bay leaf, 2–3 cardamom pods, 4–5 cloves, 1 tsp fennel seeds, 1 tsp cumin seeds. Other spices: 1 tsp turmeric, 1–2 tsp red chili powder (adjust to taste), ½–1 tsp coriander powder, salt. Optional: 1 tbsp roasted gram flour (besan) or a pinch of fenugreek (kasuri methi) for extra body. A thumb of ginger (julienned) and a couple of slit green chilies add fresh heat. Fresh cilantro to garnish. (A typical recipe uses a hearty spice mix including bay leaf, cardamom, cloves, fennel, cumin and ginger in the tempering before adding the tomato base.)
Step-by-Step Preparation
1. Soak and grind the dal stuffing: Drain the soaked urad dal. Grind it coarsely with a little water, incorporating the whole spices (fennel, cumin) and green chili. If the paste is too smooth, the puris won’t puff well; too coarse and they may not seal properly. Transfer this dal paste to a bowl. Stir in red chili powder, garam masala, amchur powder, asafoetida and salt, then mix thoroughly. (Nishamadhulika suggests you can also lightly roast this mixed stuffing in a pan for 2–3 minutes for extra aroma.) Set the flavorful dal stuffing aside to cool slightly.
2. Make the dough: In another bowl, combine the wheat flour, semolina, a pinch of baking soda, salt and oil. Mix well so the flour is crumbly. Gradually add water and knead into a smooth, stiff dough (a little firmer than for regular pooris). Knead briefly more once dough comes together. Cover and let it rest 20–30 minutes. (Resting hydrates the semolina and firms the dough; as Nishamadhulika notes, “cover the dough and keep it aside for 20 minutes” before shaping.) The dough should be pliable but not sticky.
3. Stuff and roll the puris: Divide the dough into small golf-ball-sized portions and shape into smooth balls. Also divide the dal stuffing into equal portions (about 15–18, or one per dough ball). Flatten one dough ball in your palm and place a portion of stuffing in the center. Carefully seal the edges, enclosing the dal mixture completely. Gently flatten the stuffed ball. Lightly oil a rolling pin and gently roll each stuffed ball into a round puri about 3–4 inches across (a bit thicker than a regular poori so it doesn’t tear). Dust with flour as needed. Repeat for remaining balls.
4. Fry the Bedmi Pooris: Heat 1–1.5 inches of oil in a heavy kadai or deep pan over medium-high heat. Test the temperature: a small piece of dough should sizzle and puff immediately. Slide one puri into the hot oil and gently press with a slotted spoon to help it puff up into a ball. Fry on medium heat, turning once, until both sides are golden and crisp. (If oil is too cool the pooris will absorb oil and sag; if too hot they brown too fast. Keep it hot enough for a quick puff but moderate the flame to crisp slowly.) Remove the puri and drain on paper towels. Fry the rest similarly. You should end up with puffed, golden Bedmi Pooris that are slightly thicker and crunchier than regular pooris.
5. Cook the spicy Aloo Sabzi: While the pooris fry, prepare the potato curry. Heat oil in a saucepan over medium heat. Add the bay leaf, cardamoms, cloves, fennel and cumin to the oil and let them sizzle briefly. Then add the ginger and slit green chilies; sauté 30 seconds. Pour in the tomato purée and stir. Cook on medium heat until the tomatoes thicken and the oil separates at the edges. Now add turmeric, red chili and coriander powders and roasted besan. Mix well and sauté for a minute. Add about ¾–1 cup water and salt, and bring to a boil. Then toss in the crushed potatoes and stir gently to coat them. Simmer the curry for 3–5 minutes so the potatoes absorb the spices. Finally, add a pinch of garam masala, kasuri methi and chopped cilantro; stir and turn off the heat. The result is a thin, tangy potato curry – Rasedaar Aloo Sabzi – perfect for dipping. (This “thin gravy” style is traditional, so don’t worry if it’s looser than other curries. Dunking the hot puris into it is part of the fun.)
6. Serve hot: Plate the crisp Bedmi Pooris immediately after frying and ladle the hot aloo sabzi into a bowl. Serve them steaming together. Traditionally, a dollop of mint-coriander chutney or a spoonful of sweet yogurt (raita) accompanies them. These puris are best enjoyed fresh – the contrast of the crunchy puri and the piping-hot, spicy potato curry is irresistible. Sprinkle extra cilantro on the sabzi and perhaps offer pickles or a suji halwa on the side to complete the festive spread.
Tips for Success
Oil temperature: Always heat the oil well. It should be hot enough that the puris instantly puff when added. If the oil is lukewarm, the pooris will absorb oil and go limp. As one recipe notes, “oil should be really hot otherwise puri will not puff up.” Press gently on each puri during frying to encourage puffing.
Rest the dough: Don’t skip the resting time. Cover the kneaded dough and let it sit for about 20–30 minutes. This gives the semolina time to absorb moisture and firm up, yielding puffier, crispier pooris.
Season well: The secret to flavorful Bedmi Poori is in the stuffing. Include fragrant spices (asafoetida, red chili, amchur, garam masala, ginger and green chili) in the urad dal paste. Asafoetida (hing) is especially traditional and adds an unmistakable aroma.
Crunch factor: Semolina (suji) in the dough adds crunch. If you prefer extra crispness, you can increase it slightly or add a pinch of crushed fennel or ajwain (carom seeds) to the dough.
Serve promptly: These pooris are best eaten immediately, piping hot. They turn soft if left standing. Pair them with the hot aloo sabzi and condiments right away to enjoy the full “phut phut” crunchy texture.
Accompaniments: Serve the Bedmi Pooris with sides like mint-coriander chutney, sweet yogurt (raita) or pickle. As Nishamadhulika suggests, they traditionally go well with Aloo Masala and Suji Halwa for special occasions. Fresh lemon wedges can also brighten the tangy curry.