Snacks, Street Foods

KFC-Style Crispy Fried Chicken Drumsticks Recipe

When I think of a festive family treat, crispy fried chicken drumsticks always come to mind. I still remember the excitement of biting into my first KFC drumstick as a kid – the crunch of that golden crust and the juicy, flavorful meat inside was pure bliss. Today, I bring that joy to my own kitchen. No more drive-thru needed – with a little patience and the right spices, you can recreate those famous KFC-style drumsticks at home, and even add your own pinch of masala to make them extra special. (Fun fact: the original KFC recipe is actually pressure-fried chicken seasoned with 11 secret herbs and spices, but don’t worry, we’ll get amazing results with simple tools and techniques!)

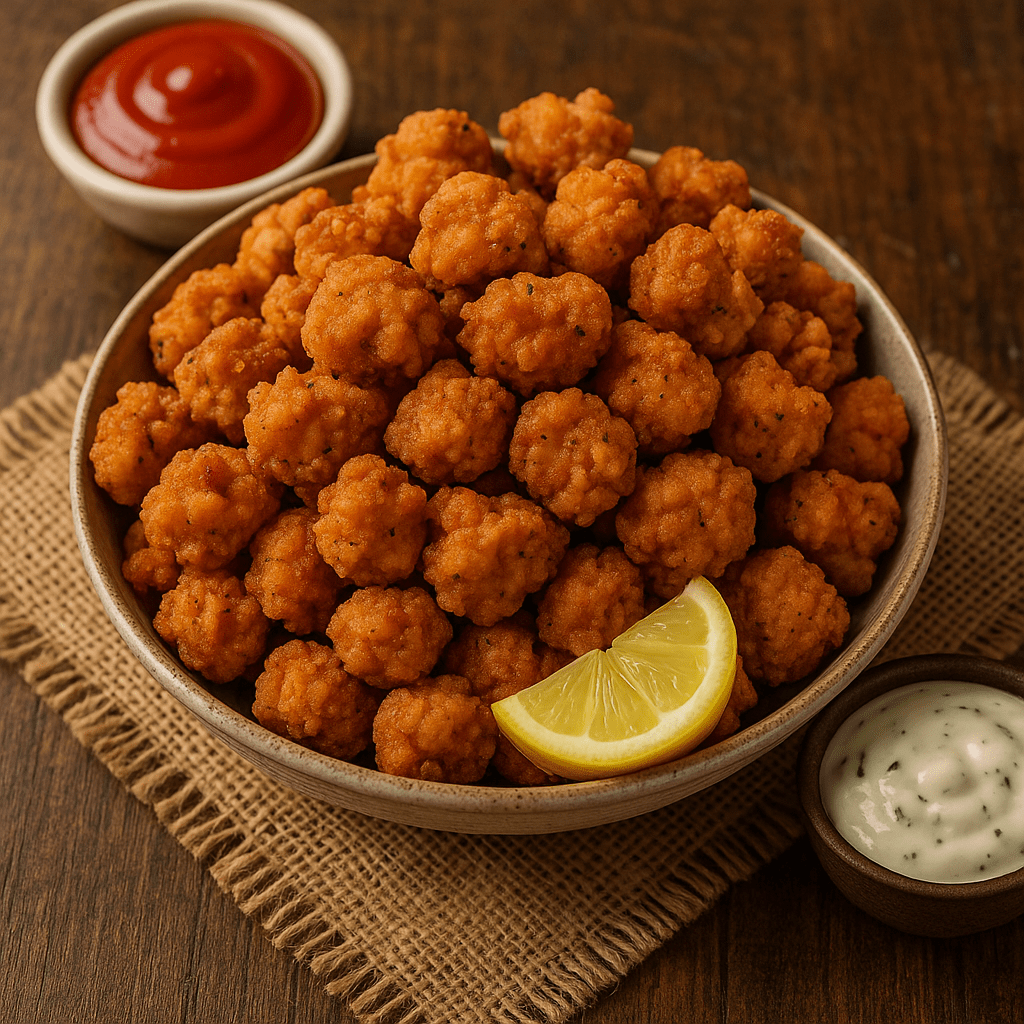
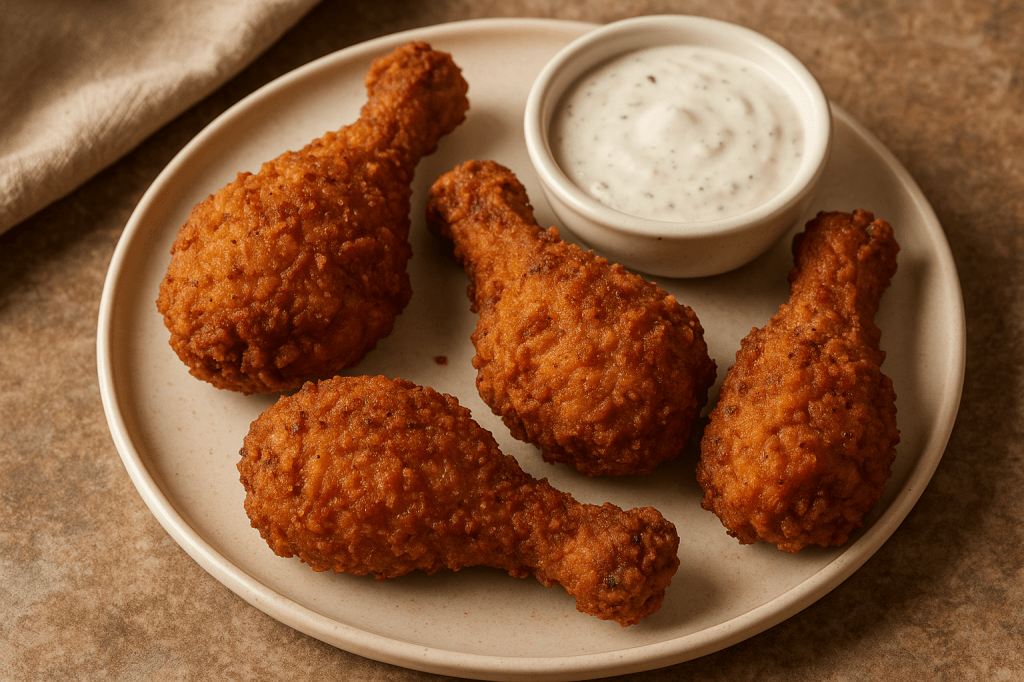
Two crunchy, golden-brown fried chicken drumsticks served with a creamy dipping sauce. The perfectly fried crust hides tender, juicy chicken inside – a homemade KFC-style delight.

Just looking at these crispy drumsticks makes my mouth water. Each piece is coated in a spiced crunchy crust that shatters pleasantly with every bite, giving way to succulent, well-seasoned meat inside. The aroma of warm spices fills the kitchen as they fry, instantly bringing back memories of festive family dinners and fun weekend feasts. Whether it’s a rainy day indulgence or a game-night centerpiece, these fried chicken drumsticks always disappear fast – they’re that good. In the recipe below, I’ll walk you through how to marinate the chicken for ultimate juiciness, coat it for the perfect crunch, and fry it to golden perfection. Plus, I’ve included all my tried-and-true tips (learned over many batches of frying!) to ensure your homemade fried chicken is a finger-licking success. Let’s get frying! 🍗🎉

Ingredients

Chicken Drumsticks – 8 to 10 pieces, skin-on. (Using drumsticks and thighs is ideal for juicy results; everyone loves a drumstick!)

Buttermilk – 2 cups (or make your own by mixing 2 cups milk with 4 Tbsp lemon juice/vinegar, let it sit until it curdles).

Eggs – 2, beaten (helps bind the coating and adds extra crunch).

All-Purpose Flour (Maida) – 2 cups, for the coating.

Cornstarch – 1/2 cup, for the coating (secret to a crispier crust).

Baking Powder – 1 teaspoon (helps create a light, airy crust).

Spices and Seasonings:

Salt – 2 teaspoons for the marinade + 1 teaspoon for the coating (divided). Salt is critical for flavor and juiciness (acts as a simple brine).

Black Pepper – 1 teaspoon for marinade + 1/2 teaspoon for coating.

Paprika or Kashmiri Red Chili Powder – 1 to 2 teaspoons for marinade (adds color and mild heat) + 1 teaspoon for coating.

Garlic Powder – 1 teaspoon for coating (you can also add 1 Tbsp fresh garlic paste to the marinade for extra flavor).

Onion Powder – 1 teaspoon for coating.

Dried Mixed Herbs (Italian seasoning or thyme/basil/oregano blend) – 1 to 2 teaspoons in marinade + 1 teaspoon in coating (mimics those “11 herbs” in KFC).

(Optional) Garam Masala – 1/2 teaspoon in marinade (optional, for an Indian twist – it adds a warm, spicy depth if you like a hint of masala in your chicken).

(Optional) Cayenne Pepper or Red Chili Powder – 1/2 teaspoon in coating (for extra kick, adjust to taste).


Oil for Frying – about 1.5 to 2 liters of a neutral high-heat oil (like vegetable, canola, or peanut oil). Enough to deep-fry in a heavy pot or deep pan.


Step-by-Step Instructions

1. Marinate the Chicken: Rinse and pat dry the drumsticks. In a large bowl, combine the buttermilk, beaten eggs, 2 tsp salt, 1 tsp black pepper, paprika, and the mixed herbs (plus garlic/ginger paste if using). Submerge the chicken pieces in this marinade. Cover and refrigerate for at least 4 hours, or for best results, overnight. (Longer marination makes the chicken ultra moist and flavorful.)


2. Prep the Coating: In a separate mixing bowl, whisk together the flour, cornstarch, baking powder, 1 tsp salt, 1/2 tsp black pepper, 1 tsp paprika, garlic powder, onion powder, and 1 tsp mixed herbs. This dry mixture will be the crispy coating. Make sure it’s well combined.


3. Dredge the Drumsticks: Remove the marinated drumsticks from the fridge about 30 minutes before frying (letting them come closer to room temp prevents the oil temperature from plummeting when frying). One by one, let the excess marinade drip off each piece, then roll the chicken in the flour mixture. Press the flour onto the chicken to form a nice even coat. You can do a single coat or, for extra crunch, do a double dredge: dip the flour-coated piece back into the buttermilk marinade, then coat in flour again for a thicker crust. Place the coated pieces on a plate or rack and rest them for 5-10 minutes (this helps the coating adhere before frying).


4. Heat the Oil: In a deep heavy pot or Dutch oven, pour in oil to a depth of about 2-3 inches and heat it to 350°F (175°C). Use a thermometer for accuracy if possible. (A heavy pot with high sides is safest for frying and helps maintain temperature.) Adjust the heat to keep the oil around [330–350°F] during frying – this is the sweet spot for a golden crust and fully cooked interior.


5. Fry the Chicken: Fry the drumsticks in batches; do not overcrowd the pan (frying too many at once can lower the oil temperature and make the chicken greasy or soggy). Add 2-3 drumsticks at a time to the hot oil. You should see a lively sizzle. Fry for about 12–15 minutes per batch, turning occasionally for even color, until the drumsticks are deep golden-brown. If you have an instant-read thermometer, check that the thickest part of the meat reaches 165°F (this ensures the chicken is cooked through). The crust will be nicely browned before 12 minutes, but make sure the meat inside is done. Tip: Maintain that 350°F oil temperature – if it drops too low, the chicken can turn out oily; keeping a steady 350°F cooks the chicken through without greasiness.


6. Drain and Rest: Using tongs, carefully remove the fried drumsticks and let excess oil drip back into the pot. Place the fried chicken on a wire rack set over a baking sheet (or on paper towels, but a wire rack is better to keep it crispy). Let them rest for 5 minutes. This brief rest helps the juices settle and keeps the crust crunchy (don’t cover or wrap them; that would trap steam). Pro tip: Draining on a wire rack instead of paper towels keeps that hard-won crust crisp by preventing steam buildup.


7. Serve: Time to dig in! Pile up those gorgeous crispy drumsticks on a platter. Garnish with a sprinkle of extra paprika or fresh herbs if you like. Serve hot with your favorite dipping sauces and sides (see suggestions below). Get ready for rave reviews as everyone bites into that juicy, crunchy goodness. Enjoy! 🎊🍗


Marination Tips for Juicy Meat

Buttermilk Brine Magic: Marinate the chicken in a buttermilk-based marinade for the best tenderness and juiciness. The slight acidity in buttermilk tenderizes the meat and infuses flavor, keeping the chicken moist. If you don’t have buttermilk, mix milk with lemon juice or even use yogurt thinned with a bit of water – the goal is a tangy dairy bath for the chicken.

Give It Time: Plan ahead! A longer marination (overnight if possible) is worth it. Let those drumsticks soak for at least 4 hours (or up to 12 hours in the fridge). This extended marinating time allows the salt and spices to penetrate deeply, resulting in meat that is seasoned all the way to the bone and super moist when cooked. (In a pinch, even 30 minutes of marinating is better than nothing, but longer is better for that juicy inside.)

Season Generously: Don’t skimp on the salt in your marinade. Salt acts as a brine, drawing flavors into the meat and helping it retain moisture during frying. Along with salt, add spices (pepper, paprika, herbs, etc.) to the marinade so the chicken is flavorful from within. For example, I add garlic and a touch of mixed herbs or even a pinch of garam masala in the marinade – it’s my little twist that makes the meat itself taste amazing.

Marinate in the Fridge, Finish at Room Temp: Always marinate chilled in the refrigerator to keep the chicken safe. When ready to fry, let the marinated pieces sit out for 20-30 minutes to lose their chill. Frying very cold chicken can lead to uneven cooking and oil temp drops. Bringing it closer to room temp ensures the chicken cooks evenly and stays succulent (and it prevents that sudden temperature plunge in the oil that can make fried foods greasy).


Coating Tips for a Perfect Crust

The Cornstarch Secret: For extra crisp fried chicken, mix cornstarch into your flour dredge. I typically use about 1/4 to 1/3 of the total coating as cornstarch (e.g. 1/2 cup cornstarch with 1+1/2 cups flour). This combo creates a lighter, crunchier crust – cornstarch weakens the all-purpose flour’s glutens just enough to make the coating more tender and flaky. The result? A crust that’s not hard or heavy, but perfectly crispy-crunchy with lovely little craggy bits.

Add a Pinch of Baking Powder: It’s an old trick, but it works wonders. A bit of baking powder in the dredge helps puff up the crust ever so slightly, giving you that sought-after airy crispness. As the chicken fries, the baking powder reacts and creates tiny bubbles, making the crust texture light instead of dense. (Just don’t overdo it – about 1 teaspoon per 2 cups of flour is plenty.)

Double Dredge = Double Crunch: If you love an extra-thick, crunchy crust, consider double dredging your chicken. This means after the first flour coating, you dip the chicken back into a wet mixture (egg wash or the buttermilk marinade), and then coat in flour again. This builds a robust crust with more flavor and crunch in every bite. Many Southern cooks swear by the flour → egg → flour method for the ultimate crispy fried chicken. Tip: When double coating, mix a bit of buttermilk into your beaten eggs or use the marinade itself – it helps the second coat stick better and adds tangy flavor.

Shake Off Excess & Don’t Rush: After coating (whether once or twice), gently shake off any excess flour before frying. A loose excess flour layer can cause the oil to get dirty/burnt and also create a pasty coating. What you want is a nice even coat that clings well. Let the coated drumsticks rest for a few minutes on a rack or plate before frying – this little rest hydrates the flour and helps it adhere, reducing the chance of the breading falling off. You’ll be rewarded with a crust that stays attached in beautiful, crunchy glory.


Frying Tips for Golden Crispiness

Use the Right Equipment: A deep, heavy-bottomed pot (like a Dutch oven or a deep cast-iron pan) is ideal for frying. The high sides reduce oil splatter and the heavy material helps keep the oil temperature steady as you fry. Also, have a spider strainer or tongs handy for safe handling of the hot chicken, and a wire rack ready for draining.

Oil Temperature is Key: For perfectly fried drumsticks, heat the oil to about 350°F (175°C) and try to maintain that temperature throughout. If possible, use a thermometer to monitor the oil. When you add chicken, the oil temp will drop a bit; adjust your heat to keep it in the 325°–350°F range. Frying at the right temp ensures the chicken cooks through without the crust burning. Pro tip: avoid the common mistake of overheating then lowering the flame too much – consistently frying at ~350°F yields far less greasy results. In fact, a steady 350°F for roughly 12-15 minutes is a tried-and-true formula for crispy outside, fully-cooked (and non-greasy) inside.

Don’t Overcrowd the Pot: Fry in small batches. Putting too many pieces in the oil at once can cause the temperature to drop dramatically and also leads to crowding (the pieces can bump and knock off each other’s breading). Frying just a few drumsticks at a time ensures they actually fry instead of steam, which is crucial for that crispy exterior. It also makes it easier to manage and flip them if needed. Between batches, let the oil come back up to 350°F before adding the next round. Yes, it takes a bit longer, but your reward will be perfectly golden, crunchy chicken every time.

Know When It’s Done: How to tell when the chicken is cooked? The drumsticks will be a deep golden-brown all over and should float to the surface when they’re nearly done. If you have an internal meat thermometer, use it – the chicken is ready when it hits 165°F in the thickest part near the bone. (Piercing to the bone and seeing clear juices, not pink, is the old-school test.) Avoid overcooking beyond 165-170°F, as the meat can start to dry out. With medium-sized drumsticks at ~350°F, about 12 minutes is usually right, but always go by the look and internal temp if unsure.

Let Fried Chicken Rest (Briefly): It’s oh-so-tempting to bite in immediately, but let your fried drumsticks rest on a wire rack for about 5 minutes after frying. This short rest not only keeps you from burning your tongue, but also helps the crust set. Crucially, using a wire rack allows excess oil to drip off and prevents the bottom from getting soggy – unlike paper towels, which can trap steam against the crust. By the time they’ve cooled just slightly, your chicken will still be hot and crispy, but the juices inside will have redistributed, meaning every bite will be incredibly moist and delicious.


(Safety note: Always be cautious when deep frying. Keep the oil at a safe level in the pot (never more than half full) and have a lid nearby just in case. Frying should be done by adults with care – but trust me, the results are absolutely worth it!)

Serving Suggestions

These KFC-style crispy fried drumsticks are a showstopper on their own, but pairing them with the right sides and dips can turn it into an unforgettable meal. Here are some serving ideas to complete your fried chicken feast:

Creamy Coleslaw: A cool, creamy coleslaw is the classic companion to fried chicken. The tangy crunch of cabbage and carrot in a lightly sweet mayo dressing complements the savory, salty chicken. It’s the perfect refreshing contrast to cut through the richness of fried drumsticks.

Fries or Potato Wedges: You can’t go wrong with golden fries! Whether classic French fries or thick-cut potato wedges, a side of potatoes (maybe with a sprinkle of seasoning or peri-peri spice) makes this feel like a true diner or picnic basket meal. For a healthier twist, try sweet potato fries.

Mashed Potatoes & Gravy: If you’re channeling the whole KFC experience, serve with creamy mashed potatoes and a generous pour of brown gravy. The combination of crispy chicken, silky potatoes, and savory gravy is comfort food at its best – your family might think they’re at a famous chicken joint!

Buttered Corn on the Cob: Crunchy fried chicken and sweet buttered corn – it’s a match made in heaven. Grill or steam some corn cobs and slather with butter (and a pinch of chaat masala or salt and pepper). The juicy pop of corn kernels adds a nice texture contrast.

Biscuits or Dinner Rolls: Warm, fluffy buttermilk biscuits (or even simple dinner rolls) are fantastic to round out the meal. They’re great for sopping up any extra juices or just enjoying on the side with a dab of butter or honey.

Dips & Sauces: Ketchup is a kid-friendly classic, but you can elevate the dip game with homemade honey mustard, smoky barbecue sauce, or a spicy Sriracha-mayo. A creamy ranch or blue cheese dip can also be delightful with the hot crunch. If you want to add an Indian flair to your serving, try a mint yogurt raita or tangy cilantro chutney on the side – they provide a cooling counterpoint to the fried chicken’s spice.

Fresh Salad or Slaw: To lighten things up, consider a side salad – even a simple lettuce, cucumber, and tomato salad with a vinaigrette, or a zesty cucumber-onion salad. The acidity and freshness will balance the richness of the fried chicken. A vinegar-based slaw (like a vinegar coleslaw without mayo) is also excellent for cutting through the grease and adding crunch.


Finally, don’t forget to serve your crispy fried drumsticks hot and fresh for the best experience. The crunch is most pronounced right after frying, and the chicken is juiciest. If you need to hold them for a short while before serving, you can keep the fried chicken warm in a 250°F (120°C) oven on a wire rack. But honestly, in my home, the challenge is not keeping them warm – it’s keeping eager hands from snatching them off the plate before meal time! 😄

Enjoy your homemade KFC-style fried chicken drumsticks, and be prepared for everyone to ask for seconds. These crispy, juicy drumsticks, made with love and a sprinkle of secret spices, are bound to become a new family favorite. Happy cooking and happy crunching! 🥳🍗

Dessert

Chocolate Barfi Recipe for Raksha Bandhan 🎉

Introduction: A Sweet Rakhi Memory

Growing up, Raksha Bandhan was always a day of laughter, friendly banter, and of course, sweets. I remember waking up to the aroma of simmering milk and sugar in our kitchen as my mom prepared homemade treats. After my sister tied a rakhi on my wrist and we exchanged gifts, she would lovingly feed me a piece of my favorite mithai (sweet). One year, to my delightful surprise, that sweet was Chocolate Barfi – an Indian fudge made with milk solids and sugar, jazzed up with cocoa. It was the perfect East-meets-West treat, combining the traditional milky richness of barfi with the irresistible allure of chocolate. From that Rakhi onward, chocolate barfi became our sibling tradition – a symbol of our sweet (and sometimes chocolatey!) bond.

*Festive Chocolate Barfi squares garnished with nuts and sprinkles – a perfect treat for Raksha Bandhan.*

Fast forward to today, I carry on the tradition by making Chocolate Barfi every Raksha Bandhan. This recipe is a quick version that uses milk powder instead of the traditional khoya (milk solids), significantly cutting down the cooking time without compromising taste. The result is a fudge-like barfi that sets into firm, chocolaty squares – ideal for gifting or serving to family during the festivities. And trust me, it’s always a hit! Chocolate barfi has become a favorite of both kids and grown-ups in recent years, proving that sometimes a modern twist on a classic sweet can create new festive memories alongside the old. So, let’s get started on this easy recipe and add a little extra sweetness to your Raksha Bandhan celebrations.

Ingredients (Makes about 8–10 pieces)

Milk Powder – 1¼ cups (unsweetened dairy milk powder). This acts as an “instant mawa,” giving the barfi its rich milky base.

Cocoa Powder – 3 tablespoons (unsweetened). This brings the chocolate flavor. Use good quality cocoa for the best taste.

Powdered Sugar – ½ cup. Powdered (confectioners’) sugar dissolves quickly, ensuring a smooth mixture. Adjust slightly to taste if you prefer a very sweet or less sweet barfi.

Milk – ¼ cup (whole milk). Helps to hydrate the milk powder and form a fudgy dough. (You can use full-cream milk for a richer result.)

Ghee (Clarified Butter) – ¼ cup. Provides moisture and a lovely aroma. Ghee brings the mixture together into a smooth barfi and adds richness. (Plus, a little extra for greasing the pan.)

Flavorings (optional): A pinch of cardamom powder for a traditional aroma, especially if you love a hint of Indian flavor with chocolate. You can also add ½ teaspoon of vanilla extract for a chocolate-vanilla vibe (optional).

Garnish: Chopped pistachios or almonds, or festive sprinkles/silver balls. Nuts not only add a pop of color and crunch but also make the barfi look festive. Sprinkles are fun if making for kids!


Step-by-Step Instructions

1. Prep the Pan: Grease a small square pan or plate with ghee and line it with parchment paper (for easy removal). Keep it ready before you start cooking, as the barfi mixture sets quickly. Also, measure all ingredients in advance – once you start cooking, things move fast!


2. Melt Ghee: In a heavy-bottomed non-stick pan, heat the ¼ cup of ghee on low flame. Let it melt completely but do not let it smoke.


3. Combine Milk & Powders: Add the milk powder and cocoa powder into the melted ghee. Stir them together thoroughly so that the ghee coats the powders. It will look like a moist crumbly mixture at first. Keep the flame low to avoid burning the milk solids.


4. Add Milk: Pour in the ¼ cup milk and immediately start stirring. The mixture will loosen up at first, then thicken as the milk powder absorbs the liquid. Stir continuously to avoid any lumps or sticking at the bottom. In about 2–3 minutes, it should come together into a thick, smooth paste.


5. Sweeten the Mixture: Add the ½ cup of powdered sugar. The heat should remain low. Mix it in; the sugar will melt and make the mixture a bit runnier initially. Continue to stir. After another 2–3 minutes, you will notice the mixture becoming glossy and thick again as it cooks.


6. Cook to Fudge Consistency: Keep stirring on low heat until the mixture thickens and starts to leave the sides of the pan. This takes roughly 5–7 minutes in total (from the time you added sugar) but can vary. You’ll see the mass clumping together; if you tilt the pan, it might even slide as one blob. To test doneness, drop a small bit on a plate or greased surface – it should set and not be runny. You can also roll a cooled bit between your fingers; it should form a soft ball that isn’t sticky. Do not over-cook – turn off the heat as soon as it reaches this stage, or the barfi may become dry or crumbly. (If you do overcook slightly and the mixture looks dry/crumbly, don’t panic – stir in 1–2 extra tablespoons of milk to rescue it.)


7. Flavor (optional): Once off the heat, quickly stir in the cardamom powder (if using) for an Indian touch. You can also mix in a few drops of vanilla extract at this point for extra flavor. The mixture will be thick, so mix fast and well.


8. Transfer and Set: Immediately transfer the hot barfi mixture into your prepared greased pan. Use a spatula (greased with a bit of ghee) to spread and press the mixture evenly into the pan. Flatten the top smoothly to your desired thickness (about ¾ inch thick is good for fudge-like squares).


9. Garnish: While the mixture is still warm and soft, sprinkle the chopped nuts or sprinkles on top. Gently press the nuts in so they stick. This not only adds festive color but also a nice crunch in each bite.


10. Cool and Cut: Let the barfi set at room temperature for at least 20–30 minutes, or until firm. (For faster setting, you can pop the pan in the refrigerator for 15–20 minutes). Once set, use a sharp knife to cut the barfi into squares or diamond shapes. Wipe the knife with a little ghee for cleaner cuts, if needed.


11. Serve and Enjoy: Gently lift the pieces out of the pan. Your chocolate barfi should hold its shape like soft fudge. Serve them on a decorative plate and enjoy! 🎊


Tips for Perfect Texture and Flavor

Low Heat & Constant Stirring: Always cook on low flame and stir continuously while making barfi. Milk and sugar can burn easily, so patience is key for a smooth texture. Use a heavy non-stick pan to prevent scorching.

Work Quickly with the Mixture: Once the barfi mixture thickens and leaves the pan sides, act fast. Turn off the heat promptly – overcooking can make it dry or grainy. Immediately transfer it to the tray because it will start setting as it cools. Smooth it out quickly before it hardens.

Know When It’s Done: The cue for doneness is when the mixture starts forming a mass and doesn’t spread like halwa. A quick test: take a small bit of the cooked mixture and roll it between greased fingers; it should form a soft ball that isn’t sticky. If it’s too sticky or loose, cook a minute longer. If it’s dry or crumbly, you’ve gone a bit far – fix it by mixing in a spoon of milk while still on low heat.

Use Powdered Sugar: Always use powdered (icing) sugar rather than granulated sugar for this recipe. Powdered sugar dissolves faster and helps the barfi set without needing extra liquid or time. This ensures a smooth, velvety texture with no graininess. (If you only have regular sugar, grind it in a mixer first).

Quality Ingredients: With such simple ingredients, quality makes a difference. Use a good-quality cocoa powder for a rich chocolatey flavor (cheap cocoa can taste flat or bitter). Likewise, using fresh ghee will impart a wonderful aroma to the sweet.

Extra Ghee for Softness: If you prefer a really melt-in-mouth barfi, you can mix in an extra tablespoon of ghee into the hot mixture. A bit more ghee makes the barfi even softer and creamier (especially helpful since cocoa can slightly dry the mixture). Don’t add too much, though – 1 or 2 tablespoons extra at most, or the barfi might be too soft to set.

Flavor Variations: While chocolate is the star, you can tweak the flavor. A tiny pinch of salt can enhance the chocolate taste (optional). For a mocha twist, add 1 teaspoon of instant coffee powder along with cocoa. Or swirl in a tablespoon of Nutella or melted chocolate at the end for extra richness. Just be cautious with extra liquids, as they can affect setting.

Layered Barfi Option: If you’re feeling adventurous, you can make a two-layer barfi (like some halwai shops do) – plain white layer and chocolate layer. Simply make a double batch of the mixture, leave half plain (with a bit of cardamom), and mix cocoa into the other half. Layer them and let set. It looks beautiful, though it’s a bit more work and needs quick hands to layer before setting!


Serving and Storage Suggestions

Raksha Bandhan is all about sharing sweetness, so serve this Chocolate Barfi with love. Arrange the pieces on a festive platter or Rakhi thali alongside the rakhi, roli, and diya. It’s traditional for the sister to offer a sweet bite to her brother right after tying the rakhi, symbolizing sweet wishes for his well-being. These chocolate barfi squares are perfect for that moment – they add a fun twist to the usual traditional sweets. You can also place them in colorful wrappers or mini cupcake liners for a neat presentation (and less sticky fingers for younger siblings!).

Chocolate Barfi also makes a thoughtful homemade gift. If your brother or sister has a sweet tooth, pack a dozen pieces in a decorative box tied with a ribbon. Barfi is an excellent choice for gifting because you can assort different flavors in one box and it stays fresh longer than cream-based desserts. Gifting a box of homemade barfi represents the affection and effort you put into celebrating your sibling – a sweet gesture in the literal sense!

Storage: In case you have leftovers (a rare case, honestly!), store the barfi in an airtight container. Because it is made with milk powder and milk, it’s best to refrigerate it for longer shelf life. It will stay good for about 1 to 2 weeks in the fridge – possibly even up to 2-3 weeks, though it’s so tasty it usually gets finished much sooner. For the best texture, bring refrigerated barfi to room temperature for 10-15 minutes before serving (this helps soften it back to fudgy). If you need to store it longer, you can freeze the barfi. Wrap the pieces in parchment and place in a freezer-safe box; they can last a couple of months frozen. Thaw in the fridge or counter before eating. Do note, freezing might make the texture a bit more crumbly when thawed, but the taste will still be delicious.

Finally, enjoy your Chocolate Barfi with your loved ones. It’s amazing how a simple sweet can evoke so many warm feelings and memories. Here’s wishing you a Happy Raksha Bandhan – may your day be filled with laughter, nostalgia, and plenty of chocolatey sweetness. Enjoy each bite of this homemade treat as you celebrate the special bond between brothers and sisters. ❤️

Lunch & Dinner

Paneer Sukhi Masala (Dry Paneer Masala Sabzi)

When I think of comfort food from my childhood, Paneer Sukhi Masala instantly comes to mind. I remember the aroma of cumin seeds crackling in hot oil and the sizzle of paneer cubes hitting the pan in my mother’s kitchen. This dish – essentially a sukhi sabzi, meaning a dry vegetable preparation – was a weeknight staple for us. It’s a North Indian-style paneer dish with no heavy gravy, just soft golden paneer (Indian cottage cheese) cubes coated in a thick, flavorful masala. Each bite would take me back to those cozy family dinners, with warm rotis in hand and this spicy paneer sabzi disappearing faster than anything else on the table.

Paneer Sukhi Masala served hot and garnished with fresh coriander. This dry paneer dish has a thick onion-tomato masala clinging to each cube of cheese, making it irresistibly flavorful. The aroma of sautéed cumin, ginger, and garam masala fills the kitchen as it cooks, truly a homestyle sabzi that brings warmth and comfort.

Despite its bold flavors, Paneer Sukhi Masala is a simple recipe that uses minimal ingredients and comes together quickly – perfect for busy days. In fact, you can have this lip-smacking dish on the table in around 30 minutes, making it an ideal last-minute vegetarian main course. Below, I’ll walk you through the ingredients, step-by-step method, and some personal tips to get the best texture and flavor. I’ll also share a few variations (like adding capsicum or a touch of cream) and serving suggestions. Let’s get cooking!

Ingredients

Paneer (Indian cottage cheese) – 250 g, cut into cubes (roughly 2 cups cubed). Use fresh or store-bought; if using refrigerated paneer, see tips for softening. (Paneer is a soft, non-melting fresh cheese common in Indian cuisine.)

Oil or Ghee – 2 tablespoons, for sautéing (use ghee for richer flavor).

Cumin seeds (Jeera) – 1 teaspoon, for tempering.

Ginger & Garlic – 1 teaspoon ginger-garlic paste (or 1 tsp each of freshly grated ginger and minced garlic).

Onions – 2 medium, finely chopped (about 1 cup).

Tomatoes – 2 medium, chopped (or pureed) (about 1 cup puree).

Green Chili – 1, slit or chopped (optional, for extra heat).

Spice Powders:

Turmeric – ½ teaspoon

Red Chili Powder – ½ teaspoon (adjust to taste; use Kashmiri chili powder for milder heat and color)

Coriander Powder – 1 teaspoon

Cumin Powder – ½ teaspoon (optional, for extra cumin flavor)

Garam Masala – 1 teaspoon (a flavorful spice blend)


Kasuri Methi (dried fenugreek leaves) – 1 teaspoon, crushed between your palms (optional but highly recommended for aroma).

Salt – ¾ teaspoon, or to taste.

Fresh Coriander Leaves – 2 tablespoons, chopped, for garnish.

Optional Add-Ins:

Capsicum (Bell Pepper) – 1 small, diced into 1-inch pieces (any color; add for extra flavor and crunch, commonly used in paneer sabzi).

Heavy Cream – 2 tablespoons (optional, to stir in at the end for a richer, slightly creamier finish).


Step-by-Step Method

1. Prep the Paneer: If your paneer is store-bought and firm, cut it into bite-size cubes and soak them in warm water for 5–10 minutes, then drain before cooking. This helps the paneer stay soft and moist. (Do not soak longer than 10 minutes or the cubes can start to break down.)


2. Temper Spices: Heat the oil or ghee in a heavy pan or kadhai over medium heat. Once hot, add the cumin seeds and let them sizzle until they begin to crackle and release their aroma (about 30 seconds). This infuses the oil with a warm, earthy flavor.


3. Sauté Ginger, Garlic, and Chilies: Add the ginger-garlic paste (or minced ginger & garlic). Sauté for a minute until the raw smell disappears. If using green chili for heat, add it now and fry for a few seconds. Be careful not to burn the garlic or spices – keep the heat on medium.


4. Onions: Add the chopped onions and a pinch of salt (salt helps them cook faster). Sauté the onions, stirring often, until they turn golden-brown. This may take about 5–6 minutes. Browning the onions well is key to developing the sabzi’s deep flavor and slight sweetness. If the onions start sticking to the pan, you can sprinkle a teaspoon of water to deglaze and prevent burning.


5. Tomatoes: Stir in the chopped or pureed tomatoes. Cook the mixture (masala) for about 5–7 minutes on medium flame, stirring occasionally, until the tomatoes break down and the masala becomes thick. You want the oil to begin to separate from the sides of the pan and the raw tomato smell to vanish. Cooking the tomato-onion masala thoroughly ensures a rich taste (under-cooked masala can taste bland or raw).


6. Spice Powders: Once the tomatoes have softened and the masala looks well cooked, add the spice powders – turmeric, red chili powder, coriander powder, cumin powder (if using), and garam masala. Also add the remaining salt at this stage. If you are adding capsicum (bell peppers) for a crunch, toss them in now. Mix everything well. Sauté this spiced masala on a medium-low flame for about 2–3 minutes, until it becomes aromatic and the spices are well roasted. Tip: Keep the flame low to medium while frying spices – cooking the masala on a low flame prevents it from burning and turning bitter. You should see the oil start to gleam on the edges of the mix; that’s a sign the spices are cooked. If the masala is too dry or starts to stick, add a few tablespoons of water to deglaze the pan and scrape up any browned bits (this also helps avoid burning).


7. Add Paneer: Reduce heat to low. Add the paneer cubes to the pan, along with the kasuri methi (crush the fenugreek leaves between your fingers as you sprinkle, to release their oils). Gently fold the paneer into the masala, coating each piece with the spices. Be gentle while stirring – paneer is delicate and can break apart if handled roughly. If you prepared the paneer by soaking, it should be soft and will absorb the flavors nicely.


8. Simmer: After mixing, cover the pan and let the paneer simmer on low heat for about 2–3 minutes. This helps the paneer warm through and lets it soak up the flavors of the masala. Keep it on low – remember, paneer doesn’t need long cooking. Overcooking can make it chewy. Just a few minutes is enough for it to heat and meld with the spices.


9. Finish: Remove the lid and give it a final stir. If you opted to use heavy cream for a richer twist, pour in the cream now and gently mix. The cream will coat the paneer and give a slight creamy touch to the masala (this is optional – the traditional recipe is typically dry). Finally, sprinkle the chopped fresh coriander leaves on top and switch off the heat.


10. Taste & Adjust: Taste the Paneer Sukhi Masala and adjust salt or spices if needed. You can squeeze a bit of fresh lemon juice if you want a pop of tanginess to brighten the flavors. A tiny pinch of sugar can also be added if the tomatoes were too acidic, to balance the taste – this is totally up to your preference.


11. Serve: Transfer the paneer sabzi to a serving dish. Serve hot (paneer tastes best when warm and soft). See below for serving suggestions on how to enjoy this dish!


Tips for Texture and Flavor

Keep Paneer Soft: No one likes rubbery paneer. For tender results, use fresh paneer or soften store-bought paneer before cooking. As mentioned, soaking the paneer cubes in hot water for about 5–10 minutes is a simple, hassle-free way to ensure they stay soft. Just be sure not to exceed 10 minutes of soaking, or the paneer can start to lose its structure and creamy texture. Another method is to briefly blanch the cubes in boiling water for 1 minute, then transfer to cold water – but soaking is easiest. Also, avoid frying the paneer for too long; a quick sauté is enough since overcooking will make it firm.

Gentle Handling: Paneer is delicate. Always stir gently after adding the paneer to the masala. We don’t want to break the cubes while mixing. Use a flat spatula to softly turn the pieces over. Coat them with masala by folding instead of vigorous stirring. This way, your paneer cubes remain intact and presentable.

Cook Masala Thoroughly (but Not Too Hot): The key to a flavorful dry paneer masala is a well-cooked onion-tomato base. Take your time to sauté the onions until golden and cook down the tomatoes until you see the oil separating. This step builds a deep flavor. However, do this on a moderate flame. Spices can burn easily and turn bitter, so it’s advised to cook the masala on a low flame to avoid burning. Stir regularly, and if you sense anything catching at the bottom, add a splash of water and lower the heat. A burnt masala will spoil the taste, so slow and steady wins here.

Balancing Flavor: Taste as you go. Once the masala is ready (before adding paneer), taste it. It should be slightly salty and spicy because the paneer will mellow it out. If it tastes too tangy (from tomatoes) or too spicy, you can adjust. Add a pinch of sugar to balance excess tang. If it’s too spicy, a spoonful of yogurt or cream can help tone it down (or use milder Kashmiri chili powder for color without heat). Garam masala can be adjusted at the end – if you feel it needs more warmth, sprinkle a little extra and cook 1 minute. Kasuri methi is a secret weapon for flavor: a small amount added at the end makes the dish very aromatic with a restaurant-like finishing touch. Just don’t overdo it; 1 teaspoon is enough as it’s potent.

Texture: For a true “sukhi” (dry) sabzi, avoid adding too much water. We only deglaze with a few tablespoons if needed, not more. The goal is a thick masala that clings to the paneer, not a curry. If you do accidentally add extra water and the dish looks wetter than desired, you can cook it uncovered on high heat for a minute to evaporate excess moisture. Conversely, if it’s too dry and starting to scorch, that’s when a tiny splash of water comes to rescue. It’s all about that perfect balance where the masala is moist enough to bind everything but there’s no gravy or liquid pooling.

Consistency of Paneer: If you prefer a slightly crisp edge on your paneer, you can pan-fry the cubes in 1 tablespoon oil separately for 2-3 minutes until lightly golden, then add them. This adds a chewiness on the outside. But keep in mind, pan-frying can make the inside of the paneer a bit firmer. If you do this, you might still want to soak the fried paneer in warm salted water for a few minutes to retain softness (yes, you can fry then soak – it’s a trick to get soft yet golden paneer). For the softest result, you can skip the pre-frying and just let the paneer cook in the masala as we did above.

Avoid Overcooking: As a general rule, once paneer is in the pan, do not cook it for too long. Only 2-3 minutes of simmering is needed for it to absorb flavors. Prolonged cooking will make the paneer tough and rubbery. Always add paneer towards the end of the recipe.


Variations

One of the joys of cooking paneer dishes is how versatile they are. Here are a few variations and tweaks you can try with Paneer Sukhi Masala:

Add Capsicum (Bell Peppers): As mentioned, adding capsicum is a popular variation. It brings a lovely aroma and a bit of crunch. You can use green, red, or yellow bell peppers. Slice or dice them and toss in when the onions are halfway done or along with the tomatoes/spices (timing depends on how soft you want them). I usually add them just after the tomatoes but before the powdered spices, so they cook slightly yet remain a bit crisp. Capsicum cooks fast, so 3-4 minutes is enough. This essentially makes the dish similar to a Paneer Tawa Masala or Kadai Paneer style preparation which often includes bell peppers.

Peas (Matar Paneer Dry): For a variation with some greenery and sweetness, add a handful of green peas. You can use frozen peas (thawed) or fresh peas (boiled until nearly cooked). Stir them in along with the paneer in the final few minutes. Peas pair well with paneer and give you a paneer-matar sukhi sabzi. Just ensure the peas are cooked to your liking (frozen peas usually cook through in 2-3 minutes).

Creamy Twist: If you’re in the mood for a richer flavor, the heavy cream trick at the end works wonders. Even a tablespoon or two of malai (the thick cream that forms on boiled milk) or fresh cream will add a subtle richness that coats the paneer. This is an optional step and turns the dish into more of a semi-dry curry rather than completely dry. It won’t be as creamy as a Paneer Butter Masala (which is a different gravy-based dish), but it adds a touch of luxury. Stir in the cream on low heat and don’t boil the sabzi after adding it to prevent curdling. You could also add a knob of butter at the end for a buttery finish.

Nutty Richness: For special occasions, you can make the masala richer by adding a tablespoon of cashew paste or almond paste (soaked and ground nuts) into the tomato-onion base. This gives a slightly thicker coating on the paneer and a Mughlai touch. It’s not traditional for a sukhi masala, but it’s a nice twist if you want a drier version of shahi paneer vibes.

Achari Paneer Sukhi Masala: Give it a pickled punch by adding achari masala (Indian pickling spices) or even just a teaspoon of your favorite pickle oil (from Indian mango or chili pickle) into the masala. This infuses a tangy, spiced flavor (often with notes of mustard, fennel, nigella) into the dish, making it taste like achari paneer (pickle-style paneer). Add this towards the end of cooking for maximum aroma.

No Onion No Garlic (Jain style): If you follow dietary restrictions or just ran out of onions/garlic, you can still make a delicious Paneer Sukhi Masala. In fact, the famous chef Tarla Dalal has a Jain version where she skips onion and garlic altogether. The trick is to compensate with a freshly ground masala of whole spices. For example, roast 2-3 dried red chilies with a tablespoon of coriander seeds, grind them into a powder, and use that along with tomatoes and capsicum. You start by tempering cumin in oil, then add capsicum, the ground chili-coriander powder, tomatoes, etc. The result is surprisingly flavorful even without alliums. Just ensure you add a pinch of asafoetida (hing) while tempering the cumin to give a subtle onion-like depth if you like.

Vegan Option: The recipe is almost vegan if you simply swap out paneer. You can replace the paneer with tofu cubes for a vegan version (extra-firm tofu works best; pat it dry and pan-fry it slightly for texture). Use oil instead of ghee, and skip the cream or use a non-dairy cream (cashew cream works well). The spices and method remain the same, and you get a tasty tofu sukhi masala that even non-vegans will enjoy.


Feel free to mix and match these ideas. You can truly make this recipe your own by experimenting with different vegetables or seasonings. The base of onion-tomato and spices is like a canvas – for instance, sometimes I throw in a handful of mushrooms or baby corn along with the paneer for variation. As long as you cook the base properly and don’t add too much liquid, it will remain a sukhi sabzi with its signature concentrated flavors.

Serving Suggestions

Paneer Sukhi Masala is a versatile dish that can be enjoyed in a number of ways. Here are some serving ideas to make it a satisfying meal:

With Indian Breads: The most classic way to serve this sabzi is with Indian flatbreads. Soft rotis or chapatis (whole wheat flatbreads) are perfect for scooping up the spiced paneer. It also pairs wonderfully with parathas – especially plain paratha or even a simple flavored one like ajwain (carom seed) paratha. Because the paneer masala is dry, it’s actually an excellent filling for a wrap: you can roll it inside a warm paratha or naan along with some onion slices and make a delicious paneer kathi roll.

With Rice: Serve it as a side alongside rice and dal for a complete meal. In many North Indian households, a dry sabzi like this is served with dal (lentil curry), rice, and roti – part of a wholesome lunch thali. You can pair Paneer Sukhi Masala with plain steamed basmati rice or a mild pulao. Jeera rice (cumin-flavored rice) is also a great companion; its aromatic but not overpowering flavor complements the spiciness of the paneer dish. Take a spoon of paneer masala, some rice, a bit of yogurt or raita on the side – it’s comfort in every bite.

As a Side Dish: This paneer sabzi can work as a main curry or as a side. If you have a larger Indian spread, you might have a gravy dish (like dal or curry) and also a dry sabzi like this on the table. It provides a nice contrast in texture. You can serve it alongside a richer curry such as dal makhani or butter chicken for a non-veg option, or alongside chole (chickpea curry) – the dry paneer balances a gravied dish. It’s also a good option for parties or potlucks where you need a dry item that’s easy to handle and serve.

With Raita: Because this dish packs a punch of spice, a cooling accompaniment goes well. Serve it with a side of raita (yogurt dip). Boondi raita (yogurt with crispy gram flour pearls) or cucumber raita would be lovely. In fact, a photographer on Wikimedia showed paneer sabzi served with boondi raita and roti, highlighting how common that combo is. The creamy cool yogurt tones down the heat and adds a refreshing element.

Lunchbox or Make-Ahead: Paneer Sukhi Masala is quite lunchbox-friendly too. Since it’s dry, it doesn’t leak or make rotis soggy, which is a bonus. You can pack it with parathas for a work or school lunch. Reheating is easy, though paneer might firm up a tad on cooling – a sprinkle of water before reheating will help. It’s also a great picnic or travel food when paired with puri or paratha, because it stays good at room temperature for a few hours.

Light Meal / Snack: You can even serve leftover cold pieces on cocktail picks as a party snack (kind of like paneer tikka, but without the tandoor). Or stuff the paneer masala into a frankie (wrap) or sandwich for a quick snack. Melt some cheese over it in a sandwich and you have an Indo-fusion grilled sandwich!


However you serve it, enjoy it hot for the best texture. The paneer is softest when warm, and the spices are most aromatic. Typically, we would have this dish for dinner with fresh chapatis and maybe a simple salad on the side. It’s the kind of dish that’s hearty enough to be the star of a meal but also flexible enough to pair with other items. And since it’s dry and flavorful, it **goes perfect with roti or paratha, and can also be served as a side with dal-chawal (dal and rice)** – truly a home-style favorite that fits wherever you need it to.


I hope you enjoy this Paneer Sukhi Masala as much as my family does. It’s amazing how a simple dish of spiced paneer can bring such comfort and joy. Happy cooking, and do let me know in the comments if this recipe brings back any memories for you or if you gave it your own twist! 😋

Snacks, Street Foods

Crispy KFC-Style Chicken Popcorn (Homemade Recipe)

Introduction: A Nostalgic Crunch in Every Bite

There’s nothing quite like the joy of KFC-style chicken popcorn to transport me back to childhood movie nights and weekend mall trips. I still remember the excitement of opening that red-and-white box, the aroma of fried spices wafting out, and popping those crispy little chicken pieces into my mouth one after another. Recreating this at home brings back those warm memories – only now I get to add my own pinch of masala to the mix. In this recipe, tender bite-sized chicken pieces are marinated in tangy buttermilk and spices (a little secret for extra juiciness) and then double-coated in a seasoned flour mix before frying to golden perfection. The result? Juicy inside, crunchy outside chicken popcorn that’s just as addictive as the takeaway classic, with a homemade touch of love. Whether you’re making these for a family game night, a fun weekend snack, or to impress guests with a crowd-pleasing appetizer, this recipe is bound to become a favorite in your household.

Ingredients

For the Chicken & Marinade:

500g boneless chicken breast or thighs, cut into small bite-sized chunks (about 1-inch pieces)

1 cup buttermilk (for marinade)

1 teaspoon salt (for marinade)

1/2 teaspoon black pepper (for marinade)

1/2 teaspoon red chili powder or paprika (for marinade, optional for heat)

For the Seasoned Flour Coating:

1 cup all-purpose flour

1/4 cup cornflour (cornstarch) – helps add extra crispiness to the coating

1 teaspoon garlic powder

1 teaspoon onion powder

1 teaspoon paprika (or red chili powder)

1/2 teaspoon dried thyme or oregano (crush between your palms for flavor)

1/2 teaspoon dried basil (optional, for that KFC herb mix feel)

1/2 teaspoon mustard powder (optional, adds depth to the “secret spice mix”)

1/2 teaspoon celery salt (optional, for authentic KFC-style seasoning)

1 teaspoon salt (adjust to taste, considering marinade salt)

1/2 teaspoon ground black pepper

For Frying:

Oil for deep frying (vegetable or peanut oil works best for high heat)

(Optional) A few extra tablespoons of buttermilk in a bowl (if doing a double coating step)

To Serve (Optional):

Your favorite dipping sauce (ketchup, mayo, honey mustard, spicy chili sauce, etc.)

Lemon wedges or chaat masala for an extra zing when serving (optional)

Recipe Method

1. Marinate the Chicken: In a large bowl, whisk together the buttermilk, salt, black pepper, and chili powder (if using). Add the chicken pieces and stir to ensure each piece is submerged in the spiced buttermilk. Cover and marinate in the refrigerator for at least 30 minutes, or for 2-3 hours for deeper flavor. (Overnight marination is ideal for maximum tenderness and flavor.) The buttermilk’s slight acidity and enzymes will tenderize the chicken and keep it moist, so don’t skip this step for juicy popcorn chicken!

2. Prepare the Seasoned Coating: In a shallow dish or large plate, combine all the coating ingredients: flour, cornflour, and all the spices/herbs (paprika, garlic powder, onion powder, thyme/oregano, basil, mustard powder, celery salt, salt, pepper). Mix thoroughly with a fork or whisk to evenly distribute the seasoning. This seasoned flour mix is the key to packing flavor into every crispy bite – it’s inspired by the Colonel’s 11 secret herbs and spices (think paprika, garlic, oregano, etc., blended to perfection).

3. Dredge the Chicken – First Coating: Working in batches, lift a few chicken pieces from the buttermilk marinade, allowing excess marinade to drip off, and roll them in the seasoned flour mix. Press the flour onto the chicken firmly so it adheres well, fully coating each piece. Arrange the coated pieces on a plate or tray. This initial dredge gives the chicken its base layer of flavor and crunch.

4. (Optional) Double Coating for Extra Crunch: If you want ultra-crispy, KFC-level crunch, give each floured chicken piece a second round of coating. Dip the flour-coated chicken piece quickly back into either the reserved buttermilk (or simply use the marinade bowl) and then coat it again in the flour mix. You can even repeat this process one more time for a triple coating if you’re feeling indulgent. Each additional layer builds up a thicker, craggier crust that stays crunchy. (Pro tip: Double coating is how restaurants get that extra crispy shell – the flour->buttermilk->flour routine traps more breading on the chicken for an amazing crunch.)

5. Rest the Coated Chicken: Place the breaded chicken popcorn pieces on a wire rack or a parchment-lined tray and let them rest for about 5-10 minutes while you heat the oil. Letting the coated chicken sit briefly helps the coating adhere better and dry out a bit, which means less fall-off when frying and a crunchier result.

6. Heat the Oil: In a deep heavy-bottomed pan, kadhai or cast iron skillet, pour in enough oil to come about 1 to 2 inches up the sides. Heat the oil on medium-high until it reaches about **350°F (175°C)**. If you don’t have a thermometer, test the oil by dropping a tiny pinch of the flour batter mix or a small piece of bread – it should sizzle gently and rise to the top. Tip: Maintaining the oil around 350°F is ideal for frying; too low and the chicken will absorb oil and turn soggy, too high and the coating might burn before the inside cooks.

7. Fry the Popcorn Chicken: Carefully add a batch of the coated chicken pieces into the hot oil. Do not overcrowd the pan – each piece should have a bit of space around it (crowding will drop the oil temperature and make the pieces soggy or cause the coating to fall off due to steam). Fry in batches if necessary. Fry the chicken for about 4-5 minutes, turning occasionally with a slotted spoon, until they turn golden brown and crispy on the outside. The chicken will cook quickly since the pieces are small. If unsure, check that the internal temperature of a larger piece reaches 165°F (74°C). The sizzling sound should be steady; if it slows dramatically, your oil may have cooled – adjust heat between batches as needed.

8. Drain and Season: Using a slotted spoon or spider, remove the fried chicken popcorn from the oil, letting excess oil drip back into the pan. Transfer them to a wire rack set over a baking sheet to drain – this keeps them from sitting in oil and ensures they stay crisp (placing directly on paper towels can make the bottom soggy, though you can blot the tops with a paper towel if needed). While the pieces are still hot, sprinkle a pinch of fine salt or chaat masala over them for an extra pop of flavor (seasoning right after frying helps the salt stick better). If frying multiple batches, you can keep the earlier batches warm in a low oven (200°F/95°C) on a wire rack until all are done.

9. Repeat: Continue frying the remaining batches of chicken, making sure the oil comes back to temperature between batches. Remember not to overcrowd the pan with each new batch. Patience is key – frying in small batches will give you perfectly crispy, non-greasy popcorn chicken every time.

10. Serve: Pile up your homemade crispy chicken popcorn in a bowl or basket. Serve hot for best texture (they’re crispiest right after frying). Enjoy the crunch as-is or pair with your favorite dips and sides (see below for ideas). Watch them disappear fast!

Tips for Perfect Crispiness

Marinate for Moisture: The buttermilk marinade isn’t just for flavor – its mild acidity breaks down proteins, tenderizing the chicken and locking in moisture. Even a 30-minute soak makes a difference, but a longer marination (several hours or overnight) yields ultra-juicy chicken that stays tender even after frying.

Double (or Triple) Dredge for Extra Crunch: For that signature KFC crunch, double-coat your chicken pieces. After the first flour coating, dip them back in buttermilk and coat with flour again. This double dredging builds a thick, craggy crust that delivers more flavor and crunch in every bite. It’s a little extra work, but trust me, the satisfying crispy exterior is worth it. If you prefer a lighter coating, a single dredge is fine – but for crunch enthusiasts, the more layers the better!

Season Your Coating Well: Ever wonder why KFC popcorn chicken is so flavorful? It’s the seasoned flour. Don’t be shy with the spices in your flour mix – add enough salt and spices so that the mixture tastes boldly seasoned. Remember, only a fraction of that seasoning ends up on each piece of chicken. A good mix of paprika, garlic & onion powders, pepper, and herbs gives an authentic taste. You can even toss in a pinch of your favorite spice blend (garam masala or chat masala) for a fun twist.

Right Oil Temperature: Keep the oil at a steady 350-365°F (175-185°C) for frying. If the oil is too cool, the chicken will soak up oil and turn out greasy instead of crispy. Too hot, and the outside will brown (or burn) before the inside cooks. Use a thermometer if possible, or do small test fritters to gauge the heat. A consistent medium-high heat will give you that perfect golden brown crust.

Fry in Batches & Don’t Crowd: It’s better to fry in multiple small batches than one big batch. Overcrowding the pan causes the oil temperature to plummet and the pieces to stick together or steam instead of fry. Give your chicken enough space to bob around happily in the oil. This ensures even cooking and maximum crispiness. Between batches, let the oil come back up to temperature before adding the next round.

Use a Wire Rack to Drain: Instead of piling your fried chicken on paper towels (which can make the bottoms soggy from sitting in oil), place them on a cooling rack set over a tray. This allows excess oil to drip away and air to circulate around the pieces, keeping that wonderful crunch intact. You can line the tray underneath with paper towels to catch the drips. If you need to hold the chicken before serving, keep it on a wire rack in a warm oven so it stays crisp.

Salt Immediately: A light sprinkle of salt or your favorite seasoning right after frying will stick to the hot, just-fried chicken popcorn and enhance the flavor. This little restaurant trick makes sure every bite is well-seasoned from the first to the last.

Dipping Sauce Ideas & Serving Suggestions

Classic Combos: Serve your crispy chicken popcorn with classic dips like ketchup or barbecue sauce. A side of honey mustard or ranch dressing also pairs wonderfully, offering a sweet or creamy contrast to the spiciness.

Spicy Kick: Mix mayonnaise with a dash of hot sauce or sriracha to create a quick spicy mayo dip. This creamy, fiery dip is perfect for those who love a bit of heat with their chicken. Alternatively, a tangy buffalo sauce or sweet chili sauce can coat the popcorn chicken for a zesty twist – toss the fried pieces in the sauce to make your own boneless “wings” style appetizer.

Desi Twist: Given our Pinch of Masala vibe, you can’t go wrong with some mint-coriander chutney or tamarind chutney on the side for an Indian twist. The fresh herby notes or sweet-sour tang of chutneys can complement the savory fried chicken. A sprinkle of chaat masala on the hot fried popcorn chicken along with a squeeze of lemon juice can instantly give an extra burst of flavor reminiscent of Indian street food.

Serving Ideas: This chicken popcorn is a versatile snack. Pile it into paper cones or baskets for a fun party treat, or serve it as a meal with French fries, coleslaw, or a fresh salad on the side (think of it as a homemade KFC combo!). You can also use these popcorn chicken pieces to stuff wraps or tacos, or as a topping over a bowl of mac and cheese for a decadent treat.

Finally, gather everyone around and dig in while these Crispy KFC-Style Chicken Popcorn bites are hot and crunchy. Each bite delivers a satisfying crunch followed by tender, flavorful chicken – and perhaps a flood of nostalgia for those KFC outings. Enjoy your homemade popcorn chicken with your favorite people and sauces, and don’t be surprised when it becomes a frequently requested snack. Happy frying and happy munching! 🥳🍗

Dessert

Pineapple Kesari – A Nostalgic South Indian Pineapple Dessert

Growing up, Pineapple Kesari was more than just a sweet dish – it was a symbol of celebration in our home. I remember my grandmother patiently stirring a pot of semolina on the stovetop, as the aroma of ghee and cardamom filled the kitchen. She’d make this golden, velvety kesari whenever there was “something to celebrate” – be it a festival morning or just a surprise visit from relatives. Each spoonful felt like a warm hug, instantly transporting us to simpler times filled with family gatherings and festive music.

Pineapple Kesari is not just delicious but also visually inviting with its vibrant saffron hue. It’s often garnished with roasted cashews and raisins for extra texture, making it a feast for both the eyes and palate. This beloved South Indian dessert is commonly served during weddings and special functions, where its tropical pineapple flavor and rich aroma always stand out.

Pineapple Kesari (also known as pineapple sheera or kesari bath) is essentially a fruity twist on the traditional rava kesari. Kesari means saffron in many Indian languages, referring to the saffron strands that lend the dish its signature golden color and name. It’s a popular treat across South India – from Karnataka to Tamil Nadu – often prepared during festivals like Ugadi and other auspicious occasions. The addition of pineapple gives a delightful sweet-tart surprise in each bite, perfectly balancing the richness of ghee and the sweetness of sugar. No wonder it’s a favorite at many South Indian homes and celebrations!

Pineapple Kesari Recipe

Serves: 4
Prep Time: 10 minutes
Cook Time: 15 minutes

Ingredients: (for a small batch)

½ cup semolina (sooji/rava)

½ cup fresh pineapple, finely chopped (use ripe pineapple for best flavor)

¾ cup sugar (adjust to your sweetness preference)

¼ cup ghee (clarified butter), divided

8–10 cashew nuts

1 tbsp raisins (optional)

¼ tsp cardamom powder (Elaichi)

A pinch of saffron strands (kesar) – soak in 2 tbsp warm water or milk

1½ cups water

Pinch of salt (optional, to balance sweetness)


Instructions:

1. Prep the Pineapple & Nuts: Heat 1 tablespoon of ghee in a pan on low heat. Add cashew nuts and fry until golden. If using raisins, toss them in for a few seconds until they puff up. Remove the nuts and raisins, set aside for garnish. In the same ghee, sauté the chopped pineapple for 2–3 minutes until it softens slightly (this helps release its juices and enhance flavor). Remove the pineapple and set aside.


2. Roast the Semolina: In the same pan, add another 1–2 tablespoons of ghee. Add the semolina (sooji) and roast on low-medium heat. Stir continuously until the rava turns aromatic and light golden. This step is key for a fluffy kesari – roasting prevents it from turning lumpy or sticky later. Once roasted, turn off the heat and keep the semolina aside.


3. Boil the Liquid: In a separate pot, bring 1½ cups of water to a boil. Stir in the saffron along with its soaking liquid, so the water turns a lovely yellow. (If you want an extra bright hue, you can add a tiny pinch of yellow food color, but saffron usually does the job.) Add the sugar to the boiling water and let it dissolve. You can also toss in a pinch of salt to elevate the sweetness. Once the sugar-water is boiling and slightly syrupy, add the sautéed pineapple pieces into it. Allow the pineapple to cook in the syrup for a minute.


4. Cook the Kesari: Reduce the heat to low. Gradually add the roasted semolina into the boiling pineapple syrup, stirring continuously with a spatula. Be careful – the mixture will bubble and thicken quickly. Stirring constantly helps avoid any lumps. Cook for about 4–5 minutes, until the semolina absorbs the liquid and the mixture starts to thicken into a pudding-like consistency.


5. Finish with Flavor: Once the kesari is thick and the semolina is cooked (no longer grainy), add the remaining ghee and the cardamom powder. Stir well to combine. You’ll notice the dessert becoming glossy as the ghee gets absorbed. Toss in half of the fried cashews and raisins, mixing them in. Cook for another minute until the kesari starts to leave the sides of the pan (it will easily slide off the pan when stirred). Turn off the heat.


6. Garnish and Serve: Pineapple Kesari is ready when it’s thick but still spoonable. Serve it warm, garnished with the reserved cashews and raisins on top. You can enjoy it as is, or spread it in a greased plate and cut into squares or diamonds once it sets slightly. Savor the kesari warm for the best melt-in-mouth texture, or at room temperature as a delightful afternoon sweet.


Variations:

Mix-and-Match Fruits: While pineapple gives a unique tropical twist, you can replace it with other fruits to make different kesari varieties. Rava kesari is often made with banana, mango, or even jackfruit for regional variations. Simply swap the pineapple with an equal amount of your fruit of choice (cooking times may vary slightly with different fruits).

No Fresh Pineapple? If fresh pineapple is not available, you can use canned pineapple tidbits. Just be sure to drain the syrup and perhaps reduce the sugar in the recipe, since canned pineapple is pre-sweetened. Pat the pieces dry and proceed – it works in a pinch! (For an intense pineapple aroma, a drop or two of pineapple essence can be added at the end, but use sparingly to avoid overpowering the dessert.)

Natural vs. Color: Traditional kesari often gets its hallmark color from a tiny pinch of food coloring, but using saffron threads not only colors the sweet naturally but also adds a delicate fragrance. If you don’t have saffron, you may use a pinch of kesar food color for that classic bright look. The taste remains delicious either way.

Richness & Vegan swaps: For extra richness, some like to cook the semolina in half milk and half water. However, with pineapple’s acidity, it’s best to stick to water to avoid curdling. To make this dessert vegan, swap out ghee with a neutral vegetable oil or vegan butter – the texture will be slightly different, but it will still come out tasty.

Sweetness Adjustments: The traditional ratio for kesari is 1:2 for rava to sugar, which makes it quite sweet. Feel free to adjust the sugar to your taste. You can go down to 1:1 ratio (semolina:sugar) for a milder sweetness. Likewise, you can increase or decrease the ghee quantity – more ghee yields a smoother, silkier kesari.


Storage & Serving Tips:

Make-Ahead and Storage: Pineapple Kesari stays good for 1–2 days at room temperature, and up to about 3–5 days when refrigerated in an airtight container. (Since this recipe doesn’t include milk, it has a better shelf life.) If you plan to store it, spread the kesari in a shallow dish – this helps it cool and set evenly.

Reheating: This dessert tends to firm up as it cools (the semolina will set into a semi-solid pudding). Don’t worry – simply warm it gently on the stovetop or in the microwave before serving. Add a teaspoon of water or milk while reheating to loosen it up, and stir well. Warming restores the soft, glossy texture and revives the flavors (always serve kesari slightly warm for the best experience).

Serving Suggestions: Pineapple Kesari is delightful on its own, but you can get creative. Serve it warm with a scoop of vanilla ice cream for a fusion twist, or with a savory upma on the side for a traditional South Indian “sweet and savory” combo. It’s commonly part of festive menus, often enjoyed as a dessert or even a special breakfast treat paired with khara bath (spicy upma) in Karnataka’s famous chow chow bath duo.

Bonus Tip: If your pineapple is a bit too tart, try this trick from experienced home cooks – toss the chopped pineapple with 1–2 tablespoons of sugar and let it sit for a couple of hours before cooking. This draws out the fruit’s juices and mellows its acidity, ensuring your kesari has a pleasant sweet pineapple taste without any tangy surprises.


Closing Note: Pineapple Kesari is more than just a dessert – it’s a dose of nostalgia served on a plate. Every family has its own little twist to the recipe, but the love and warmth it embodies remain the secret ingredients. Whether you make it for a festival, a family get-together, or simply to relive old memories, this pineapple-infused semolina pudding is sure to fill your home with a heavenly aroma and your heart with sweet joy. Enjoy each spoonful of this South Indian delight, and happy cooking!

summer Dish

Savory Pineapple Raita – A Creamy, Spiced Summer Delight

Some recipes aren’t just about taste — they’re about moments. One dish that always transports me back to sun-soaked summer holidays is pineapple raita. I remember the first time my mom brought a bowl of this creamy, golden-flecked raita to a family picnic. We’d gathered under the shade of our old mango tree, a feast of spicy biryani and hot parathas laid out, when she unveiled her special raita. At first, a pineapple in a savory yogurt dish seemed surprising – us kids exchanged curious glances. But one cool, tangy spoonful on that sweltering afternoon and we were hooked. The sweetness of the pineapple mingled with salted, roasted cumin and a whisper of chili was pure magic in the heat. Soon, that bowl was scraped clean, and a new family favorite was born.

Even today, whenever I make pineapple raita, it brings back those carefree summer memories. The kitchen fills with the scent of roasted cumin and fresh mint, and I can almost hear the chatter and laughter of those picnic days. Unlike the sweeter pineapple raitas you might have encountered, this version sticks to its savory roots. In Indian cuisine, raita (a yogurt-based side dish) can be either sweet or spicy-savory depending on the add-ins. Many pineapple raita recipes do include a spoonful of sugar for a sweet note, but my family always skipped it – the pineapple’s natural sweet-tartness was just right. In fact, you can simply leave out the sugar for a purely savory profile. What really makes this raita shine are the warm spices and herbs. A dash of roasted cumin and a pinch of kala namak (black salt) add an aromatic, tangy depth that turns simple yogurt and fruit into something extraordinary. If you’ve never tried a savory fruit raita, you’re in for a refreshing treat that might just steal the show at your next meal.

Ingredients (Serves 2–3)

1 cup thick plain yogurt (curd) – whisked until smooth. (Use chilled yogurt for best results.)

1 cup pineapple chunks – fresh (preferred) or canned. If using canned, drain the syrup fully. Fresh pineapple gives a natural tang, but canned works in a pinch.

1/2 teaspoon roasted cumin powder – roast cumin seeds and crush for maximum aroma.

1/4 teaspoon black salt (kala namak) – optional, for a funky tang and authentic flavor. You can use regular salt if unavailable.

Salt to taste – adjust considering black salt adds some saltiness.

1/4 teaspoon black pepper powder – for gentle heat. (Or substitute 1 finely chopped green chili or a pinch of red chili powder, to taste.)

1 tablespoon fresh mint leaves, finely chopped – for freshness. (You can also use chopped coriander leaves, or a mix of both.)

Optional: A pinch of sugar – only if your pineapple is very tart, to balance flavors. This raita is meant to be savory, so skip sugar if the fruit is sweet.

Garnish: A few pomegranate seeds or a sprinkle of more mint/coriander – for a pop of color (optional).


Instructions

1. Prep the Yogurt: In a mixing bowl, add the yogurt and whisk it until it’s smooth and creamy. If the yogurt is too thick, you can stir in 1–2 tablespoons of cold water or milk to achieve a slightly pourable (but still creamy) consistency. Tip: Using thick yogurt yields a rich raita, so consider straining regular yogurt for 15 minutes if it’s watery.


2. Season the Yogurt: Stir in the roasted cumin powder, black salt (if using), and a pinch of regular salt. Add the black pepper (or chili) at this stage. Whisk everything together so the spices are well blended into the yogurt. Take a quick taste and adjust salt or spice as needed.


3. Add Pineapple & Herbs: Fold in the pineapple chunks, gently mixing them into the spiced yogurt. Then add the chopped fresh mint leaves and stir. The mint will infuse a refreshing aroma into the raita. (If you’re adding a finely chopped green chili for extra kick, mix it in now. For a tangier twist, you can also add a pinch of chaat masala at this point, as some recipes do.)


4. Chill: Cover the bowl and let the raita chill in the refrigerator for at least 20–30 minutes before serving. Chilling not only makes it more refreshing, but it also allows the pineapple juices and spices to meld into the yogurt. This little patience makes a big difference – a cold raita is far more soothing and flavorful.


5. Garnish & Serve: Give the raita a gentle stir and transfer it to a serving bowl. Just before serving, sprinkle a pinch of additional roasted cumin on top for aroma. Add a few pomegranate seeds on top or a leaf of mint for a pretty garnish (optional but eye-catching). Serve the pineapple raita chilled and enjoy!


Optional Variations and Tips

South Indian Tadka (Tempering): For an extra layer of flavor, try tempering the raita. Heat a teaspoon of oil in a small pan, add 1/2 teaspoon mustard seeds and a few fresh curry leaves. Let them splutter for a few seconds, then turn off the heat. Drizzle this aromatic tadka over the prepared pineapple raita just before serving. The sizzle of mustard seeds and curry leaves in hot oil gives the raita a delightful nutty aroma (this approach is inspired by South Indian pachadi style pineapple yogurt dishes).

Herb Swaps: Not a fan of mint? Substitute coriander (cilantro) leaves for a different but equally refreshing flavor. In fact, some families prefer a mix of both mint and coriander. Either way, fresh herbs are key to that cooling, herbal note.

Spice It Up or Down: Adjust the heat to your liking. For a spicier kick, add a pinch of red chili flakes or finely chopped green chili (as mentioned earlier). For a milder raita, stick to just a dash of black pepper or skip the chilies entirely. The beauty of raita is its flexibility – it should complement, not overpower.

Add a Dash of Chaat Masala: To elevate the tang, sprinkle a pinch of chaat masala into the raita. This popular Indian spice mix contains dried mango powder and other spices, giving a zesty punch that pairs well with fruit-based raitas.

Richer Texture: For a creamier, indulgent raita, you can mix in a tablespoon of malai (fresh cream) or Greek yogurt into the curd. This makes the raita ultra-smooth and dessert-like (my mom would do this on occasion for guests!). It’s an optional treat if you don’t mind the extra richness.

Use Fresh, Ripe Pineapple: If you can, use sweet ripe pineapple – it yields the best flavor. Fresh pineapple has a slight tang that lifts the raita naturally. If using canned pineapple, choose the one in juice (not syrup) and drain it well; canned pieces are softer and sweeter. Some cooks even lightly grill or roast fresh pineapple chunks to caramelize them for a deeper flavor – a fantastic twist if you have the grill fired up!

Balancing Tartness: Pineapple can sometimes be very tart, which might cause the yogurt to taste a bit bitter over time. If your pineapple is on the sour side, consider adding that tiny pinch of sugar (we won’t tell, promise!) or use vanilla yogurt instead of plain. Also, avoid letting the raita sit out too long at room temperature, as the acidity can increase. Keeping it chilled until serving time is best.


Serving Suggestions

Biryani or Pulao: Pineapple raita makes a perfect side for biryanis and pulaos. The sweet-tangy coolness of the raita beautifully balances out rich, spicy rice dishes. Try it with a spicy vegetable biryani or a simple peas pulao – you’ll love the contrast.

Parathas & Curries: Serve this raita with paratha (flaky Indian flatbread) and a sabzi (vegetable curry) as part of a comforting lunch. It’s especially wonderful on a hot day alongside a spicy curry or dal – the raita acts as a cooling condiment that tones down the heat of the main course.

Grilled Foods & Snacks: Use pineapple raita as a refreshing dipping sauce for tandoori dishes, kebabs, or pakoras. Whether it’s grilled chicken tikka or vegetable kebabs, a spoonful of this chilled raita on the side adds a creamy counterpoint to grilled or fried foods. It’s also a hit at BBQs and potlucks – a little unexpected, but once people try it, they keep coming back for more.

Summer Thali or Picnic: Include this raita in your summer spread. It fits right into a traditional Indian thali (platter) – imagine it next to lemon rice, papad, and a simple salad – or pack it in a chilled container for a picnic. It pairs nicely with just about anything, even alongside sandwiches or as a quick cooling snack by itself.

Solo Snack: Honestly, you can even enjoy a small bowl of this pineapple raita on its own. It’s protein-rich from the yogurt and hydrating – a light savory-sweet snack that’s filling yet easy on the stomach. On days when the heat kills your appetite, a cold cup of pineapple raita can be surprisingly satisfying.


*This Pineapple Raita recipe isn’t just about mixing yogurt and fruit – it’s about preserving a slice of my childhood on a plate. The creamy yogurt, the bursts of pineapple, and that hint of cumin and mint create an experience that’s comforting and special. I hope this recipe finds a way into your home and maybe even into your memories. Serve it up at your next family dinner or summer cookout, and don’t be surprised when this simple side dish becomes the talk of the table – just like it did for us all those years ago.*

Lunch & Dinner, Street Foods

Homestyle Chhole Kulcha Recipe

Introduction

There’s a special kind of warmth in the air when chhole kulcha is on the stove. I remember my mother soaking chickpeas overnight and simmering a pot of chhole on lazy Sunday mornings, the aroma of onions, ginger, and garlic filling our home. This dish is a homestyle spin on the Punjabi classic – tender chickpeas simmered in a thick, mildly spiced onion-tomato masala with notes of bright tomato and warm cumin. Unlike the fiery restaurant versions, this everyday chhole is gentle on heat yet full of flavor, perfect for family lunches or weeknight dinners.

On the side, we have kulchas – soft leavened flatbreads that are the perfect vehicle to scoop up the curry. Kulcha dough traditionally uses all-purpose flour and a leavening (yeast or baking soda), and the breads are cooked in a tandoor (clay oven) or even on a skillet at home. My family often bought plain kulchas from the local bakery and oven-warmed them with a dab of butter until soft and aromatic. The combination of buttery hot kulcha with flavorful chhole is pure comfort on a plate. In North India, such chickpea curries with bread are a staple meal – hearty, nourishing, and made from simple pantry staples. This recipe stays true to that spirit of simplicity. It uses common ingredients you likely have on hand (no hard-to-find spices required) yet yields a deeply satisfying meal.

Pull up a chair as I share our family-style chhole kulcha recipe – complete with a few nostalgic tips, easy shortcuts, and optional sides like tangy pickled onions and mint chutney. It’s a story of comfort cooking, perfect for when you crave something warm, homely, and delicious.

Ingredients

For the Chhole (Chickpea Curry)

Chickpeas (Chana) – 1 cup dried white chickpeas (Kabuli chana), soaked overnight and drained. (Or use 2–3 cups cooked/canned chickpeas for convenience – drain and rinse if canned.)

Onions – 2 medium, finely chopped (for a sweet depth in the gravy).

Tomatoes – 2 large, ripe tomatoes, pureed or finely chopped (provides the tangy, thick base).

Ginger & Garlic – 1-inch ginger and 4–5 cloves garlic, minced or made into paste (aromatics that build flavor).

Green Chili – 1–2, slit (optional, for heat; skip or use less for a mild curry).

Whole Spices (optional) – 1 bay leaf and 1 small cinnamon stick (for subtle warm aroma, optional for everyday cooking).

Ground Spices – 1 teaspoon cumin seeds (jeera), 1 teaspoon coriander powder, ½ teaspoon turmeric powder, 1 teaspoon red chili powder (or Kashmiri chili powder for milder heat and color), 1 teaspoon garam masala (or chole masala if available – a Punjabi chickpea spice blend that’s actually milder than regular garam masala). Adjust chili to taste.

Salt – to taste (about 1½ teaspoons, divided).

Oil or Ghee – 2 tablespoons (for sautéing the masala).

Kasuri Methi – 1 teaspoon dried fenugreek leaves, crushed (optional, add at end for fragrance).

Amchur (Dry Mango Powder) – ½ teaspoon (or juice of ½ lemon, for tangy finish).

Fresh Coriander Leaves – a handful, chopped (for garnish).


For the Kulchas (Flatbread)

(This is a quick no-yeast kulcha dough using pantry staples. Feel free to use store-bought kulchas and see reheating instructions below.)

Flour – 2 cups all-purpose flour (maida). You can swap half with whole wheat flour for a healthier twist (kulchas will be slightly denser).

Leavening – 1 teaspoon baking powder + ¼ teaspoon baking soda (this combo will help the dough rise in place of yeast).

Dairy – ¼ cup plain yogurt (dahi). Yogurt makes kulchas soft and adds a slight tang; it helps ferment the dough quickly. (Use unsweetened yogurt. If avoiding dairy, you can use warm water or a non-dairy yogurt alternative, though yogurt is traditional for soft texture.)

Sugar – 1 teaspoon (feeds the leavening and gives a mild sweetness).

Salt – ½ teaspoon.

Oil – 2 teaspoons (neutral vegetable oil or ghee; adds moisture to the dough).

Warm Water – ~¾ cup (as needed to knead a soft dough).

Toppings (optional) – 1–2 teaspoons nigella seeds (kalonji) or sesame seeds, and/or 2 tablespoons chopped fresh coriander, to press on top of kulchas for a traditional touch.

Butter or Ghee – 2 tablespoons, melted (for brushing hot kulchas).


Step-by-Step Instructions

Preparing the Chhole (Chickpea Curry)

1. Soak and Boil Chickpeas: Rinse the dried chickpeas and soak them in ample water overnight (at least 8 hours). They will double in size. Drain the next day. In a pressure cooker or pot, add the soaked chana with fresh water to cover by a few inches. If using, drop in a bay leaf (and cinnamon stick). Add ½ teaspoon salt and ¼ teaspoon turmeric. Cook until chickpeas are very soft – about 2–3 whistles in a pressure cooker (or ~45–60 minutes simmering in a pot, adding a pinch of baking soda to help soften). The chickpeas should be soft enough to easily mash between fingers. (Tip: If you forgot to soak, you can quick-soak by pouring boiling hot water over the chickpeas and letting them sit for 1–2 hours.) Once cooked, reserve 1 cup of the cooking liquid and drain the rest. (If using canned chickpeas, skip the soaking/boiling – just drain and rinse them. You’ll add them directly to the masala and simmer a bit less.)


2. Make the Masala Base: Heat 2 tablespoons of oil or ghee in a deep pan on medium heat. Add the cumin seeds and let them sizzle for a few seconds. If you reserved a bay leaf from boiling, you can toss it in now for extra aroma. Next, add the finely chopped onions. Sauté the onions for about 5–7 minutes until they turn golden brown. Stir often so they cook evenly. This slow browning of onions forms a flavorful base.


3. Ginger, Garlic & Chilies: Add the minced ginger and garlic to the onions (and green chilies, if using). Sauté for 1–2 minutes until the raw smell disappears. Be careful not to burn the garlic.


4. Tomato and Spices: Stir in the chopped or pureed tomatoes. Cook this mixture for about 5–8 minutes, stirring frequently, until the tomatoes break down into a sauce and you see oil starting to separate from the sides of the pan. This step, called “bhuno”, cooks off raw tomato flavor. Now add the ground spices: coriander powder, the remaining turmeric, red chili powder, and garam masala (or chole masala). Also add 1 teaspoon salt (or to taste). Mix well and cook the masala for another 2–3 minutes. Tip: Frying the spices in the tomato-onion base releases their flavors – patience here is key to a tasty chhole. If the masala gets too dry or starts sticking, sprinkle a tablespoon of water and scrape the pan.


5. Simmer Chickpeas in Masala: Add the boiled chickpeas to the masala and stir to coat them well. Pour in about 1 cup of the reserved cooking liquid (or plain hot water) to reach your desired curry consistency (for a thick gravy, you might not use all the liquid). Mash a few chickpeas with the back of the spoon to thicken the curry. Cover and simmer on low heat for 10–15 minutes, allowing the chickpeas to absorb the flavors. If you used canned chickpeas, simmer for only about 10 minutes since they are already soft. Stir occasionally to prevent sticking. The curry will become beautifully thick and aromatic.


6. Finish and Garnish: Turn off the heat. Crush the kasuri methi between your palms and stir it in (if using). Add the amchur powder and give a final mix (if you don’t have amchur, squeeze in lemon juice to taste for that bright tang). Check seasoning and adjust salt or chili if needed. Let the chhole rest covered for 5 minutes. Just before serving, garnish with lots of fresh coriander leaves. The chickpea curry is now ready – it should be a hearty, mildly spiced gravy clinging to the soft chickpeas, rather than a thin soup.


7. Serving: Serve the chhole hot, topped with a few rings of raw onion and a lemon wedge on the side. This homestyle curry is delicious scooped up with warm kulchas. (It also goes well with rice or other breads if you have leftovers.)


Preparing the Kulchas (Flatbread)

Option A: Homemade No-Yeast Kulchas
(If making from scratch, start the dough before you cook the chhole, since the dough needs to rest.)

1. Make the Dough: In a large mixing bowl, combine the dry ingredients – flour, baking powder, baking soda, sugar, and salt. Pour in the yogurt and the 2 teaspoons of oil. Mix slightly. Now gradually add warm water, a few tablespoons at a time, and start kneading. Knead until a soft, smooth dough forms (it will be slightly sticky at first – that’s okay). You may need around ¾ cup water; add just enough for a pliable dough. The yogurt and leavening will react to make the dough light. Knead for about 5 minutes, stretching and folding, until the dough is elastic and not lumpy. Rub a light coat of oil over the dough ball.


2. Rest the Dough: Cover the dough with a damp cloth or plastic wrap and let it rest in a warm place for 2 hours. The dough will rise a bit and become airy (though not as much as a yeast dough). This resting time yields softer kulchas. (If you’re in a hurry, even 30-60 minutes rest will do, but texture improves with longer rest.)


3. Divide and Shape: After resting, punch down the dough to release air. Divide it into equal portions – about 6–8 pieces for medium kulchas. Roll each portion into a smooth ball. Keep the dough balls covered to prevent drying. On a lightly floured surface, take one ball and roll it out with a rolling pin into an oval or circle about ¼-inch thick (not too thin). If the dough springs back, let it rest another 5 minutes. Optional: Sprinkle a pinch of nigella seeds or chopped coriander on the rolled dough and press lightly so they stick (gives that traditional look and flavor).


4. Cook on Stovetop: Heat a tawa or heavy skillet over medium-high flame. Place the rolled kulcha on the hot skillet. Cook for about 30–40 seconds until you see bubbles forming on the surface. Flip the kulcha to the other side and cook for another minute or so, pressing gently with a spatula, until you see golden-brown spots on both sides. You can flip once or twice more as needed. (The kulcha may puff up in places – that’s good!). If you want a more charred finish, you can use tongs to briefly roast the kulcha directly over a gas flame after pan-cooking it, but this step is optional. Remove the kulcha and immediately brush one side with melted butter or ghee. Wrap it in a clean kitchen towel (or foil) to keep warm while you cook the remaining kulchas. Repeat for all dough balls, and serve hot.


5. Alternative – Bake in Oven: For a less hands-on method, you can bake the kulchas. Preheat your oven to 220°C (475°F). Place the rolled out kulchas on a baking sheet lined with parchment. Bake for ~8–10 minutes until they puff up and get light brown on top. (No need to flip in the oven.) Remove from oven, brush with butter, and stack in a towel to keep soft. Oven-baked kulchas won’t char as much, but they will be soft and perfect to accompany chhole.


Option B: Reheating Store-Bought Kulchas
If you have pre-made or store-bought kulchas, preparing them is even easier:

Oven Method: Wrap the kulchas in foil to prevent drying out and place in a preheated 175°C (350°F) oven for about 5–7 minutes. Then unwrap and heat for 1–2 minutes more to get a bit of crispness on the edges. This will make them soft, warm, and almost like freshly made.

Stovetop Method: Heat a tawa or skillet on medium. Lightly sprinkle a few drops of water on the kulcha (this reintroduces moisture). Place on the hot tawa and warm each side for about 1–2 minutes, pressing down gently. This refreshes the bread. Again, finish with a brush of butter. (Avoid microwaving kulchas – it can make them tough or chewy.)


Now your soft, buttery kulchas are ready to serve alongside the chhole. Keep them wrapped or covered until serving to maintain warmth and pliability.

Serving Suggestions (Optional Sides)

A plate of chhole kulcha is often accompanied by a few simple sides that add extra zing and freshness to the meal:

Pickled Onions (Sirke Wale Pyaaz): These are a classic accompaniment. You can make a quick onion salad by tossing thinly sliced red onions with a dash of lemon juice and a sprinkle of chaat masala. Let them sit for 15–20 minutes. The onions turn lightly pickled and add a crunchy, tangy bite that cuts through the richness of the chickpeas. (For a more intense pickle, soak the onion rings in vinegar, salt, and a pinch of sugar for an hour.) Serve a small bowl of these on the side or simply top your chhole with a few onion slices and a squeeze of lemon.

Mint Coriander Chutney: A vibrant green chutney brings freshness to each bite. Blend a handful of fresh mint leaves, an equal amount of fresh coriander (cilantro) leaves, 1–2 green chilies, a clove of garlic (optional), juice of one lemon, and salt to taste into a smooth paste. This mint-coriander chutney is zingy and herby, and a spoonful of it livens up the chhole. Drizzle some on top of your serving or use it as a dip for the kulcha.

Others: A dollop of plain yogurt or cucumber raita can be served alongside to cool the palate (especially if your chhole ended up spicier than intended). And if you have an Indian pickle like mango pickle, a small piece on the side can provide a spicy-sour kick that pairs wonderfully with the chickpeas.


Feel free to mix and match these sides. The combination of creamy chhole, soft kulcha, crunchy spiced onions, and cool chutney/yogurt creates a symphony of flavors and textures on your plate.

Meal Prep and Leftover Tips

Cooking chhole kulcha can fit into a busy schedule with a little planning, and leftovers are something to celebrate rather than dread! Here are some practical tips:

Make Ahead Chickpeas: You can cook a big batch of chickpeas in advance (either by pressure cooking or boiling) and freeze them in portions. Cooked chickpeas store well in the freezer for up to 3 months – keep them in airtight containers or freezer bags with a bit of their cooking liquid. This way, you have soft chickpeas ready to go for a quick weeknight chhole. (Alternatively, keep a few cans of chickpeas in your pantry for instant cravings.)

Prep in Advance: If you plan to serve this for dinner, you can do a lot beforehand. Soak the chickpeas the night before. You can even boil them earlier in the day and refrigerate (or use an Instant Pot to cook them quickly). The dough for kulcha can also be made earlier in the day – let it slow-rise in the fridge after the initial 2-hour counter rise. When it’s time to cook, the heavy lifting is already done.

Chhole Tastes Better Next Day: Believe it or not, chickpea curries often taste even better the next day! The spices deepen and the flavors meld overnight. So feel free to cook the chhole a day ahead of serving – it will reward you with an even richer taste. This also means leftovers are delightful. Store leftover chhole in the refrigerator for 2 to 3 days in a sealed container. Reheat gently on the stovetop (you may need to add a splash of water as it thickens in the fridge).

Storing Kulchas: Kulchas are best fresh, but you can keep leftovers too. If you made fresh kulchas and have extras, let them cool completely. Then store in an airtight container at room temperature for up to 1 day, or in the fridge for 1–2 days. Place a piece of parchment or a cloth between them to prevent sticking. For longer storage, wrap each kulcha in foil and freeze for up to 3–4 weeks. To reheat, use the skillet or oven methods described above (thaw frozen kulchas for 10 minutes on the counter or just heat from frozen, adding a minute or two extra).

Reinventing Leftovers: If you find yourself with a bowl of leftover chhole and a couple of kulchas the next day, you’re in for a treat. One simple idea is to make chhole toasties or sandwiches – spoon the thickened chhole onto a slice of bread (or inside a slit kulcha), top with some sliced onions and maybe cheese, and grill it into a hot sandwich. The spiced chickpeas make for a satisfying filling. You can also use leftover chhole as a topping for a baked potato or as a protein-rich stuffing for a wrap or dosa (I’ve even spread leftover chana masala inside a dosa for a fusion twist, as some home cooks do!). Get creative: turn it into a quick chaat by adding chopped onions, tomatoes, chutney and sev (crunchy noodles) on top of warmed chhole for a snack. Remember, this dish started as street food too – so those flavors lend themselves to fun street-style snacks with leftovers.

Scaling and Storing: This recipe is easy to scale up for a crowd or to meal-prep for the week. You can double the curry and it will freeze well (freeze just the chhole, not the kulchas). When reheating frozen chhole, do it gently over low heat, stirring occasionally, until it’s bubbling and hot. The kulcha dough can also be doubled; any extra dough can be kept in the fridge for a day (punch it down if it over-rises). Freshly cooked kulchas can be cooled and frozen, as noted.


By following these tips, you’ll find that chhole kulcha isn’t just a one-time meal – it’s two or three different meals in one! From the main dinner to next day’s lunch, it keeps on giving. And with a little prep, it can be a quick comfort food even on a busy evening.


Enjoy this homestyle chhole kulcha, and happy cooking! Each bite – the soft bread, the spiced chickpeas, the zing of onion and mint – tells a story of North Indian kitchens and family dinners. It’s amazing how such simple ingredients from the pantry can come together to create something so heart-warming and satisfying. I hope this recipe brings the same warmth to your home as it does to mine. Serve it up, share with your loved ones, and bask in the delicious nostalgia of this classic meal.

Dessert

Traditional Besan Ladoo Recipe (Slow-Roasted Diwali Delight)

A Nostalgic Introduction

Growing up, Diwali prep in our home meant a day dedicated to making Besan Ladoos. I remember my grandmother patiently roasting the besan (gram flour) in ghee over a low flame, never rushing the process. As she stirred, the nutty aroma of the slow-roasting besan combined with fragrant cardamom would waft through the entire house, drawing everyone into the kitchen. We kids sat nearby, waiting eagerly for a chance to taste the warm mixture before it was shaped into balls. Those moments – the warmth of the kitchen, the heavenly aroma, and the family gathered around – remain some of my sweetest childhood memories.

Festival of lights & sweets: In India, no celebration is complete without sweets, and Diwali is the time for homemade treats. Diwali (also known as Deepavali, literally “a row of lights”) signifies the triumph of light over darkness and good over evil. It’s a time filled with lamps, love, and of course, delicious traditional snacks and sweets. In our family, after the diyas (oil lamps) were lit and firecrackers burst in the night sky, we would exchange platters of goodies with neighbors – with Besan Ladoos always taking center stage. Golden, rich, and redolent of ghee and cardamom, these melt-in-your-mouth sweet balls symbolized the sweetness of togetherness. Each bite brings back a flood of nostalgia – the laughter of cousins, the glow of oil lamps, and the comfort of home.

Besan Ladoo is a humble sweet made from just a few pantry ingredients, yet it carries a legacy of love and tradition. Besan (chickpea flour) is gently roasted in ghee (clarified butter) until it turns a light golden brown and exudes a nutty fragrance. This roasted besan is then sweetened with sugar and perfumed with crushed cardamom seeds to form a delectable dough. Finally, it’s rolled into round ladoos (meaning balls or truffles) that hold their shape once cooled. Whether made for a festive Diwali spread or simply as an everyday treat, besan ladoos have a way of bringing the family together – from the eldest grandparent relishing it with a cup of chai to the youngest child sneaking an extra one from the jar.

Ingredients

Minimal ingredients are needed to make these traditional ladoos – proof that simple things can be most delightful:

Besan (Gram Flour) – 2 cups, preferably fine grind (or ladu besan). This is the base of the sweet. (You can also mix half fine and half coarse besan for a slightly gritty texture, but fine besan yields a smooth, melt-in-mouth ladoo.)

Ghee (Clarified Butter) – 1/2 cup, plus 1–2 tablespoons extra if needed. This imparts richness and moisture, and is used for roasting the besan.

Sugar – 1 cup, powdered. Traditional recipes use boora or tagar (Indian unrefined sugar) for a slightly grainy texture, but regular powdered sugar works perfectly. Adjust the sweetness to taste.

Green Cardamom – 4–5 pods, seeds crushed (or 1/2 teaspoon ground cardamom). This adds the signature warm aroma.

Optional Add-ons: A pinch of saffron (for aroma and a festive touch of color), a grating of nutmeg, and chopped nuts (like pistachios or almonds) for garnish. These are optional and not needed for the basic recipe, but a few family recipes include them for extra flavor.


(Makes about 15–20 medium Besan Ladoos)

Step-by-Step Instructions

1. Roast the Besan: In a heavy-bottomed kadai (wok) or deep pan, melt the ghee on low heat. Add the besan to the warm ghee and begin roasting. Stir continuously with a spatula, using a gentle pressing motion to break up any lumps that form. Be patient and keep the heat low – the besan should slowly toast in the ghee, not fry. After about 10 minutes of stirring, you’ll notice the besan mixture loosening up and becoming light and fluffy. Continue roasting for another 10–15 minutes (20–25 minutes total) until the color turns light golden brown and a nutty aroma fills your kitchen. At this stage, you might see the ghee start to separate slightly from the besan, indicating it’s fully roasted and has released its flavors. (Pro tip: To check if the besan is roasted, sprinkle a few drops of water into the mixture – if it sizzles instantly and the water droplets evaporate leaving little bubbles, it’s done.) Take care not to let the besan brown too much or burn – lower the heat if needed, as undercooked besan can taste raw while overcooked besan can turn bitter.


2. Cool the Mixture: Once the besan is roasted to a golden color and aromatic, turn off the heat. Immediately transfer the hot besan-ghee mixture to a wide bowl to stop further cooking. Spreading it out a bit will help it cool faster. Let it cool down until it’s just warm (comfortable to touch but not hot), which takes around 10–15 minutes. This step is important – if you add sugar while the mix is too hot, the sugar might melt and make the mixture runny or grainy. Cooling it to lukewarm ensures we get a smooth final texture.


3. Add Sugar and Spice: When the roasted besan is warm (not hot), add in the powdered sugar and the cardamom powder (from crushed seeds). If using a pinch of saffron or ground nutmeg, or if you’d like to mix in any finely chopped nuts, add them now as well. With clean hands (or using a spatula), mix everything together thoroughly. It’s best to massage the mixture with your fingertips and palms – this helps the sugar and spices incorporate evenly into the besan. As you blend and press, you’ll notice the mixture turning into a sandy dough that holds shape when pressed (the warmth of your hands also helps the ghee to release slightly, binding the flour and sugar together). The mixture will start looking glossy and clumpy, which is a good sign that it’s ready to shape. (If you prefer, you can also pulse the mixture in a food processor for a few seconds to combine – but traditionally, hand-mixing is the way to go.)


4. Shape into Ladoos: Now for the fun part – shaping the ladoos. Scoop a small portion of the mixture (about 2–3 tablespoons for a medium ladoo, or use a small cookie scoop for uniform size). Gently press and roll the mixture between your palms to form a round ball. The mixture might feel a bit loose at first, but as you press, it should come together. If it crumbles, press harder and it will bind (the ghee solidifying as it cools helps it stick). Shape all the ladoos this way. You should get roughly 15–20 Besan Ladoos from this recipe, depending on size. Place each formed ladoo on a plate or parchment-lined tray. If you like, press a single pistachio or raisin on top of each ball for garnish, or sprinkle a few strands of saffron – this is purely optional but adds a festive touch.


5. Cool and Store: Let the formed ladoos cool completely at room temperature. They will firm up as they cool. Once cooled, you can transfer them to an airtight container. If you can resist eating them all at once, store the ladoos in a cool, dry place. They stay fresh for about 1 to 2 weeks at room temperature. For longer storage, keep them in an airtight box in the refrigerator – they’ll last up to 2-3 weeks chilled. (Tip: If refrigerating, allow the ladoos to come to room temperature before serving, or warm them for 10 seconds in the microwave, so the ghee softens and they regain their melt-in-mouth texture.) Enjoy these ghee-rich delights as an offering to guests or an indulgent treat with your evening chai!


Tips for Perfect Besan Ladoos

Roasting: The key to flavorful besan ladoos is proper roasting. Use a heavy-bottomed pan and low heat, and stir continuously for an even roast. Rushing this step can result in a raw taste or a burnt bitter flavor. The besan is done when it turns golden, smells nutty, and has a light, fluffy texture. You can use the “water test” – sprinkle a few drops of water into the roasted besan; if it sizzles immediately and forms little bubbles, the besan is perfectly roasted. Patience here will reward you with the most aromatic, rich ladoos.

Binding (Mixing in Sugar): Always let the roasted besan cool to a lukewarm temperature before adding sugar. Adding sugar (especially powdered sugar) to very hot besan will cause it to melt and make the mixture too runny or sticky, which can ruin the texture. Once cooled, add sugar and spices and mix thoroughly. Use your hands to massage the mixture – this ensures the ghee, besan, and sugar are well combined and will bind properly when shaped. If the mixture feels too soft or greasy (perhaps the ghee was a bit much or the kitchen is very warm), you can add a couple of tablespoons of dry roasted besan (just roast a bit of besan separately) to fix the consistency. Conversely, if the mixture is too dry/crumbly and not holding together, mix in an extra spoonful of warm melted ghee (or a teaspoon of milk, though adding milk will shorten shelf life) to moisten it. The right consistency is achieved when a portion of the mixture pressed in your palm holds its shape without cracking.

Shaping: It’s easiest to shape the ladoos while the mixture is still warm (but not hot) – if it cools completely to room temp, it may become a bit stiff. While warm, the ghee is semi-liquid and helps the balls form smoothly. Take about 1.5–2 tablespoons of mixture and press it firmly between your palms to form a ball. If you notice the ladoo cracking as you shape, add a tiny bit more ghee or press a bit more firmly. You can lightly grease your palms with ghee to prevent sticking and to give the balls a nice sheen. Roll each ladoo until it’s smooth. Work in batches and if the mixture cools down too much mid-way, you can warm it slightly (for a few seconds in the microwave or covered in a warm place) to soften it again.

Storing: Store besan ladoos in an airtight container in a cool, dry place. They remain fresh and tasty for about 8–10 days at room temperature (in cooler weather, they can last even up to 2 weeks). If you need to keep them longer, refrigerate them – in the fridge they can last for 2 to 3 weeks without spoiling. Just make sure to bring them back to room temperature before eating, because the ghee in the ladoos can solidify when cold, making them harder; once they warm up, they’ll be soft and luscious again. (You can also briefly microwave refrigerated ladoos for 8-10 seconds to quickly soften them, but don’t overdo it, as they can break or release oil if too hot.) Properly stored, these ladoos stay fresh and flavorful, ready to grab whenever you need a sweet treat or to serve unexpected guests.


Serving Suggestions & Gifting Ideas

Besan Ladoos are a versatile sweet treat – you can enjoy them on any day or make them for special occasions. Here are some serving and gifting ideas to make the most of this delightful sweet:

Everyday Enjoyment: Serve these ladoos as an afternoon snack or dessert. In many Indian households, a ladoo with a cup of hot masala chai or a glass of warm milk is the ultimate comfort food. Their rich, nutty flavor pairs beautifully with a bitter-sweet cup of tea. You can also crumble a ladoo over vanilla ice cream for a fusion dessert or stuff one inside a warm chapati to make an impromptu sweet roll (a childhood trick for a quick treat!). Because they are energy-dense, one ladoo can satisfy those post-meal sweet cravings perfectly.

Festive Spreads: During festivals like Diwali, Holi, or family celebrations, arrange the besan ladoos on a decorative plate or in a traditional brass bowl. They hold their own among other sweets and snacks – the golden color and inviting aroma always attract guests. Besan Ladoos are often part of Diwali faral (the assortment of sweets and savories prepared for the festival) and are loved by all ages. You can also offer them as prasad (a blessed offering) during religious ceremonies or prayers. In fact, besan ladoo is a popular choice to give as prasad in Hindu temples and at pujas – it signifies sharing the sweetness of the divine. If you’re performing a Lakshmi Puja or any festive prayer at home, placing a few homemade ladoos as an offering to the deities is a beautiful way to invoke blessings.

Gifting: Homemade sweets make the best gifts, especially during festive seasons. To gift besan ladoos, place them in an attractive decorative box or jar. You can use colorful tissue paper or cupcake liners to separate the ladoos so they don’t stick to each other. Tie the box with a ribbon or attach a small note for a personal touch. In Indian culture, exchanging boxes of sweets during Diwali and weddings is a cherished tradition – it’s a way of sharing joy and goodwill. By gifting handmade besan ladoos, you’re not just giving a sweet treat, but also a bit of your love and effort. These ladoos travel well and won’t spoil easily, so they’re perfect for sending to relatives in other cities as well. Tip: Add a sprinkle of edible silver leaf (vark) on top of each ladoo to make them look truly festive and “gift-worthy.”


Warm, rich, and made with love – Besan Ladoos encapsulate the spirit of Indian festivities and family traditions. Whether you’re making them for a special occasion like Diwali, or simply to relive a grandmother’s recipe on a rainy afternoon, each bite is a celebration of flavor and nostalgia. So go ahead, try this slow-roasted, ghee-kissed besan ladoo recipe and share the sweetness with your loved ones. Happy cooking, and Shubh Deepavali (Have a blessed Diwali)! 🎇

Sources: Historical and recipe details have been adapted from family traditions and contemporary Indian home-cooking resources for authenticity. Cultural notes on Diwali and traditional methods referenced from Indian cooking blogs and Wikimedia Commons, and recipe technique tips are informed by expert home chefs. Enjoy your ladoo-making!

Fastival Food, Lunch & Dinner

Kashmiri Sweet Pulao: Festive Saffron Rice with Dry Fruits & Nuts

A Sweet Celebration from Kashmir

I still remember the first time I savored Kashmiri Sweet Pulao at a close friend’s Kashmiri wedding. The platter of golden rice, jeweled with nuts and raisins, perfumed the air with saffron and cardamom. Each bite of the warm, sweet rice mixed with crunchy nuts felt like a warm welcome into a Kashmiri home. In Kashmiri culture, this pulao is much more than just rice with dry fruits – it’s often described as “poetry in a pot,” a royal dish that carries the soul of Kashmir’s hospitality.

A bowl of Kashmiri sweet pulao garnished with fried nuts and raisins, served alongside a tomato onion raita and lauki yakhni (yogurt-based bottle gourd curry) – classic companions for this festive rice.

Unlike the spicy vegetable pulaos or biryanis common elsewhere in India, Kashmiri pulao stands apart with its mild, faintly sweet profile. Fragrant basmati rice is cooked with a medley of aromatic whole spices (think cinnamon, cardamom, cloves, bay leaf) that remain gentle, not overpowering. A pinch of Kashmiri saffron, sourced from the fields of Pampore, gives the dish its regal golden hue and heavenly aroma. A generous mix of dry fruits and nuts – cashews, almonds, raisins, and sometimes even walnuts or pistachios – provides luxurious texture and natural sweetness. In fact, this pulao is so mellow and rich that traditionally no meat or heavy spice is needed to make it special. Many authentic recipes also include a hint of crushed fennel seeds and a pinch of dry ginger (saunth) for that signature Kashmiri flavor note. The result is an aromatic rice pilaf that’s subtly sweet, delicately spiced, and utterly celebratory.

Kashmiri sweet pulao is often prepared on joyous occasions – it’s usually served at weddings, festivals like Eid, or family get-togethers to symbolize warmth and love. In Kashmiri homes, presenting this pulao to guests is a way of sharing a piece of their culture and hospitality. Now, let’s dive into my tried-and-tested recipe for this festive dish, along with all the tips to get it just right in your kitchen.

Ingredients

Basmati rice – 1 cup, preferably aged long-grain (soaked for 20–30 minutes)

Saffron strands (kesar) – a generous pinch (8–10 strands)

Milk – 3–4 tablespoons, warm (to soak saffron; use water for a vegan option)

Ghee – 2 tablespoons (clarified butter, for authentic flavor)

Mixed nuts – ~2 tablespoons cashew nuts (8–10 pieces) and 2 tablespoons almonds, halved or slivered (you can also add a few pistachios or walnuts)

Raisins – 2 tablespoons (golden or regular)

Whole spices – 1 bay leaf, 3 green cardamom pods, 4 cloves, 1 inch cinnamon stick, 1 teaspoon shahi jeera (caraway seeds) or cumin, 1 small piece of mace and 1 black cardamom (both optional)

Fennel seeds (saunf) – ½ teaspoon (or use ½ teaspoon fennel powder)

Dry ginger powder (saunth) – ¼ teaspoon (optional, for authentic flavor)

Onion – 1 small, thinly sliced (for fried onion garnish)

Sugar – 2 teaspoons (up to 1 tablespoon for a sweeter pulao, optional)

Salt – ½ teaspoon, or to taste

Water – 2 cups (for stovetop cooking; if using a pressure cooker, about 1½ cups is sufficient)


Yield: This ingredient list makes about 3–4 servings of pulao as a side dish.

Instructions

1. Prep the Rice: Rinse the basmati rice in cold water until the water runs clear. Soak the rinsed rice for 20–30 minutes in enough water. This helps the grains cook up fluffy and separate (soaked rice absorbs water and cooks more evenly). Meanwhile, warm the 3–4 tablespoons of milk, add the saffron strands to it, and set aside to let the saffron infuse its color and flavor.


2. Fry Nuts & Onions: Heat 1 tablespoon of ghee in a heavy-bottomed pot on medium heat. Add the cashews and almonds, stirring until they turn light golden. Then toss in the raisins and fry until they puff up. Remove all the nuts and raisins with a slotted spoon and set aside. In the same pot, add the remaining 1 tablespoon ghee. Add the sliced onions and fry, stirring frequently, until they turn golden-brown and caramelized. (Be careful not to burn them; lower the heat if needed toward the end.) Remove the fried onions and set aside on a paper towel. Tip: Frying the garnishes separately ensures they stay crisp and keeps the ghee flavored for the rice.


3. Sauté Spices: In the same pot, there should be a little ghee left. Add a touch more ghee if the pot looks dry. Keep the heat on low-medium. Now add the whole spices – bay leaf, green cardamoms, cloves, cinnamon, shahi jeera (or cumin), mace, and black cardamom. Sauté for a minute until they release their aroma (the spices will sizzle and become fragrant). Next, add the fennel seeds. If using dry ginger powder and/or fennel powder instead of seeds, you can briefly turn off the heat and stir them in now to prevent burning. Stir for just a few seconds to combine the spices with the ghee.


4. Add Rice and Seasonings: Drain the soaked rice completely and gently add it to the pot. Sauté the rice grains with the spices for 1–2 minutes on low heat, stirring carefully to coat each grain of rice with the spiced ghee. This step of frying the rice helps to keep the grains separate and aromatic. Now add the salt and the sugar to the rice and stir. (The sugar is optional, but a small amount gives that subtle sweetness characteristic of Kashmiri pulao.)


5. Cook the Pulao: Pour in the saffron-infused milk along with 2 cups of water (use 1½ cups water if you plan to pressure-cook). Give it a gentle stir. Increase the heat to high and bring the liquid to a boil. As soon as it starts boiling, reduce the heat to low, and cover the pot with a tight-fitting lid. Let the rice cook on low heat until all the water is absorbed and the rice is tender. This should take about 10 minutes. Do not uncover or stir while it’s cooking, to allow proper steam cooking (dum). If using a stovetop pressure cooker, cook for 1 whistle on medium heat, then turn off and let the pressure release naturally.


6. Rest and Fluff: After the rice is cooked (water absorbed), turn off the heat. Keep the pot covered and let the pulao rest for 5–10 minutes. This resting period allows the moisture to redistribute, so each grain turns fluffy without breaking. Remove the lid and gently fluff the rice with a fork, being careful not to mush the grains.


7. Garnish and Serve: Transfer the Kashmiri pulao to a serving dish (or you can serve straight from the pot). Gently fold in the fried cashews, almonds, and raisins. Top with the crispy fried onions. For an authentic touch, you can also garnish with a sprinkle of fresh pomegranate arils or a few small apple or pineapple cubes for a pop of color and extra sweetness (this is optional, but sometimes fresh fruit is added in festive versions of this pulao). Serve the pulao warm and enjoy its aroma!


Serving Suggestions

With Raita: The sweet and aromatic notes of Kashmiri pulao pair wonderfully with a cooling yogurt raita. Serve it with a simple cucumber raita or boondi raita, or even an onion-tomato raita spiced with cumin. The tanginess and creaminess of raita balance the richness of the pulao. In fact, because this pulao is on the sweeter side, it is typically served with a spiced yogurt dish to complement it.

With a Light Curry: For a more elaborate meal, pair the pulao with a mild curry so that the flavors don’t overpower the rice. A classic choice from Kashmiri cuisine is Lauki Yakhni, a delicate curry of bottle gourd in yogurt gravy. Its lightly spiced, tangy sauce is an excellent accompaniment to the sweet pulao. Alternatively, a gentle shahi paneer (paneer in a light creamy gravy) or a navratan korma can work well, providing a savory contrast without being too heavy.

Festive Feast Pairing: At grand Kashmiri gatherings like weddings (or in a traditional Wazwan feast), this pulao often appears alongside richer dishes. It may be served with a flavorful Rogan Josh (a Kashmiri lamb curry) or other spicy meats, acting as a sweet, fragrant counterpoint between spicy courses. If you have meat lovers at the table, a spoonful of a savory curry gravy alongside the pulao gives a delightful sweet-and-spicy contrast in each bite.


Tips for Perfect Fluffy Pulao and Make-Ahead

Choose the Right Rice: Opt for high-quality aged basmati rice for this recipe. Aged basmati has a lower moisture content and stays non-sticky, yielding long, fluffy grains once cooked. Avoid short-grain or new rice, as they can turn mushy.

Rinse & Soak: Always rinse the rice thoroughly 3-4 times to wash off excess starch (which is a culprit for sticky rice). Soaking the rice for at least 20 minutes is key – the grains absorb water and expand, which helps them cook perfectly fluffy and separate later. Just remember to drain the soaking water before cooking.

Low and Slow Cooking: Use a heavy-bottomed pot with a tight lid and cook the rice on a low flame. This slow, gentle cooking (similar to the traditional dum method) ensures the rice cooks evenly without burning. Resist the urge to peek too often or stir, as trapped steam is what cooks the rice fully. Once done, let the rice rest covered for a few minutes off the heat – this steam resting finishes the cooking and makes it easier to fluff the pulao without breaking the grains.

Don’t Skimp on Ghee: Frying the nuts, onions, and rice in ghee not only imparts a rich aroma but also coats the rice grains with a thin layer of fat. This helps in achieving a grain-separated pulao and enhances flavor. If you prefer, you can use half oil and half ghee, but a little ghee truly makes a difference in authenticity and taste.

Adjusting Sweetness: Traditional Kashmiri pulao is mildly sweet. The recipe uses a small amount of sugar for a hint of sweetness, but you can adjust this to your taste. Add an extra teaspoon of sugar if you want it sweeter, or skip the sugar entirely if you prefer the sweetness to come only from the raisins and nuts. The beauty of this dish is in its balance – it should not taste like a dessert, just a whisper of sweetness.

Make-Ahead and Reheating: You can prep parts of this dish in advance. Make-Ahead Garnishes: Fry the nuts and caramelize the onions a day ahead and store them in airtight containers (keep the fried onions in a paper towel to absorb excess oil so they stay crisp). Par-cook Rice: If you need to cook the rice ahead of time, slightly undercook it (leave it a tad firm), spread it on a tray to cool (this stops the cooking and prevents clumping), then refrigerate. When ready to serve, sprinkle 2–3 tablespoons of water or broth over the rice and reheat it gently – either on the stovetop covered (on low heat) or in the microwave covered with a damp paper towel. The added moisture will create steam and revive the rice’s fluffy texture. Once heated through, fluff the rice again and mix in the fried nuts and onions. (For food safety and best texture, reheat only the amount you plan to eat, and avoid reheating multiple times.)


With these tips in hand, you’re ready to create a truly memorable Kashmiri Sweet Pulao. The combination of saffron, nuts, and gentle spices will transport you straight to the Kashmir valley – right from your kitchen. Enjoy this royal, soul-soothing dish with your family, and feel the warmth and tradition of Kashmiri hospitality in every bite!

Snacks, Street Foods

Rajasthani Pyaz Kachori (Onion Kachori) – Monsoon Memories in a Crispy Bite

There’s a magic in the Indian monsoon that isn’t just about the rain – it’s about the cravings it brings. I remember as a child in Jaipur, the moment the earthy scent of first rain (petrichor) rose from the hot ground, my father would rush out to grab a batch of Pyaz Kachoris from the local halwai. We’d huddle under our verandah, warm cups of masala chai in hand, and bite into these golden, onion-stuffed kachoris as the raindrops danced around us. The flaky crust would crumble, giving way to a spiced onion filling that was equal parts fiery and comforting, a perfect contrast to the cool, damp weather. To this day, the monsoon and Pyaz Kachori are inseparable in my memories – one bite and I’m transported to those rain-soaked street corners and the joyful chaos of Jaipur’s monsoon evenings.

In Rajasthan, Pyaz ki Kachori isn’t just a snack; it’s an institution. Steaming hot kachoris are sold at nearly every sweet shop and namkeen stall, typically enjoyed with a dollop of sweet-sour tamarind chutney that balances the spice. These indulgent treats likely originated in the cities of Jaipur and Jodhpur, and they’re so legendary that people go to great lengths to get their hands on them – there’s even a tale of an Air India pilot detouring a flight to pick up her favorite Jodhpur kachoris!. Biting into an authentic Rajasthani Pyaz Kachori is pure bliss: the pastry is brittle, ghee-rich and flaky, giving way to a belly full of spiced onions (and a touch of potato) laced with fiery green chillies, fennel, and a hint of garlic. It’s the kind of street food that defines a place – mention Jaipur to any foodie, and they’ll likely reminisce about Rawat Misthan Bhandar’s famous Pyaz Kachori or the comfort of devouring one straight out of a roadside stall, rain or shine. This recipe is my attempt to bring those warm, nostalgic flavors into your home kitchen. So, let’s dive into making these crispy, stuffed pastries and create some monsoon memories of your own!

Ingredients

For the Kachori Dough:

2 cups all-purpose flour (maida)

1/4 cup ghee (clarified butter), melted

1/2 teaspoon salt (or to taste)

~1/2 to 3/4 cup water (as needed for kneading)


For the Onion Masala Filling:

2 cups onions, finely chopped (about 2 medium onions)

2 tablespoons oil

1 teaspoon nigella seeds (kalonji)

2 teaspoons fennel seeds (saunf)

2 bay leaves (tejpatta)

1–2 green chillies, finely chopped (adjust to spice preference)

2 tablespoons besan (Bengal gram flour) (helps bind the filling)

2 teaspoons ground coriander (dhania powder)

2 teaspoons red chilli powder (adjust to taste)

1 teaspoon garam masala powder

Salt, to taste

2–3 tablespoons fresh coriander leaves, chopped

Oil for deep frying (enough for a deep pan, about 2–3 cups)


Instructions

1. Prepare the Dough: In a large mixing bowl, combine the flour and salt. Pour in the melted ghee and rub it into the flour with your fingertips until the mixture resembles coarse breadcrumbs (this moyan of ghee is what makes the kachori flaky). Gradually add water, a few tablespoons at a time, and knead to form a semi-soft but firm dough. The dough should be pliable and smoother than puri dough, but not sticky. Knead well for about 4–5 minutes to develop gluten. Cover the dough with a damp cloth and let it rest for 15–20 minutes while you prepare the filling.


2. Make the Onion Filling: Heat 2 tablespoons of oil in a broad pan or kadhai over medium flame. Add the nigella seeds and fennel seeds; let them sizzle for a few seconds. Toss in the bay leaves and the chopped green chillies, stirring for a moment. Now add the finely chopped onions. Sauté the onions on medium heat for about 5 minutes until they soften and turn translucent (avoid browning them). Next, sprinkle in the besan and all the spice powders – coriander, red chilli, garam masala – along with salt. Stir everything together and cook for another 2–3 minutes, stirring continuously, until the besan gets lightly roasted and the spices cook off their raw aroma. The mixture will be fairly dry and aromatic, with the besan absorbing excess moisture from the onions. Turn off the heat, then mix in the fresh coriander leaves. Pick out and discard the bay leaves. Spread the filling on a plate to cool down slightly (warm is okay, just not piping hot) for easier handling.


3. Shape the Kachoris: Give the dough a quick knead after resting, then divide it into 10–12 equal portions (each portion will be about the size of a golf ball). Keep the dough balls covered to prevent drying. Working with one portion at a time, roll or press it out into a small disc roughly 3 inches in diameter. Place 1–2 tablespoons of the cooled onion filling in the center of the disc. Bring the edges of the dough up around the filling, pleating as needed, and pinch them together to seal the filling inside (like a money bag). Pinch off any excess dough at the top to avoid a thick lump. Now gently flatten the filled pouch with your palm. Using a rolling pin, very lightly and carefully roll the filled dough ball into a slightly flatter disc of about 2½ inches, taking care not to puncture it or let the filling spill out. (Tip: You can roll from the sealed side very gently, and if a bit of filling does peek through, patch it with a tiny pinch of flour-dough.) Prepare all kachoris this way, keeping the prepared ones covered with a cloth to avoid drying.


4. Deep-Fry the Kachoris: Heat the oil for deep frying in a heavy-bottomed pan or kadhai on medium-low heat. To test the oil, drop a tiny pinch of dough into it – it should sizzle and rise slowly without turning brown instantly. Slide in 2–3 kachoris at a time (do not overcrowd) into the hot oil. For the best crispy results, fry on a low to medium flame: in the first minute, do not disturb the kachoris. They will sink then gradually float up as they puff. Once they float, gently flip and move them around. Fry patiently, turning occasionally, until each kachori is golden brown, crisp and evenly cooked. This frying process can take about 8–10 minutes per batch on a moderate flame – remember, slow-frying is what yields the signature khasta (flakiness) in kachoris. Do not crank up the heat, as high heat will brown the outside too fast while leaving the inside doughy. When done, the kachoris will be a beautiful golden color and feel light and crisp with no soggy spots. Remove them with a slotted spoon and drain excess oil on paper towels. Repeat for all batches. (If you notice the oil temperature dropping too much between batches, let it heat up again, but never to smoking point.)


5. Enjoy: Serve the Pyaz Kachoris immediately while they’re hot and flaky. If you need to fry them a bit in advance, you can crisp them up in a preheated oven at 180°C (350°F) for 5 minutes before serving. See serving suggestions below for classic accompaniments!


Tips for Frying and Storing

Flaky Kachori Secrets: The key to flaky, khasta kachori is the dough. Be generous with the ghee (or oil) when rubbing it into the flour – this shortening makes the crust wonderfully crisp. Knead the dough until it’s smooth, but don’t make it too soft. A firmer, tight dough (with just enough water) ensures the kachori won’t absorb excess oil during frying. Always let the dough rest under a damp cloth; this relaxes the gluten and makes it easier to shape, preventing the kachori from springing back when rolled.

Frying Temperature & Technique: Frying kachoris is a slow dance. Always fry on medium-low heat for even cooking. Patience will reward you – low heat frying cooks the kachori through and produces an evenly golden, crisp shell with tiny flaky layers. If the oil is too hot, the kachori will puff up and turn dark quickly but remain uncooked (doughy) inside. One trick: once the kachori has floated and started to puff, you can gently press it with the frying spoon or a spatula to help it puff completely. Fry until the bubbling subsides significantly – that’s a sign the moisture has cooked out and the crust is crisp.

Onion Filling Tips: Don’t chop the onions too fine. Slightly larger diced onions are ideal because they retain a bit of texture and won’t release water as quickly as very fine onions. This helps avoid a soggy filling. The spoonful of besan in the filling is a traditional touch – it soaks up moisture from the onions and spices, ensuring the filling is dry enough to stay inside the kachori without bursting out. (Some halwais even use a bit of mashed boiled potato or crushed roasted moong dal for the same purpose of binding the filling.)

Variations: While all-purpose flour yields the most authentic crispy texture, you can replace part of the flour with whole wheat flour (atta) for a slightly healthier spin. Many households might not deep fry snacks often, but this treat is worth the indulgence! If you’re experimenting, you can also try other fillings (like spiced lentils or peas) with this same dough – but then it wouldn’t be the classic Pyaz Kachori we know and love.

Storing & Reheating: Pyaz Kachori is best enjoyed fresh, but you can prepare them in advance. These kachoris keep well for a couple of days at room temperature. Let the fried kachoris cool completely, then store them in an airtight container – this prevents them from turning soggy. To reheat, avoid microwaving (which can make them chewy); instead, warm them up in a preheated oven at 180°C (350°F) for about 5–8 minutes. They’ll crisp up almost as good as freshly fried. (If you need to store the uncooked, filled kachoris, you can refrigerate them separated by parchment, but fry within a day for best results.)
Leftover Idea: If by some miracle you have leftover kachoris, you can turn them into a quick kachori chaat! Lightly crush a warmed kachori in a bowl, top with whisked yogurt, drizzle with tamarind and green chutneys, and sprinkle some sev and chopped onions. This street-food style makeover is absolutely delicious.


Serving Suggestions

Classic Chutney Pairing: The traditional way to relish Pyaz Kachori is with chutneys. Tamarind-Date Chutney (imli ki chutney), which is sweet and tangy, is a must – it complements the spicy, pungent onion filling perfectly. Alongside it, serve a bright Green Chutney made from fresh coriander, mint, green chillies and lime. The duo of sweet tamarind and herbaceous green chutney offers a burst of contrasting flavors that elevate each bite of the kachori. Serve the kachoris on a platter with bowls of these chutneys, or drizzle the chutneys inside the opened kachori for a street-style presentation. You can also add a few fried green chillies on the side for those who love extra heat (bite carefully – they’re hot!).

Rajasthani Kadhi (Kadhi Kachori): In some parts of Rajasthan, especially in cities like Ajmer, Pyaz Kachori is famously served with a simple Rajasthani kadhi. This kadhi is a thin, spicy yogurt-based curry (different from the Punjabi kadhi, as it usually has no pakoras and is lighter). To serve, place hot kachoris in small bowls and pour steaming kadhi over them, then top with a drizzle of tamarind and green chutney. Eating kachori soaked in kadhi is a soul-warming experience – the kachori soaks up the savory curry, turning each bite into a soft, flavor-packed dumpling. It’s a lesser-known but delightful way to enjoy this snack as a more filling meal.

Chai Time Delight: No Indian street food story is complete without chai! Serve your Pyaz Kachoris with a pot of hot masala chai on the side. The strong, milky tea cuts through the richness of the kachori and makes for a comforting combination. In fact, many locals swear by kachori with chai as the ultimate rainy day duo. The warmth of the tea and the spice of the kachori filling will surely chase away any chill from the monsoon rain. So, dig in, sip, and enjoy the bliss – as we say in Rajasthan, “Ram ram sa, khaana ho jaye!” (Greetings, let’s eat!).


Enjoy making these Rajasthani Pyaz Kachoris at home! With each crispy bite, you’ll taste the love and legacy of Rajasthan’s street food culture – and if you close your eyes, you might just hear the patter of rain and the chatter of a busy Jaipur market. Happy cooking and happy monsoon! 🌧️✨