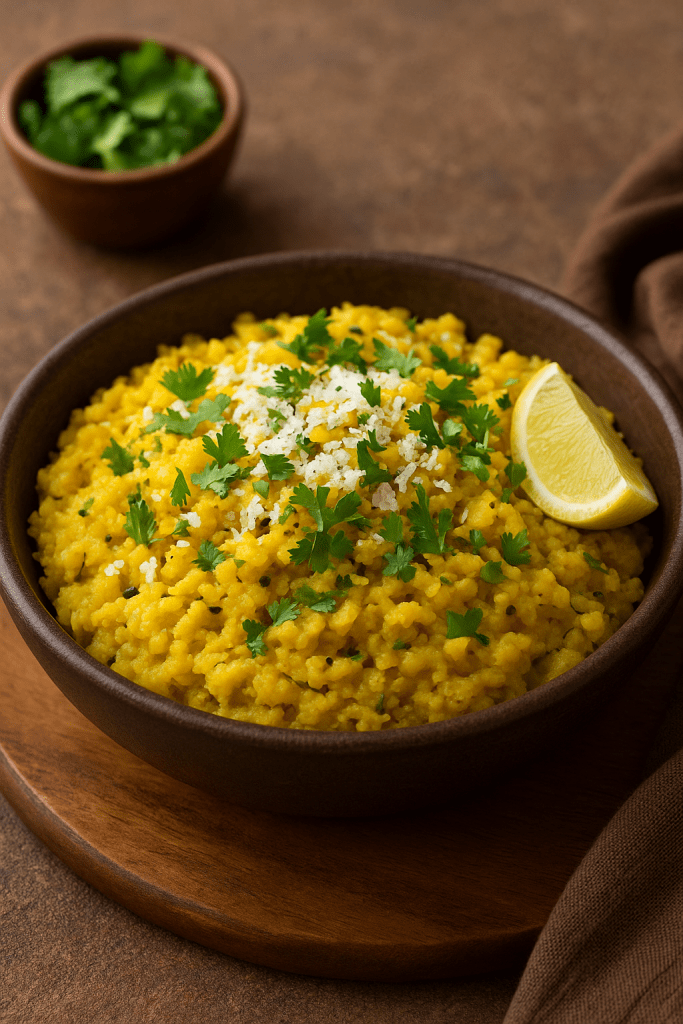
Growing up in Madhya Pradesh, the first crack of thunder during monsoons meant one thing in our household: it was time for Bhutte ka Kees. This traditional grated corn dish is Indore’s pride and joy, found bubbling away in street-side pans all over the city. My earliest memory of it is from a rainy evening at Indore’s Sarafa Bazaar, where the aroma of spiced corn drew me to a busy stall. The vendor handed me a dona (leaf bowl) brimming with golden Bhutte ka Kees, topped with coconut and a squeeze of lime. One warm spoonful and I was hooked – it was creamy, mildly sweet, and tingling with spices, the perfect comfort on a wet day.
Bhutte ka Kees served in traditional leaf bowls, garnished with fresh coconut, cilantro, and a lemon wedge. For the uninitiated, Bhutte ka Kees gets its name from the Hindi word bhutta (corn) and Marathi kees (grated). As the name suggests, juicy corn kernels are grated and slow-cooked with milk and a medley of spices until they form a rich, savory mash. The dish strikes a beautiful balance of flavors – naturally sweet corn, the kick of green chilies, warmth of turmeric, and tang from lemon. In fact, with every mouthful you get a bit of sweet, salty, sour, and spicy all at once. No wonder Bhutte ka Kees has remained an immensely popular street food in Indore for generations. It’s a staple at family get-togethers during the rainy season and a must-have for visitors exploring Indore’s vibrant food scene.
When you make Bhutte ka Kees at home, you’re not just cooking a snack – you’re recreating a piece of Indore’s culinary heritage. It’s comfort food with a cultural story, best enjoyed piping hot on a cozy evening. Now, let’s dive into the recipe so you can bring this Indori delight to your kitchen!
2 small green chilies, finely chopped (adjust to taste)
1 teaspoon ginger, grated
¼ teaspoon turmeric powder (haldi)
½ cup milk (preferably whole milk)
1 teaspoon sugar (optional, see tips)
Salt to taste
1 tablespoon lemon juice (or 1 lemon cut into wedges, for serving)
3 tablespoons fresh grated coconut, for garnish
2 tablespoons fresh cilantro (coriander leaves), chopped, for garnish
Jeeravan masala, a pinch for garnish (optional – Indori spice mix, see tips)
Instructions
1. Prepare the corn: If using fresh corn, hold each cob upright in a large plate and grate the kernels off using a box grater (use medium holes). Grate only the tender kernels, not the hard cob center. You will get a juicy grated corn mash. Alternatively, you can slice off the kernels with a knife and pulse them in a blender without water to get a coarse paste. (Do not grind too fine; a bit of texture is ideal.)
2. Heat the fat and temper: In a deep pan or kadhai, heat the ghee (or oil) on medium flame. Add the mustard seeds; when they begin to splutter, add the cumin seeds and let them crackle. Next, reduce heat to low and add a pinch of asafoetida. Immediately toss in the chopped green chilies and grated ginger. Sauté for a minute until the raw aroma of ginger fades. Stir in the turmeric powder (and a pinch of red chili powder for extra heat, if desired) and cook for a few seconds, being careful not to burn the spices.
3. Add and sauté corn: Tip in the grated corn (along with any “corn milk” juice from it) into the pan. Mix well so the spiced tempering coats all the corn. Sauté the corn mixture on low to medium heat for about 5–8 minutes, stirring frequently. The corn will begin to cook and its color may brighten; this step helps develop flavor.
4. Cook with milk: Pour in the ½ cup of milk and stir. The milk adds creaminess and helps cook the corn into a porridge-like consistency. If your corn was very dry or starchy, you can add a splash of extra milk or water as needed to cover the corn. Add the sugar now (if using, see Tips below about when to add sugar). Season with salt to taste and mix well.
5. Simmer until done: Cover the pan with a lid and let the Bhutte ka Kees simmer on low heat for about 8–10 minutes. Every few minutes, stir the mixture to prevent sticking at the bottom. Cook until the corn is soft and the mixture has thickened. You’re aiming for a texture similar to a soft upma or thick porridge – it should not be runny, but there should be some moisture (it will thicken further upon cooling). If it looks too dry, you can add a few more spoonfuls of hot milk or water and mix in. Once the corn is fully cooked and the consistency is to your liking, turn off the heat.
6. Finish with lemon and serve: Finally, stir in the lemon juice (½ to 1 tablespoon, or to taste) and give a good mix. Lemon brightens up the flavors at the end. Ladle the hot Bhutte ka Kees into serving bowls. Garnish generously with the fresh grated coconut and chopped cilantro. If you have Indori jeeravan masala, sprinkle a pinch on top for an authentic touch. Serve immediately, with extra lemon wedges on the side for squeezing. Enjoy this snack hot for the best taste and texture – Bhutte ka Kees is meant to be savored warm, when its sweet and spicy flavors are most vibrant.
Tips & Suggestions
Choosing Fresh Corn: Always use the freshest, juiciest corn you can find for Bhutte ka Kees. Tender desi corn (local Indian white corn) is ideal, but sweet corn works well too. To check freshness, peel back the husk and press a kernel with your nail – it should release milky juice, a sign of a juicy corn cob. The more “milk” in the kernels, the better the flavor and creaminess of your Bhutte ka Kees. If the corn is too mature or dry, the dish may turn out less creamy.
Grating vs. Blending: Traditionally, corn is hand-grated to extract all its juices. This yields a coarse mixture of kernels and corn milk that defines the dish’s texture. If grating is hard, you can pulse the kernels in a mixer – but do it carefully. Pulse without adding water and stop while the corn is still coarse (you don’t want a fine puree). Avoid using a high-speed blender continuously, as it can liquefy the corn or make it too fine. Some texture is desirable in Bhutte ka Kees, so that you get tiny pops of corn and a nice mouthfeel.
Balancing Sweet and Spice: One of Bhutte ka Kees’ secrets is its balanced flavor profile – every spoonful gives you sweet, spicy, and tangy notes. If you’re using sweet corn (the yellow variety), it’s naturally quite sweet, so you might skip or use very little added sugar. However, if you have local white corn (which is less sweet), add about ½–1 teaspoon of sugar while cooking to enhance the sweetness. The heat comes from green chilies – feel free to adjust the quantity of chilies to your spice tolerance (Indore locals do enjoy a bit of kick!). Don’t skimp on the lemon juice at the end; that tangy squeeze elevates the dish and balances the sweetness and richness. Always taste and adjust salt, sugar, and lemon to get that perfect sweet-salty-tangy balance that makes this snack so crave-worthy.
Serving Suggestions: Bhutte ka Kees is best enjoyed hot off the stove. Serve it in small bowls or the traditional leaf dona bowls if you have them, for an authentic touch. It’s quite filling despite being light on the stomach, so a small or medium bowl per person is usually sufficient. Before serving, don’t forget to heap on the garnishes – fresh grated coconut adds lovely texture and subtle sweetness, and chopped cilantro lends a burst of freshness. A sprinkle of red chili powder or a dash of chaat masala on top can be added if someone likes extra zing. This snack is often enjoyed on its own in the evenings, but you can pair it with a cup of hot masala chai, especially on a rainy day, for the ultimate monsoon experience!
Authentic Indore Touch – Jeeravan Masala: If you want to go the extra mile and enjoy Bhutte ka Kees just like in Indore, try to get hold of Jeeravan masala. This special spice mix (famous in Indore for sprinkling on everything from poha to salads) typically contains roasted cumin, black salt, pepper, cloves, ajwain, etc., and adds a boost of flavor. Street vendors in Indore often dust a pinch of jeeravan on top of Bhutte ka Kees before serving. If you can’t find jeeravan masala, a little chaat masala mixed with a pinch of roasted cumin powder and red chili can mimic it. It’s an optional step, but it truly gives an authentic Indori kick to the dish.
Enjoy making Bhutte ka Kees at home! With its warm spices and creamy corn goodness, this dish brings a slice of Indore’s street food magic right to your kitchen. Happy cooking and happy eating! 😋
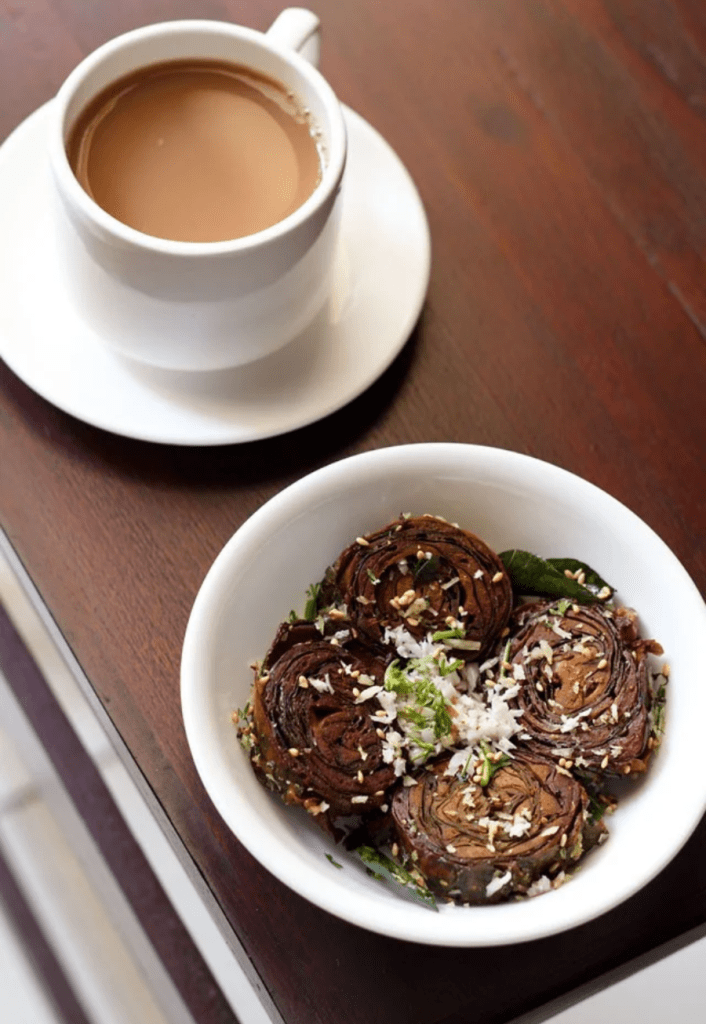
Sliced Patra (Alu Vadi) pinwheels, tempered with sesame seeds and coconut, served with chai – a beloved Gujarati/Maharashtrian snack.
Growing up, many of us have fond memories of Patra, also known as Alu Vadi, being enjoyed during rainy monsoon evenings with a hot cup of masala chai. Patra is a popular Western Indian snack originating from Gujarat, made by rolling tender colocasia (taro) leaves with a spiced gram flour paste, then steaming and often frying them to perfection. In Maharashtra, the same delicacy is called Alu Vadi – note that “alu” in Marathi refers to colocasia leaves, not potato. This treat beautifully balances Gujarati cuisine’s signature flavors: it’s sweet, tangy, and spicy in each bite, thanks to jaggery and tamarind in the batter. Patra is cherished as an heirloom recipe passed down through generations, served as an appetizer or tea-time snack at family gatherings, especially in monsoons and festivals like Ganesh Chaturthi when fresh taro leaves are abundant. Warm, flavorful, and nostalgic – this classic snack is sure to win your heart with its spiral rolls of deliciousness!
Ingredients
Colocasia (Taro) leaves: 15–20 fresh large taro leaves (called arbi ke patte in Hindi, patra ni paan in Gujarati, alu in Marathi). Choose green, tender leaves without black spots; avoid itchy leaves if possible. Trim off the stems.
Gram flour (Besan): 2 cups (about 250 g), to make the spiced batter that will coat the leaves.
Tamarind: 2 tablespoons tamarind paste or about 30 g seedless tamarind pulp (soaked and strained) – this provides the tangy punch.
Jaggery: 3–4 tablespoons grated jaggery (about 50 g) for a mellow sweetness to balance the tamarind.
Ginger and Chilies: 1 teaspoon ginger paste and 2–3 green chilies (ground to a paste). (You can also add 2–3 garlic cloves in the paste for extra flavor, though traditional Gujarati patra often skips garlic.)
Spices (for batter): 1 teaspoon salt (or to taste), 1 teaspoon turmeric powder, 1 teaspoon red chili powder, 2 teaspoons cumin powder, 1 teaspoon coriander powder, 1 teaspoon garam masala, a pinch of hing (asafoetida).
Seeds: 2 tablespoons white sesame seeds (divided) – add 1 tbsp into the batter for nuttiness and reserve 1 tbsp for tempering. 1 tablespoon fennel seeds (saunf) to mix into the batter for a subtle sweet-anise crunch (don’t skip these if possible!).
Oil (for batter): 1 tablespoon vegetable oil to make the batter smooth and keep the rolls moist.
Baking soda: 1/4 teaspoon (a pinch). Optional but highly recommended – it helps soften the leaves and ensures the rolls cook up tender. If using, add at the end with a squeeze of lemon juice to activate it.
Water: ~1/2 to 3/4 cup of water, as needed to make a thick, spreadable batter.
For Tempering: 2 tablespoons oil (for shallow frying/tempering after steaming), 1 teaspoon mustard seeds, 1 teaspoon cumin seeds, 1 tablespoon sesame seeds (including the reserved 1 tbsp), a pinch of hing, 8–10 fresh curry leaves, and 2 dried red chilies (broken).
Garnishes: 2–3 tablespoons fresh grated coconut and a handful of fresh cilantro (coriander) leaves, chopped. These add a lovely presentation and extra flavor at the end.
Instructions
1. Prepare the colocasia leaves: Gently wash the taro leaves and pat them dry. Using a sharp knife, carefully slice off the thick central veins and any thick veins on the back of each leaf without tearing it. This will flatten the leaf and make it easier to roll. Stack the prepped leaves in piles of similar size. (Tip: Organize leaves by size – you’ll be layering the largest to smallest in each roll.)
2. Make the sweet-tangy besan batter: In a small pan, combine the tamarind and jaggery with ~1/2 cup of water and simmer for a few minutes until the jaggery melts. Stir well, then cool and strain to get a sweet tamarind liquid (or use ready-made tamarind paste and dissolve jaggery in it). In a mixing bowl, sift the besan (gram flour). Add the tamarind-jaggery liquid, ginger-chili paste, all the spices (turmeric, red chili, cumin, coriander, garam masala, hing, salt) and the fennel seeds and 1 tbsp sesame seeds. Pour in ~1/2 cup of water gradually and mix everything into a thick, smooth paste. The batter should be spreadable (like peanut butter consistency – not runny). If it’s too thick, add water by the tablespoon; if too thin, add a bit more besan. Finally, add the 1/4 tsp baking soda and 1 tsp lemon juice on top of it – it will fizz slightly – stir it in. This aerates the batter and will help soften the leaves as they cook. Taste the batter and adjust salt, jaggery, or chili to your liking – it should taste sweet, tangy, and spicy all at once.
3. Layer the leaves with batter: Place the largest taro leaf on your work surface with the lighter underside (vein side) facing up. Spread a thin, even layer of the besan batter all over the leaf using your fingers or a spatula. Now place the next largest leaf on top of the first (again vein side up, but rotate it a bit so the leaf tips are not aligned exactly, which helps create an even roll). Spread batter on this second leaf as well. Continue stacking 4–5 leaves (or up to 6 if they are small), each time spreading a thin layer of batter on the new leaf. *(You can make 2–3 separate rolls, depending on the total leaves; e.g., with 15 leaves make 3 rolls of 5 leaves each.)*
4. Roll up the leaves: Starting from the base of the stacked leaves (the end with the stem), fold about 1–2 inches of the sides inward (to encase the filling). Then tightly roll the leaves upward toward the tip into a log, like a jelly roll. Roll firmly so that the roll stays tight and the batter acts as a glue holding the layers together. If any batter squishes out, just smear it on the outside of the roll. You should end up with a neat, compact log. If your roll is large, you can tie it with kitchen string to hold it, but usually if rolled tight enough, it will stay put. Repeat for the remaining leaves to form all your rolls.
5. Steam the rolls: Prepare a steamer setup (steaming pot or idli/pressure cooker without the whistle). Add a few cups of water and bring to a boil. Grease a steamer tray or plate with a bit of oil and place the patra rolls on it, seam-side down (so they don’t unravel). Steam the rolls for about 20–25 minutes on medium heat (if using an Instant Pot, steam for ~25 minutes on venting mode). You can test by inserting a knife or toothpick into the roll – if it comes out mostly clean (no raw batter), the patra is cooked through. Turn off the heat and carefully remove the rolls. Let them cool completely for at least 15 minutes (steamed rolls are delicate and will firm up as they cool). For easiest slicing, you can even refrigerate the cooled rolls for 30 minutes – this makes them firmer and less likely to break apart when cut.
6. Slice into vadis: Using a sharp knife, cut each steamed roll crosswise into pinwheels about 1/2 inch thick. Handle gently so the slices (called vadis) hold their shape. You will see the beautiful spiral of green leaf and golden filling in each slice. If any end pieces are very small or have extra batter, you can pan-fry those as a cook’s treat!
7. Temper and fry the patra: In a large wide pan, heat 2 tbsp of oil on medium heat. When hot, add the mustard seeds and cumin seeds and let them splutter. Then toss in the remaining 1 tbsp of sesame seeds, the dried red chilies, curry leaves, and a pinch of hing, stirring for a few seconds until aromatic. Carefully add the sliced patra vadis in a single layer. Fry them for about 2–3 minutes per side, until they develop a slight golden-brown crust. Flip gently with a spatula to crisp the other side. This tempering step coats the rolls in the flavorful oil and sesame, adding a delightful crunch. (If your pan is not wide enough, temper in batches or do a layer at a time. You can also remove the spices from the oil first, then fry the patra, to prevent the curry leaves and chilies from burning.)
8. Optional – deep fry method: Instead of pan-frying, you may deep fry the slices in hot oil until crispy before tempering. This yields an even crunchier result, though it’s less healthy. In Gujarat, some folks skip frying altogether and eat the patra just steamed and tempered (soft version), whereas others love the fried texture. Feel free to choose your preferred method: simply steamed and tempered for a lower-fat snack, or fried for a indulgent treat. Either way, finish with the tempering spices for authentic flavor.
Tips for Slicing & Frying
Selecting Leaves: Use the most tender colocasia leaves you can find. Older, fibrous leaves tend to be itchier and tougher. If the raw leaf irritates your skin (from calcium oxalate), rub a little oil on your hands while handling and ensure thorough cooking. When available, black-stemmed taro leaves are traditionally preferred for patra as they are less itchy (a tip often passed down from grandmothers – the vendor at the market will know!)😉.
Rolling Technique: Smear the besan paste thinly and evenly – too thick and the rolls may not cook through, too thin and you won’t get the full flavor. Keep the roll tight. If you’re new to rolling, start with smaller rolls (fewer leaves) which are easier to handle. Any holes or tears in leaves can be patched with a bit of batter.
Make Ahead: You can steam the patra rolls in advance (even the day before). Store the whole steamed rolls in the fridge (wrapped) and slice/fry them right before serving. This is great for parties – do the laborious part ahead, then just temper/fry and serve fresh.
Neat Slicing: Always let the rolls cool completely before slicing – this is crucial. A cold roll firms up and cuts into clean spirals without unrolling. Use a sharp serrated knife in a gentle sawing motion to get neat slices. Wipe the knife blade if it gets too sticky.
Shallow Fry vs Deep Fry: For a healthier version, stick to the shallow pan tempering (as in the recipe) – it uses minimal oil but still gives a slight crisp and loads of flavor. For a more indulgent crispy patra, you can deep fry the slices until golden-brown (they puff up a little). Drain on paper towels and then toss them in a hot tempering of mustard, sesame, etc. Both versions taste fantastic! You can even air-fry the slices with a light spray of oil as a modern alternative.
Leftovers: If you somehow have leftovers (rare in our home!), store them refrigerated. Patra can be reheated by re-steaming or microwaving (they will be soft), or re-pan-frying until warm and crisp. They also taste good at room temperature, making them a great travel snack.
Serving Suggestions
Patra/Alu Vadi is best served hot or warm, garnished generously with the fresh grated coconut and chopped coriander for a touch of sweetness and color. Enjoy these savory pinwheels with a side of chutney – they pair beautifully with a zesty green cilantro-mint chutney or a sweet tamarind-date chutney for dipping. In Gujarat, patra is often part of a farsan platter in wedding feasts or festive thalis, alongside other snacks. In Maharashtra, Alu Vadi makes a popular tea-time nibble – a plate of crispy patra and a cup of cutting chai is a match made in heaven on a rainy day! You can also squeeze a bit of fresh lemon juice on top or sprinkle some chaat masala for extra zing. Whether you serve it as a starter at a party, an afternoon snack, or a side dish at dinner, this flavorful Gujarati delicacy will shine. Savory, sweet, and tangy Patra are an absolute delight that tell the story of Gujarati and Maharashtrian culinary tradition in every bite. Enjoy!
When I first visited Goa, I was captivated by more than just its beaches and sunsets. One balmy evening at a local shack, the aroma of spices and charred chicken wafting from the grill introduced me to Chicken Cafreal. This legendary Goan green masala chicken is as vibrant as Goa’s culture – tender chicken coated in a fragrant green herb paste and roasted dry until succulent and slightly charred. The dish carries a fascinating history: it was originally brought to Goa by the Portuguese from their African colonies (Mozambique, to be precise) with help from African soldiers during colonial times. In fact, the name Cafreal comes from “Cafre” – a term referring to the inhabitants of Southern Africa. Over the years, Goans embraced this recipe, infusing local flavors and making it a celebratory staple. Today, no Goan feast is complete without chicken cafreal’s deep-green goodness and a squeeze of lime on top.
This Portuguese-Indian fusion dish showcases how diverse influences shaped Goan cuisine. The magic lies in its green masala marinade – a blend of fresh cilantro (coriander leaves), fiery green chilies, ginger, garlic and warm spices. Traditionally, whole chicken legs are marinated in this paste and shallow-fried or pan-roasted until the masala coats each piece in a spicy, herbaceous crust. Walk into any Goan restaurant or beach shack and you’ll likely find chicken cafreal served with potato wedges and lime, plus crisp onion rings on the side for an extra tangy crunch. The first bite is a flavor explosion – herbal freshness from the coriander, subtle heat from the chilies, and an addictive smoky tang from charred spices. Below, I’ll share a dry-roasted version of Chicken Cafreal (no curry gravy here!) just like it’s authentically enjoyed, along with tips to nail the marination, searing, and roasting for the perfect Goan experience at home.
Ingredients
Chicken: 1 kg chicken (whole legs or drumsticks preferred, bone-in pieces for best flavor). You can use thighs or leg quarters; traditionally skin-on is used for extra juiciness (optional).
Fresh cilantro leaves (coriander): 1 large bunch (about 100 g), stems removed – this gives the signature green color and flavor.
Green chilies: 5–6 (adjust to taste), for heat and color. Goan Cafreal is meant to be spicy, but you can use fewer for a milder palate.
Garlic: 10–12 cloves, peeled.
Ginger: 2-inch piece, peeled and roughly chopped.
Whole spices: 1 tablespoon cumin seeds; 1 tablespoon coriander seeds; 1-inch stick of cinnamon; 5–6 cloves; 1 teaspoon black peppercorns; optional: 2 green cardamom pods (for aroma).
Poppy seeds: 1 tablespoon white poppy seeds (khus khus) – this adds body to the masala paste. (If unavailable, you may substitute 8–10 cashew nuts or 1 teaspoon peanut butter for thickness.)
Turmeric powder: 1/2 teaspoon, for a hint of earthy flavor and color.
Vinegar: 3 tablespoons Goan coconut vinegar (toddy vinegar) if available, for authenticity. If not, use 3 tbsp regular white vinegar or apple cider vinegar. (Some recipes use 1 tablespoon tamarind paste instead of vinegar for tang – you can use tamarind if you prefer a slightly fruity sourness.)
Sugar or Jaggery: 1 teaspoon (optional) – a touch of sweetness helps balance the spice and acidity in the marinade.
Salt: 2 teaspoons (or to taste) for seasoning the chicken and masala.
Oil or ghee: 3–4 tablespoons for pan-roasting (vegetable oil or mustard oil for authenticity).
To serve: Lemon or lime wedges, sliced onion rings, and boiled potato wedges or fries on the side.
Instructions
1. Prepare the Chicken: Rinse and pat dry the chicken pieces. Using a sharp knife, make 2–3 deep slits in each piece of chicken. This helps the flavorful masala penetrate deeply for more intense flavor. Rub the chicken with 1 teaspoon of salt and a tablespoon of lemon juice and set aside for 15 minutes. (This pre-seasoning tenderizes the meat and adds a layer of citrus flavor.)
2. Make the Cafreal Masala: In a pan over low heat, dry roast the whole spices – cumin, coriander seeds, cinnamon, cloves, peppercorns (and cardamom, if using) – for about 1 minute until fragrant. Let them cool. Add these roasted spices to a blender along with the cilantro leaves, green chilies, garlic, ginger, poppy seeds, turmeric, 2 tablespoons of vinegar (reserve the remaining 1 tbsp), and the optional sugar/jaggery. Grind everything into a smooth paste, adding a splash of water or vinegar only as needed to help it blend. The paste should be thick and coat the back of a spoon (avoid adding too much liquid). Tip: Grinding the spices with vinegar (instead of water) not only adds tang but also acts as a preservative, so extra marinade can be stored refrigerated for up to a month.
3. Marinate the Chicken: Rub the chicken pieces thoroughly with the green masala paste, pushing it into the slits and all around each piece until well coated. You may reserve a couple of tablespoons of the masala for basting or an optional pan sauce later. Place the marinated chicken in a non-reactive bowl or ziplock bag. Marination Tip: For best results, marinate for at least 2–3 hours or, even better, overnight in the refrigerator. The longer marination allows the chicken to absorb all the aromatic spices and herbs, yielding juicier, deeply flavored meat. If short on time, even 30 minutes will impart some flavor, but longer is highly recommended. (Authentic chicken cafreal recipes often use a splash of dark rum or local feni liquor in the marinade for extra aroma. You can add 1–2 tablespoons of dark rum to the marinade at this stage – this is optional, but it echoes the dish’s Portuguese influence and gives a richer flavor.)
4. Sear the Chicken: When ready to cook, let the marinated chicken come to room temperature for 15–20 minutes (this ensures even cooking). Heat 2 tablespoons of oil or ghee in a wide, heavy-bottomed skillet or pan over medium-high heat. Once the oil is hot, scrape off excess marinade from the chicken (you can keep this excess marinade aside) and carefully place the chicken pieces in the pan in a single layer. Sear them for about 2–3 minutes per side until they develop a nice brown crust. The high heat sears the masala onto the chicken, locking in juices and flavor. Do not crowd the pan – if necessary, sear in batches. Add a little more oil between batches if the pan gets too dry or the masala starts to stick and burn.
5. Cook through (Braise & Roast): After searing, reduce the heat to medium-low. If you removed excess marinade earlier, return it to the pan now. Add about 1/4 cup of water to the pan and the remaining 1 tablespoon of vinegar (this creates a bit of steam and prevents sticking). Cover the pan with a lid and braise the chicken for about 15 minutes, turning the pieces halfway through. The chicken will release juices; the covered cooking helps it cook through gently and lets the green masala infuse the meat. After 15 minutes, check the chicken – it should be almost cooked (juices run clear or internal temperature around 74 °C/165 °F in the thickest part). Now uncover the pan and turn up the heat to medium-high again. Roast the chicken in the pan until all the excess liquid evaporates and the masala paste dries out and clings to the chicken pieces, about 5 more minutes. You’ll see the oil separating from the masala and the chicken getting a lovely dark green-brown char in spots. This dry-roasting step is crucial for authentic cafreal – traditionally, the dish is served almost dry with just the masala coating, not as a curry gravy. (If you prefer a bit of gravy, you can leave a few spoonfuls of the masala sauce in the pan. Some Goan cooks even stir in a tablespoon of tomato ketchup or puree at the end for a touch of sweetness and color in the gravy – a modern twist.)
6. Alternate Cooking Methods: You can also finish cooking the chicken in an oven if desired. After searing in the pan, transfer the chicken (along with any remaining marinade from the pan) to a preheated oven at 180°C (350°F). Roast for about 15–20 minutes until cooked through, then use the oven’s broiler/grill for a couple of minutes to get a slight char on top. Baste once with pan juices halfway through. Grilling is another option – grill the marinated chicken on a barbecue or grill pan, turning until nicely charred and cooked. However, the stovetop method above, which sears then simmers, ensures the chicken stays moist and the masala is well caramelized onto the meat.
7. Rest and Finish: Once the chicken is fully cooked and dry-roasted, turn off the heat. Squeeze some fresh lemon juice over the chicken pieces while they’re hot for an extra burst of freshness. Then let the chicken rest for 5 minutes in the pan – this helps the juices redistribute. Garnish the dish with fresh coriander leaves on top for a pop of color.
Serving Suggestions
Plate it up: Arrange the Chicken Cafreal on a serving platter. Garnish with onion rings and lemon wedges on the side – this is the Goan way to serve it, adding crunch and tang just before eating. You can also spoon any residual pan masala (if you left a little gravy) over the chicken.
Side Accompaniments: The classic accompaniment is potato wedges or chips (fries) which pair perfectly with the spicy chicken. A simple fresh salad (like sliced carrots, radish, and green beans lightly pickled in salt and vinegar) is often served alongside to balance the richness.
Bread or Rice: In Goa, Chicken Cafreal is often enjoyed with local pão or poee bread – a soft yeasted bread with a crusty exterior – perfect for mopping up any masala. If you can’t find Goan bread, serve it with warm dinner rolls, naan, or even roti. It also goes well with plain steamed rice or Goan coconut rice as a hearty meal.
Beverage Pairing: Given its Portuguese origins, Chicken Cafreal can be delightfully paired with a chilled beer or a glass of port wine. For a non-alcoholic option, a tart lime soda or kokum sherbet would complement the spicy, herbal notes.
Enjoy your homemade Chicken Cafreal! With its blend of Portuguese-African history and Goan spice, this dish tells a story of cultural fusion on your plate. Each bite – coated in that green masala and spritzed with lemon – will transport you to a susegad evening in Goa, where the food is as soulful as the scenery. Happy cooking!
This classic Banarasi dish, Kalonji Baingan, evokes warm memories of family meals in the narrow lanes of Varanasi. My mother‑in‑law, a native of Banaras, calls it “baingan ka achar” (brinjal pickle) for its tangy, spiced flavor. The tiny aubergines are slit and stuffed with a coarse mix of roasted coriander, cumin, nigella (kalonji), fennel and other pickling spices, then sautéed in mustard oil until tender. Each bite bursts with the earthy aroma of nigella and the sharp tang of amchur (dried mango) powder. Served hot with fresh chapatis or rice, this dry curry is a beloved North Indian side that brings the taste of traditional Banaras to any meal.
Ingredients
500 g baby brinjals (baby eggplants), washed and dried
3 tbsp mustard oil (or vegetable oil)
½ tsp panch phoron (Bengal five‑spice mix)
For the spice stuffing:
2 dried red chilies
1½ tbsp coriander seeds
1 tsp mustard seeds
1 tsp cumin seeds
1½ tsp nigella (kalonji) seeds
1 tsp fennel (saunf) seeds
½ tsp fenugreek (methi) seeds
¼ tsp ajwain (carom) seeds
½ tsp turmeric powder
1½ tsp amchur (dry mango) powder or 1 tbsp lemon juice
1 tsp Kashmiri red chili powder
½ tsp sugar
Salt, to taste
2 tbsp chopped fresh coriander leaves
Instructions
1. Roast the whole spices: Heat a dry skillet over medium heat. Add the dried red chilies, coriander seeds, mustard seeds, cumin seeds, nigella, fenugreek, ajwain and fennel seeds. Roast, stirring constantly, until the spices are golden and fragrant (about 2–3 minutes). Be careful not to burn them. Transfer to a bowl and let cool.
2. Grind and season the masala: Grind the cooled spices in a blender or mortar into a coarse powder. Mix in turmeric, amchur (or lemon juice), chili powder, sugar and salt. Set aside 1 tablespoon of this spice mix for later. Add 1–2 tbsp water to the remaining spice powder and stir into a thick paste that will bind well.
3. Stuff the brinjals: Slit each brinjal from top to bottom in a crisscross pattern, keeping the stem intact so it holds together. Gently open the slits and spoon the spiced paste into each eggplant, pressing it in firmly on all sides. Leave any extra paste for the end.
4. Temper the oil: In a wide, heavy-bottomed pan or kadai, heat the mustard oil until it just starts to smoke. Turn off the heat briefly, then reduce to medium-low and add the panch phoron (cumin, fennel, mustard, nigella, fenugreek seed mix). Let it splutter for a few seconds to release its aroma.
5. Pan-fry the stuffed brinjals: Carefully arrange the stuffed brinjals in the pan. Cover with a tight lid and cook on low flame for about 10–12 minutes. Turn the brinjals gently every few minutes so they brown evenly and don’t break apart. The covering steam‑cooks them through. (If the pan gets too dry, splash a little water under the lid to prevent burning.)
6. Finish with the masala: Once the brinjals are nearly tender, sprinkle the reserved 1 tablespoon of spice mix and a little extra salt over them. Gently toss or stir to coat, then cover again and cook 2–3 more minutes. Add the chopped coriander, mix lightly, and remove from heat.
7. Garnish and serve: Transfer the Kalonji Baingan to a serving dish. Garnish with a little more fresh cilantro if you like. This dish is best enjoyed hot, served with steamed rice or warm rotis.
Tips and Serving Suggestions
Choose tender brinjals: Small, firm baby eggplants work best. Slitting them without cutting through the stems ensures they hold the stuffing well. If large brinjals are used, you can score the sides more deeply to help the spices seep in.
Oil and spice: Mustard oil gives an authentic sharp flavor, but any neutral oil will do in a pinch. If you skip panch phoron, add a pinch more ajwain and nigella for complexity. Always cook on medium-low heat and keep the lid on so the brinjals steam and soften evenly.
Don’t crowd the pan: Give each stuffed brinjal space to fry slightly before covering. Overcrowding can make them mushy. A heavy pan distributes heat well and prevents burning.
Serving: Kalonji Baingan shines as part of a North Indian meal. It pairs beautifully with simple dal and warm flatbreads or rice. The tangy, pickle-like spices also go well with plain yogurt or a raita on the side. Leftovers store well; the flavors deepen if you reheat it gently the next day.
This Kalonji Baingan recipe brings a touch of Banaras home, weaving tradition into a humble vegetable. With every tangy, spiced bite of these stuffed baby brinjals, you taste the legacy of a family recipe that’s been lovingly passed down. Enjoy this warm, aromatic dish as part of your everyday feast – it’s sure to become a favorite in your kitchen too.
My introduction to Chettinad Chicken Curry happened on a warm evening in Tamil Nadu. I wandered into a local eatery in Chennai, lured by the irresistible aroma of curry leaves crackling in hot oil and spices roasting. One bite of the fiery, coconut-infused gravy was enough to hook me – the chicken was tender, and the masala was bursting with flavor. This recipe, passed down and perfected over time, reminds me of that first taste and the rich culinary heritage of the Chettinad region.
Chettinad Chicken Curry is a beloved dish from Tamil Nadu, known for its bold heat and aromatic gravy. The curry is enriched with a freshly ground spice paste (Chettinad masala) made of whole spices and coconut, giving it a distinctive depth of flavor. Chettinad cuisine is considered one of the spiciest and most aromatic in India, and this chicken curry showcases that reputation with a robust blend of spices like coriander, fennel, star anise, and a unique ingredient called kalpasi (black stone flower). Served in a hearty gravy style, this authentic Chettinad chicken pairs beautifully with rice, dosa, or appam for a comforting South Indian meal.
Ingredients
To Marinate the Chicken
Chicken – 500 g curry-cut pieces (bone-in recommended for more flavor)
Turmeric powder – 1 teaspoon
Salt – 1 teaspoon (or to taste)
Lemon juice – 2 tablespoons (from about 1 lemon)
Ginger-garlic paste – 1 tablespoon (optional, for deeper flavor)
(Marinating the chicken with turmeric, salt, and lemon tenderizes it and layers flavor into the meat.)
To Make the Chettinad Masala Paste (fresh spice blend)
Coriander seeds – 3 tablespoons
Dry red chilies – 5 (use a mix of spicy and mild Kashmiri chilies for heat and color)
Fennel seeds – 1 teaspoon
Cumin seeds – 1 teaspoon
Black peppercorns – 2 teaspoons
Green cardamom – 5 pods
Cloves – 4
Cinnamon – 1-inch stick
Star anise – 1
Black stone flower (kalpasi) – 1–2 pieces (a key Chettinad spice)
(This aromatic blend of whole spices and coconut will be dry-roasted and ground to a paste. It is the heart of an authentic Chettinad curry, bringing magical flavor and thickness to the gravy.)
For the Curry
Oil – 3 tablespoons (traditionally gingelly (sesame) oil or coconut oil for authentic flavor)
Onions – 2 large, thinly sliced
Curry leaves – 2 sprigs (fresh if available)
Ginger-garlic paste – 2 tablespoons
Tomatoes – 2 medium, chopped
Turmeric powder – 1/2 teaspoon (for the curry base, in addition to marinade)
Water – ~1 to 1½ cups (as needed for gravy consistency)
Salt – to taste (about 1/2 teaspoon, adjust since chicken was marinated with salt)
Fresh coriander leaves – a handful, chopped (for garnish)
(Onion, tomato, curry leaves, and ginger-garlic form the flavorful base of the gravy, while a bit of turmeric adds color and health benefits. Use coconut oil or sesame oil for an extra layer of authentic aroma.)
Instructions
1. Marinate the Chicken: In a bowl, combine the cleaned chicken pieces with turmeric, salt, lemon juice, and ginger-garlic paste (if using). Rub this marinade into the chicken. Cover and set aside for at least 20–30 minutes while you prepare the masala. *(Marination infuses the meat with flavor and yields juicier chicken.)*
2. Prepare Chettinad Masala: Heat a dry heavy-bottomed pan or kadai on low-medium heat. Add all the whole spices for the masala (coriander seeds, dried red chilies, fennel, cumin, pepper, cardamom, cloves, cinnamon, star anise, kalpasi) except the coconut. Dry roast these spices, stirring frequently, until they become aromatic and lightly golden. Now add the grated coconut to the same pan and roast for another 2 minutes, stirring constantly, until the coconut turns light golden brown. Turn off the heat and transfer the roasted spices and coconut to a plate to cool. Once cool, grind them in a mixer or spice grinder with a few tablespoons of water to make a smooth Chettinad masala paste. *(Roasting on low heat is crucial to avoid burning the spices; you want a deep toasty aroma. The freshly ground paste will have a nutty, spicy fragrance.)*
3. Sauté Onions and Aromatics: Heat the oil in a large pot or deep pan over medium heat. Add the sliced onions and sauté until they turn translucent and light golden brown. This may take about 8–10 minutes; stir regularly so they cook evenly. Tip: Properly browned onions impart sweetness and depth to the gravy.
4. Add Curry Leaves and Ginger-Garlic: Toss in the fresh curry leaves and stir for a few seconds until they crackle and release their aroma. Then add the 2 tablespoons of ginger-garlic paste. Sauté this mixture for 1–2 minutes until the raw smell of ginger and garlic disappears. (Frying these aromatics in oil releases their flavors into the base of the curry.)
5. Cook Chicken: Add the marinated chicken pieces to the pan. Increase the heat to medium-high and sauté the chicken for about 5 minutes, stirring occasionally, until the exterior of the chicken turns opaque and lightly browned. This seals the juices and adds a nice flavor to the meat.
6. Tomatoes and Simmer: Add the chopped tomatoes to the pan and sprinkle in the 1/2 teaspoon of turmeric (if you didn’t use ginger-garlic in the marinade, you could also add a pinch of red chili powder for extra heat at this stage). Cook the tomatoes with the chicken for about 3–5 minutes, stirring often, until the tomatoes break down and become soft. The mixture will start to form a thick base. Pour in about 1 cup of water and stir well, scraping up any browned bits at the bottom of the pan. Bring the curry to a boil, then reduce the heat to low, cover with a lid, and let it simmer. Cook for about 20 minutes (or until the chicken is nearly tender), stirring occasionally. (Simmering gently allows the chicken to cook through and the flavors to meld. Add a bit more water if it starts looking too dry, but remember the masala paste will also thicken the gravy.)
7. Add Chettinad Masala Paste: Once the chicken is cooked and the gravy has reduced slightly, stir in the prepared Chettinad spice-coconut paste. Mix it thoroughly into the curry. If the gravy is very thick, add a splash of water to help blend the paste. Simmer the curry uncovered on low heat for another 10 minutes, stirring occasionally. You will see the gravy deepen in color and aroma, and a bit of oil may begin to surface on top. Tip: Check seasoning at this stage and add salt if needed. The roasted spice paste is what truly defines this Chettinad curry, so let it cook in the gravy for several minutes to infuse the chicken with its rich flavor.
8. Garnish and Serve: Turn off the heat. Sprinkle the chopped fresh coriander leaves over the curry and give it a final stir. Let the Chettinad Chicken Curry rest for 5 minutes before serving – this brief rest helps all the flavors settle. Serve hot and enjoy the explosion of spicy, savory goodness in each bite!
Tips & Tricks
Adjust Spice: Chettinad cuisine is famously spicy, but you can adjust the heat to your liking. Reduce the number of dry red chilies and peppercorns for a milder curry, or add an extra chili for more kick. Remember, you can also swap in Kashmiri red chilies for a vibrant red color with less heat.
Chicken Cut: You can use any cut of chicken, but curry-cut pieces with bone (like drumsticks, thighs, etc.) yield the best flavor in the gravy. The bones release juices that enrich the sauce. If using boneless chicken, opt for thighs over breast meat to avoid drying out during the simmer.
Fresh Ingredients: Wherever possible, use fresh ingredients – especially the curry leaves, ginger, garlic, and coconut. Fresh curry leaves and coconut give an authentic aroma and texture that really make a difference. If fresh coconut isn’t available, use unsweetened desiccated coconut, but do include it because it thickens the gravy and adds a subtle sweetness.
Cooking Vessel: If you don’t have a heavy pan or if you’re in a hurry, this curry can be made in a pressure cooker or Instant Pot (see Variations below). However, using a traditional pot and slow simmer allows greater control to develop the flavors and avoid overcooking the spices.
Variations
Chettinad Chicken Dry (Masala Fry): For a drier version of Chettinad chicken (often called Chicken Chettinad Varuval or Pepper Chicken), skip the extra water and cook the dish until the liquid evaporates and clings to the chicken. In this style, the masala becomes a thick coating on the chicken pieces rather than a pourable gravy. You can increase the black pepper and fennel for a sharper flavor, as Chettinad pepper chicken is a popular dry preparation. This makes an excellent appetizer or side dish – just be sure to stir frequently towards the end to prevent sticking or burning as the masala reduces.
Pressure Cooker Method: To speed things up, follow the recipe through step 4 (sautéing onions, curry leaves, ginger-garlic). After adding the marinated chicken and tomatoes, pour in only about 1/2 cup of water. Lock the pressure cooker lid and cook for about 2 whistles on medium heat (approximately 8–10 minutes). Allow the pressure to release naturally. Open the cooker, then stir in the ground Chettinad masala paste. Simmer the curry without the lid for 5–10 minutes to thicken the gravy and finish cooking the spices. (In an Instant Pot, use Pressure Cook on high for ~10 minutes, then natural release, and then sauté mode to simmer the masala paste.) The result is a quick yet authentic Chettinad chicken gravy with the same depth of flavor.
Serving Suggestions
Chettinad Chicken Curry is best enjoyed piping hot. It tastes wonderful with steamed rice – the gravy soaks into the rice, making each bite flavorful. For a special South Indian spread, serve it with soft dosas, fluffy appams (rice hoppers), or idlis. The curry’s spiciness also pairs well with plain biryani or ghee rice (buttery rice). If you prefer breads, try it with warm naan or chapati – they will scoop up the gravy nicely. On the side, include a cooling raita (yogurt dip) or simple cucumber salad to balance the heat. And don’t forget some fresh sliced onions and lemon wedges for an authentic touch – a squeeze of lemon and bite of onion can really elevate the enjoyment of this spicy, rich Chettinad chicken gravy.
Enjoy this Chettinad Chicken Curry with family and friends, and savor the warm, fiery flavors of Tamil Nadu in every mouthful. Happy cooking! 😋
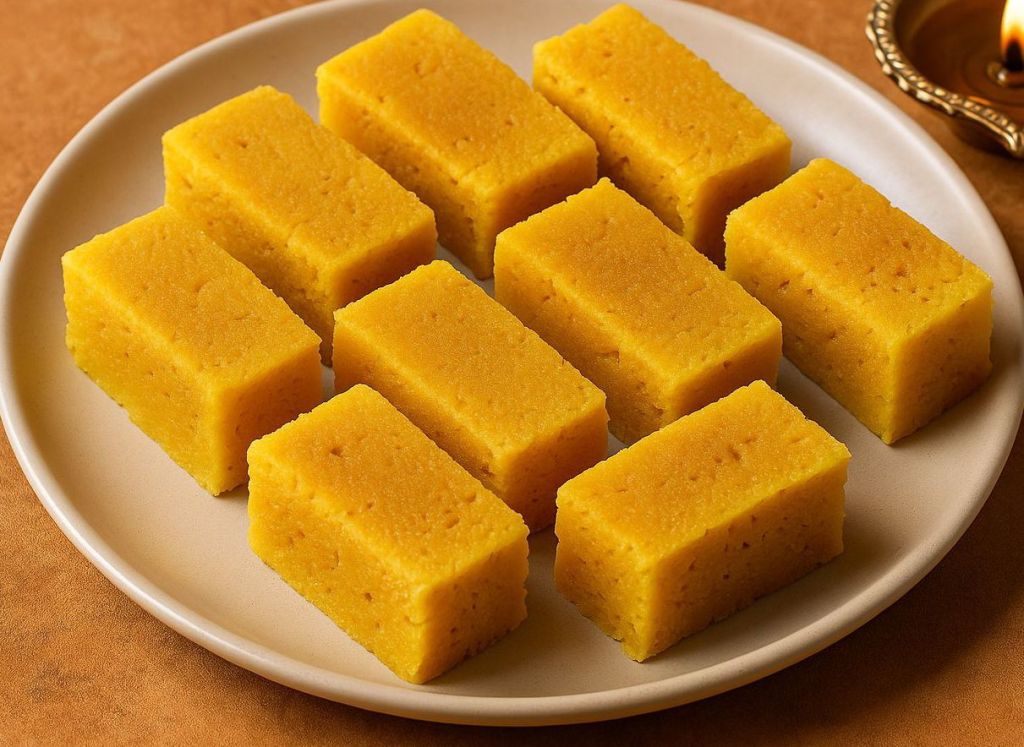
A plate of golden Mysore Pak pieces with a festive oil lamp on the side, showcasing the signature porous texture. I remember the warm glow of clay lamps dancing on the walls during Diwali, and the irresistible aroma of Mysore Pak wafting from my grandmother’s kitchen. This classic sweet – made from besan (gram flour), sugar, and ghee – was always the star of our festive spread. My grandmother would often recount how Mysore Pak was first concocted in a Mysore palace kitchen by a resourceful royal cook for the king. Every bite of this Karnataka specialty tastes like history and festivity combined, with a texture that is porous yet soft-firm, crumbling lightly and then melting in the mouth. In this post, I’ll share the traditional Karnataka-style Mysore Pak recipe (the one with the classic porous texture, not the super-soft version), along with tips, memories, and a bit of festive nostalgia.
Ingredients
Here’s what you need to make Mysore Pak at home. This recipe sticks to the traditional method using a mix of ghee and oil to achieve that porous texture:
Besan (Gram Flour) – 1 cup (about 120 g), sieved to remove lumps.
Sugar – 1¾ cups (350 g) granulated sugar. (You may reduce to ~1½ cups for a less sweet version, but using the full amount gives the authentic texture.)
Water – ½ cup (120 ml), for the sugar syrup.
Ghee (Clarified Butter) – 1 cup (240 ml), plus a teaspoon extra for greasing the tray. Use good quality pure ghee for best aroma.
Oil – ½ cup (120 ml) neutral oil, preferably peanut oil. (Using oil along with ghee is key to getting a light, airy porous structure in traditional Mysore Pak. Don’t worry – good quality oil won’t leave any smell.)
Cardamom – 3 green cardamom pods, seeds crushed (or ¼ teaspoon cardamom powder) for flavor (optional).
Preparation: Grease an 8-inch square pan or plate with a bit of ghee and set it aside. Measure and have all ingredients ready before you start, because the process moves quickly once you begin cooking.
Instructions
Follow these step-by-step instructions to make Mysore Pak. Remember to be cautious and stir continuously – the hot sugar syrup and ghee mixture can bubble vigorously.
1. Sieve the Besan: In a mixing bowl, sift the besan (gram flour) at least twice to break up any lumps. This ensures a smooth mixture later. (Tip: Traditional Mysore Pak doesn’t require pre-roasting the besan; it will cook in the hot syrup, so sieving is enough to remove raw lumps.)
2. Prepare the Ghee+Oil and Sugar Syrup: In one heavy-bottomed kadai (pan), begin heating the ghee and oil together on low heat (Burner 1). In a separate wide pan, combine sugar and water and bring to a boil on medium heat (Burner 2). Stir the sugar syrup until all the sugar dissolves.
3. Cook to One-string Consistency: Boil the sugar-water mixture, stirring occasionally, until it reaches a one-string consistency – this is when a drop of syrup between your thumb and finger pulls into a single thread. (This stage is crucial: the sugar syrup, known as paaka, is the foundation of Mysore Pak’s texture.) Once one-string consistency is reached, keep the syrup on low-medium heat so it continues to bubble gently.
4. Add Besan to Syrup: Quickly but carefully sprinkle the sieved besan into the bubbling syrup in 2-3 batches, stirring vigorously with a spatula as you add it. Ensure there are no lumps – the mixture should be smooth. (Adding the flour gradually while the syrup is boiling prevents clumping.) Cook this besan-syrup mixture on medium heat. You’ll notice it thickens and starts to froth.
5. Incorporate Ghee and Oil in Batches: Now, take the hot ghee-oil mixture from Burner 1. Add one ladle of hot ghee/oil into the besan-syrup mixture and stir continuously. The mixture will sizzle and bubble up lively as the hot fat hits it. Stir until that ghee is fully absorbed and the mixture looks uniform. Repeat this process, adding one ladle of hot ghee-oil at a time and stirring well after each addition. Each addition will cause the mixture to froth and become airy. Continue until almost all the ghee+oil is incorporated. (Keep a few tablespoons of hot ghee/oil reserved in case needed, but you might not use it all.)
6. Watch for the Porous Frothy Stage: As you keep stirring, the mixture will turn glossy and start to lighten in color. After the last addition of ghee, cook a bit more until the whole mass thickens and starts to leave the sides of the pan. You will see the mixture turning very bubbly/foamy with lots of tiny holes (“pores”) appearing. It will also start to come together into one lump and you might hear a faint hissing sound. This is the critical moment – the Mysore Pak is ready to set. (If you stir a few seconds too long here, it can get overcooked; a few seconds too little and it might be slightly soft, so stay focused.)
7. Turn Off and Transfer: The instant you see the mixture looking porous, frothy, and starting to separate from the pan, turn off the heat. Do not add any more ghee at this stage – if you do, it won’t absorb and will make the sweet greasy. Immediately pour the hot mixture into your greased pan. Do not shake, press, or flatten it too much; simply tilt the pan if needed to spread it evenly. (Avoid smoothing out the top with a spatula – leveling it firmly can collapse the air pockets that create the porous texture.)
8. Cool and Cut: Let the slab of Mysore Pak cool for about 5–10 minutes. It should start to set but still be warm to touch. Using a sharp greased knife, gently cut into squares or diamonds (classic shape) while warm. Wiping the knife with a bit of ghee helps to get clean cuts. Allow the pieces to cool completely in the pan – as they cool, they will firm up to the perfect soft-yet-firm consistency. Once fully cooled, lift out the pieces and enjoy!
Tips for Perfect Porous Texture
Getting Mysore Pak right can be tricky, but these tips and tricks will help you achieve that ideal porous, soft-firm texture:
Maintain Ingredient Ratios: The proportion of sugar and ghee/oil is key to texture. Don’t skimp on ghee, and use at least a 1.5:1 ratio of sugar to besan. If you significantly reduce sugar or fat, the Mysore Pak may turn soft like a fudge or come out too brittle. (Traditional recipes often use equal parts besan and sugar, or even more sugar, to get the proper crystallization.)
Use Ghee and Oil: Using a mix of ghee and a bit of oil gives Mysore Pak its light, porous structure. Oil has a higher smoke point and helps create tiny air bubbles as moisture escapes, yielding an airy texture. Don’t worry, the final sweet won’t taste oily (especially if you use a flavorful peanut oil) – it will still be rich in ghee aroma.
Sugar Syrup Mastery: Achieving the correct paaka (sugar syrup consistency) is crucial. One-string consistency means the syrup is neither too thin (which would make the sweet soft or not set) nor too thick (which could make it hard). This stage ensures the Mysore Pak sets with the right firmness and melt-in-mouth feel. Use a heavy pan and medium heat so you don’t overshoot the syrup stage.
Constant Stirring: Once you start adding besan and ghee, stir continuously and briskly. This prevents lumps and ensures even cooking. It also helps distribute the ghee, allowing it to cook the flour and create the hallmark “holes” without any part catching on the bottom.
Timing is Everything: Toward the end, keep a close eye. The moment the mixture turns frothy with porous bubbles and starts to leave the pan, remove it from heat. A few seconds can make the difference between a perfect Mysore Pak and an overcooked one. It’s better to err on the side of slightly under than over – the mixture continues to cook for a bit even after you turn off the stove due to residual heat.
No Pressing Down: When you pour the mixture into the tray, do not press it flat or bang the tray too hard. Minimal spreading is fine, but pressing will compact it and you’ll lose that airy texture. Just pour and let it settle naturally; it will set into a porous slab.
Optional Enhancements: You can stir in the crushed cardamom just as you turn off the heat for a lovely aroma. Some traditional cooks also add a tiny pinch of baking soda right before pouring to enhance porousness (the soda releases extra bubbles), but this isn’t necessary if your technique is good.
Practice Makes Perfect: Don’t be discouraged if your first attempt isn’t perfect. Mysore Pak is famously temperamental – even seasoned cooks take a couple of tries to master the timing and consistency. Every stove and pan is different, so if at first you get a softer burfi or a harder candy, note what might have gone wrong (heat too high, syrup under/overcooked, etc.) and try again. The result is worth it – homemade Mysore Pak has a fresh aroma and authenticity that’s hard to beat!
Serving Suggestions and Shelf Life
Mysore Pak is a festive delight often made for Diwali, weddings, and special occasions. Here’s how you can enjoy and store it:
Serving: Serve Mysore Pak at room temperature. It’s perfect on a festive platter alongside other Indian sweets, or simply on its own with a cup of hot chai or filtered coffee. The pieces have a beautiful golden color and porous look that invites you to take a bite. Because it’s quite rich, you can serve small squares – a little piece goes a long way in flavor. For a special touch, garnish the serving plate with a few toasted nuts or a sprinkle of crushed cardamom to complement the Mysore Pak (though the traditional version is plain).
Gifting: In South India, Mysore Pak is often called the “king of sweets” and is a popular choice for gifting during Diwali and other festivals. You can pack the pieces in decorative boxes – the sweet’s long shelf life makes it travel-friendly and great for sharing.
Storage: Once the Mysore Pak has fully cooled and been cut, store the pieces in an airtight container. It keeps well at room temperature for 2 to 3 weeks, and in fact can last up to about a month without refrigeration if stored properly in a cool, dry place. (The low moisture and high sugar/ghee content act as natural preservatives.) Avoid refrigerating, if possible, as refrigeration can sometimes make the texture denser or cause the sugar to crystallize. Always use a clean, dry spoon or hands to take out pieces, to prevent introducing moisture. Pro tip: If you see the Mysore Pak releasing a bit of ghee while stored, don’t worry – just blot gently with a paper towel. This is normal for homemade ghee sweets and doesn’t affect the taste or shelf life.
Enjoy! This traditional Mysore Pak, with its porous texture and rich aroma, is more than just a sweet – it’s a bite of Karnataka’s heritage and the memories of celebrations. Whether you’re making it for a festival or just to satisfy a sweet craving, I hope this detailed guide helps you create a melt-in-the-mouth Mysore Pak that earns you rave reviews. Happy cooking, and Happy Festivities! 🎉
Growing up, Raksha Bandhan was always a day filled with laughter, love, and homemade sweets. I still remember waking up to the aroma of simmering milk and saffron wafting through our home as my mother prepared fresh peda in the early morning. Peda (also known as doodh peda or mawa peda) are traditional Indian milk fudge sweets that have graced festive tables for generations. Originating from Mathura, these creamy, cardamom-kissed confections have become a staple for celebrations across India.
On Raksha Bandhan – the festival celebrating the bond between brothers and sisters – exchanging sweets is as important as the sacred rakhi thread itself. My sister and I would team up in the kitchen to make Kesar Malai Peda for our brothers. The term “Kesar” means saffron, and “Malai” means cream – together they signify the rich, luxurious flavor of this peda. We’d stir the milk powder and cream mixture patiently, excitedly waiting for it to turn into soft khoya (milk solids). I can never forget how special it felt to shape the warm dough into pedas, garnish them with vibrant saffron strands and pistachios, and present them to my brothers as a homemade token of love. The saffron-infused golden color of these pedas always reminded me of the auspiciousness of the occasion.
A batch of homemade Kesar Malai Peda, garnished with pistachios and saffron, ready to be enjoyed during Raksha Bandhan.
Fast forward to today, I carry on that tradition in my own kitchen. This instant Kesar Malai Peda recipe is a quicker take on the classic – perfect for busy festival days when you want a delicious sweet without spending hours in the kitchen. Traditionally, peda is made by slowly simmering milk for hours to create mawa or khoya, then adding sugar and flavorings. But with this quick recipe, we shortcut the process using milk powder and heavy cream to mimic that rich khoya in minutes. The result is a melt-in-your-mouth peda that tastes just like the traditional version – creamy, slightly grainy, and scented with cardamom and saffron. It’s amazing how a handful of simple ingredients can come together so quickly to create something so festive and delightful.
Whether you’re making these pedas to share with your siblings on Rakhi or to gift to friends and family, the process itself is filled with joy. So, let’s get started on this warm, nostalgic journey of crafting Kesar Malai Peda at home!
Saffron strands (kesar) – A generous pinch (about 15–20 strands)
Milk – 1 tablespoon (warm, for soaking saffron)
Green cardamom powder – 1/2 teaspoon (freshly ground from about 4–5 pods for best aroma)
Chopped pistachios or almonds – 2 tablespoons (for garnishing, optional)
Notes on Ingredients: The combination of milk powder and heavy cream forms an instant mawa (milk solids) base for our peda, saving hours of traditional simmering. Saffron lends a beautiful golden hue and delicate aroma, while cardamom provides warm, classic flavor. Ghee is used to enrich the mixture and to grease your palms for easy shaping. Feel free to use full-fat dairy for the creamiest peda. If you have mawa/khoya available, see the Variations section for using that directly.
Step-by-Step Instructions
1. Soak the Saffron: In a small bowl, soak the saffron strands in 1 tablespoon of warm milk. Set this aside to bloom while you prepare the peda mixture. (This helps extract maximum color and flavor from the saffron.)
2. Begin the Mixture: In a heavy-bottomed non-stick pan, melt 1 tablespoon of ghee over low heat. Once the ghee is warm, pour in the heavy cream and stir for a minute until the cream is just slightly warm (do not boil).
3. Add Milk Powder: Gradually add the milk powder to the warm cream, stirring continuously to prevent any lumps. It will form a smooth, thick batter-like consistency as the milk powder absorbs the cream. Tip: Use a spatula to scrape the sides and bottom of the pan regularly, so nothing sticks or scorches.
4. Cook into Khoya: Continue to cook this mixture on low to medium-low heat, stirring constantly. In about 8–12 minutes, it will begin to thicken and come together like a soft dough or lump (instant khoya). Keep the heat gentle – the mixture should not brown, just cook until it starts to leave the sides of the pan and you have a moist dough that can hold its shape. The texture will be somewhat lumpy or grainy, which is perfect.
5. Flavor with Saffron & Cardamom: Once the mixture has reached a soft dough stage, reduce the heat to low. Add in the soaked saffron along with the milk it’s in, and sprinkle the cardamom powder over the mixture. Stir well to incorporate; you’ll see the dough turn a lovely golden hue from the saffron. Cook for another 1–2 minutes on low heat to let the saffron and cardamom infuse into the dough. Optional: You can also add 1 more teaspoon of ghee at this stage for extra gloss and richness (especially if the dough looks very dry).
6. Cool the Mixture: Turn off the heat and transfer the peda mixture (khoya dough) to a plate. Spread it out a bit and let it cool until it is warm-lukewarm but not hot to the touch. This cooling step is important – if the mixture is too hot when you add sugar, the sugar will melt and make the dough runny or sticky. Give it about 5–10 minutes to cool down. It should still be pliable, just comfortably warm.
7. Add Sugar and Knead: Once the dough is lukewarm, add the 1/2 cup of sugar. Using your hands (grease them with a bit of ghee first), knead the sugar into the dough thoroughly. At first it might seem dry or crumbling, but keep kneading; the sugar will blend in and the dough will become soft and smooth. Tip: Knead just until everything is well combined and the dough is coming together – over-kneading isn’t needed. The final peda “dough” should be soft yet firm enough to hold shape, with a slight grainy texture (danedar) from the milk solids. (If the mix feels too dry/crumbly and isn’t coming together, sprinkle a teaspoon of warm milk or cream and knead again. If it feels too sticky or soft, you can add a spoonful of milk powder or almond powder to adjust. Avoid the temptation to reheat the dough at this point, as that can make the pedas hard or chewy.)
8. Shape the Pedas: Grease your palms with a little ghee. Pinch off small portions of the dough (about the size of a large marble or walnut). Roll each portion between your palms to form a smooth ball. Gently press the ball to flatten it into the classic peda shape – a thick disc. If you like, use your thumb to make a small indent in the center of each peda (this is traditional and also a nice spot to nestle a nut or saffron strand). You can also use decorative peda molds or cookie stamps to emboss designs on the pedas for a festive touch, but this is optional. (As one popular tip suggests, having a peda press can make them look uniform and fancy, but it’s not mandatory – shaping with hands works just as well.)
9. Garnish: Press a sliver of chopped pistachio or almond in the center of each peda for garnish. You can also place an extra strand of saffron on top of each peda to highlight the saffron flavor. The garnishes not only make the pedas look inviting but also add a nice little crunch and contrast of color.
10. Set and Serve: Allow the Kesar Malai Pedas to set at room temperature for 15–20 minutes. As they cool completely, they will firm up slightly. Now your pedas are ready to enjoy! Serve them fresh at room temperature for the best soft, melt-in-mouth texture.
Serving & Gifting Suggestions
Serving: Kesar Malai Peda is best served at room temperature. Arrange the pedas on a decorative plate or mithai platter. They make a wonderful dessert after a festive meal or a sweet accompaniment to your afternoon chai. The saffron and cardamom flavors truly shine when the pedas are not too cold, so if you’ve stored them chilled, let them sit out for a few minutes before serving.
Gifting: These pedas are a beautiful homemade gift, especially for Raksha Bandhan. Place each peda in a small cupcake liner or butter paper cup to prevent sticking, and arrange them in a decorative gift box. Tie the box with a ribbon – perhaps alongside a handwritten note or a rakhi – for a personal touch. The golden-yellow pedas flecked with green pistachios look as delightful as they taste, making them perfect for gifting to siblings, relatives, or friends to show your love.
Festive Presentation: For a special Rakhi presentation, you can include the pedas as part of a Raksha Bandhan thali. On a thali (plate), place the pedas alongside the rakhi, a small diya (lamp), rice grains and kumkum (for the tikka), and perhaps a few other sweets. It creates a beautiful, traditional arrangement to carry out the Rakhi ceremony. The pedas can be offered as prasad (sacred offering) after the rakhi tying ritual, symbolizing the sweetness of the sibling bond.
Storage: Kesar Malai Pedas will stay fresh for about 3 to 4 days at room temperature (in cooler weather) and up to 1 to 2 weeks refrigerated. Store them in an airtight container so they don’t dry out. If refrigerating, bring them to room temperature before serving for the best texture. (Although, I’ll admit, in my house these pedas rarely last beyond a day because everyone finishes them off quickly!) For longer storage, refrigeration is recommended, especially in warm climates, to keep the dairy-based pedas fresh.
Optional Variations
While Kesar Malai Peda in its saffron-and-cream glory is a treat on its own, you can easily tweak this recipe or try different variations to suit your taste or ingredient availability:
Traditional Khoya Peda: If you have store-bought khoya (mawa) or want to make peda the traditional way, you can skip the milk powder and cream base. Instead, use about 250 grams of crumbled khoya. Heat 1 tablespoon ghee in a pan, add the khoya and cook on low flame for a few minutes until it softens and releases aroma. Then add sugar (start with 1/2 cup, adjust to taste) and the soaked saffron + cardamom. Cook until the mixture thickens and leaves the pan, just like in the main recipe. Let it cool and proceed to knead and shape. Using khoya yields an even richer dairy flavor and is the classic method. (In fact, many sweet shops make peda purely from khoya.) This variation is great if you want to experience the authentic Mathura peda made from milk solids.
Condensed Milk Version: For an ultra-quick method, you can replace sugar with sweetened condensed milk. Cook 1 cup milk powder with 1/2 cup condensed milk and 2 tablespoons cream (plus a bit of ghee) on low heat until it forms the dough. You won’t need to add sugar later since condensed milk is sweet. Add saffron and cardamom toward the end of cooking. This yields a very moist, fudgy peda. (Be sure to cook on low and stir constantly, as condensed milk can scorch easily.) Using condensed milk is a handy shortcut that also avoids any issues of sugar not dissolving.
Cardamom-Only Peda (Doodh Peda): If you prefer a simpler flavor or don’t have saffron on hand, you can omit the saffron entirely to make classic doodh peda. Follow the same recipe minus the saffron – you’ll have milky white pedas with just the fragrant elaichi (cardamom) flavor. These are just as delightful, with the cardamom’s warmth shining through. You can still garnish with nuts, or even add a tiny drop of yellow food color if you want the look of kesar without the saffron. Cardamom-only pedas are a bit more economical but no less traditional.
Flavor Twists: Beyond saffron and cardamom, pedas are quite versatile. You can knead a teaspoon of rose water or a few drops of kewra (screw pine) essence into the dough along with the sugar for a floral twist. For Chocolate Peda, divide the dough and mix a spoon of cocoa powder into half of it, then shape – kids love this dual-color treat. Another variation is Kesar Badam Peda – add 2 tablespoons of almond flour to the mixture (especially if it’s a bit soft; it also adds a nice nutty taste). Feel free to get creative with shapes and toppings: you can use silver vark (edible silver leaf) to adorn the pedas for a truly festive presentation.
Celebrating Raksha Bandhan with Homemade Sweets: There’s something truly special about making a traditional sweet at home for your loved ones. This Raksha Bandhan, as you tie the rakhi on your brother’s wrist (or give a warm hug to your sister), share a Kesar Malai Peda and relive those sweet childhood memories. The creamy richness of the peda, the aroma of saffron and cardamom, and the love with which it’s made — all of it embodies the spirit of Raksha Bandhan. I hope this recipe brings a bit of that warmth and festivity to your home. Enjoy these pedas with your family, and Happy Raksha Bandhan! 🎉🎊
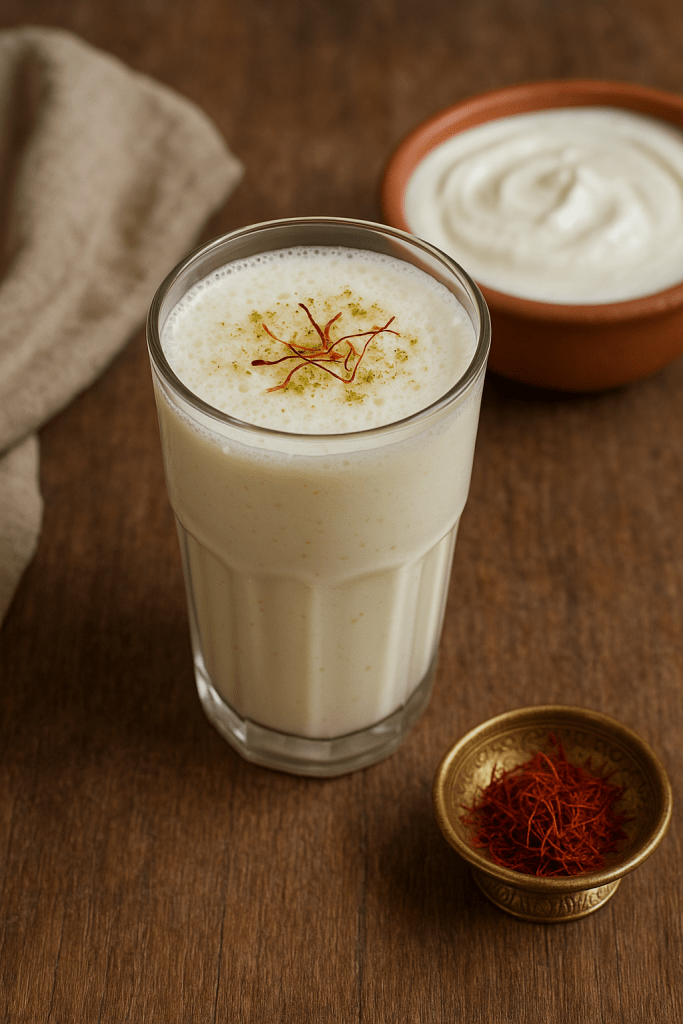
For many North Indian families (mine included), a chilled glass of lassi was a summer staple. I vividly recall summer mornings at my grandmother’s house, where sweet lassi was a breakfast essential. She would hand-churn the yogurt in a tall steel pot using a wooden mathani (traditional whisk) until the drink turned creamy and frothy. We’d often scoop off the fresh butter (makhan) that rose to the top and plop a dollop on our lassi – a true old-fashioned treat! Those memories of sitting in the courtyard, savoring the cold, velvety dahi lassi in steel tumblers, remain unmatched.
Three types of chilled lassi – from front: sweet lassi topped with saffron strands, a classic salted lassi with a cumin sprinkle, and a mint masala lassi with fresh mint. Each is creamy, frothy, and perfect for summer.
Dahi Lassi is a traditional Indian yogurt-based drink served chilled and enjoyed especially in the hot months. Originating in the Punjab region, this creamy concoction has become popular all over India (and beyond) as a cooling refreshment. It’s essentially whisked yogurt with water or milk and seasonings – sugar and aromatic spices for the sweet version, or salt and spices for the salty version. Lassi is not only delicious but also probiotic and great for digestion, thanks to the live cultures in yogurt. There are countless variations – from fruity mango lassi to fragrant rose lassi – but in this post we’ll focus on the two classic styles: meethi lassi (sweet lassi) and namkeen lassi (salted lassi).
The beauty of lassi lies in its simplicity and versatility. A sweet lassi can feel like a rich dessert drink, often topped with a swirl of cream or sprinkled with nuts, while a salty lassi (sometimes called chaas when thinner) is light, savory, and known to aid digestion with its spices. No matter which you prefer, a well-made lassi is creamy, smooth, and frothy – the perfect antidote to a sweltering afternoon or a spicy meal. Below, I’ll share the complete ingredient lists, step-by-step instructions (with tips to get that perfect froth), flavor variations, and tips on serving, storing, and enjoying this timeless yogurt drink.
Ingredients
Sweet Lassi (Meethi Lassi) (2 servings)
Yogurt (Dahi): 2 cups, chilled (use fresh whole-milk yogurt for best results)
Water: ½ to 1 cup, chilled (adjust to desired thickness; start with ½ cup). Optional: Instead of water, you can use a mix of 2–3 ice cubes plus a splash (~¼ cup) of cold milk or cream for extra richness.
Sugar: 3 to 4 tablespoons (adjust to taste; you can substitute honey or jaggery).
Green Cardamom Powder: ¼ to ½ teaspoon (from about 2–3 pods, crushed freshly for best aroma).
Rose Water: 1 teaspoon (optional, for a floral hint).
Saffron Strands (Kesar): a pinch (optional, for color & aroma; soak in 1 tablespoon warm milk for 5 minutes before using).
Chopped Nuts: 1 tablespoon almonds or pistachios (optional, for garnish).
Ice Cubes: 2–3 (optional, to blend for extra chill and froth).
Water: ~½ cup, chilled (you can adjust up to 1 cup for a thinner consistency).
Salt: ¼ to ½ teaspoon (to taste; use plain salt or Himalayan pink salt for traditional flavor).
Roasted Cumin Powder: ½ teaspoon (bhuna jeera powder, for that earthy, aromatic note).
Black Salt (Kala Namak): a pinch (optional, adds tangy depth and aids digestion).
Chaat Masala: 1–2 pinches (optional, for a tangy chaat flavor kick).
Fresh Mint Leaves: a few (optional, to blend for a mint lassi or to garnish).
Ice Cubes: 2–3 (optional, for blending a chilled, frothy lassi).
Tip: Using full-fat, fresh yogurt is key for a creamy lassi. If your yogurt is very thick (like Greek yogurt), you might need a bit more liquid; if it’s homemade and slightly thin, start with less water. Also, make sure the yogurt isn’t too sour – fresh, slightly tangy dahi is ideal for the best flavor.
Step-by-Step Instructions
Sweet Lassi (Meethi Lassi) – Directions:
1. Prep: Ensure the yogurt and water are nicely chilled before you start (you can refrigerate them in advance). If using saffron, soak the strands in warm milk now so they release color and flavor.
2. Whisk the Yogurt: In a mixing bowl or blender jar, add the 2 cups of chilled yogurt. Whisk it well (using a hand whisk or mathani) until it’s smooth and there are no lumps. This step breaks up the curd and makes the base creamy.
3. Add Sweeteners & Flavor: Add the sugar to the yogurt, along with the cardamom powder and the saffron-infused milk (if using). Also add the rose water now if you want that flavor. Whisk everything together until the sugar dissolves and the yogurt mixture is uniform. You’ll notice the aroma of cardamom and saffron as you mix.
4. Add Liquid & Froth: Pour in about ½ cup of the chilled water (or water+milk/ice combo). Now whisk briskly for a minute or two, until the lassi becomes light and foamy. You can see bubbles or froth forming on top. *(If using a blender, blend on medium speed for 30–60 seconds until frothy – you may add a couple of ice cubes while blending for extra froth, but avoid over-blending.)* The goal is a creamy, airy texture; traditionally, people would pour the lassi back and forth between two containers to make it foamy!
5. Adjust Consistency: Check the taste and thickness. If it’s too thick for your liking, add a little more cold water (or milk) and whisk again. If you prefer it sweeter, mix in another spoon of sugar. Remember, lassi can be made as thick as a milkshake or more drinkable – adjust to your preference. (I like mine thick but still pourable.)
6. Serve: Pour the sweet lassi into serving glasses. Garnish by sprinkling a pinch of cardamom powder or a few saffron strands on top, and add the chopped nuts if desired. Serve immediately, chilled, and enjoy every sip of this creamy delight!
Salted Lassi (Namkeen Lassi) – Directions:
1. Whisk the Yogurt: As with the sweet version, start by whisking the 2 cups of chilled yogurt in a bowl or blender until it’s completely smooth and creamy. No lumps should remain – a smooth dahi is the base for a good lassi.
2. Add Spices & Salt: To the whisked yogurt, add the salt (start with ¼ tsp and adjust later), the roasted cumin powder, and a pinch of black salt if using. If you like a little zing, add a pinch of chaat masala as well. Whisk these into the yogurt so they’re well combined. The yogurt will take on the wonderful aroma of cumin.
3. Add Liquid & Froth: Pour in about ½ cup of chilled water. Whisk vigorously for a couple of minutes until the lassi is light and frothy. You should see a good head of foam on top. (If using a blender, you can toss in a few ice cubes and blend on medium for ~30 seconds until frothy.) Be careful not to over-blend into butter – stop as soon as it’s smooth and slightly foamy.
4. Adjust to Taste: Taste the salted lassi. You can add more salt if you feel it’s needed, or a extra pinch of cumin for a stronger spice note. If it’s too thick, whisk in a bit more water until it’s to your desired consistency. Salt lassi is usually a bit thinner than sweet lassi, but it’s your call how thick you want it.
5. Serve: Pour the namkeen lassi into glasses. Garnish with a light sprinkle of cumin powder on top or a tiny pinch of chaat masala. You can drop a fresh mint leaf or two into each glass (or float on top) for a pop of color and refreshing aroma. Serve it chilled (you can even add an ice cube to the glass). This savory lassi is incredibly refreshing, especially after a heavy or spicy meal.
Tip: Both sweet and salted lassi are best enjoyed immediately after preparation, when they’re frothy and cold. If you let lassi sit around, the foam will subside and the drink may thicken as the yogurt settles. So serve it up at once for that freshly made texture and taste!
Tips for a Perfect Lassi
Use Chilled Ingredients: Temperature can make or break your lassi. Always use cold yogurt and ice-cold water/milk, and serve the lassi immediately while chilled. Using chilled ingredients helps keep the lassi creamy and prevents it from separating quickly. In fact, lassi is meant to be enjoyed nice and cold – if it’s not cold, it just doesn’t taste as refreshing. You can even chill your serving glasses in the fridge beforehand.
Choose Fresh, Whole-Milk Yogurt: The quality of yogurt (dahi) is key. Use plain whole milk yogurt (homemade curd is fantastic if you have it). This yields a richer flavor and texture. Avoid yogurt that is overly sour or anything with gelatin/stabilizers (which can affect the texture). If your yogurt tastes too tangy on its own, your lassi might come out too tart – in that case, balance it with a bit more sugar or opt for making a salty lassi instead. Fresh, slightly tangy (not bitter) yogurt makes the best lassi.
Don’t Over-Blend: While a blender makes quick work of lassi, be cautious not to over-blend the mixture. Over-blending can churn the fat in the yogurt and start turning your lassi into butter or butter-milk (especially if using very high-fat yogurt or cream) – not what we want! The traditional hand-churning method with a wooden whisk incorporates air more gently, giving a frothy texture without over-processing. If you use a blender, just blend until everything is mixed and frothy – no more than a minute. You can always pulse in short bursts to be safe.
Incorporate Air for Froth: The signature foamy top on lassi comes from air bubbles integrated into the yogurt. If whisking by hand, use a rapid circular motion (or even better, pour the lassi back and forth between two containers) to create froth. If using a blender, adding a couple of ice cubes and blending briefly can help create foam. Just remember the point above – stop blending once a nice froth has formed on top.
Adjust Thickness to Your Liking: Lassi’s thickness is personal preference. Street-style lassi in Punjab is often very thick and served with a spoon (nearly like a thin milkshake), whereas home-style lassi might be more fluid. Feel free to adjust the yogurt-to-liquid ratio. For an ultra-rich thick lassi, use less water and even add a tablespoon of heavy cream (this makes it decadent and silky). For a lighter lassi, add a bit more water or milk until it’s easily sippable. There’s no wrong consistency as long as you enjoy it!
Sweet vs. Salt – No Double Dipping: Traditional wisdom says lassi is either sweet or salted, but not both. So if you’re making sweet lassi, you generally wouldn’t add salt (except maybe a tiny pinch to enhance flavor), and if making salted lassi, you skip the sugar. This keeps the flavors clean. Of course, modern recipes sometimes play with a sweet-salty balance, but classic lassi sticks to one or the other.
Use a Pinch of Salt (for Sweet Lassi): This might sound counterintuitive, but adding a tiny pinch of salt to sweet lassi can actually heighten the sweetness and balance the flavor (similar to adding salt to desserts). Don’t overdo it – just a pinch can make the sweet flavors pop. (This is totally optional and not traditional, but a useful trick in general.)
Experiment with Aromatics: Cardamom (elaichi) is the superstar spice for lassi – its warm, floral aroma is what makes a plain lassi heavenly. Always use freshly ground cardamom if possible, as it’s far more fragrant. Saffron and rose are other aromatics that can elevate your lassi (more on these in variations below). Even in salted lassi, a hint of mint or cumin aroma defines the experience.
Serve Fresh and Frothy: Lassi is best served immediately while it’s still frothy and chilled. Over time, the froth will die down and the lassi can thicken or separate slightly. For the optimal texture, drink it up sooner rather than later. If you must hold it for a short while, give it a quick whisk before serving to revive some of the foam.
By following these tips, you’ll get a lassi that’s creamy, frothy, and utterly satisfying every time!
Flavor Variations and Add-Ins
One of the joys of lassi is how customizable it is. Once you have the basic recipe down, you can get creative and add different flavors to switch things up. Here are some popular lassi variations you can try:
Mango Lassi: Perhaps the most famous variation internationally! To make a mango lassi, blend in about ½ to 1 cup of ripe mango pulp (fresh mango pieces or canned pulp) with the yogurt and sugar. Alphonso or Kesar mangoes (when in season) work great for an authentic flavor. If the mango is very sweet, feel free to reduce the added sugar. This golden, tropical lassi is like a smoothie-meets-milkshake – thick, fruity, and indulgent. Tip: Use chilled mangoes and/or a few ice cubes to keep it cold, and consider adding a pinch of cardamom to complement the mango flavor.
Rose Lassi: For a delightful floral twist, add a bit of rose flavor to your sweet lassi. You can use 1–2 tablespoons of rose syrup such as Rooh Afza (a concentrated rose sherbet syrup) – its vibrant pink color and sweet rose essence will transform your lassi. If using rose syrup, reduce or omit other sugar since the syrup is sweet. Alternatively, add 1 teaspoon of rose water for a subtler fragrance. Stir the rose syrup or water into the prepared lassi. Garnish: a few dried rose petals on top for a gorgeous presentation. Rose lassi is especially refreshing and often enjoyed during the spring and summer.
Kesar Pista (Saffron Pistachio) Lassi: Elevate your sweet lassi by infusing it with saffron. Soak a generous pinch of saffron strands in 2 tablespoons of warm milk for 10 minutes, then add this golden milk while blending your lassi. It imparts a beautiful color and a rich aroma. To make it kesar pista lassi, also mix in 1–2 tablespoons of finely chopped or ground pistachios (or almonds). The nuts add texture and a nice nutty flavor that pairs with saffron. Saffron lassi feels regal – in fact, kesar lassi is a prized variant in many Indian households. (You can sweeten this with a touch of honey which goes well with saffron.)
Cardamom Lassi: We already use cardamom in the classic recipe, but you can make it the star. For a stronger elaichi flavor, add an extra ¼ teaspoon (or more) of freshly ground green cardamom to your sweet lassi. You can even lightly crush a cardamom pod and drop it into the lassi while it chills for an hour (then remove it) to infuse more flavor. Cardamom lassi is aromatic and soothing. Sometimes, a pinch of cinnamon or nutmeg can be added alongside cardamom for a spiced lassi (though not traditional).
Mint Lassi (Pudina Masala Lassi): A refreshing variation on salted lassi. Blend a handful of fresh mint leaves into the yogurt along with the salt and cumin. You can also add a small pinch of grated ginger or a green chili (de-seeded) for a real chaas style kick. A squeeze of lemon juice brightens it up further. This mint masala lassi comes out green-flecked and ultra-refreshing – perfect for the hottest days when you need something cool and savory. Mint aids digestion, so it’s great after a heavy meal. Serve this lassi with an extra sprinkle of chaat masala on top and a mint sprig as garnish.
Bhang Lassi (Holistic variation): Bhang is an edible cannabis preparation traditionally mixed into a lassi during certain Indian festivals like Holi. Bhang Lassi has a mild intoxicating effect and is a festive special. (This is definitely an adults-only variation and very region-specific!) It involves grinding bhang paste into a sweet lassi, often with spices and nuts. Unless you’re specifically looking for this, stick with the yummy fruit and spice variations above – but it’s an interesting cultural footnote.
Other Fruit Lassis: Beyond mango, you can experiment with other fruits to make fruity lassi smoothies. Strawberry Lassi – blend a handful of strawberries with yogurt and sugar (the lassi will turn a lovely pink). Banana Lassi – add a ripe banana; this yields a super creamy, sweet lassi (you might skip extra sugar because banana is sweet). Berry Lassi – blueberries, raspberries, or cherries can all be blended in for unique flavors and colors. When using fruits, it’s often best to use the sweet lassi base (with sugar or honey) and omit cardamom/rose to let the fruit flavor shine. A dash of vanilla can pair nicely with some fruits. These are not traditional, but they are delicious modern twists – almost like healthy yogurt smoothies.
Feel free to get creative! The base of yogurt + liquid + a bit of sweetness or salt is a blank canvas. You can blend in ripe guavas (for a guava lassi), chikoo (sapodilla) for a tropical treat, or even dates and figs for a rich, shake-like lassi. Just remember to adjust the main flavors (sweet or salty) accordingly and strain fibrous fruits if needed for a smoother drink.
Serving Suggestions and Pairings
Lassi is wonderfully easy to serve – just pour it out and enjoy. That said, here are some serving tips and pairing ideas to make the most of your Dahi Lassi experience:
Serving Vessels: Traditionally, lassi may be served in tall metal glasses or even in earthen clay cups called kulhars/kulhad for an authentic feel. The clay imparts a nice earthy aroma and keeps the drink cool. At home, any tall glass will do. In Punjabi dhabas (roadside eateries), you’ll often get lassi in a huge tumbler with a layer of malai (clotted cream) or makhan (white butter) floating on top! If you want to be indulgent, you can mimic this by adding a spoonful of lightly whipped cream or a scoop of vanilla ice cream on top of your sweet lassi when serving – a decadent touch for guests or special occasions.
Garnishes: As mentioned, garnishes can elevate the presentation. For sweet lassi, sprinkle a few saffron strands or a pinch of cardamom on the foam, and scatter some chopped pistachios or almonds. It not only looks pretty but adds a nice texture when you sip. You can even place a few rose petals if you flavored it with rose. For salted lassi, a light dusting of roasted cumin powder on top is classic. You could also dust a pinch of chili powder or paprika for color, and pop a small mint leaf on the surface. The aroma hits as you bring the glass to your lips. Presentation-wise, those little touches make your homemade lassi feel like a treat.
When to Enjoy: Lassi is often enjoyed during the daytime, especially in summer. It’s a fantastic cooler for hot afternoons – picture yourself relaxing in the shade with a cold lassi in hand. Sweet lassi can serve as a dessert or a mid-morning/afternoon snack on its own. In Punjab, a tall sweet lassi is sometimes breakfast by itself because it’s so filling (rich with yogurt and butter/cream). Salted lassi (or chaas) is commonly drunk alongside meals or after meals. Its salty, spice-infused taste complements food and can soothe the stomach if you’ve eaten something heavy or spicy. In fact, many people have a glass of salted lassi after lunch to aid digestion and cool off.
Pairing with Foods: Because lassi is cooling, it pairs beautifully with spicy or rich foods. Here are some pairing ideas:
Enjoy a sweet lassi with a spicy Punjabi meal like chole bhature (spiced chickpeas and fried bread) or butter chicken with naan. The sweetness and cold yogurt tone down the heat and provide a contrast to tangy, spiced gravies. It’s also great with biryani or pulao – take a sip of lassi between bites to refresh your palate.
Sweet lassi is a match made in heaven for parathas stuffed with potato or paneer. In many North Indian homes and dhabas, aloo paratha with lassi is an iconic breakfast combo – the lassi helps wash down the hearty, flaky paratha and you truly don’t need anything else!
If you’re having a heavy or oily meal (like something fried or a rich curry), a salted lassi alongside works wonders. Try namkeen lassi with pakoras (fried fritters) or samosas – it’s a classic pairing, as the tangy salted lassi offsets the oiliness and spice. It’s also excellent with biryanis or grilled meats (like tandoori tikka) where the subtle sourness and salt of the lassi complement the savory flavors.
For a light meal or snack, have a glass of salted lassi with a simple rice dish or just by itself to hydrate. And of course, mint lassi or masala lassi (salted lassi with spices and herbs) is great after any meal to help digest and prevent that heavy feeling.
Seasonal Touch: In summer months, serving lassi extra chilled is key. You can even blend in some crushed ice or keep the glasses in an ice bucket if serving outdoors. In winter, people drink lassi less often (since it’s cooling by nature), but if you do, you might skip the ice. Some even enjoy warm sweet lassi (just room temperature, not chilled) in cooler weather or add warming spices like cinnamon – but that’s more an experimental twist. Generally, lassi = summer bliss.
Serving Quantity: Lassis can be very filling, so serve modest portions if it’s accompanying a meal (about 1 cup per person). If it’s the star (say, a standalone snack or beverage), you can go generous – those big Punjabi lassi glasses can be 12-16 ounces or more! You might want to provide spoons if your lassi is extremely thick or has a malai topping, so guests can scoop and eat the cream first (that’s the traditional way in Punjab – eat the butter/cream, then drink the lassi). Otherwise, a straw or just sips from the glass work for thinner lassi.
However you serve it, make sure it’s cold and fresh. An under-chilled lassi or one that’s been sitting around warm is not nearly as enjoyable. A perfectly served lassi should have a light froth on top, be garnished appealingly, and feel like a soothing balm as it goes down!
Storage Tips
Lassi is best enjoyed fresh, but if you need to make it ahead or have leftovers, here’s how to store it properly:
Refrigeration: Transfer your lassi to a jug or bottle with a lid and keep it in the refrigerator. It will stay good for about a day – possibly up to 2 days – in the fridge. However, for the best taste and texture, try to consume it within 12-18 hours or so. After that, it can start to lose the fresh yogurt flavor or become more sour as fermentation conti
Growing up, the tantalizing aroma of Bharwa Shimla Mirch roasting in my mother’s kitchen was enough to draw everyone to the table. There’s something magical about the smell of bell peppers (capsicums) charring slightly on a pan, filled with a warmly spiced potato mixture. This dish takes me back to cozy family dinners on rainy evenings, when a platter of these stuffed peppers and hot rotis made the perfect comfort food.
Bharwa Shimla Mirch (North Indian stuffed capsicum) loaded with spiced potato filling, roasted to perfection. Pictured above is a batch I made recently – tender green capsicums generously filled with masala aloo (spiced potatoes) and lightly charred on the edges for extra flavor. Bharwa means “stuffed,” and Shimla Mirch means “capsicum,” so the name literally translates to stuffed capsicum. This colorful dish is as appealing to the eyes as it is to the taste buds, bursting with the aroma of roasted spices and fresh herbs.
For me, Bharwa Shimla Mirch isn’t just about the taste – it’s about nostalgia and home-style cooking. It’s a dry sabzi (vegetable dish) that packs a punch of flavor without needing heavy gravy. Each pepper is like a little package of comfort: the natural sweetness of roasted bell pepper, the savory spiced potato filling, and the hit of cilantro and garam masala in every bite. Let’s dive into how to make this simple yet delightful North Indian classic at home!
Ingredients
4 medium green capsicums (bell peppers) – try to use equal-sized peppers for even cooking
3 medium potatoes (about 250 g total), boiled, peeled, and lightly mashed
2 tablespoons oil (vegetable or mustard oil for authentic flavor)
1 teaspoon cumin seeds (jeera)
1 medium onion, finely chopped (optional, for filling)
1–2 green chilies, finely chopped (adjust to taste)
Spice powders: ½ teaspoon turmeric powder, 1 teaspoon coriander powder, ½ teaspoon cumin powder, 1 teaspoon red chili powder (adjust to taste)
½ teaspoon garam masala (Indian spice blend)
½ teaspoon amchur (dry mango powder) – for tang (or use 1 tablespoon lemon juice)
Salt, to taste
2 tablespoons fresh coriander leaves (cilantro), chopped (to mix in and for garnish)
(Optional) ¼ cup boiled green peas – to mix into the potato filling for extra texture and nutrition
Step-by-Step Instructions
1. Prep the Bell Peppers: Wash the capsicums and pat them dry. Slice off the top “lid” of each pepper (the stem end) and scoop out the seeds and membranes inside to hollow them out. Pro Tip: If a pepper doesn’t sit flat, slice a thin bit off the bottom (without cutting a hole) to help it stand upright while cooking, so the stuffing won’t spill out.
2. Make the Potato Filling: Heat 2 tablespoons of oil in a pan on medium heat. Add the cumin seeds and let them sizzle for a few seconds until fragrant. Next, add the chopped onion (if using) and sauté until it turns golden brown. Stir in the ginger-garlic paste and green chilies, cooking for another minute until the raw smell disappears. Now add the boiled potatoes, crumbling them into the pan. Mix well and toss in all the spice powders: turmeric, coriander, cumin, red chili, and garam masala. Add the amchur (if using lemon juice instead, add it at the end) and salt. Cook this potato masala for about 3–4 minutes, stirring so that the spices cook through and the mixture is fairly dry. Finally, turn off the heat and mix in the chopped fresh coriander leaves. Pro Tip: Taste the potato mixture and adjust salt or chili to your liking – the filling should be well-seasoned on its own, since the capsicum will be unseasoned.
3. Stuff the Peppers: Take each hollowed capsicum and spoon the warm potato filling into it. Press down gently to fill the pepper completely. You can fill them to the top (even form a little mound) as the filling will settle a bit on cooking. If you kept the tops, place the cap of each pepper back on like a lid (this is optional, purely for presentation). Pro Tip: Don’t press the filling in too tightly; a loosely packed filling allows heat to penetrate evenly and prevents the pepper from splitting during cooking.
4. Cook the Stuffed Capsicums (Stovetop Method): Heat 1–2 more tablespoons of oil in a wide pan or skillet over low heat. Gently place the stuffed capsicums in the pan in a single layer. Cover the pan with a lid and let them cook on low flame for about 10–15 minutes. Every few minutes, uncover and carefully turn each pepper a quarter turn, then cover again. This helps all sides get lightly browned and the pepper cooks evenly. Continue slow-roasting until the capsicums are tender (you can poke with a knife to check – it should glide in easily) and the skins are a bit blistered/charred. Pro Tip: Keep the heat low – the goal is to slowly soften the peppers. If you notice the peppers are charring too quickly or sticking, sprinkle a few drops of water in the pan and cover; the steam will help cook them gently. (For oven or air-fryer methods, see Variations below.)
5. Serve and Enjoy: Once cooked, turn off the heat and let the stuffed peppers rest for 5 minutes. To serve, gently lift them out with a spatula (be careful, they are delicate) and place on a serving dish. You can serve the capsicums whole or cut in half. Enjoy Bharwa Shimla Mirch hot with your favorite Indian flatbread or as a side with a larger meal. Squeezing a little fresh lemon juice on top right before eating really brings out the flavors of the spices and peppers!
Variations
Paneer Stuffing: For a protein boost and a slightly richer filling, replace half (or all) of the boiled potato with paneer (Indian cottage cheese). Simply crumble the paneer and mix it with the same spices (you can follow the filling steps above, adding paneer in with or instead of potato). Paneer gives a lovely soft texture and mild flavor that pairs well with capsicum. You can even add some peas or grated carrot into a paneer stuffing for extra variety. Stuff and cook the peppers the same way. This paneer bharwa shimla mirch turns out delicious and creamy inside.
Besan Masala Stuffing (Rajasthani Style): Another popular variation is a gram flour (besan) based stuffing, which is especially common in Rajasthan. Instead of potatoes, you make a spiced besan filling that has a unique nutty taste. Dry roast about ½ cup besan in a pan until it turns aromatic and light golden. In a bit of oil, crackle 1 teaspoon cumin seeds (and optionally a pinch of fennel seeds), then add the roasted besan along with turmeric, red chili powder, salt, and a pinch of sugar. Squeeze a little lemon or add a pinch of amchur for tang, and cook this mixture for a couple of minutes. It will be a dry, crumbly stuffing. Fill this into the prepared capsicums and cook on low heat (or bake) as usual. The result is a besan-stuffed shimla mirch with a nutty, spiced filling – a great gluten-free alternative to the potato stuffing.
Air-Fryer or Baked Version: Want to skip babysitting the stove? You can bake or air-fry the stuffed capsicum too! For baking, preheat your oven to about 180°C (350°F). Brush the stuffed peppers lightly with oil and place them upright in a baking dish or on a tray. Bake for roughly 20–25 minutes until the peppers are cooked and slightly charred on top. For an air-fryer, preheat to 180°C and arrange the stuffed peppers in the basket (you may need to cook in batches). Air-fry for about 12–15 minutes, turning them once halfway through, until they are tender and starting to brown. The advantage of these methods is convenience – no need to turn them frequently – and you might get a slightly more roasted flavor. Pro Tip: In the oven, if the peppers start drying out, you can cover them loosely with foil for the first half of the bake, then remove it to let them brown in the second half.
Serving Suggestions
With Roti or Paratha: Bharwa Shimla Mirch is traditionally enjoyed with Indian breads. Serve these stuffed capsicums with warm rotis, chapatis or parathas. Tear a piece of bread and scoop up some of the spiced potato filling and tender pepper – it’s a perfect bite! A little mango pickle on the side wouldn’t hurt either for a tangy kick.
Alongside Dal & Rice: Make it a complete North Indian meal by pairing the stuffed capsicum with a comforting dal and rice. For example, serve them with dal tadka (tempered lentils) and steamed basmati or jeera rice. The mellow, spiced flavors of the potato stuffing complement the dal, and the capsicum adds a nice veggie component to the plate.
With Other Curries: You can also serve these as a side alongside rich curries like chole (spiced chickpeas), rajma (kidney bean curry), or a paneer gravy. The dry nature of Bharwa Shimla Mirch balances well with saucy dishes and adds variety to your menu.
As a Party Appetizer: If you can find smaller bell peppers or baby capsicums, you can stuff those and turn this recipe into a fun appetizer or party snack. Mini stuffed peppers look cute and are easy to handle as finger food. Just reduce the cooking time a bit since they’ll cook faster than big ones.
Accompaniments: A spoon of cool yogurt raita on the side can be a great accompaniment, as it complements the spices and also cools the palate. You might try a cucumber raita or mint yogurt. Additionally, a fresh salad or simply some onion rings and lemon wedges go well on the side – a squeeze of lemon on the hot stuffed pepper just before eating livens up all the flavors!
Enjoy the colorful, flavorful goodness of Bharwa Shimla Mirch! This home-style stuffed capsicum recipe is sure to bring a touch of North Indian comfort to your kitchen. Happy cooking and happy eating!
When I think of Potato 65, I’m flooded with warm memories. Growing up, my mother would fry up a big batch of this spicy, bright-red potato dish for special occasions. The kitchen would fill with the aroma of curry leaves crackling in hot oil and chiles, and we kids would line up eagerly to snag the first crispy bite. Whether it was a family Diwali get-together or a rainy monsoon evening, a platter of Potato 65 instantly made it feel like a celebration, with its vibrant colors and bold flavors bringing joy to everyone.
Potato 65 is an Indo-Chinese inspired snack that’s popular across India, especially as a vegetarian take on the famous Chicken 65. It features golden deep-fried potato cubes coated in a spiced batter, then tossed in a tangy, chili-infused yogurt sauce along with curry leaves and chilies. The result is a crispy, spicy, and tangy appetizer that’s finger-licking good. (Ever wondered why it’s called 65? Legend has it the original Chicken 65 got its quirky name either from being item #65 on a Chennai canteen menu or from being introduced in the year 1965. Whatever the true story, all that matters is how delicious these “65” dishes taste!)
Potato 65 served in a bowl, garnished with curry leaves and green chili – a vibrant appetizer that’s crispy, spicy, and irresistibly tangy. In the photo above, you can see how the fried potato cubes are generously coated in the reddish yogurt-chili sauce and dotted with fried curry leaves. Each bite bursts with flavor: the crunch of the batter, the heat of chilies, and a slight tang from that special sauce. It’s no wonder this dish is a crowd-pleaser at parties and family gatherings.
Despite its restaurant-style flair, Potato 65 is quite straightforward to make at home. Below, I’ll guide you through the ingredients and step-by-step instructions, along with plenty of handy tips to ensure your Potato 65 comes out perfectly crispy (and not greasy or soggy!). This festive snack makes a fantastic starter for any party, and also doubles as a flavorful side dish – you can serve it alongside naan or biryani, or even with fried rice and pulao. Now, let’s get cooking this spicy treat!
Ingredients
For the Potatoes & Batter:
Potatoes (boiled) – 3 medium potatoes, peeled and cut into 1-inch cubes (par-boiled until just fork tender).
All-purpose flour (Maida) – ¼ cup (for binding the batter).
Corn flour (Cornstarch) – 3 tablespoons (adds extra crispness).
Rice flour – 1–2 tablespoons (optional, for even more crunch; you can skip if not available).
Ginger-Garlic paste – 2 teaspoons (for robust flavor in the marinade).
Kashmiri red chili powder – 1 teaspoon (mild, for color).
Garam masala – ½ teaspoon (warm spice mix).
Black pepper powder – ½ teaspoon (for a slight kick).
Turmeric powder – ¼ teaspoon (adds color and flavor).
Salt – to taste.
Baking soda – a pinch (helps make the coating light and crisp).
Water – ~¼ cup, or as needed to make a thick batter.
For the Tempering (Yogurt-Chili Sauce):
Oil or Ghee – 2 tablespoons (for tempering the spices).
Cumin seeds – 1 teaspoon (adds a nutty aroma when tempered).
Mustard seeds (optional) – ½ teaspoon (for a South Indian touch, optional).
Garlic – 3–4 cloves, finely chopped.
Onion – 1 small, finely chopped (optional, adds extra flavor in the final toss).
Green chilies – 2, slit lengthwise (for heat and garnish).
Kashmiri red chili powder – ½ teaspoon (for color in the sauce; adjust for spice level).
Coriander powder – 1 teaspoon (adds earthy flavor to the sauce).
Soy sauce – 1 teaspoon (optional, for an Indo-Chinese twist and umami).
Tomato ketchup – 1 teaspoon (optional, adds tangy sweetness in the Indo-Chinese version).
Yogurt (curd) – ¼ cup, thick and whisked (this is the base of the tangy sauce; use plain yogurt or Greek yogurt, at room temperature to avoid curdling).
Salt – a pinch (to season the sauce, remember the batter already has salt).
Sugar – ½ teaspoon (optional, to balance the heat and tang if needed).
For Garnish:
Fresh cilantro (coriander leaves) – a handful, chopped.
Fried curry leaves & chilies – reserved from tempering (they become crispy and aromatic).
Lemon wedges – to serve on the side (a squeeze of lemon before eating elevates the flavors).
Chaat masala – a pinch to sprinkle on top (optional, for a tangy finish).
Tip: Using Kashmiri red chili powder gives a brilliant red color without making the dish too spicy – no artificial food coloring needed. If you prefer extra heat, you can mix in a bit of hotter chili powder or a couple of chopped green chilies to the batter or sauce.
Step-by-Step Instructions
1. Prep the Potatoes: Peel and cut the potatoes into cubes (about 1-inch pieces). Par-boil the potato cubes in salted water until just tender but not mushy. You can boil for about 5–6 minutes or pressure cook for 1 whistle – the potatoes should be cooked through yet firm enough to hold their shape. Tip: Do not overcook the potatoes, or they’ll break apart and soak up oil later, making them soggy. Once done, drain and let the potato cubes cool slightly (excess moisture will also make the batter slip off, so ensure they are not water-logged).
2. Make the Batter: In a mixing bowl, combine the flours (all-purpose, corn flour, and rice flour if using), ginger-garlic paste, Kashmiri chili powder, garam masala, black pepper, turmeric, baking soda, and salt. Add a little water at a time and whisk to form a thick, smooth batter that can coat the potatoes (no big lumps). The batter consistency should be like pancake batter – not too thin (or it won’t cling) and not too thick (or the coating will be dense). Tip: If the batter looks too runny, sprinkle a bit more flour; if too thick, add a spoon of water. Also, taste-test the batter and adjust salt or spice if needed (keeping in mind the sauce will add more flavor later).
3. Batter Coat the Potatoes: Add the boiled potato cubes into the bowl of batter. Gently toss or fold until every potato piece is well coated with the spiced batter. Let it sit for 5–10 minutes while you heat the oil. (This short rest helps the batter adhere better, but don’t leave it too long or the potatoes might start releasing moisture).
4. Deep Fry the Potatoes: Heat oil in a deep kadai or heavy-bottom pan for deep frying. You’ll need enough oil to submerge the potato pieces (about 2 inches of oil depth). Once the oil is hot (around 350°F/180°C; you can test by dropping a bit of batter – it should sizzle and rise immediately), carefully drop in the batter-coated potato cubes in small batches. Do not crowd the pan. Fry on medium-high heat until the potatoes turn crispy and golden-brown on the outside, about 4–5 minutes per batch. Stir occasionally for even frying. Tip: Frying at too low a heat will make the potatoes absorb oil and turn limp, so keep the oil moderately hot. On the other hand, don’t crank the heat to smoking – you want the potatoes to crisp up gradually; they take a little time to get a nice crunchy coating, so be patient. Once done, remove the fried potatoes with a slotted spoon and drain excess oil on paper towels.
5. Prepare the Tempering (Tadka): In a wide pan or wok, heat 2 tablespoons of oil (or ghee for extra flavor) on medium heat. Add the cumin seeds (and mustard seeds, if using). Let them splutter for a few seconds (this releases their aroma). Then toss in the finely chopped garlic, broken dried red chilies, slit green chilies, and fresh curry leaves. Sauté these for a minute until the garlic turns lightly golden and the curry leaves turn crisp. (Careful, this will release spicy fumes – keep your face away!). If using onions, add the chopped onion now and sauté until translucent. Your kitchen should smell divine at this point with all those aromatics frying.
6. Add Spice Powders & Sauce Base: Reduce the heat to low. Now add the spice powders: Kashmiri chili powder (for that bright color), coriander powder, and a pinch of salt to season the masala. If you want the Indo-Chinese twist, also stir in the soy sauce and ketchup at this stage, mixing everything well so the spices and sauces combine. Sauté for just 20–30 seconds – be careful not to burn the powders. Tip: Adding the sauces (soy & ketchup) gives a lovely sweet-spicy kick reminiscent of chili sauce; you can skip them for a more traditional flavor, but they do elevate that Indo-Chinese profile.
7. Stir in the Yogurt: Still on low heat, add the whisked yogurt to the pan. Immediately stir continuously as you add it, allowing it to form a creamy, spiced sauce with the tempered spices. Cook this yogurt-chili sauce for about 30 seconds to a minute on low flame, just until it heats through and thickens slightly. Important Tip: Keep the flame low when adding yogurt to prevent it from curdling or splitting. You can even take the pan off the heat, stir in the yogurt, then return to low heat – this gentler approach helps if you’re worried about curdling. The sauce should be fairly thick and clingy; if it looks too thick or dry, you can stir in a splash of water to loosen it a bit (or if you prefer more “saucy” Potato 65).
8. Toss Fried Potatoes in the Sauce: Now add the fried potato pieces into this yogurt sauce. Increase heat to medium-low and gently toss or fold the potatoes so that each piece is well coated with the tangy, spiced sauce. Do this for a minute until the potatoes are reheated and nicely covered in the masala. You’ll see the potato 65 take on a gorgeous fiery color and shiny glaze from the sauce. Finally, turn off the heat.
9. Garnish and Serve: Transfer the Potato 65 to a serving dish. Sprinkle the chopped fresh cilantro on top. For extra punch, you can sprinkle a pinch of chaat masala over the top and a squeeze of fresh lemon juice. Garnish with the crispy fried curry leaves and green chili pieces from the pan (they’re edible and delicious!). Serve immediately while it’s hot and crispy.
Tip: Potato 65 tastes best when served right away, as that’s when it’s most crispy. If it sits too long, it may soften – but you can re-crisp it in a hot oven or air fryer for a few minutes if needed. Also, if you find the dish too spicy, serve a cooling mango lassi or yogurt raita on the side to balance the heat.
Variations and Tips
Air-Fryer Potato 65: Want a lighter version? You can air-fry the batter-coated potatoes instead of deep frying. Preheat your air fryer to 180°C (350°F). Lightly grease the basket and place the coated potato cubes in a single layer. Spray or brush a little oil on them for extra crispness. Air-fry for about 15–18 minutes, shaking the basket halfway, until the potatoes are crispy and golden. Then, toss them in the prepared yogurt-chili tempering as in the main recipe. (They’ll be slightly less evenly browned than deep-fried, but still delicious!).
Baked Potato 65: Similarly, you can bake the coated potatoes in a conventional oven. Preheat the oven to 200°C (400°F). Arrange the batter-coated potato pieces on a greased or parchment-lined baking sheet, spacing them out. Drizzle or spray a bit of oil on top. Bake for ~25–30 minutes, flipping them once halfway through, until they turn crisp and golden-brown. Then toss in the sauce. Baked Potato 65 will be a bit lighter in texture but is a great option if you want to avoid deep frying.
Pan-Fried (Tawa) Version: If you don’t want to deep fry, you can shallow-fry the potatoes on a tawa (griddle) or wide pan with a few tablespoons of oil. Place the batter-coated potatoes on the hot pan and cook on medium heat, turning them to cook all sides. They may not get uniformly crispy like deep-fried ones, but you can achieve a good golden crust on most sides. Proceed with the tempering and sauce once they are nicely browned. Tip: Ensure your potatoes aren’t over-boiled for this method, as they need to hold up to flipping.
“Chili-Sauce” Base Alternative: While the recipe above uses a yogurt-based sauce, you can make a pure Indo-Chinese style Potato 65 by replacing the yogurt with a chili-garlic sauce base. For example, skip the yogurt and instead add 2–3 tablespoons of schezwan sauce or your favorite bottled chili-garlic sauce (along with the soy sauce and ketchup) into the tempering. Toss the fried potatoes in that; it will give a spicier, stickier coating similar to Chili Potato (another Indo-Chinese dish). This variation packs an extra punch and has no dairy. (If doing this, you can also add a teaspoon of vinegar for a tangy kick instead of yogurt).
Other 65 Variations: The “65” style is so versatile that you can swap out the potato for other ingredients. Cauliflower 65 (Gobi 65) and Paneer 65 are popular variations – using the same marinade and process, just replacing with cauliflower florets or paneer cubes. Even baby corn 65 or mushroom 65 are delicious alternatives. So, feel free to use this recipe as a template and get creative with other veggies or proteins!
Healthier Flour Swap: If you prefer not to use refined flour (maida), you can substitute whole wheat flour for the batter – it works, though the coating might be slightly denser. You can also experiment with using gram flour (besan) for a different flavor, but the texture will change a bit.
Adjusting Spice Levels: Potato 65 is meant to be spicy, but you can always adjust it to your taste. Use fewer chilies (or remove chili seeds) for a milder version. For extra-spicy, add more green chilies in the tempering or a hotter variety of chili powder in the batter. Tasting as you cook is key!
Serving Suggestions
Potato 65 is best enjoyed hot and fresh, when the exterior is still crispy. It makes for an excellent party appetizer – stick toothpicks in the pieces to serve them finger-food style, and watch them disappear in no time! For a party platter, you can serve Potato 65 alongside other Indo-Chinese snacks like spring rolls or Gobi Manchurian, and a bowl of green chutney or ketchup for dipping (although it’s flavorful enough on its own).
For a more substantial meal, pair Potato 65 as a side dish with Indian breads or rice. It goes wonderfully with chapati or naan, since the tangy sauce can be scooped up, almost like a dry curry. I also love it with a mild fried rice, pulao, or even jeera rice, to add a spicy kick on the side. In South India, it’s not unusual to serve it alongside biryani or pilaf as a crunchy contrast.
To balance the spiciness, serve a cooling accompaniment: a simple raita (yogurt dip with cucumber) works well, or the classic mango lassi as mentioned earlier for kids and adults alike. A squeeze of lemon on top of the Potato 65 just before eating also brightens up the flavors and adds extra tang.
If you have any leftovers (a rare occurrence!), you can reheat them in an oven or air fryer to bring back some of the crispiness. However, avoid microwaving, as that will make the batter soft. But honestly, once you put this dish out, there’s seldom anything left to store – it’s that addictive!
Enjoy your homemade Potato 65 – a dish that’s crispy, spicy, tangy, and absolutely unforgettable. It’s the kind of recipe that brings people together, be it at a festive holiday gathering or just a fun weekend snack night. Happy cooking and happy eating! 🎉🥔🔥